#quirkyresources
Text
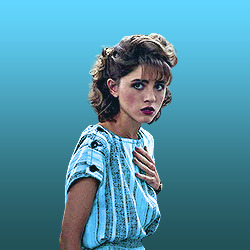
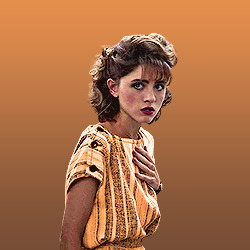
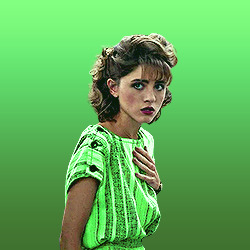
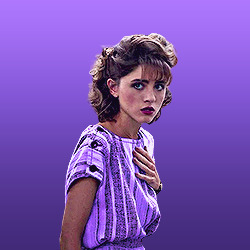
GIF LAYOUT/TEMPLATE PACK!
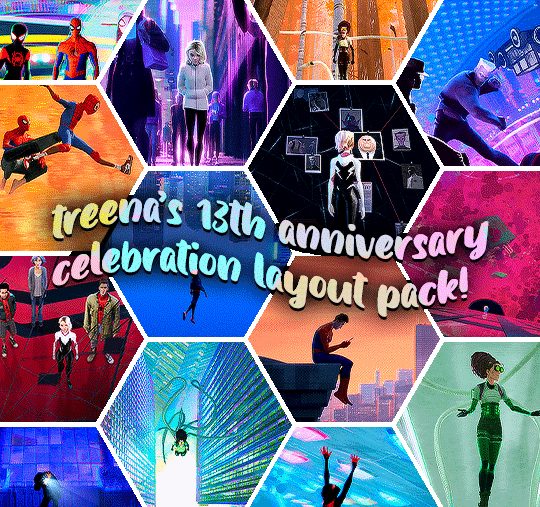
i've had my beloved blog for what feels like forever, but today it turns 13, so in celebration and as a little thank you to all of you for following my nonsense and sticking around, i've decided to share some of my favourite layouts that i've created.
PLEASE credit if you use any of these! either link to this post or the original sets linked below!!! (except of course the sharpening actions!)
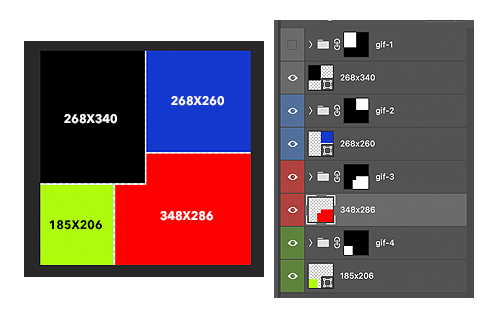
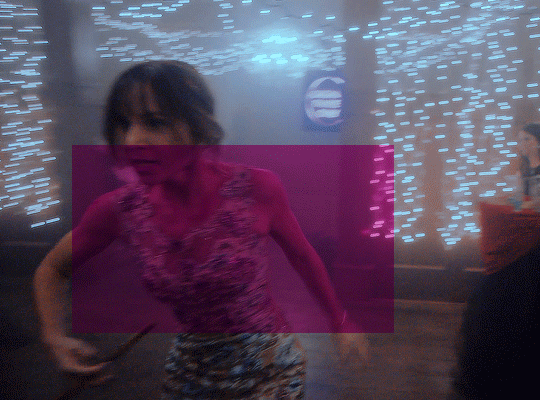
HEXAGON LAYOUT - this is my favourite kind of set to make so i hope y'all have as much fun with this as i do. there's two folders of the layout, one is just the reverse of the other depending on how you want your gifs to look, just clip your gifs to each hexagon and watch it all take shape!
[first seen here]
PALETTE MOVIE POSTER - this psd has folders for each element, so the text layers are labelled in a group, and then the palette boxes are grouped together too, just fill each layer clipped to a palette square with your chosen colour!
[first seen here]
LETTERBOXD TEMPLATE - i almost didn't share this one because of the labour of love it was to make, but feel like i'm so proud of it, it deserves to be shared. each movie space is split into a group, and within that there's the folders for the star ratings. you can toggle on/off the heart/review/date (as the ratings change you'll just have to shift over these logos to keep things uniform!) and clip your gif over the shape for the movie poster.
[first seen here]
DIAMOND MULTI GIF LAYOUT - the most simple of all the layouts, but it got a really great reaction so i'm throwing that in here too, again like the hexagons, there's two versions. one being the reverse of the others, just clip your gifs to each shape.
[first seen here]
SHARPEN ACTIONS - VERSION #1 & VERSION #2 - have been asked about sharing these recently so thought i'd add this in, i mostly use version one but occasionally it's too sharp for certain media, so i use version two, which is just the same thing without the last extra sharpening!
#quirkyresources#chaoticresources#userk8#userhella#usernik#alielook#userrainbow#uservivaldi#usershreyu#userelio#usermorgan#userrobin#usergiu#usersalty#useryoshi#useral#uservale#tuserabbie#userelm#userfanni
890 notes
·
View notes
Text
♡ Love is the flower you've got to let grow ♡
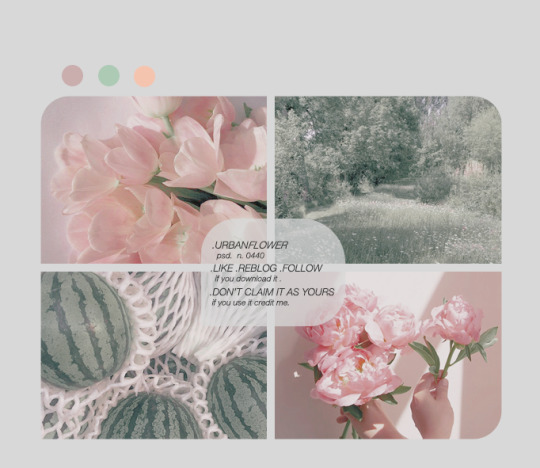
Here’s psd n. 440 . I hope you like it!
♡ ♡ ♡ ♡ ♡ ♡ ♡ ♡ ♡ ♡ ♡ ♡ ♡ ♡ ♡ ♡ ♡ ♡ ♡ ♡ ♡ ♡ ♡ ♡ ♡ ♡ ♡ ♡ ♡ ♡ ♡ ♡
♡ Please like / re-blog / follow if download.
♡ Don’t claim as your own,if you use it credit me.
♡ ♡ ♡ ♡ ♡ ♡ ♡ ♡ ♡ ♡ ♡ ♡ ♡ ♡ ♡ ♡ ♡ ♡ ♡ ♡ ♡ ♡ ♡ ♡ ♡ ♡ ♡ ♡ ♡ ♡ ♡ ♡
[DOWNLOAD at Deviantart] ♡
[DOWNLOAD at Google Drive] ♡
[ for MORE PSD] ♡
♡ ♡ ♡ ♡ ♡ ♡ ♡ ♡ ♡ ♡ ♡ ♡ ♡ ♡ ♡ ♡ ♡ ♡ ♡ ♡ ♡ ♡ ♡ ♡ ♡ ♡ ♡ ♡ ♡ ♡ ♡ ♡
#psd#urbanflower#chaoticresources#resources#itsphotoshop#urban flower#yeahps#my psd#moodboard#completeresources#dailyresources#quirkyresources#rpg resource#pastel psd#allresources#rpg#icon psd#coloring psd#roleplay resources#rp psd#psd coloring#hisources#filter#pink
89 notes
·
View notes
Text
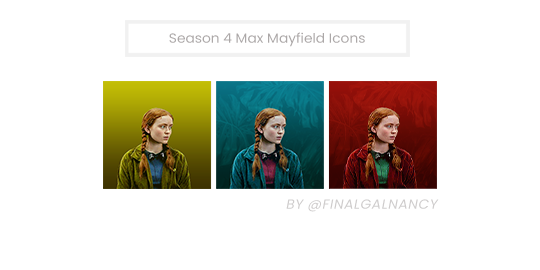


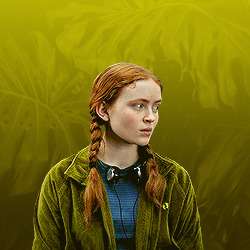
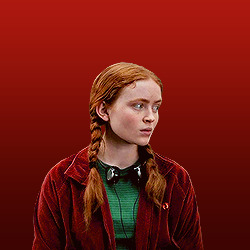
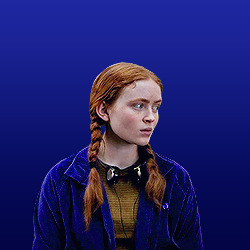
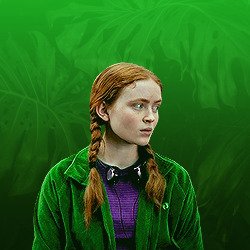
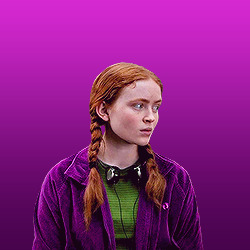
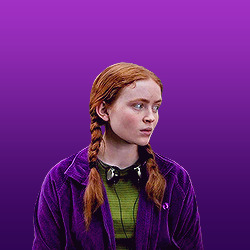
Season 4 Max Mayfield Icons. Three in template are at the top and the rest are below the cut.
250 x 250
14 icons
♡ or reblog if you save or use. Can be found here and on my icon page.
Do not repost or claim as your own.


#my iicons#stranger things#strangerthingsedit#max mayfield#maxmayfieldedit#max mayfield icons#maxmayfielddaily#completeresources#hisources#quirkyresources#usermaguire#jessielynnposts
54 notes
·
View notes
Note
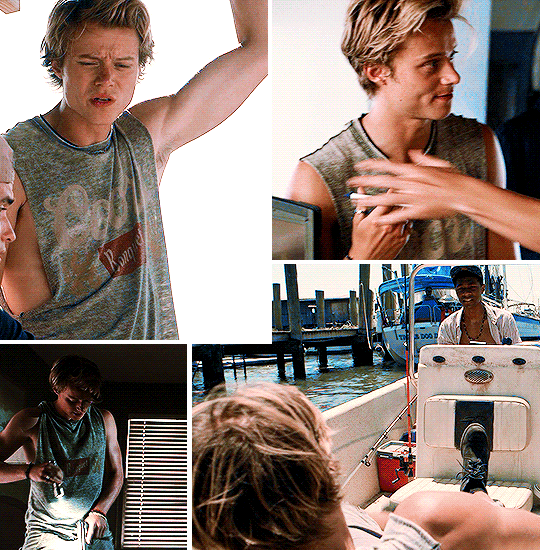
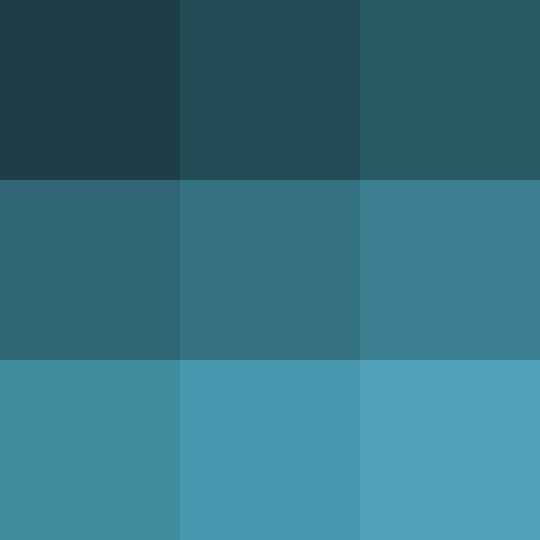
Hi! I'm wondering if it's too much to ask by wondering if you could explain how to do gifs like this: /post/665885361316233216. Or if you know of some other tutorial or just things to think about while making it? Thank you!
Not at all, I’m happy to know someone appreciated my template! I'm sure there are other tutorials out there on how to create layouts like this but I haven’t seen any lately to link you to so I'll go ahead and show you my approach to getting this type of layout. This will be very detailed and image heavy to make it easy for those who might have never worked with putting gifs into templates before to follow.
This tutorial assumes you have:
just about any version of photoshop (I use CC23)
basic knowledge of giffing with this program
some experience with layer masks
If you want to actually learn how to make a template like this from scratch, keep reading. Otherwise you can just download the template I created here and skip to step 3, or download this anyway for a visual and follow along.
(STEP 1): HOW DO I GET STARTED?
Create a new blank document with the dimensions of the entire size of the canvas (file > new) and change the highlighted settings to match these (with your own choice of dimensions of course):

Before you do anything else, make sure your timeline is visible (window > timeline) and select “create video timeline” from the drop down.

(STEP 2): MAPPING IT OUT AND CREATING THE TEMPLATE
With your blank canvas is where you have to use a little imagination to create your layout to fill in the space and where you start is up to you.

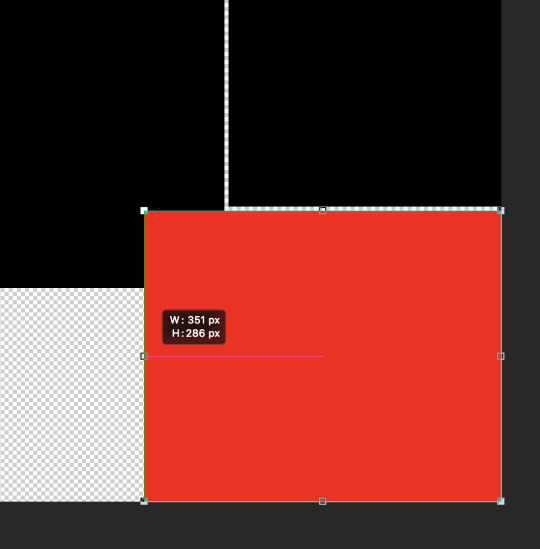
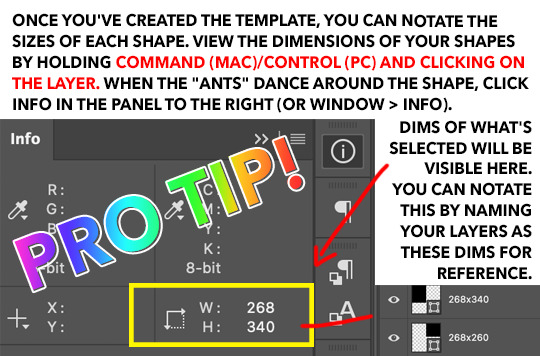
I started at the top of the canvas in the left corner and decided my first gif was gonna be 268 x 340. Why these dimensions? 268 is tumblr’s standard width for (2) side-by-side gifs and I want the gutter alignment at the top of this canvas to be centered. The height of the block just felt right. As you drag the tool, photoshop will tell you what the dimensions are.
Now I have this:

Our second shape will also have a width of 268px to ensure the transparent space between them is perfectly centered. My second block ended up being 268 x 260.
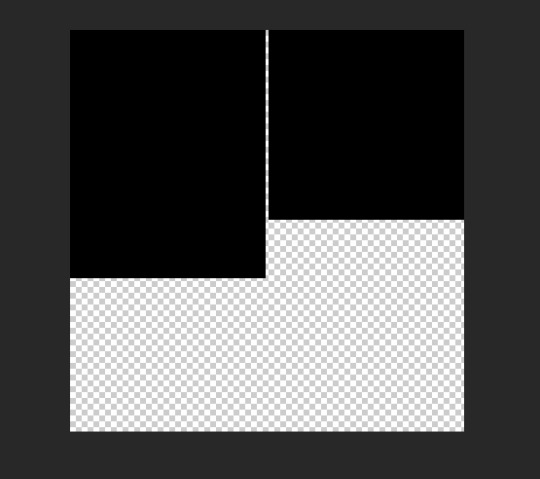
Make sure there is a gutter of 4px between all of the squares you create. This is important because tumblr’s standard gutter size between gifs is 4px, and this means you need to subtract 4px from your squares on all sides that face each other.

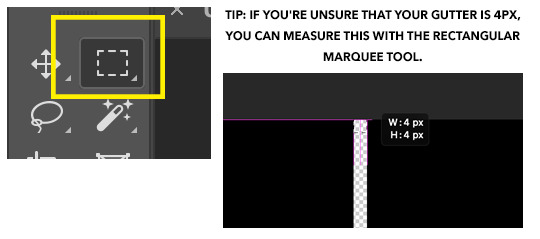
The easiest method to make and align the squares without spending too much time on it is to click off the canvas in the corner and drag the shape inward. Then click on the shape you’ve just created and align it with its designated 90 degree corner of the canvas first. [Edit > free transform] the sides until they align correctly by holding shift + control while dragging. Zoom in to a microscopic level to make sure the gutter is right if you have to 📐🔬🔎👀
If you’re not using weird shapes in your template, do the same thing with all the blocks until you get your desired outcome.
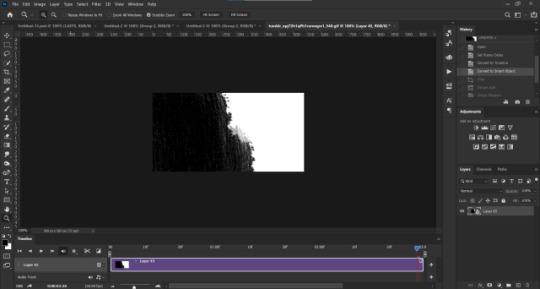
Otherwise, you’ll have to deal with this:
(STEP 2.1): THE ANGLE

In order to create a template like this, you will need to delete the corner of your shape. Create your rectangle like normal as you did with the others, but this one is going to overlay the layer on the top left.
To make sure everything will be even, I used the rectangle tool again to measure and with a new square (in yellow for visibility), I determined that this corner overlay is 75x75, so I fixed the alignment of the red rectangle to make it even.
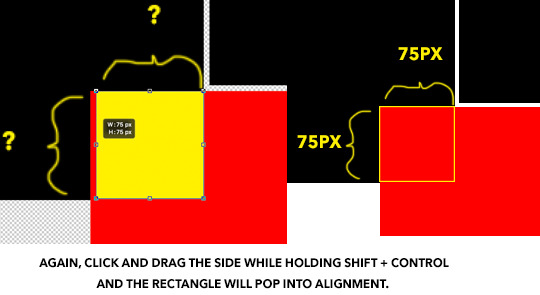
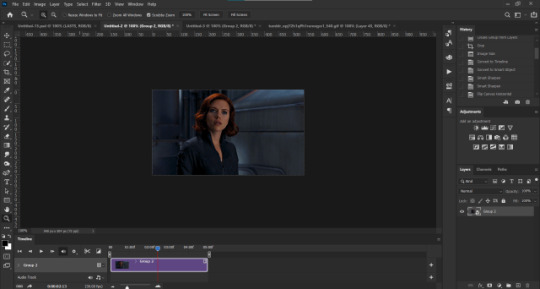
(STEP 2.2): DELETING THE CORNER OUT OF THE SHAPE
Using the yellow square as your new guide, extend its edges to cover the gutter on the two sides while maintaining its 1x1 proportion.
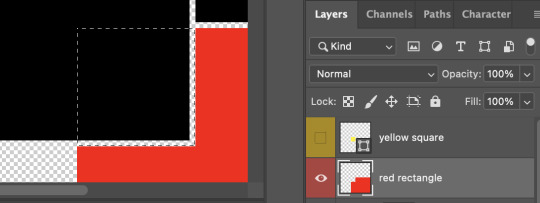
Keyboard command + click on your yellow square layer and once the “ants” dance around the square, hide the layer so it’s invisible on the canvas.
Right click on the red rectangle layer and select “rasterize” from the drop down menu, then you can hit “delete” or “backspace” on your keyboard which will remove the selected portion only to reveal the gutter. command + D will make the 🐜s go away. Then the yellow square layer can be deleted.
Once this is complete, you can finish up your template by adding your small rectangle in the left bottom corner in the space that remains and VOILA! You have a template!
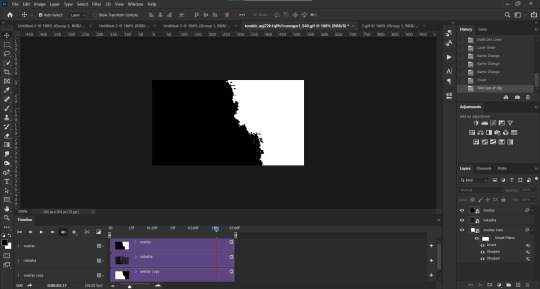
3. REPLACING THE SHAPES WITH GIFS USING LAYER MASKS ETC
When you make your gifs, remember that they will need to be in timeline form in order to drag them onto the template. You can resize them to match the dimensions of the shapes, or you could just drag your gif—whatever be the size—directly onto the canvas, and “free transform” them to fit inside each space.
Create a group for each shape and create a layer mask for each group, containing it’s designated shape. I’ve colorized this visual to make it make sense.
Now you can finally drag your gifs onto the template. The coloring can be added before or after, it doesn’t matter as long as you place your gifs and the colorings inside the groups with the layer masks to contain the effects of the color adjustments.
And the best thing about putting gifs in a template in timeline is you can move the groups containing the gifs from left to right to get your desired part of the clip.
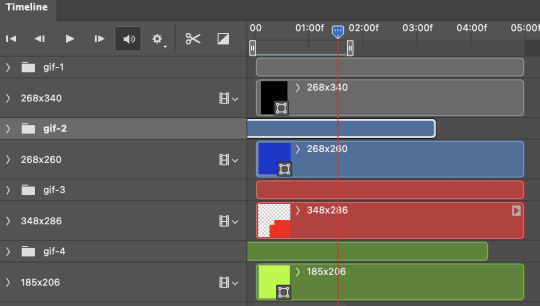
Once you’re finished with this, hide the original shape layers, as they were just guides and we no longer need them, but also if you don’t do this, you may be able to see them on the sides rather than transparency once you upload to tumblr. And AT LAST you can convert everything into frames as you normally would and save.
It seems like a lot, but these are very satisfying to make. Feel free to drop me another ask if you have any questions regarding some detail I might have left out.
#gif tutorial#tutorials*#resources*#templates#template tutorial#pshelp#completeresources#quirkyresources#answered#idk who to tag in tutorials tbh
65 notes
·
View notes
Photo

color inspiration • holden
#ECA471 • #766F55 • #CD6C2D • #9F5B2D • #1D0D07
like my work? consider donating to my paypal!
✘ PLEASE DO NOT REMOVE CAPTION OR REPOST ✘
34 notes
·
View notes
Photo
long post with useful tips and inspiration for jimin content creators ♡ if you want to start making gifs too! read a lot of tutorials, it’s a lot of work but it’s easier once you learn some tips.
- tags to boost your posts
- where to find content
- tutorials that were very helpful for me
- useful blogs for creators
KEEP READING!
— TAGS TO BOOST YOUR POSTS
please only use the tags if the content matches the description.
#PJMDAILY (for all jimin edits, graphics, fanart and gifs)
#DAILYBTS #DAILYBANGTAN (bts content)
#BTSGIF (all bts gifs)
#DAILYMUSICIANS #BLOGMUSICDAILY #MUSICEDIT #USERMUSIC (for music edits and gifs)
#ASIANCENTRAL (for asian artists)
#POCSOURCE #POCPOPCULTURE (for poc artists)
#IDOLSINCEEDITS #ULTKPOPNETWORK #DAILYBG (kpop artists)
— WHERE TO FIND CONTENT
• onextime91
• kpop24hours
• glitchyoongi
• koreasass
• deokdeokgoose
• 93plushie
also, youtube is your best friend
— TUTORIALS THAT WERE VERY HELPFUL FOR ME
• how to make gif (for beginners)
• how to sharpen gifs at once without action
• downloading videos, using vapoursynth to make gifs and using photoshop to make gifs (best tutorial ever made)
• usergif font recs
• giffing/coloring tutorial
• avoid whitewashing
— USEFUL BLOGS FOR CREATORS
@usergif
@pscentral
@creatornet
@itsphotoshop
@completeresources
@quirkyresources
@onlyresources
#pjmdaily#btsgif#tutorial#masterpost#jimin#park jimin#bts#i'm gonna tag some creators just in case you wanna share this ♥#usersky#userloverjimin#userjoonie#annietrack#trackofthesoul#tusermanny#tuserjay#userhobeah#boongietrack#esmetracks#by renata#*
107 notes
·
View notes
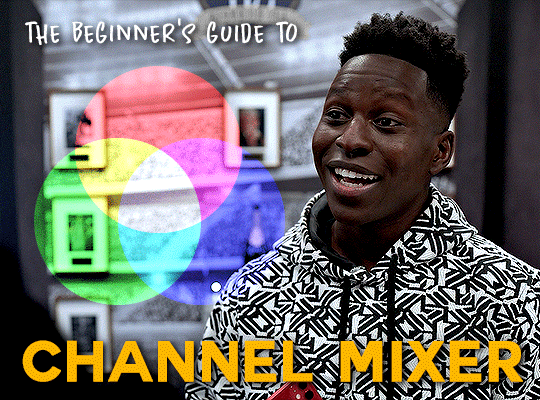
Photo
tutorial under the cut!
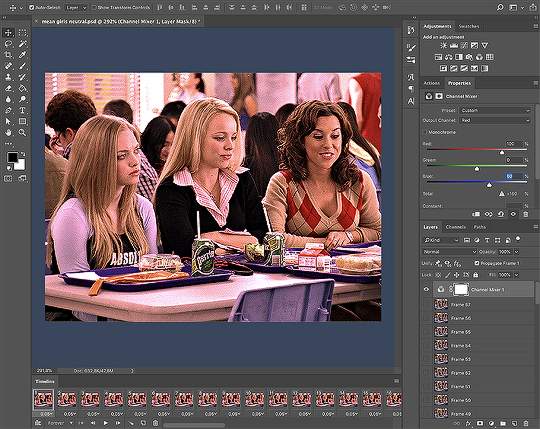
Whenever I colour correct difficult scenes I get asked how I did it and the answer is always the same: channel mixer.
I know it seems like a daunting adjustment layer and a minor mistake can drastically change your gif, but I’m here to tell you (and teach you) how to avoid that and use channel mixer as best as possible!
Things you’ll need:
- Photoshop
- a difficult scene
- 10 mins time
- a ton of patience and willingness to try
I’m going to briefly explain what exactly the channel mixer adjustment layer is and how it works, and then show you the process on a gif.
Before we begin, I’d like to give a shout out to Val / @poisons-ivy and Hella / @katbishop for pushing me to learn how to use channel mixer and for helping out with this tutorial.
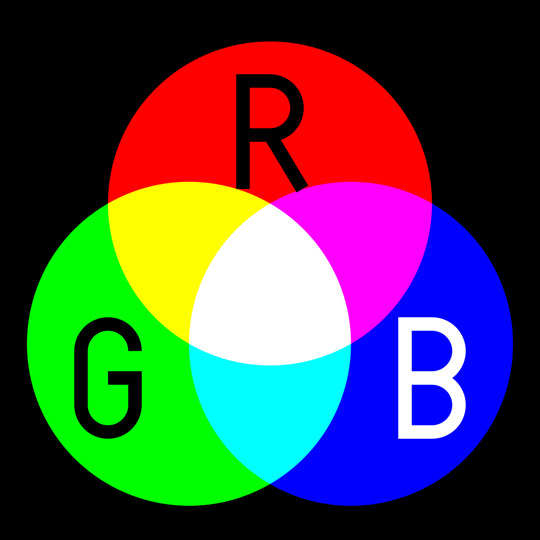
Now, a fun fact to start us off: in all things photoshop and digital screens, the primary colours are red-blue-green.
I’m pretty sure everybody learned in elementary school that the primary colours are red-blue-yellow. There’s a whole explanation for why that’s not true which I am not going to delve into because I still think it’s absolutely bonkers and it would make this tutorial even longer than it already is, but HERE is a link to that explanation if you’re interested in reading about it. (it also explains the difference between RGB and CMYK which I thought was really cool).
In Photoshop and our eyes, RGB is primary and I’m going to leave this nifty little chart here for you to use as a lil cheat sheet:
The channel mixer adjustment layer works with RGB. It basically “breaks down” your canvas into those three colours, and gives you some sliders to adjust those colours.
I’m going to get into how to fix a specific colour-washed scene in just a minute — first I want to show you what it looks like and what happens when you move certain sliders.
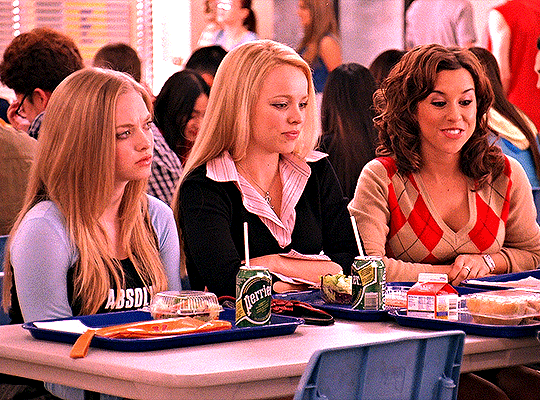
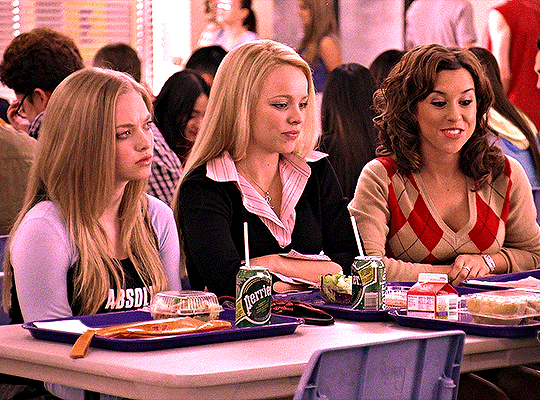
I picked a neutral scene that has the three primary colours and where the whites are truly white and the blacks are truly black (thank you Mean Girls!)
This is what the gif looks like with no colouring:

as we progress through this guide, I want you to keep looking at the following:
RED - Gretchen’s shirt with the red diamonds
GREEN - the Perrier can in front of Karen
BLUE - the empty chair in front of Karen and/or the blue shirt just behind Gretchen
This is what the channel mixer looks like when you open it up:
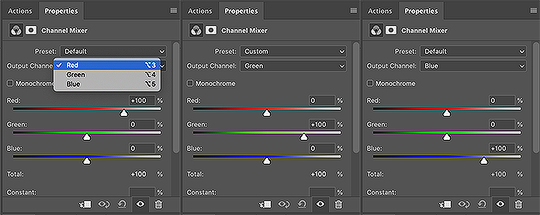
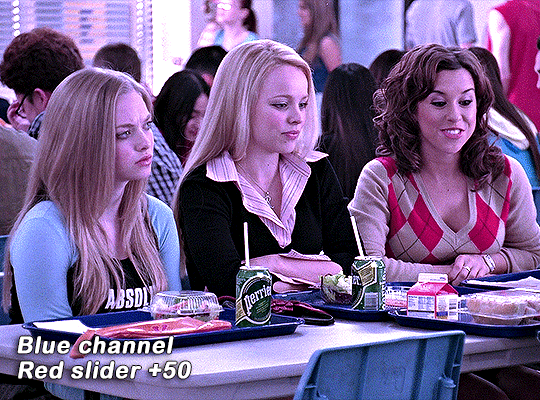
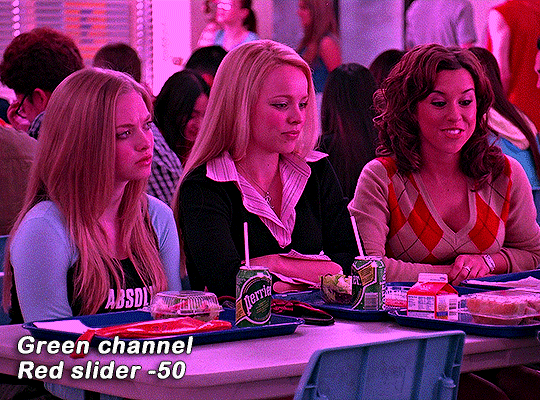
as you can see, in the red channel, the red is set to +100, green to 0 and blue to 0, and same for the others. The “main” colour of the channel you select is always set to +100.
Now, because no colour is purely one colour, once you start moving the sliders it’ll affect most/the entire canvas. But as you adjust, the channels will add and subtract colours based on what’s already there.
Look at what happens when I slide the red from +100 to +150

compare that to if i move the green up to +50

or the blue up to +50
Look at the red colour on Gretchen’s shirt. When adding the red to the canvas, the first one looks brighter and “redder”, the second (green adjustment) looks slightly muted, and the third (blue) looks darker.
But if you look at the other things I told you to keep an eye on (Perrier can and chair up front), you’ll see that those are also adjusted. That’s because we’re working in the RED channel right now, and in the red channel you can add red to other colours as well.
In the second image, the green looks almost yellower (because mixing red with green makes yellow).
In the third image, the blue chair looks more purple/pinkish (because mixing red with blue makes magenta).
Look at how different the canvas looks based on which slider you use:

and here you can see what happens when you play with the other channels:

Now that we’ve talked addition, let’s talk subtraction.
If you remember your RGB colour circle, you’ll realise that removing a colour means the overall canvas will shift more into the opposing colour.
Removing red will make your canvas more cyan, removing green leads to more magenta, and removing blue gives more yellow.
RED - CYAN
GREEN - MAGENTA
BLUE - YELLOW
These are the images after I’ve removed 50 points off each slider


Hopefully you now understand the theory of Channel Mixer!
Now let’s get to practice.
You can colour correct a lot of scenes using the channel mixer because you can select which colours you want to target and what you want to mix them with. It’s a sort of double-layered approach.
I myself started using channel mixer to remove yellow tint from movies and from there I branched out to other colours.
I’m going to show the process using a slightly yellow tinted scene — not entirely yellow washed because this is a channel mixer tutorial and usually when you have a fully colour washed scene it’s going to take more than just channel mixer to fix.
The way I like thinking about it in my brain is that the three RGB primary colours are discs that I move closer and further from each other. With a yellow scene like below, that means the blue disc has strayed too far from the center (which is neutral — white).
So my first step is to go to the Blue channel and play around there. Since I want to push more blue into the reds and greens, I move those sliders up a bit, to +15 each.

But now you can see my gif is a little peach coloured. Too much red/magenta. Time to remove some of that by going into the Red channel.
There I drag the red slider down until I like what it looks like and end up with this:

I’ve effectively removed the yellow tint and gotten to a great starting point for my colouring because the gif looks much more neutralised. It’s a great base to work with.
For this gif, I’ve gone ahead and coloured it very minimally (a bit of levels, selective colour, hue/saturation) and ended up with:
I used only four layers (and the channel mixer is doing the heavy lifting) and look at the difference:
You can do so many things with channel mixer! Whenever I see a tinted scene, Channel Mixer is my very first step.
Here are some more examples:


two from @poisons-ivy:
and two from @katbishop:

As you can see, you can neutralise almost any colour using Channel Mixer. I hope I’ve managed to explain this great adjustment layer and how it works!
if you have any questions or if there’s anything confusing in this tutorial, my inbox is always open! :)
(and once again a great big thank you to Val / @poisons-ivy and Hella / @katbishop for all the help — be sure to check out their stuff!)
If this helped you in any way, please REBLOG it 💕
#k8*tutorial#tutorial#photoshop tutorial#coloring tutorial#quirkyresources#sibylresources#chaoticresources#completeresources#allresources#dailyresources#hisources#userrobin#userposs#userpavi#userannalise#underbetelgeuse#usermarcy#uservalentina#userjasmine#userchaitali
3K notes
·
View notes
Photo
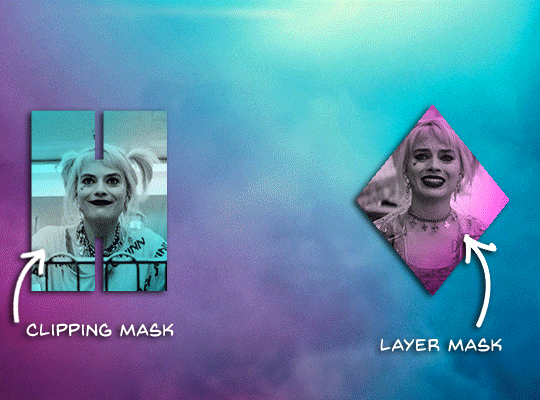
We recently got someone asking how to put little gifs on top of a bigger gif so here’s a quick explanation below!
There are two main methods you can use to put your smaller gif on a big gif: using a clipping mask or a layer mask.
As implied by the name, both are masks, so they “hide” the rest of the gif so that only the parts you want to show are appearing.
Make your base gif:
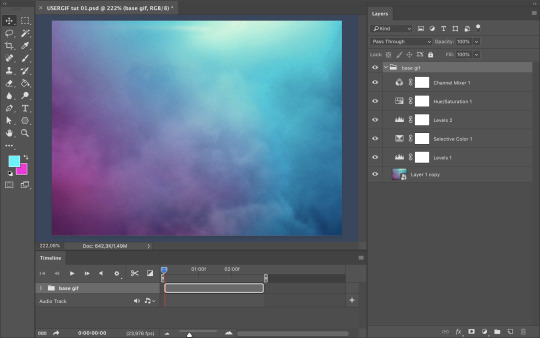
For this tutorial I’m using text and a rasterised shape

In a separate photoshop window I’ve made the two gifs that will make my smaller gifs and I’ve pasted the first one directly onto my base gif. After resizing it and making sure that the layer is above the text layer in my LAYERS tab, you right click and select Clipping Mask.
Basically what this does is it “clips” the top layer to the bottom one, so everything that’s on the top layer will only show where there is a bottom layer (think of when you’re wrapping a present and you put the big sheet of wrapping paper on top of your gift, and then fold the sides and tuck them against the sides so it fits to the gift shape, that’s what happens here).

On the left side you can see the gif clipped to the letter H:

I’ve not put the second gif onto the base gif and resized it. Using the Magic Wand tool, you’re going to select the inside of the diamond (make sure you’ve selected the rasterised layer!) and it gives you a selection. At the bottom right of your photoshop there is an option to add a Layer Mask.
(Think of this as slicing away the wrapping paper so that it fits the front of your gift perfectly).
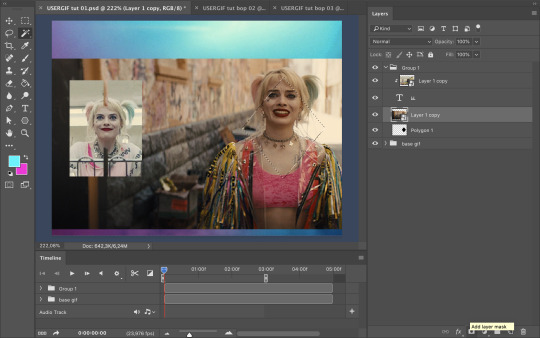
You achieve the same effect, but the process is different (which you can see in the LAYERS tab.)

There are benefits to both methods and it’s really more a preference choice than anything.
The great thing about a clipping mask is that you can add a gif to pretty much anything; text, shape, layer, etc.
The great thing about using a layer mask is that you can freely select what you want to appear, for example:

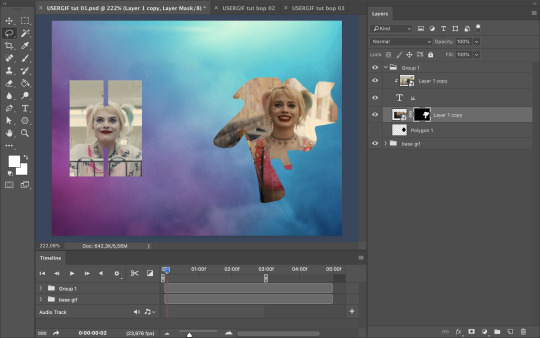
After all of that, you can colour your little gifs and add any effects (you can also do this before clipping/layer masking but I prefer to do it at the end when all the gifs are together so I can make sure they look nice)
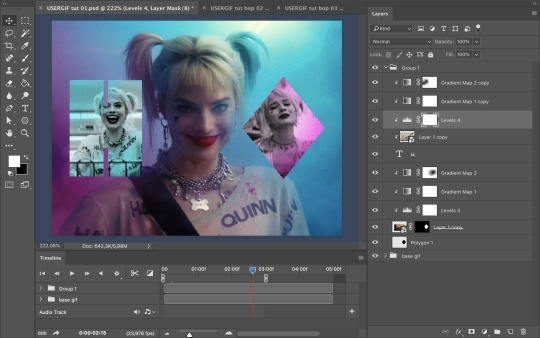
and voila:

#*usergif#*tutorial#by kate#request#chaoticresources#quirkyresources#sibylresources#allresources#dailyresources#hisources#usernik#userhella#uservalentina#userace#tusermeg#userrobin#usernums#ccnet#tuserssam
786 notes
·
View notes
Text
Coloring Tutorial Using Gradient Maps + Keyframes
This post wasn’t requested but I’ve gotten many asks asking how I do my colored gifs, this post will explain how to color moving gifsets, like these two gifsets. This will be our example:
With that being said, you will need some knowledge on keyframing on photoshop.
1. Make the gif like you normally would
Apply coloring, sharpen and other stuff you would normally do to your gifs. Converted it to a Video Timeline and your layers into a Smart Object in your gif making process, let’s proceed.
2. Adjustment Layer ➜ Gradient Map
Before creating a gradient map adjustment layer, make sure you’ve made your two color squares on the left side of your screen the colors you want.

Make sure black is the color above and the color you want the gif to mostly be is the one on the bottom. If black is on the bottom, it’ll show an inverted image.
3. Erase, Erase, Erase
Drag the playhead at the start of the gif. With the gradient map having already a layer mask, select the layer mask and erase the parts of the gif you want to have the natural colors. Some gif makers involve the whole body, but I’m satisfied with erasing only the face.
4. Easy loading
Deactivate your smart filters so that it won’t take long to load the whole gifset and you’ll be able to freely move the playhead.

Next thing you’ll do is unlink the layer mask from the gradient map in order to freely move the layer mask without disturbing the whole layer. You can do that by clicking the chain between the icon of the gradient map and the layer mask.

5. Moving the layer mask
On your video timeline, scroll down to gradient map and click on the arrow beside it.

After selecting, you’ll be able to see an option called “Layer Mask Position”. Click on the clock on the left side to activate keyframes on the layer mask. This is very important.

6. Tracking the movements
Turn off auto-select. Making sure you’ve selected the layer mask on instead of the gradient map itself. Move the playhead and whenever the face is moving outside the erased parts, drag the LAYER MASK to follow the head. If you are unable to turn off auto-select, you can just move the layer mask using your keyboard’s arrow keys, once again make sure you are moving the layer mask and not the gradient map.

AND VOILA YOU’RE DONE!
Just make sure you activated your smart filters again before saving your gif.
[OPTIONAL] HAZY LOOK
Above the gradient map adjustment layer, create a new layer and set it on SCREEN.
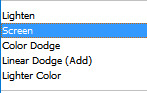
Using the same color on the gradient map, select the gradient tool.

When you’re satisfied with the look of the gradient, duplicate the layer, set the duplicated layer to overlay and decrease the opacity to 10% - 30%.

#**resources#tutorial#photoshop tutorial#coloring tutorial#gif help#gif tutorial#dailyresources#usersource#quirkyresources#sibylresources#chaoticresources#completeresources#allresources#hisources#userk8#tusersbeth#tusershay#userjack#usersnat#quintennyson
966 notes
·
View notes
Note
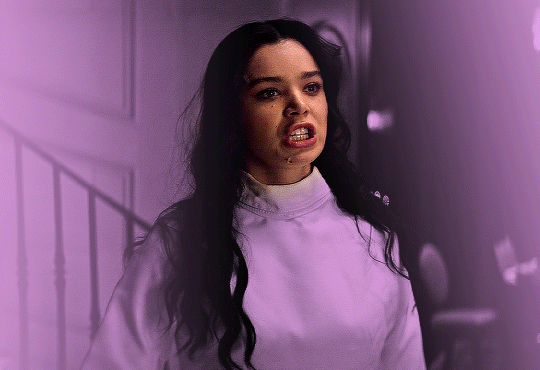
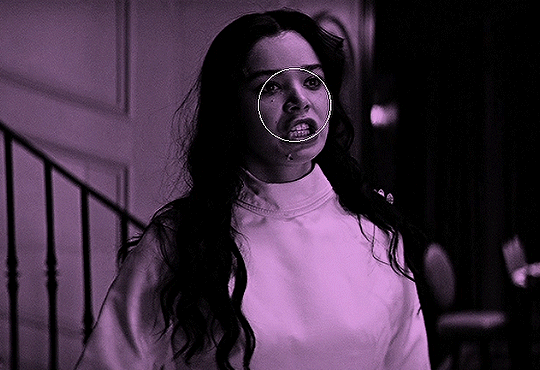
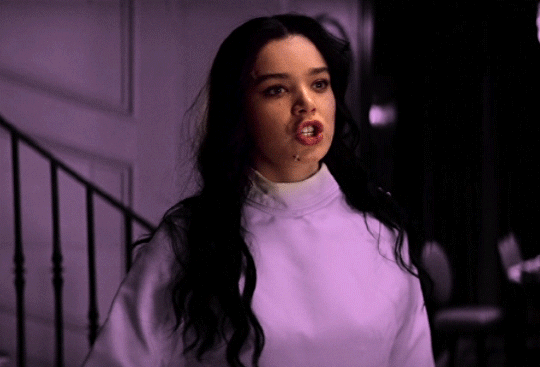
hello! just wondering if you know of a tutorial for the lines going through gifs? and getting them all to match up? like in these sets /post/714978685858496512 and /post/733101286452559872 also are they overlays or how did you make them? thank you in advance!
hey! so, i've attempted to show you with a little tutorial on how i made lines like the ones here and here, i've not seen one around myself and decided to try this out one day and it didn't go too badly so, i hope this makes sense and helps.
so, i'll be explaining and showing you how i did the lines on these gifs:
now, firstly i'm going to assume you know the basics and can create/colour etc a gif, you'll need your base gif ready to go. in this example i've flattened them to frames, but you can do this in timeline as well.
step one: add a new layer on top of the gif/smart object, and set up your brush ready. i personally have used 2px brush, 100px hardness, 100px smoothing and 75% flow;

the flow is the main thing i think that is more down to personal preference, it affects how the line draws/moves and will be down to a little bit of trial and error - i've added below how the lines look at difference levels of flow (no other setting from the above has changed just the flow)

step two: decide where you want your lines to link, i've always done from the centre of the gif but you could want your lines to meet up 100px from the left at the top and exit the gif 100px from the right at the bottom. no matter what, the best thing to do here is to add guides to your gifs. as i'm just going straight from the centre to the centre for every gif i add a guideline at 270px

step three: i recommend testing this all out on a separate canvas first to play around and see how you want your line to look etc, but when you're ready you're good to go. start from when the guideline is and draw your line until where you want it to end, the best way to show you this is on video so i've screen recorded the whole process.
youtube
it's honestly pretty straight forward, so i hope this all makes sense, and just have fun with it, i love messing around and drawing 30 versions of the same line until i'm happy with it!!
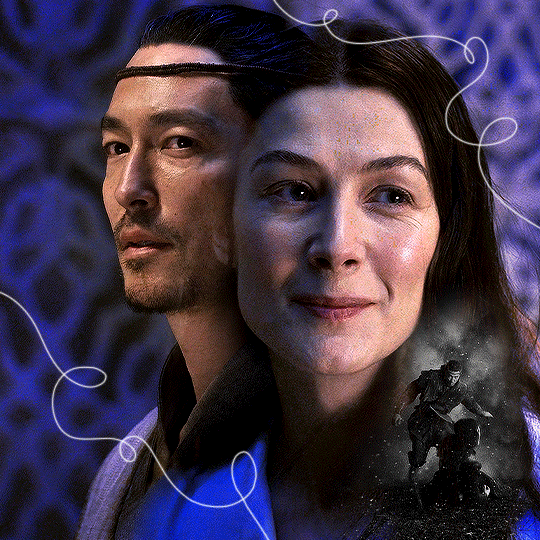
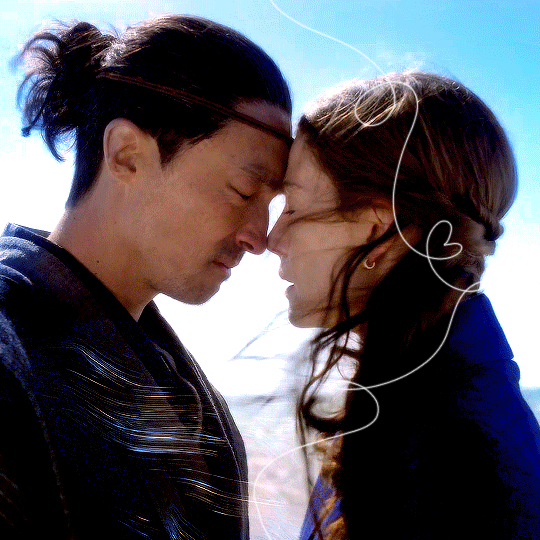
ALSO, in case you were wondering about the final gif in the wheel of time set, the moving line, that was simply an overlay from this video that i set to screen so the black background disappeared leaving just the line (i stretched/rotated/moved it around get it to start and end where i wanted it to! i just played around with the line thickness when drawing my lines to match as best i could with the line in the overlay!
#ask#anonymous#ps ask#quirkyresources#usernik#userhella#uservalentina#userrobin#userannalise#userrainbow#usershreyu#alielook#useralison#userives#useryoshi#ps help#ps tutorial#chaoticresources#dailyresources#hisources
216 notes
·
View notes
Text

♡ our souls may be consumed by shadows, but that doesn't mean we have to behave as monsters ♡
Here’s psd n. 439 . I hope you like it!
♡ ♡ ♡ ♡ ♡ ♡ ♡ ♡ ♡ ♡ ♡ ♡ ♡ ♡ ♡ ♡ ♡ ♡ ♡ ♡ ♡ ♡ ♡ ♡ ♡ ♡ ♡ ♡ ♡ ♡ ♡ ♡
♡ Please like / re-blog / follow if download.
♡ Don’t claim as your own,if you use it credit me.
♡ ♡ ♡ ♡ ♡ ♡ ♡ ♡ ♡ ♡ ♡ ♡ ♡ ♡ ♡ ♡ ♡ ♡ ♡ ♡ ♡ ♡ ♡ ♡ ♡ ♡ ♡ ♡ ♡ ♡ ♡ ♡
[DOWNLOAD at Deviantart] ♡
[DOWNLOAD at Google Drive] ♡
[ for MORE PSD] ♡
♡ ♡ ♡ ♡ ♡ ♡ ♡ ♡ ♡ ♡ ♡ ♡ ♡ ♡ ♡ ♡ ♡ ♡ ♡ ♡ ♡ ♡ ♡ ♡ ♡ ♡ ♡ ♡ ♡ ♡ ♡ ♡
#psd#urbanflower#chaoticresources#itsphotoshop#yeahps#resources#moodboard#completeresources#my psd#dailyresources#quirkyresources#urban flower#rp resources#rp psd#psd download#allresources#photoshop resources#icon psd#psd coloring#hisources#rpg resource#rpg
32 notes
·
View notes
Text
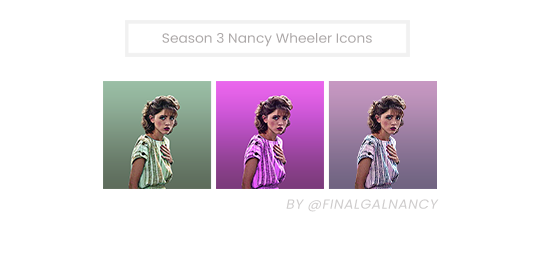

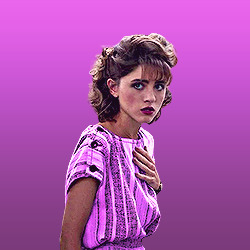

Season 3 Nancy Wheeler Icons. Three in template are at the top and the rest are below the cut.
250 x 250
9 icons
♡ or reblog if you save or use. Can be found here and on my icon page.
Do not repost or claim as your own.


#my iicons#nancy wheeler#stranger things#strangerthingsedit#nancywheeleredit#nancy wheeler icons#completeresources#quirkyresources#hisources#usermaguire#userjake#stedit#sticons#jessielynnposts
54 notes
·
View notes
Text
websites to find ✨free fonts✨
creative market free goods
google fonts
pixel suplus free fonts
dafont
befonts
fontfabric free fonts
fontesk
behance (search for free font)
some will give you commercial/desktop license, some will only allow for personal license. the difference is with commercial and sometimes desktop license you can use the fonts for commercial use. if you'd like to use a font for e.g. your merch shop, always use fonts with commercial/desktop license. desktop license is a bit tricky, just make sure to read everything. different websites have also different licenses, please always read the license before downloading and use the fonts!
feel free to add more websites!
#resources#fonts#allresources#tracksintheam#sourceblog#photoshop#typeface#quirkyresources#completeresources#hisources#dailyresources#bellesresources
1K notes
·
View notes
Photo
color inspiration • renata
#1D3E47 • #234C57 • #295865
#2F6574 • #357282 • #3B7E91
#418B9F • #4798AE • #51A2B8
like my work? consider to donate to my paypal!
✘ PLEASE DO NOT REMOVE CAPTION OR REPOST ✘
#color#colors#color palettes#color schemes#teal#completeresources#quirkyresources#itsphotoshop#usermaximoff#renata
61 notes
·
View notes
Photo

Hello! There is a new version of this tutorial that can be found here. Please look at that tutorial.
hi! so since i’ve recieved multiple asks about how i made this post i thought i would put together a little post!
for this tutorial you will need two clips (preferably a dark one and light one) and a gif overlay. you can fin gif overlays on google images, tumblr, and deviant art but here are some that i would recommend! x x x
tutorial under the cut
1. Open both scenes in photoshop and do everything you would to make just a normal gif! So crop, resize, and add all of your adjustment layers for both of the gifs.
2. Then we need to convert each gif into a smart object. To do that, select all of your layers > convert to video timeline > convert for smart filters. Your gif should now look like this.
3. Now open up the gif overlay in photoshop. If the gif overlay opens as frames, set the speed that you want and follow the same steps from above to convert it into a smart object. If it opens as a video press convert for smart filters.
4.Not all gif overlays will be the same size as the gif that you arer making. If this is the case, you need to do the following. Crop and resize the gif overlay so its the same size as your other gifs. Then sharpen the overlay until its just sharp enough.

5. Now you can see that my overlay gif is not completely black and white. That means when my gif is completed, some parts will be a little transparent. So I’m going to create a curves layer and play around with the settings until its very black and white. Once you’re done, make sure to select both layers again and turn it into another smart object.
6. Now, pick a gif to “paint” over the other one. Drag that smart object onto the gif overlay. Trim the new layer so its the same length as gif overlay and drag it underneath the gif overlay.

7. Now, duplicate the overlay lay and drag the duplicated layer to the bottom and invert it (ctrl + i).
8. Now for the tricky bit. Set the blending layer of the top overlay layer to lighten. This makes only the light part of the layer appear, revealing Natasha underneath. If your gif is the other way around i.e. the white part of the gif is the one that moves, you need to select darken so that only the dark part appears.
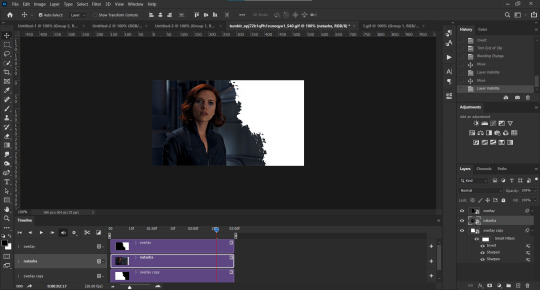
9. Select the top overlay layer and your scene and press convert for smart filters.
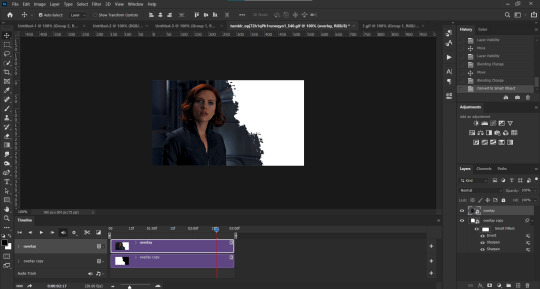
10. Drag both layers onto your other gif. Make sure they stay together!!!
11. Set the Natasha/overlay smart object to darken blending mode and the overlay duplicate to lighten blending mode. If your overlay is reversed and instead of seeing white there, you see black, then switch the blending modes.
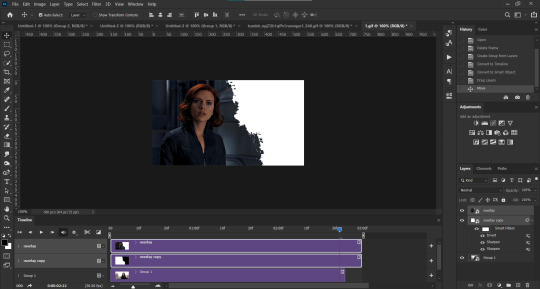
12. Now you can trim the layer and move the Natasha/overlay file along the timeline to your liking. Make sure that you move the Natasha/overlay and duplicate overlay layers together or they will look weird.
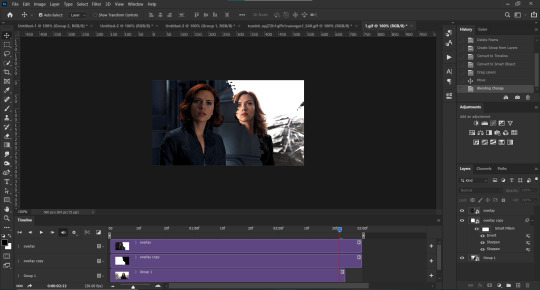
And that’s it! Now you can export, add text, or whatever you like.
If anyone has any questions or issues please let me know!
#hella.txt#tutorial#gif tutorial#gif help#photoshop tutorial#quirkyresources#chaoticresources#completeresources#allresources#dailypsd#dailyresources#userk8#uservale#tuserdia#userjochi#userpavi#usernia#1k
2K notes
·
View notes
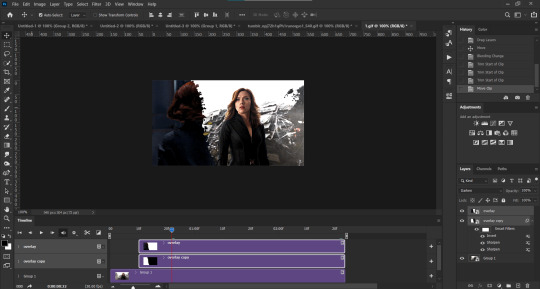
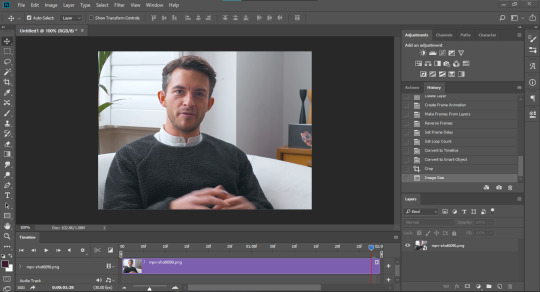
Text
a really nice anon requested a gif sharpening tutorial (referring to this gifset) and I’m only too happy to oblige! First off, I’d like to credit this tutorial for the base sharpen settings and PiXimperfect on YouTube for this sharpening tutorial and action - I can’t explain the principles as well as he does, so please do watch the video! For more gifsets from me, see my sideblog here.
You’ll need:
Any version of Photoshop with Timeline - I’m using CC 2018 (I’m currently exploring the version without timeline, send me an ask if you’re interested and I can update you).
Basic giffing knowledge. I currently use the load files into stack method, but most gifmakers I know use the video timeline method. Here’s a good giffing tutorial by @marysberry and another good giffing and coloring tutorial by @bestmistake.
As an aside, the best thing I’ve discovered through this is that you can make gifs out of higher-end 480p quality gifs. See this set from a bootl*g I got online. They won’t be as amazing as 4k or 1080p gifs, but they’re great for stuff where you really cannot get the best quality. This point clarifies that you do not need a 2160p or memory-heavy 1080p video in order to use this sharpening method.
Difficulty: ★ ★ ★ ☆ ☆ if doing manually, ★ ☆ ☆ ☆ ☆ if using the actions. This works best with portrait shots, i.e. a gif focusing on about one to three people as this sharpening tool really benefits the outline of the subjects more than anything else.
The rest of the tutorial is (very screenshot heavy and) under the cut!
[1] Making your GIF (ft. Jonathan Bailey)
Make your gif through whatever method gets you to the video timeline. Just your usual - and if you have a regular sharpening that works relatively fine, you can use it here and skip [2]. Here’s what your layers tab, timeline tab, and working GIF may look like without any other edits:
[2] OPTIONAL: Smart Sharpen your GIF
For those who don’t have a regular sharpening... routine, this is how I do my basic sharpening. I will be using two different sharpens in this portion. Click on ‘Filter’ and find Sharpen. Hover your mouse on it and look for Smart Sharpen (shown below):
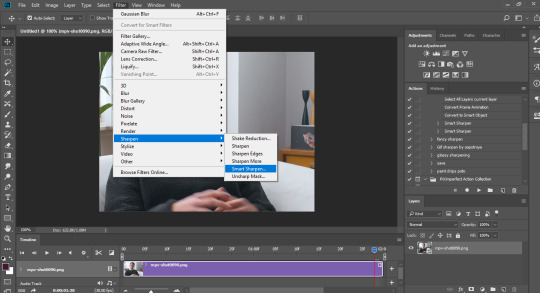
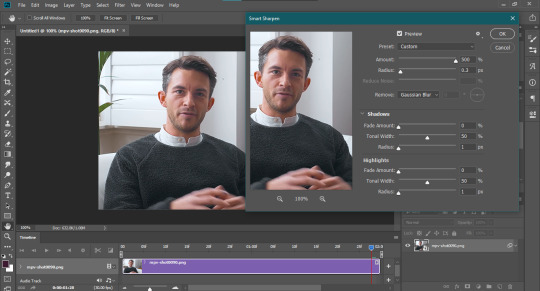
Click on it, and the window below should open. The first one I use is 500%, 0.3px, and Remove Gaussian Blur, but feel free to experiment as you wish:
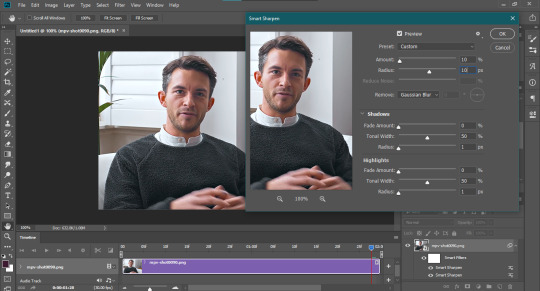
the second smart sharpen I use is 10%, 10px, and Remove Gaussian Blur. Again, feel free to experiment. The ending GIF should be shown with the label “Smart Sharpen x2″ towards the end of this tutorial:
[3] Use what I call the “Vivid Sharpen” to further sharpen your GIFS
Normally you’d stop at [2] and be ready to post or do whatever else with your GIF. I do this extra sharpen because not all GIFs look great when posted here (particularly those downloaded off YT, bilibili, dailymotion, what have you, or bootl*gs as mentioned above). I got a relatively nice-looking video, but this will still help make the gif look sharper.
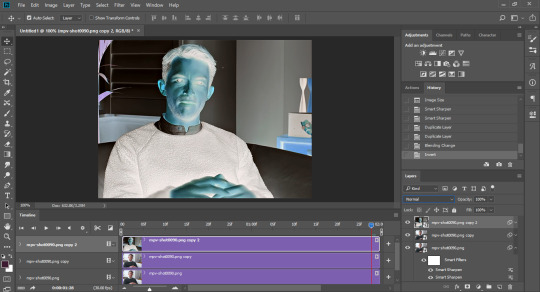
First off, duplicate your GIF layer twice. I use the Right Click on Layer and Click Duplicate Layer method because it works best for my timeline, but a good old Ctrl+J on Windows (Cmd+J on Mac if I’m not mistaken) should work. Just make sure all three layers are aligned like so:
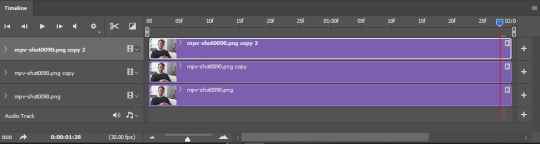
Turn off the visibility of the uppermost layer (mpv-shot0090.png copy 2 here; see below) Click on the second layer (mpv-shot0090.png copy in this case) and change its blending mode to Overlay. This is what the layer should look like:
Now turn the topmost layer (mpv-shot0090.png copy 2) back on. Invert the layer by clicking Ctrl+I (that’s I, not L). This is what it should look like:
Now change the blending mode of this layer to Vivid Light. See results below:
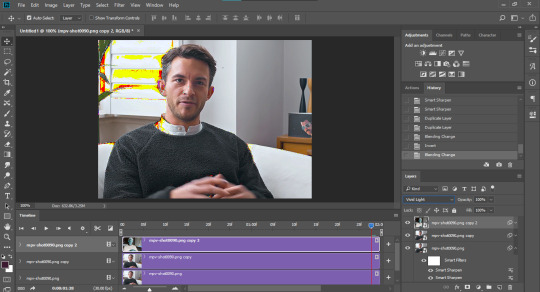
Now click on Filter > Blur > Gaussian Blur above. A window opens asking for the pixel amount. I usually enter in 3.0px but again, feel free to experiment. The GIF may now look overly sharpened, like so:
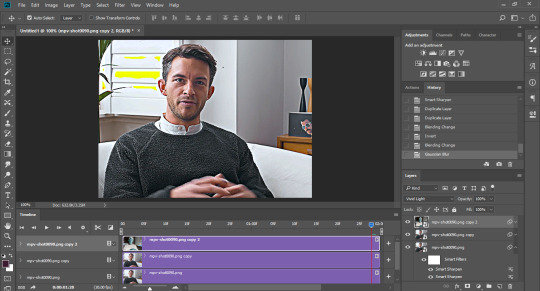
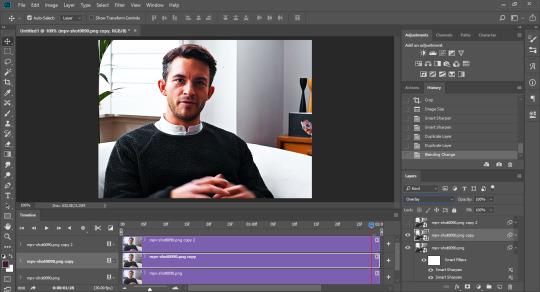
Group together the topmost layer and the layer just below that. This is important. I usually just highlight both layers and click on the folder icon at the bottom right corner. Once both layers are grouped together, set the group’s blending mode to overlay. This will remove the yellow spots you see above.
This is the last step for this version of sharpening. Set the opacity level of your sharpening group to what you think looks good. For 1080p source videos, I usually go for between 30-40% (I’m using 40% in the one below) opacity, but feel free to adjust according to what you like! For the 480p gifset I linked above, I used around 70%, give or take.
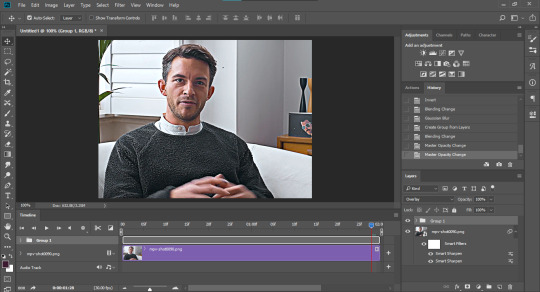
Here are the different results based on the sharpenings I did!
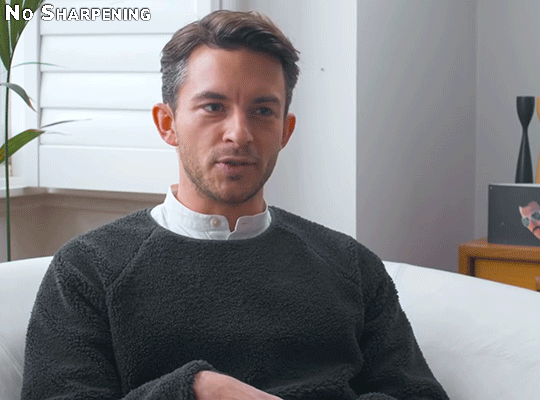


The only thing this last gif would require, in my opinion, is some coloring brighten everything up, but other than that, Jonny Bailey looks pretty crisp! This marks the end of a very long tutorial, which only takes a few seconds using the two sources I credited above (smart sharpens and vivid sharpening). Do let me know if you have other gif-related questions; send them either to me or @vaganov, my edits sideblog. Thank you!
#tutorial#sharpening tutorial#gif tutorial#midniter#usershreyu#usercardigan#useryoshi#tuserchar#usersmia#usernobie#usersanggu#usernums#allresources#completeresources#itsphotoshop#resourcemarket#yeahps#chaoticresources#wehearttutorials#quirkyresources#*mine
336 notes
·
View notes
Last Seen Blogs
wear-network
Untitled

workwearhiviz
Untitled
musicfeedsmysoul12
Thoughts
npnz
Unbetitelt
benjisarrow
I'm Not Ever Afraid.