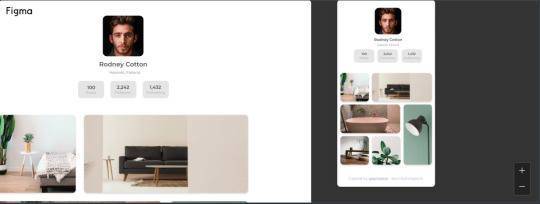
#reactjs
Text
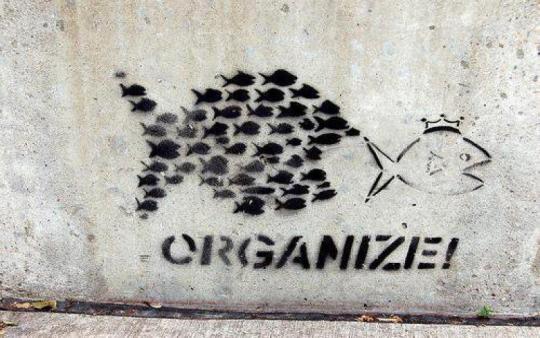
join praxis now - discord - github
2K notes
·
View notes
Text
JavaScript Fundamentals
I have recently completed a course that extensively covered the foundational principles of JavaScript, and I'm here to provide you with a concise overview. This post will enable you to grasp the fundamental concepts without the need to enroll in the course.
Prerequisites: Fundamental HTML Comprehension
Before delving into JavaScript, it is imperative to possess a basic understanding of HTML. Knowledge of CSS, while beneficial, is not mandatory, as it primarily pertains to the visual aspects of web pages.
Manipulating HTML Text with JavaScript
When it comes to modifying text using JavaScript, the innerHTML function is the go-to tool. Let's break down the process step by step:
Initiate the process by selecting the HTML element whose text you intend to modify. This selection can be accomplished by employing various DOM (Document Object Model) element selection methods offered by JavaScript ( I'll talk about them in a second )
Optionally, you can store the selected element in a variable (we'll get into variables shortly).
Employ the innerHTML function to substitute the existing text with your desired content.
Element Selection: IDs or Classes
You have the opportunity to enhance your element selection by assigning either an ID or a class:
Assigning an ID:
To uniquely identify an element, the .getElementById() function is your go-to choice. Here's an example in HTML and JavaScript:
HTML:
<button id="btnSearch">Search</button>
JavaScript:
document.getElementById("btnSearch").innerHTML = "Not working";
This code snippet will alter the text within the button from "Search" to "Not working."
Assigning a Class:
For broader selections of elements, you can assign a class and use the .querySelector() function. Keep in mind that this method can select multiple elements, in contrast to .getElementById(), which typically focuses on a single element and is more commonly used.
Variables
Let's keep it simple: What's a variable? Well, think of it as a container where you can put different things—these things could be numbers, words, characters, or even true/false values. These various types of stuff that you can store in a variable are called DATA TYPES.
Now, some programming languages are pretty strict about mentioning these data types. Take C and C++, for instance; they're what we call "Typed" languages, and they really care about knowing the data type.
But here's where JavaScript stands out: When you create a variable in JavaScript, you don't have to specify its data type or anything like that. JavaScript is pretty laid-back when it comes to data types.
So, how do you make a variable in JavaScript?
There are three main keywords you need to know: var, let, and const.
But if you're just starting out, here's what you need to know :
const: Use this when you want your variable to stay the same, not change. It's like a constant, as the name suggests.
var and let: These are the ones you use when you're planning to change the value stored in the variable as your program runs.
Note that var is rarely used nowadays
Check this out:
let Variable1 = 3;
var Variable2 = "This is a string";
const Variable3 = true;
Notice how we can store all sorts of stuff without worrying about declaring their types in JavaScript. It's one of the reasons JavaScript is a popular choice for beginners.
Arrays
Arrays are a basically just a group of variables stored in one container ( A container is what ? a variable , So an array is also just a variable ) , now again since JavaScript is easy with datatypes it is not considered an error to store variables of different datatypeslet
for example :
myArray = [1 , 2, 4 , "Name"];
Objects in JavaScript
Objects play a significant role, especially in the world of OOP : object-oriented programming (which we'll talk about in another post). For now, let's focus on understanding what objects are and how they mirror real-world objects.
In our everyday world, objects possess characteristics or properties. Take a car, for instance; it boasts attributes like its color, speed rate, and make.
So, how do we represent a car in JavaScript? A regular variable won't quite cut it, and neither will an array. The answer lies in using an object.
const Car = {
color: "red",
speedRate: "200km",
make: "Range Rover"
};
In this example, we've encapsulated the car's properties within an object called Car. This structure is not only intuitive but also aligns with how real-world objects are conceptualized and represented in JavaScript.
Variable Scope
There are three variable scopes : global scope, local scope, and function scope. Let's break it down in plain terms.
Global Scope: Think of global scope as the wild west of variables. When you declare a variable here, it's like planting a flag that says, "I'm available everywhere in the code!" No need for any special enclosures or curly braces.
Local Scope: Picture local scope as a cozy room with its own rules. When you create a variable inside a pair of curly braces, like this:
//Not here
{ const Variable1 = true;
//Variable1 can only be used here
}
//Neither here
Variable1 becomes a room-bound secret. You can't use it anywhere else in the code
Function Scope: When you declare a variable inside a function (don't worry, we'll cover functions soon), it's a member of an exclusive group. This means you can only name-drop it within that function. .
So, variable scope is all about where you place your variables and where they're allowed to be used.
Adding in user input
To capture user input in JavaScript, you can use various methods and techniques depending on the context, such as web forms, text fields, or command-line interfaces.We’ll only talk for now about HTML forms
HTML Forms:
You can create HTML forms using the <;form> element and capture user input using various input elements like text fields, radio buttons, checkboxes, and more.
JavaScript can then be used to access and process the user's input.
Functions in JavaScript
Think of a function as a helpful individual with a specific task. Whenever you need that task performed in your code, you simply call upon this capable "person" to get the job done.
Declaring a Function: Declaring a function is straightforward. You define it like this:
function functionName()
{
// The code that defines what the function does goes here
}
Then, when you need the function to carry out its task, you call it by name:
functionName();
Using Functions in HTML: Functions are often used in HTML to handle events. But what exactly is an event? It's when a user interacts with something on a web page, like clicking a button, following a link, or interacting with an image.
Event Handling: JavaScript helps us determine what should happen when a user interacts with elements on a webpage. Here's how you might use it:
HTML:
<button onclick="FunctionName()" id="btnEvent">Click me</button>
JavaScript:
function FunctionName() {
var toHandle = document.getElementById("btnEvent");
// Once I've identified my button, I can specify how to handle the click event here
}
In this example, when the user clicks the "Click me" button, the JavaScript function FunctionName() is called, and you can specify how to handle that event within the function.
Arrow functions : is a type of functions that was introduced in ES6, you can read more about it in the link below
If Statements
These simple constructs come into play in your code, no matter how advanced your projects become.
If Statements Demystified: Let's break it down. "If" is precisely what it sounds like: if something holds true, then do something. You define a condition within parentheses, and if that condition evaluates to true, the code enclosed in curly braces executes.
If statements are your go-to tool for handling various scenarios, including error management, addressing specific cases, and more.
Writing an If Statement:
if (Variable === "help") {
console.log("Send help"); // The console.log() function outputs information to the console
}
In this example, if the condition inside the parentheses (in this case, checking if the Variable is equal to "help") is true, the code within the curly braces gets executed.
Else and Else If Statements
Else: When the "if" condition is not met, the "else" part kicks in. It serves as a safety net, ensuring your program doesn't break and allowing you to specify what should happen in such cases.
Else If: Now, what if you need to check for a particular condition within a series of possibilities? That's where "else if" steps in. It allows you to examine and handle specific cases that require unique treatment.
Styling Elements with JavaScript
This is the beginner-friendly approach to changing the style of elements in JavaScript. It involves selecting an element using its ID or class, then making use of the .style.property method to set the desired styling property.
Example:
Let's say you have an HTML button with the ID "myButton," and you want to change its background color to red using JavaScript. Here's how you can do it:
HTML: <button id="myButton">Click me</button>
JavaScript:
// Select the button element by its ID
const buttonElement = document.getElementById("myButton");
// Change the background color property buttonElement.style.backgroundColor = "red";
In this example, we first select the button element by its ID using document.getElementById("myButton"). Then, we use .style.backgroundColor to set the background color property of the button to "red." This straightforward approach allows you to dynamically change the style of HTML elements using JavaScript.
#studyblr#code#codeblr#css#html#javascript#java development company#python#study#progblr#programming#studying#comp sci#web design#web developers#web development#website design#ui ux design#reactjs#webdev#website#tech
338 notes
·
View notes
Text
Mini React.js Tips #1 | Resources ✨

I thought why not share my React.js (JavaScript library) notes I made when I was studying! I will start from the very beginning with the basics and random notes I made along the way~!
Up first is what you'll need to know to start any basic simple React (+ Vite) project~! 💻
What you'll need:
node.js installed >> click
coding editor - I love Visual Studio Code >> click
basic knowledge of how to use the Terminal

What does the default React project look like?

Step-by-Step Guide
[ 1 ] Create a New Folder: The new folder on your computer e.g. in Desktop, Documents, wherever that will serve as the home for your entire React project.
[ 2 ] Open in your coding editor (will be using VSCode here): Launch Visual Studio Code and navigate to the newly created folder. I normally 'right-click > show more options > Open with Code' on the folder in the File Explorer (Windows).
[ 3 ] Access the Terminal: Open the integrated terminal in your coding editor. On VSCode, it's at the very top, and click 'New Terminal' and it should pop up at the bottom of the editor.


[ 4 ] Create the actual React project: Type the following command to initialize a new React project using Vite, a powerful build tool:
npm create vite@latest
[ 5 ] Name Your Project: Provide a name for your project when prompted.

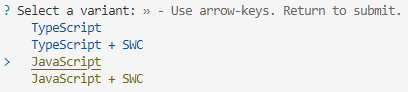
[ 6 ] Select 'React' as the Framework: Navigate through the options using the arrow keys on your keyboard and choose 'React'.

[ 7 ] Choose JavaScript Variant: Opt for the 'JavaScript' variant when prompted. This is the programming language you'll be using for your React application.
[ 8 ] Navigate to Project Folder: Move into the newly created project folder using the following command:
cd [your project name]
[ 9 ] Install Dependencies: Execute the command below to install the necessary dependencies for your React project (it might take a while):
npm install

[ 10 ] Run the Development Server: Start your development server with the command (the 'Local' link):
npm run dev

[ 11 ] Preview Your Project: Open the link provided in your terminal in your web browser. You're now ready to witness your React project in action!
Congratulations! You've successfully created your first React default project! You can look around the project structure like the folders and files already created for you!
BroCode's 'React Full Course for Free' 2024 >> click
React Official Website >> click
Stay tuned for the other posts I will make on this series #mini react tips~!
#mini react tips#my resources#resources#codeblr#coding#progblr#programming#studyblr#studying#javascript#react.js#reactjs#coding tips#coding resources
95 notes
·
View notes
Text

Built a basic expense tracker with react :)
The course instructor was like "spend about an hour on it, and if you get stuck no worries, you're learning it's normal". So I spent maybe 5 hours on it hahaha. But I got it done! And I learned a lot about form validation and using hooks to manage state. Some parts were so challenging and I had a hard time figuring out the logic of sending state across components via props, plus typescript was always there to humble me ಥ_ಥ but I'm proud of myself.
Now onto seeing the solution and learning all the ways I can improve :)
#coding#codeblr#reactjs#life#studyblr#study space#desk setup#academia#guys it's so fun learning something from 0#but it's also so bad for my self-esteem to not be great at it immediately
265 notes
·
View notes
Text
Websites to practice Front-End
(22/02/2023)
Today I wanted to share websites to practice your frontend skills.
Front-end is complicated for my head (ask me to solve an algorithm with structure while but not to center a div HUEHHUE).
BUT at the same time I love a well done and coded design/ui. That's why today I want to share resources to help you train
1- Front-End Practice
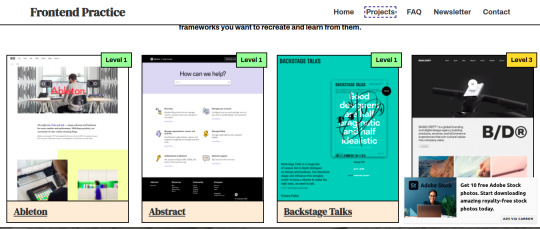
They have 3 levels, beginner, intermediate and advanced. There's no "answer" so you can't copy the code, it's just you trial and error until you get to the template (which really is a website that exists)

One thing I thought was really cool here was that it tells you what you're going to practice the most in the exercise, color palette and search features.
It's very interesting for a front-end not to be dependent on a tutorial, because from what I've seen in interviews, they ask you to make a layout and you won't be able to make one yourself if you don't learn to break down a single layout from the beginning and try and making mistakes until it's perfect.
2- DevChallenges
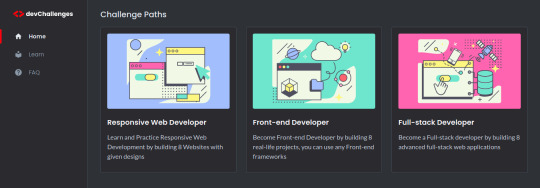
I find the projects not only beautiful visually but also interesting to practice. Here you already have the solutions that other people recommend, but again I think it's best for us to try and make mistakes until we get similar.And it also sorts the levels.
Here an example:
Cool huh? Well, I hope this helps someone who is looking for projects to practice with. We can invest a lot of time trying to make a layout, so having something ready I know helps a lot.
I wish you good studies and a great Wednesday, drink water.
#front end#frontenddevelopment#html css#html5#full stack developer#static website design tools#css3#javascript#reactjs#software engineer#practice#studyblr#studyblog#codeblr#resour#study tips
264 notes
·
View notes
Text


another day, another cat
today i finished the homework for week 1 of the react course and i had to "recode" the weather app into react components and it was pretty cool.
have a good weekend!
#codeblr#programming#web development#codenewbie#studyblr#coding#webdev#progblr#shecodes#reactjs#react#mine
46 notes
·
View notes
Text
Learn flexbox!
Although it is IMPOSSIBLE to ever get align-items vs justify-content right on the first try, getting familiar with how flexbox works will allow you to know at least one of them does what you want them to. If there's anything I've learned during my studies it's that development is much more about knowing you can do certain things and being able to google it when you don't know how, rather than having everything memorized. What you need to memorize you will memorize from practice, repetition and experience.
That being said: here are some (two) resources for learning flexbox!
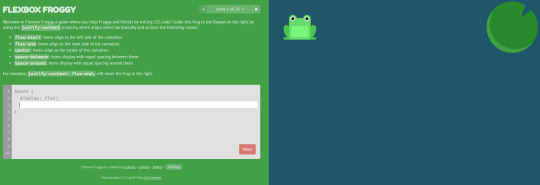
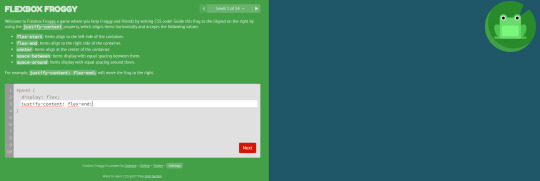
Play Flexbox Froggy
This was such a huuuuuge help for me when learning flexbox. I completed all of the exercises once, and then I would use this as a guide and reference when trying to figure stuff out on my own projects. It's a great interactive way of learning, and it really simplifies and makes flexbox digestible. I recommend just crunching through it once, and you will be exposed to all the different ways of using flex! Then you will have in the back of your head what is possible with flex, and you will be able to recall this and maybe use the next resource to implement it if you don't remember all the keywords yourself!

CSS tricks - a complete guide to flexbox
This was recommended to me by a developer waaay back when i started studying, and it has saved me countless times. It's so good for referencing the different properties, with clear visual examples and a super easy-to-follow structure of the page. I have this bookmarked because of how often I use it.
Good luck in your studies 💻🐸
#css#html#javascript#js#reactjs#react.js#next.js#vite#web development#web developer#frontend#frontend developer#frontend development#software development#coding#codeblr#studyblr#resources#learn how to code#study code#programming#progblr#tech#women in tech#stem#compsci#computer science
165 notes
·
View notes
Text

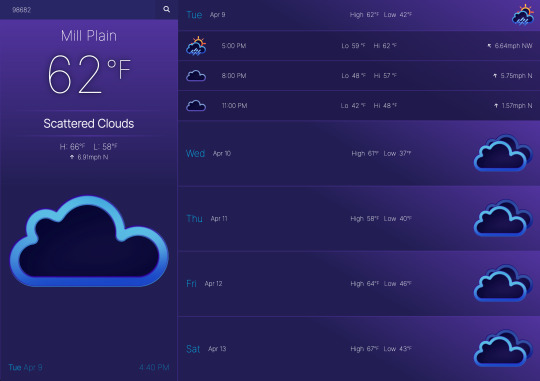
Just like with my art, I like to revisit old coding projects.
First image is from a class project I did about a year ago using the Open Weather API. Weather graphics are mine. It's built entirely in vanilla JavaScript.
Second image is the attempt I'm currently working on. Same API, same graphics, but now in React instead of just pure JS. I'm pretty satisfied with the new results.
17 notes
·
View notes
Text
100 Days of Code - Day 6 ・゜゜・.

✧*6/28/2023*✧
finally added a much wanted feature to my todo app! ( ◡̀_◡́)ᕤ
!!!saving tasks in local storage!!!
⁽ᴵ ᵃˡˢᵒ ᵃᵈᵈᵉᵈ ᵃⁿ ᵃᵈᵈ ᵗᵃˢᵏ ᵇᵘᵗᵗᵒⁿ ᵇᵘᵗ ᵗʰᵃᵗˢ ⁿᵒᵗ ᵃˢ ⁱᵐᵖᵒʳᵗᵃⁿᵗ⁾
so when you refresh or close the page and come back to it your tasks still stay there wooooo ৻( •̀ ᗜ •́ ৻)
it still looks absolutely terrible but its one step forward!!
next steps/future features:
✧ delete task button
✧ rearrange tasks
. • ☆ . ° .• °:. *₊ ° . ☆ . • ☆ . ° .• °:. *₊ ° . ☆ . • ☆ . ° .• °:. *₊ ° . ☆

. • ☆ . ° .• °:. *₊ ° . ☆ . • ☆ . ° .• °:. *₊ ° . ☆ . • ☆ . ° .• °:. *₊ ° . ☆
#codeblr#progblr#programming#tech#coding#resources#frontend#comp sci#studyblr#aesthetic#100daysofcode#Day 6#vercel#nextjs#javascript#reactjs
112 notes
·
View notes
Text
join the praxis discord - mastodon - github
#open source#praxis#free software#typescript#foss#graphql#design#collaborative decision making#tech#technology#nodejs#reactjs
550 notes
·
View notes
Text
I'm a Web developer
Hello, my name is Bettina and i'm 27 years old. I live in Sweden 🇸🇪 but i'm born in Hungary 🇭🇺.
I'm currently studying web development focusing e-commerce. I've done it for a year now and i have one year left in school. I have not had my internship yet.
The languages i'm learning:
HTML
CSS
JavaScript, React.js, Node.js, expess.js,
MySQL, PHP.
I've even experience UX-design, web design, digital marketing, SEO and entrepreneurship. And i love talking about problem solving and accessibility 🪄🪲
Currently i'm developing wordpress with PHP, HTML and hierarchical CSS.
So, if you are into this stuff, especially wordpress and php, talk nerdy stuff with me! I would be so happy if i had more connections with people who are into this stuff, especially women. 🌸
My github:
My portfolio:
It is not done yet, i will update it soon 🫣🐢
🌦️ A weather app made in our Javascript course:
#web developer#webdeveloer#web developers#website#web design#web development#tiikiboo#frontenddevelopment#frontend#backend#php#phpdevelopment#php developers#php programming#php training#html css#javascript#reactjs#wordpress ecommerce#wordpress#wordpress php#wordpress development#portfolio#developer#juinor#women in tech#tech#codeblr#code#programming
19 notes
·
View notes
Text
Wheeewww what a week!! I started to learn React and lemme tell you...it hasn't been easy due to my own silliness . I had already tried to learn it earlier last year and I thought I had still retained most of the concepts I needed to start beginners' tutorials ( ignore the gross overestimation of my capabilities) . Boy was I wrong......
So after watching hundreds of tutorials (okay maybe just three hehe.....), I decided to relearn React. Which was really the best thing to do, because I feel clearer in my head now (*ᵕᴗᵕ)⁾⁾.
While I was stressing with React, I decied to learn HTML Canvas as a way to cool off, because aside scrolling through Pinterest, I have zero relaxing hobbies; they're all so active! Okay that's a lie, I read. I'm currently reading David Copperfield but I've got to a particularly sad part and I really can't continue ಥ﹏ಥ. So HTML Canvas came in to save the day. It's really really fun and I love love love bouncing balls.
I followed a YT tutorial by Chris Courses. He has a playlist on the topic which is sooo useful. 10/10 will recommend!
Oh yes, before I forget, here is the link to the React tutorial I'm currently following.The course is on Scrimba but I preferred to follow it locally. I'm old school like that.
Wish me luck everyone.Love love love ⸜(。˃ ᵕ ˂ )⸝♡⸜(。˃ ᵕ ˂ )⸝
꒷꒦꒷꒦꒷꒦꒷꒦꒷꒦꒷꒦꒷꒦꒷꒦꒷꒦꒷꒦꒷꒦꒷꒦꒷꒦꒷꒦꒷꒦꒷꒦꒷꒦꒷꒦꒷꒦꒷꒦꒷꒦꒷꒦꒷꒷꒦꒷꒷꒦꒷
PS : Anyone have any good classics recommendations? I'm tryna become 'cultivated and well read'. And no, not just 'Western' literature. Stories from all over the world would be greatly appreciated 𓆩♡𓆪.
#codeblr#programming#web development#frontend#html#progblr#css#coding#technology#tech#code#dark academia#light academia#literature#reactjs#javascript
13 notes
·
View notes
Text
React.js Resources | Resources ✨

I made a React.js resources list for a friend and thought why not share it here!
Learning React.js Resources Notion Page = click/щелкнуть
React.js is basically like a one-up for the JavaScript programming language, so typically when you finish learning JavaScript you want to go on to learn React.js (or Angular, Vue.js etc) but React is one of the popular ones for modern companies~!
Heads up, some words are in Russian because ① the friend is Russian and ② I am learning Russian :p
#my resources#resources#codeblr#coding#progblr#programming#studyblr#studying#react.js#reactjs#coding tips#coding resources
67 notes
·
View notes
Text

// building my portfolio website ...
#im a muffin#blog#open to work#i need work#web development#web design#front end development#graphic design#reactjs#html5#css3#node#nodejs#coding#programming
18 notes
·
View notes
Text
Has anyone found a way to use both GraphQL Shield and dataloaders at the same time while using Apollo Server and NestJS?
I recently found that because I have asynchronous calls being made in some of my shield rules, it's causing my dataloader batch functions to be called multiple times, when they should only be called once, which leaves me with the N+1 problem across my entire app.
I believe this is due to how dataloader requires that all of the batch function calls occur during the same event loop "tick", and the async calls in my shield rules are preventing this.
Here's where I asked the question on reddit
27 notes
·
View notes
Text
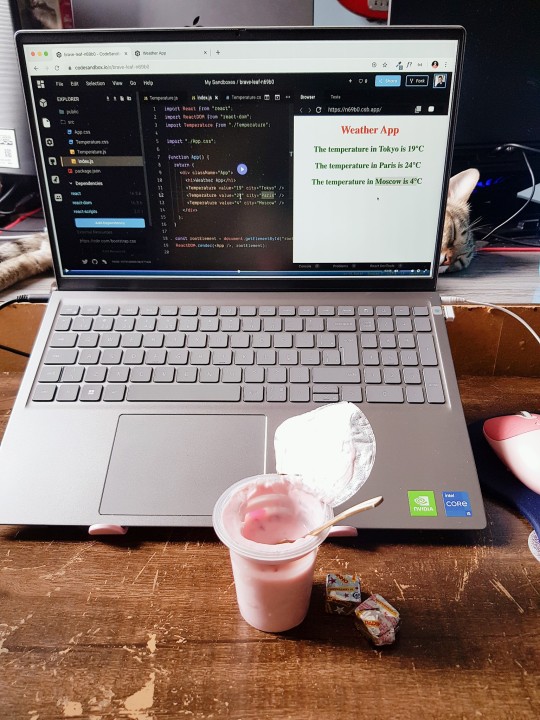


first week of learning react, there's a lot of new and exciting things to learn; this time having yogurt instead of coffee because it is extremely hot where i live so i have zero energy to do anything, but still trying to keep up with my studies. (there's a cat behind the pic, it's this cute baby yoda).
i'm taking notes of the lessons im taking because everything is really new to me. what i've learned so far this week:
components
properties (props)
multiple components
how to use html/css with react
#codeblr#programming#web development#codenewbie#studyblr#coding#webdev#progblr#shecodes#reactjs#react#mine
31 notes
·
View notes
Last Seen Blogs

kaamsworld
Untitled

bpd-carver
A Hawke And A Warden Walk Into A Tavern

mermarielll
•👁just here to smoke weed & get paid👁•

poorlilbeans
Angsty Writer

shotinheart
SHOT IN THE HEART