#recipie
Text
#today on tumblr#bread#daily bread#breadcrumbs#nightly bread#recipie#breadblr#carbs#yum#bread crumbs#bread machine#food#foodblr#dig in#it's bread time#teleport this bread
1K notes
·
View notes
Text

Cassie's Comforting Mac'n'cheese
Ingredients:
1 can of Spam original
1/3 brick of Velveeta
1 box pasta shells
Splash milk (any)
Cube and fry spam, set aside. Cook pasta according to box or to taste, mix in 1/3 brick Velveeta while still hot. Stir vigorously. Add milk until desired thickness. Mix in fried spam. Consume.
For added nostalgia, pair with a glass of tang.
#old comic I forgot to post#don't look too close at sturges I don't know what happened there#sanctuary 5#fallout#fallout 4#preston garvey#mama murphey#sturges#fo4#fanart#cooking comic#cooking#recipie#codsworth#my art#you can substitute stuff if you like#if you take a bite and feel instantly full you've done it right#you will have leftovers#that is a threat
166 notes
·
View notes
Text
Fuck it. I’m gonna teach every one of you how to make a kickass bone broth, and there’s nothing you can do about it. Buckle up losers it’s time to cook.
Step One: do you cook at home? Save the scraps. Even if you don’t cook, you’d be surprised by what counts. The ends of carrots. Onion skins. Garlic peels. The gross parts of celery. Animal bones (chicken wings and thighs, usually). Every time you cook, you’re going to put the scraps into a gallon freezer bag.
Step One B: if you don’t cook, you can buy all of these things. I’d recommend half a stalk of celery, some carrots, and two yellow onions to start with. Don’t bother making it look pretty, include all the skins and gross bits. We’re making stock, not soup.
Step Two: when the bag is full, buy a rotisserie chicken. This part may be superfluous if you’ve saved up enough bones, but bones are your flavor so it never hurts to have more if you’re unsure.
Step Three: peel the chicken. Separate the meat from the bones and set it aside. You can do whatever you want with this meat, but I recommend saving it for the soup you’re gonna make with this kickass stock.
Step Four: add the contents of the scrap bag to the largest pot you own. Add the bones. Add water until everything is just covered or until the pot is completely full. If you want to add whole spices like peppercorns and bay leaves, nows a good time, but it’s not required.
Step Five: put that shit on the stove on low heat. Leave it there until around half the water has evaporated. This will probably take a couple of hours, at least three or four. No need to stir.
Step Six: using a collider (pasta strainer), separate the solids from the liquids. That’s it. Enjoy your delicious and flavorful and nutrient-dense stock, idiot.
Obviously you can use that stock to make soup, but you could also use it to cook vegetables, pasta, or rice. Or you could drink it plain. You could freeze it in an ice cube tray and use it as dog treats.
If you choose to save it in the fridge, you’ll probably notice that it doesn’t stay as a liquid, instead having the texture and consistency of a soft jello or pudding. Don’t panic! It’s just the collagen from the bones aka gelatin. This means you did everything right and let it sit on the stove long enough. Your bone broth is filled with lots of nutrients!
106 notes
·
View notes
Text
Jar of Sunshine - Lemon Curd
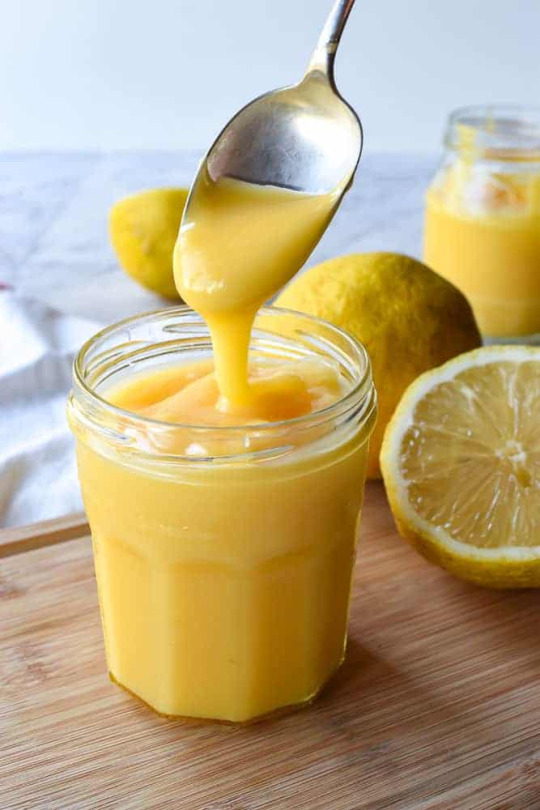
So I've shared stories about Lemons and I've shared stories about Eggs. Both items are staples in cooking and baking, but I thought I'd share a recipe that uses mainly these two ingredients. Lemon Curd.
Now, I'll be the first one to admit that the name "Lemon Curd" for a dish is not the most appetizing sound. It almost sounds like milk that has curdled so bad, it's as sour as lemon juice. Instead, I call it a jar of sunshine, as magically, it harnesses the best parts of the ingredients' solar energy. Lemons have been connected with the sun and this recipe uses mainly Egg Yolks. This allows you to help bring out some of the best aspects of solar energy like Passion, Courage, Energy, Inspiration, Rejuvenation and Joy. The later two I find I get the most out of with this recipe.
Need:
1 Cup White Sugar
2 Tbsp Lemon Zest
6 Egg Yolks
1/2 Cup Lemon Juice
1/2 Cup Butter
1/2 tsp lemon extract (Optional)
Zest your Lemons and add to sugar. Incorporate these together well to activate the oils of the lemon zest. You can shake in a bag, use a food processor, or just mix really, really well.
Juice your Lemons, taking care to keep seeds out. Add your juice and egg yolks into a pot. Whisk well. Slowly add your sugar and lemon zest mixture, stirring well with whisk. If you want lemon extract, add it now.
Place your pot on low heat and whisk continuously. Keep stirring until the mixture thickens and starts to bubble. This is going to take a while, but don't stop stirring or turn up the heat. It’s ready when you stick a wooden spoon in and it coats your spoon in yellow.
Remove from heat, and add your butter. Make sure it is cold and cubed. Continue stirring until butter has melted.
Pour your finished mixture through a fine mesh strainer. This will ensure your curd is smooth and silky. Put mixture in a glass jar with lid. Let cool at room temperature for an hour before lidding and putting in fridge. It will set completely in fridge. Will last several weeks in fridge and months in freezer.
Tip:
-Do not stop whisking when eggs are on heat. Failing to do so may cause the eggs to overcook and become lumpy.
-If your stove doesn’t go low enough, consider cooking in a double boiler.
-Two Lemons should yield your needed Zest and Juice.
-Use fresh lemon juice. The pre squeezed stuff you can get in a bottle will not cut it.
-You can easily separate egg yolks from the egg white by tipping the egg back and forth between the shells. Or Gently use your hands to separate the yolk from the whites.
-Do not fret if some egg white mixes in with your yolk.
-Let your lemon curd cool completely before using it in baking.
-When you make your lemon curd and you want it to have max solar energy, make sure you are cooking during the day. Not at night or in the evening.
-Use less or even no lemon extract if you do not want your lemon curd to taste too strong.
#Kitchen Witch#Sun Witch#Solar Witchcraft#Lemon Curd#recipie#baking#jar magic#food and folklore#klickwitch#kitchen witchcraft#kitchen magic#witch#october#kitchen
58 notes
·
View notes
Text
anyways here's
HOW TO MAKE A PORTABLE SOUP THAT’LL BLOW YOUR TITS CLEAN OFF
Why you should bother making this:
you’ll be able to have a soup you can eat outside your home that tastes great, won’t get soggy and ideally needs minimal microwave action
You will need:
A decently sized tupperware
A smaller Tupperware or glass jar
A thermos that can carry enough hot water to fill the medium Tupperware
some type of bouillon cube
some type of neutral oil
one or more of the following: scallions, onions, garlic, ginger
ingredients to make suitable soup trimmings (vegetable of choice, protein of choice, eggs, noodles or rice, mushrooms etc)
(optional) additional seasonings (salt, your favorite spices or sauces, lime or lemon juice, etc)
How to Make the Damn Thing
leave enough time to prepare ingredients in advance before you need to eat the soup
start by making a soup base. mince up your scallions/onions/ginger/whatever and fry it in one tablespoon of neutral oil (you can add more or less depending on how much oil you want in your soup). Transfer everything in the pan into your small Tupperware or jar (watch the temperature!), then add your bouillon cube and a tiny bit of water (just enough to dissolve the cube). Mix together (shake it in its closed container if you’re feeling yourself), then place it in your fridge. If you’re feeling really hip you can add extra ingredients to this base if you think it’ll improve your soup experience.
Prepare the trimmings for the rest of your soup. cook whatever grains/noodles you wanna use, cut up your vegetables, pre-cook your protein and mushrooms, whatever. it is recommended that you cook in advance and not rely on the ingredients cooking in the water on the day of (unless you know some insane hot water magic that I am unaware of). Let the cooked ingredients cool, then place in your medium Tupperware and put that in the fridge too. Again, if you’re feeling up to it you can prepare a separate container of seasonings or garnishes.
Just as you’re about to leave the house (I'm assuming you’re taking this to go, otherwise why wouldn’t you just make a normal soup), fill a thermos with warm water. In another pot/kettle, boil some more water. Then, once the water is at its highest boiling point, pour the water out of the thermos and replace with the new water. Seal immediately.
place your trimmings, soup base and thermos in your bag and get your ass out the door. Don’t forget to bring a spoon to mix and utensils to eat your soup with
When it’s time to eat your lunch, pour a little bit of hot water into the Tupperware with your trimmings and mix them around to revitalize them after spending time in the fridge. Pour the rest of the hot water (as much as you can fit) into the smaller Tupperware with your base and mix that around, then pour that into the trimmings container as well. If you still have hot water left in your thermos, add the rest of that in. Stir around until it’s all combined. Add garnish if you decided to bring/add that.
The only time you might need a microwave for this is if you take a sip and realize your cold ingredients have turned your broth lukewarm – if you have a microwave on location its worth blasting the ingredients with some radiation real quick to warm them up before you add your broth. Otherwise, enjoy your delicious soup. on the house.
#chatterboxing#long post#cooking#recipie#just add salt#im becoming a recipe blog now.#this was inspired by the fact that I made this literally right before making this post following these exact steps#and it tasted like angel tears (positive). 10/10 will be doing this again
72 notes
·
View notes
Text
I just went through and tagged all the stuff and recipie doesn’t look like a word anymore. You are WELCOME (Edit: I spelled it wrong it’s not a word anyway whoopsie)
The tags will be in the tags of this, my pinned post. I tried to make them as self explanatory as possible.
#repeat recipie#recipie#feel better tips#life tips#not a recipie#recipie for a sick fuckin burn#fun trivia#recipies included#bread#drinks#dessert#mug cake#video only#video recipie written down#human moment
2 notes
·
View notes
Text


#pink#pinkcore#tradfem#feminine#sahm#girl mom#housewife#recipie#strawberies#strawberry#fruit#sweet#treat#dessert
4 notes
·
View notes
Text
Potato wedges and Tofu ‘burger’!!

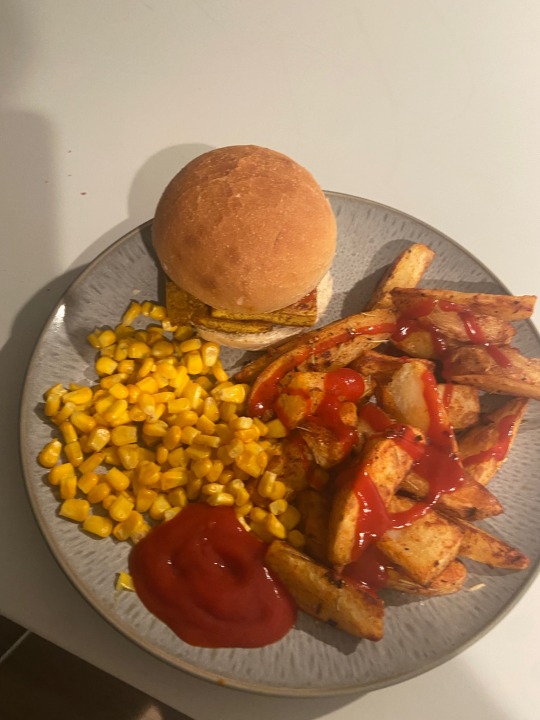
One serving: £1.33
(excl. seasoning & sauce)
Recipe & individual pricing below cut!!
Bulk total exl seasoning: £6.39
(King Edward) Potatoes £1.75
(Bio) Tofu £1.99
White crusty roll £0.25
Cucumber £0.95
(Freshona) Sweetcorn £1.45
Seasoning ect. I used
Vegetable oil
Turmeric
Cumin
Cayenne
Paprika
Rosemary
Ketchup
Siracha
Step 1
Preheat ur oven to around 200-220c (depends on your oven/ how you like your potatos cooked honestly!)
Step 2
Wash 2 medium-large potatoes! I do this very quickly and I don’t bother peeling them - but if you like em peeled, do your your thing!!
Step 3
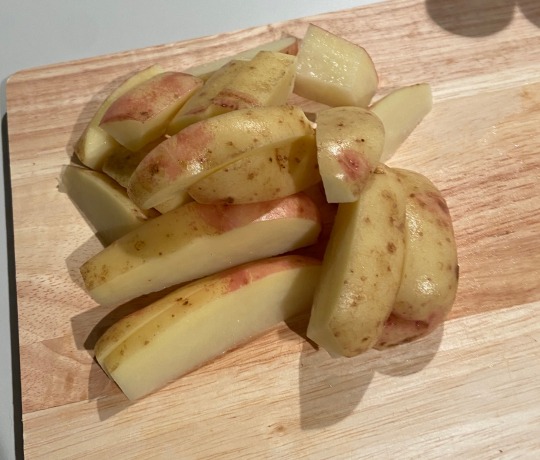
Chop those bad boys! You can do wedges, slices, chips, whatever you want!
Step 4
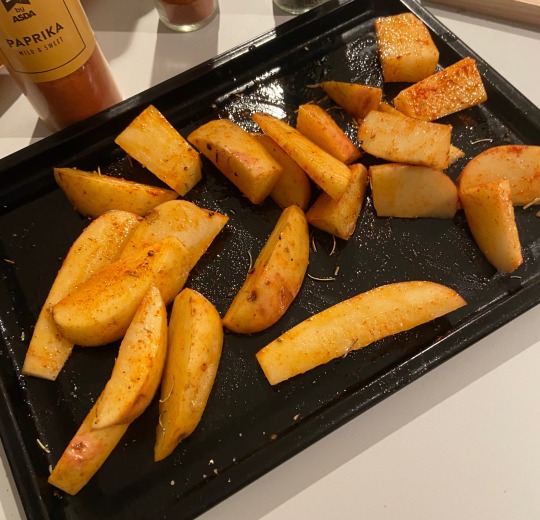
Oil and seasoning! Drizzle a tiny bit of oil (you can add more later if you need), then some seasoning. I used salt, pepper, rosemary, cayenne and paprika. Don’t use too much, the texture of the chips will become very dry if you do !
Use your hands to rub the oil and spices over the chips, try to get them evenly covered! If this is a struggle, add a little more oil :)
Step 5
Put them in the oven! Make a timer for 25 minutes BUT make sure you keep checking in them and giving them a shake + flipping them
Step 6
Tofu!! You want one serving (generally a quarter of a block). I cut 2 big slabs.
Step 7
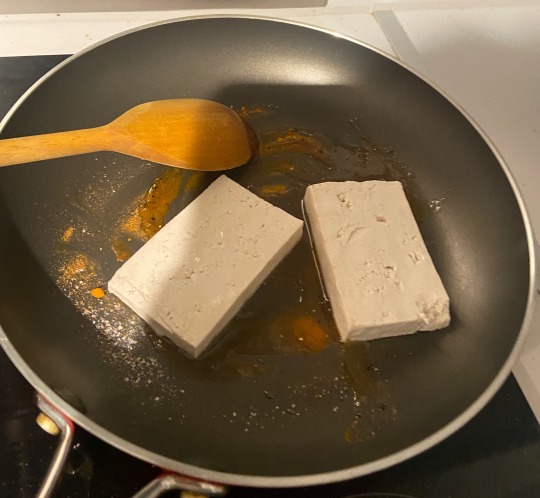
Fry that guy!! Pour a little vegetable oil (i used too much oops). I used salt, pepper, turmeric and cumin. Keep an eye on it and flip it every so often (see step 10 for how it might look when done!!)
Step 8
Chop a lil cucumber! I only used two slices.
Step 9
Put ur sweetcorn in!! Boil that boy!!!
Step 10

It should look kinda like this! Tough enough to hold together on a burger bun.
Step 11
PUT IT TOGETHERRRRR OH YEAA
#cooking#meal#food#food blog#foodblog#vegan#veganism#vegitarian#vegan food#recipie#recipies#vegan recipie#student meal#student#budget meal#budget meals#student meals#budget
3 notes
·
View notes
Text
snack recipe:

• Tiny Bagle
• Whipped cream cheese spread
• Cinnamon Sugar
My rating: 10/10
2 notes
·
View notes
Text
First tumblr post and I'm gonna teach you the most bussin'est pizza sauce
this sauce so good it'll ruin any jar sauce you get

28oz can of whole peeled tomatoes
[can be what ever brand you want or have as long as it's oval shaped and in a can]
Dump them in your pan
Crush them to bits but not paste
Boil them on MED-HIGH
Add:
-1 tbls of butter
-1 tbls of olive oil
-2 pinches of salt
-as much Italian seasoning as you wish as long as it's like <1/2 tbs
[you can literally just use a generic bottle from your local store]
Continue boiling uncovered for 45-60min or until thick to your liking
Stir sauce occasionally to prevent burning and clumping
Times up
let your creation rest in the fridge until pizza time
you can use the empty can and lid to store
♥~enjoy~♥
7 notes
·
View notes
Text
Wednesday, November 22.
Dessert.
For those that save the best until last. Dessert is trending, and this can only be a good thing. Perhaps the very sweetest thing. So, in that spirit, behold this array of sweetest things to help you on your way, this Wednesday, November 22.
We invite you this morning, those sweet of teeth, to peruse our wares of the finest sugary delights: macarons, cakes, doughnuts, and croissants. All of it too pretty to eat, but too tasty not to.


@lustingfood
#today on tumblr#dessert#cookies#chocolate#dessert recipe#dessert art#food#foodblr#food porn#foodie#food tw#food mention#recipie#dessert aesthetic#dessert cakes#pancakes#yum#tasty#delicious#comfort food#tw: food#tw food
851 notes
·
View notes
Text
Brown Sugar Peanut Butter Cookies
1 Cup Salted Butter
1 Cup Dark Brown Sugar
1 tsp Vanilla Extract
2 Large Eggs
3 Cups All-Purpose Flour
1 tsp Baking Soda
1/2 tsp Baking Powder
1 tsp Table Salt
2 Cups Peanut Butter Chocolate Chips
Preheat oven to 350 degrees F. Line a baking pan with foil and set aside.
2. Mix flour, baking soda, salt, baking powder.
3. In a separate bowl Cream together butter and sugar until combined.
4. Beat in eggs and vanilla until lighter in color.
5. Mix in the dry ingredients until combined.
6. Fold in Chocolate Chips.
7. Roll 1-2 Tbsp. of dough at a time into balls and place them evenly spaced on your prepared cookie sheets.
9. Bake in preheated oven for approximately 8-10 minutes.
190 calories per cookie
41 notes
·
View notes
Text
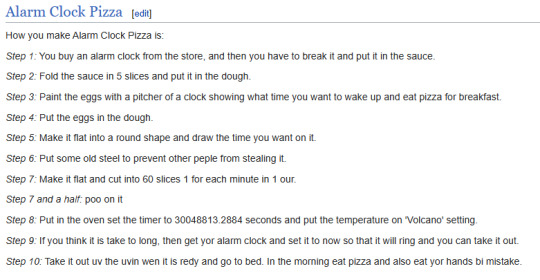
cowards at wikipedia took this down
source: BJAODN.
2 notes
·
View notes
Text
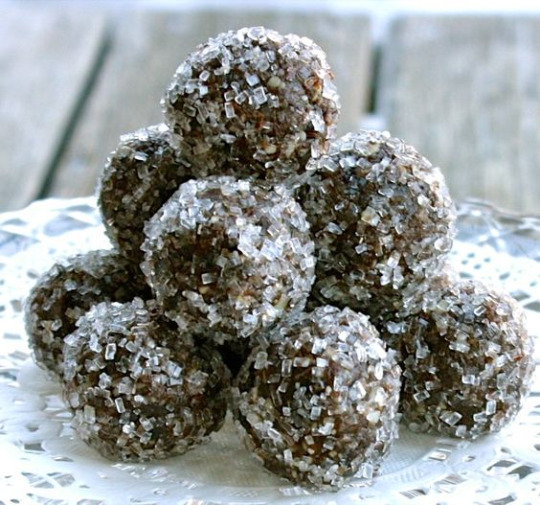
Sugar Plums

If you live in a Western country like myself, you've likely heard the story or Poem 'The Night Before Christmas' It's a Christmas tale, written during Victoria England in 1823 By Clement Clarke Moore in the Troy Sentinel. It established a lot of things into long standing Christmas tradition. The hanging of stockings, a flying sleigh pulled by reindeer and their names, Santa (Still being called St. Nicholas) is descried as fat, jolly, with a white beard who comes in through the chimney. It's all pretty consistent with what we picture a snapshot of Christmas to be.
So what the hell are sugar plums?
"The children were nestled all snug in their beds,
While visions of sugar-plums danced in their heads;"
When I heard this as a kid, I pictured it as some kind of candy or desert that was light an airy. After all, there's a ballet song called the 'Sugar Plum Fairy' so it must be absolutely magical. And it was! For it's time.
One of the reasons we don't have sugar plums to look forward to anymore is because, frankly, we've been able to procure better Christmas goodies. Sugar plums were chopped up dried fruit and nuts, formed into a sticky ball then rolled in sugar. Fruit was a huge treat for the Victorians, so being able to not only have sweet, dried fruit but ALSO dip it in sugar must of been an absolute treat for children.
If You want to try these yourself, I have a recipe I found.
Sugar Plums
You will need:
3oz Dried Prunes (longevity, clears obstacles)
1oz Dried Dates (Rebirth)
1oz Dried Apricots (Rejuvenation, eases anxiety)
1oz Dried cranberries (Celebration, Rejuvenation, Bring people together)
2oz Walnuts or Other Assorted Nuts (Wishes, Prosperity)
1/4 teaspoon Cinnamon (Success, Happiness, Prosperity)
1/4 teaspoon Cardamom (Love, Courage)
1/4 teaspoon Nutmeg (Luck, Happiness, Prosperity)
1/4 teaspoon Cloves (Love, Friendships, Protection)
Teaspoon of Honey (Happiness, Prosperity, Love, Friendship)
1/4 teaspoon salt
Course Sugar
Chop your dried fruit and nuts until very small and fine.
Add your chopped fruit, nuts, spices, salt, and honey to a bowl. Mix until well combined in a large ball. This is going to take some arm strength.
Once your lump is mixed, start rolling out smaller balls with your hand. Use the palm of your hands to help shape the small ball. Once you have your small ball, roll it in your sugar.
You have now made a sugar plum.
Repeat until all the mixture has been rolled and covered.
#kitchen witchcraft#food and folklore#fairytale#folktale#kitchen witch#klickwitch#december#holidays#hello december#christmas#night before christmas#sugar plum#witch#food magic#recipie#folklore
51 notes
·
View notes
Text
Source: 🍞
#foodtok#video#foodie#cooking stim#cooking#food#baking#foodporn#food stim#recipie#peasant bread#bread#queue at 350°
33 notes
·
View notes
Last Seen Blogs


youswiminmywater
enjoy the blag

martianmanhuntter
semi-hiatus


musicdiscoveryapp
Music Discovery App.