#riah.txt
Photo

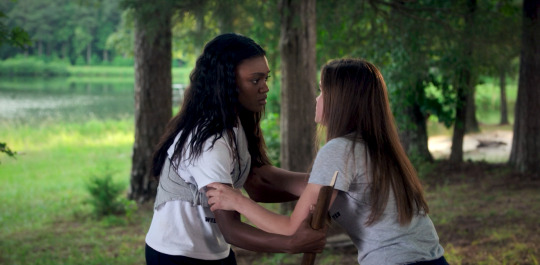
Here’s a coloring tutorial for how to make vibrant single color backgrounds for gifs. This way relies on the color you want the gif to be already existing in the original scene or the background color already being mostly just one solid color. It should also require minimal to no layer masking which normally results in a cleaner coloring. There will be a second tutorial which will explain how to do more complicated manipulations.
For my example, I chose a scene that had yellow and green most prominent in it. Scenes like this can be changed to many other colors so they tend to be very versatile.

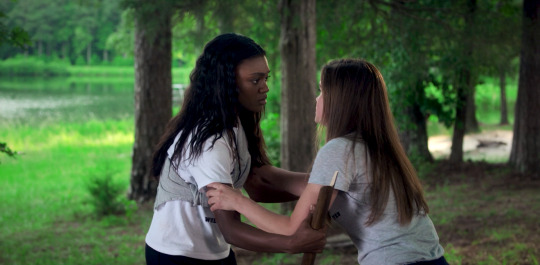
I always start my colorings with Levels, Curves, Black Selective Color, and Exposure. This is not absolutely necessary but I prefer this set of adjustments to begin with because it increases contrast and brightness, and helps make colors more defined (which makes them easier to manipulate). If there are other ways you know how and want to achieve a similar effect, do whatever looks best to you. This is the scene with my base coloring on it:

As a rule of thumb, if there are people in the scene that I'm giffing, keeping their skintone looking as normal as possible is my first priority. This is especially important if there is a person of color in the scene so as not to white/light/orangewash them. This tutorial is a great resource for learning how to avoid that so I won't go into depth about it, but I will explain some of the steps I take because the method is a bit trickier for when you're also doing a vibrant coloring.
To begin with, Cal's skin has already been lightened a bit by my base coloring. To start with I use a layer of Red Selective Color to darken the skin tones and remove some of the yellow. The more yellow you remove at the beginning the easier it will be to manipulate the yellow and green background later without affecting their skin. Then a Hue/Saturation layer that desaturates and darkens the reds so that their skin doesn't look unnaturally red.
These are the adjustments I made for this scene. They may need to be further adjusted later, but this is a good start.
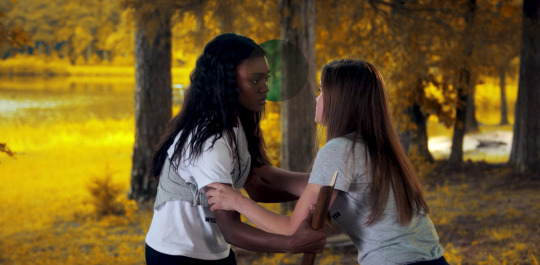
The next layers will focus on manipulating the background. The first step is to convert the mix of yellow, green, and minor cyans to a single, less muddy color. The easiest way to do this is changing them all to a more distinct green. In a Yellow Selective Color layer, increase cyans so that it becomes more green. In a Cyan Selective Layer, increase the cyans and yellow. Finally, in a Green Selective layer increase the cyans. You'll see that these adjustments have made the background a much more vibrant and solid green.
If the background color of your original scene is not green like this one, still try to get all of the different colors to become one base color to work off of.
At this point, you get to be creative with what color you want the background to end up being. I have previously made gifs of this scene in a yellow orange scheme. It could just as easily be changed to cyan or purple, etc. Sometimes, in order to end up with a certain color, you must first convert it to one or more other colors.
YELLOW
For a yellow background, use a couple of layers of Green Selective Color and take out all cyans and maximize all yellows. Two to three layers of the same adjustment should be enough. Next add layers of Yellow Selective color, also removing cyans and adding in yellow. This should only need one or two layers, depending on the shade of yellow you want. I personally like a warmer yellow, so I do one layer with Cyan at -100 and Yellow at +100 then a second layer with Cyan at -30 and Yellow +100. These settings will of course change depending on the scene, but the theory is the same.
These are the settings for the group of adjustment layers (in order) that I used to change the background to yellow.


You'll see that you can get vibrant and clean colorings with just a few selective color layers and sometimes even no layer masks. The last step is to check on skin tones again and make sure that the adjustments added did not change the color or tone too much. A good way to check the difference between the original and your coloring is to use the marquee tool and place a small marquee somewhere that will show you both when you use it as a layer mask. I usually group all my adjustments together then use a small circle marquee on part of a face and create a layer mask with it on the group. Then you can see how much everything has been altered.
I always find it very satisfying to see how marked of a difference my coloring has made, especially when I make such drastic changes. It also allows me to verify that I've kept skin tones looking natural and not whitewashed.
I'll demonstrate how to change this scene to a couple of other colors as well. Even if the adjustments might be different for your respective scene, the main idea of what I do should still be applicable.
CYAN
To change it to cyan, I started again with Green Selective Color layers, but with essentially the opposite settings as what I did for the yellow coloring. On your green layers, add Cyan +100 and remove Yellow -100. Two to three layers should be enough. I found there was a bit of yellow that my previous adjustments did not catch, so I put a Yellow Selective Color layer before the green ones and added Cyan +100 and removed Yellow -100.
Sometimes you have to change the order of your layers around to see what's going to look best. If the yellows don't get fixed before the greens, then the adjustments to the green layers will not affect the yellow. Placing the yellow layer before the green ones turns the yellow to green which then allows the following layers to also affect it.
At this point, the yellow and green layer adjustments have made the background fairly close to cyan. To clean it up and get the shade I want, I add a couple of Cyan Selective Color layers.
With Cyan, the more Yellow you remove and Magenta you add, the more of a true blue it will become. The less Yellow and more magenta you remove, the more of a true cyan/blue-green it will become.
To get the shade of cyan I prefer to color with usually, I use a Cyan Selective Color layer with Cyan at +100 and Yellow at -50; then another Cyan Selective Color Layer with Cyan at +100, Magenta at about -20, and Yellow at -50. These adjustments result in this:


At this point you probably get the point, but I'll also explain my process for purple.
PURPLE
Any adjustment that involves magenta tends to be just a bit trickier. The more you mess with magenta, the more it can mess up the quality and overall coloring. Green does not convert directly to purple easily, so I would suggest you start with the Cyan coloring and make your changes from there.
From the adjustments that make up the cyan coloring, go to the first Cyan Selective Color layer and put both Cyan and Yellow at -100, then Magenta at +100. Repeat with the second Cyan Selective Color layer. Then add a Blue Selective Color layer with the same adjustments.
Blue and Magenta have a lot of overlap so if you're trying to magnify the Magenta in your scene and working directly in a Magentas layer doesn’t seem to be doing as much as it should, try making changes to the Blues (and vice versa).
These adjustments give this shade of purple:

As always, make additional adjustments as needed to achieve the shade you desire.
Sometimes I use a Hue/Saturation layer to increase the saturation of certain colors, but most of the time the result I want is achievable by the Selective Color layers. There is also a greater margin of change you can do with Selective Color versus Hue/Saturation. Selective Color gives you the ability to fine tune colors with a lot more precision. Hue/Saturation has a threshold of about +30-40 on the saturation bar before it starts to degrade quality and distort pixels.
Here is the final gif with each color I explained vs. the original scene:

#*tutorial#quintennyson#omgari#uservalentina#userkraina#tuserabbie#tusergabriela#userrobin#usersunny#userfanni#useroli#userbells#supervalcsi#riah.gif#riah.txt
277 notes
·
View notes
Text
.
#would you still love me if i started posting kpop too#i promise to be normal abt it lmao#but i am a simple wlw who has recently fallen into a rabbit hole of kpop women#god i swore i would never 😶#riah.txt
0 notes
Text
“the worst thing that’s ever happened to me already happened”
what if something happens to imogen later and they call back to this line and laudna’s like ‘i thought the worst thing that could ever happen to me already happened. i was wrong.’
#just thinking some thoughts#and then she ofc pulls a delilah and breaks the world to bring her back#imodna#critical role#cr spoilers#riah.txt
78 notes
·
View notes
Text
I’m really going feral over
“Kiss me where I’m not hurt.”
197 notes
·
View notes
Text
the only things you need to enjoy a Flanagan show are trauma and bisexuality
#and i have both in spades#both or either will get you through every scene from the heart wrenching to the most camp#funny how this really applies to all my fav media#methinks theres a pattern#riah.txt
16 notes
·
View notes
Text
do you ever have just a sudden realization of how bland your own personality is like damn I must be absolutely boring to be around
#like talking to my coworkers who are close to my age im just like oh i do nothing and have no interests#yes i am going to continue to have a new existential crisis everyday and im gonna make it everybody’s problem#i’m just gonna attribute it to being so insecure as a child#both self esteem wise and having spent my childhood feeling like everything and anything would be taken away at any moment#that i didn’t allow myself to truly develop my interests or try anything new#for fear of being bad at it or liking it and not getting to keep it#after all i am nothing if not living in a shame and fear based existence ¯\_(ツ)_/¯#hey siri how do i acquire a personality? asking for a friend#riah.txt
17 notes
·
View notes
Text
my boss just said “5 more min then it’s breakdown time” and i know he meant cleaning but im just sat here like it sure is

20 notes
·
View notes
Text
does anyone know how to make the new post editor let me put gifs in a post? it keeps telling me i can’t upload that type of file
#i keep going to try and it tells me that so i give up#that’s half the reason i havent posted in so long#riah.txt
9 notes
·
View notes
Text
social cues? i dont know her
#why am i so fucking awkward jfc#thought i was getting better at talking to people lol but apparently not#riah.txt
8 notes
·
View notes
Text
.
#would it be so much to ask for my brain to let me express a single genuine heartfelt emotion#just once?????#i am on another plane of emotionalally stunted#riah.txt
5 notes
·
View notes
Text
it’s a crime that we never saw Tess and Joel kiss but had to watch Tess and fucking infected do a weird ass mycelium kiss
#like whyd he have to be so weird about it#the last of us#the last of us hbo#the last of us spoilers#riah.txt
19 notes
·
View notes
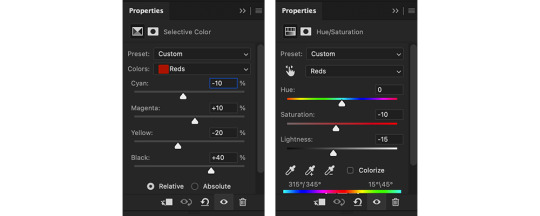
Note
hi! do you mind sharing your sharpening settings your gifs are so nice omg
hi thanks! i use smart sharpening in two layers
first layer:

second layer:
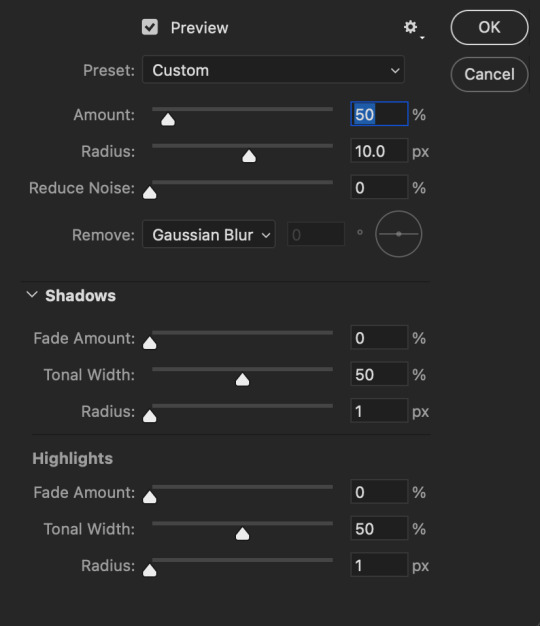
adsjust ‘amount’ as needed on the second layer
#ask#anon#this is in ps 2020#ive heard different versions of photoshop will make the same sharpening settings look different but i cant attest to that ive only used this#*tutorial#riah.txt
16 notes
·
View notes
Text
the way so many of these shots exactly match the game 😌
#the dialogue too#im a sucker for that shit#the last of us hbo#the last of us spoilers#tlou lb#riah.txt
16 notes
·
View notes
Text
williamsmiller -> napoleon-usher
3 notes
·
View notes
Text
FUCK they did That scene such justice
#tlou lb#the last of us spoilers#down to the shove and everything#it was so true to the game but also their own#riah.txt
13 notes
·
View notes
Text
i thought i was prepared for That scene but I Was Not 🥹
10 notes
·
View notes
Last Seen Blogs

aimortggage
Untitled
dodedits
icons & lockscreens.

boutiquedebolos-blog
Boutique de Bolos
mother-ofthe-universe
Universe Birthgiver

pompeytvcdsstuff
pompeytvcd