#rp tutorial
Text
how to use xkit rewritten / trim reblogs on mobile:
updated for december 2022
this method is beta editor / npf compatible
my previous tutorial to trim posts technically still works, but as tumblr is discontinuing legacy posts that method is already outdated and unhelpful for people who have no other option than to use the beta editor.
but fear not! i've figured out how to use xkit rewritten on mobile and it's VERY easy.
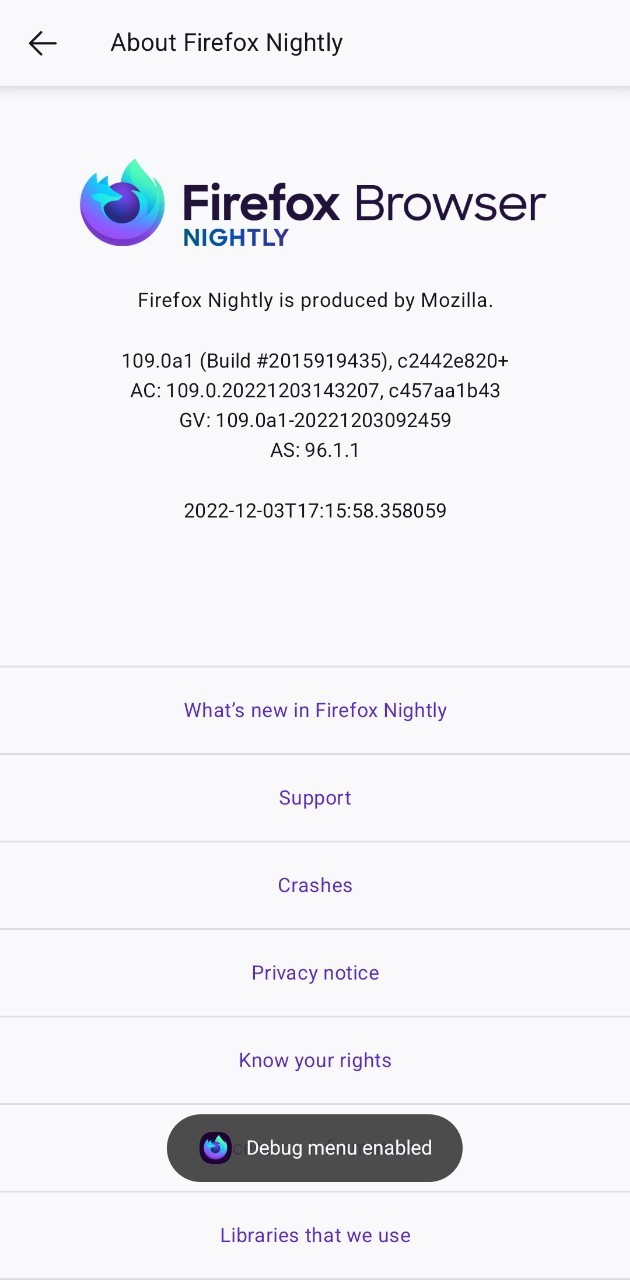
install "firefox nightly for developers" OR "firefox beta for testers". must be one of these two, not regular firefox.


go to settings, scroll down to the "about firefox" page at the end and then click on the logo 5 times until debug mode is enabled.

back to settings and below add-ons you'll see the 'custom add-ons collections' option.
add 17683742 as the ID and name it 'tumblr' like so:

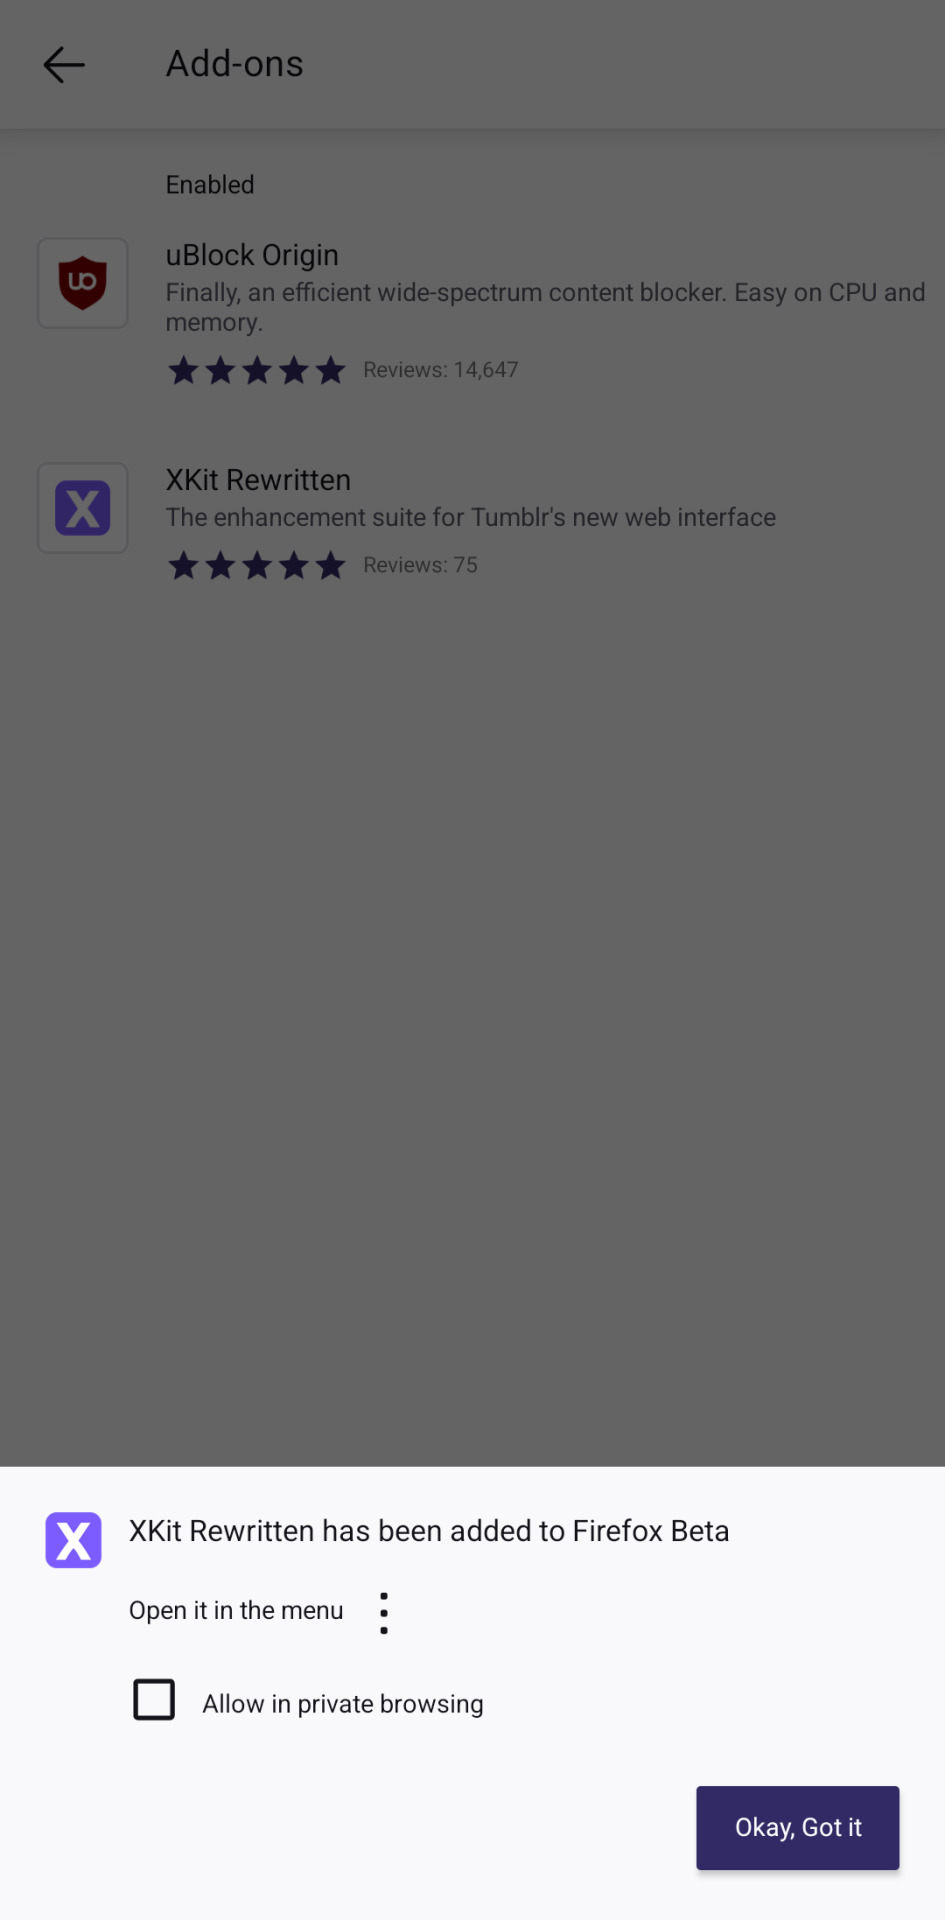
the browser will give you a little pop up that the extension is being added and the app is being restarted.
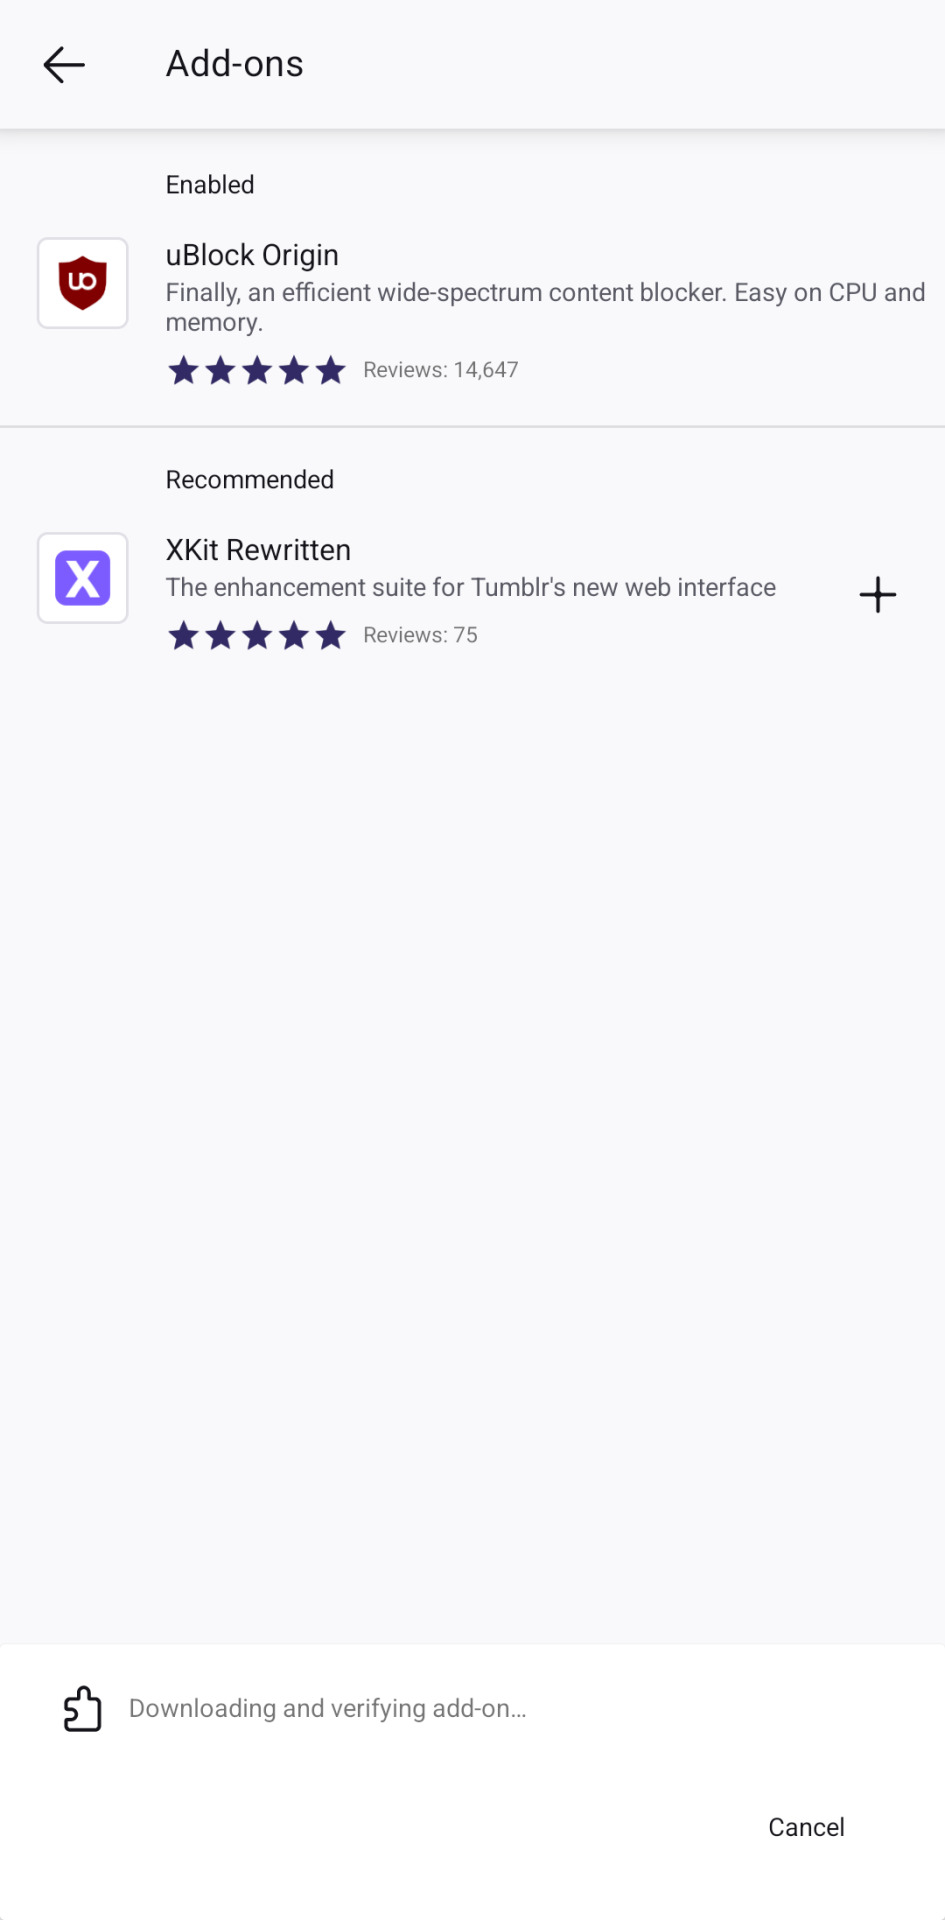
now enter the app again, go to the add-ons section and xkit rewritten should be loaded there. i've included ublock in the collection so you can use both because you absolutely should.
on firefox beta you'll see the extension with a +, click on it to add it.
now cut your replies the same way you do it on desktop with xkit rewritten!
save the post as a draft
click on the scissor button
it's done!


please consider that this is experimental so not all of xkit rewritten's features will work on mobile. trim reblogs does work though!
i still recommend using my roleplay formatter for formatting your replies and then copy pasting the html on your reblog.
other useful links :
this post explains the differences between the two editors and why we're switching.
this post is a tutorial on how xkit rewritten's 'trim reblogs' feature works.
1K notes
·
View notes
Text

✦ Okay, I give in. Let's upload our gifs on the beta editor to prepare for a gif pack page. Resources are available at the bottom, so lets get started !!
So first things first, you can only upload 30 gifs at a time. Now for me, I will always upload as I gif, around every 20 gifs, then upload to the page (this also ensures I don't skip any or have doubles) and keep gifing. That used to mean that I don't have to wait for tumblr to load 300 gifs and die from impatience. For the rest of y'all that means you're going to have to batch upload. I know, I'm sorry.
Note: With the help of @nataliealynlind we discovered that the daily limit is 250 gifs! So if you have more than that, prepare to upload your gifs over the course of a couple days or use a second blog. (imo this is another great reason to upload as you gif! that way you don't have to get stuck at 250!)
So after you upload your gifs (in this case I only did 10)*, you're going to go to the gear at the top of your post and click it. Then scroll all the way to the bottom where it says Text Editor. This looks familiar, right?

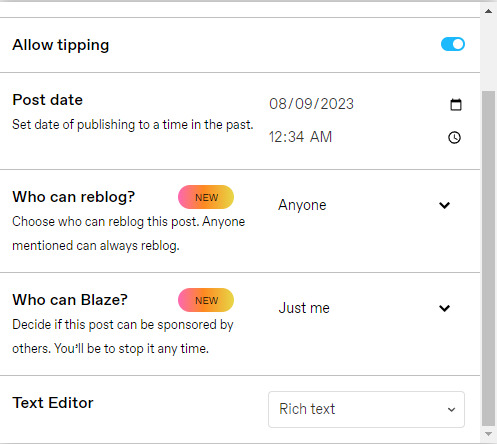
*Note: If you don't save it as a draft first, your gifs will be in .gif format, not .gifv. This means you can skip removing this tag later on, but I'm not sure if gifs that are uploaded but never saved/drafted will later disappear at some point. To be safe, I would save it as a draft. I just forgot at this part tbh
Well the good news is, you only have to change this once! The bad news is, we don't do Markdown then HTML anymore bc Markdown doesn't strip any of the code anymore 🙃 So just change it to HTML
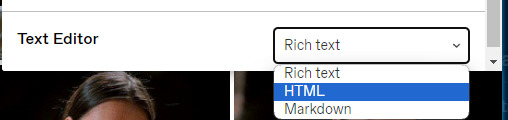
Now it should look like this! Fun!
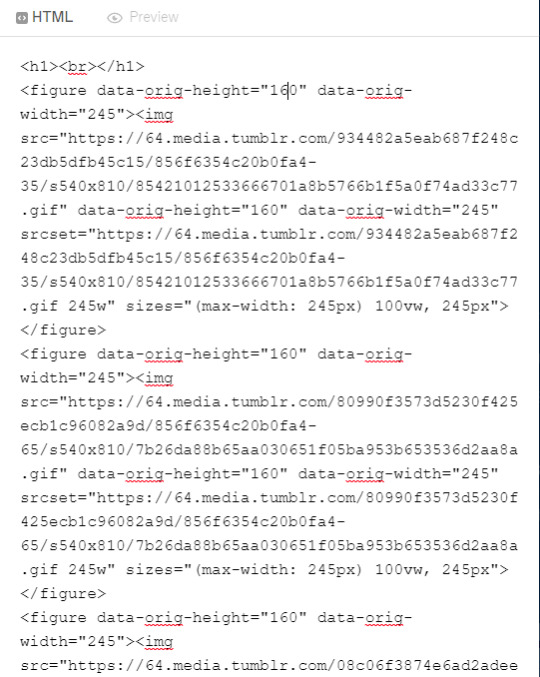
Okay, now we're going to copy that text and take it on over to our new best friend, the HTML Cleaner! So you're going to want to paste it on the right side of the screen. Your gifs should appear on the left side. If both sides have text, that's how you know you pasted it on the left.
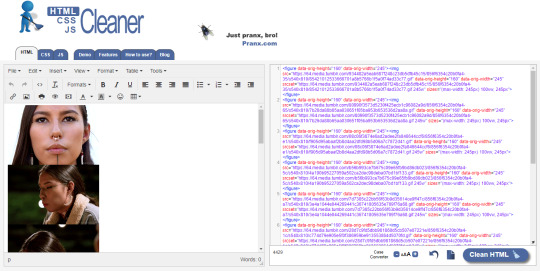
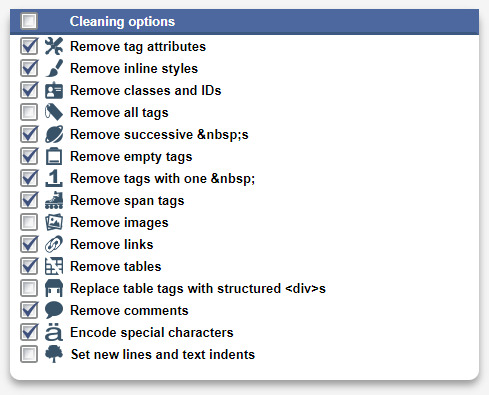
So in order to get ride of all this extra code, it's going to take a couple extra steps. First, you're going to check these boxes on the left hand side.
Now, on the right hand side, you're going to enter these under Find and Replace (copy/paste section below!!). I know you're like, uh what? Where the hell did you get those numbers? Well, I got them from our gif post code!
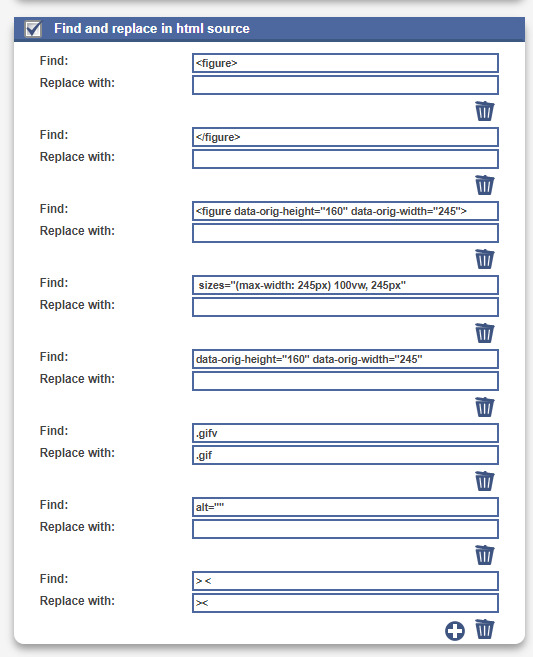


For easy copy pasting:
Find: <figure>
Replace: (leave blank)
Find: </figure>
Replace: (leave blank)
So after you add the specific widths for your gifs, you're also going to want to add the following:
Find: .gifv
Replace: .gif
Find: alt=""
Replace: (leave blank)
Find: /> <
Replace: /><
NOTE: If your gifs are usually the same size, I would recommend saving these snippits above on your computer's sticky notes or a draft to copy/paste for future uploads! While I do appreciate the viewer traffic, I'm sure coming to this tutorial every time is gonna get old real fast.
After all that, click Clean HTML

And now, your code should look like this! If there's still a space between your image links, just click Clean HTML again and it should get rid of it!

Now your code is nice and clean to put into your gif pages! Not quite sure how to do that? Read the Setting Up Your Sidepage section in this older tutorial!!
Resources
HTML Cleaner
My Gif Pack Page Codes
Recommended Gif Pack Page Codes (tag)
Previous Tutorial (How to upload to a Standard Sidepage)
Barebones Code (for previous tutorial)
#rpc#rph#gif pack tutorial#uploading gifs on beta#rp tutorial#beta editor tutorial#mytutorial#rp guide#me: i'm tired of this (remaking this tutorial every other year) grandpa#tumblr changing posts every five minutes: that's too damn bad!
157 notes
·
View notes
Text
Hace unos días, cuando estaba compilando las fuentes para el pack que les subimos, me llegó una duda. Verán, algunas fuentes tienen versiones alternativas o caracteres alternativos. En Photoshop es fácil elegir la opción para usar esas variantes, pero me surgió la duda de cómo se lograría en CSS.
Bueno, al parecer la opción sí existe y se llama font-feature-settings. ¿Es infalible? Nope. ¿Podré usar todos los caracteres que tenga la fuente? No lo sé al cien por ciento. De todas maneras, quise hacerles este post para compartirles mi nuevo descubrimiento.
Tomemos de ejemplo la primera fuente de este pack, Balgon. Lo primero que vemos es el nombre de la fuente con caracteres que no están en los glifos principales, ¿cierto?
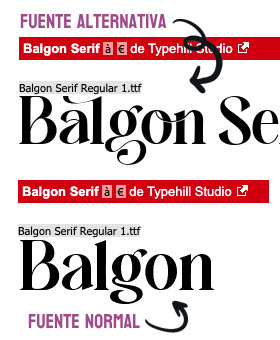
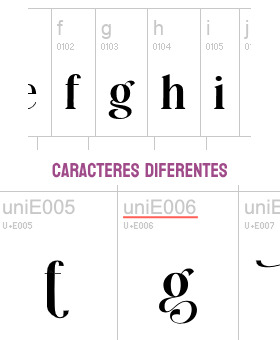
Pero si clickamos en "Ver todos los glifos", podremos darnos cuenta que sí están incluidos en la fuente, sólo que bajo un nombre diferente. En el caso de la fuente Balgon, tienen el nombre uniE000, de acuerdo al caracter. A veces, en otras fuentes, estos caracteres alternativos se llaman alt, aalt, salt, etcétera.*
Entonces, si queremos usar estas versiones, basta con agregar lo siguiente:
.tu-clase {
font-feature-settings: "salt" 1;
-webkit-font-feature-settings: "salt" 1;
}
*Si no funciona con "salt", intenta alguno de los otros nombres como alt, aalt, etcétera.
¡Y voilà! Puedes ver el resultado dando click acá. ✨
¡Pero espera, hay más! Si hay más de un estilo alternativo, puedes sustituir el 1 por 2, o 3. Inténtalo y nos cuentas.
41 notes
·
View notes
Text
Tutorial: Cutting Posts in the Beta Editor
hello everyone !! i am certainly not the only person to write a tutorial like this, but i'd thought i'd try my hand at writing one.
this tutorial covers how to cut your replies in the beta editor using xkit rewritten, as well as how to remove those pesky gif source links.
read on for the tutorial !!
keywords: beta editor, xkit rewritten, cutting posts, trim reblogs
written 12.09.2023.

Step 1: xkit rewritten
the beta editor requires a new browser extension completely different from the previous xkit ( the one that showed in your tumblr settings ) called xkit rewritten. if you have not done so already, go ahead and install xkit rewritten for chrome or firefox.

xkit rewritten shows in your browser task bar along with your other extensions. i like to pin mine to always show. it is through here that you control all the settings.

Step 2: enable "trim reblogs"
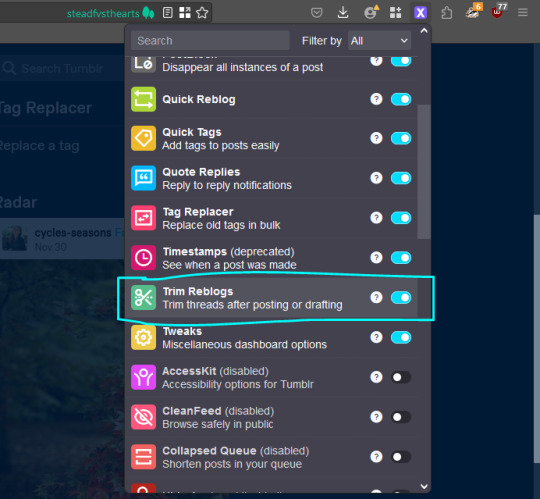
the setting in xkit rewritten that will enable you to cut posts is called "trim reblogs".
to turn it on, click the extension icon. a menu will pop up where you can toggle on and off various settings. scroll until you see "trim reblogs" and toggle it on.
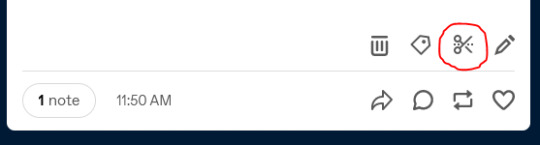
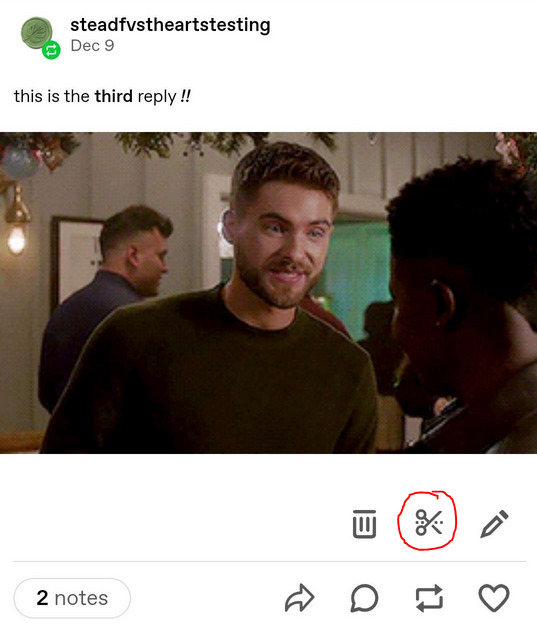
you can check this is properly enabled by going to your blog page and looking at any post you've made. at the bottom of the post with the editing, reblog, and like options, there should now be a scissors icon which is the trim reblogs option !!
Step 3: cutting/trimming replies
we are now ready to write and trim a reply !!
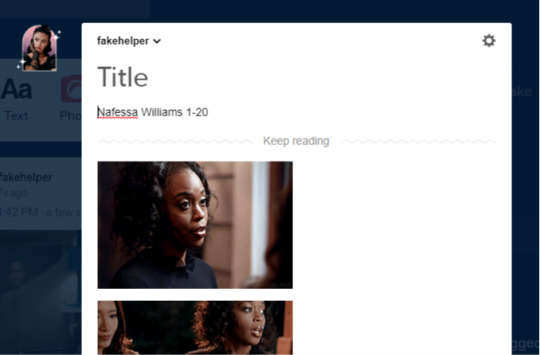
Step 3a: write and draft or queue/schedule your reply
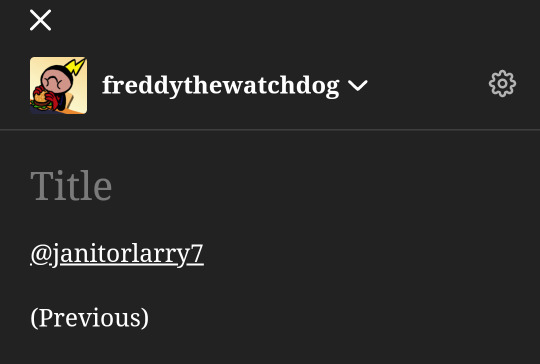
write your reply below the other two previous replies.
you do not need to copy or paste anything from the previous replies. simply write your reply in the editing space and put in your gif or icon if desired.
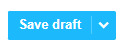
when you are done, draft or queue/schedule your post.
**note: as someone who doesn't draft replies first, i'm partial to scheduling the post for a few minutes in the future as a popup like the one below shows at the bottom of the screen when you do this. you can click this pop up to take you directly to the post in your queue which just cuts out having to manually navigate to your drafts or queue.

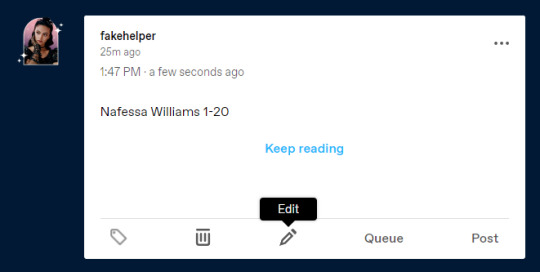
Step 3b: trim your post !!
navigate to your drafts or queue and find your post. scroll to the bottom of the post and click the scissors icon. this is the trim reblogs icon.

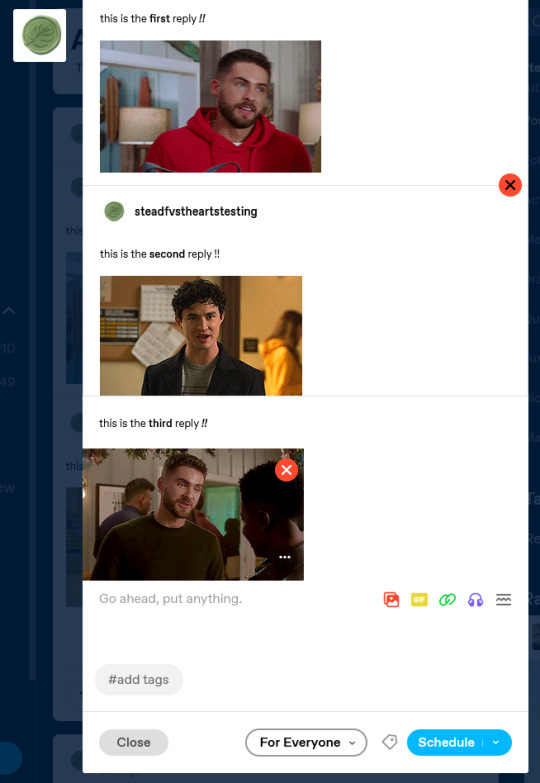
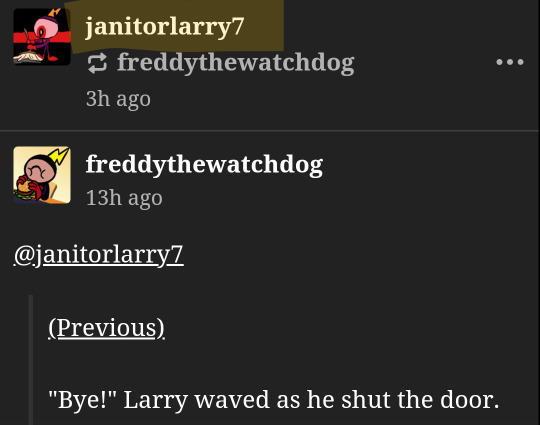
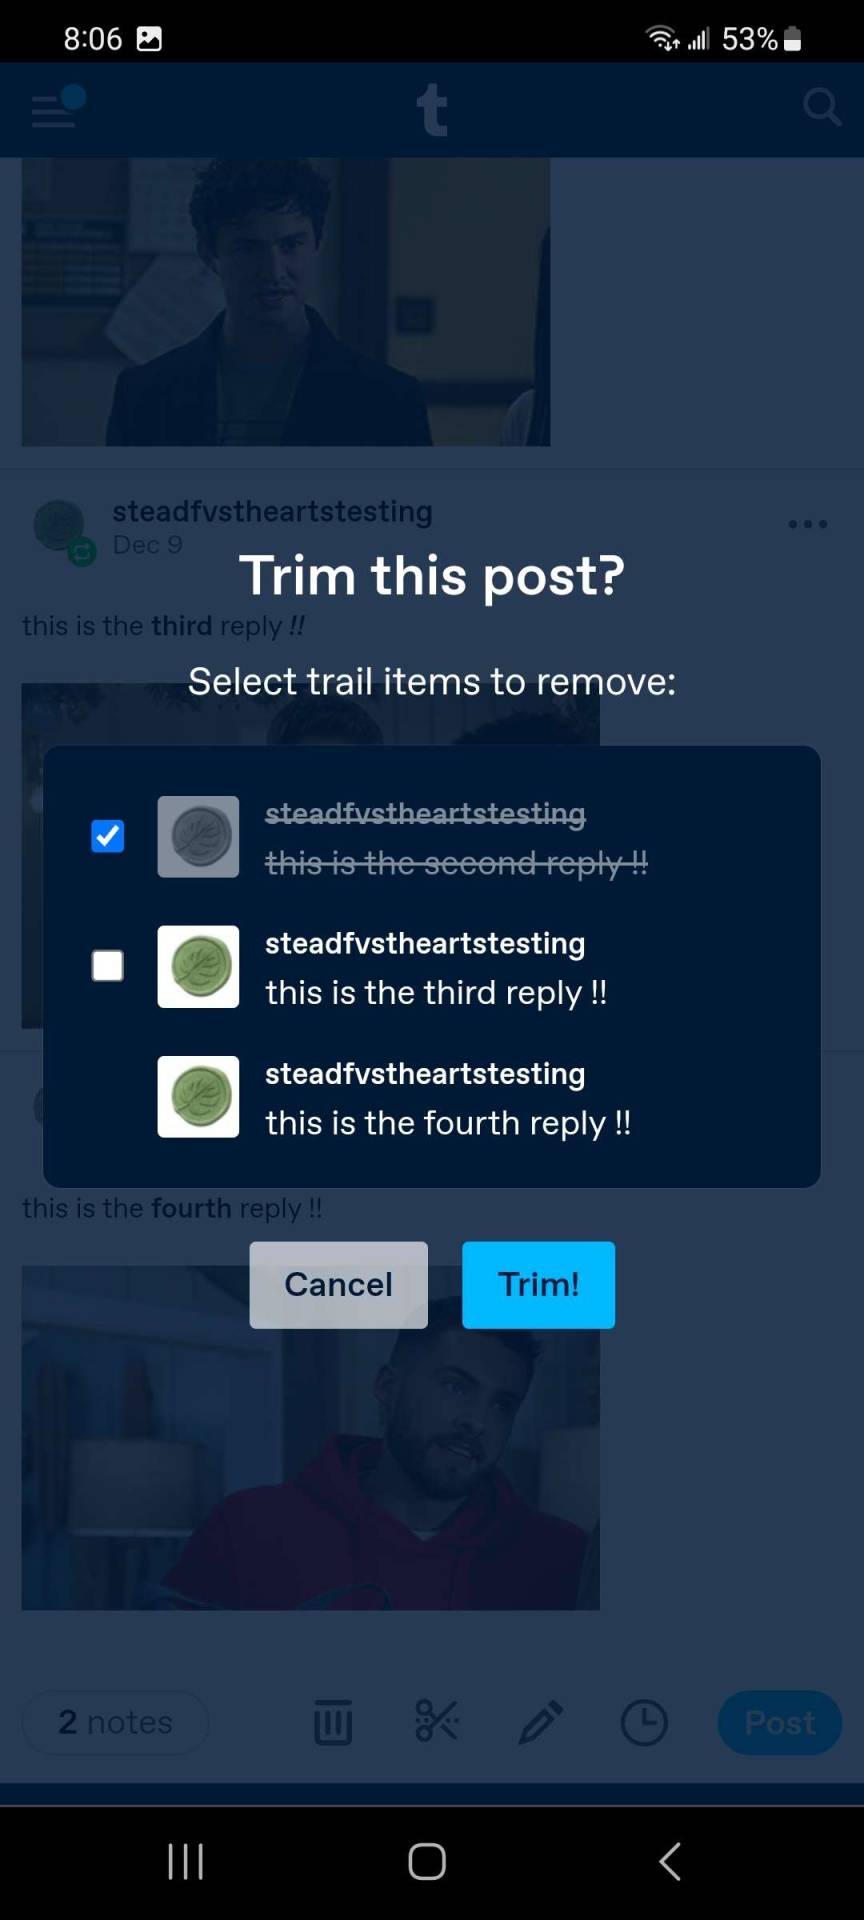
you will see the following pop up. the checked box is the reply that will be removed. classically, the first box is the one you want checked as you are removing your old reply.
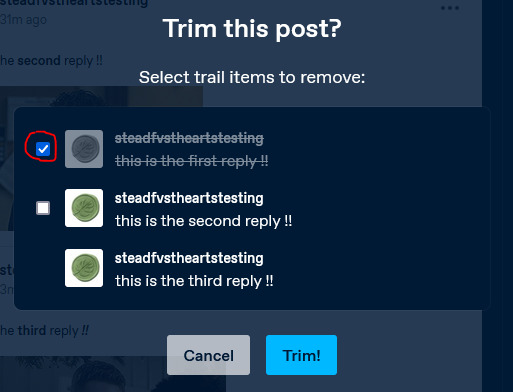
make sure the correct reply is checked, then click trim !!
you will now see the post has been trimmed to just the proper two replies.

that's all !! you are now ready to post.
**note: if you forget to draft or schedule your post, you can trim reblogs directly on the dash too !!
Bonus: getting rid of the gif source link

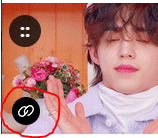
if you are seeing the source link show beneath your gif like above, there is an easy way to get rid of it!
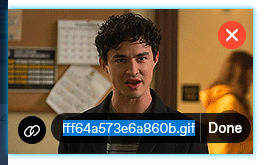
in the post editor, hover over the gif and click the link icon:
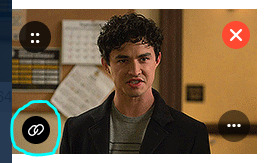
delete the text in this field and click done !! that's all !!
this concludes this tutorial !! one last note : if you are an android user, you are also able to use xkit rewritten to cut posts while mobile. for a more detailed tutorial on how to set that up, see here.
please consider giving this a like and/reblog if you found it helpful !! happy rping !!
35 notes
·
View notes
Text
A USEFUL TIP WHEN USING BETA TEXT EDITOR
many of us seem to be struggling with a minor bug when it comes to typing out our responses on tumblr using the BTE. the biggest one i've come to notice is when we make our replies small. it's super common for the BTE to hardcore glitch and have the last couple of letters regular sized while the rest of the response is small. here is an example:
Lorem ipsum dolor sit amet, consectetur adipiscing elit. Aliquam eros leo, feugiat sit amet massa at, dapibus consectetur massa. Aliquam eget metus nec dolor efficitur sodales faucibus interdum dolor. Maecenas mollis justo euismod varius dictum. Etiam scelerisque erat vitae est hendrerit, a maximus justo tempor.
idk about you but i find that to be pretty annoying but that's just me.
another problem is that, for some odd reason, we're not able to do a form of "indentation" when typing out our responses on here via the BTE. why? idk. i really don't. now when i say "indentation" i mean like how one does when writing a research paper for school or writing out a fanfic. you know ... something like this:
Lorem ipsum dolor sit amet, consectetur adipiscing elit. Aliquam eros leo, feugiat sit amet massa at, dapibus consectetur massa. Aliquam eget metus nec dolor efficitur sodales faucibus interdum dolor. Maecenas mollis justo euismod varius dictum. Etiam scelerisque erat vitae est hendrerit, a maximus justo tempor.
so what i honestly recommend doing is to just type all of your responses on Roleplay Formatter. the reason for this is because Roleplay Formatter is what many coders and graphic designers call WYSIWYG. for those of you wondering, WYSIWYG stands for What You See Is What You Get. this is very beneficial for those of us who code, do gfx, and whatnot because it helps us get a better idea on what to expect for the end result.
it's super easy to use and i honestly can't recommend it enough. really. and not only that but you can use hell of a lot more colors for your text through there than on here where you only get eight options to choose from. all you need is a website that gives you the color hex and you're golden. here's a couple of sites i recommend you using for getting color hexes:
encycolorpedia
color-hex
wikipedia ( a - f ) / ( g - m ) / ( n - z )
#rp tutorial#rpc tutorial#rp tutorials#rpc tutorials#rp#rpc#tutorial#tutorials#roleplay#roleplay community#community#roleplay tutorial#roleplay tutorials#how to#how#to#beta text editor#bte#beta#text#editor#wysiwyg#what you see is what you get#what#you#see#is#get
231 notes
·
View notes
Note
hii, do you have any templates for a multimuse pinned post??
idk if it’s a template, but idk how to make my pinned post pretty yk?
hello there! i don't have any templates for that per se ( because there's no one universal answer for this and i think it's up to each individual how they wanna style it ) but i can give you some markers. also, here's an example of my potential multimuse blog, just to give you an idea of what you can do without overcomplicating it.
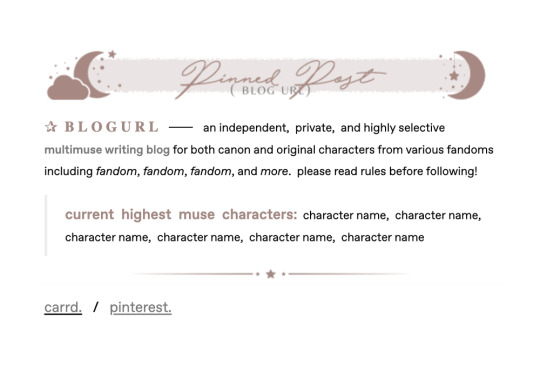
first off, the easiest thing to make it pretty is if you already have a certain color scheme or aesthetic you can use. ( so in the example above, the theme is mostly stars and the color scheme consists of a muted red / brown and grey. ) it basically gives you a basis on what things to use and how to make it fit your theme nicely.
secondly, just play around with various fonts ― personally, i use this site a lot, but there are a lot of similar ones out there, just use whatever you like best ― styles like different sizes, colors, spaces, bold, italic, and links to emphasize certain things ( just note here, that the more excessive you get with all of that, the more difficult it may become to read; so always keep that in mind if you care about readability ) and use symbols / emojis to give it more, for lack of a better word, character.
put some graphics if you have them, use quotes that seem fitting, include a little info on whatever you deem important, list the characters you currently have the most muse for ― the possibilities here are pretty much endless.
honestly, overall i'd just say play around a bit, maybe look at the way other people style their pinned posts ( without downright copying everything they do ) and try until you find something you are happy with. after all, you can always change the look of it at a later time again. i do hope this little guide helped you a little, though! :)
118 notes
·
View notes
Text
╰ ––––––– ✧ nana hace tutoriales: beta editor

en el link fuente o source link van a encontrar un google docs en el que me encargue de explicar como rolear con el beta editor, al menos las cosas que sé de momento. he leído varios tutoriales en ingles, pero parecía práctico que exista un tutorial que cubra las bases de como rolear con el beta editor en español.
nota importante: el docs esta sujeto a cambios y adiciones, planeo añadir una parte para creadores de contenido. si quieren añadir sus dos centavos al docs pueden dejar comentarios o enviándome un ask o submit sobre algo que debería añadir e intentare hacerlo apenas tenga el tiempo para hacerlo.
¡ por favor reblogueen y denle like para ayudar a alguien más !
38 notes
·
View notes
Text

HOW TO REMOVE THE GREY URL LINE IN BETA EDITOR
right now, if you copy a gif directly from any gif page, it will show a link that leads you to the weird tumblr view for gifs
it looks like this:

you can remove this with the following steps.
step 01: hover over the gif, pick the symbol for links on the bottom left corner.
step 02: click into the field and remove the link. important! click done once you have removed it or else it won't save the changes.

and that's it! if you have followed the two steps, your gif will look like this.
in theory, it works with all but with smaller ones, it might be tricky to get the selection. hope this helps 💚
50 notes
·
View notes
Text
RP Thread Trimming Tutorial
Note: Done on mobile Google Chrome. This will probably work on any browser (including the desktop site.) Although it doesn't work for the app.
1] @ the person you're roleplaying with.
2] Add text that you'll use to create a link.
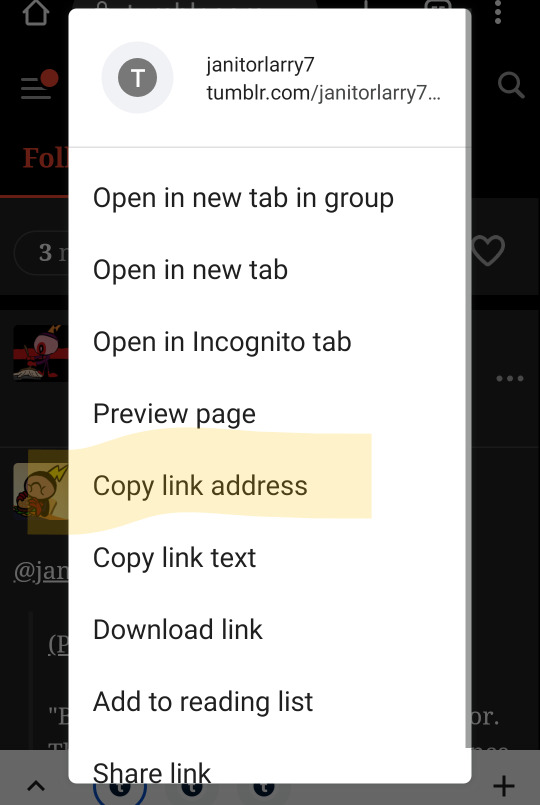
3] Go to the other person's reply and right-click/hold your finger on their username at the top.
(Note: Tumblr has three types of links for some reason, so clicking elsewhere may get you a different one.)
4] Press copy link address
5] Go back to your post and highlight the spot where you'll put the link. Then click this button.
Note: On mobile your phone's text editing menu may pop up over it. Scroll a bit to hide it and hit the button while it disappears. This may take practice.
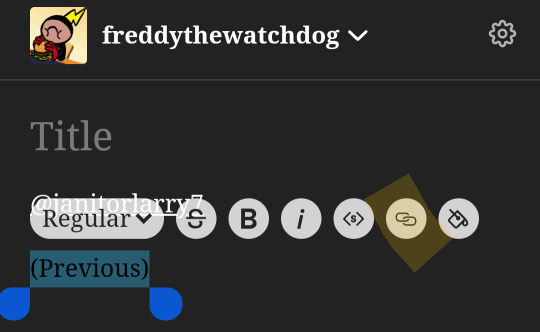
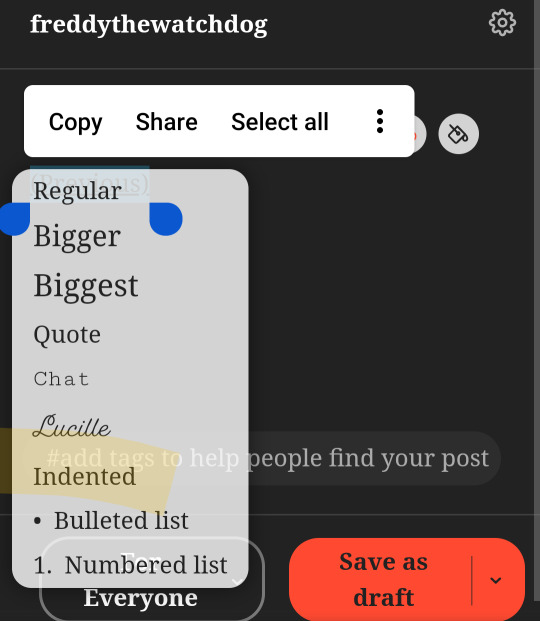
6] Go back to the same menu and click the button that says regular. This will show you types of text formatting that applies to entire text blocks. Click indented.
7] Go back to the other person's reply and copy it. Make sure you don't accidentally highlight everything above it on the page too. (That may be a mobile exclusive concern.)
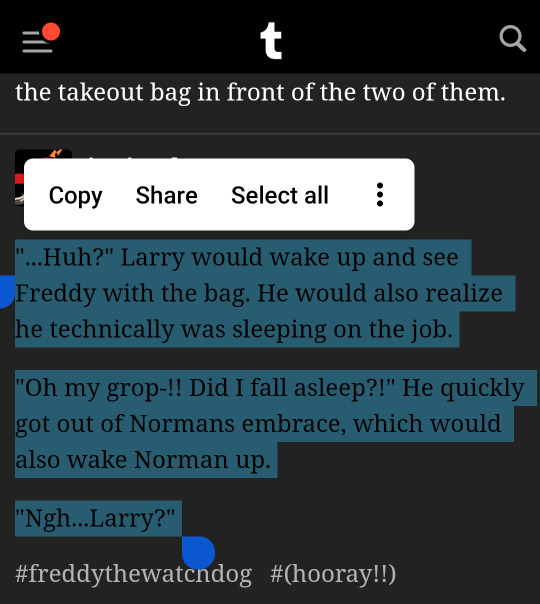
8] Go back to your post and press enter once to make another line in the indented part. (Twice will return you to regular text below it.)
If on mobile: Paste from the clipboard on your keyboard instead of from the pop-up text editing menu so it's pasted as plain text (which means it gets indented.) This way you'll have to redo the other person's formatting (bold, italic, etc.)
Or you could keep their formatting and repeat steps 5-6 for each paragraph.
Either way, this is where I go back and add another line between the link and the start of their reply.
9] Add your text below. You may have to press enter a few times at the end to get back to normal formatting.
5 notes
·
View notes
Text
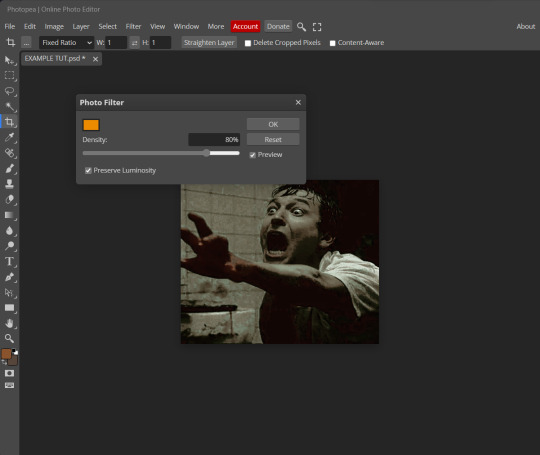
PHOTOPEA TUTORIAL / PHOTO FILTER FOR SKIN TONES:
a tutorial on HOW TO BRING OUT SKIN TONES if an image is 'too gray' (faded) or has too much of one (likely over saturated) color!
this technique can easily be applied to icons that already have a border ! just put your focus on the base image / icon ! this works on relatively anything, including poc and non-poc.
WHAT YOU WILL NEED: photopea...and your desired your base image(for example, i'll be showcasing inconsistent or otherwise dark/faded scene lighting, like twilight and saw).
DISCLAIMER: not all lighting/images are the same, nor are psd colorings. while some colorings may be designed to bring out reds/yellows(which is the filters we'll be using in this specific example), others may mute them and you may have to improvise with whatever color the psd you're using is designed to focus on. this is just a general idea, you will have to explore as you see fit. it's all going to depend on your personal taste !
by the end of this, you should be able to manage results like this !

cool, huh?....anyway, on with the mechanics !
EXAMPLES:

[ BEFORE PSD ] [ SYNOPSIS ]
#01 / LEFT IMAGE ABOVE: too much green, becomes muted with psd and doesn't show variety.
#02 / RIGHT IMAGE ABOVE: the colors are very faded in this scene, and the pink focused psd in question made the image seem gray. we will start with EXAMPLE #01.
i will be using the same PSD on both, a custom psd i made and focuses on reds/pinks.

as you'll see above the PSD has now been applied...but now it's kinda boring :// (there's nothing wrong if you don't mind how it is above, everyone's got their aesthetic choice—HOWEVER, we're aiming to add skin tone...)
once you have your image open, you'll want to go to image>adjustments>photo filter; i went ahead highlighted it in yellow for easy finding !

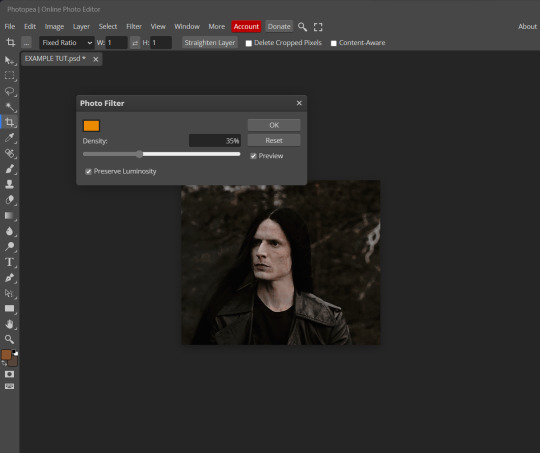
since this psd DOESN'T mute reds/yellows, (and those are usually the base of most/general skin tone combinations) i applied both a yellow and red filter. now, these colors i'll be using in this example, because they're in my default colors on the photo filter option—you can totally choose lighter or darker variants of these colors, or like i said, a different color altogether based on how the PSD you're using works. the toggle setting doesn't have to be exact to this example either—this is just what worked best on this image combined with the chosen PSD ! // RIGHT IMAGE IS THE FINAL RESULT AFTER APPLYING THE RED FILTER AFTER THE YELLOW.

repetition

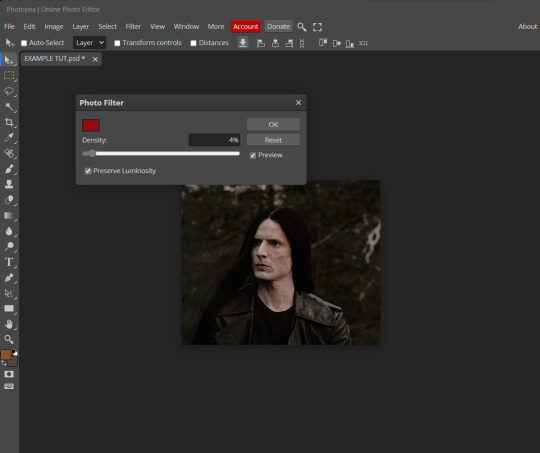
this scene in particular is very faded, and the red feels a little blotchy/over saturated here...so i'll show you an EXTRA STEP you can use ! in saying this, you don't have to do exactly this; you can even choose to go ahead with selective color to fix your image, without doing the filters, if you find that suitable. but i'll be showing you the magic of selective color to balance out the red toned overlay.
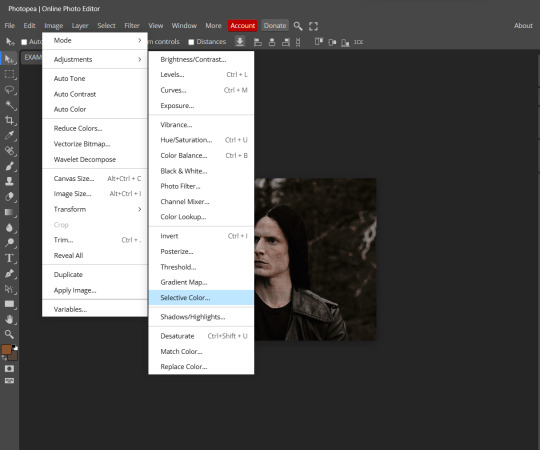
same concept as before, just a different selection: image>adjustments>selective color. think of selective colors as "balancing" the colors.
it does have a toggle selection for each color, which is super helpful, including diminishing or adding white highlights.
given the PSD colors, naturally, i'll be focusing on yellow and red.
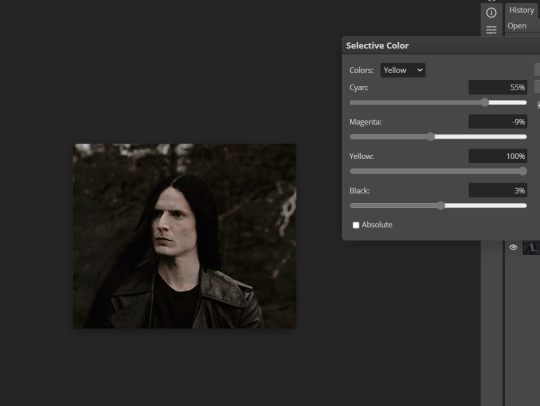

it's now got a general skin tone and red is not as blotchy !
[ FINAL RESULTS / CONSISTENCY WITH PSD APPLIED ]

this is a great hack i use quite a bit, it's great for maintaining consistency in your icons when the lighting is working against you...hope this was comprehensible and helpful, happy editing !
#FREE TO REBLOG !#leech's tutorials: photopea.#rp community#icon tutorial#rp icon tutorial#psd tutorial#roleplay coloring#roleplay help#roleplay resources#roleplay community#roleplay graphics#coloring psd#psds#icon psd#psd#roleplay psd#rp graphics#rp psd#rp resources#tutorial#editing tutorial#rpc tutorial#long post /#editing resources
173 notes
·
View notes
Text
updated tutorial on trimming posts on mobile
reply formatter mobile edition:
i’ve been trying to figure out a way to adjust the roleplay formatter to be used on mobile but unfortunately tumblr just does not render blog themes well on mobile browsers (my guess is to force people to use the app but i digress)
so i made a mobile friendly version with carrd. the only differences are the box size option and the night mode toggle, which the carrd version doesn’t have.
if you don’t use either of these you can use the carrd version on desktop as well, everything else is the same. for the purpose of this tutorial i’ll be using the carrd version as it is optimized for mobile screens.
if you can consider tipping my ko-fi or using my carrd referral code ( DPY34V1H ) to help me keep hosting the formatter ♡
this is a very easy level tutorial
even if you’re not comfortable with html!
this post may be long because of the screencaps, but the method itself is only a handful of clicks and it shouldn’t take you more than a minute.
this method technically works on any browser, but it works best on firefox as it is the only browser i’ve tested that keeps all formatting (bold, italics, color text, etc).
i encourage you to install firefox on your phone to at least cut replies, you could technically use the tumblr app to write and format your reply once you get the code of the trimmed reblog.
what you will need:
a mobile browser (can’t stress this enough i strongly suggest firefox, specially if you don’t want to have to manually add your partner’s formatting. it will make your life easier)
the mobile friendly reply formatter.
that’s it.

tutorial:
step one:
first thing you’re going to do is copy this line of text:
?redirect_to=%2Fdashboard%3Frestore%3D1&avoid_redirect=1
time saving tip! depending on your device you may have a “pin” or “lock” option in your clipboard, use it so you can keep using it without looking for this post and copying it all over again.
if your device does not have a pin / lock option, you can create shortcuts assigning a short word or symbol and when you type it the saved line of text will be suggested.
here is a tutorial for android and ios.
step two:
save the post you want to trim as a draft.
you can do this on the app.
step three:
open your draft on your mobile browser. click to edit the address bar.
the url of this post will look like this : https://www.tumblr.com/edit/USERNAME/POSTNUMBER
now delete the part with your username and one of the brackets (either the first one or the last one, it doesn’t matter which one, just don’t leave 2 brackets.
then add “?redirect_to=%2Fdashboard%3Frestore%3D1&avoid_redirect=1" (without the quotes) at the end of the link, then click on the link and load the page

thanks to this anon who figured the link trick out💗
step four:
select everything and copy

then click on the x to remove the previous reblogs.
step five:
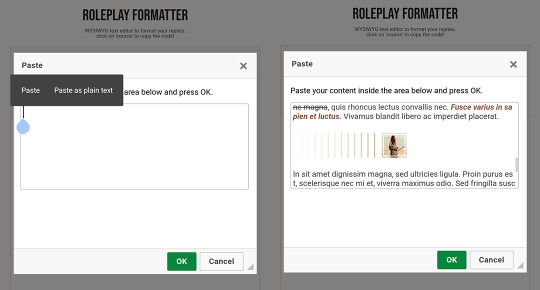
now go to the reply formatter here, click on the paste button and you’ll get a pop window.
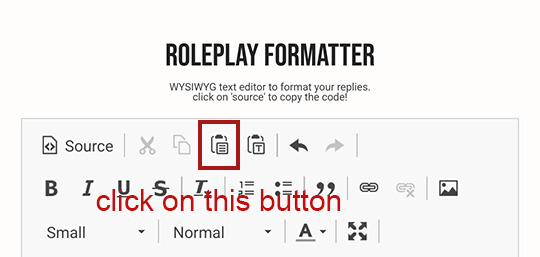
there tap your screen until you get the options “paste” and “paste as plain text”. use the regular “paste” option.
step six:
select the blockquote text you want to delete trimming the reply like you would on desktop with editable reblogs.
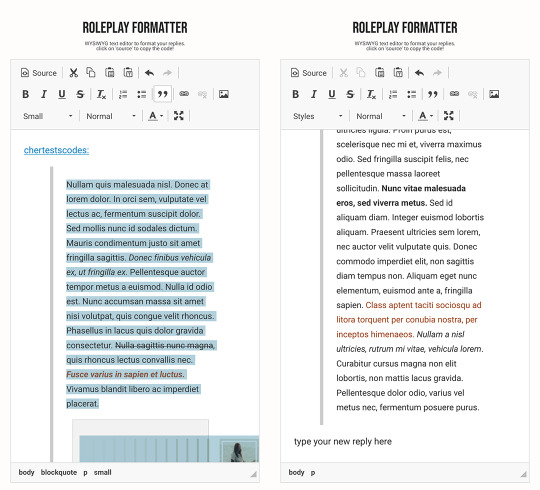
and that’s it ! you’re done.
from here you can either write and format everything on the formatter
or you can copy the html code from trimming the post and paste it on your trimmed draft on the app
ir order to do that, on step 4 add anything to the body of the post so you can save the post (it can be just a comma or a keymash)
then write + format everything on the app. just remember to switch the editor to html on the app!
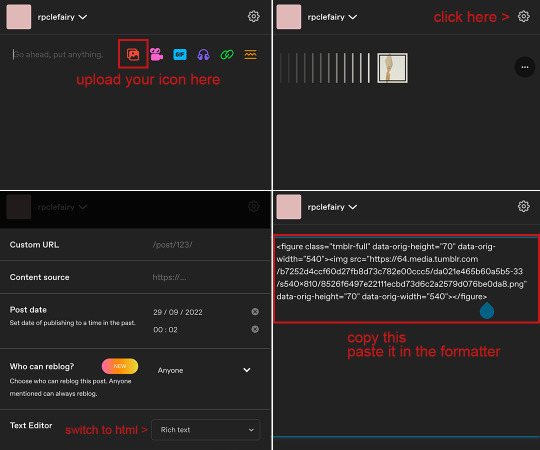
bonus tip + tutorial: uploading icons
save your icons folder to your phone / google drive (and then save to your phone the icon you want to use)
on your browser (NOT THE APP) create a new post
upload your icon
switch the editor from rich text to html
copy everything, paste it in the source code of the formatter.
you’re done!
384 notes
·
View notes
Photo

Hello there! This is my new and (hopefully) improved tutorial on how to upload gifs for a gif pack page! Tumblr has changed in recent years when it comes to how to upload gifs and how they’re formatted (like .gifv coming in and ruining everyone’s day). People in the community have also made the shift towards more decorated and custom gif pack pages rather than strictly gif filled pages. As such, this tutorial will focus on how to prepare your gifs for those codes. Resources will be linked at the bottom!
NOTE: This tutorial is also available as a Google Doc (the recommended platform for reading this tutorial) with full size images that might be easier to see, however I know some users don’t like going outside of Tumblr to view tutorials, so it’s available on both platforms. To read the Google Doc version, please CLICK HERE.
Setting Up Your Gifs
Load all of your gifs as you usually would into a new post. I usually wait until I have around 20 gifs, then I get ready to move them. Moving them over periodically usually helps it feel like less of a strain waiting for a million gifs to load all at once. Make sure all of your gifs are under a READ MORE! This will prevent them from turning into the gifv format!
Once you’ve uploaded all your gifs, make sure to SAVE AS A DRAFT.
Next, you’re going to want to hit edit on the draft, again, this has to be SAVED before you can do the next step.
This is where all the magic happens. What we’re going to do is strip our gifs of any unnecessary code in a few simple steps. First, hit the gear icon at the top of your post and change the Text Editor from Rich Text to Markdown.
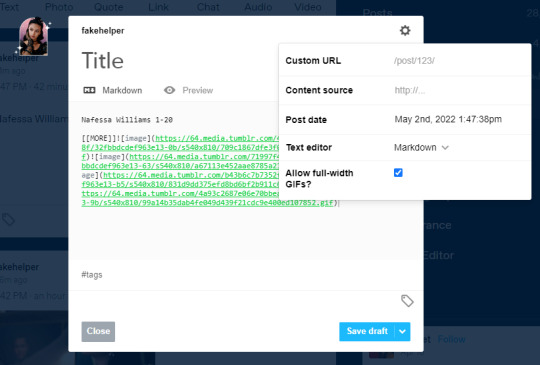
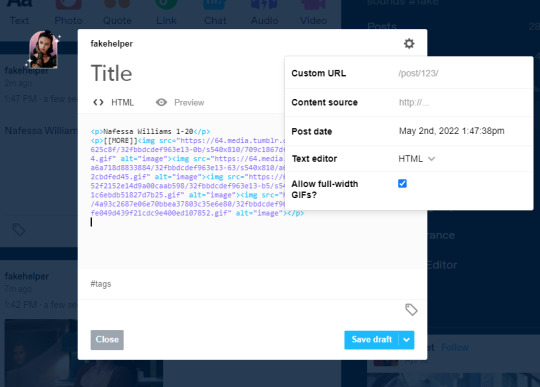
Next, you’re going to change it from Markdown, to HTML
Now, you’re going to want to keep this tab open, and set up your sidepage!
NOTE: If you are using the beta editor, you may require some extra steps to clean up your code! Read more here.
Setting Up Your Sidepage
Now you can create your new page. You can do so by going to Customize and then clicking Add a page (I recommend using a sideblog for this as it can heavily clog your main blog, and if you ever change your main url, you can keep the url of your gif pages the same).

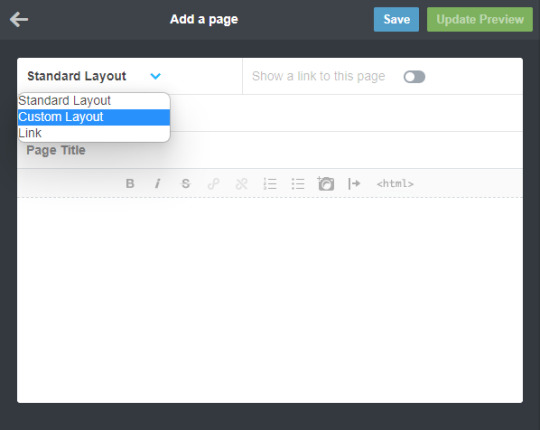
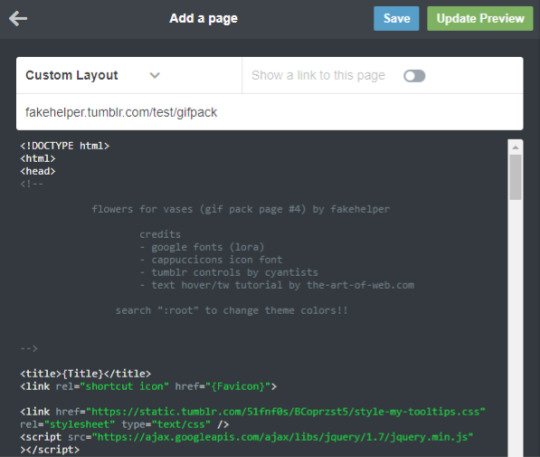
After creating your new page, make sure to change it from a standard layout to a custom layout using the dropdown menu, then give the page a url. You cannot save the page until you add a url.

Okay, now for the next step, you can use any gif page code you’d like! I have a tag here with codes made by many different theme makers to choose from! If you’d like to use one of mine, you can find them here. Today I’ll be using my newest theme as an example. From the post, download the code and paste it into the page. It should look something like this.
Now you’re going to want to find the section to add your gifs. In my older codes, you would be able to find it looking something like this:
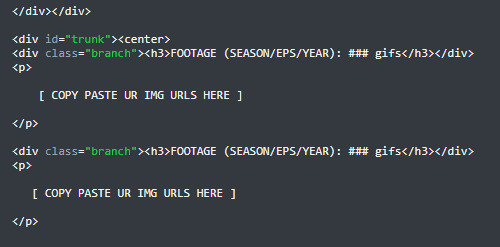
For this theme, however, I used placeholders because of the trigger warning feature. To figure out more on how to use that feature of the theme, please read the tutorial here. For the sake of this tutorial, however, you can DELETE THESE PLACEHOLDERS (highlighted by the blue box, make sure you keep the <p> and </p> tags).

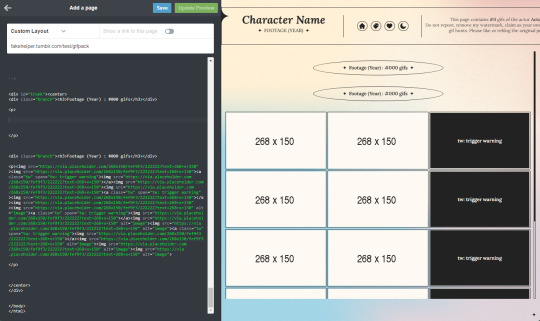
Once those are deleted, you’re going to go back to your tab with your gifs and select everything after [ [ MORE ] ] , but before the </p> tag, then copy it.

Now, paste your code in between the <p> and </p> tags. Hit Update Preview to make sure it’s loading correctly. Every time you add gifs, make sure there are NO SPACES between the img links. (aka make sure those < ... alt=”image”><img src=”...> are back to back instead of < ... alt=”image”> <img src=”...> leaving a space in between).
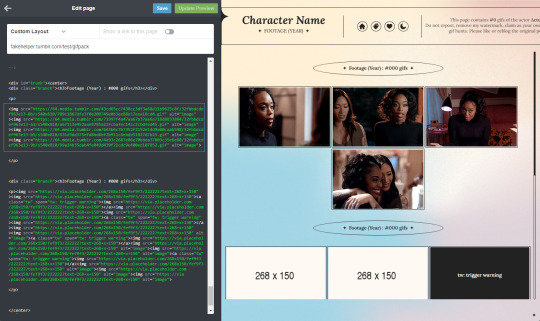
And that’s all! Make sure to change the other parts of the theme necessary (titles, fc info etc) and you’re good to go! Always make sure to hit save before you navigate away!!

Resources
My Gif Pack Page Codes
Recommended Gif Pack Page Codes (tag)
Previous Tutorial (How to upload to a Standard Sidepage)
Barebones Code (for previous tutorial)
#rph#rpc#rp tutorial#rp guide#gif pack tutorial#gif pack guide#mytutorial#fakecontent#PLEASE READ THE GOOGLE DOC IF U CAN INSTEAD#it's way easier to read lmao
105 notes
·
View notes
Text
˚꒰ 🏹 DISCORD FORUMS TUTORIAL♡
i'm not sure if people have seen or tested out the forums on discord but i thought i'd make a tutorial on how i use it for roleplaying since i found it super fun and helpful for organization purposes!
so what are forums? discord describes it as "a space for organized discussions". much like threads, the discussions can be contained in one post which makes it easy to keep your topics in order. the part that i find most useful is that you can organize your post by tags and filter through them! now in order to get forums in your server, you will have to enable 'Community' on your server. so let's start!

♡ . ) first thing you'll do is open your server setting. there will be an 'Enable Community' that you can click on and it will take you to a page like this
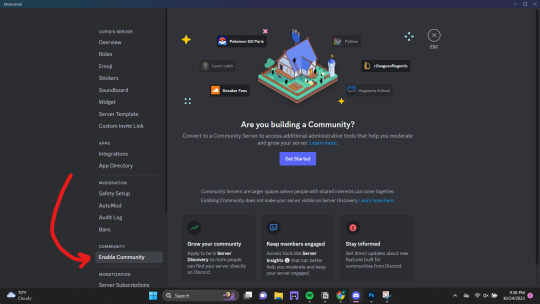
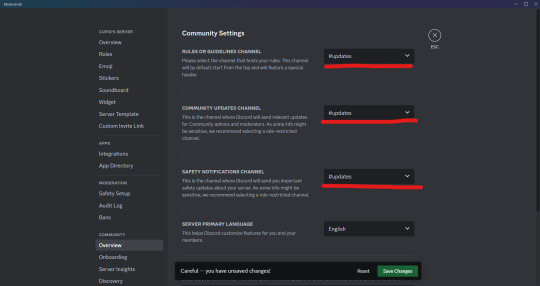
♡ . ) once you click 'Get Started' it will take you through a series of questions and system settings. you will need at least one "default channel" where discord will send automated updates. this channel is necessary if you want to use forums.

if you continue with the default settings, discord will automatically create two channels for you: one titled 'rules' and another titled 'moderators-only'. the announcements made whenever there's an update as mentioned above will be sent to the latter.
NOTE FROM CUPID ! i personally like to make a single channel titled something like 'updates' and keep it locked. this can be done before or after enabling community, you will just need to change the settings to go to the new channel first.
♡ . ) once you have community enable, you're free to make all the forums you want! when you go to create a new channel, 'forums' will show up as an option like this

for this example, i'm going to show how i set up my muses' profiles for 1x1 writing server like a roster, but you can also do this for single muse / threads / sms / etc.
♡ . ) when you click into the forums channel you created, you will see a landing page like this. there are instructions on how to navigate the channel as well so feel free to read those as well! the first thing i like to do is create tags. you can open that setting by clicking either of these buttons.
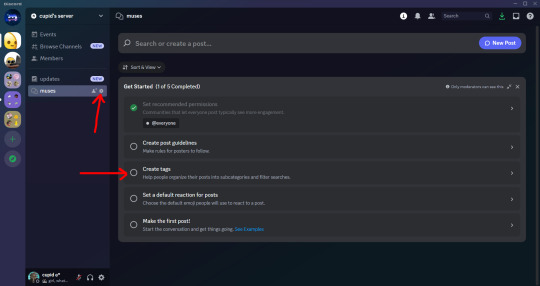
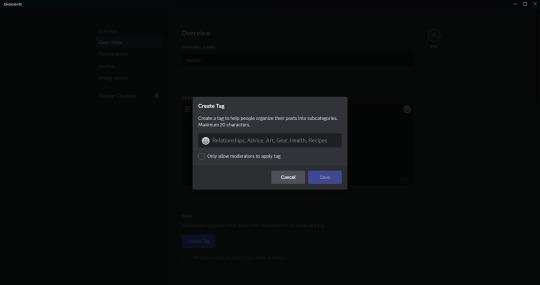
(navigate to the 'Tags' section and click 'Create Tag' if you need to) it will open a popup box like this. i like to create a tag for every muse that i want to add to my roster and you're able to add 20 tags!
when you're finished, they will be listed as you see below. there are other options in forums settings that you can play around with including a 'default reaction' emoji, 'slowmode', layout and sorting option, age restriction and 'hide after inactivity'. all these are based on preference!

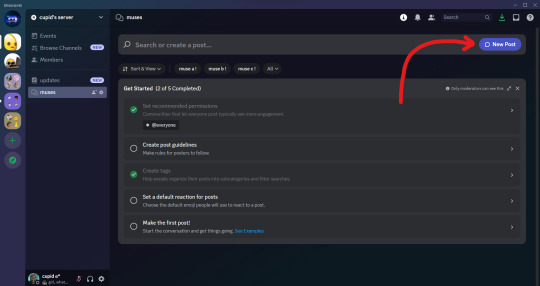
♡ . ) once you've saved your setting changes, you can leave this page and are now able to make your posts by clicking 'New Post' on the upper right hand corner.
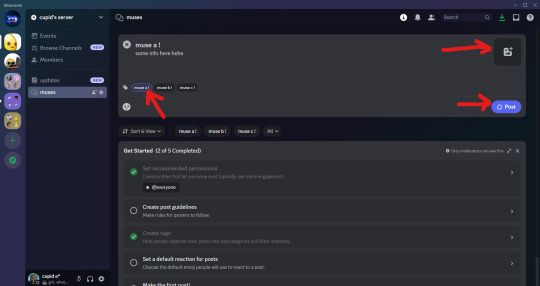
this is where you're pretty much able to do whatever suits your style including formatting how you like and adding photos, all you need to make sure to do is add the corresponding tag to the post! once you're finished making it look how you want, you can click 'Post'
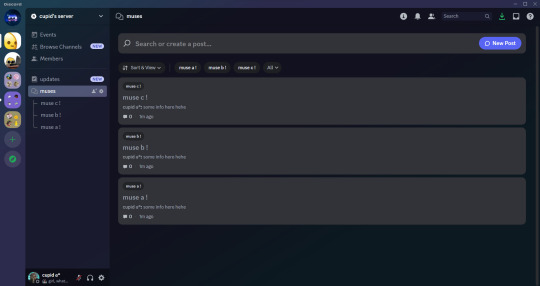
they will appear in the channel like this!
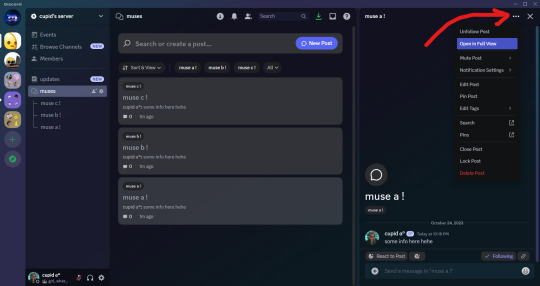
♡ . ) and by clicking on a post, you will be able to open it in a side view like this. if you want to see the post in full view, you will click the three dots in the upper right hand corner of the side view and then choose 'Open in Full View'.
you're now able to add more messages within the post! for me, i like to add stats of my muses and headcanons that may be useful when i thread.
NOTE FROM CUPID ! one set back i found is that you are not able to use threads within a forum post so it may get a bit cluttered depending on what you send in a forum post. so if you are wanting multiple different sections for one topic, i suggest creating a forum instead. for example, if you are wanting to add musings, faceclaim pics, headcanons and stats all for one muse, i would create a single forum post just for that muse instead to avoid having important info getting lost!
and that pretty much covers how i use forums for discord rp! i encourage you to play around with it to find a style and format that best works for you. and if you have any questions, you're more than welcome to send it to my inbox. happy writing everyone♡♡♡
157 notes
·
View notes
Text
TUTORIAL: cutting beta editor posts while mobile on android
hello everyone !! i stumbled upon this super easy and straightforward method to cut posts in the beta editor while mobile for android users and wanted to share !!
it requires the installation of a mobile extension compatible browser (firefox or kiwi) and then everything else is done natively within the mobile browser version of tumblr itself. it uses the exact same process with xkit rewritten as the desktop browser site — no need to toggle back and forth between things. after the set up, you can use tumblr to roleplay on mobile almost identically as you do on desktop !!
this method is currently only feasible on android. the bottom of this tutorial details what my friend and i tested on iphone for those interested in troubleshooting this for ios further.
read on for the tutorial on how to set everything up !!
tldr; if you're an android user, you can install a mobile browser that will let you use xkit rewritten. this essentially lets you perform the same workflow as desktop on mobile to cut posts.
keywords: mobile rping, beta editor, cutting posts on mobile
written 12.19.2023. edited 12.27.2023.

**WARNING** ANDROID ONLY TUTORIAL
this does NOT work with ios.
this tutorial was written by a samsung galaxy user so all screenshots are specific to that phone, but it should all look very similar for other android users.
Step 1. Install a Mobile Extension-Compatible Browser
this method hinges on using a mobile browser that allows for the usage of chrome or firefox extensions on mobile.
firefox on android allows for use of many of their extensions on mobile, including xkit rewritten. there are also other integrations between their web and mobile interface as well.
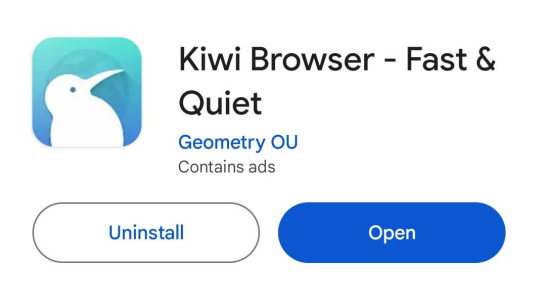
the european browser kiwi browser allows for installation of many google chrome-based extensions on mobile. it does not integrate to google chrome in any other way. if you choose kiwi, make sure the icon is of kiwi the bird not the fruit (shown below).
12.27.2023 edit. on my phone ( samsung galaxy ), i've found that formatting is a little easier in kiwi. italics, bold, and strikethroughs all transfer from my notes app when i paste into kiwi ( but not when i paste into firefox ). also, in kiwi, when i press and hold and select "select all" the floating text dialogue disappears and i'm able to easily select the small text tumblr option. the floating text dialogue in firefox doesn't disappear when you select "select all" which makes using the tumblr formatting options difficult. however, you can still achieve small text in mobile firefox by going into html mode and adding "<small>" to the beginning of each paragraph.
pick whichever you like. i've tried both on my phone and in terms of mobile tumblr browser and xkit rewritten they appear to function identically for purposes of cutting posts.


Step 2. Install & set up XKit Rewritten
for firefox...
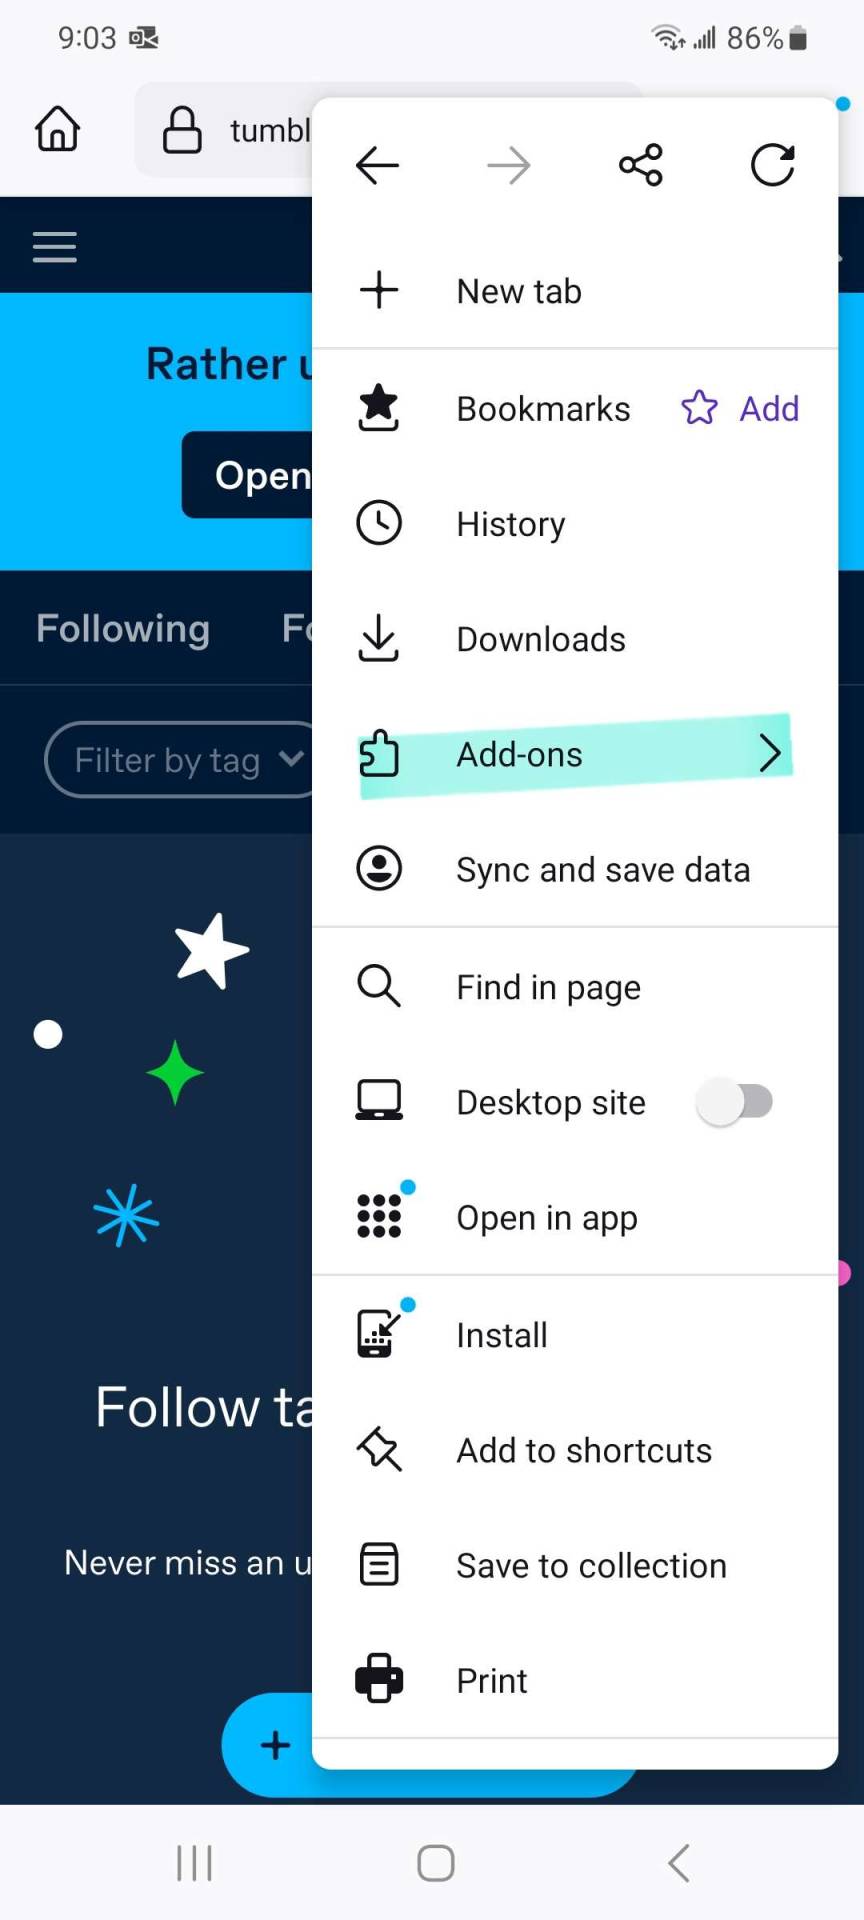
click the kebob menu (three vertical dots) in the upper righthand corner. click "add-ons".
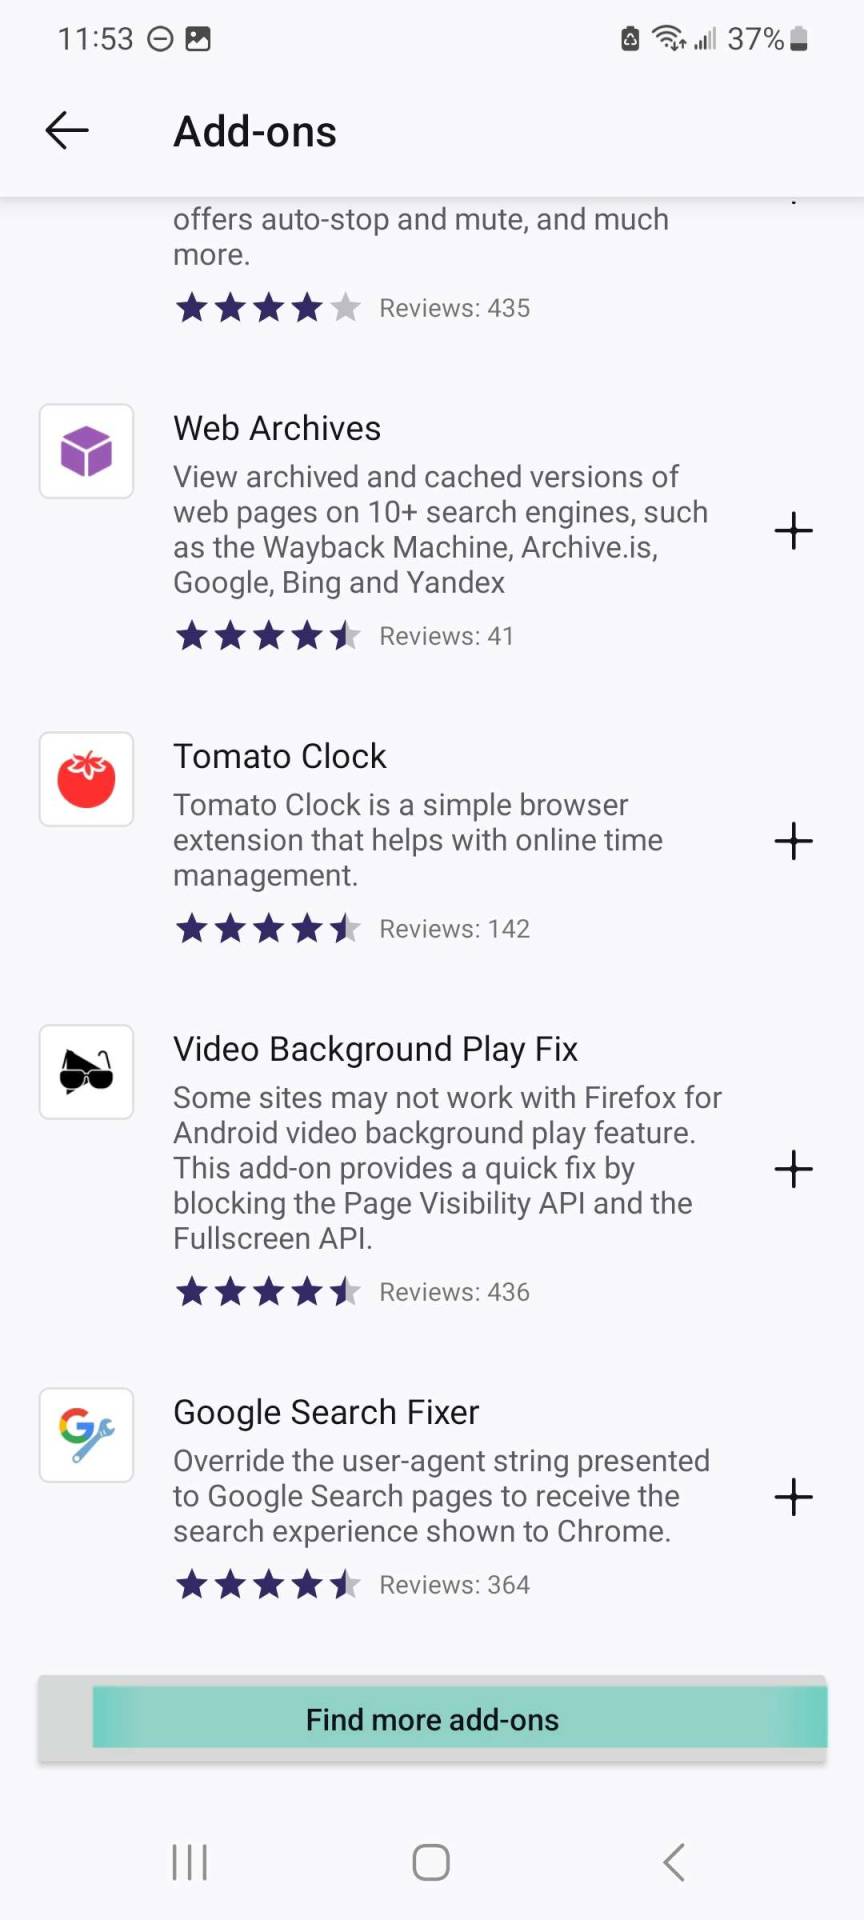
scroll to the bottom of the page that pops up and click "find more add-ons."
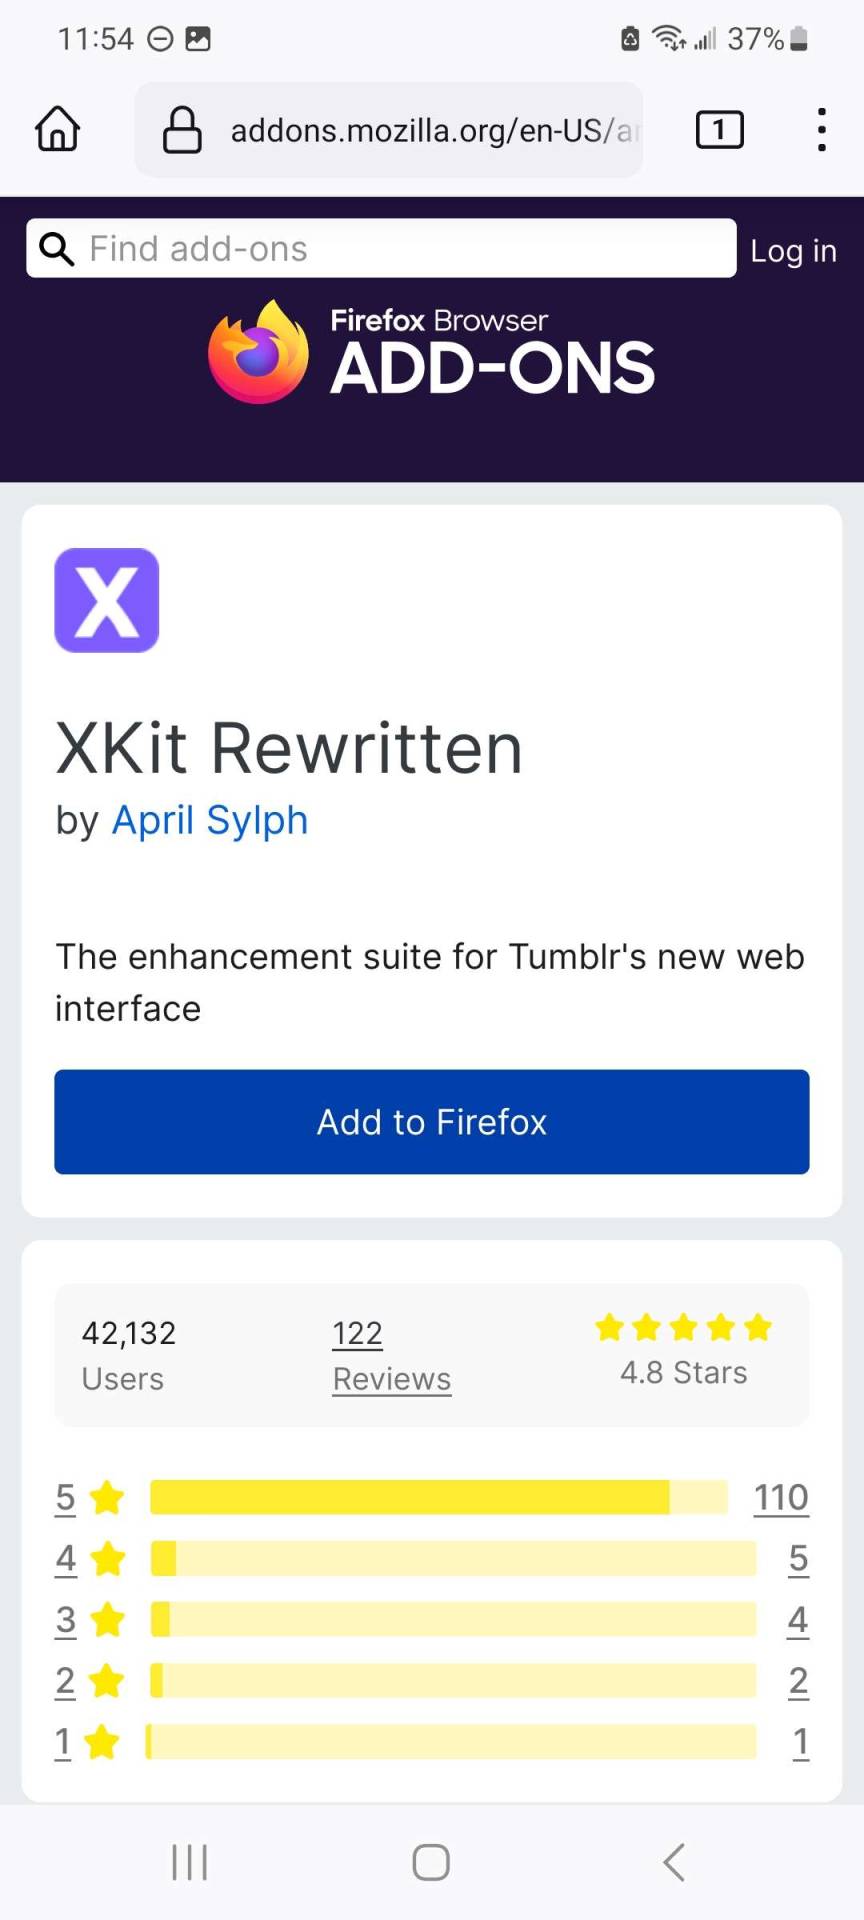
search for xkit rewritten and click add to firefox. (sidenote: i also recommend picking up ublock and privacy badger while you're here).

once xkit rewritten is installed, go to tumblr.com in firefox and log into your account. we will now set up xkit rewritten.
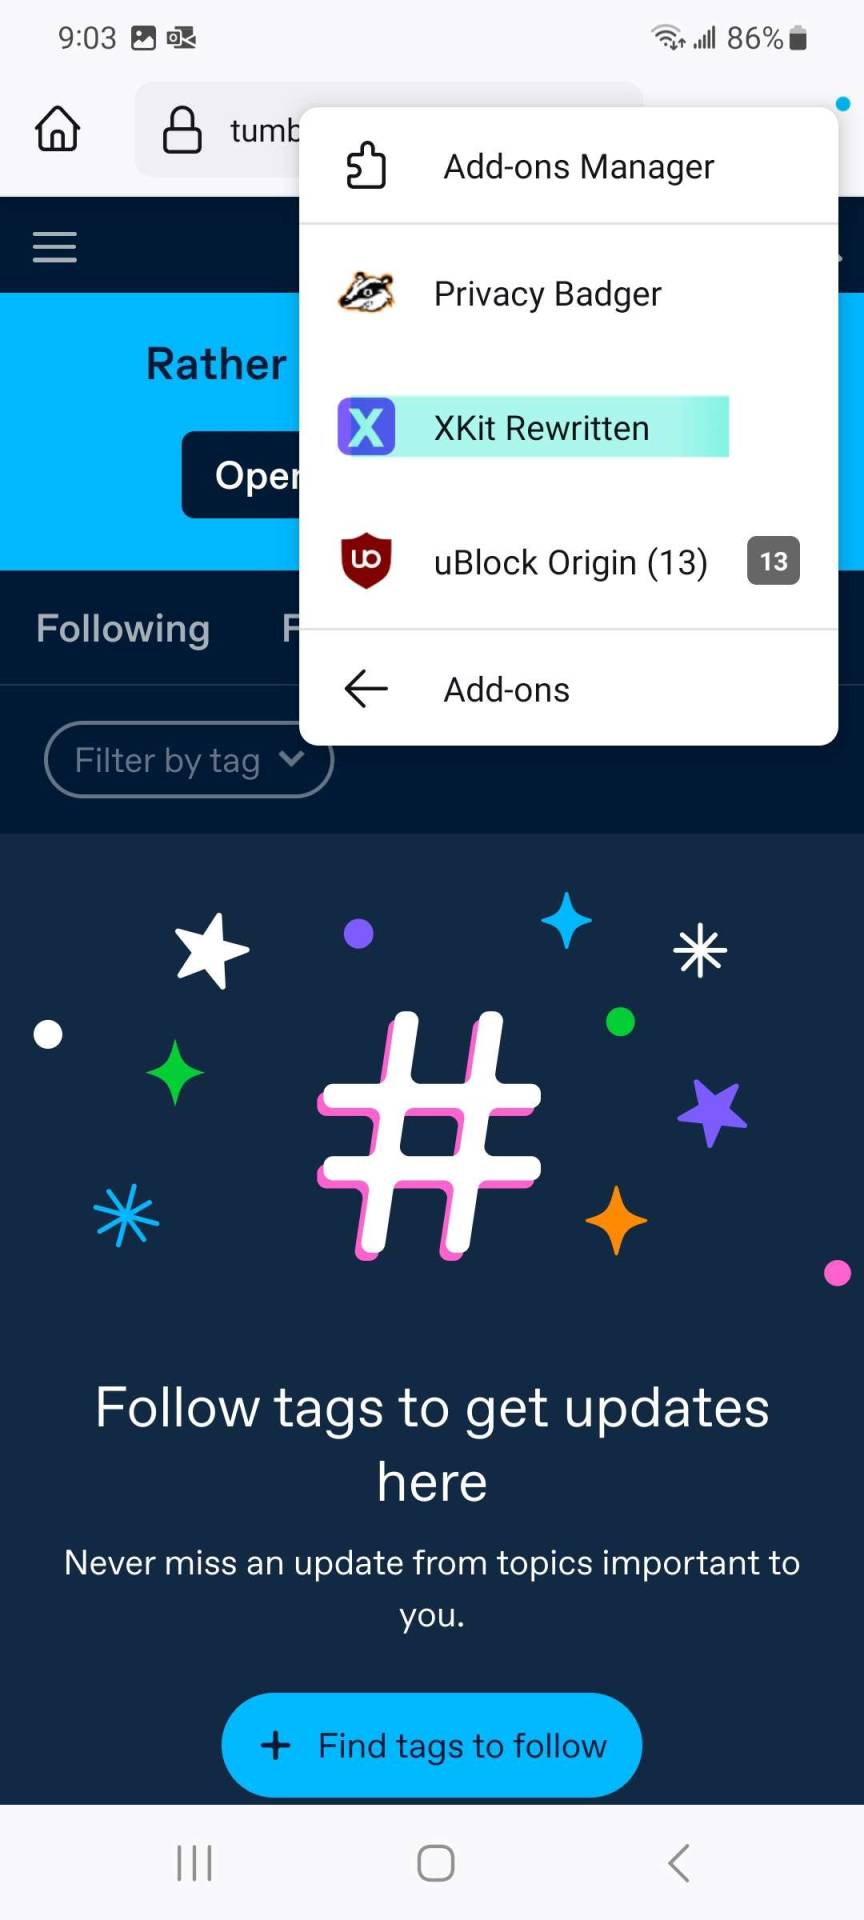
click the kebob menu and click "add-ons" again. there should be an arrow next to "add-ons" this time. clicking it will open the list of extensions added to firefox. find xkit rewritten and select it.
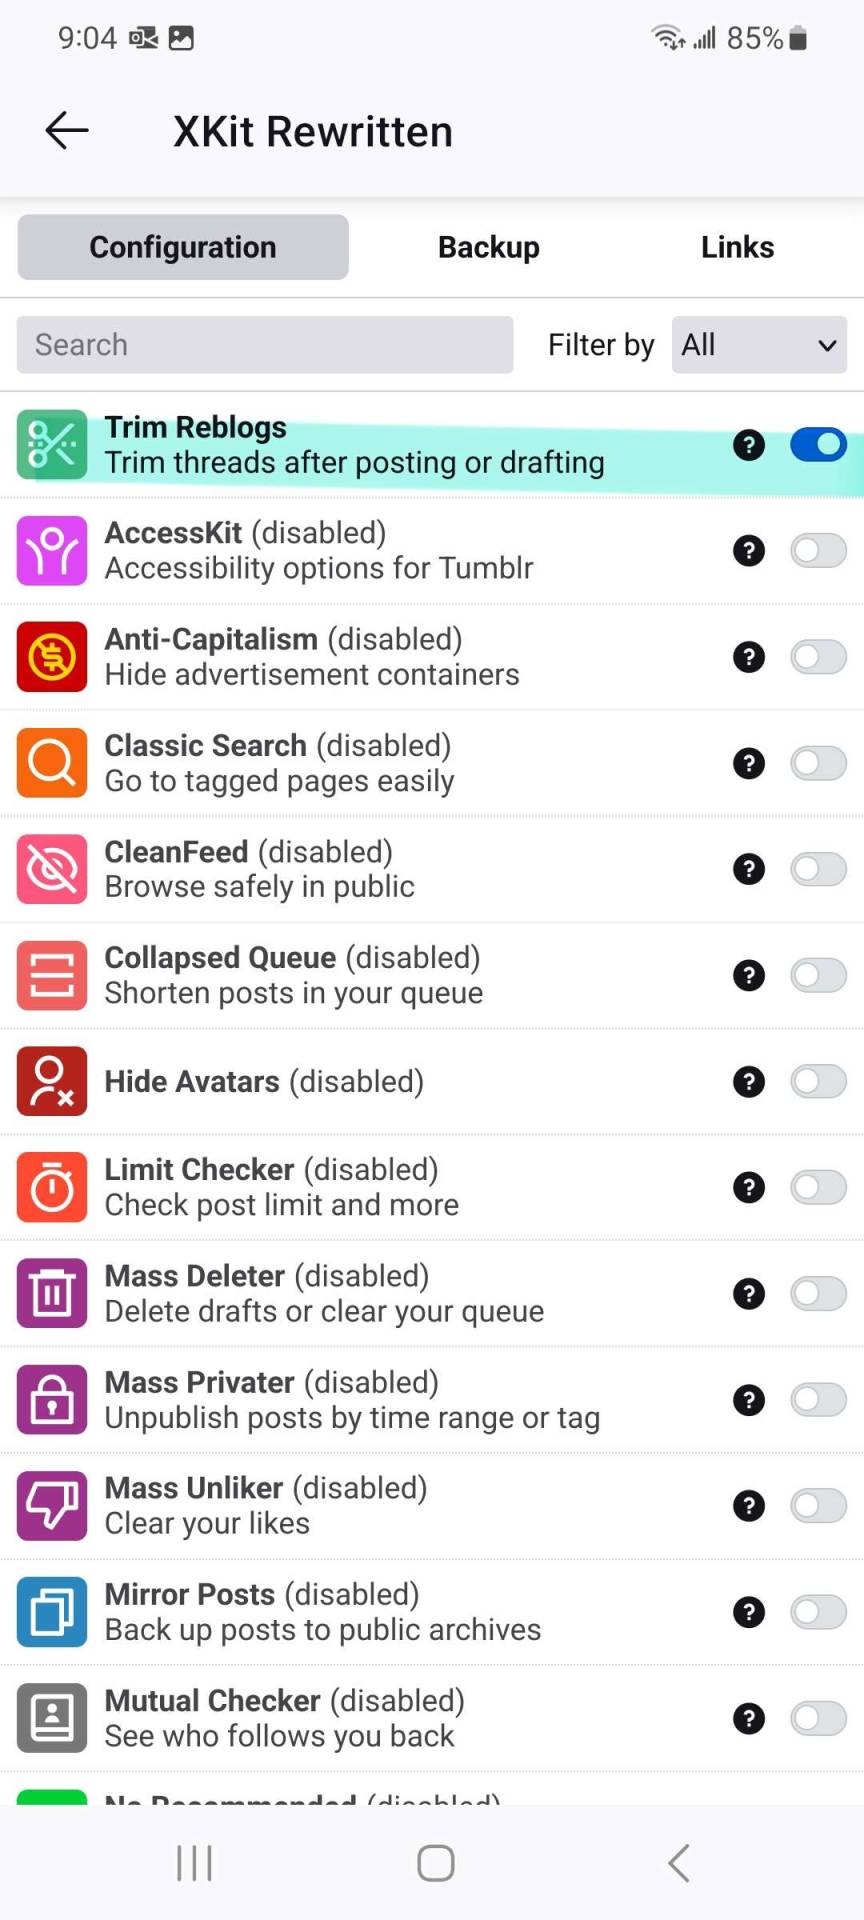
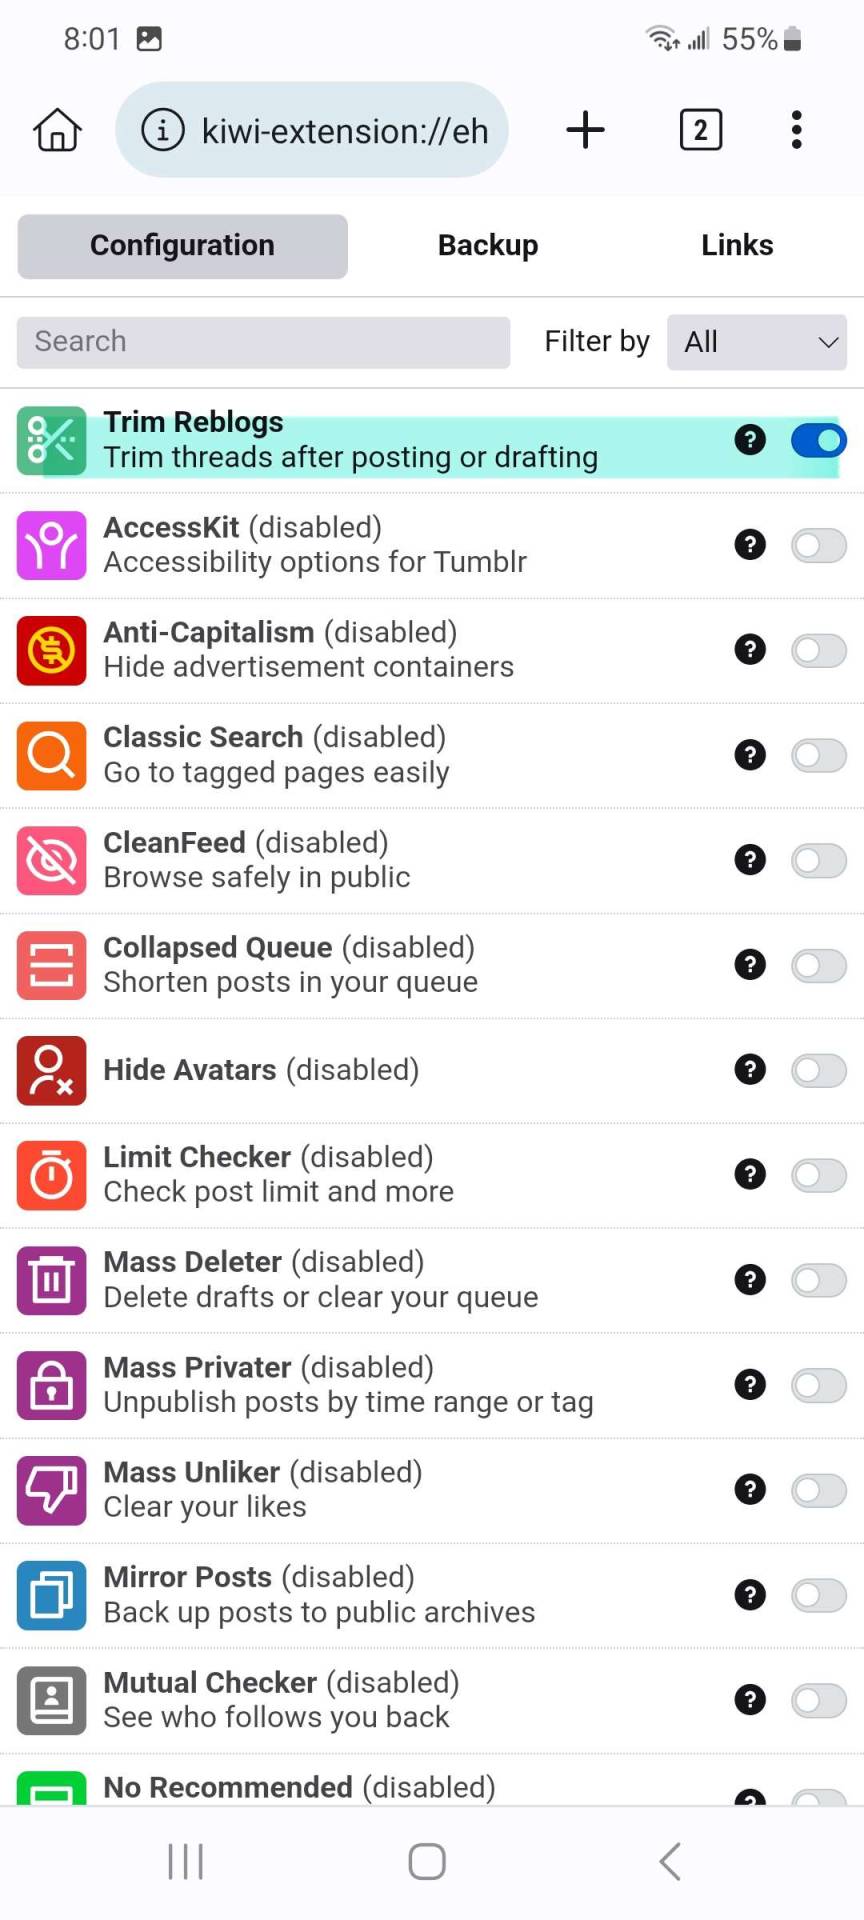
this will open the configuration menu for xkit rewritten. scroll until you see the trim reblogs option with the green scissors icon and toggle it on.
for kiwi (google chrome extension compatible)...
navigate to the chrome extension store (https://chromewebstore.google.com). you may have to type this in manually or head to google and search for it. in the extension store, search for xkit rewritten.
you will be taken to the usual chrome extension installation page as you are on desktop browser. go ahead and click 'add to chrome'.
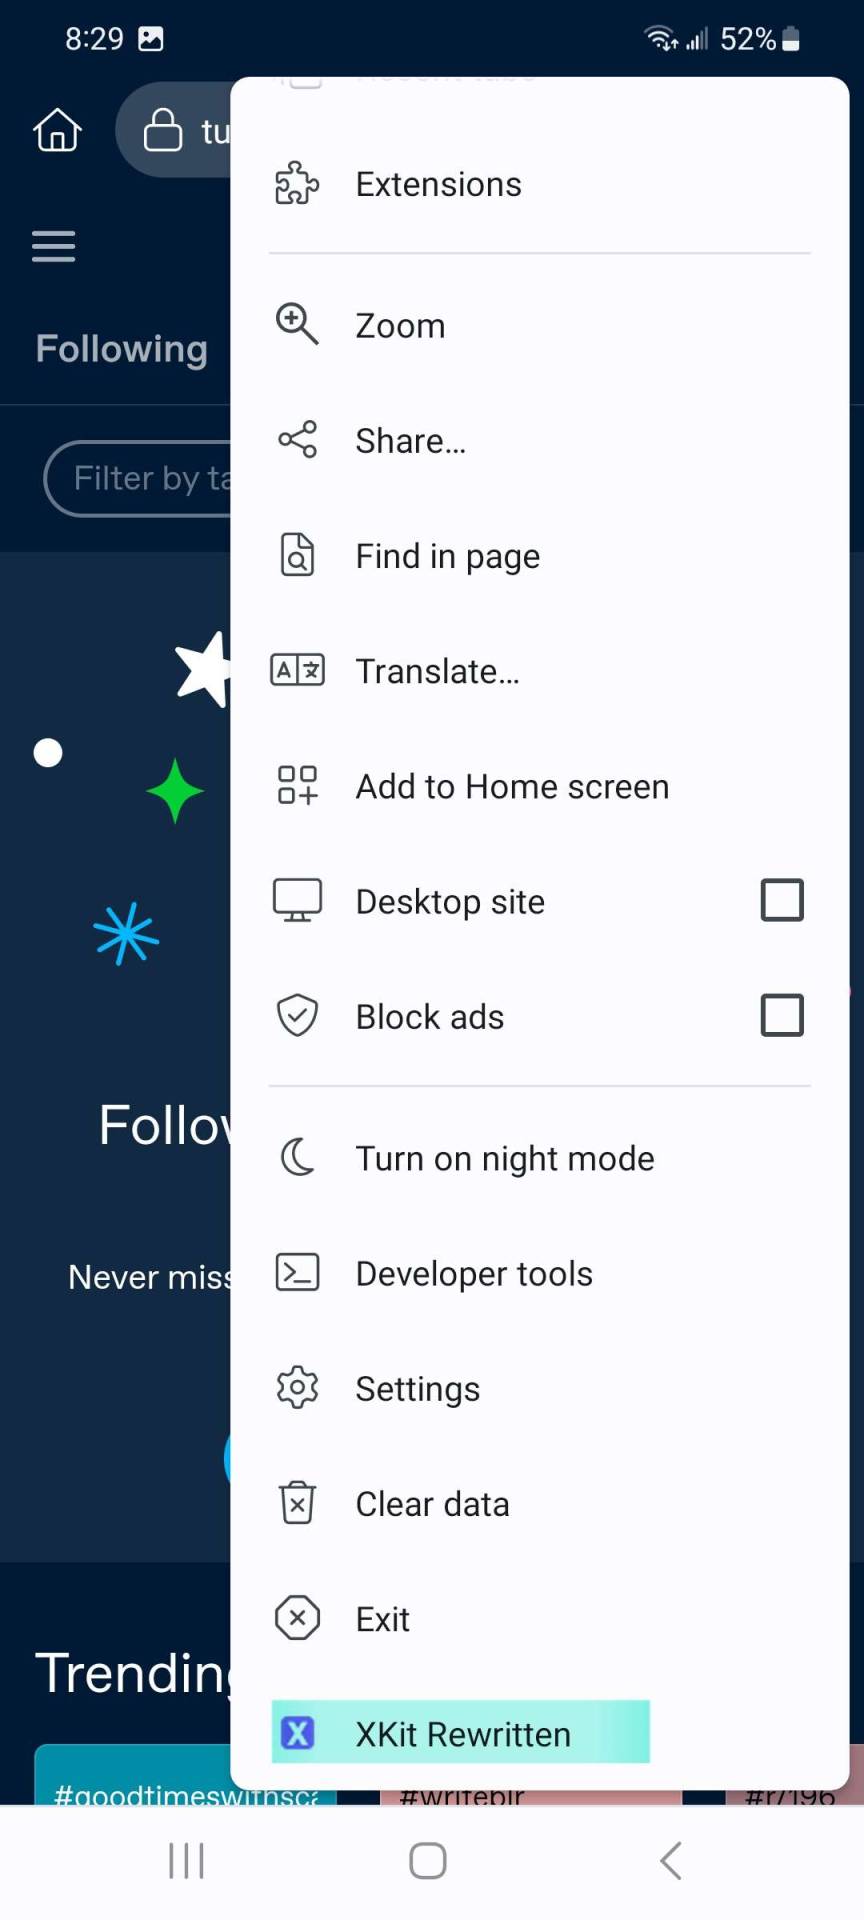
go to tumblr.com in the kiwi browser and log into your account. we will now set up xkit rewritten. look for the kebab menu (three vertical dots) in the upper right hand corner of your screen and click it.
you will now see the browser settings. scroll all the way to the bottom. find the xkit rewritten option and click it. if after clicking the menu, you only see options for a new tab, incognito mode, settings, etc, make sure you are actively in a tab, not on the page that allows you to navigate between tabs.
clicking xkit rewritten will open a configuration menu similar to the one on desktop browser. scroll through the options and toggle on trim reblogs, the one with green scissors icon (as well as any other desired xkit rewritten settings).
for both browsers...
refresh your tumblr page and navigate to your original posts. at the bottom of your posts you should now see the trim reblogs' scissors icon.
Step 3. write and cut a post
the set up is now complete !! you should now be able to write, draft, and cut a post as you do on desktop browser.
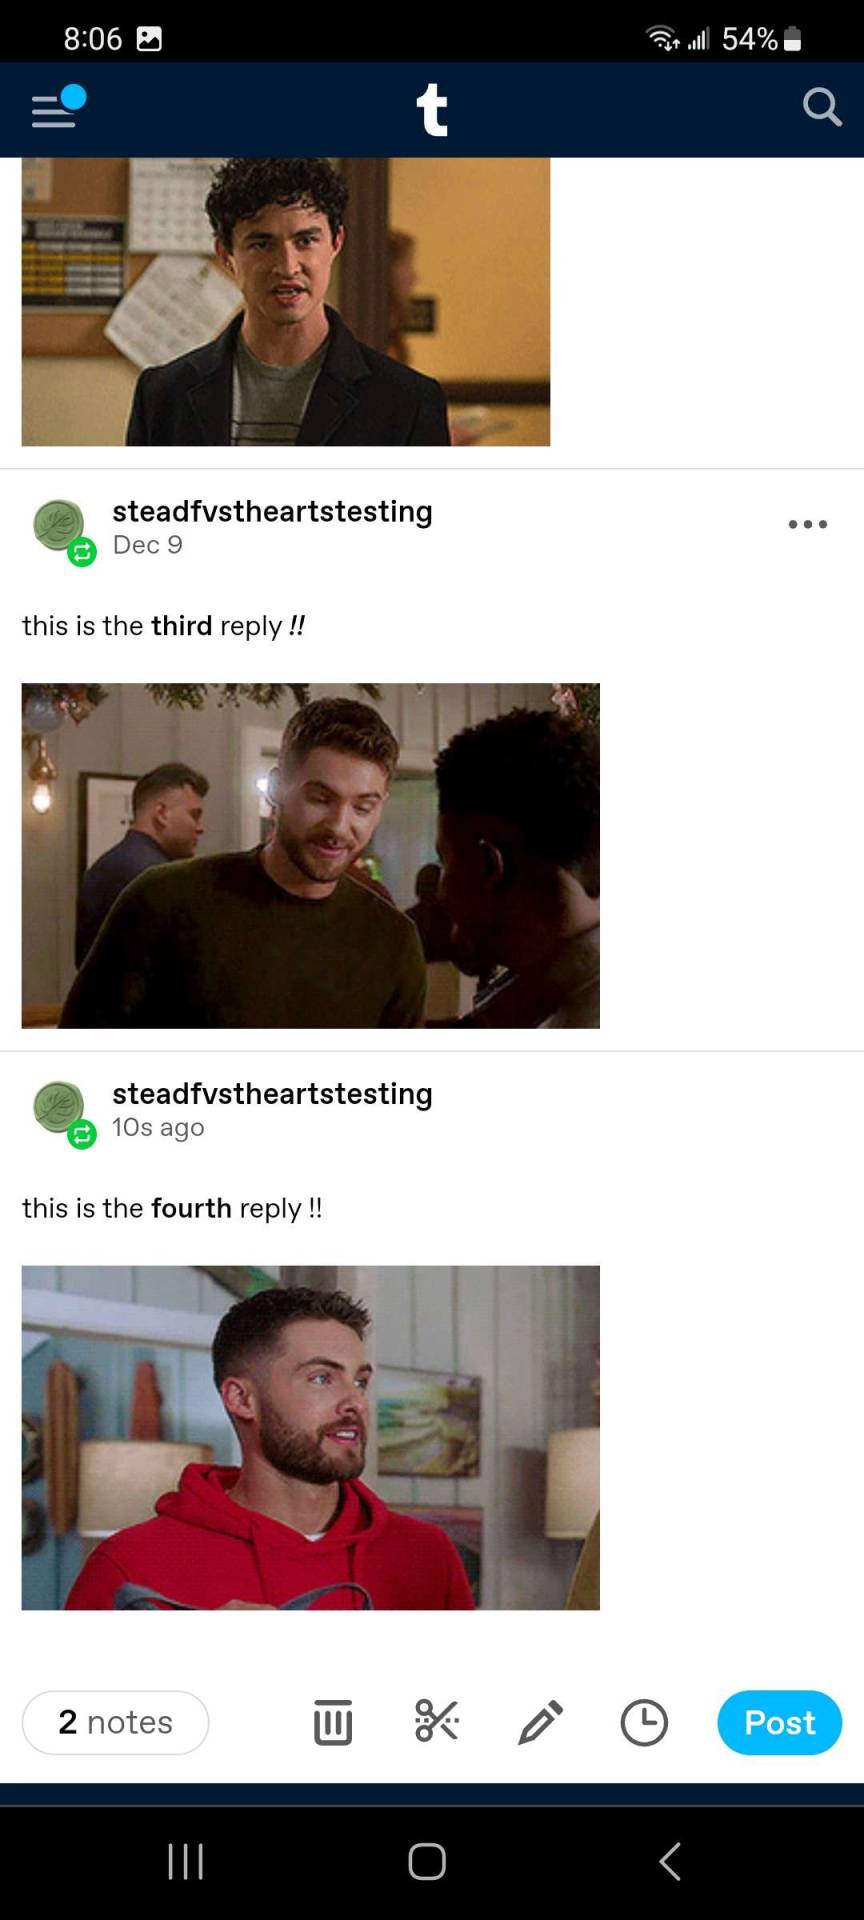
a refresher : write your reply, draft/queue/schedule your post, navigate to where you drafted/queued the post, click the scissors icon, make sure the first box is checked, and click "trim!" . if you would like a more in depth tutorial on how to step through the actual cutting process with xkit rewritten's trim reblogs, check out my other beta/xkit rewritten tutorial here.
images of how things look on mobile are below. you are also able to paste in a gif with the image link and remove the hyperlink text as you do on desktop.
this ends the tutorial portion !!
Notes on iOS
it appears this method will not currently work with ios as apple restricts things with third party extensions in its app store. ( sorry iphone users, we really tried to make it work. take up complaints with apple ). here are the things my friend i tried to get xkit rewritten installed/working on an ios mobile browser.
1. firefox is not able to provide their extensions in ios. the mozilla support page notes: "Apple has created a proprietary iOS extension system which is incompatible with Firefox add-ons and extensions for Android, Mac, Windows and Linux."
2. the kiwi browser that shows in the apple store is not the same one as the one in google play. it should be an icon of kiwi the bird, not kiwi the fruit. the fruit one does not work.
3. we tried the orion browser on iphone and were able to get pretty far but no dice. they were able to install xkit rewritten through orion's firefox extension library but while the configuration menu showed, the xkit rewritten changes did not take on tumblr mobile browser. orion does admit not all extensions work at this time and this may change in the future.
4. another potential method is to get access to xkit rewritten by using chrome's remote desktop access (a tutorial here), but we did not try this.
if anyone is able to figure out a way to install and execute xkit rewritten on ios please feel free to write your own tutorial and please let me know — i would be happy to link it with this one. kindly, please also consider linking this one as a tutorial for android users in it as well.
this concludes the tutorial !! please give this a like and/or reblog if you found this useful.
thank you for reading and happy rping !!
24 notes
·
View notes
Text
HOW TO GET YOUR OWN SCREENCAPS FOR MAKING ICONS / GFXs / ETC.
being able to find pre-made icons of whomever you want to roleplay as can be nothing short of tedious, right? well, that's why i've put it upon myself to make this tutorial! because idk about you guys but i prefer making my own icons because mine are all 150 x 65 because i simply like and prefer rectangular icons to square icons. so let's get down to business, yeah? and like pretty much all of my lengthy tutorials, this will be under a READ MORE.
STEP 1: PROGRAMS
the main program you'll need for this is VLC Media Player. the reason for this is because it has a built-in feature that allows you to screencap any video you play. now if you're roleplaying as a video game character and you need the cutscenes from said game ( or video game movies as i call them if they're all together in one video ) then i definitely recommend you getting 4K Video Downloader. the free version allows you to download up to 30 videos / day for free whereas the license grants you an unlimited # of downloads / day off of youtube.
STEP 2: THE SETUP
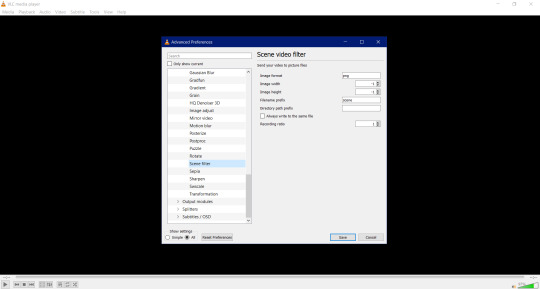
after you've install VLC Media Player, get it going and go to Tools > Preferences. once you've done that something like this should pop up.
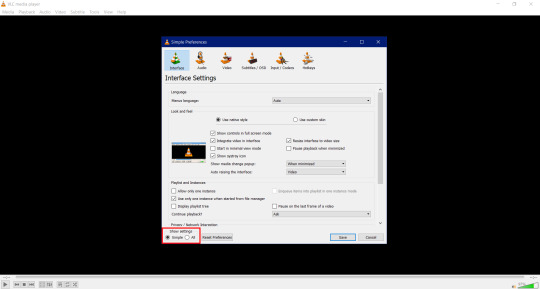

now do me a solid and click All in the box that's highlighted in the red box. by doing so will result in this popping
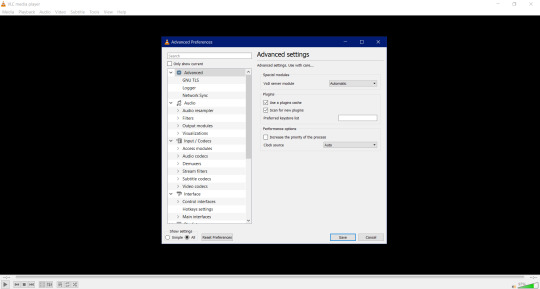

now scroll all the way down to where you see Video and then click on Filter. once done you'll have this pop up.

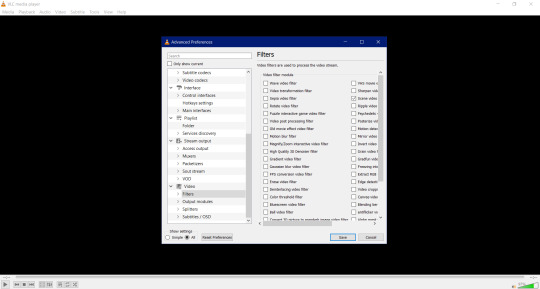
once you have this window up scroll the sidescroll all the way to the right until you see Scene filter video. it'll be third from the top as highlighted down below. check it and then click Save.


STEP 3: WE'RE ALMOST THERE
so once you hit Save, the box closes. there's nothing to freak out or worry about because that's perfectly normal. what we're gonna do now is have you go to ... like ... your Pictures folder and make a folder named after whatever you're getting screencaps for. if you're needing screencaps for, say, crisis core reunion then you'll create a new folder and name it something like ... say ... Crisis Core Reunion Screencaps. now do me a favor and double click on the folder so that you're now actually in it. you'll see why in a minute.
i need you to go back to Tools > Preferences > All > Videos in VLC Media Player. once you do that i need you to click on the little > right next to Filter so that a little drop down menu will pop up. it'll look a little something like this.

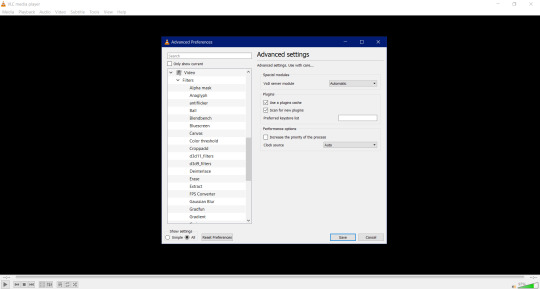
now scroll all the way down until you see Scene filter and click on that. once you've clicked on it this window will pop up.

remember when i told you to keep that folder up and running for Crisis Core Reunion Screencaps? well, this is where it comes into play! click on where it says This PC > Pictures > Crisis Core Reunion Screencaps , highlight everything , and the press CTRL + C to copy it. and for those of you wondering ... ... ... ... ... it'll look a little something like this: C:\Users\PROFILE\Pictures\RP Stuff\References. that's perfectly normal!
now i want you go pay close attention to the box i have highlighted down below. why? because the original number they had for the Recording ratio is ridiculous. switching the number to 1 means that it'll take one ( 1 ) screencap every second! and the number of screencaps you'll have will determine how long your video game movie is.

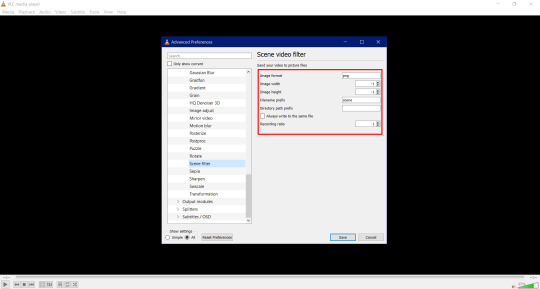
now you're probably wondering why the Directory path prefix is empty. of course you are. why wouldn't you be wondering it? well, that's where you're putting the directory for the directory path you just copied earlier! click on the empty box and press CTRL + V to paste it. once finished, click save and you're good to go.
STEP 4: GETTING THE ACTUAL SCREENCAPS
now that you've gotten all of the hard stuff done and out of the way, this is when you click on Media > Open file and then click on that Crisis Core Reunion movie you downloaded using 4K Video Downloader. once you have that going, the screencapping will commence and all you have to do is just minimize VLC Media Player and go on your merry way until the "movie" is done!
this is all you have to do to get screencaps. and all you have to do every time you want to get screencaps for something super specific is to make a folder for said thing, copy the directory path, and paste it into the Directory path prefix.
i'm hoping this tutorial was simple enough and easy to understand for y'all!
#how to#tutorial#tutorials#rp#rpc#roleplay#roleplay community#rpc tutorial#rpc tutorials#rp tutorial#rp tutorials#screencaps#screencap#icon#icons#iconing#gfx#graphics#photoshop#making icons#making
207 notes
·
View notes
Note
I'm new to tumblr and i'm not sure how rp bandwagons work on here haha.
I know i have to reblog them, but i'm not sure what happens next or where to put the starter 'n such. so sorry if this doesn't make sense LOL.
hi there! gotta be honest here, i have no clue what bandwagons are ( i tried looking it up but all i gathered was that it's something used in twitter rp ) so i'm not exactly sure this'll be the right answer. but i hope this will be of help for you anyway and is what you're looking for. if not, feel free to send me another ask and i'll try to give a better explanation.
after you've set up your blog and gathered some followers, there are two easy ways to get interactions going. technically there are more, but these two are the ones that work the quickest and make you start doing stuff on your blog.
starter calls. make a post titled starter call in which you give people a chance to request a starter from you. they can like or reply to that post, which in turn shows you they're interested in writing with you. now you can either reach out to plot with them ( if you want to ― usually, starter calls are more of a spontaneous thing that isn't really planned out, although it can eventually evolve into something deeper ) or just make a new post / starter for them. you can keep it simple with just a line of dialogue ( remember to make open dialogue and give your partner something to work with; roleplaying is a back-and-forth that requires some kind of effort being put into it ) or write maybe a paragraph or two ― whatever you feel like doing. it's best to tag the person the starter is for somewhere in the post ( you can do that by using @ and putting the username right after the symbol ) so they'll hopefully see your post. from there on, they reblog your post with their reply, and afterward, you reblog your reply to their post, and so on and so on.
memes. another easy way to get things going is by reblogging memes / sentence starters to your blog. you can find a variety of them either by looking up rp memes ( or if you want something more specific, e.g. angst starters, try looking up that ) and all you'll have to do is to click on the reblog button and put them on your blog. now your followers can send you one or multiple of these through your inbox ( which reminds me that you have to make sure that is turned on. to check that, go to your blog settings, scroll down until you see the switch titled "let people ask questions" and make sure it's on ) for you to reply to. as for your reply, you can either directly do that by accessing your inbox ( if you're on desktop, it's the little mail symbol on top / on mobile you can access it by clicking the profile button on the far right, then going to the settings at the top right and clicking on inbox ) and clicking answer or you can make a completely new post in which you'll copy and paste the sentence starter that was sent to you, and then do basically the same thing i explained for the starter call. write your reply, tag the person who sent it to you in it, and let the reply thread begin.
anyway, it might seem a little daunting at first but once you've got the hang of it, it's really simple and quite fun.
37 notes
·
View notes
Last Seen Blogs