#rresources
Note
Hi! Do you mind sharing your coloring tutorial or tips? especially for the animation ones, they're so good! your gifs are crisp and HD
hi, anon. tysm! 🫶 i don't mind at all since i’ve gotten more than a few requests from before, ig it's time to give it a go. (more) details are under the cut. 😁

before we start, i want you to take note of the following things that will be helpful in the process of making/coloring gifs.
if you want to get the know-how on making gifs, @redbelles did us a solid and gave us this comprehensive guide that will save me the time for explaining lmao. 😅✌️
make gifsets without skipping frames. keep frame delay 0.05 and 0.06 for less than 25 frames. anything more or less is too fast or too slow. additionally, it's also important to note that if you're dealing w videos that are faster than 30fps you change the frame delay to 0.04.
gif using the the new dimensions (in this tutorial i used the dimensions of 540px x 510px since it's all about big gifs now 🙄).
use the standard sharpening settings (smart sharpen, amount 500%, radius 0.3px, remove gaussian blur and tick more accurate) also note the sharpening settings for 2d as you've specifically requested.
you can use action that will convert your gif back to frames and set your timing to 0.05 with a single click. basically photoshop will follow out all of these time-consuming steps for you! just download the action and double click it. it should now be added to your list of actions. to see your actions, go to window > actions. find the folder that says "GIF ACTION" and select the lines that says "CLICK HERE" and voila! ps will do all the hard work for you.
the coloring on your gifs will look good if you have a good base so try not to skip on video qualities. use high quality copies like 1080p or 2160p (4k ones are good) the higher the gb the better. it makes coloring so much easier and reduces grains.
*cracks knuckles* let's start!
for 2d animation's sharpening settings, it usually varies so i just move the amount around and see what looks or works better for a specific gif. i used amount: 189 and radius: 0.2 for this ponyo gif. anything can work between 189 to 350 for me but i maintain the radius at 0.2. again, you can just play the amount around until you find the one that looks good for your gif.

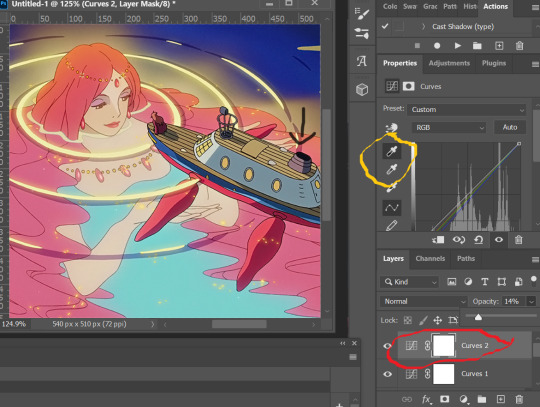
when i’m making gifs. i look for that notorious contrast between the light and dark parts. i think it gives life to the gif- so exposure, levels and curves are best to achieve that. for curves, just go to layer > new adjustment layer > curves. this layer is going to help brighten up the gif in certain areas, and darken others. select the white eyedropper. click the lighter part of the gif like the white/light part of the ship.
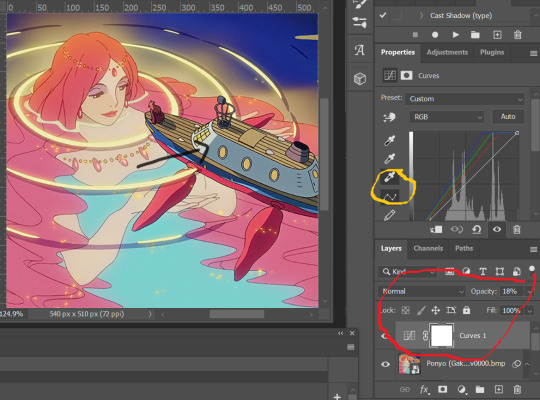
next, select the black eyedropper and click on a black/dark area of the gif (refer to the arrow bc i don't know which part of the ship is that called lmao).
you can skip the black eyedropper if you're already satisfied w the result of the white one.
color balance and selective color are your two best buddies. they’re great when you’re trying to change some tones or specific colors of the gif, like the skin tone which is very tricky.
using selective color is pretty simple, here’s a really useful guide:
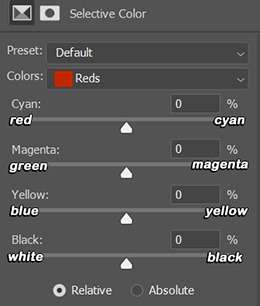
if you pull any of the tabs to the right, it increases the amount of color (cyan, magenta, yellow and black), and reduces the amount of opposite color (red, green, blue and white).


i also use the blacks and whites in selective color especially if the gif is saturated w colors to tone down some parts and make shadows more visible (idk if this is still making sense 😅).

in working with color balance, i use midtones and highlights sparingly. it's really helpful in removing or balancing out a certain tone.

here's my save setting ⬆️
idk why but ps puts the default frame delay to 0.07/0.03 so open your gif in ps again and don't forget to change the delay to 0.05.

and we're done!

i sometimes go back and forth and do some tweaking until i’m satisfied with the result. this is how i color and i know it’s not perfect but i learn by constant practice. there’s really no standard in coloring so you can make yours the way you like it. just enjoy- until you get the hang of it and it becomes less daunting (or something like that). i hope this helps. if you have more questions, my askbox is always open 😊.
#completeresources#usergif#userpayton#usersugar#rresources#yeahps#itsphotoshop#userbells#dailyanimatedgifs#usercharl#usersavana#Chaoticresources#hisources#ps help#tutorials#ask replies#anon
172 notes
·
View notes
Text
PSD #243
Download here
Like or reblog if you download
Like my content? Support me on ko-fi! ☕💖
#psd#psds#rresources#completeresources#dailyresources#hisources#makersleague#ihaveresources#allresources#pastel#*#photo
56 notes
·
View notes
Photo
hi! so an anon asked how i make my text see-through on gifs so here’s a quick tutorial! you need basic knowledge of making gifs. i use photoshop 2023 and i’m using a mac.
step one: color/sharpen your gifs as you wish! resize to what’s needed (in this case, 540x540). then add your text layer. make sure your text is white (#ffffff is the hex code). the font i used is here.
step two: add your drop shadow! to do this i go to the text layer in my layers panel and use control click which opens a bunch of options. i then go to the first, “blending options...” and click the drop shadow box on the left. these are my settings. once your done, click “ok”.

step two: i then go back to my text layer and duplicate it. so i do the same thing and do control click. then go to the option “duplicate layer”. a box will pop up and if you want to rename the layer, you can. so my original is “text tutorial” and the new layer is “text tutorial copy”. then hit “ok”.
step three: now go to the original layer “text tutorial”. you’ll see it highlighted below.
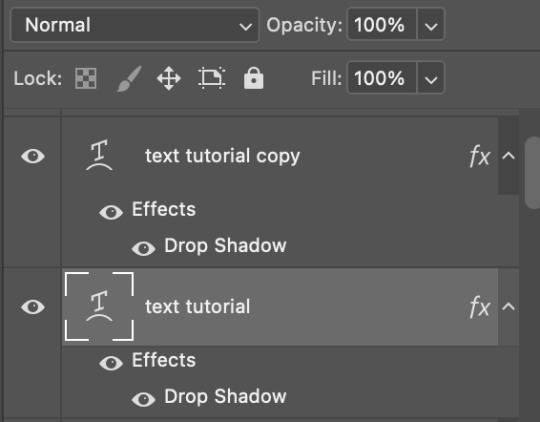
where it says “normal” those are your blending modes. with the layer highlighted, scroll to the bottom and change it to “exclusion”. “difference” will also work! it doesn’t look like anything changed because the duplicated layer is still on top.
step four: now go to your duplicated layer “text tutorial copy” and highlight it. now change the color of your text to the color you want. for this i chose #ff008a. then change the blend mode to “linear burn”.
for every gif, i’ll change the blend modes on the second layer depending on the colors of the gifs or just what i like best. the one i use the most is “color” but i like to play around with the others.
bonus things: to get the white outline effect, i duplicate the exclusion layer, and move it to the top of the two layers. then i change the blend mode back to normal. after that, i add stroke the same way i added drop shadow. these are my settings:

then change the fill to 0% and change opacity to around 50% or whatever looks best. i then move the text to the right to give it that effect.

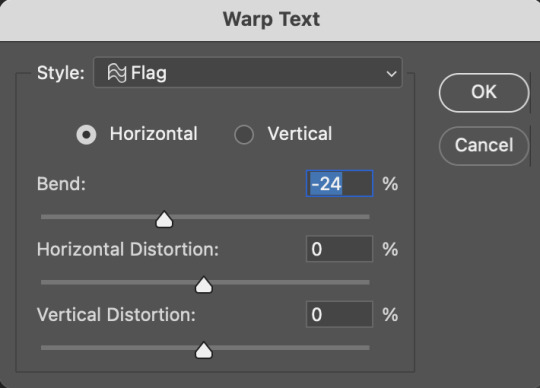
to give the text that warped look i highlight my text layers by clicking on the top layer, clicking shift and then clicking the last layer and then going here. make sure your on the text tool.

you can then change the style to what you want. these are my settings.
hope this helps! let me know if you have any questions!
#completeresources#rresources#allresources#userrobin#usermorgan#omgari#userdean#usershale#usernanda#userautie#supervalcsi#imperiuswrecked#usermahroash#userrainbow#userfern#usergiu#usercim#*tutorial
311 notes
·
View notes
Text

WELCOME TO DAILYTHEMES!
We are a source blog focused on themes, pages, posts about themes help, html and codes. This blog honors all the theme and page creators, the credits are all for them!
We track #dailythemes — tag us!
#signal boost#themes#pages#dailyresources#hisources#rresources#completeresources#finesources#allresources#evansyhelp#userbru#resourcemarket#ihaveresources#theme hunter
63 notes
·
View notes
Photo
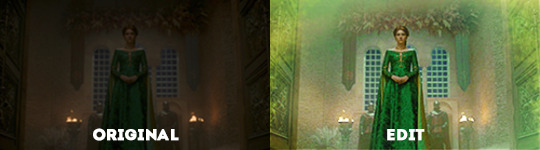
A lovely anon asked for a coloring tutorial and here’s is it! My photoshop is in spanish so I added a translation in some parts that I felt it was necessary (the other stuff is pretty much in the same place) but if you have questions let me know!!
(image heavy!!)
First, I choose my scene > delete the unnecessary frames > sharpen my gif, you know, the basics, this tutorial is pretty good explaining it!
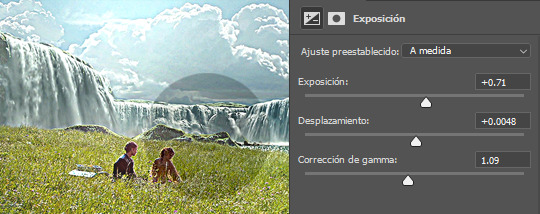
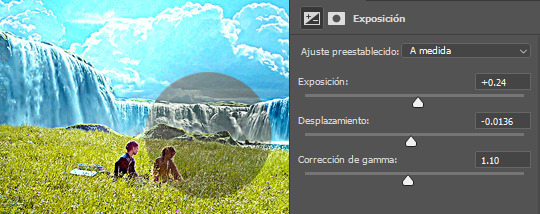
Then, I start with an exposure layer, I feel you can play with values more than a curves or brightness/contrast layer (which is useful when you work with dark scenes). This scene is not too dark so I didn’t do much
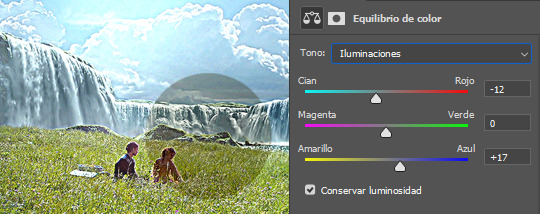
After that, I use a color balance layer. Most scenes have either a yellow or a blueish filter, so depending on the scene you have to play with the numbers. If it’s a yellow scene, try to add more blues, if it’s a blue scene, add more yellows (and the same if it has a different filter). In this case my scene has a soft yellow filter, so I added more blues. If I see the filter is too difficult to work with color balance I use a curves or a channel mixer adjustement! these are good tutorials explaining how those works

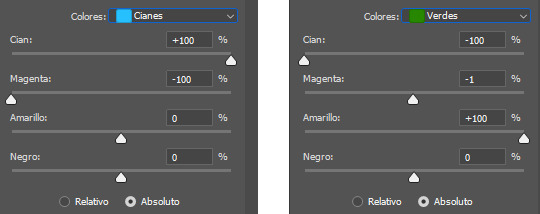
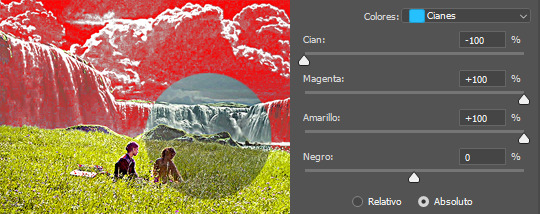
Now it’s time to make the colors pop! and i start with a selective colors adjustement. I set it in absolute because the change is more ~radical~, if you are going for a softer look, set your selective color to relative (that part at the end). In this case, the predominant colors are blue and green so I play with them:
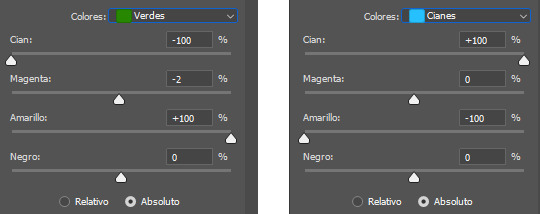
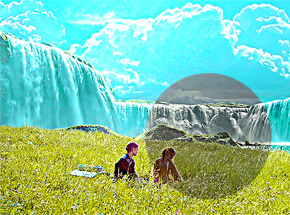
Here’s how it looks now! as you can see, the sky is more blue and the grass looks more greenish

You can end the coloring there if you want, but I’m too extra so I add a vibrance layer to make the colors pop more. Adding a vibrance layer can make the skin look orange so I advice to check this tutorial explaining how to fix it

Then I add other exposure layer to add more contrast in the gif so it doesn’t look ~plain~
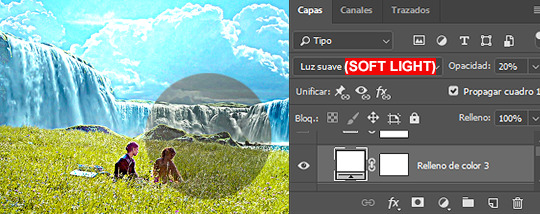
This is optional and I usually do it when I work in dark scenes but I like to add a white layer, set it in soft light and play with the opacity depending of how light I want the scene
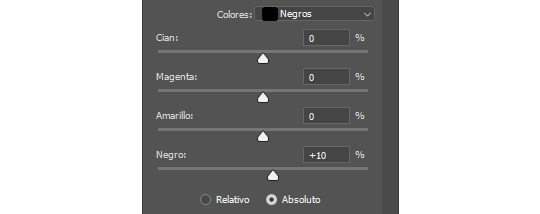
Now, a new selective color layer again! I wanna make the sky more cyan and the grass more ~lemon green~ so here are my settings:
Here’s how it looks now, it make a BIG difference
Optional but I like to add other vibrance layer if the scene let me do it (which means is not grainy/the colors are well defined)

And finally, I add a levels layer to add more contrast on my gif. I set this one in 50% (forgot to add it to the screencapture sorry lol)

And that’s it! That’s the basic coloring. Of course you can play with layer modes or other adjustements! I like to do it depending of the ~vibe~ I’m looking for my gifs, here’s for examples of what I do when I’m in the mood of experimenting
1. Gradient map, set it to hue 50%
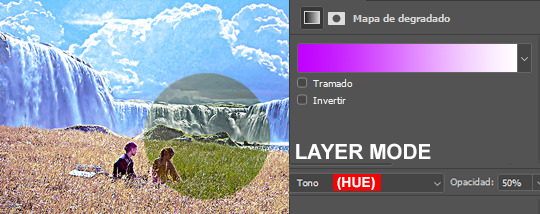
2. Hue/Saturation, in this case I’m playing with the yellows, set it in normal 50%

3. Selective color, modifying the cyans
4. Gradient layer, the layer mode is color 100%
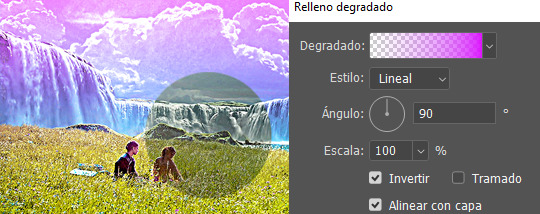
Keep in mind that every scene is different, so what works for this gif It could look bad in others and that’s why it’s important to experiment! Depending of how vibrant/colorful you want the gif to be you can add more or less adjustements
And that’s it! if you have a question feel free to send me an ask and I’ll gladly explain it :)
#completeresources#allresources#dailyresources#makersleague#tutorial#coloring tutorial#rresources#gif tutorial#photoshop tutorial#reblogresources#is this clear?? i hope so fjdshjs i tried my best anon#also idk who to tag sorry sdhfd#ps help
225 notes
·
View notes
Text

♡ Every lake belongs to the quietness desired by the swans ♡
Here’s psd n. 438 . I hope you like it!
♡ ♡ ♡ ♡ ♡ ♡ ♡ ♡ ♡ ♡ ♡ ♡ ♡ ♡ ♡ ♡ ♡ ♡ ♡ ♡ ♡ ♡ ♡ ♡ ♡ ♡ ♡ ♡ ♡ ♡ ♡ ♡
♡ Please like / re-blog / follow if download.
♡ Don’t claim as your own,if you use it credit me.
♡ ♡ ♡ ♡ ♡ ♡ ♡ ♡ ♡ ♡ ♡ ♡ ♡ ♡ ♡ ♡ ♡ ♡ ♡ ♡ ♡ ♡ ♡ ♡ ♡ ♡ ♡ ♡ ♡ ♡ ♡ ♡
[DOWNLOAD at Deviantart] ♡
[DOWNLOAD at Google Drive] ♡
[ for MORE PSD] ♡
♡ ♡ ♡ ♡ ♡ ♡ ♡ ♡ ♡ ♡ ♡ ♡ ♡ ♡ ♡ ♡ ♡ ♡ ♡ ♡ ♡ ♡ ♡ ♡ ♡ ♡ ♡ ♡ ♡ ♡ ♡ ♡
#urbanflower#chaoticresources#resources#rresources#itsphotoshop#yeahps#moodboard#urban flower#psd#filter#red#green psd#rpg#rpg resource#rp psd#dailyresources#quirkyresources#psd download#allresources#completeresources#hisources
34 notes
·
View notes
Text
GIF Tutorial
Someone asked me how I made my gifs so HD so I decided to write a full step-by-step uuuh babyyy 🎶 tutorial + useful tips on every part of the process.
It is explained in detail, so people with 0% experience can try it for the first time, and the more experienced gif makers can focus on the parts they are interested in 👍 (click on the images to see them bigger)
Disclaimers: I am not a professional, I have learned by trial and error and by watching other amazing creators. I use photoshop CC 2019 in Spanish so some of the names may vary but I tried to use the more accurate English names and used colors as references so even in other languages you can still follow this tutorial.
GIF TUTORIAL STEP BY STEP:
1.- Open photoshop and create a new project. Then go to “files” 🠲 “import” 🠲 “convert video to frames” 🠲 this will send you to your video folder, and from there select the one you want. TIP 1: try always to download it in the best quality possible (1080p or 720p) so you will end up with “cleaner” HD gifs.

2.- When you select your video, then you will have to choose the specific moment or scene you want (you do this by selecting and moving the arrows at the bottom of the image) TIP 2: I usually limit every 2 frames, but if your scene is too short (less than 20 - 25 frames) then I suggest not clicking the limit and leaving it at 0, likewise if your scene has too many frames (over 70) then limit every 3 frames 👍 to make it smaller.

3.- Sometimes when you select your scene, a few extra frames will show up in your timeline, it’s ok, you can delete them by selecting the frames and clicking the trashcan icon at the bottom. Next, don’t forget to change the speed, you do this by selecting all the frames (click the first one then press SHIFT and click the last one, this will select everything), and then click one of the numbers below the image and select “Other”. TIP 3: Usually I use between 0,07 - 0,08 (my fav) - 0,09 from faster to slower. The speed will depend on the gif you are making. TIP 4: If you have PSDs colorings, now it’s time to add them, just click and drag your PSD on top of the image, and remember to make sure it is on top of all the frames and layers ( the ones on the side). Personally, I do it now, because when I do it later in the process there is always a few frames that won't color.

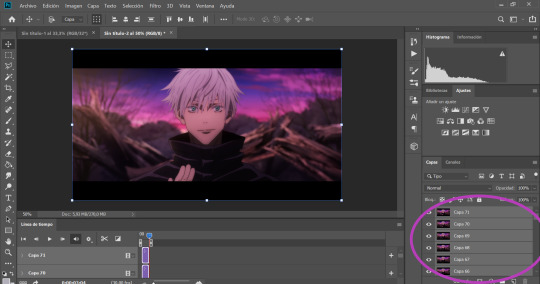
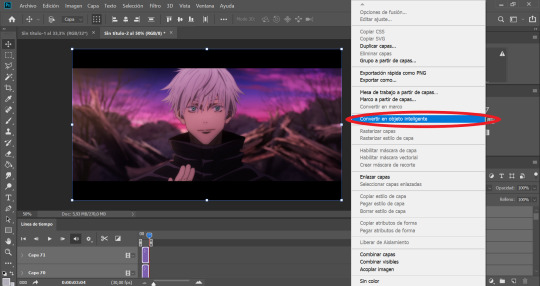
4.- Now that we have our desired frames, speed, and PSD coloring (optional), we need to make it easier to keep editing. So we need to click on the little icon with stripes at the top right corner on top of the timeline (the orange square) 🠲 “Convert timeline into video” 🠲 and now you should have one long frame instead of many single ones.

Now let’s do the same with the layers that are on the right (purple circle), once again click the first layer then shift-click on the last one to select everything 🠲 right click on one of the layers 🠲 “convert into a smart object” 🠲 and now all the layers also become one.
5.- What I like to do next is to cut and then resize (you can do it the other way around if you’d like) select the cutting tool on the left side (light blue circle) and then it is up to you to choose which shape do you want (in the purple circle) there are some basic proportions but you can also make your own.
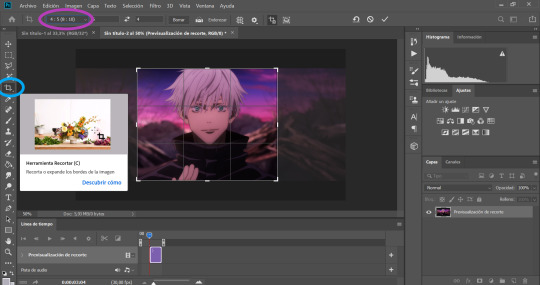
6.- Now is where all the fun begins. Let’s resize our image so we won’t end up with a giant gif. to do this go to the “Image” tab on top of the screen 🠲 “image size”
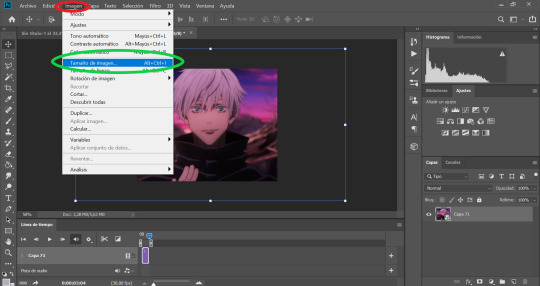
TIP 5: To choose a good size, please keep in mind the standard sizes on Tumblr or other social media. If you are using one gif per row then the size should range between 540px - 560px - or 580px / If you are using 2 gifs per row then the size should be around 268px / and if you have 3 per row then the size should be around 177px. Once you select the appropriate size… this is where it gets tricky. Depending on the gif you are making you will have to select a different option ex: if your gif is too blurry or has lots of movement or grains if they are too dark or too light if the colors are too different, all these factors will determine what you need to use. TIP 6: I usually use only 3: bilineal - bicubic reduction or keep details 2.0 (the names may change in English but look for something along those lines or in the same place as the ones in the image with the green ticks)

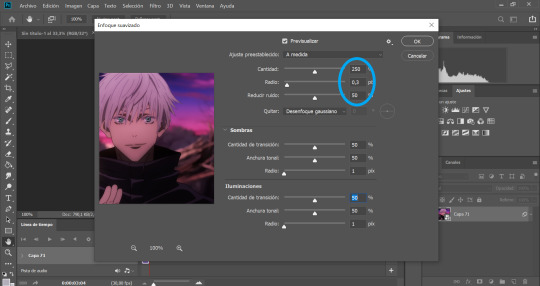
7.- SHARPENING TIME!: go to “Filter” 🠲 “sharpen” 🠲 “smart sharpen”

As I have mentioned before, the amount will depend on the gif you are making, there is no perfect formula for all the gifs, so you need to play around a bit to find the perfect setting for your specific gif. TIP 7: This is what I normally use: amount: between 250 and 300 / Radius: 0,3px - 0,4px or 0,5 (but never over 0,5) / noise: anything between 0 and 50, now if you have a very blurry scene you can go up to 100 👍 and finally select the option “Grussian blur”.
Tbh I never change the “shadows” and “lighting” settings (they are always 50 -50 -1) If you know how to use them or want to play around, then go for it…. I have no idea how to 🤣 oops.
8.- BLUR: sometimes the gifs look TOO sharp so we need to add a blur filter. so go to “filter” 🠲 “blur” 🠲 “surface blur”

then once again, depending on your needs, you can play around with the settings. TIP 8: I normally use 10-6 / 9-4 / 7-4 or 3 / etc. but I never go over 10.
Also if you are noticing that your gif is still looking a bit blurry or with imperfections, due to the quality of the video, the scene is too complicated, etc. then I recommend adding noise on purpose 🤣 hey! if you can’t fight against the noise then put it on purpose and make the gif with a bit of texture and colors, it will look nice too 👍 go to “filter” 🠲 “noise” and then add the amount you want.

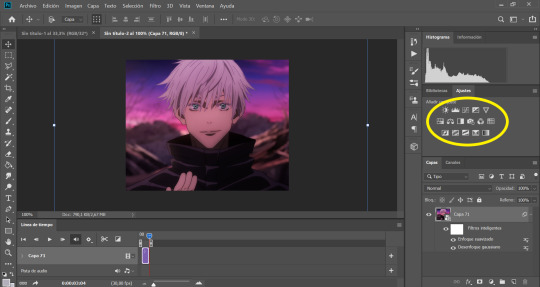
9.- Now we are almost done, you can leave it like that if you want or you can add some extra steps and play around with the brightness, exposure, color balance, gradients, filters, etc. you can find everything on your right (the yellow circle). Here is up to you to explore and experiment, I never use the same, it changes every gifset I make.
10.- You can add your watermark, images, texts, paint with the brushes, or do anything else with your gif. but this time I will skip these steps, but if you need extra information about something, please feel free to ask, and I will gladly help you 😊.
TIP 9: Before you save your gif, please make sure all the things you added are in line with your gif “video frame” 🠲 move the little arrow so it will end perfectly with your gif, if the others are longer, it doesn’t matter, you can move them or you can leave them there, the important thing is that the line is perfectly in line with your gif.

11.- Now there is nothing left to do, it’s finally time to save it for the web. Go to “files” 🠲 “export” 🠲 “save for the web”
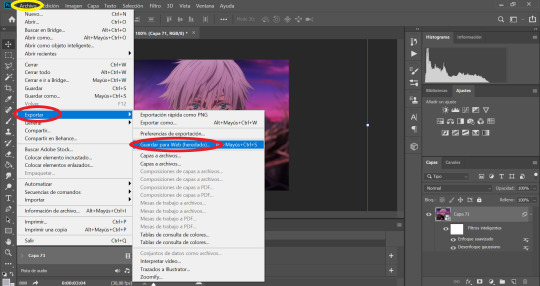
TIP 10: Now you have two options: you can view your gif in the “optimized version” tab where it will show you one option that you can edit. If you select this option then these are the settings I always use, the only option that changes is: using pattern (the gif will have a small invisible “net” that will make the gifs look more uniform, use this especially when the lights or shadows and colors look grainy) or you can use Diffusion (to make it smoother and move flowy) you can try both and see which one suits your gif best 👍

and then the easier second option is to click the “4 copies” tab on top of the gif, and it will show you 4 different options, then you just select the one you like the best and it’s ready!

12 .- THE LAST STEP!!! TIP 11: make sure your final gif is smaller than 10MB (Tumblr's limit) and hit SAVE! and you are ready!! ヾ(≧▽≦*)o
This is our final result: A sexy Gojo 💙
Thank you for reading, I hope this helped you, and I can wait to see all of your creations! ✨
Feel free to tag me in your gifsets or to ask me any other question in case you need extra information or need me to explain something better 💖
Also, if you are an expert and would like to comment, change or suggest better steps and/or settings, please let me know! so we can all learn and grow 👍
#gif tutorial#tutorial#mygiftutorial#i apoloogize in advanced for any mistake or bad explanation#I really hope this help you to learn how to make gifs or to learn new steps or settings 💖#allresources#completeresources#rresources#please let me know if im doing something wrong#or if you would like to recommend me better settings or steps#i would gladly accept them! 🥰🥰🥰
161 notes
·
View notes
Photo

BRUSHES SET
DOWNLOAD HERE: DA | DRIVE
Contains 11 doodle-like brushes, handmade by me
All of them are random doodles of different sizes
There’s no need to give me credits if you use them
Like and/or share them so my work can be seen by more people
Enjoy!
248 notes
·
View notes
Text
WELCOME TO DAILY-ICONS!
We are a source blog focused on icons edits, dash icons, tutorials about icons and more! This blog honors all icons makers, the credits are all for them!
We track #dailyiconsedit — tag us!
#signal boost#iconedit#iconsedit#dailyresources#iconfrenzy#hisources#rresources#completeresources#fineresources#allresources#evansyhelp#userbru#perfectopposite#usermiia#usergiady#icons
30 notes
·
View notes
Photo


In the link below you’ll find three psd for dark/night scenes - two for blue, one for red.
Please remember that you’ll have to adjust the layers to make it work, or add extra steps; these were all made from scratch and tailor made for each scene.
Do not repost, sell, claim as your own or include as part of another psd. Please, credit if used.
Reblog & like if you find them helpful.
FREE DOWNLOAD
#dailypsd#completeresources#rresources#allresources#itsphotoshop#dailyresources#supportcontentcreators#psd coloring#photoshop resources#photoshop psd#rpc#rph#psd
49 notes
·
View notes
Note
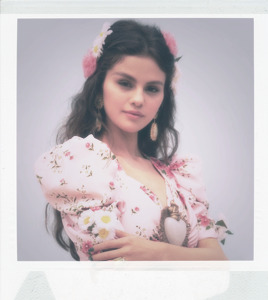
okay can i ask: HOW did you color the gorgeous green alicent cap and pink cap here? I'm SO in love post/695248863493324800/house-of-the-dragon-104-king-of-the-narrow
hi!
first off, thank you for the kind words :)
here's a general picspam tutorial: x
picspam inspo/prompts: x
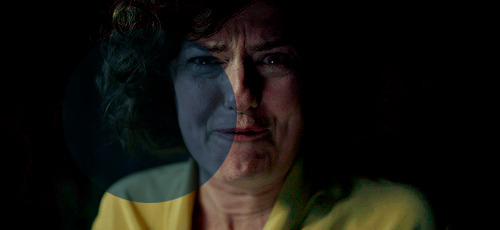
here's a tutorial on how to color these house of the dragon caps:
let's start with the alicent cap:
step 1: fix that dark lighting
add a curves or brightness layer
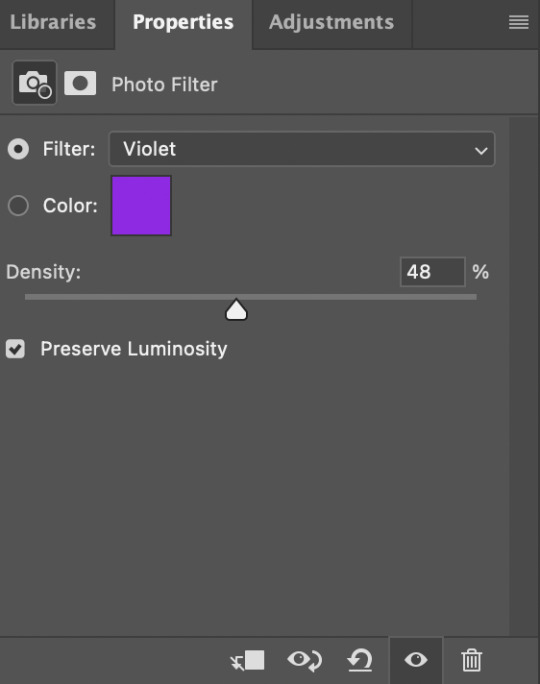
add a color filter layer - this will help with the yellow lighting & these are my settings:


step 2: light leak textures
after that i added textures which were these and changed the color to only green by using hue and saturation adjusment + set it to screen
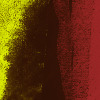
and that's literally it! basically just used a lottttt of light leaks and textures that were green but the main component was the color filter that made the cap have more cool tones. if you wanted to make the coloring red for example then you’d use the warming filter on the color filter adjustment! :)
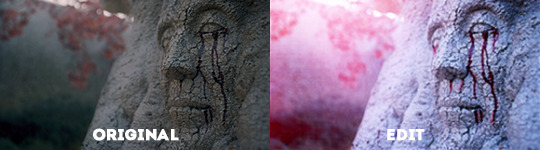
alright moving on to the next cap:
step 1: fix that lighting again!
like the prev. cap, i used a curves layer and color filter layer except i used the violet filter
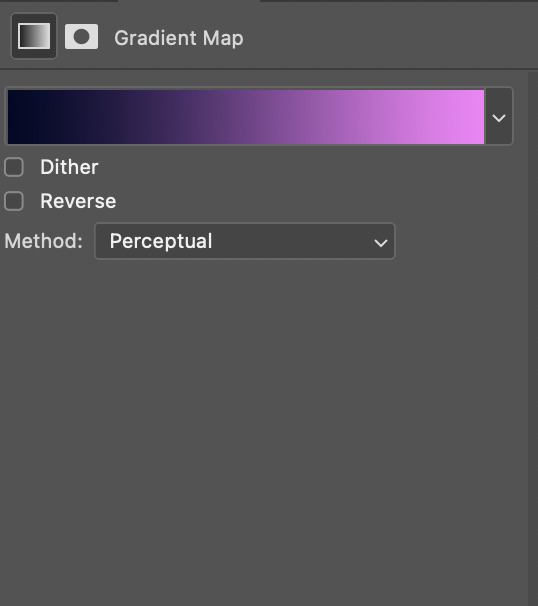
step 2: add gradient map layers
use the gradient map adjustment layer and set it from a dark to light color of your choice + set it to soft light OR screen (adjust opacity as needed)
step 4: add light leaks
for this specific cap i only added the light leaks on the corner (same one as above + changed it to pink) and set it to screen
and that’s all! hope this helped :)
as always, my inbox is open to any questions or comments!
~farah
#answered#anonymous#tutorials*#picspam tutorial#allresources#psshit#coloring tutorial#psd#rresources
67 notes
·
View notes
Photo

PSD #241
Download here
Like or reblog if you download
Like my content? Support me on ko-fi! ☕💖
#psd#psds#rresources#completeresources#dailyresources#hisources#makersleague#ihaveresources#allresources#pastel#photo#*
56 notes
·
View notes
Photo
hey!! so an anon asked if i could make a blending tutorial from my troyella set so here it is! you need basic knowledge of making gifs. i use photoshop 2022 and i’m using a mac.
step one: make your gifs
make your two gifs in separate documents
crop (i did 540x540), color and sharpen as you please. then go to image - image size and resize them to 540x540
make sure your gifs have the same amount of frames - this was 47 and make sure your gifs are under the 10mb limit
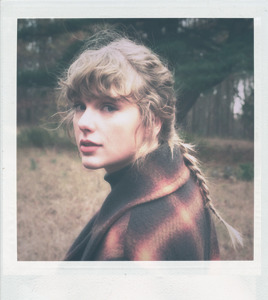
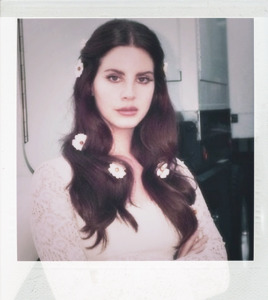
i decided on a close up shot and a more far away shot
step two: adding the pink color
for the more far away gif i added a gradient map layer and changed the white to this pink color. the gradient goes from black to pink. the hex code is e2a7dd
for the close up gif i created a new layer and then used the brush tool to paint around them with the same color. i used a bigger brush for the outside and a smaller one for the middle. i used a soft round brush and kept it at 50% opacity.
step three: combining the gifs
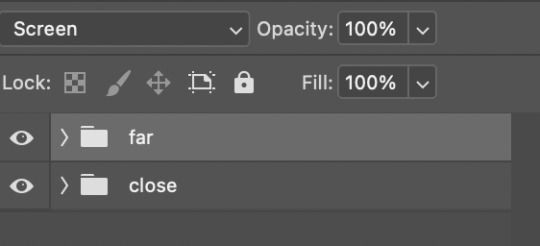
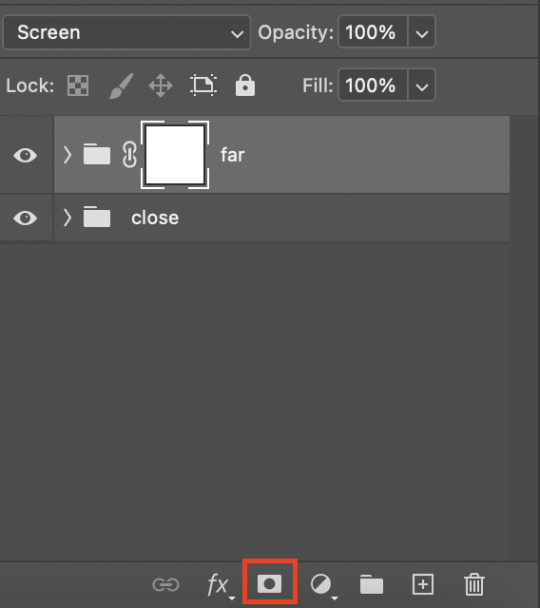
on each document i grouped all of my layers together. i select them all using shift. then i hit ctrl and click on the layers. then go to group from layers. you can name it whatever you want and then hit ok. i named the far gif “far” and the close one “close”
on my far gif i make sure my group layer is selected and i hit command c and then go to the other document and hit command v. you’re just copying and pasting! now your gifs are on the same document. you can also create a new document if you want
step four: change the blending mode
my far gif is now on the top
with that group selected change the blending mode to “screen”
it should look like this:
now the gif looks like this:
as you can see kelsi is still in the frame so that leads us to
step six: erase anything you don’t want in your gif
with that top gif still selected add a layer mask
next make sure your colors are set like this
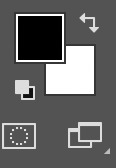
then use the brush tool to erase kelsi. i use a soft round brush (size 412) and change the opacity to 100%. you might even erase more like troys hand on the side or kelsi’s hand on the bottom but that’s up to you! here is the final product!

hope this helps and if anyone has questions let me know!
#usergif#completeresources#rresources#allresources#userkosmos#userrobin#supervalcsi#usermorgan#usernanda#uservivaldi#usermills#userhella#usernatty#uservalentina#uservier#userkarolina#userannalise#userdean#*tutorial
411 notes
·
View notes
Text
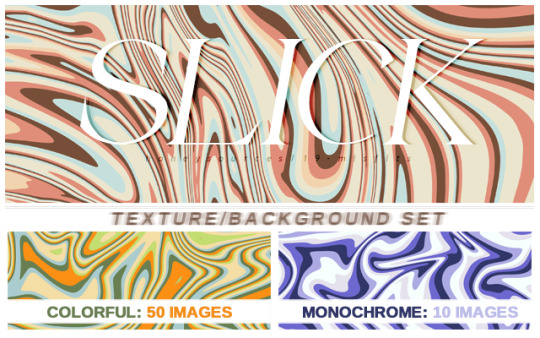
Slick Texture Set
Includes a psd for making your own 'slick' texture! Like or reblog if using! If you enjoy my work, consider supporting me on ko-fi :)
DOWNLOAD
(downloads are always ad-free!)
#textures#backgrounds#graphic textures#photoshop#resources#psd#yeahps#completeresources#resourceme#itsphotoshop#chaoticresources#allresources#dailyresources#hiresources#hisources#peachresources#rresources#chaoticresoucres
83 notes
·
View notes
Photo
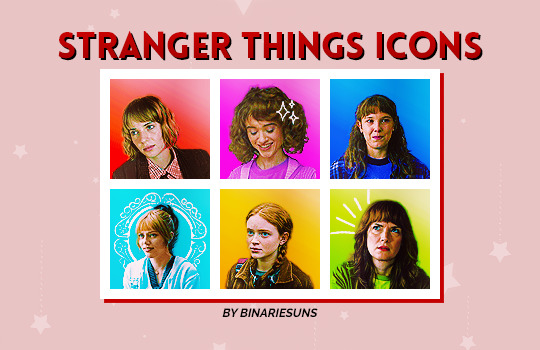
STRANGER THINGS ICONS
21 icons with 6 versions each one (3 different colors + 3 w/textures)
Don’t edit them or claim them as your own
Credit isn’t necessary but it’s appreciated! Redirect if it’s asked
Please like or reblog if you save/use one
Icons can be found here
support me on ko-fi 💖
#stranger things#strangerthingsedit#tvstrangerthings#completeresources#rresources#dailyresources#iconsnetwork#dailystrangerthings#icons#*#mmm idk??
48 notes
·
View notes
Text

Here’s psd n. 428 . I hope you like it!
♡ ♡ ♡ ♡ ♡ ♡ ♡ ♡ ♡ ♡ ♡ ♡ ♡ ♡ ♡ ♡ ♡ ♡ ♡ ♡ ♡ ♡ ♡ ♡ ♡ ♡ ♡ ♡ ♡ ♡ ♡ ♡
♡ Please like / re-blog / follow if download.
♡ Don’t claim as your own,if you use it credit me.
♡ ♡ ♡ ♡ ♡ ♡ ♡ ♡ ♡ ♡ ♡ ♡ ♡ ♡ ♡ ♡ ♡ ♡ ♡ ♡ ♡ ♡ ♡ ♡ ♡ ♡ ♡ ♡ ♡ ♡ ♡ ♡
[DOWNLOAD at Deviantart] ♡
[DOWNLOAD at Google Drive] ♡
[ for MORE PSD] ♡
♡ ♡ ♡ ♡ ♡ ♡ ♡ ♡ ♡ ♡ ♡ ♡ ♡ ♡ ♡ ♡ ♡ ♡ ♡ ♡ ♡ ♡ ♡ ♡ ♡ ♡ ♡ ♡ ♡ ♡ ♡ ♡
#psd#chaoticresources#rresources#yeahps#coloring psd#psd coloring#urbanflower#urban flower#resources#moodboard#rp psd#dailyresources#quirkyresources#pastel psd#filter#psd download#itsphotoshop
27 notes
·
View notes
Last Seen Blogs

princess-of-whump
Dove
elong615
615

helnorsk-svartmetall-blog
Helnorsk Svartmetall
kazz09
ki

kaguraito
capria_tee