#scalable vector
Text

Found this while going through my old Mischief files. That was such a good art program and I can’t believe it still works. Gonna be drawing on it more I think.
#the whole scalable vector drawing thing was super rad#made with mischief#mae draws#still happy with this old art#might use this as an OC for something someday#she doesn’t have a name yet
2 notes
·
View notes
Text
I love you scalable vector graphics
0 notes
Photo

"Overwhelm Scalable Vector Graphics" by Park Na-rae, "170 Eggs ⁇ 18L of Cooking Oil" (I Live Alone) on Chuseok Foods The Speech
0 notes
Text
Hotel room amenities sheet
#hotel#airbnb#canva#template#hostel#vector#icons#scalable#hostelitems#roomamenities#booking#guest#hoteldesign#roomitems#hospitality#accomodation#design#canvaeditable#etsy#sale
0 notes
Text

I had the idea of making a poster of this specific homestuck asset when I realized there wasn't an HD version anywhere online, So I decided to make it myself.

1 note
·
View note
Text

Image masking see more smpclippingpath.com is a technique used in digital image processing to selectively hide or reveal certain parts of an image. It is commonly employed in graphic design, photo editing, and computer vision applications.
There are several types of image masking techniques, including:
Layer Masking: This involves creating a layer mask in image editing software like Adobe Photoshop. A layer mask is a grayscale image that determines the transparency of corresponding pixels in the layer it's attached to. White areas of the mask reveal the underlying image, while black areas hide it, and shades of gray produce varying levels of transparency.
Clipping Masking: Clipping masking involves using a specific shape or path to hide or reveal portions of an image. This technique is often used to isolate objects from their background or to apply complex edits selectively.
Alpha Channel Masking: In this technique, an alpha channel is used to determine the transparency of pixels in an image. An alpha channel stores transparency information separately from the image's color channels, allowing for precise control over transparency levels.
Vector Masking: Vector masking involves using vector graphics, such as paths or shapes, to define areas of transparency in an image. This technique is commonly used for precise and scalable masking operations.
Image masking is widely utilized in various fields such as graphic design, photography, advertising, and web design to achieve complex editing tasks like removing backgrounds, creating composite images, or applying selective adjustments to specific parts of an image.
#photography#professionalphotographer#businessphotography#commercialphotographer#freelancephotographer#landscape#love#aesthetic#aesthetictumblr#art#photo editing#advertising#illustration#fashion#grunge#vintage#quote#gif#lol#tumblr#tumblrgirl#tumblrboy#tumblrpost#tumblraesthetic#tumblrtextpost#tumblrposts#tumblrquotes#fotostumblr#funnytumblr#frasitumblr
44 notes
·
View notes
Text

Recreated the TEO logo in high resolution, have fun!
A vector version (.svg file) for limitless scalability is also available in the Fin Fin on QEMU MEGA folder under 'Extras' (Link Here)
#fin fin#finfin#fin fin on teo#finfin on teo#fin fin on teo the magic planet#finfin on teo the magic planet#my projects
84 notes
·
View notes
Text


Long Story Short: A discussion of what Bluey Merch would people like to see wound up with a Spaceballs Reference ("Spaceballs: The Flamethrower! The Kids love this one!") and also inspired by the Hellmo/Elmo Rise meme.
Vectorized a screenshot from The Sleepover in Illustrator (I was thinking of doing in Procreate but I wanted it to be scalable ) Couldn't decide which I like more the realistic or cartoony one so here's both.
Credits: Realistic Fire Vector is by upklyak on Freepik [ x ] | [ x ]
Cartoon Fire Vector is by pch.vector on Freepik [ x ]
81 notes
·
View notes
Text
Unveiling the Cutting-Edge Qxefv Technology: A Glimpse into the Future
Introduction:
In the ever-evolving landscape of technology, one name that has been creating waves is Qxefv Technology. With a commitment to innovation and a focus on pushing the boundaries of what’s possible, Qxefv Technology has emerged as a key player in the tech industry. This article explores the revolutionary Qxefv Technology, delving into its core features, applications, and the potential impact it may have on various sectors.

Understanding Qxefv Technology:
Qxefv Technology, an acronym for Quantum eXtended Field Vectorization, represents a groundbreaking approach to computing that combines the principles of quantum computing and advanced field vectorization techniques. This fusion results in a computing paradigm that surpasses the capabilities of traditional computing methods, promising unprecedented processing power and efficiency.
Key Features:
1. Quantum Computing Integration:
Qxefv Technology integrates quantum computing principles, harnessing the power of quantum bits or qubits. This allows for parallel processing and the ability to perform complex calculations at speeds that were previously thought to be unattainable.
2. Field Vectorization Techniques:
The technology utilizes advanced field vectorization techniques to manipulate and process data in multidimensional spaces. This approach enhances the efficiency of data processing, enabling a more comprehensive analysis of information.
3. Scalability and Flexibility:
Qxefv Technology is designed with scalability in mind, making it adaptable to a wide range of applications. Its flexibility allows it to be applied in various fields, from scientific research to artificial intelligence and beyond.
Applications Across Industries:
1. Healthcare:
Qxefv Technology holds great promise in healthcare, where the rapid analysis of vast amounts of medical data is crucial. From drug discovery to personalized medicine, the technology’s computational prowess can significantly accelerate advancements in the field.
2. Finance:
In the financial sector, Qxefv Technology can revolutionize data analysis for risk assessment, fraud detection, and algorithmic trading. Its ability to process complex financial models at unparalleled speeds can provide a competitive edge to institutions.
3. Artificial Intelligence and Machine Learning:
Qxefv Technology’s quantum capabilities make it a natural fit for enhancing artificial intelligence and machine learning algorithms. This could lead to breakthroughs in natural language processing, image recognition, and predictive modeling.
4. Scientific Research:
Researchers can benefit from Qxefv Technology’s ability to handle intricate simulations and computations. From climate modeling to particle physics, the technology’s quantum-enhanced processing can expedite scientific discoveries.
Challenges and Future Prospects:
While Qxefv Technology opens up exciting possibilities, it is not without challenges. The field of quantum computing is inherently complex, and addressing issues such as error correction and scalability remains a priority.
As researchers and engineers continue to refine Qxefv Technology, its potential applications are bound to expand. The journey towards realizing the full potential of this technology will likely involve collaborative efforts across disciplines and industries.
Conclusion:
Qxefv Technology stands at the forefront of the technological revolution, offering a glimpse into a future where computing capabilities defy current limitations. As this innovative technology continues to evolve, its impact on industries ranging from healthcare to finance and scientific research is poised to be transformative. Keep an eye on Qxefv Technology, for it may very well shape the technological landscape for years to come.
click given link to read more:
5 notes
·
View notes
Text
im going to blow uuupppppppp cananybody here help me with blender? details of what im trying to accomplish below the cut vv
I have pixel art that I want to extrude/make 3d, and make it rotate in a circle, maybe bob up and down a bit if im getting fancy with it. like when you drop an item in minecraft, and the sprite rotates in 3d, like this

every tutorial ive watched says i need a .svg (scalable vector graphic) file, and then you can just extrude from the premade vertices/faces/edges whatever theyre called. im not very well versed in 3d modelling jargon. but every single one that ive tried doesnt work very well for pixel art, it blurs/rounds the sharp edges and makes it look like this:

and this happens when i try to convert both the original 52x52 png AND the 352x352 png to an svg.
the only one that I can find that DOESNT fuck with the pixels/reduce the sharpness leaves me with an incredibly jumbled mess of vertices.
so basically what i was wondering is - can anyone tell me how to do this? how to make the pixel art turn 3d? i've already imported the image as a plane, but it comes as a square and not the outline of the image. if anyone knows how to like, snap vertices/edges to the outline of the pixel art and then solidify/thicken it from there, i would really really appreciate the advice.
EDIT:

i have made it this far by importing the svg, removing all of the overlapping/clipping textures/materials, and slapping a png on the cover of it. however, this leaves the sides "unpainted" -- does anyone know how on earth to fix this? can i just like, paint directly on the model?
EDIT #2
I think i did it better than blender could using another program (magicvoxel)
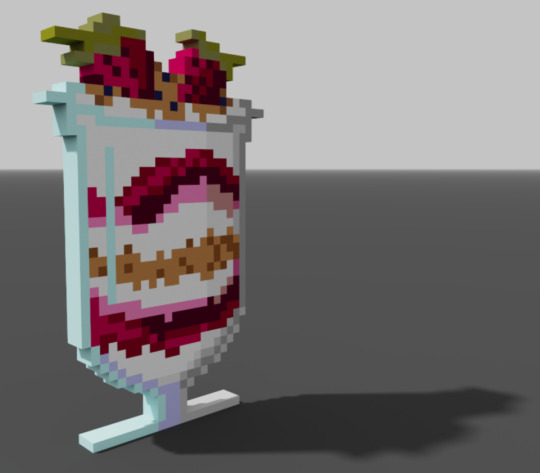
im still going to try to animate the rotation of it in blender, but i think i'll use this to make the models !
#i was originally going to just animate the rotation in aseprite but i thought that animating 24 individual frames would take longer than#just thickening an image in blender. but i think i might be wrong this shit is hard blender is so daunting#blender
8 notes
·
View notes
Photo
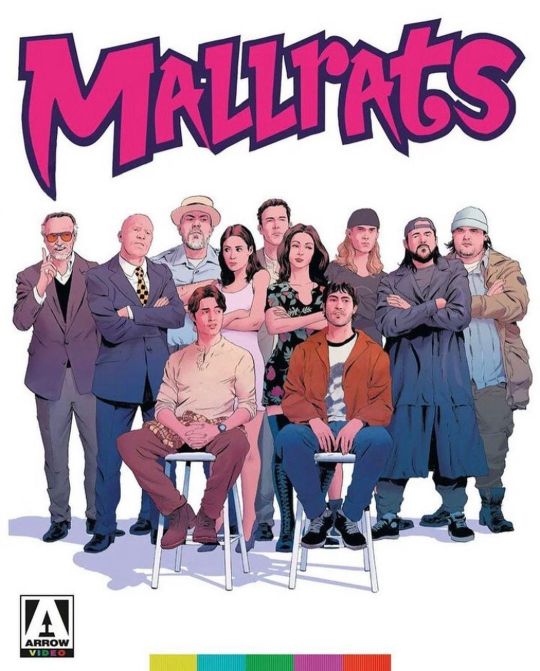
Mallrats will get the 4K treatment - I did the cover art (and somewhat pointlessly redrew the old logo in vectors just for the love of scalable clean lines) out in June from @arrowvideo - swipe for some product shots of @scottsaslow design work. #robertsammelin #illustration #arrowvideo #mallrats #bluray https://www.instagram.com/p/CqdSxkyNh82/?igshid=NGJjMDIxMWI=
24 notes
·
View notes
Text
The Basics Of Logo Design - Lode Emmanuel Palle
Logo design is a creative and essential aspect of branding. A logo is a visual representation of a brand or company, and it should be memorable, versatile, and communicate the essence of the brand. Here are the basics of logo design explained by Lode Emmanuel Palle:
Simplicity: Keep the design simple and easily recognizable. A cluttered or complex logo can be difficult to remember and reproduce.
Memorability: A good logo should be memorable at a glance. Think of iconic logos like Apple or Nike – they are simple and instantly recognizable.
Relevance: The logo should reflect the nature of the business or brand it represents. Consider the values, products, and target audience of the brand.
Versatility: A logo should work well across various mediums and sizes – from business cards to billboards. It should be recognizable whether in color or black and white.
Timelessness: Aim for a logo design that will still be relevant and effective years down the line. Avoid using trendy elements that might become outdated quickly.
Colors: Choose colors that resonate with the brand's identity. Different colors evoke different emotions, so consider the psychological impact of color choices.
Typography: The choice of typography should be legible and appropriate for the brand. It can convey the brand's tone – whether formal, playful, or modern.
Originality: Strive to create a unique logo that sets the brand apart from competitors. Avoid using clipart or templates.
Scalability: Ensure the logo retains its quality and clarity when resized. Test it at various sizes to make sure it's still recognizable.
Balance: A well-designed logo has a balanced composition, where the elements are harmoniously arranged.
Negative Space: Utilize negative space creatively. It can add depth and meaning to the logo, and it's a clever way to hide additional imagery within the design.
Cultural Sensitivity: If your brand has an international presence, make sure the logo's symbols and colors are culturally appropriate and don't unintentionally offend.
Sketching and Conceptualizing: Begin the design process by sketching out multiple ideas. This helps you explore different concepts before moving to digital design.
Digital Design: Once you have a concept, use graphic design software like Adobe Illustrator to create a digital version. Vector graphics are ideal for logos as they can be scaled without losing quality.
Feedback and Iteration: Share your logo drafts with others, especially team members or clients. Constructive feedback can help refine the design.
Test in Different Contexts: See how the logo looks on different backgrounds, both light and dark, to ensure visibility and contrast.
Legal Considerations: Check for any potential trademark or copyright issues before finalizing the logo.
File Formats: Ensure you have the logo in various formats (PNG, JPEG, SVG, etc.) for different use cases.
According to Lodi palle, logo design is a creative process that requires experimentation and iteration. Don't be afraid to explore different ideas and seek feedback to create a logo that effectively represents the brand's identity.
8 notes
·
View notes
Text
Intermediate Machine Learning: Advanced Strategies for Data Analysis
Introduction:
Welcome to the intermediate machine learning course! In this article, we'll delve into advanced strategies for data analysis that will take your understanding of machine learning to the next level. Whether you're a budding data scientist or a seasoned professional looking to refine your skills, this course will equip you with the tools and techniques necessary to tackle complex data challenges.
Understanding Intermediate Machine Learning:
Before diving into advanced strategies, let's clarify what we mean by intermediate machine learning. At this stage, you should already have a basic understanding of machine learning concepts such as supervised and unsupervised learning, feature engineering, and model evaluation. Intermediate machine learning builds upon these fundamentals, exploring more sophisticated algorithms and techniques.
Exploratory Data Analysis (EDA):
EDA is a critical first step in any data analysis project. In this section, we'll discuss advanced EDA techniques such as correlation analysis, outlier detection, and dimensionality reduction. By thoroughly understanding the structure and relationships within your data, you'll be better equipped to make informed decisions throughout the machine learning process.
Feature Engineering:
Feature engineering is the process of transforming raw data into a format that is suitable for machine learning algorithms. In this intermediate course, we'll explore advanced feature engineering techniques such as polynomial features, interaction terms, and feature scaling. These techniques can help improve the performance and interpretability of your machine learning models.
Model Selection and Evaluation:
Choosing the right model for your data is crucial for achieving optimal performance. In this section, we'll discuss advanced model selection techniques such as cross-validation, ensemble methods, and hyperparameter tuning. By systematically evaluating and comparing different models, you can identify the most suitable approach for your specific problem.
Handling Imbalanced Data:
Imbalanced data occurs when one class is significantly more prevalent than others, leading to biased model performance. In this course, we'll explore advanced techniques for handling imbalanced data, such as resampling methods, cost-sensitive learning, and ensemble techniques. These strategies can help improve the accuracy and robustness of your machine learning models in real-world scenarios.
Advanced Algorithms:
In addition to traditional machine learning algorithms such as linear regression and decision trees, there exists a wide range of advanced algorithms that are well-suited for complex data analysis tasks. In this section, we'll explore algorithms such as support vector machines, random forests, and gradient boosting machines. Understanding these algorithms and their underlying principles will expand your toolkit for solving diverse data challenges.
Interpretability and Explainability:
As machine learning models become increasingly complex, it's essential to ensure that they are interpretable and explainable. In this course, we'll discuss advanced techniques for model interpretability, such as feature importance analysis, partial dependence plots, and model-agnostic explanations. These techniques can help you gain insights into how your models make predictions and build trust with stakeholders.
Deploying Machine Learning Models:
Deploying machine learning models into production requires careful consideration of factors such as scalability, reliability, and security. In this section, we'll explore advanced deployment strategies, such as containerization, model versioning, and continuous integration/continuous deployment (CI/CD) pipelines. By following best practices for model deployment, you can ensure that your machine learning solutions deliver value in real-world environments.
Practical Case Studies:
To reinforce your understanding of intermediate machine learning concepts, we'll conclude this course with practical case studies that apply these techniques to real-world datasets. By working through these case studies, you'll gain hands-on experience in applying advanced strategies to solve complex data analysis problems.
Conclusion:
Congratulations on completing the intermediate machine learning course! By mastering advanced strategies for data analysis, you're well-equipped to tackle a wide range of machine learning challenges with confidence. Remember to continue practicing and experimenting with these techniques to further enhance your skills as a data scientist. Happy learning!
2 notes
·
View notes
Text
wow hi sry it’s been a minute. i finished the odin project foundations course so i’ve hopped to the javascript stack, currently working on the intermediate html css section.
what are svgs?
scalable vector graphics. basically easy to scale to any size and retain their quality without changing the file size. vector graphics are built on formulas that are more adaptable to resizing, while raster graphics are built with pixels, making them susceptible to quality loss
they’re often used for icons, charts/graphs, large simple images, patterned backgrounds, effects via filters.
there are two ways to embed them:
you can use the html <img> tag or link with css background-image
you can also paste the contents directly into the code without linking it to an image. this can allow for altering via css and javascript
why use svgs (or why not)??
PROS
defined using XML (extensible markup language), which is html like syntax used for APIs, RSs, spreadsheets and word editing software
makes it easy to integrate into html files without changes
CONS
not good for textured/photo realistic images
you don’t really want to create them from scratch - you’ll more often find yourself copying or downloading from an image editor, like adobe illustrator or figma
here's an excerpt of some simple svg code
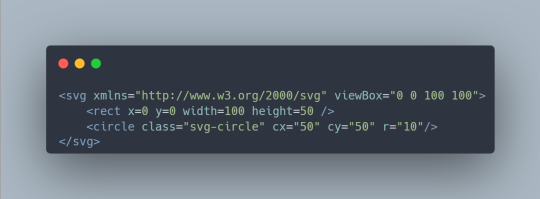
some of these attributes are pretty recognizable, but a simple breakdown:
xmlns: XML namespace that specifies the dialect of the svg, imagine like defining the language you're using
viewbox: defines the aspect ratio and origin
class, id: same as html, allows us to target an element
circle, rect: click here for elements that are defined by the svg namespace
--
wow hi sry it’s been a minute, studying w a full time job is so inconsistent sometimes zzzz BUT i finished the odin project foundations course so i’ve hopped to the javascript stack, currently working on the intermediate html css section. the next couple posts are prob gonna be more html css oriented (⊙_⊙)
23 notes
·
View notes
Text
Effective web designing

Affordable serbvices providing
Web design encompasses the creation of websites, focusing primarily on the user experience aspects rather than the technical development. Traditionally centered around designing for desktop browsers, the field has evolved to prioritize compatibility with mobile and tablet browsers since the mid-2010s.
A web designer's role involves shaping a website's appearance, layout, and sometimes its content. Appearance considerations include color schemes, typography, and imagery choices, while layout pertains to how information is structured and organized. A well-designed website is user-friendly, visually appealing, and aligns with the target audience and brand identity.
Key principles of effective web design include simplicity, clear communication, and trust-building with users. Responsive and adaptive design are two common approaches to ensure websites function seamlessly across various devices, including desktops, tablets, and mobile phones.
Responsive Web Design, commonly referred to as "Responsive" or "Responsive Design," adapts website content to fit different screen resolutions. This approach uses viewport breakpoints to determine when content should scale and reorganize for optimal viewing on devices of varying sizes.
Best practices for responsive design include adopting a mobile-first approach, creating fluid grids and images, prioritizing the use of Scalable Vector Graphics (SVGs), and incorporating design patterns to enhance usability and familiarity for users.
In contrast, Adaptive Web Design tailors content and functionality based on the specific characteristics of each device. While responsive design maintains consistent content across all devices with adjustments in layout, adaptive design may alter the content itself to suit different device types.
Both approaches aim to provide an optimal user experience across a diverse range of devices, with responsive design focusing on flexible layout adjustments and adaptive design customizing content for specific device contexts.
2 notes
·
View notes
Text
learn to digitizing your embroidey designs

From Sketch to Stitch: A Comprehensive Guide to Digitizing Your Embroidery Designs
The world of embroidery has embraced the digital age, allowing you to transform your own unique designs into stunning stitched masterpieces. But how do you bridge the gap between a simple vector graphic and a complex stitching pattern? This comprehensive guide, crafted with 2500 words, will teach you the art of digitizing your embroidery designs, from software choices to stitch considerations and finishing touches.
Before We Embark: Understanding SVGs and Embroidery Files
Scalable Vector Graphics (SVGs): These text-based descriptions of images offer infinite scalability, making them perfect for digital design.
Embroidery files: These contain specific instructions for your machine, including stitch types, colors, and placement (DST, EXP, JEF, PES formats are common).
Step 1: Choosing the Right Software
Consider these factors when selecting your digitizing software:
Skill Level: Are you a beginner or an experienced digitizer? Some programs cater to novice users, while others offer advanced features.
Budget: Free and paid options exist, each with varying capabilities and functionalities.
Compatibility: Ensure the software outputs files compatible with your embroidery machine.
Here are some popular choices:
Free:
Inkscape: A free vector graphics editor with the Ink/Stitch plugin for basic digitizing.
Sewing & Embroidery Software (SERF): Free software with limited but beginner-friendly digitizing features.
Paid:
Wilcom Embroidery Studio: Offers powerful tools for advanced digitizing and editing.
Embrilliance Enthusiast: User-friendly software with various features at a good price point.
Brother PE Design: Ideal for beginners with Brother embroidery machines.
Step 2: Preparing Your SVG
Simplify the design: Remove unnecessary details or intricate lines that might not translate well to embroidery.
Optimize colors: Limit your color palette to what your machine can handle (usually 6-12 colors).
Convert to paths: Ensure all elements in your SVG are outlines (paths) for proper stitching.
Step 3: Importing and Converting
Import your cleaned-up SVG into your chosen software.
Follow the software's specific instructions for converting to an embroidery file. This typically involves:
Choosing stitch types: Select appropriate stitches for different parts of your design (satin stitch for filling, backstitch for outlines, etc.).
Setting stitch parameters: Adjust stitch density, length, and direction for desired effects.
Color mapping: Assign thread colors to different parts of your design.
Step 4: Digitizing Tweaks and Adjustments
Preview and test: Most software allows you to preview your design on a virtual embroidery machine. Check for stitching issues and adjust paths or settings if needed.
Refine stitch types and parameters: Experiment with different stitch combinations to achieve the desired look and texture.
Consider thread types and colors: Choose thread that complements your fabric and design aesthetic.
Step 5: Export and Embroider!
Once you're happy with your design, export it in a file format compatible with your embroidery machine.
Transfer the file to your machine and prepare your fabric and thread.
It's finally time to see your creation come to life! Embroider your design, following your machine's instructions.
Bonus Tips for Success:
Start simple: Begin with basic shapes and designs to get comfortable with the conversion process.
Practice digitizing: The more you experiment, the better you'll understand how different stitches and settings affect your final outcome.
Join online communities: Connect with other embroidery enthusiasts for tips, advice, and inspiration.
Don't be afraid to ask for help: If you get stuck, consult software manuals, online tutorials, or seek assistance from experienced digitizers.
Remember, with a little practice and this guide as your compass, you'll be well on your way to transforming your SVG dreams into beautiful embroidered realities!
Further Resources:
Websites: Needlework Tips and Techniques: https://www.needlework-tips-and-techniques.com/
Books: "The Complete Book of Digitizing" by Jeannette Douglas, "Digitizing Designs" by Laura Ashley
YouTube Tutorials: CreativeBug Cutwork Embroidery Masterclass, Bluestone Creations Cutwork Basics
Online Forums: Embroidery Forum
With these additional resources and the knowledge you've gained, you
Read the full article
2 notes
·
View notes
Last Seen Blogs

phoenixashbringer
you will know my name is the lord

museum-of-empathy
creative studio

himynameislina
lina

itsaliving-blog
triggerhappy.

thatgidgetismine
That Gidget is Mine!