#sewblr
Text
Finished my art book project for a class! Not the usual thing I knit, I’ll admit, but I’m so proud of how it turned out.
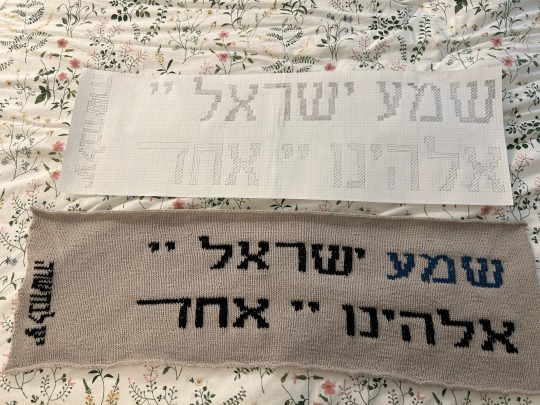
First, the charting was fine but the actual duplicate stitching was a NIGHTMARE to get right. I had to rip out ל so many times 😭


Making the scroll poles was a Learning Experience involving wood stain and super glue. Sewing on the canvas back was somehow the easiest part! Anyway, I’m super pleased with the result and I’m excited to present it to my class.
Skip the read more if you’re not interested in hearing about my artistic decisions :)
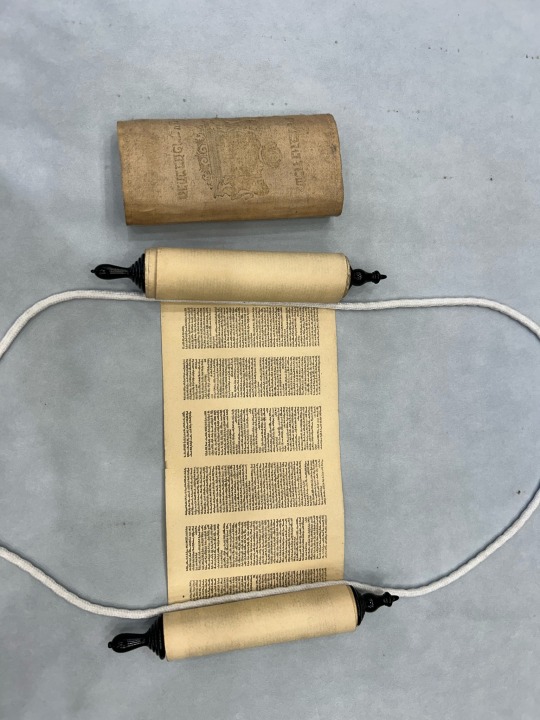
Part of this final assignment was to create something based on items in the library collection at my workplace. There’s a beautiful, giant 19th century Torah that I’ve viewed several times and haven’t been able to forget the sheer comfort and awe of being able to sit down for an hour or two and just read the Torah.
But there are rules to interacting with a Torah (both Jewish and archival rules): do not touch the text. Do not touch the parchment. Do not unroll without assistance. No, we can’t repair the holes and whatnot in this manuscript because 1) she’s super old and 2) we have no idea how to do it (which makes me sad!! She needs a good cleaning)


I also got to view a teeny miniature Torah from the library’s EXTENSIVE miniature collection.
So I decided I wanted to make a representation of the Torah that encouraged touch, and interacting with a text through another sense. This one only has the Shema stitched in it (funny, because no one is going to be reading this aloud to a congregation so no one is technically going to hear it). I made the first word blue in the Jewish manuscript illumination tradition, which wouldn’t illuminate just one letter, but rather the whole word, so as not to place one letter above another in importance. The blue is also reminiscent of tekhelet, a probably-blue dye mentioned in the Torah.
I also did not write out G-d’s name because Obviously Not. I’m not an official scribe and I also don’t want smartass or ignorant goyim viewing my art book and going “tehe I know how to pronounce that” when they see the tetragrammaton and just. Saying the Name.
All this to say, I’m so happy with my final project and I hope I get an A.
122 notes
·
View notes
Text
Wednesday, November 29.
You reap what you sew.
Never have truer words been spoken. But they come as good news for Tumblr's sewing community, however, who have been sewing some absolute delights. Some real œuvres d'art. Some winner-winner chicken dinners.
As luck would have it, #sewing is trending. And it's trending right now, so we have reaped a selection of these very dinners for your eyes only. We have then asked ourselves just what did we do to deserve y'all, and your resplendent talents.
#today on tumblr#sewing#sew#sewblr#crafts#sewing machine#crafting#sewing project#textile arts#crochet#sewing patterns#sewing tutorial#sewing tag#craftblr#contemporary art#artists#artists on tumblr
1K notes
·
View notes
Text
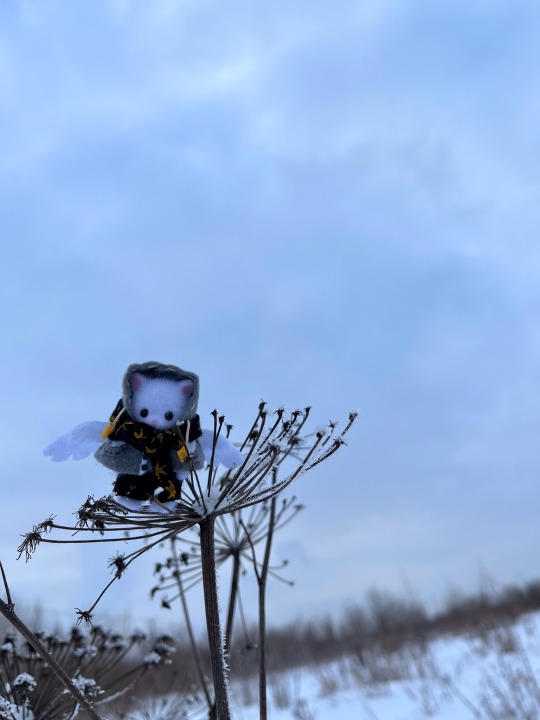

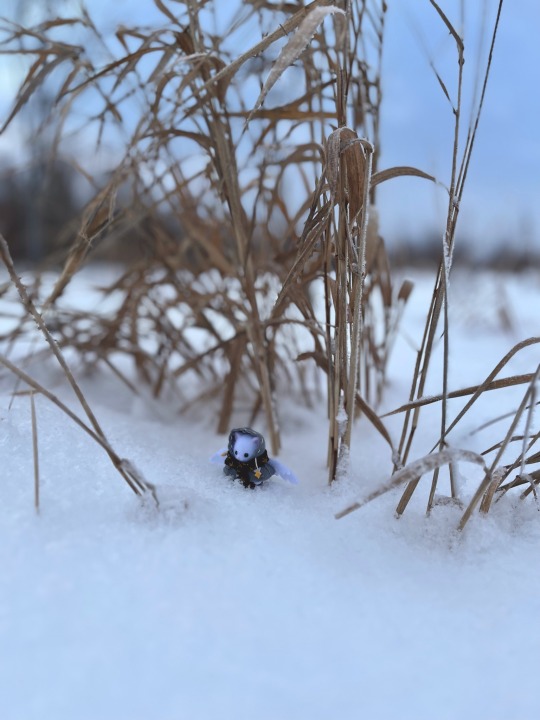
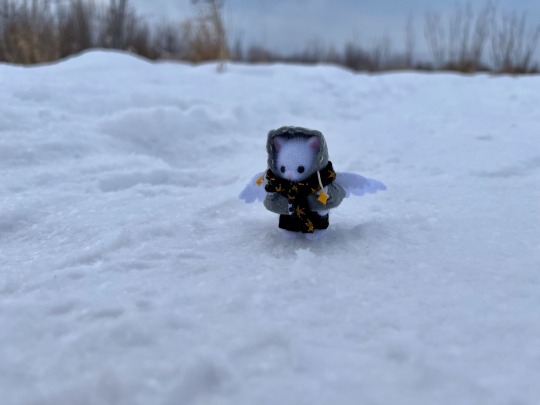
I made an outfit for my little persian cat! He goes on a long snowy adventure 🌨
I hope his tiny wings wont get too tired.
896 notes
·
View notes
Text
Just saw someone claim that “the sewing machine will not hurt you (probably)” and I am shocked and appalled. Sewing machines are power tools. They are dangerous. Even a skilled user can get careless or unfocused and seriously injure themself. Needles break and can go flying, and if you’re at the wrong angle and without eye protection, that means they go flying into your eye. You can sew through fingers. It is genuinely is unsafe to tell people, especially in a post geared towards beginner sewists, that sewing machines are not dangerous.
569 notes
·
View notes
Text
Just saw a post about creating art and I want to share with y'all the project I've started.
I'm going to sew a life size, 1:1 ratio scale Enderman.
I've worked out all the calculations for the dimensions based off the information given by the the texture and data given by Minecraft.
He will be 290 cm (about 9'6") tall. His arms and legs are all 174 cm (about 5'8") long. The width of both arms and legs is 11.6 cm (about 4.57 inches).
I have all the calculations laid out as well as an estimation of the pattern layout. I'll reblog with the images as soon as I have my notebook handy.
It's going to be a very expensive and time consuming project but I'm really excited to do it :3
9K notes
·
View notes
Text
It was green, so I bought it
Fabric stores are extremely dangerous; in this essay I will
734 notes
·
View notes
Text
FREE POETSHIRT PATTERN
Some assembly required
Ok so. I made a sewing pattern that involves a lot of maths on the end users part - this is the only way I, a complete pattern making novice, can make this 100% size inclusive. Luckily it’s super simple and it just a whole bunch of rectangles.

Yes it’s written in cm. Bite me.
So to elaborate a bit:
It’s pretty straight forward. You plug in your own measurements in the places it’s needed.
Body x2: should be twice your either shoulder width or your widest point (if you’re more pear shaped you might want to use your hip width) by the length from your shoulder to about mid thigh* (you can make it as long or short as you want. This could probably also work as a shift pattern in a pinch). In one of the pieces, you should cut a slit in the middle, which as shown above should be about from your neck to your sternum.
Sleeves x2: these should be 2-3 times your bicep measure (this will determine the poofiness of the sleeves), by your arm length. Adding a few cm to the length can be a good idea here. I usually just round up to what seems most logical.
Cuffs x4: your wrist measure + 3-4cm of ease, by how ever long you want them - 5-10cm is a good place to start.
Collar x2: your collar measure** by however tall you want your collar. Keep in mind that it will be folded over.
Gussets
Oh glorious gussets. The whole reason this pattern works! But also where it gets a bit mathy
Sleeve gussets: these are square. The diagonal should be about 1/6 of your total armscye (all the way around). Rather a bit too small than too big - it can fuck up the fit (it did for me)
Shoulder gussets: these will depend wholely on how buff your trapezius muscles are. If your neck/shoulder is at a right angle, they’re not strictly necessary, but if you’re super buff, they’re very necessary. I’d say an average shoulder gusset is about 5-7cm, but it’s up to you.
Reinforcements
Again, these aren’t strictly necessary, but if you want your shirt to last it’s a good idea to put them in. You can choose to use between 5 and 10 total. These don’t need to be very big, they just go at any split in the fabric. About 2,5cm is good.
Instructions
I used these videos for assembly instructions
youtube
This is going to be hard without pictures…
youtube
youtube
*you can also keep the body as one piece, which should then be twice the length you want it. The slit at the neck will also have to be cut in the middle of the piece.
**your collar measure is the measurement at your neck going over your collarbone rather than tight to the neck.
302 notes
·
View notes
Text
Loft's Tunic
The finished product! Loft is a Link from @bonus-links by @ezdotjpg. The weaving process is detailed here for the alpaca overtunic. The undertunic was hand sewed in linen, and the amber necklace is hemp. Pleated pants were from a past project. Sadly, I do not own a Goddess Harp, so a Turkish lyre will have to do.
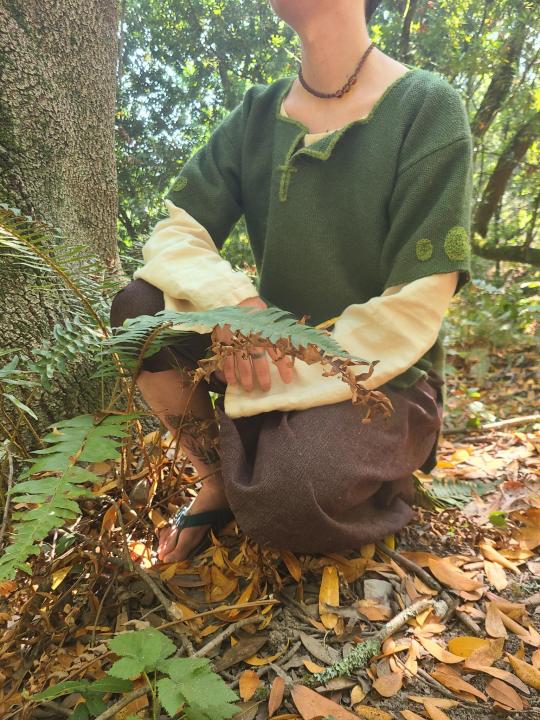
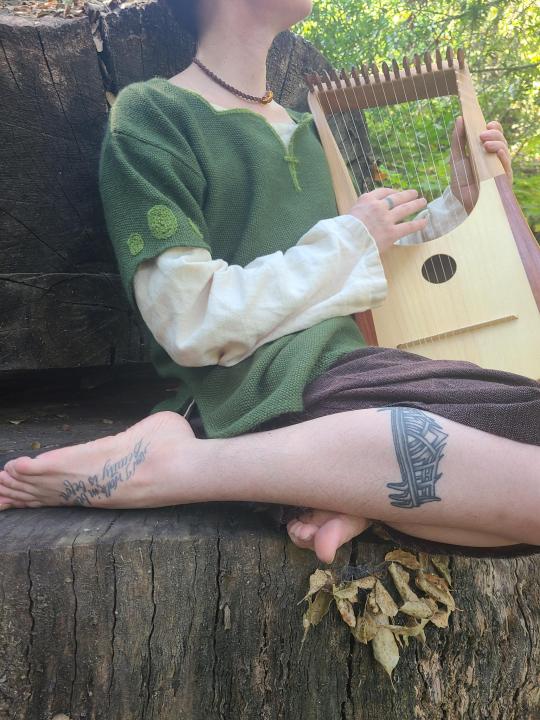

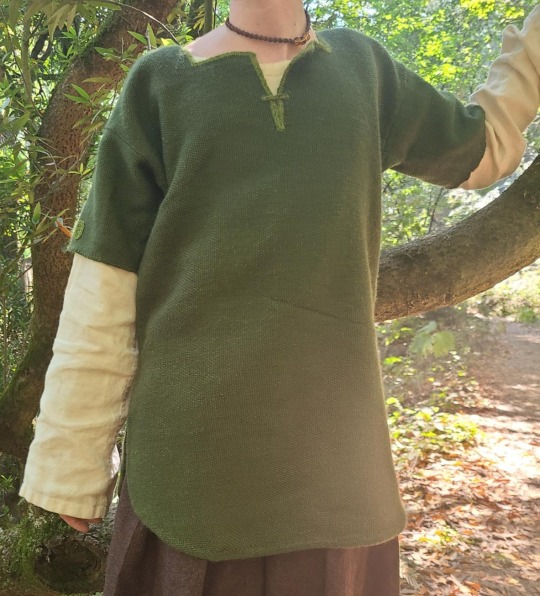

[IDs in Alt Text]
Much gratitude to one of my partners for driving me out to Huckleberry Reserve Faron Woods and taking pictures.
#still not a#cosplay#T sadly has not given me Loft's looks#i could maybe pass as mage#i just like em's depiction SO MUCH#he looks SO COMFY#i do not even like sksd#i just saw his tunic and was like 'hehe warm'#weaving#artistic shenanigans#artisticshenanigans#sewing#fashion#sewblr#craftblr#rigid heddle#natural fibers#tunic#loom#yarn#hand sewing#bonus links#bonus loft#id in alt text
662 notes
·
View notes
Text
The perks of working at a fabric shop
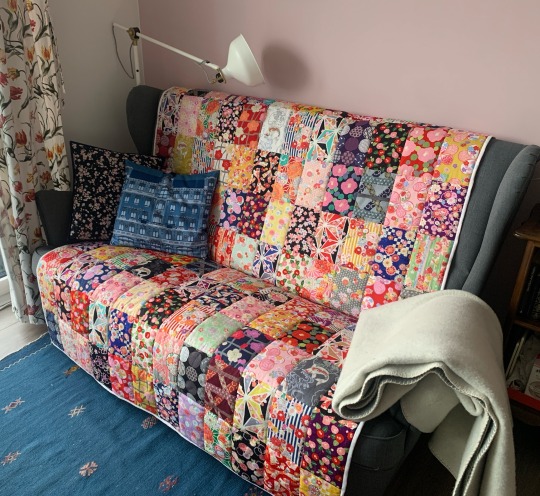
Last summer, I got a bunch of surplus fabric samples from my boss, saving them from the trash.
I knew I wanted to make a blanket from them right away and spent a good bit of time counting, sorting and planning the arrangement. I tried to spread the colours and different patterns as evenly as possible and went for an otherwise simple approach, as this was my first time quilting anything bigger than a pillowcase. It was at times super difficult to wrangle this under my sewing machine and handstitching the binding all around took forever. I might add some more intricate stitches on the individual rectangles at some point, but for now I really like how it turned out and it makes for a fun cover for my couch.
#sewing#patchwork#quilting#quiltblr#quilt#handmade#japanese fabric#japanese patterns#upcycling#sewblr#my posts#made by me#mine#home decor
172 notes
·
View notes
Text
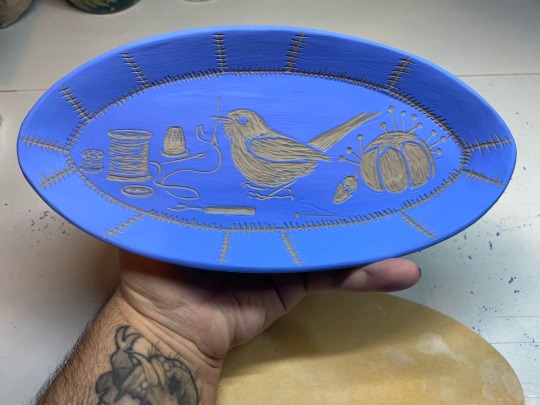
tailorbird is here to mend your life
#reserved#pottery#ceramics#ceramic#sgraffito#ceramic art#carving#bird art#bird#birds#tailorbird#sewing#sewblr#quiltblr
391 notes
·
View notes
Text
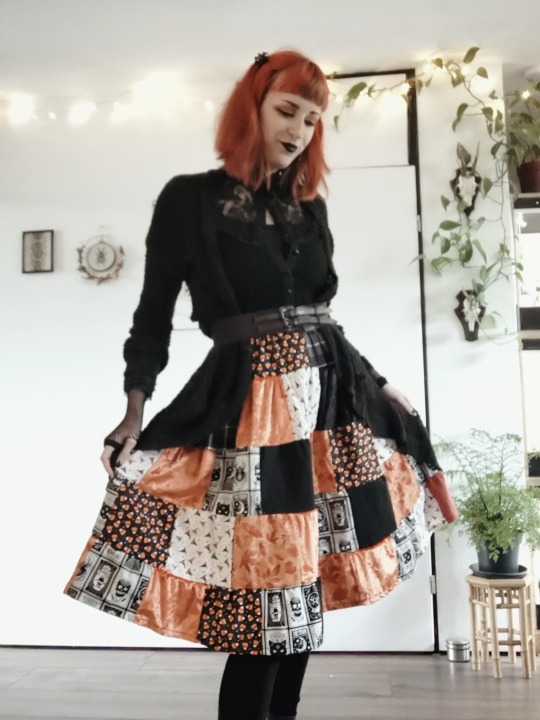

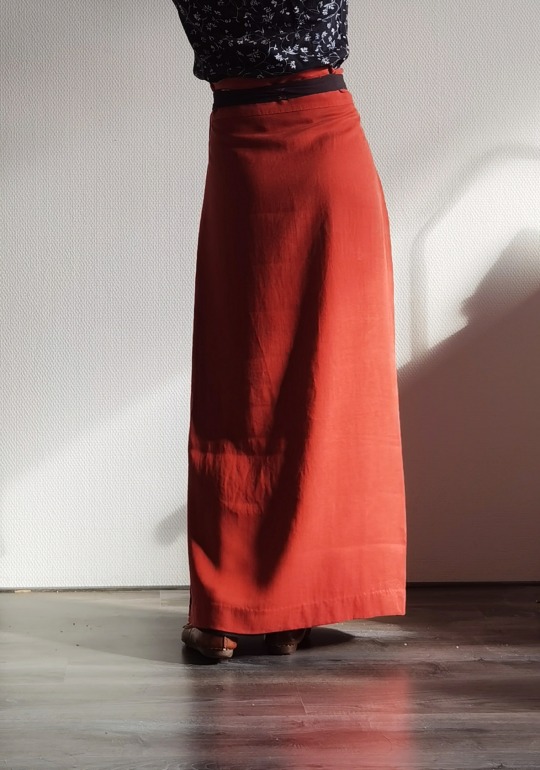
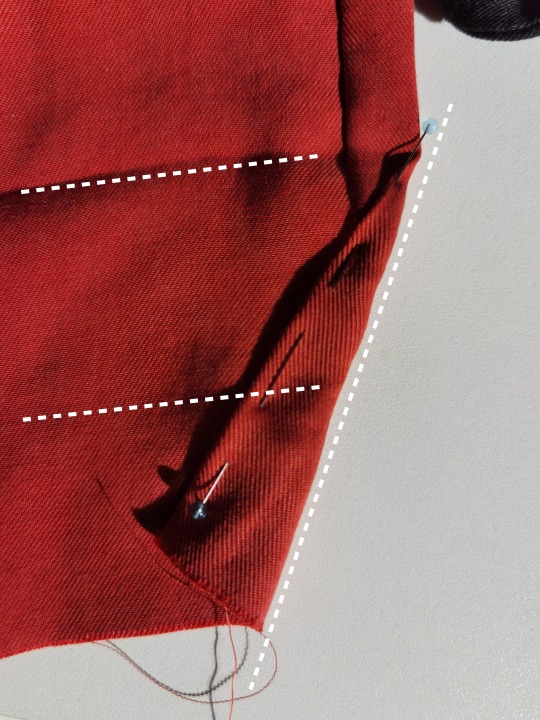
Finallyyyyy finished this patchwork skirt! I'm so happy it's done
#mine#sewing#sewblr#handmade#goth#orange hair#it was SUCH a pain to make because i used crap thread for most of it
242 notes
·
View notes
Text
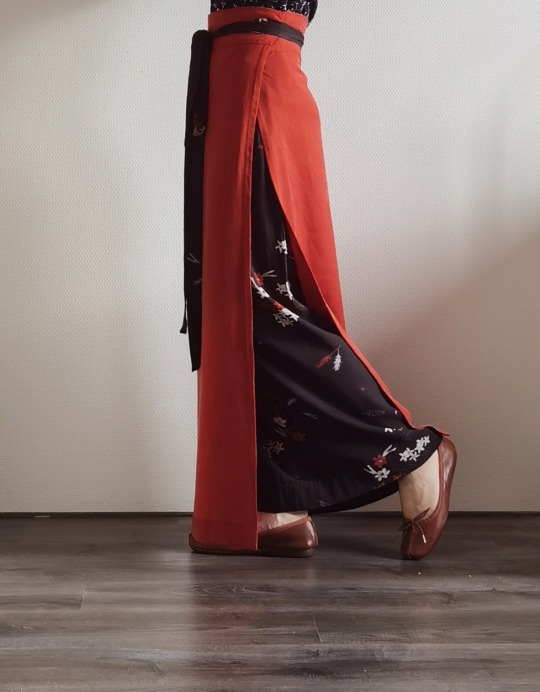
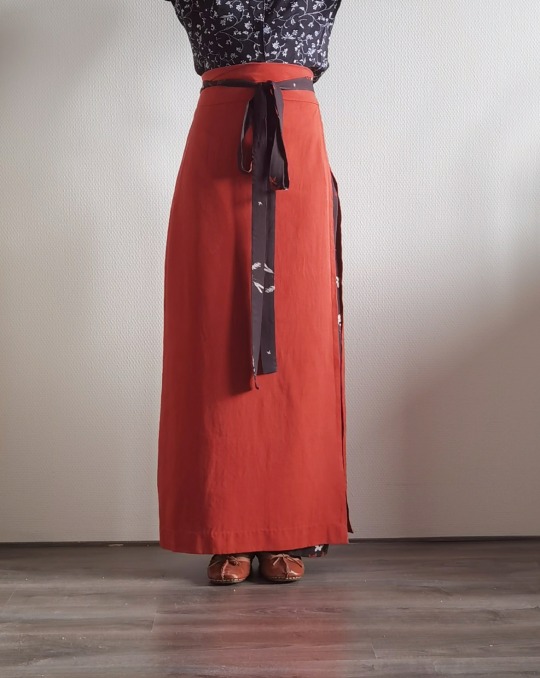
October, 2023 | Two-pieced skirt from Southern Song Dynasty (intro+tutorial)
Introduction
(Note: for now I’m not making a bibliography for this article, but if you are interested I’m more than happy to send the sources.)
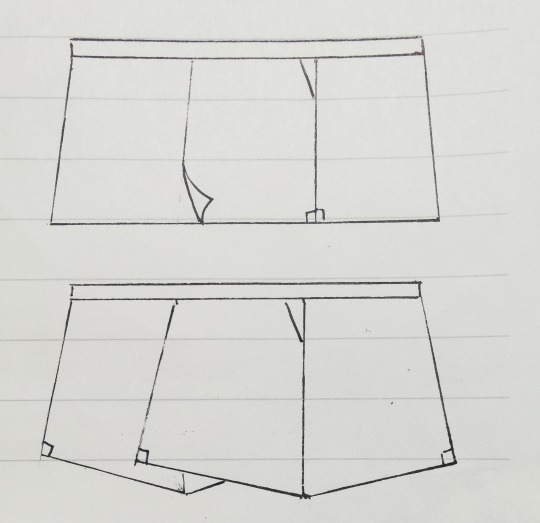
The two-pieced skirt (liǎng piàn qún) is a type of skirt from the Southern Song Dynasty (1127-1279). It is also known as xuàn qún (literal translation: circle/swirl skirt). As far I know, there are two sets of surviving samples of these skirts, one from the tomb of Ms Huang Sheng (this was her full maiden name - she died at 17, one year after getting married, in 1243) and the other from the tomb of Ms Zhou (also her maiden name - she died possibly at 35 and was buried in 1274). The main stylistic difference between these two sets of two-pieced skirts is that those of Ms Zhou had a relatively large difference between the hem and waist measurements (the hem is 15~20cm wider than the waist circumference), whereas those of Miss Huang Sheng had a small difference (approx. 10cm).
Below is a diagram showing the construction. The skirt is composed of one upper piece and one under piece. Each piece consists of two panels which are trapezoids or (roughly) rectangles. For the sake of convenience, we shall call them the centre panel and the side panel. You can see that the centre panels of the two pieces overlap, and the whole thing is fixed onto a waist band. All surviving samples have relatively wide waist bands—about 10-14cm in width. One strip on each side of the waist band is used to tie the skirt.
Pattern details
The modern common agreement is that the panels are usually right trapezoids (trapezoids with two right angles). I don’t know whether this is historically accurate, as some people think they were pentagons, but I doubt we can ever find out from what is currently available, just because the fabrics had been damaged and distorted over time. Assuming that they are right trapezoids, there are two different ways to piece the panels: you can sew the edges with two right angles together, or you can sew together the opposite edge with two non-right angles together (see diagram). They yield different results. A skirt made with the first method would have more of an A-line and more flowy. One made with the second method would wrap more snugly around the torso and give an H-shape.
You might have noticed that the centre panel is a bit wider than the side panel. This is because the centre panel would be worn in the back and the side in the front. A good starting point is to make the centre panel 10cm wider, but this of course depends on one’s body shape.
Another modern agreement is that the skirt better compliments a flat body shape with gentle curves (as has been the mainstream high-class aesthetics for the female body for a very, very long time right up to now). The most prominent issue with a difference between waist and hip measurements is that the skirt will bunch up at the lower back. To alleviate this issue, darts are used on the sides. Another way is to wear a petticoat, some underpants, or just something around the waist to enlarge the waist measurement. The skirt is not designed to accommodate a large difference between waist and hip circumferences (>30cm probably, though it starts to get difficult at 25cm).
Applying your measurements
(Numbers, when applicable, are in centimetres.)
You need your waist and hip circumferences. The skirt is usually full length. I like to make it as long as possible without the danger of tripping. It could be made shorter for thicker stiffer fabrics or a more modern look. Keep in mind that the skirt has a very high waist.
The length of the waistband is usually 1.7-1.9*waist circumference. In any case, it cannot be shorter than 1.3*hip circumference or it won’t close properly.
Now that you have the length of the waistband, you can calculate the upper edges of the panels. Let a be the length of the waistband, b the finished upper edge of the side panel. Then the finished upper edge of the centre panel is roughly b+10. Using the information discussed in the previous section, we have an equation: a=2b+b+10. This is your starting point—adjust as needed.
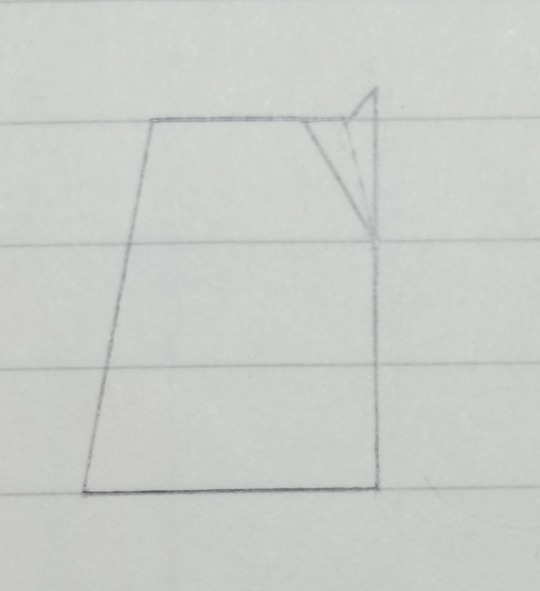
Triangular darts. There are a few ways to make them and this is just one of them. Let c be the width on each side of one dart. c=(hip-waist)/4. This means each dart will eliminate half of the (hip-waist) difference, and there are two darts.
c+b= total width on the upper edge of the panel. The bottom edge (i.e. the hem) of the same panel would be about 5cm wider than the upper edge.
The width of the waistband. If you would like to wear it without folding, 6-8cm is good. If wearing with a fold (which sometimes also helps reducing the bunching at the lower back), make it 10-14cm. Note that you need to cut the waistband doubling the width plus allowance.
The ties are usually 2-3cm wide. As for the length, try start from waist circumference+0.6*skirt length. I like to make it 20cm longer because I like long billowy ribbons. Like the waistband, you cut the ties doubling the width since you will fold it in sewing.
Then you would have something like this:
(measurements used: waist 65, hip 89)
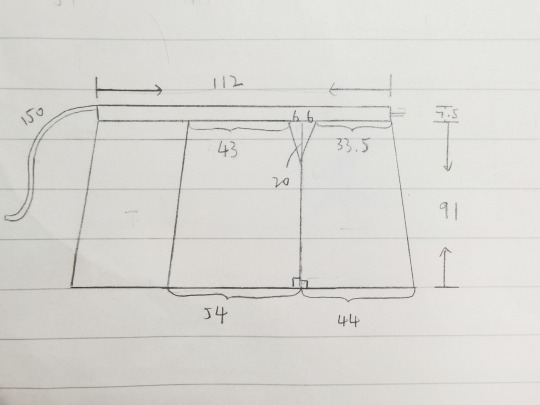
Be careful that you need extra fabric because of the fold created at the dart. (You’d need less fabric if you cut away the excess fabric in the dart.)
Fabric suggestions
This is important. Very very important. Because only the right fabric is worth your time and produces the desired result.
In general, choose something soft, drapey and that conforms to your body. Two or three centimetres of difference in calculation hardly matters when you use a good silk.
Silk: a Chinese specialty called Luo is probably one of the best. Other types of soft drapey silks of medium weights are all fine. I don’t like the right side of silk charmeuse because it reflects the body curves a bit too much.
Viscose: use silk as a guide. I find that twill weave or crepe tends to be more drapey than plain weave.
Cotton/linen/wool: some of these are fine too. If using a thicker wool, only use it for the top piece and use a thin fabric for the under piece of the skirt.
An extra note on cutting out the pieces:
If you are making a skirt with contrasting colours/prints, pay attention to where you cut so that the best part of the pattern of the under piece can actually show through the slit.
Construction
Piece together the side panel and the centre panel, using French seams to make the side seam. Sew all the way from top to bottom.
Sew the dart and press it towards the back. (Alternatively, you can cut away excess fabric, or even make a pocket at the side seam.)
Do Steps 1 and 2 for both the upper and under pieces. Finish the allowances on the sides by folding twice and doing an invisible edge stitch. Leave the hem unfinished.
Lay the upper and under pieces together, baste and check fit. Sometimes the centre panel don’t overlap perfectly and that’s fine.
Finish the ties, including the shorter edge not attached to the waistband.
Sew the outer side of the waistband to the skirt panels by laying them right sides together. Press open.
Fold the waistband right sides together and sandwich the tie in between. If wearing the waistband unfolded, you need to attach the tie along the top of the waistband on the under wide and in the middle of the waistband on the upper side (see picture). Sew. Do this for both short edges of the waistband.

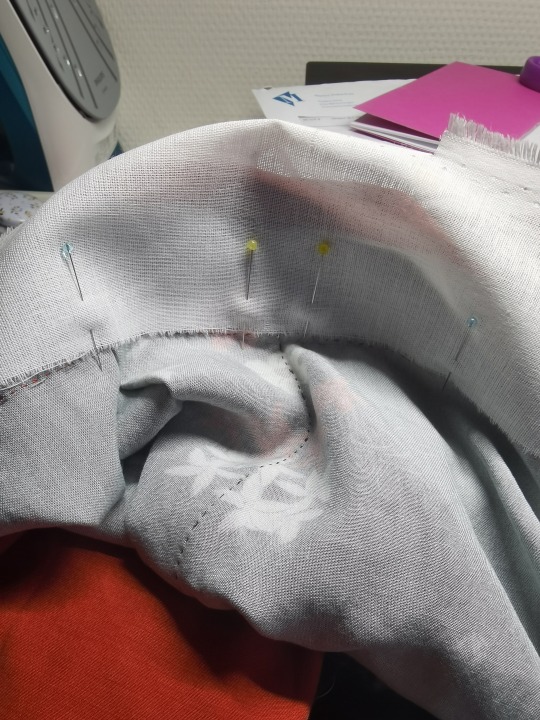
(You can interline the waistband if the fabric is too soft. I used a non-adhesive cotton interlining and cut it without allowance and stitched it onto the allowances of the skirt panels. Whatever method suits you should work.)
Turn the right side out and finish the inner side of the waistband by folding in the allowance and using an invisible stitch/felting stitch.
Finish the hem. For the corner, I prefer to do a three-fold corner so that I don't have to trim away the excess.
Wash and press. Et voilà!
386 notes
·
View notes
Text
As we approach the marathon crafting that is Right Before The Holidays, this is your annual reminder to please remember to take frequent stretch, water, and food breaks to keep yourself well friends 💕
1K notes
·
View notes
Text
There should be a rule that if anywhere in your 'I made this for just 8 bucks!' thrift video you mention you mention supplementing the purchased fabric with 'Stuff you just had lying in your stash' I should be allowed to come and confiscate your fabric stash until you understand that even though you bought it last year, it still cost you money that factors into a project's final price.
#home sewing#budget sewing#thrifting#thrift fabric#sewblr#sewing#i can get past not factoring in threads zips and buttons into the final price#but this is my big no-no
206 notes
·
View notes
Text
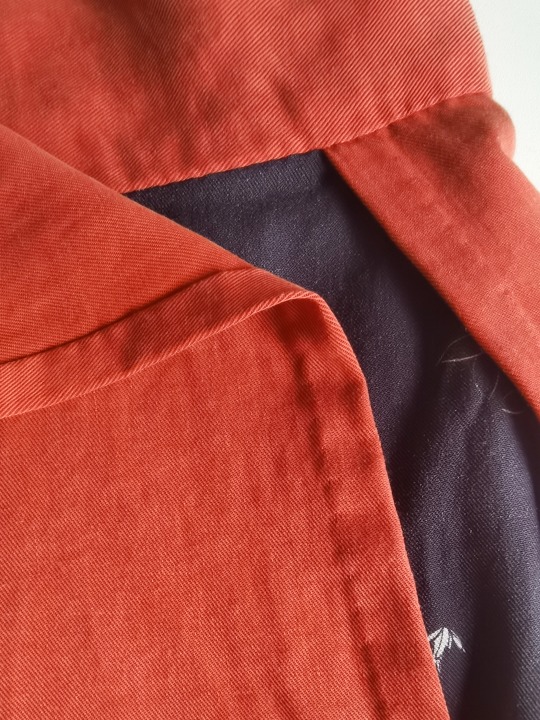
First sewing project ✅
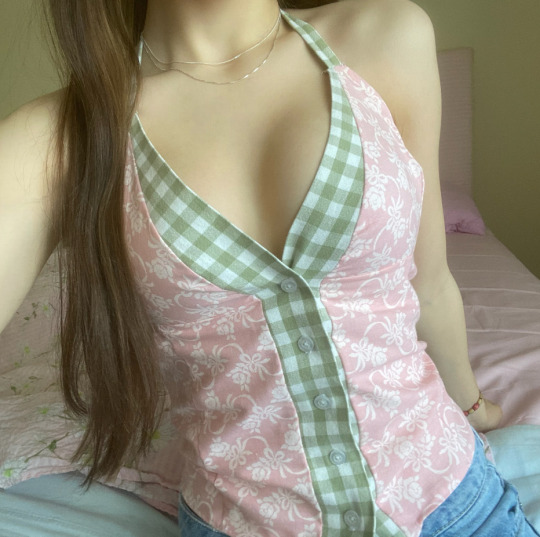
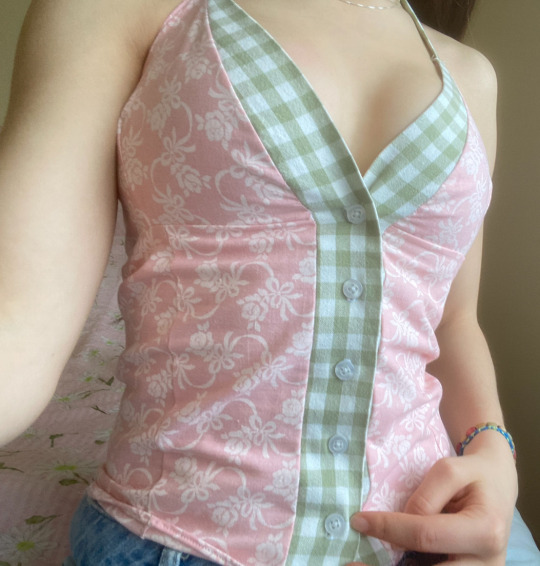

It’s a top!!! Pretty cute right? No!😡
The problem with it is that it’s not made out of clothing fabrics so it doesn’t fit very well and it turned out veryy revealing sadly. I made the halter neck too long. Oh well I’ve gotten a lot of experience from this and it’s a good first try for not having a pattern to follow. 🪡 🎀 🧵 🪡
(Also look at me doing the little coquette clothing haul scrunch on the sides of the top lmao😭)


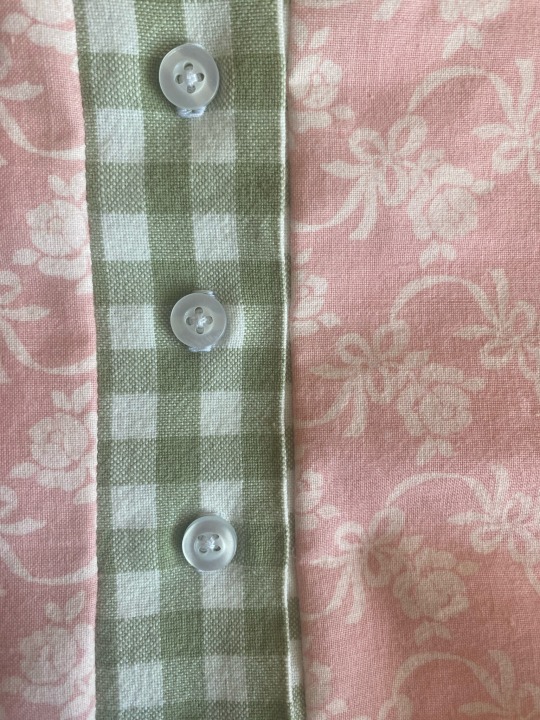
During this project I’ve learned how to sew buttonholes!!!!!! lol I always misread that word. When you sew buttonholes you use a special presserfoot. The picture in the middle are practice buttonholes. 🪡💕
That’s all!!! I’m hoping to actually find some sewing patterns soon as this was a bit of a struggle but other than that I did alright!!!😊
Also ignore how deathly pale I am!!!! Geez lol😅
I LOVE YOU💕
#sew#sewblr#sewing clothes#recycling#coquette#coquette aesthetic#girly girl#cute clothes#cute top#sewing#sewist#clothing haul#girlblogging#girly blog#becoming the best version of yourself#becoming that girl#pink coquette#pinkcore#y2k aesthetic#y2kcore#art#artists on tumblr#dream girl#girlblog#girly fashion#fashion#girly stuff#kawaii#diy sewing#pale girl
117 notes
·
View notes
Last Seen Blogs