#sewing 101
Text
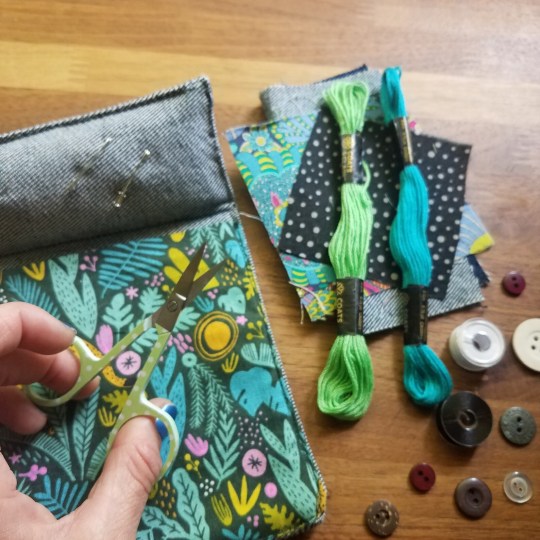
From Scraps to Quilt :: what to do with the overflowing leftover fabric pile
From cut offs of clothing taken in, to left overs from sewing kits I make, to off-cuts from a local sewing supply shop there are lots of colors and textures populating my scrap basket.
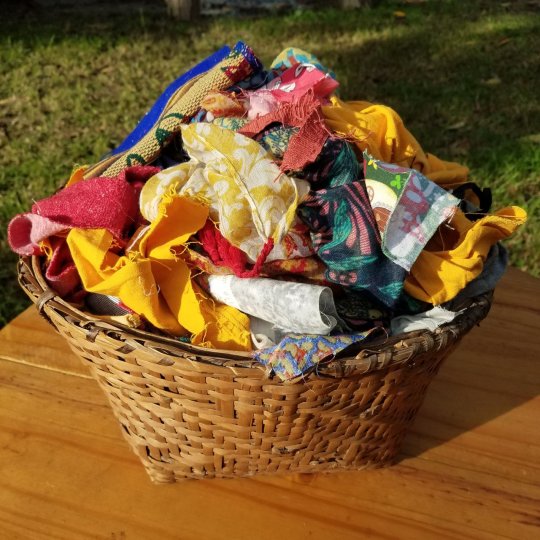
And of course, the pile is ever growing as I upcycle and makes so I wanted to do something to showcase the diversity of fabric I have acquired over the years.
As a child I admired the quilts passed down to my mom and the new quilts she and my sister made and always wanted to try making one myself. At the moment, more than a blanket, my greatest need is to update chair cushions that are worse for the wear with permanent stains from idk what.
So, a quilted cushion it is!

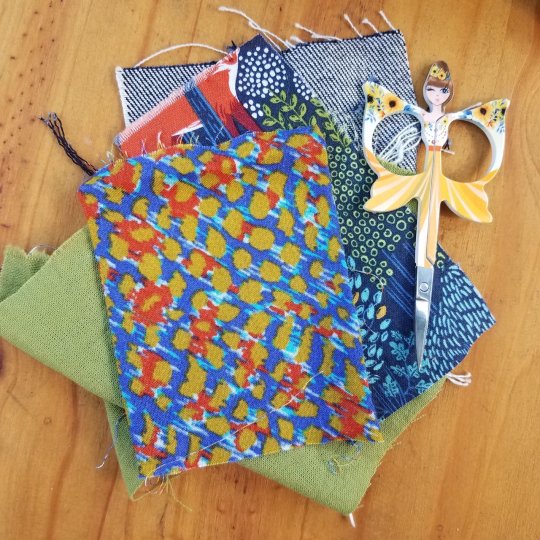
Let's begin - Lay flat the base fabric you will be quilting over. In my case it is a pillow case though you may use a square or rectangle fabric to make a blanket or table mat.
Then, start to plan the patched layout. I wanted to highlight the natural shapes of the patches and the eclectic theme of our kitchen, so I used a variety of shapes and patterns right out of my scrap baskets. With the help of an iron I then pinned down the patches, being sure that they overlap with now raw edges showing.
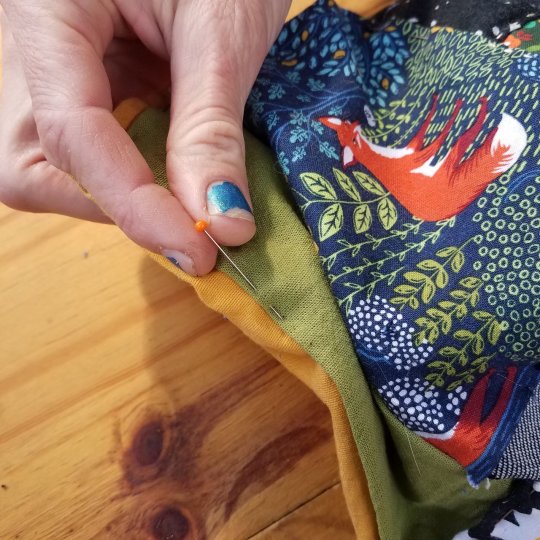
The first pillow I made I put together with a sewing machine which was fine but for the second pillow I wanted a more rustic look at secured the patches by hand with embroidery floss. For a large project, like a quilt, sewing with the machine would be most practical though hand sewing adds a lot of character.

An important note about embroidery floss - in many projects you will need to split the floss for it to actually fit through the eye of the needle and through tighter fabrics. For this quilt I used three strands, in other words half the floss.
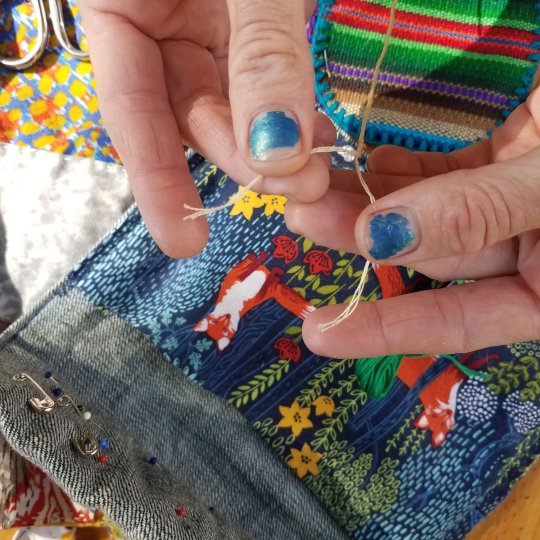
And then, simply, sew! This is such a relaxing project to do outside on a sunny day or by the fire on a rainy night.
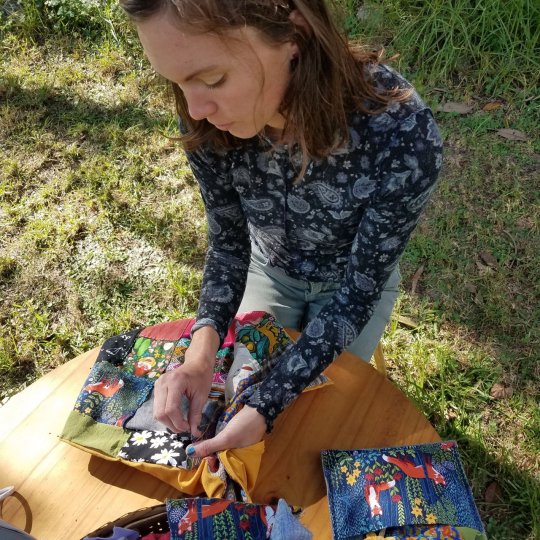
In the end I am so happy with the resulting and glad to have found a use for my collection of scraps before they outgrew the basket. And for those long, thin fabric scraps, not to worry, I have another scrap-cyling project coming soon! Happy Crafting <3
#cottagecore#scrap busting#scraps#upcycled fashion#upcylcing#DIY#Sewing 101#slow stitch#cottage core#cottage crafts#slow fashion#handmade#quilts#quilting#sewing projects#fiber art#fibre art
14 notes
·
View notes
Video
youtube
new video!! trying to help people who never learned how to sew a patch on :) it’s super easy and hopefully has clear instructions :) leave me a comment to help out a lil spooki jus tryna help the babygoffs
39 notes
·
View notes
Text
How to bind a neckline with bias tape
One easy and neat way to bind a neckline when making your own clothes is by using bias tape.
This Sew Guide article will show you six different ways to bind a neckline with bias tape.
Don't have any bias tape? Check out my bias tape 101 post to learn how to make your own. It's a great way to reuse fabric scraps!
#wasteless crafts#bias tape#neckline#sewing techniques#sewing#sewing 101#sewing for beginners#binding necklines#fashion#fast fashion#slow fashion#sustainable fashion#zero waste#zero waste crafts#fibre arts#fibre crafts#diy#how to#tutorial#reduce reuse recycle#stash buster#fabric scraps#bias
146 notes
·
View notes
Text
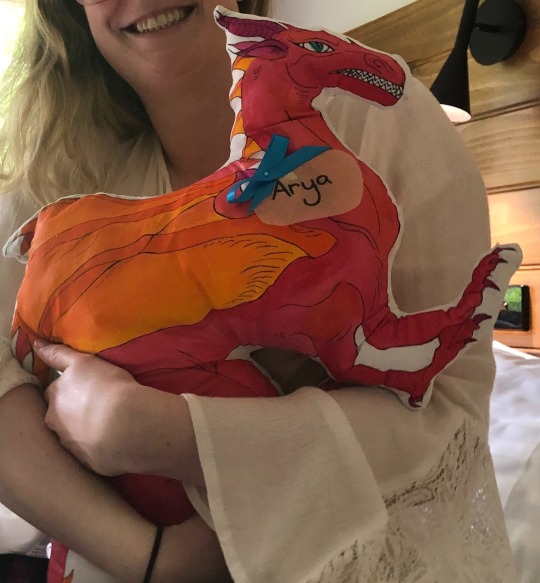
When I was a little child, there was a particular library book I checked out week after week, endlessly renewing it as much as I was able. The book, How to Raise and Keep a Dragon by John Topsell was a quasi-nonfiction guide to, as you guessed, rearing different species of dragons. I loved it. Tiny-me had plans.
As an adult, I tried to buy it a few times. No dice. The book was so old that no mainstream bookseller stocked it. Even when I tried niche websites recommended by various booksellers and librarians, I still couldn't find it. It was sadly lost to time, apparently not popular enough to make it into the archives.
But.
My best friend had a copy of that book. We're going to call her G, for several reasons not relevant at the moment. I was discussing my search with G one day, for some reason I can't remember now. She got a funny look on her face, asked me a few questions about the cover, listened to me do a very poor job of explaining with my hands how the hardcover copy had included a real gemstone in the dragon's forehead, and then went off to fish it out of her bookcase.
I was Gobsmacked.
I should not have been, given that the history of shared childhood books between us both would have made a circle with ragged edges, more so than a venn diagram, but I digress. The book came home to live in my house for a few months, and I was delighted by the chance to read it again.
Do people remember those type of books? Dragonology, Egyptology, The Stone Age - a way of introducing children to non fiction. They very earnestly spoke about the responsibilities needed to raise dragons, the practicalities involved. There was a record of registration you could fill out, if you had carefully considered the information to your self and felt you were responsible enough to to go through with adopting a dragon.
I vaguely remember filling out some of the riddle and puzzle questions in the Dragonology books. I would never have written in John Topsell's book, it was a library book.
But.
When I re-read G's copy at home, smiling over the familiar artwork, I was surprised to turn the page and find the painstaking, somewhat-wonky handwriting staring back at at me. Baby G, with her name spelled out in freshly-joined but still-not-quite-got-the-hang-of-this-yet cursive lettering. Baby G had filled the registration out in her best handwriting, in glittery green gel pen to denote the importance of the document. This was compared to the earlier, less important checklists done in plain black ink.
I read the registration certificate. Smiled. Smiled some more at the names listed for G's dragon, her dam, and her sire - Eragon was also a great book. Go off, Christopher Paolini.
Breed; standard Western Dragon. The box 'miniture' was ticked, to show that G's dragon was of the minature specic variety, rather than a full size dragon. This was, as she would later explain to me, chosen on the basis that baby-G felt it was the more financially responsible choice. Also so she could keep her dragon in her house with her, but we're not there yet.
I looked at that certificate. Looked at it again. Looked at the calendar, and then looked at the sewing machine I had just been given for Christmas.
G celebrates her birthday in January.
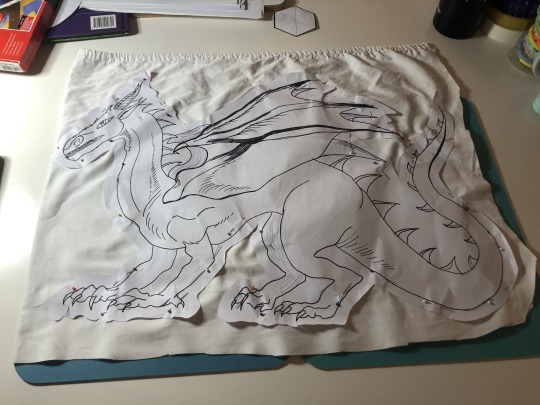
The template came first. I studied the different images of the standard western dragon through the book, picked my favourite, and re-drew it to a significantly larger scale.

Inking the design to the fabric, four times over probably took the longest.
I very subtly asked G the next time she was over (after hurling all dragon-related materials in a panic into the depths of my wardrobe) what type of colour dragon she would have, should it come up. As G later said, that type of question from me truly did not register as anything other than a question asked from theoretical interest. I transitioned the topic as discreetly as I could after she answered, and delightfully, my sneakiness went in one ear, out the other, and she forgot I had ever asked until several weeks later.
I enjoyed painting them.

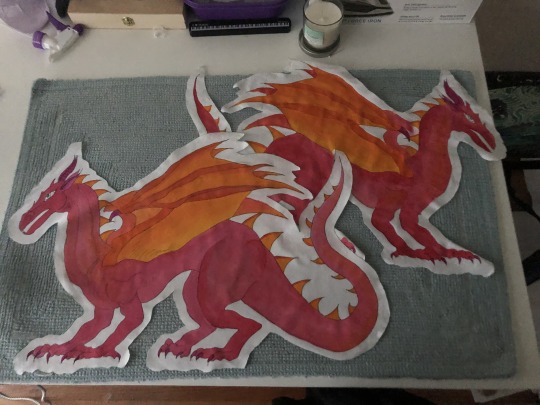

Don't ask me how many mistakes I made through this process. So many. I do already know how to sew, but it's been a long time. I'd been meaning to get back into it for a while.

Given that various aunts and grandmothers and my mother had a knack for calling when I was up to my elbows in either paint or pins, it became a family affair. Each of them peered at the project through face time and offered their advice.
Some of the advice I took, some I didn't. No regrets about sewing it in pink thread. Considerable regrets about accidentally slicing one of the feet in half and having to fix that.
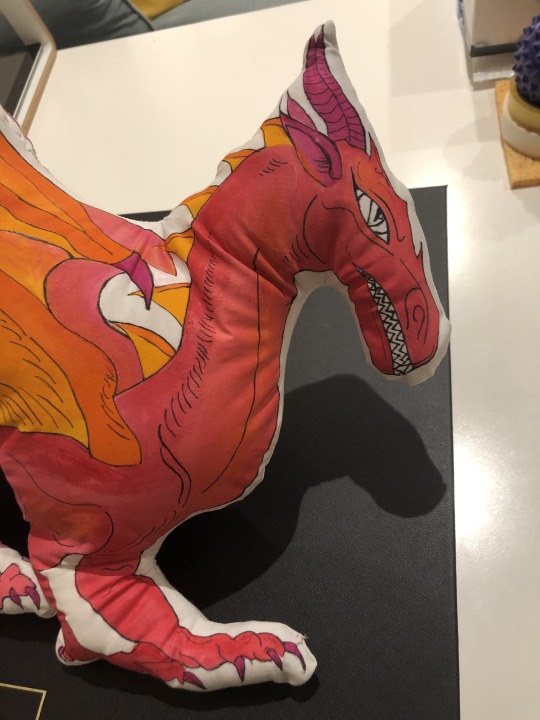
In the end though, she was finished.
I carefully pinned on her name tag, with the name baby-G had chosen with a little blue ribbon. A collar was unacceptable, this is a dragon, people, come on. Dragon's don't wear collars.
I put the book in the box, open to the registration certificate, and put the dragon on top. Wrapped the whole thing up with a bow and then refused to touch it before I sent myself mad trying to fix details that didn't really need to be fixed.
A bit late for her birthday, sure, but there we are. We'd gone for a trip off to nowhere for a weekend, to go try wine made out of blueberries and hike up a waterfall. (And climb on it. And swim in it. It was a very good waterfall).
I gave her the box, informed her she wasn't allowed to keep the box, just the contents (it was the only thing I had that was big enough for me to keep all of my A3 portfolios in, it had only been temporarily-repurposed as dragon housing), and then left the next bit up to the gods.
A surprise, sitting un-awaited for some 15 years in amber, to catch up to baby G and adult G together.
Happy Birthday, baby and adult G.

#StClaire speaks#How to Raise & Keep A Dragon#John Topsell#Joe Nigg#the thing about problems hammers and nails#except in this case it was childhood wishes and sewing machines#and as someone said#you were relearning to sew and you started with THAT?#well no#I started with a scrub hat#which kept the hair out of my face while I painted this#and then also that apron my aunt gave me the pieces to years ago that I refused point blank to do by hand#but yeah#101 mistakes later#and one re-attached foot#pretty happy with her#dragons
322 notes
·
View notes
Text
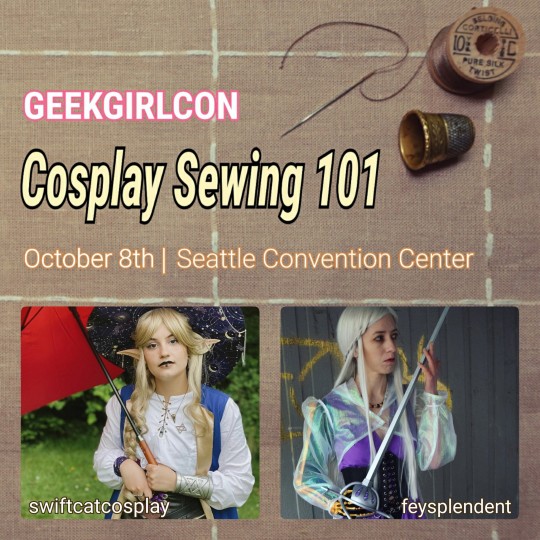
#I will literally make you sew#no more saying you cant sew#this is a threat#visit our panel please#geekgirlcon is a lovely time#geekgirlcon#geekgirlcon 2023#seattle convention#convention blogging#convention blog#how to sew#cosplay sewing#cosplay sewing 101
8 notes
·
View notes
Text
I made this Disney Villains pillow back in 2022, and I decided to make it again! If you’d like a custom pillow like this one, check out my Etsy store NerdyCreationsStudio!
#Disney#Disney pillow#disney villains#disney villains pillow#Ursula#Ursula pillow#maleficent#maleficent pillow#cruella de vil#cruelly de vil pillow#evil Queen#evil queen pillow#the little mermaid#sleeping beauty#Snow White#101 dalmatians#etsy#etsy seller#etsy shop#artists of tumblr#artists support artists#artists supporting artists#sewing#sewists of tumblr#sewingblr#sewist#support small business#support etsy sellers#support etsy shops#pillow
3 notes
·
View notes
Text
On an unrelated note, I have never believed Rhys’ mom made those dresses for Feyre. He is a secret seamstress and the reason they moved into the estate is because his sewing machine is stuck at the first house, and he’s afraid that someone will find out about his hobby of making dresses for the wife he didn’t have yet. Why else would they fit? He tailored them afterwards. Why does he have so many? He’s still at it. This is the only reasonable explanation.
#its required of a villain to know how to sew#how else would they make their cape and costume#Rh/ys knows how to sew#this is villain 101#which he was at least for the first book#debatable for the rest#He's at least 35% villain#this is basic math
126 notes
·
View notes
Text
Dylan felt plush
12 notes
·
View notes
Photo
☑ Determined
☑ Motivated
☑ Self Sufficient
☐ Smart
☐ Quick Learner
⍰ Capable
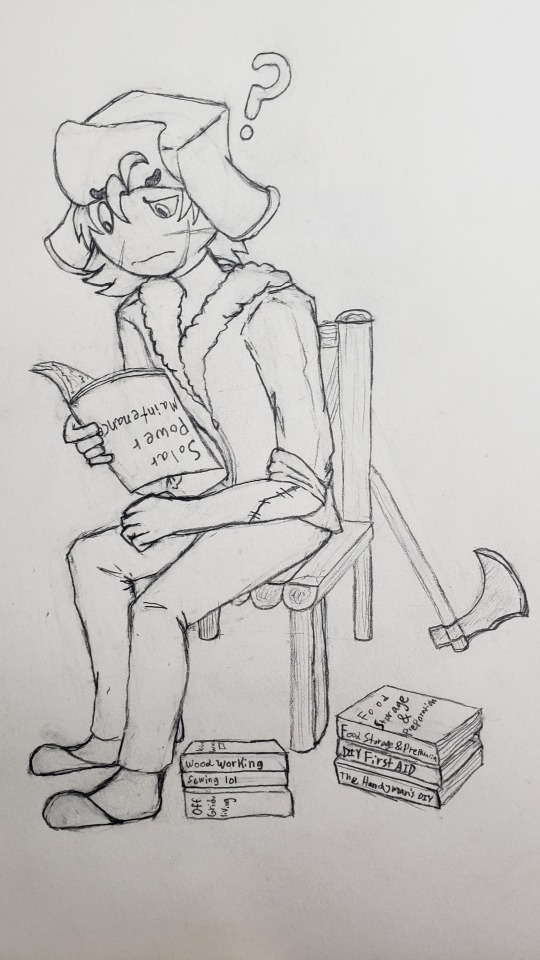
In my head canon, Alan tries to completely separate from society which includes dependence on utility companies. So how is he gonna run his tv to watch old slasher movies? How will he minimize fewer trips to civilization? By forcing himself to read up on esoteric topics and putting them into practice. He doesn’t have the internet to provide him tutorials so he’s doing it the old fashioned way.
He made that chair by himself! All those memories of him and Claude making wooden bird houses and feeders came in handy. He begrudgingly remembers to use a level and to make things as even as possible because of the unpleasant lingering memories of Claude’s harsh criticisms. He didn’t get any encouragement or praise whenever he did things right either. Claude just expected it from him. (All of this is my head canon by the way...)
I don’t think he realizes that the harsh criticisms were evidence that Claude cared about him. He was brutal on Jules and his cooking too, hammering in “mise en place!” into his brain.
89 notes
·
View notes
Text
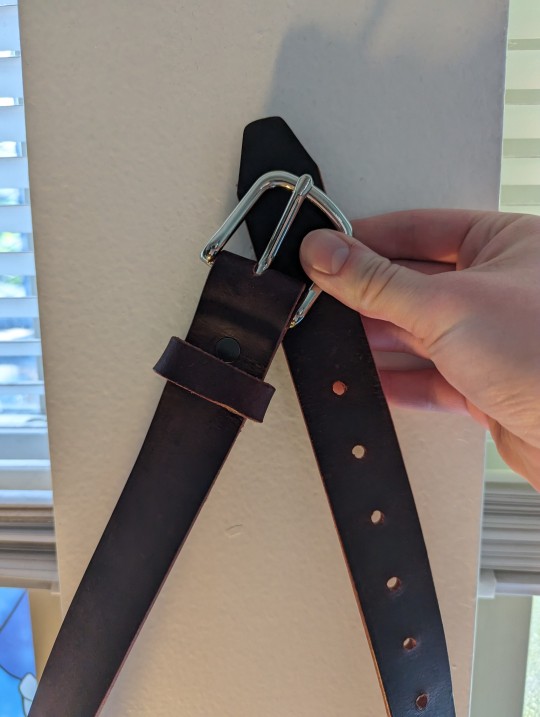
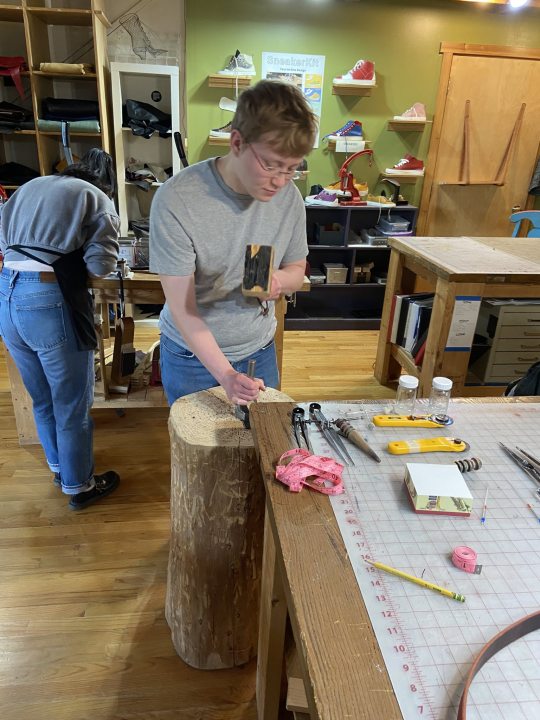
made a belt today!!!!
#found a school of leatherwork/shoemaking BY ACCIDENT yday and was able to snag a 101 class today!!!!#it rocks#they have a ton of industrial sewing machines#and a harness/collar course...#lll
9 notes
·
View notes
Text
Fabrics 101: Three Basic Types of Fabric
Let me guide you on the intellectual journey of fabric and the wonders of the grain line. The first step of sewing is understanding what you are trying to sew and how it is formed.
There are three types of fabrics: Woven, Knit, and Non-Woven
Woven Fabrics is created by weaving threads on a loom or other woven devices. The threads going vertical are the warp and threads going horizontal are the weft. These fabrics have little-to-no stretch and are used for more structured garments, like jackets, corsets, tailored pants, and structured dresses.
Knit Fabrics are stretchy fabrics created by the interlocking or interloping of yarn and fibers together. There are two types of knit fabrics: 2-way fabrics and 4-way fabrics. These fabrics are used more for sportswear, t-shirts, and garments that move with the body.
Non-woven Fabrics are not technically fabrics, but designed to resemble fabric and can be used as such. These fabrics are created with either short (stapled) or long fibers bonded together tightly using chemicals, heat, solvents, or mechanically. Some fabrics included interfacing (stabilizer for woven and knit fabrics) and felt.
If you would like some photos or graphics to go along with this posts, I will happy edit and added them for you! :)
Until we hear from our Goddess again.
Praise Be the Needle & Thread -Demi 🖤
#fabric#fabric 101#beginner sewing#sewing lessons#threads of night#patterns#craft#textile#sewing#class#cosplay#learning#education
10 notes
·
View notes
Text
Simple Slow Fashion :: taking out a too-tiny mini skirt
Picture this: you are searching through a pile of second hand clothing and find something super cute but ... way too small.

A couple of months ago I was in this exact predicament when a friend gifted me a pile of clothes that no longer fit her, or were in need of repair in some way. One item in the pile was this white mini skirt that had shrunk & shrunk over the years, making it unwearable to either of us.
Looking at this skirt I had a vision of what it could become with a little needle work. I saw myself taking out this skirt in a visible (and hopefully) fashionable way by adding panels of floral fabric on either side. So, I selected this and a few other items from the pile and took them home to be mended, up-cyled, or totally transformed and thus, fuel for this and future mending tutorials I will be sharing with the tumblr crafting community!
We have all heard of "taking in" clothing, especially in the context of hand-me-downs from older siblings. In this tutorial however, I want to do the opposite: "take out" this skirt and gift it to my younger sister.

She in return was the model in the pictures you will see throughout this post. Thanks Jana!
Step One ::
To begin we must do the most difficult part --- cutting up a perfectly good garment in the hopes of improving it. It is really important to plan well before taking scissors to clothing. As I want to add to the structure of this garment rather than taking it down to scraps, I was careful to leave the whole front of the skirt as is.

That is to say: to embark on this mend cut just behind the seam of the front of the fabric and keep the front pockets intact.
I did this by first marking with a pin where I wanted to cut then turning the skirt inside out so that I could clearly see the in-seam. Cut carefully, please!
Step Two ::
Now, I needed to add the extra panels to each side that will widen the skirt. Ideally, you would be making this alteration for yourself, or have the model nearby from whom you could measure just how much to add. My sister was far away while I worked on this skirt so I had to guess-estimate how much to add. It turned out I was pretty close but now wish I had added just a quarter inch or so more to each panel. Oh well!

Remember, the hips are a particularly curvy area of the body so you will likely need to add a bit of a curve to these panels. More than likely the edge of the front and back of the skirt will have a bit of curve to them from which to guide the shape of the panels.
Step Three ::
Now, sew! You can either sew by hand or with a machine. I did a combination of both because some sections of the skirt had many layers and I didn't want to force my machine.

I suggest trying on the skirt throughout the process. I wasn't totally sure how much fabric to add to each side and solutioned this by making panels extra wide and adapting as I worked on this skirt. I am about the same size as my sister but it would be best to have exact measurements of the person you are tailoring this for.

Take note that denim clothing often have little metal studs to hold the pockets together, these will definitely break a needle on a sewing machine if you try to go over one.
Better be safe & slow than sorry and sew around the pockets by hand.
Step Four ::
Optional, but fun.
I wanted to add a little bit more presonalization to this project and replaced the tags with one of my own design to match the panels I had added to each side.
And, here it is! From way too small to a perfect fit:

I am very pleased with how this turned out and so was my sister who has a deep love for 1990's and early 2000's fashion. Normally I am very shy about modeling my designs so I do appreciate her love of being in front of the camera. She was also kind enough to model my mending kits!
Throughout this entire project I found my handy sewing kit to be very helpful. In fact, I use my kit in just about every mending or upcycling project ... and if you are interested in acquiring one of your own, you can find one in my shop.
#slow fashion#tutorial#mending tutorial#ecological fashion#handmade#handsewn#DIY#DIY fashion#sewing 101#mending#sewing tutorial#upcycling#upcycled fashion#mending culture
5 notes
·
View notes
Text

I've decided I make quilts now so my very first project is a whole cloth quilt using my childhood bed sheets.
#quilting#hand quilting#101 dalmatians#i just get ideas and then decide yep this is a new hobby to invest in#better go to JoAnns#hand sewing#that gay audacity to just get gud at every skill then move on forever
1 note
·
View note
Note
hi! this is embarassing but i'm trying to learn how to embroider, and i wanted to ask: how many threads are we supposed to put in the needle hole? i wasn't sure wehre to find this information...the tutorials show one thread but the thread from the embroidery spool is so big and won't fit when i try to thread it through the fabric :(
How many embroidery floss strands
It's okay, we all have to start somewhere.
A lot of us feel like everything we do has to be perfect on our first try, but that's just not realistic. It leads to us feeling embarrassed about messing up, and then giving up altogether.
Mistakes are an important part of learning any skill, and so is asking for help when you run into trouble.
And you know what? Asking questions you're embarrassed about is really brave, so good job on sending this ask in the first place!
Embroidery floss:
Most embroidery floss consists of six separate strands. (This may vary depending on which type you use.)
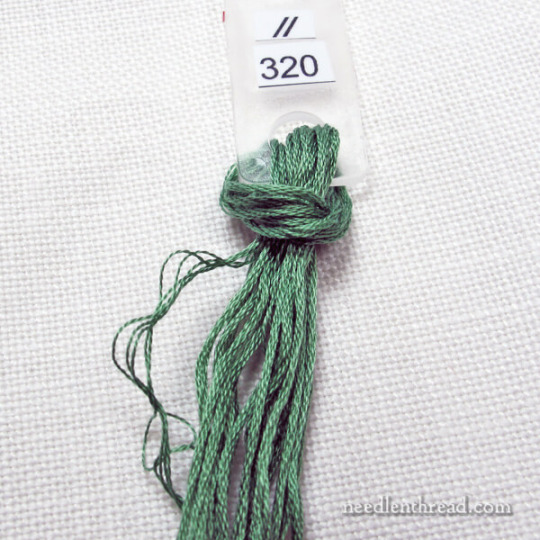
(Image source) [ID: a bunch of green embroidery floss looped around a plastic tag labelled "320", lying on a white piece of fabric. One of the floss threads has been loosened up, showing the different threads it consists of. Text: "needlenthread.com".]
By having multiple strands at your disposal, you can choose how many to use. Using all six will give a bolder look than using just one strand. It's kind of similar to drawing: lines made with a big marker will look different than those of a fineliner.

(Image source) [ID: six short lines in stem stitch embroidered in light blue floss. Each line is numbered from one to six, indicating how many strands of floss were used per line. Text: "How many strands of thread to use? stitchfloral.blogspot.com".]
And just like how a fineliner or a bold marker will result in different effects, the amount of strands you use will effect what your embroidery looks like.
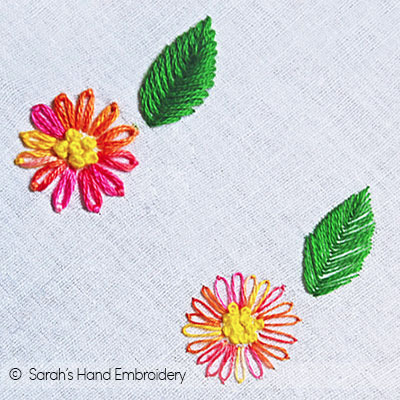
(Image source) [ID: two sets of an embroidered red and yellow flower paired with a green leaf. The set on the left has been embroidered with six strands of floss while the set on the right has been embroidered with only one strand of floss. Text: "© Sarah's Hand Embroidery".]
How many strands to use depends on the look you're going for and the fabric you're working on.
How many threads?
So, how do we decide how many strands to use? Ask yourself the following questions:
What visual effect do you want to achieve? A bold design, or something more delicate?
How much thread do I have? Can I afford to use six at the same time, or should I use my floss sparingly?
Do I want my embroidery to lay flat on the fabric, or do I want something raised?
Do I want to work fast and bold, or slow and detailed?
What's the most comfortable amount of strands to work with for me personally?
What's my fabric like? Can it handle six strands, or would that result in damaging it? Does my thread count match the needle I want to use?
Which amount of floss is the most appropriate choice for the stitch I'm using?
If you're unsure, try your stitch and strand combination on a scrap of spare fabric first and see what it looks like before tackling your project. Make sure to use a needle that's appropriate for your fabric and thread, too.
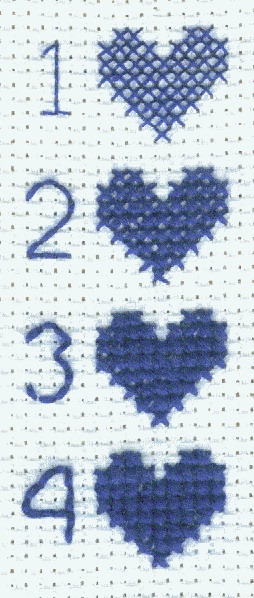
(Image source) [ID: four cross-stitched blue hearts on white canvas. Each heart is labelled one to four and was stitched with a different amount of thread, resulting in different fabric coverage.]
Conclusion:
How many strands to use depends on your project, your design, and your fabric. It can be hard to choose how many to use at first, but this is something you get a feel for the more you practice.
For more information, check out these strand guides by Needle 'n Thread, Crewel Ghoul, Sarah's Hand Embroidery Tutorials, Stitch Floral, and Better Cross Stitch Patterns.
#wasteless crafts#ask#embroidery#embroidery floss#embroidery 101#embroidery for beginners#diy#fibre arts#fibre crafts#thread count#how many strands#tutorial#how to#sewing#cross stitch#crafts
1K notes
·
View notes
Text
this dress is going to be the death of me
0 notes
Text
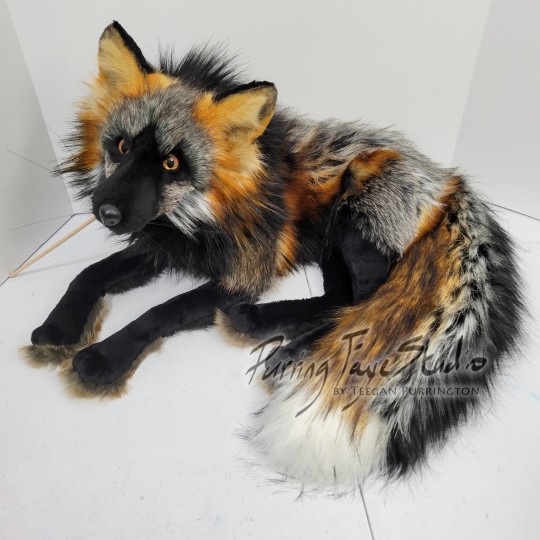
Birth of a Fox Plush!
Watch one of my plush grow from uncut fabric to final photos.
Video description: stop-motion animation of a fox plush being made. Faux fur pieces in black, silver and bright ginger orange get cut, move into a fox shape, attach bit by bit, get turned inside-out for final sewing, turn right-side out and get stuffed, eyes, shaved ears, painted, closed up, and then set up in front of a white board, finished. Music: Lifestream. Musician: Dream Machine. URL: https://icons8.com/music/
101 pieces from 19 different fabrics (17 faux furs and 2 vinyl) went until this fox. It took me twenty-some hours to complete over a month's time, possibly longer to account for all the camera angle fiddling.
This was my first stop-motion video so I definitely learned some things! This is my usual order of assembly for plush, though not every step was captured, in part because I wasn't sure how to do so or it would have been awkward. For example you can see I redid the neck, but didn't show the replacement of the piece between the shoulders. But I hope to try this again and get even more of the process!
#purringfayewips#plush artist#fox art#purringfayestudio#behind the scenes#stop motion#video#plushies#animation
19K notes
·
View notes
Last Seen Blogs
dunnhm
dunnhm
imoonblaze
iMoonBlaze's blog and art
yoshimarutranslations
YoshiMaru

topmoving-blog
Untitled

agasihome
Untitled