#shoe repair
Text
My work boots are the most expensive shoes I’ve ever owned.
Also the most comfortable. I chose them after trying on several different brands and comparing lifespan vs usage vs comfort - I needed them for a physically demanding job, not the weekend hiking trails. I could have easily chosen cheaper boots that would have lasted long enough to be worth their low price, but I know the Sam Vimes Boot Theory and knew weaker, less comfortable boots would make my life harder in the long run.
So when the outside edge of the heel started wearing down after three years of heavy use I went to the shop I got them from and said “hey this is a common problem for me with how I walk but now it’s affecting my ankles and knees and I don’t wanna have to buy a new pair, is there a way to fix this?”
The salesman at this very fancy upscale boot store said “oh yeah, there’s a shoe repair place that can give you some heel guards - it’ll keep the rubber from wearing out.”
So at 8am this morning right after my 9hr shift ends I went to the shoe repair shop and it is the most hole-in-the-wall, is-this-a-real-business-or-a-mafia-front, am-I-gonna-get-shot tiny cinder block cube I’ve ever seen in my life. I grew up plenty poor and love me a good hole-in-the-wall business, but going from upscale store to this cash-only repair shop gave me whiplash. Wasn’t expecting this when a guy who wears three piece suits to sell boots said it’s the best place to go.
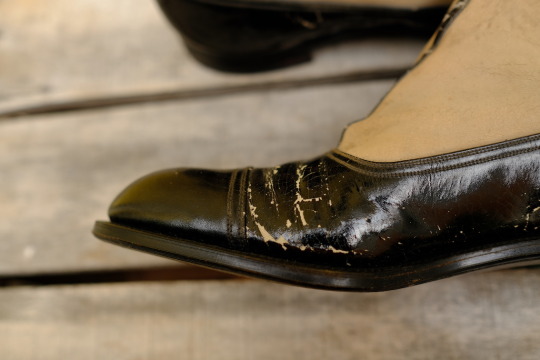
The skinny kid behind the counter looks somehow 16 and 25 at the same time, but when I tell him this place was recommended he smiles and says to hand over my boots. I hand him the vaguely warm foot-smelling boots, and stand in my socks in the 3’ square entryway surrounded by every color leather polish you could buy and watch as he turns my boots around in his hands, sizes up a crescent moon bits of plastic, and unceremoniously hammers tiny nails through them before handing them back.
The heels are perfectly level again. I can walk without almost rolling my ankles. They don’t clack loudly on the pavement or feel different. This is gonna fix my knee pain. It cost $10.
This kid had every tool he needed within arms reach, worked fast and smoothly, I was in and out the door in less than 8 minutes, and it only cost $10.
I didn’t think anything could cost only $10 anymore. I’m so used to hyperinflation prices I was spiritually thrown back to the 1400’s visiting the cobbler in town square. This kid might have been that cobbler and just decided to never die.
I’m still reeling from the whiplash, and gobsmacked at the price, and thrilled I didn’t have to go buy new, worse work boots (cuz I don’t have that kind of money for a second pair, I’m expecting these ones to last a decade) and it feels like I just experienced one of the rare little chunks of magic that floats around our world.
#shoe repair#cobbler magic#good work boots are a necessary part of life#and finding a cobbler I can take other shoes to is gonna change my life#I love craftsmen#bjurnberg
69K notes
·
View notes
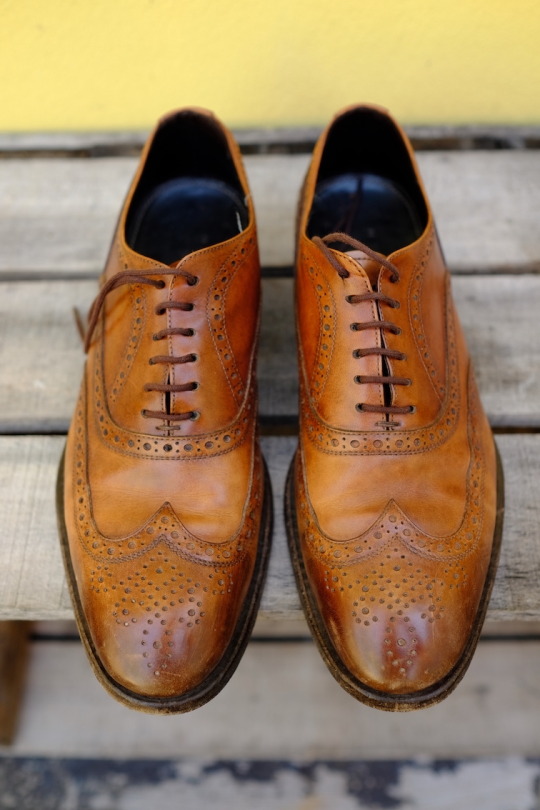
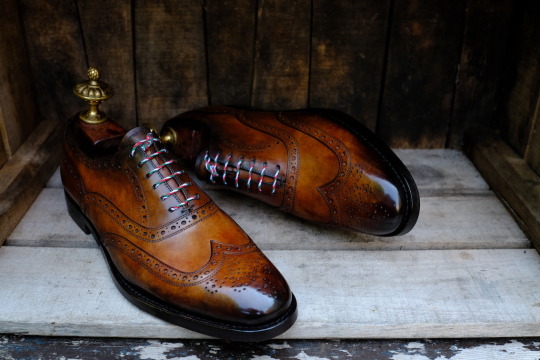
Text


Before and after by Dandy Shoe Care
[email protected] for any info
#dandy shoe care#alexander nurulaeff#shoes#art#bespoke#style#menswear#shoemaker#button boots#1920#shoe repair#best service in the world#before and after
21 notes
·
View notes
Text
Shoe repair: Regluing soles.
So, when I was out and about, dressed all cute, my Bodyline shoes did to me what my Bodyline shoes have done to me many times before.

By the end of my trip to the quality retail establishment known as Five Below, the platform and sole of my Mary Jane pump had detached itself.
As I've mentioned before, it's generally not a bad idea to have some tape in your purse when you're working with Bodyline shoes. Almost every pair of Bodyline shoes that I've owned has broken on me in some way, and sometimes you need to tape it back together to get home. I was driving myself this time, and I keep backup shoes in my car because of a longstanding ankle problem, so my day wasn't completely ruined.
if you have to tape your pump to your foot so you can get through the day, I find that putting a few loops of tape around the middle works pretty well, Tape all the way over your foot and all the way under the shoe. This allows the tape to actually support the shoe, instead of trying to peel off, and it's relatively subtle if you have to do it, like I had to at the convention earlier this year.
Anyway, Bodyline's shoes are just not meant for northern California in the summer, and I think the glue just melts, so I actually had two pairs I needed to glue back together. There's part of me that actually looks forward to needing to do this, because I know that my glue job won't fall apart, and my shoes will be better in the end. I did a tutorial on regluing shoes back in 2015, so it's time to redo that tutorial.

Let's take a look at what we need to do this:
One, we need a place to work that will be safe if little bits of glue get on it. If we do this right, we will not drip glue everywhere. However, if we do this right, we also will not be somewhere that a little drop of glue will destroy.
Two, you need clamps and clamping material. I'm going to be honest, getting some good quick-release clamps and keeping them with your sewing/crafting/diy supplies will be a game changer in many aspects of what you do.
Pretty much any clamp that you get will be good for something, but here's my favorites:
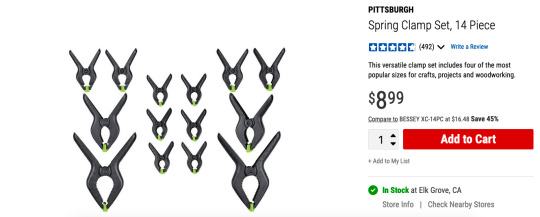
Rabbit-ear spring clamps. The smaller sizes are really good to have around because you sometimes just need A Thing to hold A Thing nice and tight. I used one of the really big ones to hold the sole of the black shoe's rubber sole onto the back. The clamping surface swivels so they're good for clamping angled things.

These things are like a traditional c-clamp, but with a quick-slide action that makes them way easier and faster to use than a c-clamp. I have like 20 of these with my weaving supplies because it's way better than a warping peg or a table clamp. These have a swivel clamping surface, so they can do angles okay. The end of the clamp that swivels also adjusts in and out, so you can use that to put clamping force over a edge of a shoe and avoid bending the edges too much. You can also use that screw mechanism to really tightly clamp something.

You can take the end off one of these and put it on the other end, and then it's a reverse clamp used to hold things apart. I like these little 4" ones for a lot of applications. You can also get a really tight clamp/strong spread with these because of the ratcheting handle. In this tutorial, I use one of these, but I'm using the 14" version instead of the 4" version. This is because I don't know how to read when I buy things online.
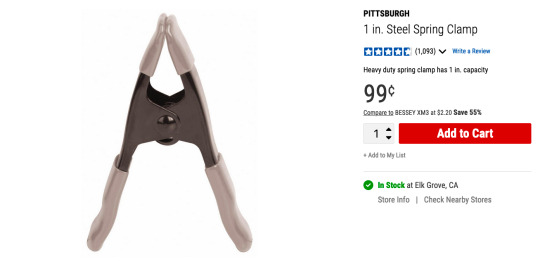
And I'm throwing this 99 cent spring clamp in here because I use these in sewing all the time. Any time you need to get some fabric together and out of the way, this is your tool. Also, if you have rented costumes that are larger than your actor, you can clamp the extra fabric in the back to make it look like it fits them (and then clamp it in the front for any shots of them from behind). I keep these on my dress form as well, because I'm a slightly different size than my dress form, and clamping the back edge of the garment sometimes makes it photograph better on the form.
So get yourself some clamps. In addition to those clamps, I used bungee cords and a lot of stained towels/discarded shipping envelopes to stuff the insides of the shoe. Don't need to make new trash if you reuse the trash you have.
Let's talk about glue, really fast. In that picture, we have four kinds of glue.
Shoe Goo: This is the one I used in this tutorial. Shoe Goo is a glue made specifically for shoes. It's a little bit flexible when dry, is water proof, and can withstand higher temps intermittently. This means that it won't melt when you leave your shoes in your car on a summer day.
E-6000: E-6000 will glue most things to most other things. It comes in a few colors and dries flexible. I keep it on hand, and I have fixed shoes with it before. I like the Goo a little better for this specific application, but I use E6000 on small things like broken buckles. I think I fixed the left shoe of this black pair with E6000, because the store I was at didn't carry Shoe Goo.
Fix All Adhesive: I've used this one in a pinch before. You can find it in more places. It also does something that the other two glues can't do, which I'll go into in a minute.
Glossy Accents: Glossy Accents should not be out there. Glossy Accents is not ready for shoe repair. Glossy Accents does not know what it's doing out there with all those strong glues. Glossy Accents should go back home. Do not use Glossy Accents on your shoe repairs.
Please note that, with the exception of the accidental inclusion of Glossy Accents, all of these are called solvent glues. A water-based glue has water in it, and the glue will dry as fast as water evaporates. If you want it to dry faster, you can replace the water with a solvent like acetone, which will dry as fast as acetone evaporates, which is much faster. If you expose a dried water-based glue to water, it could dissolve back into the glue, making the join weak. A solvent-based glue won't dissolve in water, but you also can't use water to clean it up. Read the instructions on your glue. It will tell you, "when wet, clean up with x." Find out what X is and then have that on hand. Hopefully, you won't need it. Also, most solvent glues are flammable, so don't smoke or burn candles while you do that. The lighter in that picture up there, much like Glossy Accents, has no place in that image and should just go home.

My white rocking horse shoe is a really good example of an easy shoe to re-glue. The front is still attached, but the back is free. Because the front it attached, it will keep the back in alignment. You don't need to worry about lining it up as much, because the shoe will line it up for you.
This is also nice because there's not really any dirt or grass in there. If your shoe broke and you had to walk home with your sole missing, you might have dirt to clean out before you do this glue.
What we do here is pretty simple: put a lot of glue in there, spread it around, put the two sides, together, clamp, and come back later.
How much glue? You want enough so that there's not a lot of empty air pockets between the two sides of the shoe. You want it to be shoe to glue to shoe, without air between. However, you don't want so much that a ton runs out of the sides of the shoes and you need to do cleanup.
I did a nice fat bead of glue down the sole, squished it together, and then pulled it apart. From that point, I could spread the glue around and get good coverage. You want glue on both parts to be glued.
Then, apply some force onto the shoe, to really get the two glue surfaces touching each other as much as possible. I like to just put the shoe on my foot and stand on it for a few seconds.
Once I've put some pressure onto it, I check for two things. The first is for any glue squeeze-out. Acetone cleans that up, but it can also dissolve some of the finishes on some shoes, so be careful with throwing it on there.
The second thing I look for is any areas where the sole and the shoe are not properly joining. You can see in that three-part pic up there that the back of the shoe wasn't totally meeting the sole, so I had to make sure that I had glue all the way back there.
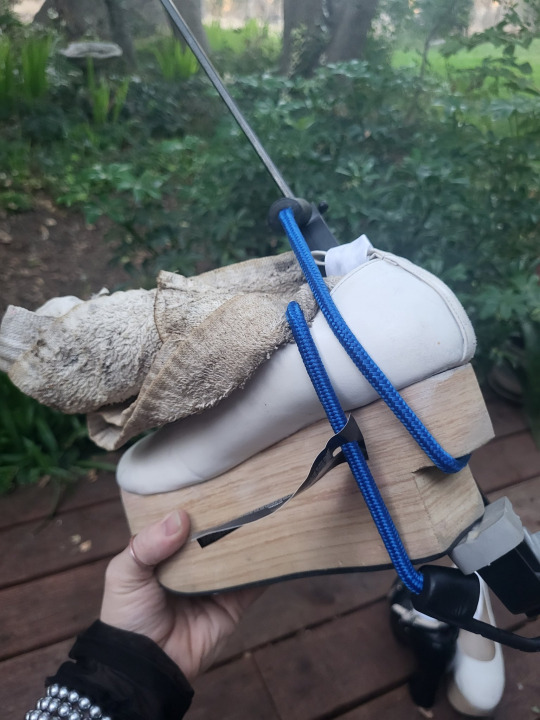
Then it was time to stuff the shoe with something (I used a stained towel) and apply clamps to it. We stuff the shoe so that the clamp can't bend the edges of the shoe down and break them. Here I have one large clamp to provide most of the clamping force, and then a bungee cord to make sure that very back part stays stuck to the sole properly.
Once I was confident that everything was making contact, and that any excess glue was cleaned up, I could set the shoe aside and allow the glue to cure.
So what's going on with the Fix All glue? The main different thing about the fix-all glue is that they instruct you to apply it to both sides, let it dry, and then bring the sides together. This makes two changes to doing it with Shoe Goo.
First of all, when you use glue that dries first, you only get a single chance to align the two parts. This means it's a good choice for things that are very easy to align (like this shoe where the front half is still attached) and not very good for things that might take a couple of tries (like my black pump with the whole platform detached).
The second thing is that it grabs hold immediately, making it a good option for things that are difficult to effectively clamp. You will still want to clamp it in place until it dries, but it will do a lot of that initial holding for you.
Know that one kind of glue will give you multiple tries, but must be heavily clamped while it dries, and another kind will only give you one shot, but it'll do some of the holding for you. (If you really need that sudden grab and long hold, and you're applying it to a large heavy-wear area like the entire sole of a shoe, you probably want Barge All-Purpose TF Cement. It's a dangerous product to work with, but exposing yourself multiple times to different slightly-less dangerous products to glue and then reglue and reglue a shoe as it keeps falling apart seems like a not better option IMO).
So a glue that has you let both sides dry first can be really great if you have just the tip of the rubber sole starting to peel back. The other advantage is that, if the glue dries before it sticks, it dries faster than if you have glue trapped between two non-porous surfaces. Because of this, I use Fix-All when I'm just gluing the soft rubber coating on the sole back into place.
On the black shoes, I needed a few tries to be able to get the platform aligned with the upper. The platform had completely detached, so I had to make sure it was in proper alignment. The right shoe is also where my bad ankle is, so I had to make sure the shoe wasn't twisted, so that my ankle wouldn't be under additional stress.

Here's how much glue I used, before it was spread around. I moved it around to make sure there weren't big patches with no glue. Good contact is good bond.
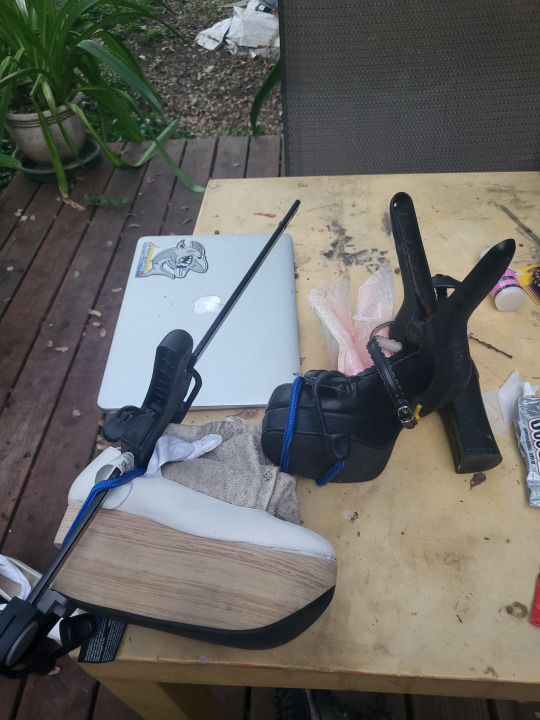
And here's how I clamped it. I shoved a bubble mailer (waste not; reuse your trash!) into the toe of the shoe, and the wrapped a bungee cord around that to hold on the platform. Then, I used a rabbit-ear clamp to hold the instep together.
And then it's just about giving it 24 hours to mostly cure. After 24 hours, it's a good idea to remove the clamps, so you don't put stress on the walls of the shoe. However, give it a full 48 before you try to wear the shoes, because there's still some final curing that has to happen before the whole thing is ready to be put under stress.
And now you can go out and about, knowing that your shoes are stronger than before, and that you won't need to fix that shoe again.
#tutorial#shoe repair#20dollarlolita#lolita fashion#diy lolita#long post#bodyline#rockinghorse shoes#rhs#i told myself i'd be doing a better job with pictures of this one and then used the ugliest table ever
123 notes
·
View notes
Text
Shoe cobbling pdfs!
Was doing a little browsing on repairing rubber shoe soles and it led me down this rabbithole. I thought I'd share what I've found to tide everyone over until the next embroidery page update, which may be another few days.
Taken from The Shoe Service Institute of America website, a pair of free pdfs!
First is The Shoe Repairer's Manual written and compiled by Robert Sieburth circa 1936.
The second is Shoe Repairing by Henry Karg, circa 1965.
I'm still flipping through them, but the subject of cobbling and shoe repair is a fascinating one.
#shoes#shoemaking#shoe repair#cobbling#shoe making#educational content#free books#educational resources
16 notes
·
View notes
Text
Make do and MEND
"The French government has announced a €154 million ($173M) five year scheme which will pay consumers to have their clothes and shoes repaired rather than throw them away and buy new ones.
Under the scheme, announced by the Secretary of State for Ecology, Bérangère Couillard, contributions to repair costs ranging from €6 ($6.70) to €25 ($28) will be available depending on the complexity of the work."
We need more of this everywhere - and also to bring back the businesses that did this.
Image via Rawpixel
11 notes
·
View notes
Text

Ready to make a statement. #BalenciagaBlack
3 notes
·
View notes
Text
So I just thrifted some knockoff converses which are in great condition except for the fact they have large old sharpie stains on the rubber. My friend suggested sunscreen and it made it paler, nail polish remover failed, and at the moment I’m trying vinegar and water. Any suggestions?
8 notes
·
View notes
Photo
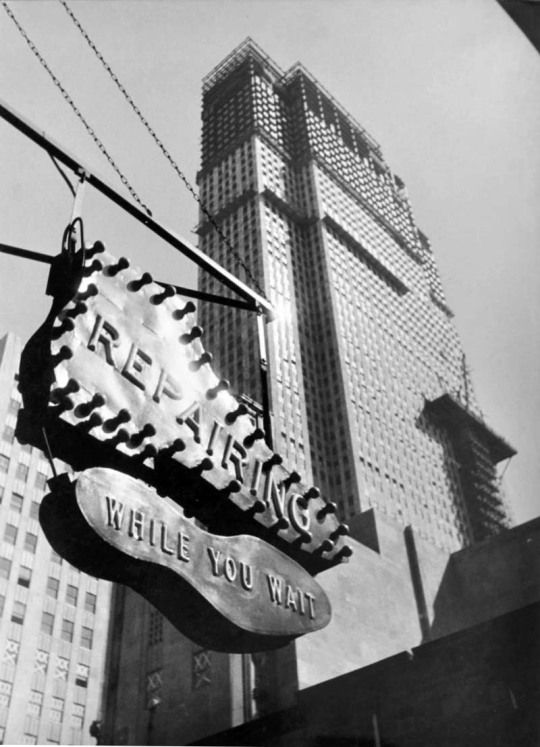

Sixth Avenue, 1932.
Photos: Paul Wolff via Invaluable Auctions
#New York#NYC#vintage New York#1930s#Paul Wolff#6th Ave.#Sixth Ave.#Rockefeller Center#shoe repair#Great Depression#b&w photography
127 notes
·
View notes
Text


So- I decided to datum my shoes. I am very much worried it will give me blister and I may regret it, but ut is already done. I will keep anyone interested updated on how this will go. For now, pray for my right heel or alternatively, for my bank account 🥲
#mending#sneakers#sneaker mend#shoe mending#shoe darning#darning#might regret this later#shoe repair
2 notes
·
View notes
Text

Behold my shoe!
I did my best to sew a patch with some card paper inside into the heel. When I went to the pride parade last week, the worn down material behind it tore up the skin on my ankle through the sock, sooooo....
Repairs were necessary.
It was a bit of a pain, but I'm gonna do the other one too. It's only a matter of time before that one wears to the point of roughing up my skin as well.
3 notes
·
View notes
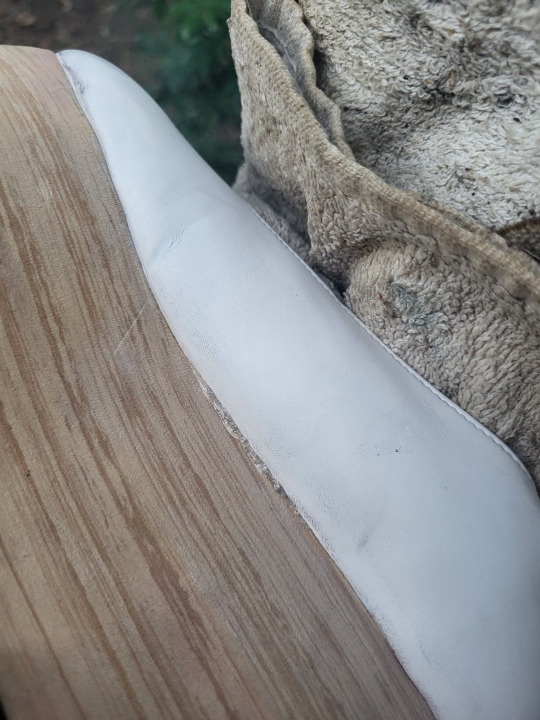
Photo
Before and after.
If you have a natural leather pair of shoes of a neutral or very light color - we can create the beautiful and unique Patina for you.
#before and after#Dandy Shoe Care#Patina#remise en forme#shoe repair#reparazione#restauro#scarpe#stile#dapper#pitti
41 notes
·
View notes
Text
One thing I specifically enjoyed about Moeyo Ken were the small details on set, like this overhead look into the shoe repairer's toolkit. (He was also set up next to a used kimono salesman in this scene.)

I'm also intrigued by Yamanami's (Sannan's) eyeglasses. (The little detail here is that there's a small pad behind the nose piece for a proper fit!)

They appear to be an older frame style, but it's unusual to see this type of glasses with a straight nose piece, especially in Japan.
Nose pieces on these, even in the West, are usually curved. Ones made in China or Japan tend to have a very high curve so that the nose piece would rest against that space between the eyebrows rather than sit on the bridge of the nose (like the ones shown in the Hokusai print below).
There's one pair with a straight nose piece found here, which dates to the late Edo or early Meiji period. Since they're the only ones with a straight nose piece I've been able to find, I wonder if they were the basis for Sannan's?

#moeyo ken#baragaki#screenshots#screen grabs#details#shoe repair#eyeglasses#spectacles#late edo period#bakumatsu period#movies
16 notes
·
View notes
Text

Morning jagweeds, let’s get weird this week and do some sun stunts.
7 notes
·
View notes
Text
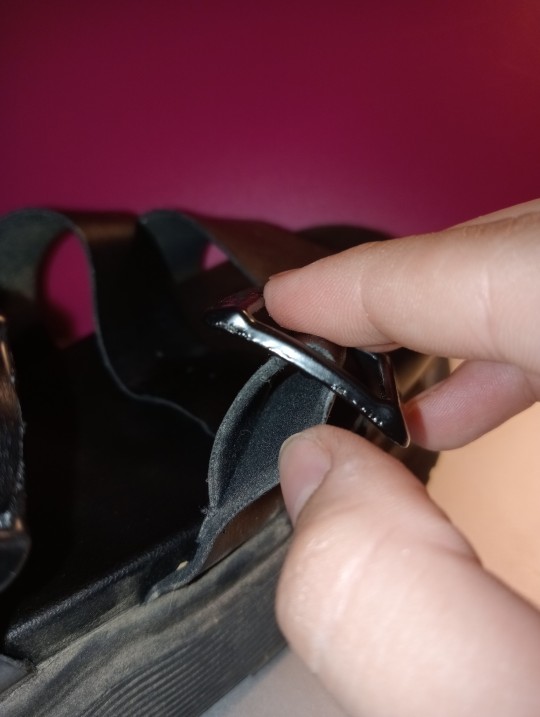
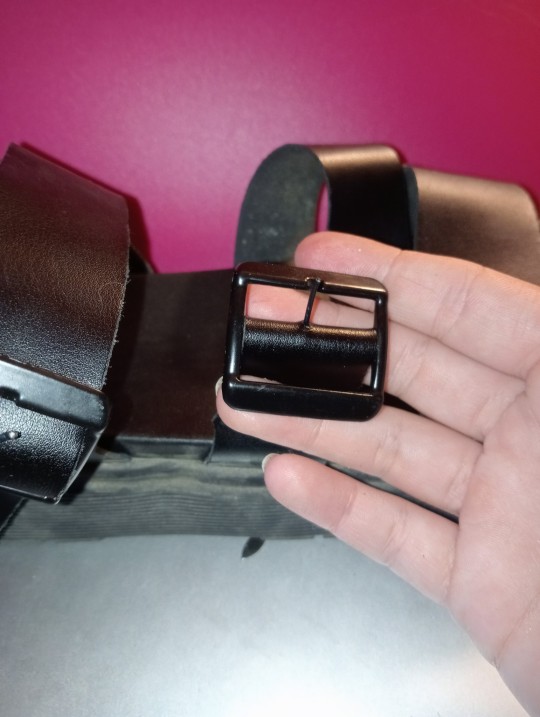
HOW TO DIY REPAIR A BROKEN BUCKLE PRONG FOR PUNKS
SO i bought these dope goth sandals the other day - unfortunately i bought them secondhand for $5 and they’re at least 10 years old already, so the prongs in both buckles on the right foot fell out

i was getting by using a bobby pin to clamp the top buckle shut, but when the bottom one fell out too i got a decent look at it and decided i could probably make a replacement for it. so for any punks out there who prefer to fix rather than throw out, here’s how you do that:

you need:
your borked shoe
a paperclip (unbent)
scissors
a decently thick needle and any thread
(optional) a mini dremmel, if you’ve got that kind of thing from a past hyperfixation
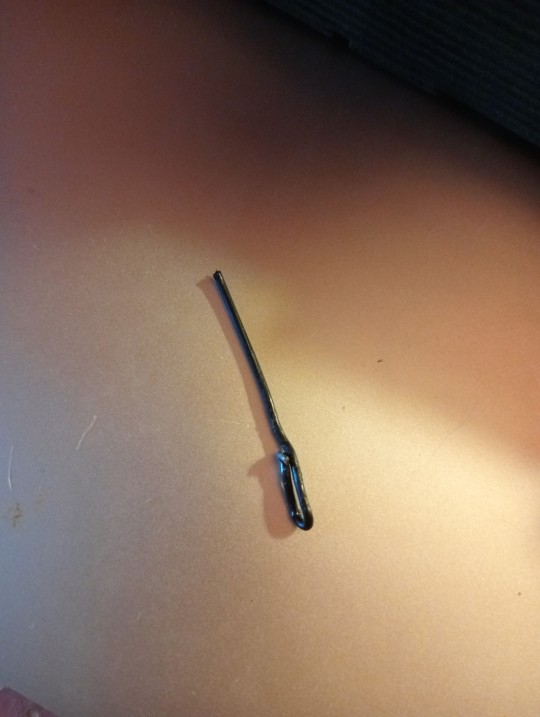
what you wanna do first is unbend your paperclip, and in my case i needed two prongs, so i snapped it in half. (your teeth can do this. or pliers, which is a better idea, but i don’t have those.) then you take one half of your unbent paperclip and create an l hook - this looks like a cursive lowercase l; a line with a small hoop at the bottom.
you’re gonna take your diy l hook and open the loop that connects your buckle to the shoe itself, and thread the l hook up through the existing hole in the middle of your buckle.
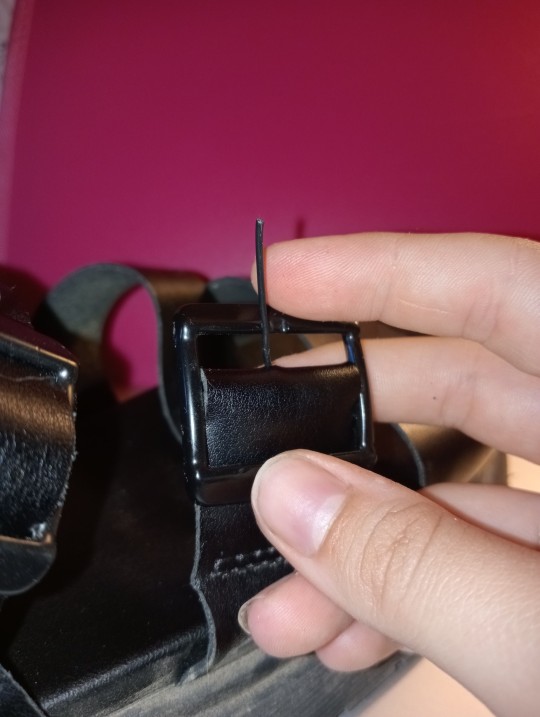
your diy l hook has now become a diy buckle prong, albeit likely way too tall. that’s okay! depending on the length of your l hook, wiggle it up and down to a good length, and then clamp it with your fingers. this is where your prong is going to sit when anchored.

now you’re gonna take your threaded needle and find the point on the inside of the strap (where it will rest on your foot, unless you don’t mind the scarring, in which case the outside is fine if you’d rather it not rub on your foot) where the loop of your prong is. should be around halfway down the strap (give or take for length).

post your needle through the strap like so, and this part is super fiddly, so i would recommend feeding both the needle and the prong out the side so you can make sure you’ve gone through the loop. then you can push the loop back inside the strap down the needle, and it will stop where it was anchored originally where it hits the other side of your needle. then sew a few quick loops to hold it in place, just like sewing on a button. you only want to anchor one side, though, because your prong should still be able to hinge forwards and backwards a little bit to fit through the holes of the foot strap.

make the most gordian knot you can and tie it super tight. i like to leave a little tail so i don’t accidentally chop into my anchoring stitch. it’s unlikely to be exactly glamorous, but the good news is, chicks dig scars.
(if you really don’t want the knot to rub on your foot, you can use gaffer tape or bandaids here to cover it.)
if you’re lucky, your prong oughta be about the right length after all that wiggling and stitching, but if not you should be able to either poke it down a bit, OR this is where that optional dremmel comes in, because you can snap it down to length and then smooth the edges so you don’t buzzsaw yourself every time you do your shoe up.

and ta-da!! the buckles on your orthopedic goth sandals are now working!! this may not be a permanent solution, but you can repeat as necessary, and you can use hardier materials like nails or jeweler’s wire to make a less-mortal prong - not that i personally can vouch for the efficacy of that, because i used paperclips, but please feel free to let me know if you do.
now go forth and be punk!
11 notes
·
View notes
Text
Crusty
New Rock 161
Renovation
PART 6
POLISHED
Self explanatory. The final polish was with Kiwi polish. This can be applied with a cloth over a finger. The results are impressive.
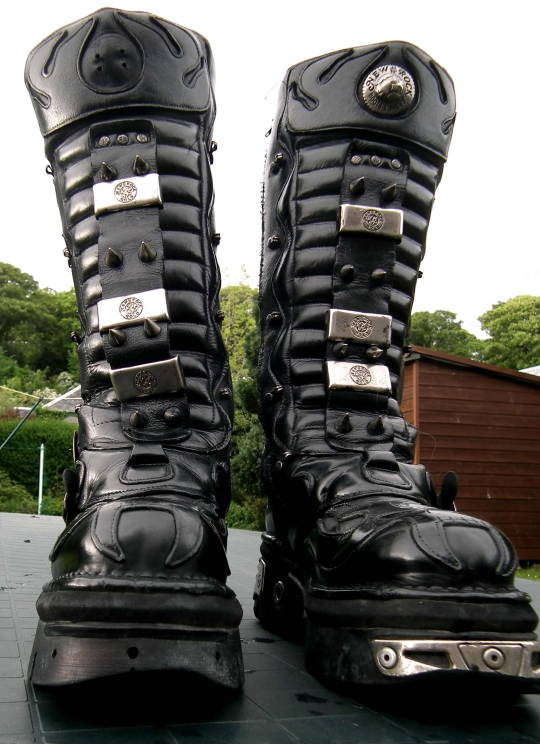
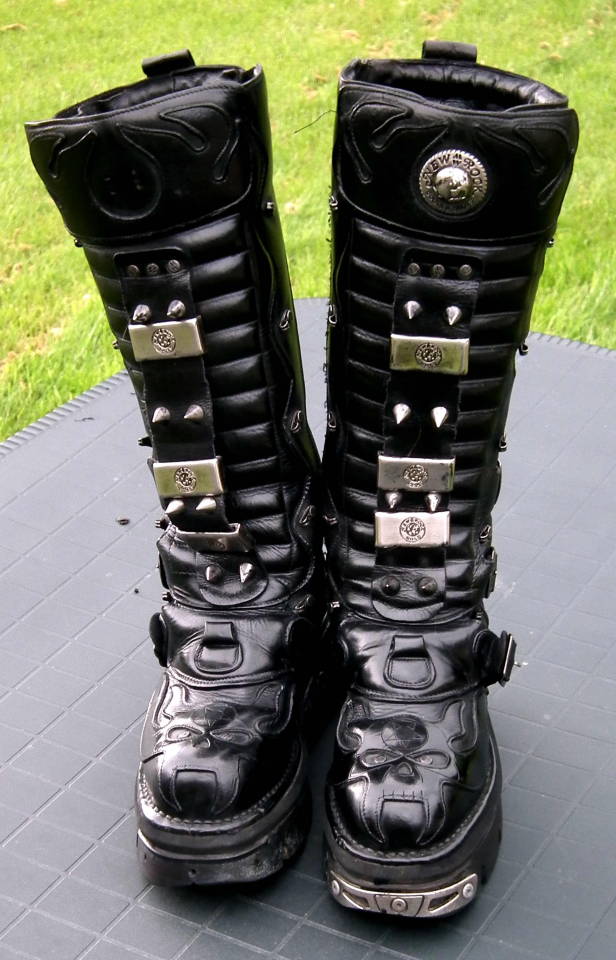

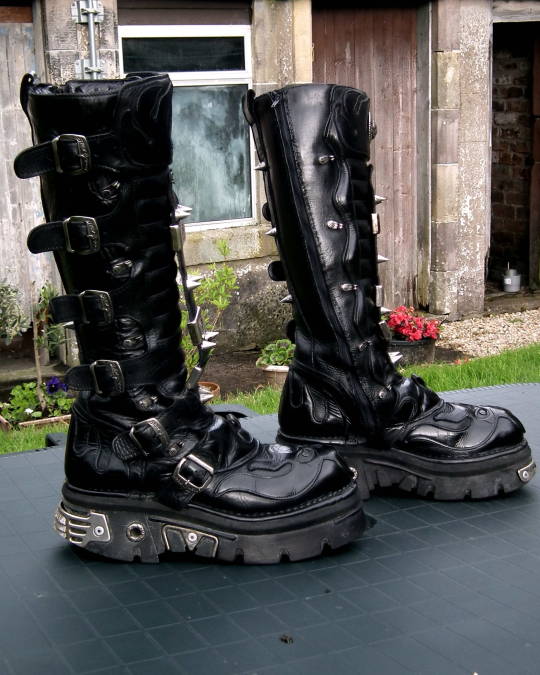
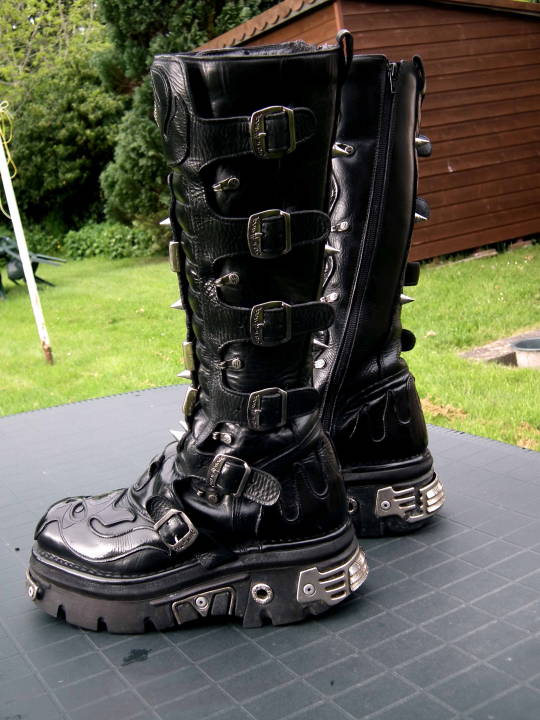
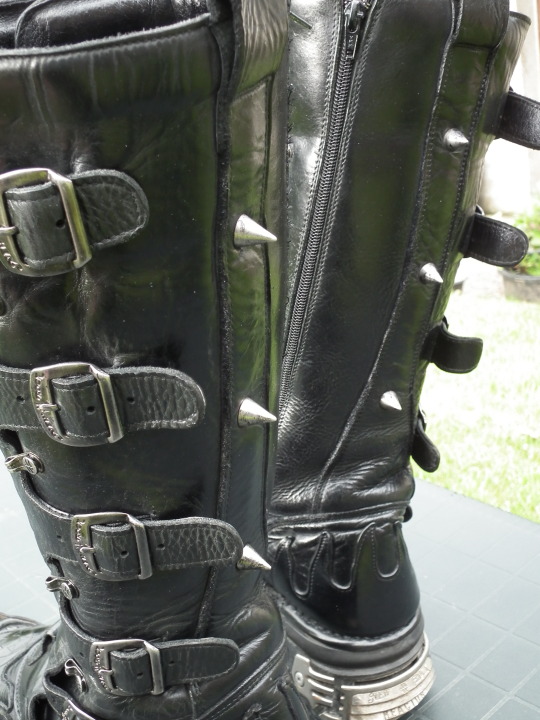

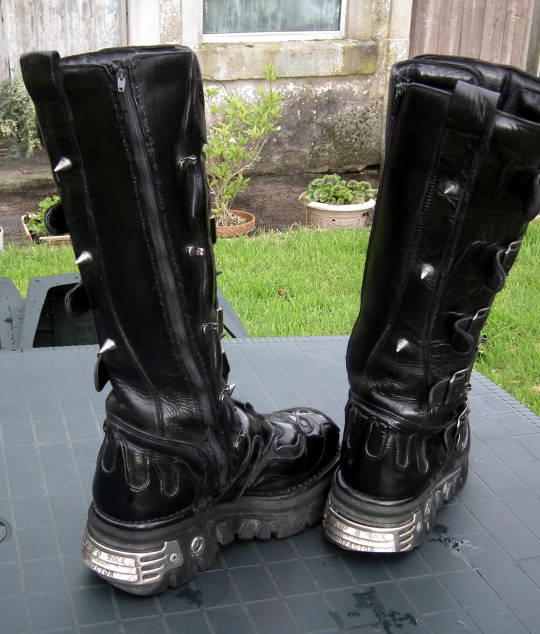
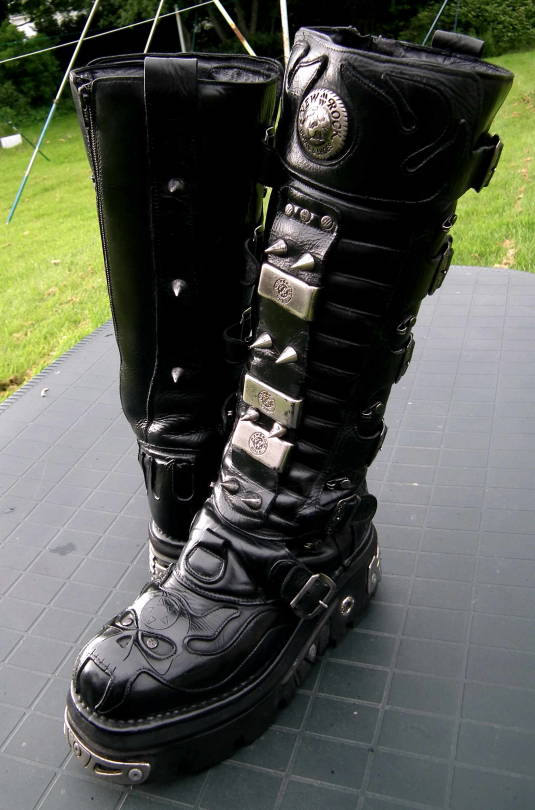

#New Rock#new rock#new rocks#emo#punk#goth#gothic#new rock shoes#metal#scene#steampunk#cyberpunk#zip repair#shoe repair#cyberpunk aesthetic#y2k aesthetic#crusty
20 notes
·
View notes
Text

Doctor Uncle: Bringing Your Beloved Shoes Back to Life!
Is your favorite pair of shoes looking a little worse for wear? Don't toss them out! Doctor Uncle, Delhi's one-stop shop for all your shoe care needs, can transform them like magic.
Here's what makes Doctor Uncle special:
Shoe Repair & Restoration Experts: From scuffs and worn soles to complete makeovers, our skilled team breathes new life into your shoes.
Beyond Shoes: We also care for handbags, jackets, and even leather car seats and sofas!
Cleaning Magic: Say goodbye to dirt and grime. Our sneaker cleaning and laundry services leave your footwear sparkling.
Delhi's Finest Cobblers: We offer the best shoe repair services in Delhi, using traditional techniques and top-quality materials.
Doctor Uncle - We don't just repair shoes, we create shoe miracles!
Find us - https://www.thedoctoruncle.com
#sneakers#shoe repair#shoerestoration#kicks#sneakerhead#delhi#shoes repair in delhi#cobbler in delhi
2 notes
·
View notes
Last Seen Blogs

oiichyo
oiiChyo

werohitverma3
Rohit Verma

antarcticatg
Antarctica's TG Captions

agentcalypso
toxic masulinity? no. toxic by britney spears? yes.

hulkowaaa
hulkowaaa