#sims build tips
Text
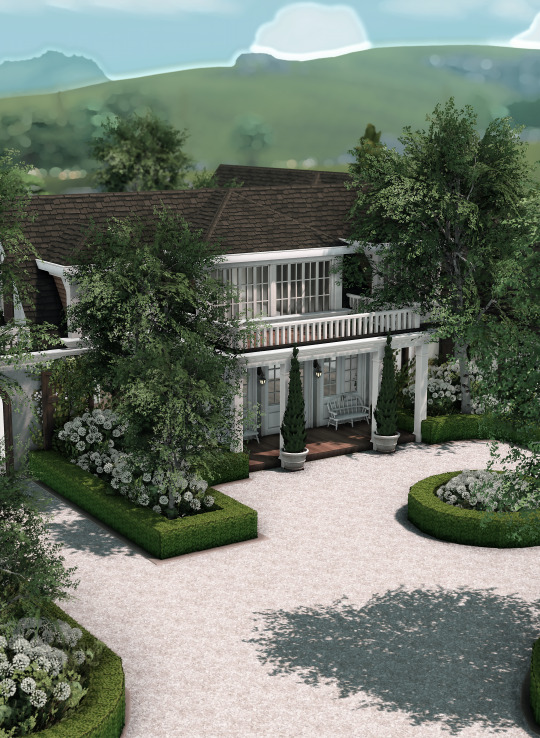
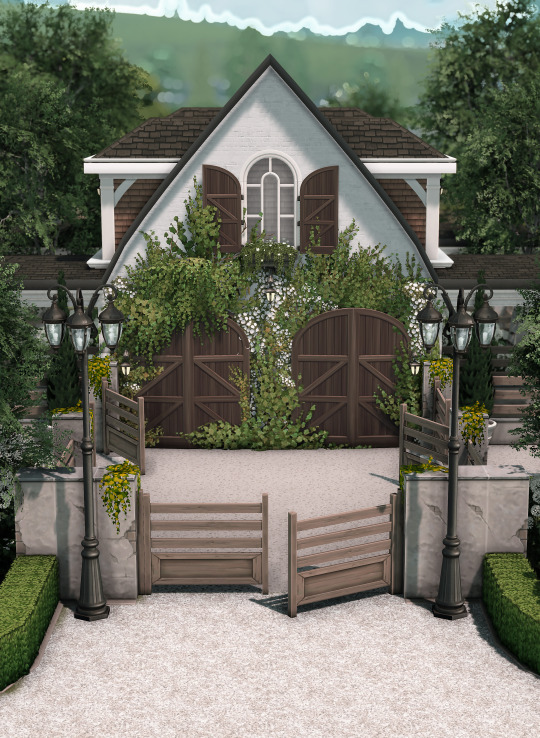
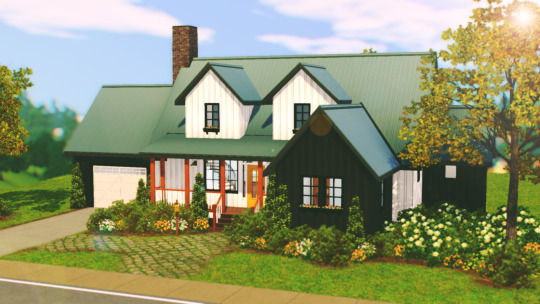
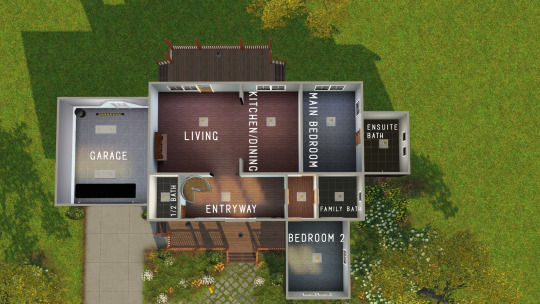
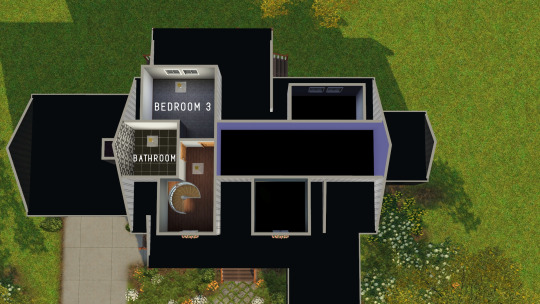
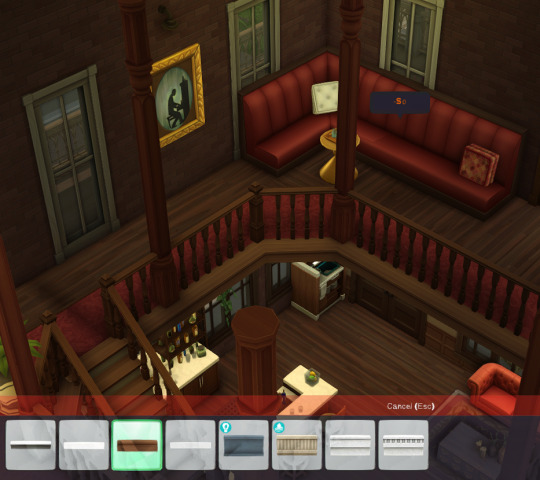
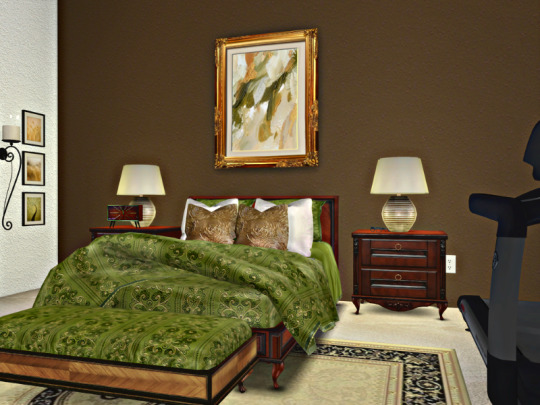
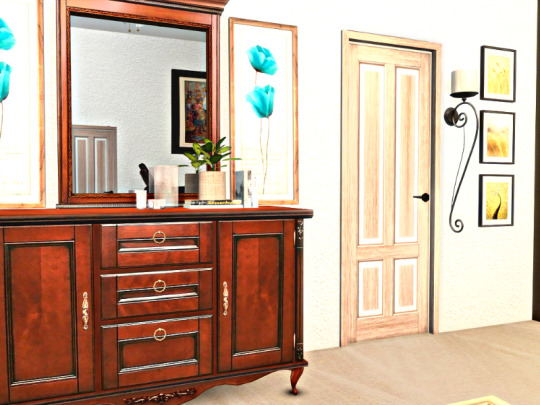
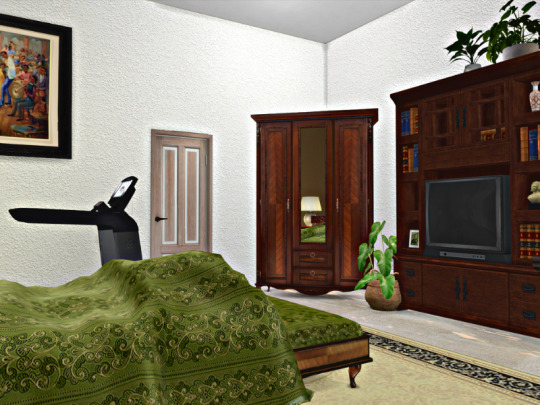
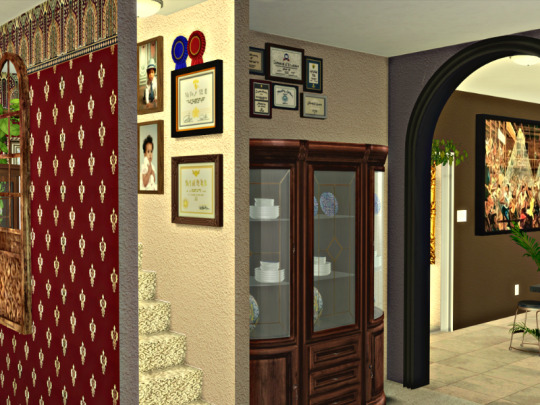
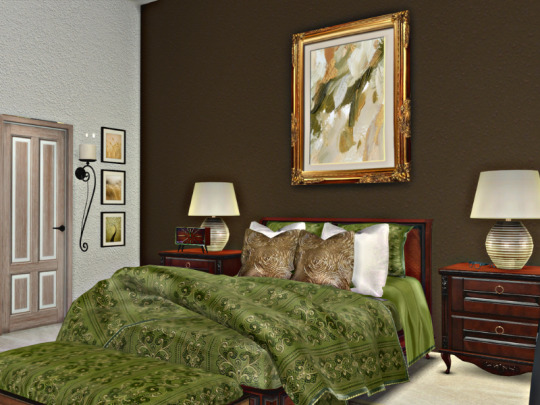
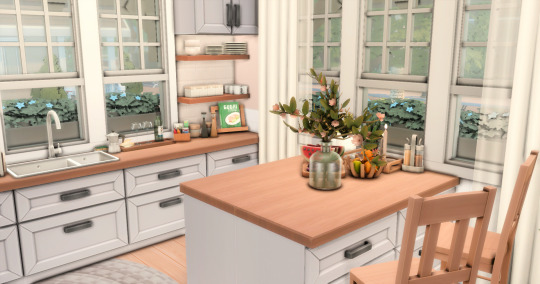
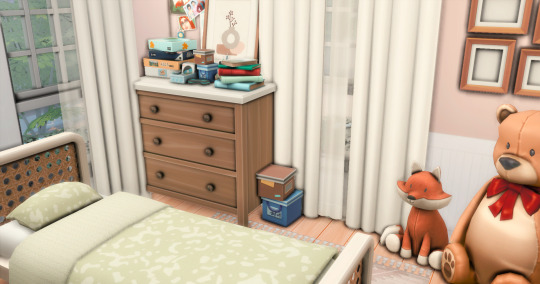
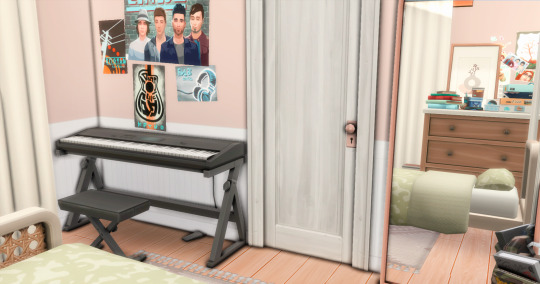
Countryside Farmstead 🐄
#farfallasims#countrysidefarmstead*#henford*#sims 4 interior#ts4 interior#the sims 4 build#building tips#sims 4 build#sims build#the sims#sims 4#the sims 4#the sims community#sims 4 screenshots#sims#sims 4 maxis match#ts4 simblr#ts4 build#thesims4#sims4#the sims4#sims 4 simblr#simblr#showusyourbuilds
1K notes
·
View notes
Photo

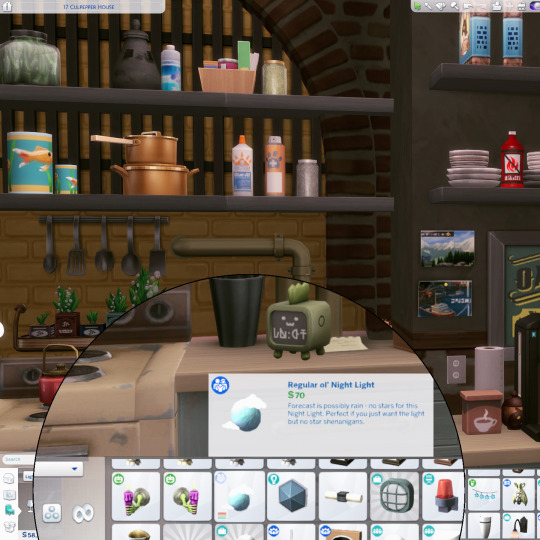
Huge shout out to @jessicapieyt who had this amazing tip on her most recent video. The 'Regular 'Ol Night Light' from Parenthood has what looks like sockets on the back. If you use TOOL by @twistedmexi to turn it around you have sockets!!
173 notes
·
View notes
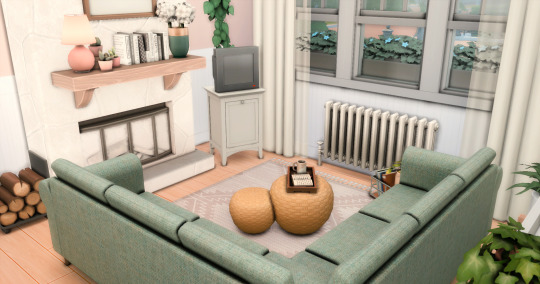
Photo
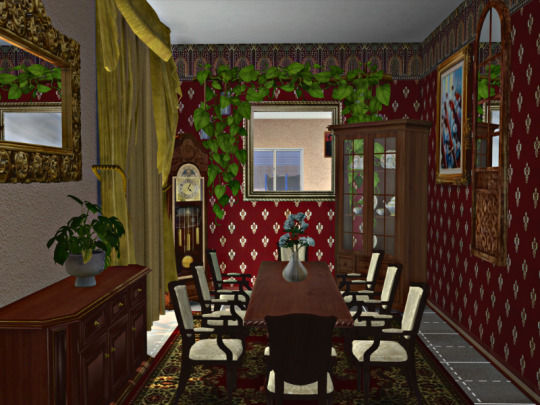
UNFURNISHED FAMILY FARMHOUSE 🏠
if you want my top building tips, click on boop down below!
♡ if you decorate this family farmhouse, please tag me as i’d love to see it ♡
• 3 bedrooms, 3.5 bathrooms [more rooms could be added on the 2nd floor]
• feel free to change the layout so it suits your sims’ family
• cc free [no store content!]
:: download ::
boop
#the sims 3#ts3#ts3 unfurnished family home#ts3 unfurnished farmhouse#ts3build dl#ts3 no cc build#top decorating tips coming soon
246 notes
·
View notes
Text
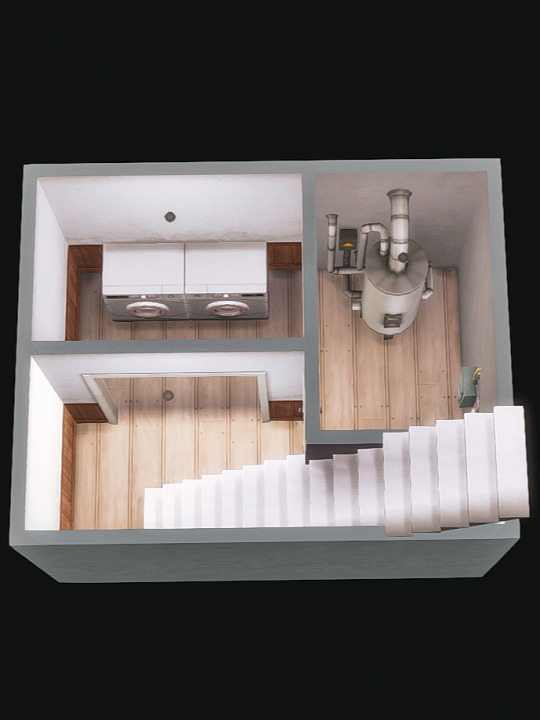
💡A quick layout idea for a small townhome basement.
I ran out of space for ulitities and laundry and came up with this.
🤔For some reason I always forget about basements so if you struggle with space in your townhomes like I did, try them out!

24 notes
·
View notes
Text
TIL that you can use exterior trim to clean up the edges of indoor floor cut outs and my life has truly changed for the better. It looks so much cleaner!
28 notes
·
View notes
Text


Johnson Family Home
Download
#Sims 4 Custom Content#Sims 4 Mods#Sims 4 Hairstyles#Sims 4 Outfits#Sims 4 Furniture#Sims 4 Build/Buy#Sims 4 CC Finds#Sims 4 Gameplay#Sims 4 Expansion Packs#Sims 4 Building Tips#Sims 4 Cheats#Sims 4 Challenges#Sims 4 Interior Design#Sims 4 Create a Sim (CAS)#Sims 4 Maxis Match#Sims 4 Alpha CC#Sims 4 Custom Worlds#Sims 4 Legacy Challenge#Sims 4 Family Gameplay#Sims 4 Seasons
47 notes
·
View notes
Photo

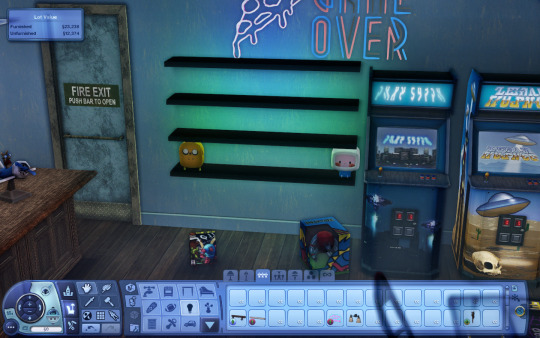

just a little tip for those who dont use cc objects in game here is a nice way to get neon lights in game if you have all packs like Late Night
use this light as shown below to just hold shift and click on the light as normal to get the color you like ;)
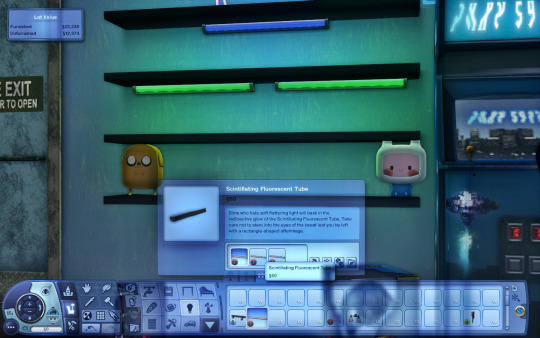
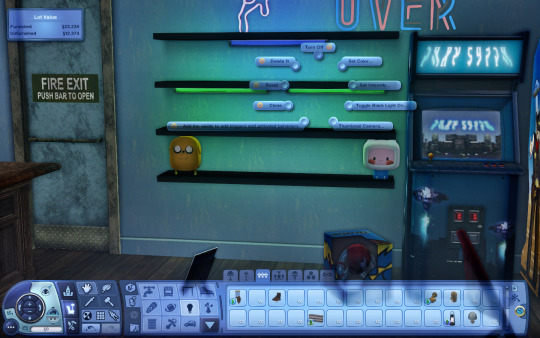
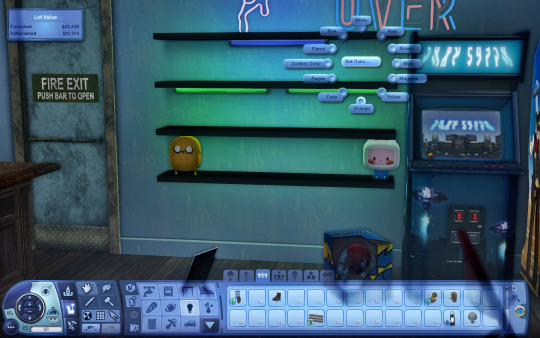
there you go ;p
25 notes
·
View notes
Text
How to Build from a Real Life Floor Plan in The Sims 4 - 3 ways, Beginner and Base Game Friendly
And yes, like a nerd.
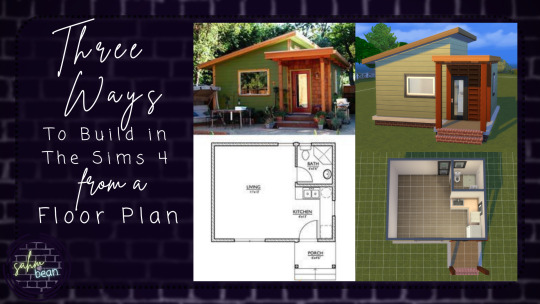
The three methods are Measure for Measure, General Vibes, and Referencing Items. The first one uses math but the others don't, so don't let that stress you too much. Ready? Let's build!
If you prefer video format, I got you! Check out the full video with even more plans and examples here.
Here is the floorplan we will be using in this article.

Method One: Measure for Measure
Ready to break out your calculators? Using the most exact measurements possible will give you the most technically accurate results. However, since we are translating real life into a video game, there are going to be a couple of issues. First, we are stuck to a grid system, so having the exact measurement is pretty much never going to happen. Second, the scale of items in the game is not perfect or very manipulatable, so where we may see a fridge and sink fit perfectly in the floor plan, that may not be the case measurement wise in the game. Be ready to tweak things here and there.
This method has some strong points as well, though. For example, trying to get the best reference for a house you are building IRL, building in a standard size space like a shipping container, or learning new ratios and measurements for new home styles. Beginner or not, I recommend using this method at least once to see how you like it and what new revelations it can being to your building style.
Ok, now we will do math. Each tile in the game is 32" (81cm). Why do I use 32" and not the much more common 24" or 36", or even 1m? First, I looked closely at the default drywall swatch, and you can see every tile gets two studs based on the screw pattern. Studs are generally 16"-18" apart, so I started there. That ruled out 24" and 1m immediately. Next, I compared other standard sized items, like refrigerators, beds, and even the Sims themselves. Since the beds are just shy of three tiles long, going with 36" would make them nearly 8 feet long, and Sims 7-8 feet tall. 32" brings this to a much more reasonable 6.5 and 6 feet respectively. That does mean twin mattresses in the game are only about 30" wide, but like I said there are just bound to be discrepancies. But that's why I use 32" as my tile measurement.
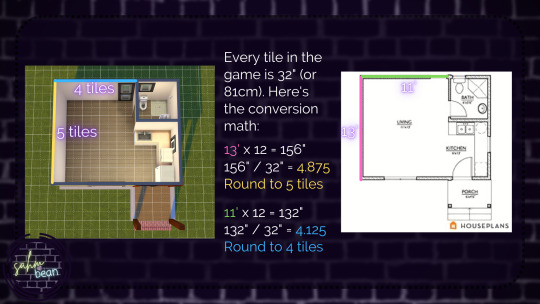
Now we need our conversion. I am going to work in inches, so the first measurement I am going to take is the depth of the main area at 13', convert it to inches, divide that by 32" to get the tiles, then use standard rounding practice to get my tile count.
13' x 12 = 156"
156" ÷ 32" = 4.875 tiles
Round 4.875 to 5
5 tiles deep
Again, with the width of the main living space:
11' x 12 = 132"
132" ÷ 32" = 4.125 tiles, rounded to 4
Repeat this same process for each measurement and eventually you will have everything in this image below:

I don't usually leave the grid on for these, but I felt like it could be helpful. Now let's look at some of the things that may need adjusting. First, I had to use an open shower to keep the same bathroom layout. If you don't have an open shower (they come with Discover University and Snowy Escape), you will have to swap the placement of the shower and sink and scooch the toilet closer to the the wall, or resize the bathroom. The first option would require turning on the bb.moveobjects cheat since the shower and the door would overlap, but I use that bathroom layout a lot and have never had an issue. You'll also notice there is not a counter space to the left of the sink in the build like there is in the floor plan. With bb.moveobjects and some serious finagling and playtesting you could get it to work in this space, or you could expand the kitchen by one tile, or leave it alone. The kitchen is still functional.
If you look at how the exterior of the house lines up, you can see it is pretty accurate. That is always exciting. Of course you can always modify window and door placement like anything else, but it just feels good when it works well the first time.
Method Two: General Vibes
I do not recommend this for beginners because it is too easy to make the rooms too big or too small way too fast. However, if you like the general layout but want it a different size, don't care about closets, or are combining the space with a different floorplan or preexisting build, this is great.
I started with the kitchen. I decided I liked the super open plan, but wanted more space for my Sim to cook. After expanding the kitchen, I used the floorplan to scale the rest of the space from there.

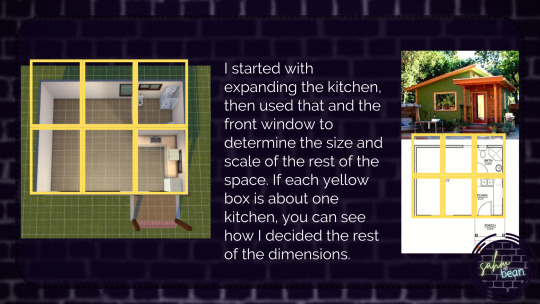
I wanted my main area to still be about four times the size of the kitchen, and I liked the square bathroom but wanted it larger. In the end, this is what I came up with. This could also work for shrinking floorplans. Maybe a huge house is just the style you need, but you only have a 20x30 lot. Once you get the kitchen and living space pared down to the minimum size, you can use that to build the bedrooms, halls, decks, and so much more.
One last thing to be aware of before you go resizing things all willy-nilly is it will complicate the roofing. Even if it was a simple roof to start with, any change to the footprint will mean another adjustment to the roof.
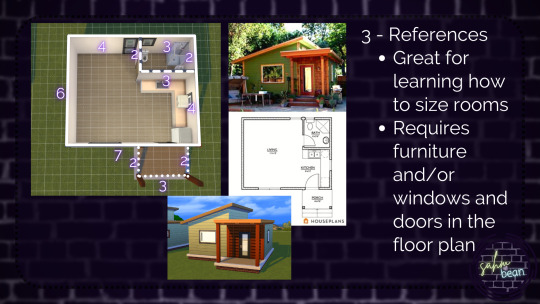
Method Three: Referencing Items
This is probably the one I most recommend for beginners. However long you've been building, at some point we have all made a room wayyy too big (or too small, that was my curse) and building from floorplans by referencing the items in the plan is a great way to familiarize yourself with scale and build better overall.
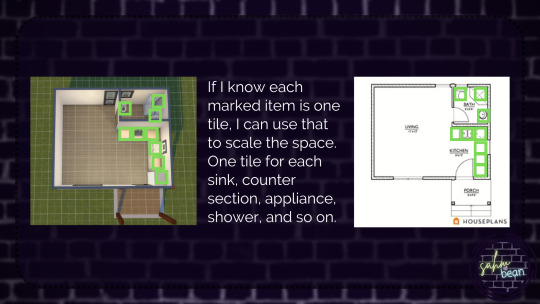
In order to use this method, you need to have something to reference. Most plans have at least a kitchen and windows marked in, but if you can find one that has even more furniture all the better.
In this case, I used the kitchen primarily. I did keep that counter piece to the side of the sink, so that plus the sink plus the corner piece made my kitchen three tiles wide. For the depth, I needed the corner piece, two full pieces, and a space for a refrigerator, which made that four tiles. I kept the same width for the bathroom but only made it two tiles deep, one tile each for the shower stall and the sink.
To scale the living space I figured that the front window was about a two tile window. It was clearly closer to the wall to the left than the door on the right, so I drew the wall to have one tile, two tiles for the window, two tiles for the space between the windows and the door, a tile for the door, and the rest of the width of the kitchen for a total of seven tiles. The six tile depth was already decided by the kitchen and bathroom.
So there's the same floorplan three different ways. If you want more practice, I have a whole Pinterest board of floorplans I have curated that should be relatively simple to translate into the game without having to make too many adjustments. If you would like to see more examples, I have a whole YouTube video here that has these three methods shown in three more complicated plans. I go over roofing there as well, if that's something you're interested in. I am also on TikTok so if you have specific questions that's a great place to ask because I can actually respond with a video. I am a little behind due to the holidays (which you've also noticed here as it's been too long since I have posted here)
Happy New Year and Happy Building!

46 notes
·
View notes
Text


NEW BUILD!!!
TRAY FILE ON MY BLOG
#the sims#ts4#ts3#sims 4#sims 3#fixer upper#gameplay#challenge#pg#family friendly#build tutorial#builders bible#let's build#let's play#sims 4 building#house building#building tips#tutorial#build tips#sims tips#the sims 4 modern house#the sims 4 base game house#the sims 4#sims 4 house build#sims 4 no cc house#sims 4 speed build#sims 4 base game no cc#sims 4 house#sims 4 houses without packs
5 notes
·
View notes
Photo


someone’s always home 🥧
#tip but idk if i'll ever finish it this is so out of my comfort zone 💔#**wip#a beb build ??? that iSN'T brown and bland ?? something isn't adding up#sims 4#sims 4 build
125 notes
·
View notes
Text
mickey
#🔅#literally only made him to pose on the couch in this build i’m doing rn KWHWIE#vibes are ‘barista who hates his job but flirts with customers for more tips’#i love he#ts4 cas#ts4 lookbook#ts4 screenshots#show us your sims
12 notes
·
View notes
Text
BUILD TIP WITH TOXIC
Do you have a floor that has a jarring sudden change from say wood to carpeting?

I did. Then I found this thing from the Get Together pack.


It’s called Thousands of Years Old. Just size it down to your preference and it will cover the sudden transition from floor tile to floor tile like an actual irl metal transition strip. No cheats, debug or MoveObjects required, it can go through walls and overlap each other piece without issue and your sims will completely ignore it like any other rug.
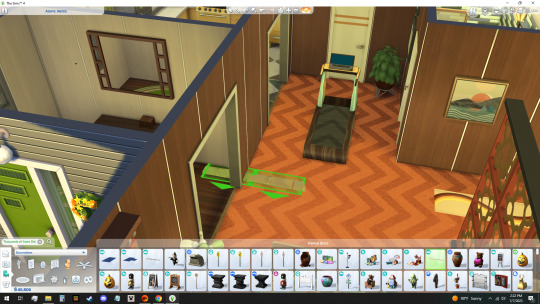
Please ignore my treadmill.
Happy Building! OvO/
7 notes
·
View notes
Text
confession: i bulldozed juni’s entire lot (after saving all of her plants of course) because i had a lighting glitch i could NOT FIX that was driving me crazy. 😵💫
i really want to get better at building, but i worked so hard on that stupid cottage only to scrap it when that glitch happened 😤 so i downloaded a shell and now i’m working on a floor plan to decorate and it honestly makes me so happy!!! 🥹
soooo mayyyyyyybeeeeeee the moral of the story is just play however works for you and don’t let a struggle get in the way of a storyline??? 🙃
excited to show y’all what i come up with!
#sims 4#ts4#simblr#the sims 4#sims#sims struggles#ts4 glitch#ts4 building#juni bright#juniper bright#juni update#the postcard legacy challenge#postcard legacy#I’ll learn how to build one day#that day ain’t gotta be today though that’s what I know#I’m having so much more fun now#I do wanna challenge myself but not when it stops me from wanting to play!#feel free to send me building tips though because ya girl does struggle shew mercy#send help#dopaminestarvedrambles
6 notes
·
View notes
Text
Sim Homes for Tips
I know a bit ago, I linked my ko-fi for help with medical, and I am so grateful for everyone who donated and shared the post. However, it looks like things are not going to be easing up on me for the seeable future. But I don’t want to just ask for money. It makes me uncomfortable. However, I am not a talented artist like some of you, and I’m not a prolific writer either. But! I am fairly decent at building homes in the Sims 4, lol.
I know building the game can feel like a mess and just a pain, but it’s cathartic for me and I often do it to relax, so I can at least if you play on PC offer homes! I will even do requests, to ensure it’s a home where everything is useable in your game.
I am uploading photos now of various builds I already have for download, to show examples of where my skill level is. So yeah I guess this will be my little side hustle to keep paying for my medical.
Here is my ko-fi again [Link]
I will be making a sims side blog as well, where I will share various things as well and once that’s set up I will share that link. Once again thank you all for being amazing humans. It’s made the last few years bearable.
#sims 4#I am not saying you have to pay to have me build something#As I do believe that gets into mess legal territory#but tips and requests are welcomed is what I'm getting at#as again I don't like feeling that I'm just taking money#◾ I blinked and the world was gone — ooc
8 notes
·
View notes
Text
I've updated my resources friends! Which includes all my gameplay mods. I also added a section in blog navigation for the tutorials I've done! Since I couldn't find my own editing tutorial for 15 minutes!!!!

#puffer talks#jeez louise#okay now ill work on the gameplay tips and tricks guide#but also my joints hurt so bad and i can't find my pain meds so i might have to become the wizard to heal my mana#dork#gif warning#also i except ill have to do a big update for the build a sim icon pack#which ill need to wait for sfs to update and some wiki lists to come out first#so i know i got them all#also i confess that party animal trait is incorrect in it#i will fix it then lmao
18 notes
·
View notes
Text
The scene I'm working on for my comic right now is like the absolute worst because it's chapter 01, and has so many moving parts. I actually completed the second chapter and prologue before attempting this part for the second time. I did a draft of it back in 2020 but I've rewritten it since then and it's much stronger now. It's just.... This fucking party scene... Why did I write this. Why did I put myself in this position where I have to basically draw a ballroom full of people 🤡
#heres my tip#for if you draw and really struggle with environmental perspectivr#particularly interiors#invest in the sims and learn to build some environments in the free build mode#its a much easier learning curve than attempting to learn sketchup or similar programs#sims wont always have assets that directly correlate to what you want but thats ok because its just a base for the structure#youll be able to add onto it as you illustrate over various screenshots
14 notes
·
View notes
Last Seen Blogs

oddoink
A venue for creative insights and observations

ehessler82
Untitled

mintsuwu
Random Art Corner!

weeblilly
Kawaikute otome

risse-d
Рефлексирую опыт социума