#steelhipdesign
Text
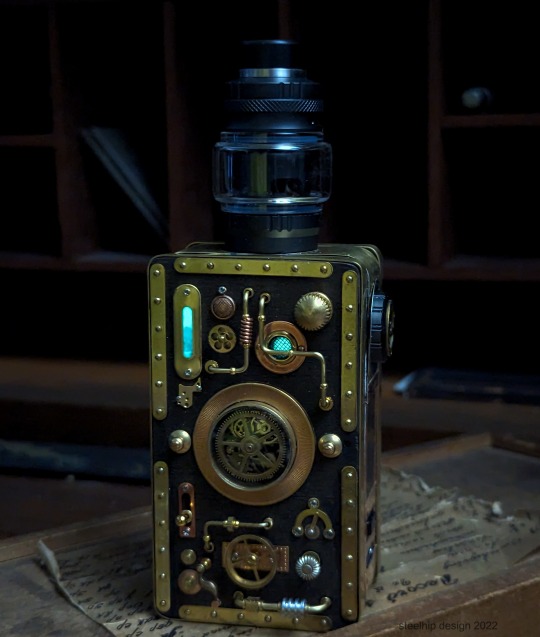
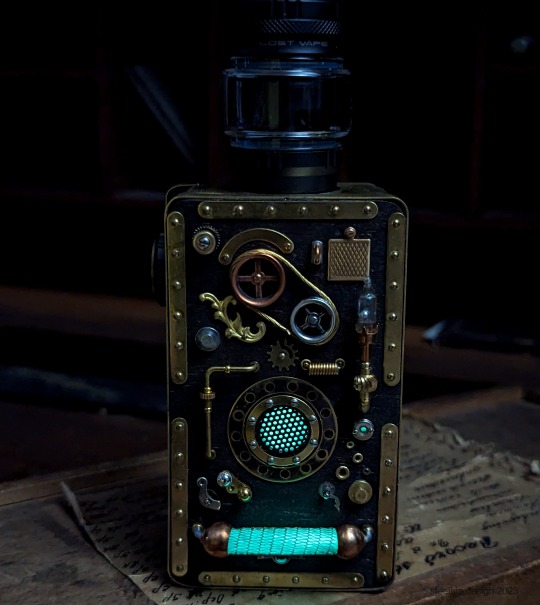
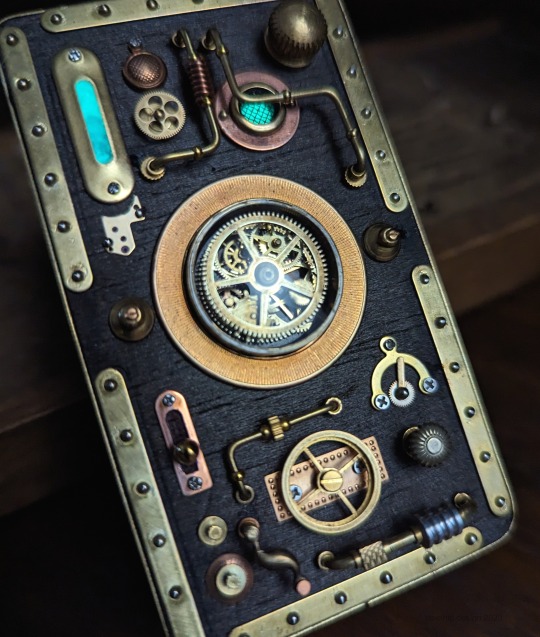
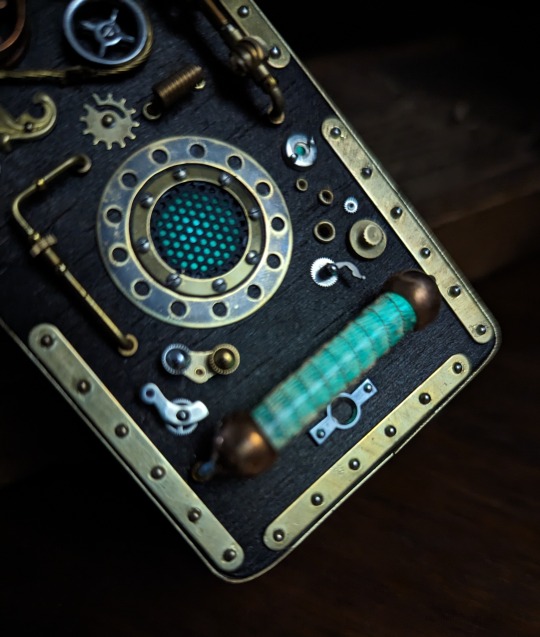

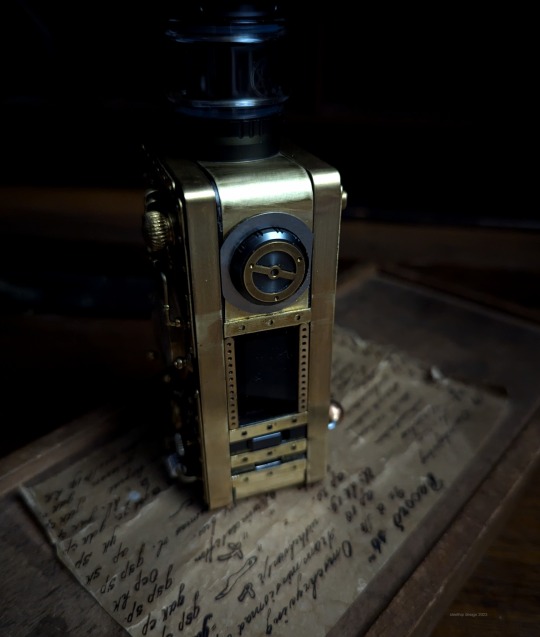
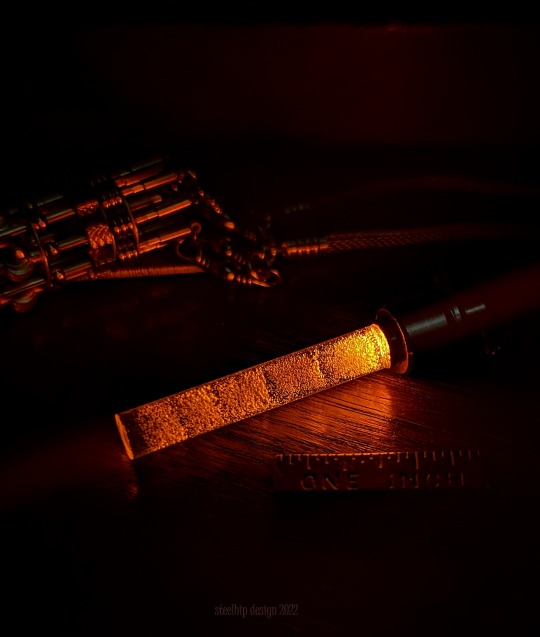
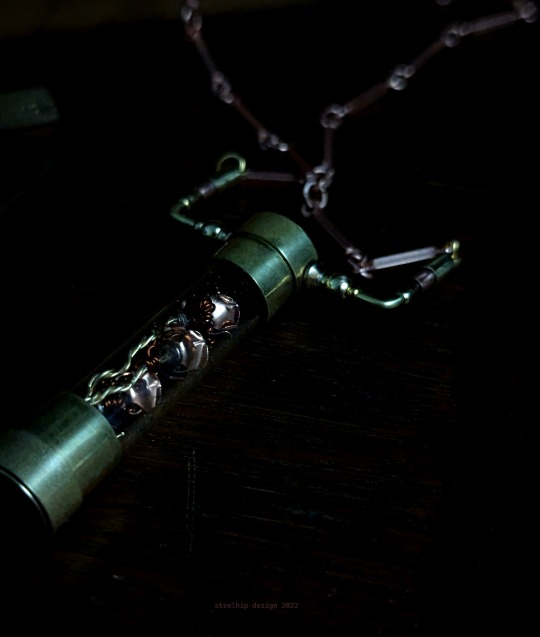
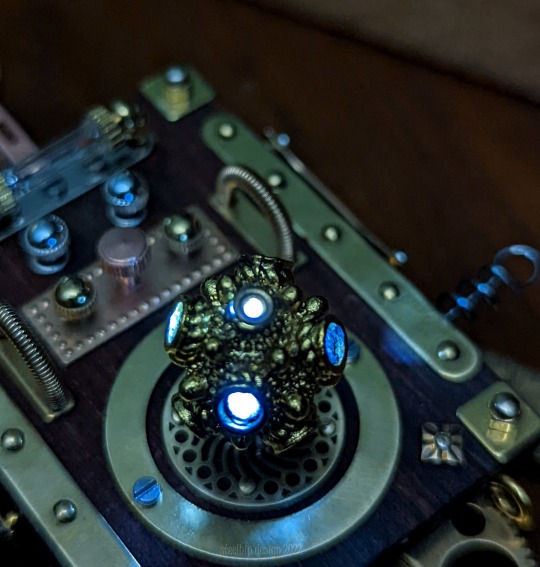
This is a first for me - a vape commission. First problem was needing some material to attach all the embellishments. I wrapped the thin magnetic side panels with brass strips and then sealed the brass and titanium panel with a thin resin pour. I then crafted two layers of balsa wood to fit snuggly in the form. If I had to do it over, I would have picked a stronger material - like a 3D print. Next time.
I wanted a window to add depth and reveal a gear train mechanism. That alone took hours of layering vintage brass gears in the ring. I want it to look like a real machine so I try to avoid "orphan" gears. I've used glow in the dark pigment in resin under the mesh grills, brass panels and in the glass tube. Easy to charge using a UV torch. The rest is a cacophony of vintage crowns, brass tubing, miscellaneous beads, screws, pins, wire, struts and textured elements. There is even a little glass mercury switch.
I've had to take time off this year so this was a real challenge to start building again. I'm happy to answer any questions about the project. My client is happy with the result but I warned him that it is fragile.
#steampunk#steam punk#steelhipdesign#handmade#vape#vape mods#gears#watchparts#mechanical#industrialart#steampunk art#machinery#brass#scratch build#green glow#glow in the dark#etsymaker#etsy#etsyseller#handcrafted#artists on etsy#wooden#fantasy art#assemblage art#assemblage#mixed metals#mixed medium#mixed media#art
92 notes
·
View notes
Text
What Moon's Gear looks like
This gear helps Moon feel emotions.
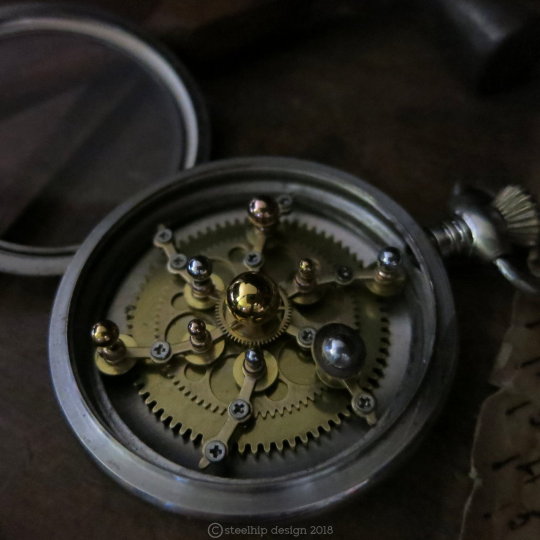

(It was good to look like this but I changed my mind)
(Both pictures are from steelhipdesign look them up it's beautiful)
4 notes
·
View notes
Photo

Awesome Steampunk heart credits: @steelhipdesign https://ift.tt/2kTLUky #steampunkart #steampunkmarket — view on Instagram https://ift.tt/2HsRALc
2 notes
·
View notes
Photo
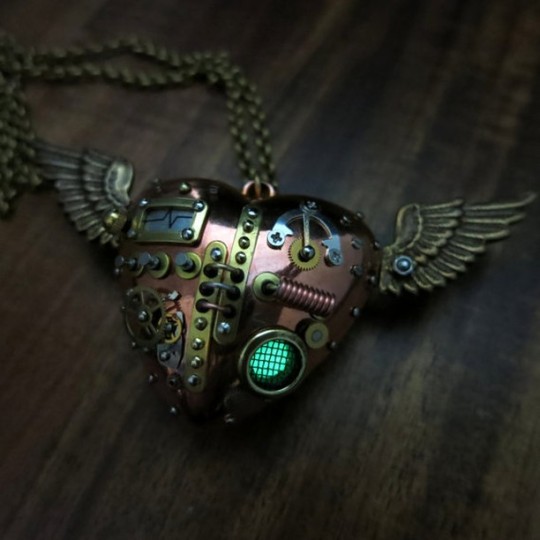
Awesome Steampunk heart credits: @steelhipdesign www.steampunk-accessories.com #steampunkart #steampunkmarket — view on Instagram https://scontent.cdninstagram.com/vp/392b0d2ce7a9295d3e139f2f456c6d3c/5BB4BA36/t51.2885-15/e15/34033430_163191227869042_4018902771196493824_n.jpg
1 note
·
View note
Photo

Cool nebula pendant by Michelle Murray at steelhipdesign on Etsy. Not just for steampunk.
#wearables#jewelry#jewellery#steampunk#space#galaxy#stars#nebula#colors#colours#bronze#pendants#necklaces#Etsy#handmade#geeky#nerdy
0 notes
Text
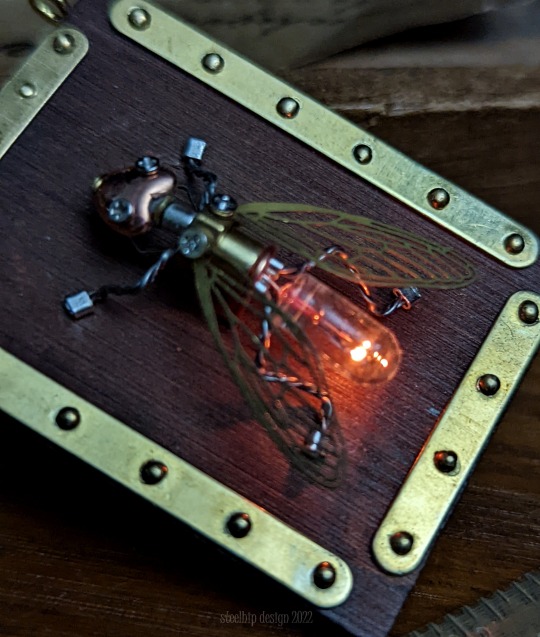
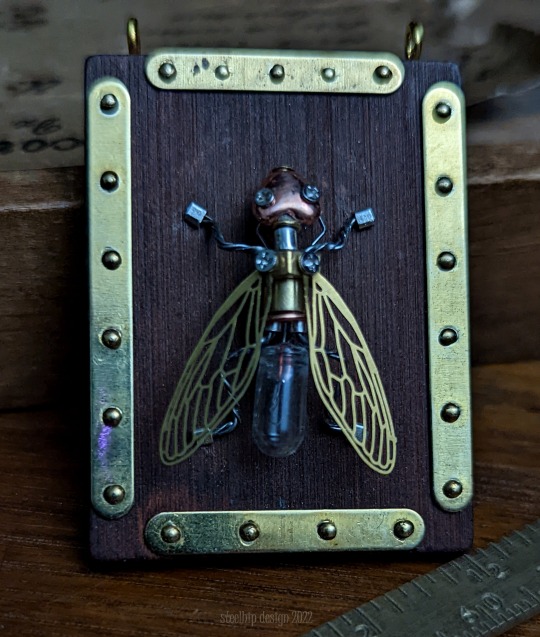
Glow Fly
Yay! It's the last one in this series. I don't mind posting but it does take a lot of time. Trying to make a description of the build interesting can be challenging too.
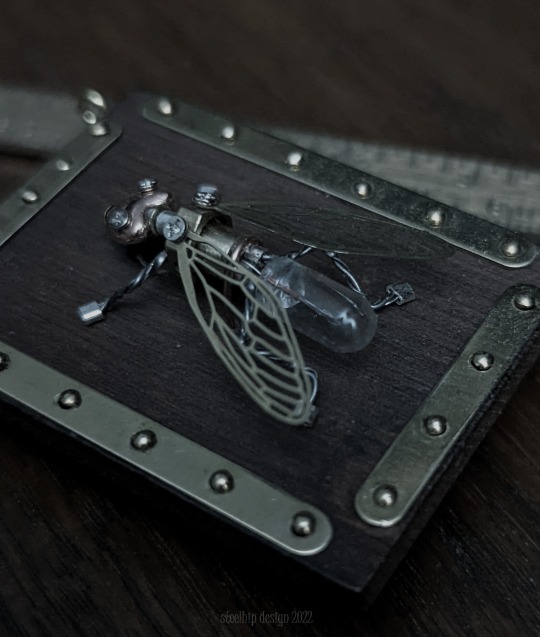
As those who have followed me for awhile know I'm a bit obsessed with making mechanical insects. They are not easy to make. The legs need holes in the main body, the head needs a hole, the abdomen needs another hole. That's a lot of holes in a tiny piece of brass. The engineering is always a challenge. It does make it a bit easier if it's like this, mounted on a panel. I will make another but just anchor each piece, legs, body, head, abdomen, to the board. If I space it correctly - it will look like a joined mechanism hopefully.
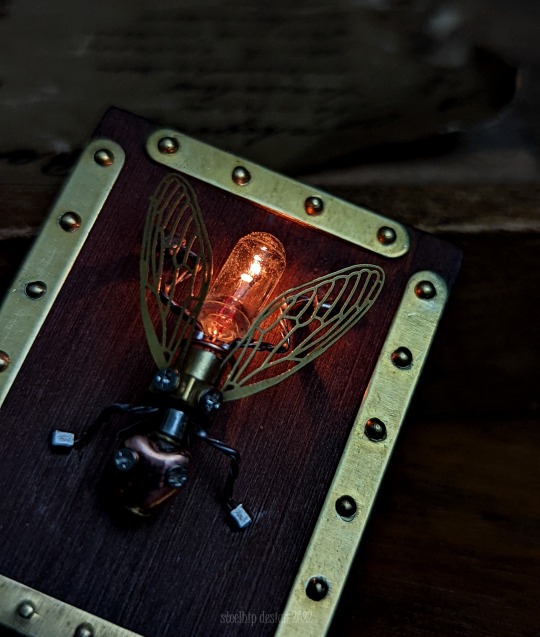
I didn't use a LED for this one. I wanted it to look old, so I chose to use an incandescent globe. As it's only 3V it's not that powerful. You can really see the difference between the power use of an LED compared to old "Edison" bulbs. The light isn't the feature here - the insect is. So I didn't overly embellish the piece for that reason too.
The wings are brass charms but they are thin and fragile so I don't think they would hold up under heavy wear unsupported. As a pendant you would only have to worry about clothing or hair snags. The body is a small brass tube. I inserted four smaller tubes and poured in some resin. I drilled those out so I could thread the four legs (made from heated element wire and crimps). The wire leads from the bulb are threaded through as is the head (a heart shaped vintage copper bead) and finally to two tiny front legs/feelers. The eyes are simply phillip's head screws. The wings are screwed onto an hexagonal ring. That is attached using two more screws tightened onto the body. As the wires are so fine, I had to secure the body with an extra wire anchor so it wouldn't put any tension on the wires.
There is an obvious caveat on this piece. She is fragile. The incandescent globe will chew through batteries too. I showed this to my group of friends who meet down the dog park on Fridays for wine and snacks. It was the favourite of many. I'm looking forward to making more fantasy insects that won't really resemble any real species on our planet.
#incandescent#light globe#light bulbs#steampunk#steampunk jewelry#steam punk#steelhipdesign#handmade#steampunk art#mad scientist#science jewelry#pendant#miniature#light up#insect#entomology#insects#fly#flying insects#mechanical insect#fantasy jewelry#fantasy#fantasy art#science fantasy#steampunk insect#machinery#fly model#insect model#wood#wooden
257 notes
·
View notes
Text
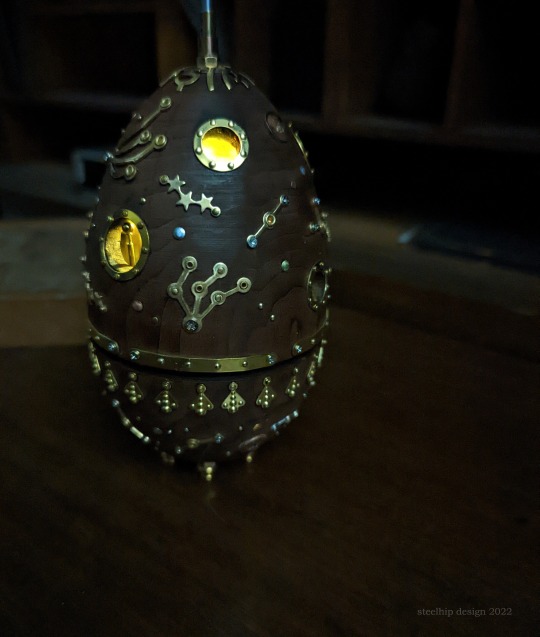


I've been watching videos on those beautiful Russian jewelled eggs. Can't mention the name - trademarked. I wanted to create my own version in wood and metal embellishments, adding a tiny LED smaller than a grain of rice within the "sun" crystal bead. The wire leads are finer than a strand of hair so soldering is tricky. As you can see in the photos the battery pack is in the base and both the top and bottom plates can be opened. I wanted it to sit on the legs with the battery pack exposed so it can easily be turned on and off, so there is a notch for the cord to run in the base plate. It takes two CR2032 that are easy to find. I'm still not at the skill level for USB power source.
It's ticked all the boxes for my art: industrial, steampunk aesthetic, science, space, light up, lots of whimsy and unique. I stained the wooden egg to a darker tone. I avoided glue with most of the decoration pinned, riveted and screwed into place. Although it looks delicate - it can be handled. To undo the top part of the egg it should be turned open. I installed two knobs on the internal top plate and a finger grip on the base. Unfortunately I had to fix the planets and sun in place due to the lighting.
This is a prototype so it took many hours to build, not counting the hours working out all the problems with the electrics. But I'm happy with the finished product and will list it in my Etsy shop. The next one will be smaller with a vintage aluminium stamped earth and moon if it will fit.
Fellow builders who are interested most of the brass and copper embellishments from vintage jewellery findings from US sellers. The "star map" points are rivet heads. Although I am learning how to turn wood, I bought the wooden egg as a blank and it came with four other "nesting" eggs inside. Now I'm thinking about doing an egg for each planet.....
Thank you for your interest in my work! I really do appreciate all the hearts, shares and follows. It inspires me to create everyday.
#steampunk art#steampunk#steelhipdesign#steam punk#handmade#artists on tumblr#assemblage#egg#wooden#lamp#lighting#astro observations#celestial#orrery#astronomy#planets#outer space#solar system#space#LED#light up#metalwork#decorative#ornament#desk ornament#mcguffin#prop#film props#OOAK#Etsy
302 notes
·
View notes
Text
The Squid
I'm often asked to remake designs in my sold history. I made the original piece about seven years ago so it was interesting to remember just how I made it and if I even could. I also wanted to improve on the original design if possible.
With the original the light was an afterthought. It wasn't very strong and the on/off mechanism wasn't great. So I redesigned it with a stronger light and easier access to the on/off switch. The most difficult element was creating the bubbles in the resin that amplify and diffuse the light. As you can see, I had to do it in five small pours but I'm happy how it came out. I destroyed three lights and five glass vials before I was happy.
This is a side to my work that people don't see. I sell in a high price bracket, some may argue too high. I don't think I need to justify my prices but few realise just how many supplies are destroyed/wasted trying to achieve the end result. I try to save what I can and sometimes I keep the mistakes to remind me not to do that again.
It's a heavy piece with solid brass rings, beads, rods, chain, tubes and crimps. I've used vintage clock pinions above the fantastic four ridged beads. I can't tell you how many times all the beads and tubes fell off during construction.
It is really tactile. I can't help but play with it. With the removable LED, I can make different colors inserts. Despite the challenges in the build, I'll be making more of these. It certainly has an Art Deco feel to it.
#steampunk#steampunk art#steampunk jewelry#art deco#jewerly#art deco jewelry#necklace#brass#brass jewelry#steampunk pendant#pendant#led lights#light up#led jewelry#mad scientist#steelhipdesign#handmade#industrial necklace#resinjewelry#resin#resinart#etsymaker#etsyshop#etsyseller#etsy#8 legs#michelle murray#orange glow#original stuff#clock parts
81 notes
·
View notes
Text
Yay! Here is the promised video of skulluminati. See more photos in the previous post.
The magnet set in the adjustable ring turns the LED light off and on. Magic!
#steampunk jewelry#steampunk#steam punk#steelhipdesign#steampunk art#handmade#skull#skulldesign#skull aesthetic#skull art#dark art#macabre#mad scientist#laboratory#victorian#biomechanoid#biomech#stasis#miniature jewlery#necklace#mens jewelry#unisex#steampunk pendant#jewelry#jewellery#brass jewelry#retro aesthetic#magnetic#magnets#magnet switch
180 notes
·
View notes
Text


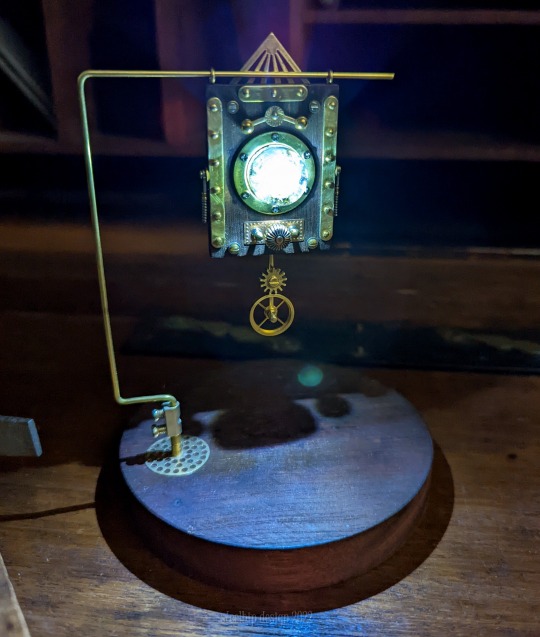
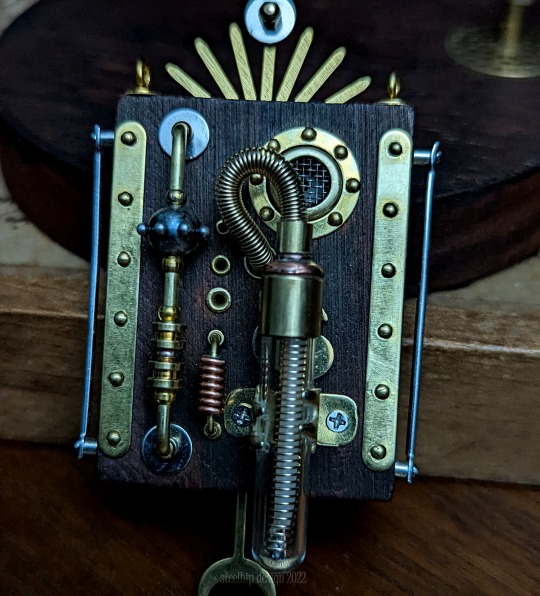
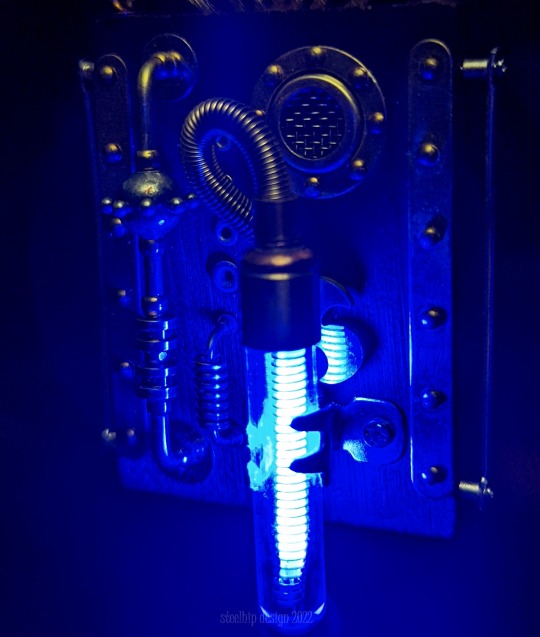
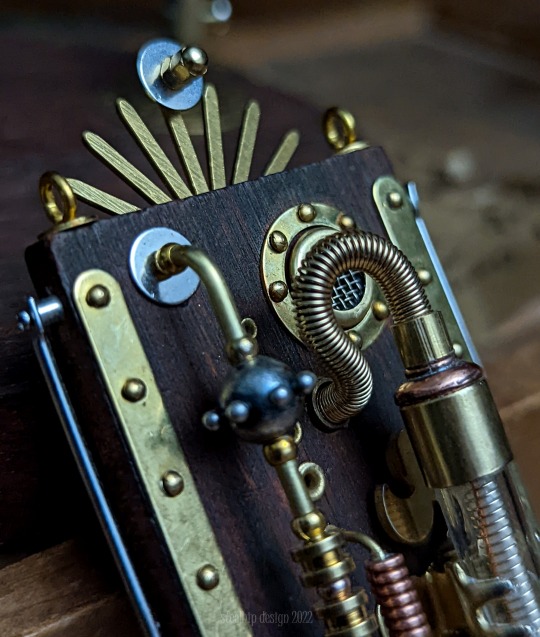
Starmaster 5000
Looking for a convenient remote for your Dyson Sphere? Well here is the Starmaster 5000. With a quantum display of your harvest star, the Starmaster gives you the control you need in a simple sleek design. It comes with a special rest so it won't be lost during a critical energy harvest. It's small enough to be worn as a stylish accessory at the next planetary council meeting.
===========================
I love creating a back story for my designs. I often don't know which comes first - the design or fantasy around the design. I have been wanting to create a piece referencing a Dyson Sphere concept so I suppose it's been rattling around my brain for awhile now.
I've been very busy creating a line of designs I call "panels". Basically they all start with a simple rectangle of wood, that I stain, before embellishing it with an array of bits and pieces. I imagine a classic "mad scientist" laboratory and visualize the equipment, experiments and instruments within it.
They can all be worn as pendants but they are also miniature works of art. To that end, I've made stands so they can be displayed when not being worn. I'd love for them to become collectables. Each panel will come with a standard chain. The battery (CR 2032) is on the back with a small switch to turn the "star" on.
This piece has a glass dome as the main feature. Within it I've used resin to simulate a star sitting in a nebula. The LED is tiny but very bright. The wires are finer than a strand of hair so the "gas cloud" hides them well. This design is classic Art Deco - simple, uncluttered, geometrical.
The stand is embellished a bit too much for the Deco style but I did want it to look like a stylised star field. There are three control knobs in gold, silver and copper. The "antenna" is telescoped tubing also featuring the three different metal tones. On the top is a gold geometric semicircle stamp. It has "handles" on the sides with gold tone "rivetted" struts around the panel. There are two gold tone rings to attach or thread, the chain through.
#steampunk#steampunk jewelry#steam punk#steelhipdesign#handmade#steampunk art#mad scientist#pendant#jewelry#necklace#fantasy art#sci fi art#dyson sphere#space#astronomy#planets#galaxies#astrophysics#stars#miniatures#control panel#display stands#art deco#art#artists on tumblr#props#LED#LED jewelry#light up#etsymaker
145 notes
·
View notes
Text


The Stellarator
Here is another window into a star sitting in a nebula gas and dust cloud. The LED used in this is tiny and the wiring is so fine it can't be seen in the resin. I've also obscured it using some swirling pigment powder. The effect is the light just suspended in the space. This is the second star field "panel" in the series and I'm keen to make many more.
I would love to create some of the famous space images taken by the Hubble and amazing new images coming from the James Webb. I could back light it using the magnetic switch modules I'm currently using. So many ideas - not enough hours in the day. I could also feature our own solar system with tiny little planets the size of a grain of sand.
This piece also features a different "control panel" with a wonderful vintage pocketwatch "onion" crown. On each side are "levers" that are really used in glasses. It needed a few more features for balance so it has the vintage brass wheel on the bottom and a cut up geometric brass stamp on the top. It will have a basic wood display stand and chain so it can be worn as a pendant. If someone wants it to be worn on a lapel or waistcoat I could easily adapt it.
Like all my recent panel series, it has a battery module on the back with a tiny on/off switch. The battery is a CR2032 that is widely available and not terribly expensive (I'll throw in a spare)
#star#steampunk#steampunk jewelry#steam punk#steelhipdesign#handmade#steampunk art#mad scientist#science jewelry#miniature#pendant#james webb space telescope#jwst#webb telescope#space#space art#outer space#astronomy#nebula#galaxies#LEd#led#led jewelry#light up#antique parts#assemblage art#assemblage#mixed media#science fiction#science
105 notes
·
View notes
Text
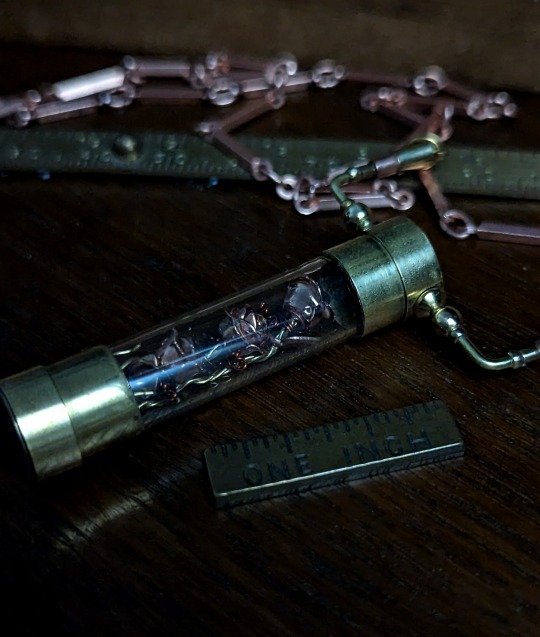
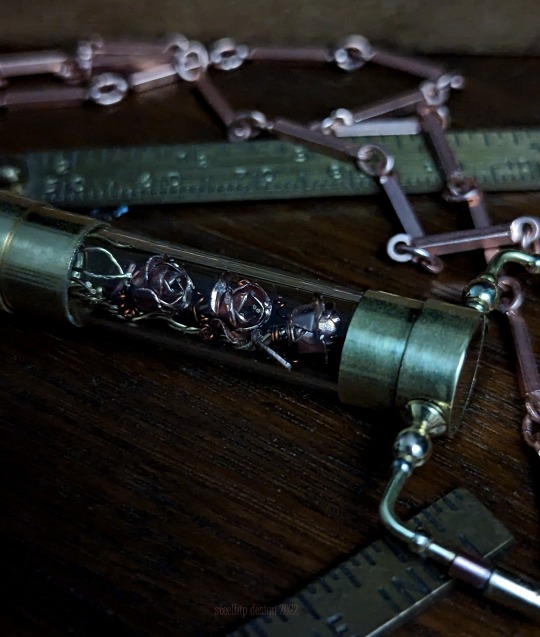
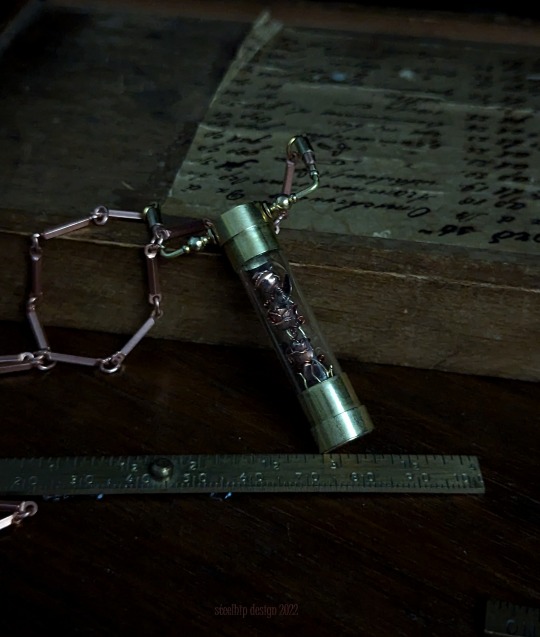
Three Roses
I was asked to create an original pendant/necklace based on the client's name. For privacy concerns, I can't tell you her name but this is the finished piece.
It takes time to flesh out a design based on words or a specific theme. I'm not like an AI bot - spitting out rendered images from a collection of terms. With the way I design, I need to work with real components to see how, and if, they will work together. The first one I started was a single vintage brass mesh rose. Despite a great multicolored aged patina, it wasn't really speaking to me. The next design was a single mesh rose set in a wood base, surrounded by a tangle of leaves and branches. It wasn't going anywhere either.
Finally, I found in my supplies these tiny rose gold roses - only 6 to 8mm wide. I mounted each flower on a plaited brass wire. On two of them I included a tiny copper leaf. I also made some curled tendrils coming off the stalks. It was a tight fit but eventually the roses were in the right position to seal the vial. I made each cap with brass tubing and metal disks. It looks like a specimen collection with the brass fittings and hanging bar.
I did try to include a LED light but it didn't really work with the design only illuminating the top rose.
I hope she loves it but if not, no problem, I'll try again and list this one in my store. It's so difficult photographing small items, even worse if they are under glass.
#metal rose#miniature rose#miniature jewlery#miniatures#glass vial jewelry#rose#steampunk jewelry#necklace#pendant#custom#flowers#copper#brass jewelry#steelhipdesign#customisedjewellery#mixed media#mixed metals#rose gold#roses#floral#etsyhandmade#etsyseller#etsymaker#etsyshop#etsy
37 notes
·
View notes
Text
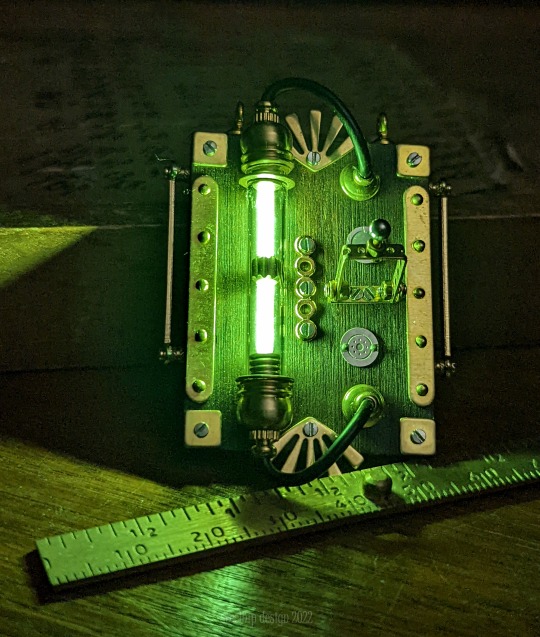
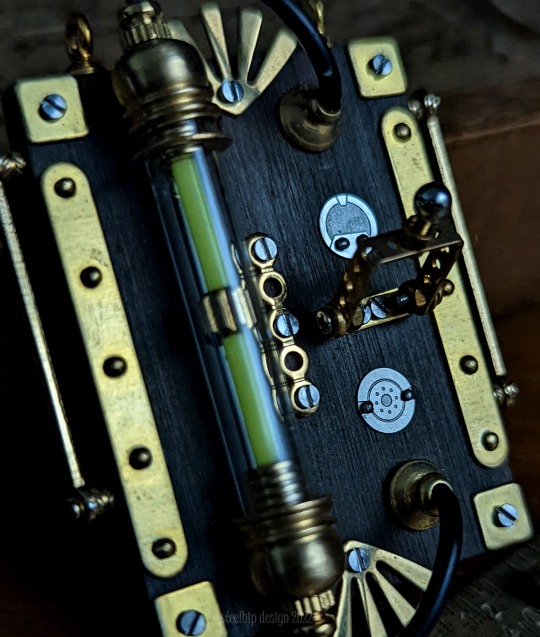
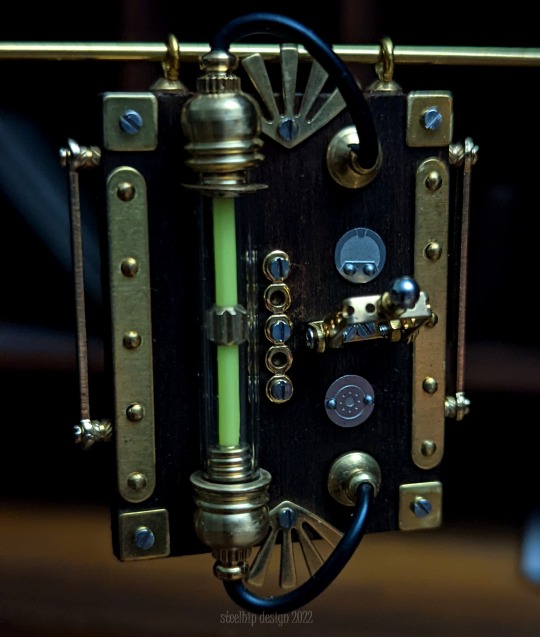
Blue Tube
These blue filaments have a spectacular tone, vivid and deep. I've put it in a test tube. It reminds me of Cherenkov radiation, seen in nuclear reactor pools when the rods are actively generating heat. To fit into that theme I've used tubing, unique beads, rivets and a mesh "porthole". Behind the test tube I used a bladed fan earring. There are a lot of little details in this.
On the top is a geometric "radiant" stamp with a silver tone circle bolted on. The balance the bottom I added a crescent on a strut. There are silver tone "handles" either side of the piece. It can be worn on a chain (included), connected using the two rings screwed into the wood. The test tube is held buy a spring loaded, serrated tooth, vintage brass clip.
As I said, I've been really busy making these. I love them but an artist never knows if a design they love, will be popular. It's just the risk you have to take as a working artist. If wishes came true I'd sell them as unique collectables with bespoke stands. Little "mad scientist" panels that fit together to form a miniature laboratory.
It will be sold with a complimentary chain and wood and brass display stand. If you prefer it as a pin I can adapt it.
#blue pendant#blue glow#steampunk#steampunk jewelry#steam punk#steelhipdesign#handmade#steampunk art#mad scientist#science jewelry#pendant#miniature#test tube#blue LED#laboratory#assemblage art#assemblage#installation#collage#mixed media#sci fi#science#fantasy#fantasy art#cherenkov radiation#nuclear reactor#cherenkov#glowing jewelry#blue#glowing
70 notes
·
View notes
Text

The Knife Switch
I set myself a challenge to make a miniature working knife switch. Turns out it's harder than I thought. So the second best option - a miniature fake knife switch teamed with a green glowing vial. It does come with a caveat: constantly moving it will loosen the nuts so the new owner must be careful. I think I'll put a couple of extra nuts and bolts - just to be safe. I'll try a working knife switch when I figure out the wiring.
This panel is a "horror/monster/retroscience" film trope. Every version of Frankenstein I've seen had at least one knife switch and green glowing liquid/lights. I've used the genuine item on some of my big prop pieces. Love the look of them, appreciate how dangerous they were when used in real high voltage machines.
I've included a few unique embellishments in this one. The "sun" ray brass stamps on the top and bottom and machined brass cord ends. It comes with a basic wood stand for display when not being worn as a pendant. I could also turn it into a pin or fob for the dapper gentleman.
#steampunk costume#steampunk#steampunk jewelry#steam punk#handmade#mad scientist#science jewelry#pendant#jewelry#steampunk art#steelhipdesign#knifeswitch#glass vial jewelry#glass vial#laboratory#scifiart#scifi#sci fi movies#frankenstein#costume#machine#green glow in the dark#green glow#LED#LED jewelry#led lights#etsyseller#etsyjewelry#etsyartist#brooch
68 notes
·
View notes
Text


Magnetosphere
This started with an amazing bead! I drilled out every "hole" in it and suspended a tiny LED in it. The lighting is a bit more subtle than the other panels I've made but this has a lot of other bits and pieces going on.
I've been amazed at the recent scientific breakthroughs with fusion reactors in Korea and China. I not on love the possibility of abundant clean energy in the future but I also love the names of these experimental machines like Tokamak, Stellarator, Magnetic Mirror, Toroidal Z-pinch, Spheromak. They really do evoke fantasies of portals to a parallel universe or bending space time - the only way we will be able to travel those distances. Einstein's relativity really did take a dump on the possibility to live in a Star Trek type reality.
So this contains an array of "controls" including watch crown "dials". It has a tiny glass fuse (or it could be a magnetic switch - not sure) and spring wire tubing. It is the only panel to feature a clock gear. I love gears - it was one of the reasons I was drawn to the steampunk aesthetic. But, and this is controversial and just my opinion, I think gears are used far too much.
Way back in 2010 there was the "slap a gear on it" by those just wanting to jump on (and profit from) the zenith of the steampunk trend. I use gears sparingly, often not using them at all, and rarely an "orphan" gear. They have to look like they have an actual use in the "machine" even if they don't move. In this design I want the gear to look like it's doing something behind the scene.
If there was such a think as a 6 volt coin battery I would have also back lit the amazing "swirl" stamp at the base of the main feature. Just have to wait for those to be in production. The wire "aerials" coming out of the side of the panel is fishing tackle. To balance the piece I finished it with a small copper strut and brass wheel.
This piece does deserve it's own stand. I will make a special one for it and include another LED to it. It will also come with a standard brass chain.
#fusion#steampunk#steampunk jewelry#steam punk#steelhipdesign#handmade#steampunk art#mad scientist#science jewelry#pendant#miniature#fusion reactor#spherical tokamaks#spheromak#sci fi#science#scientific#scifi#scifiart#energy#machine#light#light up#experimental#scientific instruments#fantasy jewelry#fantasy#fantasy art#science fantasy#contol panel
58 notes
·
View notes
Text


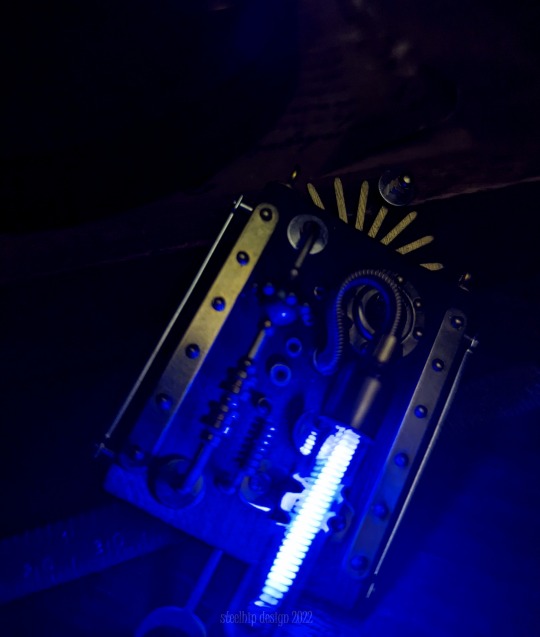
Liquid Light
As I've said before, it's amazing what you can access in LED filaments today. This flexible "rubber" one is 13cm long. Unfortunately when I was making this piece I managed to wreck two before it finally came together. That's the downside to working without a hard draft, I never know what is going to work with other parts until I try to make it. Pro tip: flexible LED filaments don't like being pulled or stretched, even gently.
So I will guarantee this will get attention when being worn, even without the light on. Turn it on and get the "wow" factor instantly. I love watching YouTube videos on metal smelting and processing. This piece reminds me of that. It's fascinating watching glowing metal in it's liquid form cascading through machines and rollers. I like seeing magic in the mundane.
I made a matching wood display stand so it can be seen when not being worn. Even if you don't want to wear it as an accessory, the piece as a quirky, unique desk ornament will intrigue.
#industrial necklace#industrialart#smelter#steampunk#steampunk jewelry#steam punk#handmade#steampunk art#mad scientist#science jewelry#pendant#steelhipdesign#laboratory#LED#led#light jewelry#light up#green glow#green light#jewelry#ornament#deskdecor#desksetup#desklamp#science fiction#science#scifiart#edison#etsyshop#etsyjewelry
60 notes
·
View notes
Last Seen Blogs

heaven-in-a-wild-flower
Eternally beguiled by the beauty of words


celebrieloflothlorien
Celebriel of Lothlórien

tunameltpizza
EAT THE RUDE

cuhlairr
to the moon and back