#that project polygonal bubbles around them like hello
Text
there’s so little Ethersea fanart but i love how every single fanartist seems to have missed that vapor suits aren’t actually suits… they’re a collar that projects an air bubble around their bodies, it’s not a diving suit at all jdjdmdnsmdndjf
#y’all i love you but please#these big bulky old timey diving suits are killing me#they have MAGIC!#MAGIC SUITS!#that project polygonal bubbles around them like hello?!? that’s so much cooler#taz ethersea#the adventure zone#taz#myken talks
70 notes
·
View notes
Text
Unit 1: An Introduction to Visual Communication.
The place of words (Book design)-Narrative & Sequence.
Screenshots of making the imagery for the book.
Below are screenshots that I took of the methods and processes that I used whilst I was creating the final imagery for the book.
The first thing I did when creating the final imagery was scan my favourite drawings that I did in my sketchbook. I then opened each drawing up in Photoshop and used the Paint Bucket tool to add colour to the drawings. I also used the Polygonal Lasso tool to select areas that were uneasy to fill with could so that I could add colour to them and fix any mistakes.
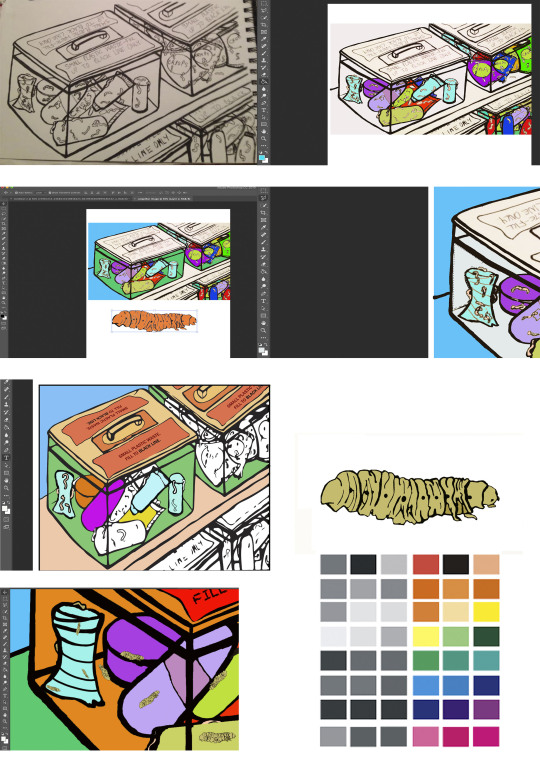
Above is the process I used to create the image for ‘The world’s plastic pollution problem is solved’, text. Firstly, I scanned the illustration that I produced in my sketchbook into the computer. I then opened the scan in Photoshop and used the Polygonal Lasso, Paint Bucket, Paint Brush and Colour Picker tools to add colour to the scan. I went over the original scanned in pen lines with a black fill in order to make them stand out more against the colour. I chose to use the colour pallet featured in the screenshots above as the main colours used in the image. The colour pallet was based on a Pop Art colour pallet. I used this pallet because I was inspired by the art movement when illustrating my imagery.
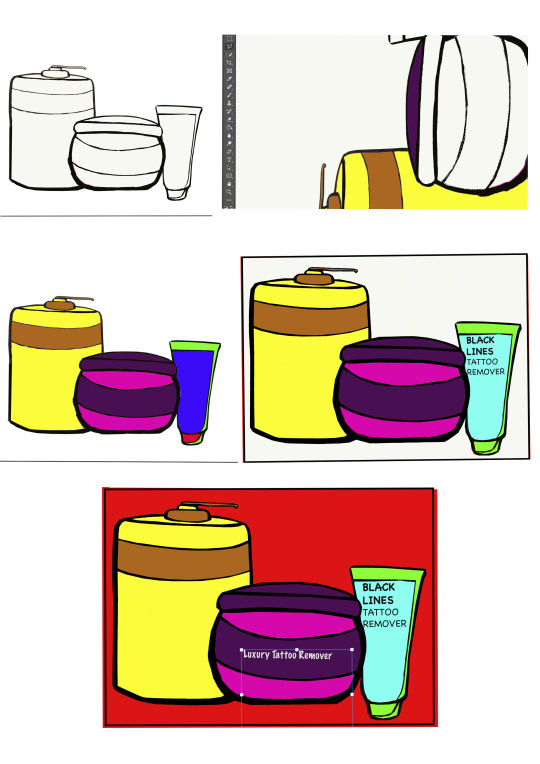
Above are screenshot documenting the development of creating the image for ‘There will be tattoo removing creams’. I used the same process as I used for creating the other images.

Above is the process that I used to create the second image for the ‘There will be tattoo removing creams’ text in my book. I found several problems when colouring in this image due to the line lengths of the original scan. Therefore, I had to use the Polygonal Lasso tool to select the problematic areas of the scan to fill with colour without filling the whole of the image with the colour. I also used the Paint Brush tool to connect any lines that weren't joined so that the colour would fill the section that I wanted it to fill.
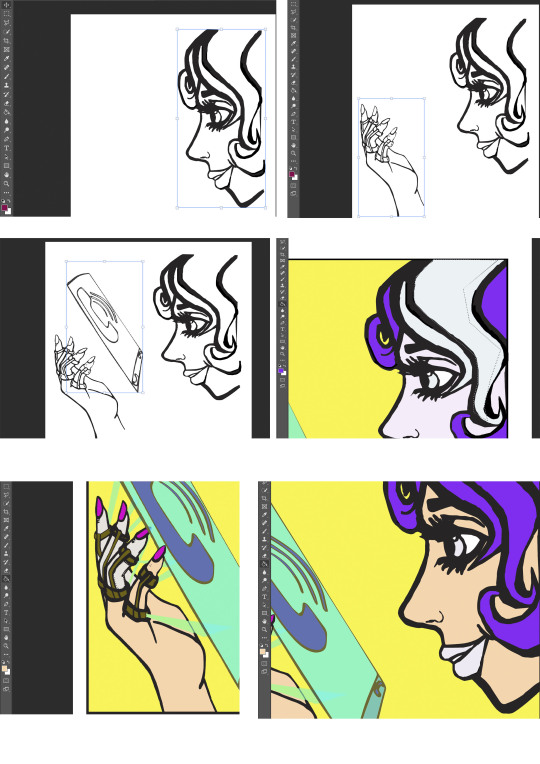
Above are screenshots of the process that I used to create the image for ‘The future will be screen-less’. The process in creating this image was a bit more time consuming than the others. This was because there were two original scanned-in drawings that I had to put together to create one whole image.
The first scan was a pencil drawing of the woman’s hear and the other scan was a pen line drawing of the hand and screen-less phone. In order to change the pencil drawing scan into a line drawing image, I opened the scan in Illustrator and selected ‘Image Trace’. This traced over the image and produced a black and white version of the scan. I then opened this in Photoshop and imported the pen line drawing scan into the same document as a separate layer.
Next, I copied the pen line drawing scan and cut around the drawing of the screen-less phone, removing the hand from the layer so that the phone was its own layer. I then placed the screen-less phone on top of the layer with the hand on so that it looked more like the woman in the illustration was looking at it. I then changed the opacity of the colours on the phone to look more like it was being projected form the lady’s rings on her fingers.
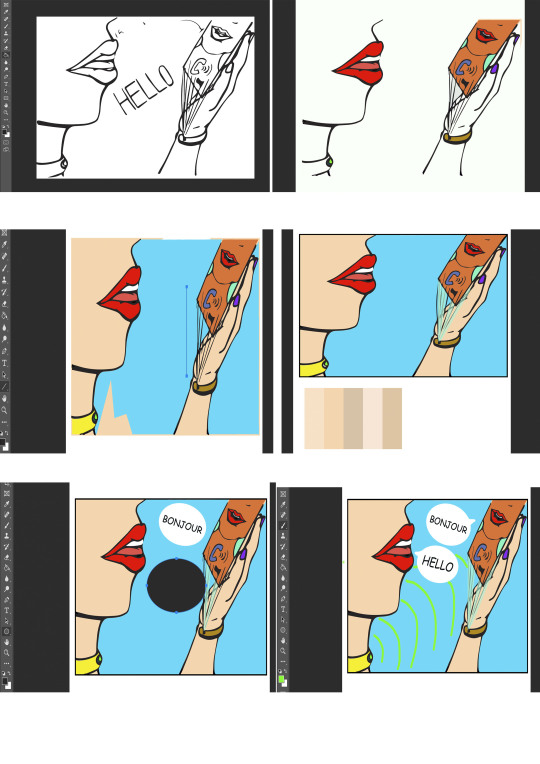
Above are screenshots that I took of making the imagery for the ‘Language will be Universal’ text. I followed the same process that I did creating the other images, however I used the Ellipse Tool to create the speech bubbles.
I decided to get rid of the word,‘Hello’, that was in the original drawing. I did this because when colouring the image in I thought that having three words crowded the image.

Above are the screenshots documenting the making of the first image for the text, ‘There will be self-driving electric cars.’

Above are the screenshots for the second image used for the text, ‘There will be self-driving electric cars’. I found this image quite simple to colour in.
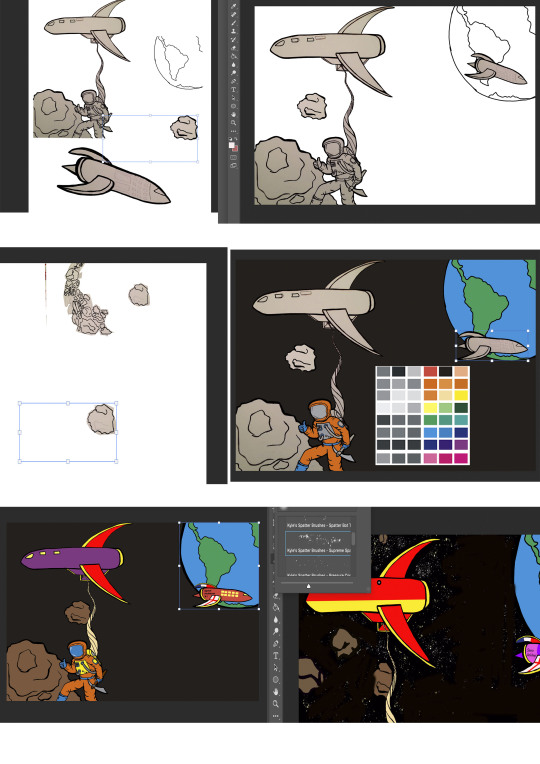
Above are screenshots that I took documenting the creation of the imagery for the double page spread text, ‘A new space age’. This image took a little bit longer to create as I originally only scanned in a drawing of the spaceship and spaceman. I added in asteroids, the earth and another rocket into the document by scanning in drawings of each of them and opening. I used a colour pallet for the colours for this image that was influenced by colours used in the art movement, Pop Art. I created the stars in the background of the illustration with a Paintbrush tool style setting.
0 notes
Last Seen Blogs
amylidgett
Amy Lidgett
boeyylee-blog
Boeyylee

leoliandemay
Leo Lian
protect-luna-squad-blog
Luna protection squad
femalespie
BASICALLY THERAPY