#they act as both lighting reference for the CG artists
Text
Opportunities in India for VFX Careers
If you are an artist who wants to see your work on the big screen, a VFX course in Pune is a great career option. You can work on high-profile projects, collaborate with top studios, and eventually climb the corporate ladder to lead teams of talented VFX artists
Layout Artist 1.
As the name suggests, a layout artist lays the foundation for the final appearance of the graphics. Usually, this work is done during the pre-production and pre-visualization stages. A layout artist's primary responsibility is to convert the script and storyboard into templates that may be utilized to adapt them for the visual medium. This range includes everything from picking camera angles to setting up settings.
2. Composition by an Artist
Effective visual effects seamlessly blend into the background and do not in any way interfere with the viewing experience. However, a single mistake could ruin the entire viewing experience. A compositor's job is to assure the seamless integration of live action with VFX and to eliminate any visual artifacts.
3. Lighting Artist
Lighting is one of the most crucial aspects of any film production, whether it be live-action or animated. Understanding how light behaves and interacts with objects in the real world and applying that knowledge to the world of visual effects are the responsibilities of a lighting artist. Lighting is essential to visual coherence and even the storytelling process, therefore a lighting artist must be able to provide the perfect amount of illumination to make a scene sparkle.
4. Rendering Artist
When it comes to job prospects in the industry, rendering artists are in high demand across the majority of the nation's leading VFX studios and production businesses. Rendering artists, like lighting artists, are in charge of turning 3D models into the graphics that appear realistic on the screen. The project's translation from an idea to a visual, which is a sensitive and highly skilled effort, is ensured by rendering artists.
Roto Artist 5.
Rotoscoping artists, commonly referred to as roto artists, have the difficult but crucial task of tracing all the locations of a frame where computer-generated graphics (CG) meets real life in order to provide compositors with a starting point for their work. Because they offer a strong VFX foundation and can act as a stepping stone for VFX specialists, roto artists are in high demand.
Matte Painter, no. 6
You know those beautiful tapestries that seem to only be in special effects films? The matte painter had a big impact on how they were made. A matte artist uses visual reference material, such as images, sketches, and other references, to produce convincing VFX scenes. All of the action will take place in these scenes.
7. A performer who moves matches
A match mover typically has expertise in both 2D and 3D since they must work at the nexus of two different worlds. The match mover is often in charge of ensuring that the computer-generated graphics seamlessly mix with the real-world video and that all proportions, movements, and other details look realistic. Tracking movements is a crucial element of the match mover's responsibilities as a CGI artist.
0 notes
Text
God theres photos of the stand ins from the Sonic movie sequel and... I can't take them seriously

Tails, are you okay bud?? Tails???

Tails????
The lights are on but nobody is home
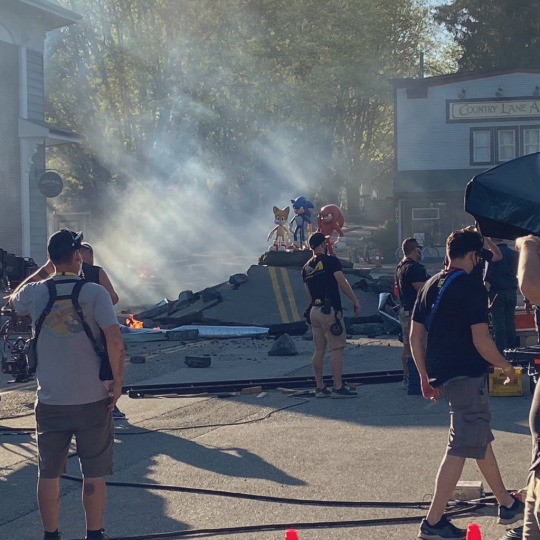
Honestly, seeing these characters, half the size of a human and brightly coloured standing on a pile of rubble is making me crack up.
#the consensus im seeing is knuckles looks gr8 and i have to agree#but these stand ins look SO out of place its comical#also if anyone is wondering why the hell they have these-#they act as both lighting reference for the CG artists#and a guide for the human actors to know where the CG characters are#but god just trying to deliver lines while looking at Tails' dead eyes..... im not sure i could take it seriously
6 notes
·
View notes
Text
FE16 Blue Lions Liveblogging
Chapters 17-18. Lots of heavy plot content here.
The further along I get in the war phase the more superfluous the monastery content and calendar system becomes. I haven’t gotten any new paralogues since Annette and Gilbert’s, because I believe you only get ones for characters you’ve recruited and I’ve exhausted all of those. I’ve read that Dimitri may have one toward the end, and Mercedes shares hers with Caspar of all people so that’ll have to wait for a playthrough when I do inter-house recruiting, but apart from that everyone in my army has had one. There’s little to do at the monastery but grind professor rank and Renown, mostly for supports and a last few skill ranks. What little there is in the way of quests is just Gilbert asking for resource contributions. It’s like the endgame WoW of years past, only without even the option to do group content (not that I would, but regardless).
The enemy AI for the school phase’s Battle of the Eagle and Lion allowed it to feel like a genuine struggle between three opposing armies, but round 2 in the war phase sacrificed narrative for the sake of difficulty. The Alliance forces charged my position after a few turns and didn’t go for the Empire at all, leaving me to play more defensively to neutralize their flying archer lord (...I really hope Claude spontaneously getting a wyvern gets some kind of explanation in the Deer route, something more than “because Almyran, just go with it”). Dedue once against punched Edelgard into submission because he’s distinctly good at that - really goes along with the hunting her down and killing her bit in another route, which TVTropes is now claiming can still happen if you choose to spare her. Huh.
Student kills: Ferdinand and Bernadetta from the Eagles, Lorenz, Raphael, Ignatz, Leonie, and Lysithea from the Deer, with the others either retreating or still unseen in the war phase. Petra was the only one who really surprised me by retreating instead of dying.
Starting in Chapter 18 Dimitri can be interacted with again like a normal unit. While I have issues with some of the presentation behind his change of heart (see below), it’s good to have him working on supports and building his skill ranks during training sessions again. Not that he really needs the latter; his stats are massive and both his sword and lance ranks are nearly maxed out.
The story map for Chapter 18 introduces magic/technology hybrids that act like either monsters or siege towers, on top of having at least one enemy caster with a traditional siege spell. Adding a lever far into the map to shut down the lightning towers was a nice touch.
Most of the master classes have been a pain to grind toward, as only a few units have what it takes to be true hybrids. Sylvain is evidently one of them, but sending Mercedes through cavalier to work on her riding for holy knight made her borderline useless. At least some of the advanced classes are good enough to where they could feasibly work for endgame (but I do still want a holy knight, so Mercedes will continue poking things for a while).
Story/Character observations
I’ve been getting all kinds of A supports. Dimitri/Dedue and Felix/Sylvain are as gay as advertised. Catherine/Ashe is one of those rare plot-heavy support lines, where we find out more about Lonato and Ashe’s own drive for revenge. Byleth/Gilbert is not even slightly romantic even late into their A support, which makes me wonder why he’s an S rank option for either gender when it’s more about pushing him to go home to his wife. Ditto Gilbert’s supports with Annette. Ashe/Annette gets kind of cute in the end, but Felix/Annette involves entirely too many of her comically bad songs to be endearing. Manuela cuts out the cougar routine when she spies on Sylvain being an asshole. Catherine thought young Dimitri was a maiden based on his haircut (as seen in the CG of him dancing with Edelgard - this guy is forever doomed to multiple varieties of bad hair) and repeats Felix’s taunt that Dimitri used to get so excited while training that he’d break swords in half but he’s better with lances even though they have less durability? I forget with whom, but Dimitri shuts down the impossible dream of fellow lance lord Ephraim by acknowledging that his traveling the world as a warrior would be irresponsible. The gender of Shamir’s first love might depend on Byleth’s - will have to see how the f!Byleth support words it.
As for the story, this is the moment where Dimitri makes his turn back toward sanity and a sense of personal responsibility. Just as I predicted, his decision to allow that unnamed orphan girl to join the army turns out to have been a bad one. After Rodrigue takes a blade for his prince and Byleth shows himself again adept at swift executions, Dimitri is moved by the death of yet another of his loved ones to go walking in the rain and respond favorably to vaguely inspirational dialogue choices. While I understand what the writers were going for, I have two issues with this sequence of events. The first is minor, in that the CGs used for them - of Fleche preparing to stab Dimitri and Rodrigue stepping between them, of the dying Rodrigue cradling Dimitri’s face, and of Dimitri in the rain - don’t do a very good job of matching the intended mood. The first two use sunset lighting and thus appear much too soft, while Dimitri in the rain with his hair plastered to his head alone against a black background looks unsettling and almost creepy for what’s meant to be his big moment of redemption. That’s a small quibble with artistic choice, however.
On the other hand, my other issue will take a whole post to explain. I’ll be saving that for a larger Dimitri/Dedue project after I’ve completed playthroughs of all the routes routes, but my basic argument is this: Dedue being removed and then optionally re-inserted into the Blue Lions storyline was necessary for Dimitri’s emotional arc to make sense, and to allow Byleth a much larger role in said arc than they otherwise would have had. Yes, I have major shipping goggles on here, but try to imagine a scenario where Dedue saves Dimitri from prison and they go on the run together for five years, before reuniting with everyone at the monastery.
To no one’s surprise, Dedue takes up watching after the prince in the monastery the chapter after he returns. In Chapter 18 he comments that he’s the only that Dimitri hasn’t really changed despite appearing more sane, that he’s still too kind and sensitive to the suffering of war and that Dedue admires him for that. They’re just laying the subtext on thick now.
Related to my problem with the Alliance AI in the threeway battle, it’s never explained why Claude joins the battle at Gronder Field (apart from getting him into that cutscene they all share, anwyay). Prior to that battle House Reigan opposed the Empire and even engaged House Gloucester’s pro-Imperial faction to distract them from Chapter 16′s bridge. As the next chapter’s title references the Deer however I imagine I’ll get an explanation sooner rather than later.
Cornelia’s cleavage may be impossible, but as far as under-dressed female villains in this series go she wasn’t terrible. She doesn’t flirt with anyone and apparently got her lofty position in the Kingdom through her talents at magic and infrastructure reform (which may have included the turrets and giant robots in Fhirdiad? Was that the implication?). Her dying revelation about Dimitri’s stepmother would have landed better had we ever seen anything of her, but I suppose as Edelgard’s birth mother she’ll be brought up again in some capacity on her route.
9 notes
·
View notes
Text
My pilot survey response for tomorrow under the cut! I could write a whole separate essay on things I didn’t like about sweet enchantment, but heres a hot 1.5k about social issues.
Sweet enchantments has as solid a premise as any other series. I wasn’t especially excited about the high concept, but I’ve always maintained that execution is much more important than format. So I was really looking forward to see what your team would do. I played both routes, even though I’m not attracted to men, because I wanted a fuller picture of the lore. Despite wanting to love sweet enchantments, I’ve found its institutional problems to be too severe. As a survey inherently invites critical engagement, I hope you can keep an open mind to examining these problems.
Sweet enchantments was a strange kind of cognitive dissonance. It’s played as a light hearted café drama, but every element reads as a horror story. And not just because of the customer service work, or the kidnapping. Its implications about race and relationship dynamics were frightening. The lovestruck team has shown that they care deeply about respecting issues of race, sexuality and gender, class, and trauma, so I’m assuming a level of base knowledge here. You know how deeply fiction interacts with life. It’s understood.
To start, Lucien’s route is fun, but the magical alternate world where racism as we know it might not exist isn’t an excuse for how he’s treated as a character of color in our world. His first cg is massively whitewashed, and while the others are better they’re not great. In that first cg he looks vaguely tan, not like the dark skinned black man that he is. Lightening a character’s skin this way is not only unprofessional as an artist, but also as a habit comes from racist norms.
You need to have a sit-down conversation with your artists about drawing people of color. Because while Lucien is the worst whitewashed, he’s not the first. We were all socialized with white beauty standards, but that’s not an excuse to persist with these norms. It’s a demand to resist them. To put it simply, prioritizing light skin and white European features is bad, even if it’s what we’ve been taught. Artists have the ability to look at reference material, to study what they don’t know about brown skin. Art is created. Everything that is done is done intentionally. Palette, filter, and lighting are all generated by the artist, and they don’t exist in actual space. This is not a case of bright lighting. The lighting isn’t real. Even if it were, that’s not how bright light looks on brown skin. The perceived value is just too far from the local value.
Here’s a video on rendering black skin-( https://www.youtube.com/watch?v=ALIBrFzIQ8s)The dude’s clearly a little awkward talking about it, but it’s sweet and technically sound. For more on how lighting black skin works in real space, mic.com has an article called ‘keeping insecure lit:cinematographer Ava Berkofsky on properly lighting black faces’
Runa’s problems are more in the narrative. Many of the lovestruck routes I’ve read are excellent about respecting consent. It’s even been the focus of multiple narratives. So I was surprised by the active use of charm magic here. Please put a pin in this thought- it’s important to pay attention to real life allegories for narrative elements. They will always read as intentional connections. In this case, charm magic jumped out immediately to me as a consent issue. Please at this point jump to planned parenthood’s FRIES- consent must be freely given, reversible, informed, enthusiastic, and specific. By these standards consent cannot exist under charm magic, the same way it cannot exist in any other impaired state of mind. I know this thought wasn’t in any of the producer’s minds, but Runa’s charm magic has the ability to be a magical allegory for a date rape drug. This was a risky choice considering the predatory lesbian stereotype, but I assumed the route would work around it. Unfortunately, her last batch of episodes revealed that she has used her charm magic. Her action on Kamila, to magically intoxicate and coerce her into a relationship that quite probably included sex, is an act of sexual assault. For what it’s worth, Kamila coercing the mc into a kiss is sexual assault as well, and was incredibly unwise to inflict on the players, who have their own traumas. I urge you to not go any further with this route. Oversight that it may have been, Runa is a sex offender. Lovestruck can’t encourage forming any kind of relationship with a rapist.
Individual routes aside, the premise of sweet enchantments has its issues. The choice to set the café as a prison was tone deaf. Particularly troubling is the fact that this prison is mostly inhabited by people of color. The American prison system grew out of slavery and to this day exploits the free labor of black people in particular, and brown people at large. If you need a short introduction, Jaron Browne has an article called ‘Rooted in Slavery: Prison Labor Exploitation’. There is at most one white prisoner in sweet enchantments- I’m not clear on Roman’s race. To have the café set up as the free labor of these prisoners of color, and then on top of that introduce a white mc to save them from their past, is incredibly concerning. Glorifying white crime wouldn’t have been good either, but that’s where we get into the complexity of the penal system being too much. There’s no good way to do this plot.
The penal system is not a light subject. Once again, real world allegories matter- no matter what you do, this is not a new prison system that you’re making up. It will always run in parallel to real life. And prison in America, the country you’re based in, is a corrupt, politically complex, broken, racist system that you can’t hope to create media about with the kind of levity this series is curating. You do not have time to talk about privatized prison, or the school to prison pipeline. Watching orange is the new black is not sufficient research. Nodding to mass incarceration is not effective social commentary. I don’t mean to say that you can’t address the penal system. Lovestruck has handled a lot of complex heavy themes. But the light hearted tone and surface level treatment sweet enchantments is coming at it with can’t do the topic justice.
Also, I realize magical racism is a well-trodden road, but that doesn’t make it good. The prohibition of human/magician relationships in particular hit me hard. The real life equivalent here is anti-miscegenation laws. In my own life, these laws were why my grandparents had to leave the state to get married. These issues have not yet been rendered purely historical. They’re recent, and present in the minds of the public. Real life allegories matter. You can’t have a plot about races not being able to legally marry without invoking real life eugenics and institutional racism. This is another story that could theoretically be done, but never as a fun, quirky subplot as I fear it is in sweet enchantments.
Someone had the forethought to make Liora the warden and I appreciate that. I appreciate that there are so many poc characters in this series, and I’m really hopeful that that’s the norm going forward, which seems likely considering other recent series. Lovestruck is still miles ahead of many other stories. But effective representation requires consideration of the characters’ identities. In this case, not fully considering the implications of the forms of representation in sweet enchantments created some huge misunderstandings and upsetting themes. Diversity without thought is better than no diversity, but still less than true inclusion. It’s a bigger question than percentages. The other day I heard Dr. Dafina-Lazarus Stewart speak, and there’s something they said that I think explains it well. To paraphrase- diversity asks who sits at the table. But inclusion needs to ask, whose seat at that table is in danger? Whose ideas are considered? Who is made to feel that they belong?
Originally, I was going to write this response focusing on ways that sweet enchantments can improve. Lovestruck has yet to actually drop a pilot series, so it seemed like the most efficient option. And in my initial impressions there were several nice things about sweet enchantments that could stand to be played up- the patisserie in Lucien’s route is lovely and well researched, and the plot of overcoming the food critic is fun. Nothing in Runa’s route was super appealing to me, but I appreciated the niche her character would fill. Female characters should be able to have a wide range of personalities, including abrasive ones. But these are little consolation in the face of its larger problems. Sweet enchantment is a minefield of sensitive issues that deserve respect, care, and time that you can’t give to make it even acceptable. While I recognize you’ve already invested time and resources in the series, it needs to be dropped. If you can’t drop this pilot, then there’s no pilot you can.
#sweet enchantments#this is the third time I've posted this trying to get the read more right so if it doesn't work sorry but I have a real essay to write#hoo boy we out here#yknow
50 notes
·
View notes
Text
8 SPECIALIZATIONS AND COURSES IN VFX – VFX & 3D ANIMATION CAREER GUIDE
In this blog we will discuss about the multiple specializations, courses in vfx, animation courses in pune. Will also try to provide you a road map to build up a great career in vfx by selecting right courses/specializations. VFX being a new career option is very less explored and not many people can guide on to selecting a right vfx career path. We will also provide information about softwares relevant to each of the VFX specialization and the one that are demanded globally. In our previous blogs we provided information about VFX as a career and misconceptions students have towards VFX career, here we are going to focus on VFX courses and specializations in detail.
VFX, Animations are basically a CGI (Computer Generated Imagery) used for creating film shots in film industry. CGI shots complexity and quality differs depending upon the projects and the budgets of a certain show. When a series of frames runs at the pace of 24 FPS (frames Per Second) digitally, it gives us an illusion of a motion picture; so, if a VFX artist wants to edit a one second shot of a movie then he/she has to work on 24 frames one by one. Any CGI Animation shot in a movie is not a job of a single person but is a product of multiple departments and artists that work together in liaison with each other. To understand the specializations and courses in VFX let us now understand VFX pipeline.
VFX pipeline is basically a step by step process which is followed globally by each and every production house to create CGI effects. The VFX pipeline followed globally is as follows,
Conceptualization – Concept Design.
3D Modelling – Creating a 3D model with reference to concept design.
Texturing – Giving texture (color) to the 3D model with the reference to the concept design.
Rigging – To rigg the character basis the anatomy / structure (animal anatomy, human anatomy etc).
3D Animation – To animate the character developed by the 3D modelling, texturing and rigging department.
Digital Lighting – Providing light effects, shadows etc to the shot as per the requirement to match the real shot footage.
FX – Simulating / creating smoke, fire, dust, destruction, water, cloth (flag, superman’s cape etc), liquid as per the requirement.
VFX Compositing – Combining of visual elements from different sources / departments in to a one single shot.
The above-mentioned departments are the specializations in VFX a student may choose to opt while starting VFX training. It is very important for a student to understand that he can get professionally trained on either one of the mentioned specializations / departments. To understand why only one specialization please refer to our previous blogs.
Now to understand these departments in detail, imagine a scene wherein a furious bull is running on a dusty path for attacking a man (Man in this scene is a real person shot on a green screen and bull is a CGI which needs to be created digitally). This shot is an imagination / vision of a director and he wants to turn it in to realty with the help of VFX. Let us now understand the pipeline in detail as below.
Conceptualization – Concept department is the first stage in VFX pipeline for which there are concept artists who are professionally trained on softwares like Photoshop and Illustrator. Director/Client communicates his vision to the concept artist; artist in turn develops a bull in photoshop or illustrator software that the director wants to put in a movie. Creating a concept is not an easy job and takes lot of time and efforts; concept artist keeps on making multiple versions of a bull till the time the client is not satisfied. Once the concept is ready and approved, now the job is passed on to the 3D modelling department.
Software training required to be a concept artist – Photoshop, Illustrator.
CONCEPT DESIGN
3D Modelling – Modelling is the second stage in VFX pipeline for which there are 3D modelers. Modeler takes the reference from the concept department and creates a 3D model (bull in our case) in a computer. This model of a bull is just a model without any color. In modelling again there are divisions viz organic modelling (creating model of any of any living being like for example human, animal, birds etc) and inorganic modelling (creating model of a nonliving item like for example table, chair, rock etc), in current scenario it would be an organic modelling for a bull. Once the modelling is approved, now the job is passed on to the Texturing department.
Software training required to be a 3d modelling artist – Maya, 3ds max, Z brush.
3D MODELLING
Texturing – Texturing is the third stage in VFX pipeline for which there are texturing artists. Texturing artist gives texture (color) to the model created by a 3d modeler with reference to the concept design. Texturing artists are trained on softwares like Maya, 3ds max, Zbrush etc. 3D modelling and texturing can go hand in hand i.e. One person can learn both of these skills together and can take responsibility as a modelling and texturing artist in the industry. Once the texturing is done to the bull the work is then passed on to the rigging department.
Software training required to be a Texturing Artist – Maya, 3ds max, Z brush.
TEXTURING
Rigging – This is a very niche skill; rigging is basically to give joints/bones to any model where the movement is required to be animated by an animator. Rigger will study the anatomy of the character and basis that will provide joints/ bones to the model in a computer; in our current scenario it’s a bull so the rigger will work as per the animal/ bull anatomy. Rigging is a must before animation step and animators know the basics of this skill; however, highly skilled riggers are required in animated or grade one, top quality movies like for example The Avengers, Kung fu panda wherein the movie quality and budgets are the best in the industry. In certain movies hair rigg is also required where you see hairs moving as the character moves. Rigging is followed by lighting department.
Software training required to be a Rigging Artist – Maya, 3ds max
RIGGING
3D Animation – Animation is to animate a character i.e. to give movements to the character that is created by the previous departments. Animators gives frame by frame movement to the CG (computer generated) character as per the requirement and this movement is so seamless that it gives an illusion of a motion picture. In our case the bull that is created will be animated by an animator, so what all movements one sees of that bull is a work done by an animation department. Animators also studies real life animal or people movements; they also try acting in front of a mirror for a certain shot so that they can use it as a reference to give movement to the character accordingly.
Software training required to be a Rigging Artist – Maya, 3Ds Max, Houdini
3D ANIMATION
Digital Lighthing – Lighting artist works on the type and a source of light in any sequence. Lighter has to match the light color and source that is used by the director at time of shooting a movie shot. Shadows of CG characters and light effects that you see in movies are the work done by the lighting artists. In our scenario lighter will match the light color used by the director during the shoot and will ensure that the shadow of the bull falls in the same direction as that of the man so that everything matches in one line failing to which there will be a mismatch in lighting and scene will not look real. Lighting and FX departments generally works parallel to each other and from both of these departments the job is passed on to the VFX compositing department.
Software training required to be a Lighting Artist– Maya, Katana, Nuke.
DIGITAL LIGHTING
FX (Effects) – FX artists simulates / creates smoke, fire, dust, destruction, water, cloth (flag, superman’s cape etc), liquid as per the requirement. The simulation created is so seamless that it looks like a real-world thing. In our example the dust that will arise while the bull is running is created by the FX department. FX is a much-demanded skill in the industry but we suggest this specialization to students with technical background since there is python coding knowledge required in this area. Post FX simulation the job is passed on to the VFX compositing department.
Software training required to be a FX Artist– Houdini, Maya, RealFlow
FX
VFX Compositing – Compositing is the final stage of the VFX pipeline and is responsible for the overall shot aesthetics and delivery to the client. Compositing artist composes the final shot in which he combines the visual elements from different departments in to a one single shot. In our example Compositor will compose the final shot by combining the animated bull, Man shooted by the director in green screen, dust and many other elements made by different departments together; comper will add multiple effects to the shot, will beautify the shot and deliver it to the client. Rotoscopy, Paint (cleanups), tracking, match move, chroma keying (green screen, blue screen), matte paint (digital paint) is a part of compositing and compositor needs to have knowledge about all of these things. VFX compositing is the most demanded skill and generally has maximum number of vacancies in the industry. VFX compositor after a relevant experience can also be the part of on shoot vfx supervision wherein he/she works with the director of the movie on shoot.
Software training required to be a VFX Compositor– Nuke, Silhouette, After Effects, Mocha
VFX COMPOSITING
The delivery made by the compositor is then checked by the client; if there is any feedback then that is communicated back to the studio which needs to be addressed and rectified. This is how the effects are given in any of the movie globally that you see on screen. The softwares mentioned above for the respective specializations are globally demanded and students must consider these softwares while selecting any course. Student may kickstart his career in any one of the above-mentioned departments
If you still have any more queries then please click here to know more.
0 notes
Text
What Is Your Real: your name and Hyperreality in Anime
The detail seen in your name. is detail that goes beyond detail, into the creation of new details such that one is reminded of Satoshi Kon’s Paprika, the incredible overwhelmingness, but specifically present in the mundane. Thus, one is flooded with the “realness” of detail, while in fact this sublimates the Real of film, of “live action” as a stand-in for “reality” as there is only so much detail that can be captured on film. The means by which a work is created when captured by a lens specifically relies upon certain properties of light which cannot provide the same fidelity as a recreation can, and thus the hyperreal can act as an overcoding element to the “Real” imagined by the artwork. Anime is often critiqued for having low framerates, or for techniques that require looping, recycling, or other forms of perceived-laziness in animation. Apart from the way that, stylistically, this represents both a differance in the metatextual structuring of the text, and the textual means of signification, it eventually makes examples of anime that have been rendered with incredibly conspicuous fluidity, detail, emphasis thereof stand out disproportionately when compared to acknowledgement of Western art with similar supposed-detail. The turn in Western art toward CG as the standard of the animated feature leads in turn to a certain sort of hyperreality, one differentiated from the art of your name. by its status as generative: effectively, while a sort of simulation, it only acts as a simulacra toward the apparent-Real, toward objects depicted: it acts in a far more meaningful sense as a simulation, more apparently as such.
The effect of the detail in your name. is to not only create a simulation of the Real, but a simulation-of-simulation, a process of overlaying unto simulacrum that eventually results in an image that is impossible in any meaningful reality, that is not limited by the bounds of perception. The film itself is a collection of objects, objects continually in motion, given the dreamlike states in which the two characters interact. When switching between one another’s lives, there is a sense in which they are “dreaming” and thus continually forgetting, continually absent from their own experience. They are forced to create simulacra of these days based upon that which the other tells them, upon artifacts of recognition, the ephemera of their photos and journal entries acting to record for one another who the other is. The dramatic changes as they fluctuate between one another are realized not by the other characters as differentiated people, as two individuals, but as a sort of unknown univocality, the bodies united as a singular person who, in a process of crossing-over, has crossed over into a singular opposition, a Derridean pair that cannot be without its other. This, in turn, leads to the way in which one finds the two yearning for one another, looking for a completion that they admit as absent, a sort of sublimation of each other into a univocality of the self. The expression of this process of overlaying, of lives realized as simulacrum, is aesthetically represented through the incredible details of the hyperreal art style: it is “more real” than live action, than a less stylized but less detailed art style would be, in that it is more faithful to the representative act than mere replication would allow. Showing the features of a phone’s user interface in such intimate detail even in passing shots, creating means of encounter that lead to the ways in which they discover one another, relies upon a way of thinking about each other, about themselves, that is reflected in the beauty of the work.
To again refer to animation more typically considered the domain of the West, we can move to the way in which animation targeted at adults in America is so often merely vulgar comedy. Shows like Family Guy and the endless repetitions thereof have largely bland art, blander storylines, and jokes entirely reliant on whatever joke would have been most offensive the week it was being written. King of the Hill, likely Mike Judge’s best body of work, is often articulated in differance when related to other “adult” cartoons in that it relies on an artstyle which does not confuse the presence of stylization and distinctiveness with an absence of realism. Overwhelmingly, episodes of King of the Hill rely not upon gags unique to the show as a cartoon, but rather explore a sort of hyperreal Texas, a Texas which makes the viewer’s living room feel far more “real”, far more “situated” than Arlen through the development of a safe, reasonable hyperreality. The calming dulcet tones of Hank Hill’s voice and the moderate American centrism of the show’s politics combine to create a space where there is a great deal of room to develop, but where there is little buy-in required before that space may be accessed. The realism seen in the show’s artistic style is part of what allows it to function in this fashion: one preserves the character-as-image, one can create an idea of the character as expressed through aspects of the character’s self too intimate to be played out by an actor and then captured on camera, one can create the figure of Cotton or of Bobby as static, as persisting in a similar sort of character throughout time, and develop them to a far greater extent than a live-action television series would be able to given the same sorts of characters. The show succeeds because the detail, the nuance it is given over to leads to an incredibly well-developed cast of characters growing over time to include a growth of the audience, of the stories at hand, of the stories made possible through the series. That so many have related the dynamic between Hank and Cotton, as well as the difference seen in comparing that relationship to the one between Bobby and Hank, is important in that it is one of the central dynamics of the show, the way that one realizes trauma and how that trauma can be mapped onto others, but even in this process of recognition one can intentionally act against an urge to inflict it, to realize it again on the body of the perceived-Other.
The pivotal turn in the narrative of your name. comes after the characters have stopped switching lives, a transition whose nature I will attempt to disguise in order to preserve the process of unveiling I believe vital to the effect of the story, so that those interested in the film are still able to experience it. It relies on a realization of the story as a story, a sort of metatextual process of realization, of rewriting. It is the creation of time as a field of the infinite, a contingency reliant upon the realization of the past as such, the creation of a present-of-the-past and a new past-of-the-present as realized in the dramatic resolution of the story. In short, one enters into a series of overlain hyperrealities wherein the characters are unsure of what events are “real” and which are “dreams” in a fashion that is continually developed by the film, that is vital to the film’s process of resolution. Taki’s hyperreal drawings have been part of realizing a career of architecture, an unsuccessful one at that, which is a turn of art that differentiates the previous-present, the original course of time set out by the narrative, from the present now understood as real, despite the audience’s realization that it in fact represents a new overlay upon the previous-present, a present that is taken from a present that now has been made extant, a present that thus never was. Similarly, the conditions under which Mitsuha has moved to Tokyo, enabling her to finally meet Taki, have changed due to the turn imposed by Taki in the film’s climax. This act of erasure and reorientation realizes the end of the narrative as a sort of hyperreal, as the resolution that required the simulacrum of the story’s vital turn, a present that would then be erased, that would remain uncompleted for a number of years until it was finally resolved.
The collapsing of the film into merely being a well-produced movie, into it being a high-grossing anime with a beautiful style of art, belies how it has in fact itself produced a certain hyperreality: a staircase featured prominently in the movie’s resolution became a tourist destination and is now a staircase beyond itself: it only presents itself now as a staircase because of your name. whereas before, it was merely a staircase like any other. It is a simulation of the staircase in the movie, just as the scenery of any other movie is in some way a simulation using actual locations, and in turn it is able to become a staircase beyond itself, a simulation of a simulated moment contained in the movie, a hyperreal object representing a version of the staircase that never “existed” in the material sense. The creation of an attraction as such, the way in which it inscribes upon the apparent-real through an act of creating its hyperreal presence, is thus the final turn of the movie’s hyperrealism. By affecting this hyperreality, it serves to show the course of the narrative within becoming-hyperreal, within this development of something that is far more real than any adaptation into supposed “live action” could meaningfully be. It is far more real when it is not, it is a simulation of the real more meaningful than its realization.
46 notes
·
View notes
Text
Creature Effects & Character Design
Alien: Covenant 2017
Sir Ridley Scott’s latest installment in the ALIEN franchise.
Odd Studio was honoured with designing and creating the creature and prosthetic effects for Alien Covenant in collaboration with the U.K.’s Creatures Inc.
Together, the company’s merged to become ODD CREATURES for the project.

Alien-Covenant.com (AC): How did Odd Studio and Creatures Inc first become involved with Alien: Covenant?
Conor O'Sullivan (Conor): I’ve worked with Ridley on 3 occasions, Prometheus (we were responsible for the Engineers),
the Counsellor and Exodus. You’d have thought I’d learnt my lesson!
But I enjoy working with him – he’s creative, fun, demonical and loves working with his crew. He decided that he wanted me to head up the Creatures design and Make up effects department – which was a great honour and opportunity.
I had long admired Odd Studios work and after meeting them knew we could work together and make a great team.
Adam Johansen (Adam): I had also admired Conor’s work on projects such as Dark Knight (Heath’s joker make up) and I thought the ‘Engineers’ Creatures Inc did for Prometheus were beautifully done.
Conor contacted myself and Colin Ware October 2015 as he was heading to Australia and was keen to chat about a possible collaboration with Odd Studio on Alien: Covenant. We met and chatted and it quickly became apparent we could work well together. We also have a lot of mutual friends and colleagues both here and in the UK and a partnership seemed
to make sense.

AC: How long would you say Odd Studio and Creatures Inc spent working on Covenant?
Conor: We started on the project in November 2015 – and finished on the main shoot in July 2016 – though there were some pick-ups. I am currently working on an installation of the creatures for Madam Tussauds – so I’m still on it.
Adam: Yes, November 2015 was when I officially started and by mid November my Odd Studio business partner Damian Martin joined me along with Colin Ware and Emily James, working
on some initial sculptures and finishing tests. Actually, I had a day last week going through Fox storage for some pick ups. So maybe I’ve only just finished working on Covenant as of
the start of March 2017!
AC: Compared to your work on other films, would you say Covenant was more challenging or was it a fairly smooth process?
Conor: Ridley is demonical! He likes to stir it up for everyone – the crew the cast, and the producers. He does that because it achieves a greater degree of effective creativity.
It was very challenging. Above all of that, Alien is an incredible high standard to maintain. As Adam said once – it almost made him feel physically sick working on it.
Adam: Alien, was one of those films that to say had a huge impact on me would be a monumental understatement. The world that Giger and Ridley created together, using Giger’s artwork for the creature, instantly became a cinematic classic.
Following that legacy and being honoured with working with Ridley Scott on an Alien film was indeed a huge responsibility. That responsibility, combined with the sheer scale of the
project and the pace of which it ran, was one of the most challenging jobs I’ve been involved with.

AC: What aspect(s) of creating props for Alien: Covenant were the most challenging?
Conor: For me the design was the most difficult thing. Getting my crew of designers to give Ridley not only what he wanted – but also what he needed. It was a difficult balancing act.
Adam: Personally, the design of the adult Neomorph, in particular the head, was most challenging. There were many, many artists working on the designs for this but nobody was quite getting there. Ridley continually referenced a goblin shark for the mouth/jaw articulation and a sketch form Carlos Haunte. I sculpted many maquettes and full scale heads while Colin Shulver worked on the body in Zbrush with Conor compositing both elements together in photoshop until Ridley was happy. Damian did a gorgeously disgusting paint job and colour scheme to finish it off. When we presented the finished full scale Neomorph head to Ridley on location in NZ he was thrilled. It was a satisfying moment. Generally, the design of most creatures was challenging because again, we were trying to
give Ridley exactly what he wanted and also trying to retain a Giger aesthetic.

AC: What aspect(s) of creating props for Alien: Covenant were the most enjoyable?
Conor: Working with Adam and his crew!
I like working on set with the things we’ve made. But otherwise we did a lot of 3D printing and I found this very interesting and productive.
Adam: I enjoyed working with Conor and his crew too. Both our crews worked very well together and it resulted in one big creature crew family, with old friendships re ignited and many new friendships made among our 45 strong crew. Having such a dedicated and talented crew made it all possible and made the experience most enjoyable for me.
This was the first time I’d worked with Ridley and it was a career highlight for me to work so closely with him, especially on set. Be it puppeteering or dressing blood, KY and food onto
our puppets/suits/effects with him was an unbelievable experience for me. He really loves to get things in front of the camera and shoot effects/creatures practically and that was an
honour to see him in action with our creations.
AC: We know Covenant will feature a variety of Alien monsters, a few of which are familiar to us. Since Ridley Scott teased the return of the Chestburster, are you able to confirm if a practical model of a Chestburster was created and used?
Conor: We designed and made a practical version of the chestburster – Dominic Hailstone came up with the design. It was a simple puppet made in a beautiful glass clear silicone
It’s very new. Gonna be controversial!
Adam: I loved the puppet we came up with and Ridley and Dom’s design in my opinion was gorgeous. Greg McKee our head animatronic designer came up with a beautiful little armatured puppet that moved very well. As it’s a departure from the original, I feel it may divide audiences too.
AC: To what extent would you say your practical effects have been paired with CGI? By this I mean, is there an overabundance of practical effects used with complimenting CGI enhancements? Or were most props used un-altered by CGI?
Conor: Hmm, at the point of this interview it’s difficult for us to know what will end up on screen. Everything was built and filmed, with the discussion of cg augmentation etc required for some elements.
Adam: At this point it is difficult to say what is and what is not CG. We made practical effects for all of the creatures and all the make-up effects – even though some of the creatures we had designed were impossible to realize without CG.
Ridley prefers to film everything for real and then use it to dictate lighting, textures and design in CG. It seems to be part of Ridley’s process, making things practically and shooting
it to determine how it’ll end up, practical, cg…or both.
Remember - you’d have thought I’d learnt my lesson!

AC: We've heard Alien: Covenant will utilize animatronics as well, for various aliens throughout the film. One of these is the Xenomorph itself. Are you able to elaborate at all on this specific piece?
Conor: The Xeno’s design was one of the impossible creatures to realize practically. But we gave it a go.
Adam: The full scale suit was unlike any creature suit we’ve produced before. I think we came up with something really neat. I still clearly remember the conversation Conor and I had which
was a bit like “what if we…”.
It stayed as true to the proportions of the design as much as practically possible I think. A huge bunraku suit/puppet with some animatronic movements in the head/neck by Greg McKee. The life size version was an animatronic puppet attached to an actor (a bit like a Chinese dragon) with animatronic head etc. I started fleshing out the full scale body sculpture and was joined by Dominic Hailstone.
Together we worked on the body and Dominic moved onto the full scale legs and arms. Bradley Simmons sculpted the initial head and face. Later there were some facial tweaks made by myself and Robert Trenton.Colin Shulver was working on the design too in Zbrush. Marea Fowler, our head fabricator
did a brilliant job bringing the suits together making it as comfortable as possible for our creature performer, Andrew Crawford. Andrew did an amazing job wearing and performing in the suit, on stilts, in very trying conditions and small on small set environments. Damian, myself and Julian Ledger did the art finishing on the suit and Julian painted all the translucent carapaces.
A smaller, more traditional xeno suit, worn by Goran D. Kleut was requested by Ridley for shots where the full scale suit, which stood over 7.5feet tall would’ve been impossible to use. This was sculpted by Andy Hunt and Colin Shulver and painted again by Damian and Julian.
Conor: The final body design by Colin Shulver was realized towards the end of shooting.
We made 3 practical versions – 1 at life size version (8 ½ feet tall) and another as a man in a suit and a third totally animatronic upper body.
AC: Was an animatronic suit created for the new Alien creature (Neomorph) as well?
Conor: A simple suit was made as well as a separate animatronic head.
Adam: The Neomorph is seen at varies stages of growth. This meant we had to produce 2 versions of small rod puppets, some stand in and vfx reference heads and the adult suit and animatronic head Conor mentioned.
AC: Early rumors suggested the new Aliens in Alien: Covenant would have translucent skin, like the original concept for Giger's Xenomorph. Are you able to confirm if a translucent puppet or suit was created for Alien: Covenant?
Conor: We always use translucency using silicones – wherever we can. The Neomorphs have skin like an old man or a new born bird.
Adam: Yes, the are really translucent elements to both creatures however the Neomorphs are definitely the more translucent of the two. We referenced a lot of aquatic animals such as the goblin shark and sting rays etc for the finish.
AC: The shower scene at the end of the Alien: Covenant trailer, was that Alien a suit or CGI, or blend of both?
Conor: This was the animatronic head and torso. It was our first outing of our Alien creature – which was barely ready. From what I can see there have been some enhancements but it is largely a practical shot.
Adam: Actually this was one of the most enjoyable shots with the Xenomorph for me. We were literally sitting in the next shower cubicle with our big animatronic xeno soaking wet as Conor puppeeteered the tail and I was the hand coming into shot.
AC: The eggs seen in the Covenant Trailer look taller and less bulbous than the ones in previous Alien films. Was this merely a design preference or can you say whether or not these are "different" eggs?
Conor: They are slightly different eggs – again one of the designs Ridley like by Dominic. I think I prefer the original shape – more Aphid egg like.
AC: You worked closely with Alien: Covenant's concept artists to bring their imaginations to life. Were there any of their concepts which you did not get a chance to create, but wish you could have?
Conor: We were the Alien: Covenant Creature concept artists. I would have liked to have more time.
Adam: When we began the project we were under the impression most things were designed and had been signed off on, but this was not the case and we did become the concept artists/designers.
AC: Of all the practical props and effects you worked on for Covenant, which was the most memorable (if you can say)?
Adam: I loved all the shots we worked on but perhaps the most memorable for me was the first gag we shot, which was filmed on location in Milford Sound NZ. This was the beginning of principle photography and the scene was insanely violent and technically challenging. The scene was with my good friend Nathaniel Dean who plays Hallet, whom Damian, myself and Colin Ware had worked with years ago on Farscape. It was the Creature Dept’s first gag so it was a big deal for us, making sure we nailed it. After a few takes and after many, many litres of blood, slime and entrails had covered Nathaniel he looks at me. And right before the next take he smiles like a kid and says “How fucking awesome is this!” I hope the audience finds them all memorable.
Conor: They’re all totally unforgettable – but the chestburster’s going to be the controversial one.
AC: How many "burster" sequences can we expect to be completely practical?
Conor: The chestburster is largely digital replacement I think, however the mouth and backburster's should be 90 % practical.
AC: We know Ridley enjoyed scaring his cast in both Alien and Prometheus by surprising them with some form of practical effect gag - to elicit a real, natural response. In Alien, it was the Chestburster sequence and in Prometheus, it was the Hammerpede escape sequence. Did Mr. Scott request any similar set-ups from your team prior to filming certain scenes? If so, we're they effective?
Conor: He did – with everything. We shot facehugger's out of eggs, made dummies of everybody and sprayed more blood around than an abattoir.
Adam: Ridley would make sure the cast weren’t in earshot when he discussed sequences on set with Conor and myself.
AC: Were there any setbacks or issues which arose while building any of the props or suits?
Conor: The biggest setback for us was time. We had been told that all the creatures were all designed and there would only be motion capture suits with ref heads for us to make for the CG guys to ad in the digital creatures.
We were just to do practical make up effects and do the design.
I should have known better – I never learn my lesson it seems.
There were hundreds of random designs - none of which Ridley had committed too. Then Ridley decided at the last minute to make men in suits (something I subconsciously knew he was going to do all the time) – which then began a frantic search for suitable cast and crew.
Adam: Time was an issue especially with the late decision to make suits. Finding the right cast for the suits and then obviously producing the suits required the team to be at the top of their game and we certainly benefitted from years of experience building creature suits in short time frames from the Farscape days.
AC: Were there any dramatic changes made to any of your props throughout or just prior to filming? If so, are you able to say which ones and why?
Conor: Things got a bit jumpy on our first outing with the Xeno.
Ridley had approved a design by Bradley Simmons – which we had scanned, printed molded remodeled and cast.
But in the frantic activity of starting the shoot, travelling to a remote location and then trying to get the thing ready we had all overlooked the impracticality around the lips design.
When the mouth closed, the muscles went baggy – which looked crap. Adam, Rob Trenton, Damien Martin and a few others - did a couple of long days (and nights) and sorted the whole
thing out. Jumpy but we got through it.
Adam: Yeah, I basically made the call to strip the Xeno face back to the skull and redesign it as it wasn’t totally working. That required us working around the clock to redesign, resculpt, recast and finish it. I’m so glad we did because Ridley’s response to the modified look was “There he is!”
AC: Have you enjoyed reading some of the fan theories on the internet regarding Alien: Covenant? Have there been any rumors or speculations which caught your attention?
Adam: The leaked photos stirred up loads of theories, which were interesting to read. New names/titles/theories for some of the space creatures have been fun to read :-)
Conor: Nothings really caught my attention – but I know there will be stuff once it comes out.
AC: How would you rate your experience working on Alien: Covenant? Compared to previous films you've been involved with; would you say Alien ranks higher on your list? Why or why not?
Conor: I’ve aged about 20 years. Stressful, fun, creative and a great experience.
Adam: Working with Ridley Scott on an Alien film, where I was privileged enough to co-supervise the creature effects, is about as high an honour as I can imagine. Other career highlights I’ve been honoured to be involved with was working with George Miller on a Mad Max (Fury Rd) film and George Lucas on 2 Star Wars films.
I definitely aged on Alien: Covenant, it was very stressful but one of the most amazing experiences of my life.
AC: Finally, can you tell us what the "Black Goo" is really for?
Conor: The black Goo? The God’s special jam.
Adam: Nope ;)
Read more:
http://www.alien-covenant.com/news/exclusive-interview-with-alien-covenant-practical-effects-company-odd-studio--creatures-inc#ixzz4sVJZnjLB
Follow us:
@Scifiedcom on Twitter | Scifiedcom on Facebook
#alien covenant#alien: covenant#odd creatures#odd studio#creatures inc#xenomorph#neomorph#babymorph#mouth burster#chest burster#dancing baby alien#dancing baby#Goran D. Kleut
7 notes
·
View notes
Photo

Choosing a Specialism: Stop-Motion
With the freedom and independence to choose our specialism for this project, much like the ‘Mystery Box’ project I want to push myself outside of my comfort zone to learn new skills, try new products and explore new software. With the option of both CG and stop-motion again, I decided to flip it on its head and have a go at Stop-Motion. And although we would be physically animating the character in any way, to translate my ideas in physical space using stop-motion will give me the chance to play around with a new set of tools and skills I haven’t fully pursued before in the past.
Having only played with clay and Sculpey in the past to create a series of human heads and the odd hand. It’s an odd passion for me that I found quite relaxing and tranquil. Having to evaluate and consider a three-dimensional space is definitely a challenge and I hope that my secret passion for the craft brings a level on ingenuity and creativity that CG otherwise wouldn't bring me. To generalise myself as an artist, I feel that I would benefit more as a first-year student to widen the mediums I work within to get a better understanding and grasp of the variety of skill sets available to me as an animator. To understand and differentiate the difference and importance of a character creator in the animation pipeline.
To expand my skills as an artist, I hope that going back to the physicality will introduce me to a different approach to character design. Considering the limitations of a real life puppet, I think it’ll be fun to encounter the challenges of what I want to produce versus what I can produce. Considering what limitations may hold me back and how I can push beyond them in the hopes to bring an exciting and creative outcome to the light of day.
Existing Examples
Puppet building has always been an aspect of the production pipeline I’ve always been interested in. I found that when working within stop-motion that I was always much more interested in the pre-production elements of the task than the animation at hand. Taking a step back to appreciate the steps that go towards, sculpting, moulding, casting and all the steps in between to achieve a physical representation of what once was a sketch on paper.
That initial translation, and how we perceive our designs in a 3D space, has always captivated me and influenced the progression of my work. A key process even on the production lines of traditional and CG animated films, it amazed me to see how sculpting a character could be used not only to translate the character to a 3D space but guide animators as a point of reference and the production as a whole. The opportunity for the creative team to see a physical embodiment of their character, this stage of production gives the team an opportunity to really embrace the characters flaws and change and tweak the necessary elements of the design to best suit and adapt the work to the needs of the narrative.
An opportunity to really see the character in its full light, I’ve always considered Modelling in the production line of an animation as a tool that supports the team down the line in terms of reference. I'm excited to learn the difference in which how sculpting and modelling are used in terms of stop-motion and how I would need to cater my ideas towards a physical puppet that needs to be articulated and move to a sense of degree that could bring life. Considering the range of joints and posable limbs I’ll need to produce to create a character that embraces a sense of believability to a level of degree.
The Stop-Motion Process
Unlike CG, there's a range of core steps that need to be taken into consideration when producing an articulated puppet. In comparison to CG in which you build the character and place the rig after, the stop-motion process encapsulates those skills into the character as the process begins. Acting as a skeletal structure and foundation for our design, we’ll be working in a range of materials over the course of the next few weeks and we create a range of iterations of our designs that best fit the appropriate mediums within stop-motion.
Most likely working with materials such as foam and fabric, not a particular skill I’m extremely confident within. I'm excited to work with textiles as its something I’ve always hoped to pursue and would provide as a tedious physical challenge to bring my character to life consider the range of materials I could incorporate throughout my work and my designs. Alongside this, unlike CG I’m limited to the real world applications of weight and balance and will have to take these into consideration within my design, as I don’t want a character that ends up being too top heavy to support its own weight. These are the challenges I’ll need to consider when designing my characters and as I begin my research to understand the capabilities of character design in stop motion in the upcoming weeks.
Specialism Reflection
I’m hoping that picking stop-motion will give me enough of a challenge whilst introducing me to a series of new tools and processes that expand my capabilities as an animator. To grow and understand the limitations of the process, I feel that this generalist mentality now will help me when pursuing and deciding upon a specialism I hope to pursue down the line and in the upcoming years.
As per usual I hope to use this brief to my full advantage and go beyond the expectations by creating something of a professional outcome that uses all the tools and skills accessible to me to my full advantage to produce the best outcome possible. I'm excited to be one again working with Helen and be introduced to working with Barry Leith and the range of industry practice, skill and knowledge he has under his belt.
To summarise;
I decided on pursuing stop-motion as my chosen specialism for the ‘Fantasmical Creatures’ brief.
I broke down my familiarity with the medium and how I expect us to be using it.
Built upon my initial ideas and how I can use the medium in a reflection of the brief to best create my outcome.
Discussed my enthusiasm to be introduced to a new course tutor and to be back working with Helen.
0 notes
Text
Week 21- Weekly Summary
Day 1-Mystery Box
Today I continued with the mystery box brief but took a different approach to the walk cycle. As I was unhappy with the outcome of the previous iteration I decided to start the walk cycle again. Found that the difficulty of having splined and stepped key frames was too challenging to create the correct spacing and timing for the walk cycle itself. By having splined and stepped keyframes the animation was jittery and didn’t offer the flow a stepped keyframes animation would give. In addition I found that limbs would twist and be in positions I didn’t place them in meaning It would take longer to fix them than just starting the walk cycle again.
For the new walk cycle I used reference from the animation survival guide with the tip toe sneak as I felt this best suited the character I wanted to portray. I found it easier after the practice of the previous animation to place the character in key poses. Instead of doing the separate parts of the character moving I focused on every aspect of the character. For instance instead of just animating the legs I focused on the legs and waistline together. This is because the waistline would dictate the position of the legs. With the walk cycle itself I found that the top part of the body would arch forward which intern would push the shoulder up closer towards the ears.This meant that little animation is needed on the arms due to them being held in place by the character as he is sneaking.
When creating the walk cycle I decided to use the heel roll and to roll functions. This complicated the animation as I was using the toes as reference when interacting with the floor. This led to the character feeling weightless and lacking consistency when he walk. There was no weight to his steps and he appeared to float across the screen. To fix this I began to remove the heel and toe roll as well as the rotation of the foot. By doing this I made sure the foot was firmly planted onto the floor this added weight to the step. To develop this I can now add the heel roll which will then emphasise how the foot hits the floor and how softly the character is walking.
In addition I realised that on the upwards pose on the step the characters body would have to lean back to emphasise the greater step. This would push the knee higher and up towards the mid stomach. By changing this from the previous iteration it gave a more realistic walk cycle. This is because the body now moves with the waist and drives the legs forward pulling himself along to emphasise the sneak.
To conclude, the animation needs improvements through the heel roll and the spacing and timing between actions has to be offset. I will continue to take reference video to ensure that this is presented accurately. In addition I will begin to change the position of the arm to emphasis where the wight has shifted on the body and ultimately move the head to complete the walk cycle up to the box. I am looking forward to completing the walk cycle as I feel like I have grasped the main aspects of Maya in this process. Furthermore I am looking forward to creating a believable interaction with the box itself as I feel like this will compliment the walk cycle itself.
Day 2- Media industries: Roles and practices lecture
Project overview
6 weeks project researching media roles and practices giving a 10 minute group presentation on your work. Working in groups , you will research areas within the animation industry and the potential jobs available to you.
Research blog needed in the area I want to look into . Also including contacting a practitioner in the industry about research area. My early thoughts are to contact Ben Su a Pixar animator who I had made contact with earlier on in the year.
Project deliverables:
10 minute group presentation using video clips and supporting text.
Everyone in group must contribute and speak during the presentation
Research portfolio
Blog has to contain what the degree can go into. Further study , independent filmmaker or working for a company.
500 word statement that summarises research findings.
Must include bibliography for the presentation.
Project aims
-Employability
-By researching into the industry it familiarises yourself with the job roles and studios that I can apply to after my degree.
-using areas of interest as a starting point. Begin to locate creative practice with a wider range of knowledge
Group 1
Rachel Selby
August Abrahamsson
Tan Sriwongwaew
Zayrick Villar
Sam Abbot
Myself
Weekly Breakdowns
Week 22
Working in your groups, discuss and chose an area of interest on which to focus your presentation research.
Group task for the following week
-Prepare a 5-minute, 3 slide presentation profiling your chosen area Job role you are profiling
Week 23
Career presentation from Daisy Morgan
Week 24
Career presentation Helen Schroeder
Week 25
Internship presentation by Oyku Baskin
Career presentation by Indigo Illusions
Animation industries 2d, Cg, Motion graphics , stopmotion
Content producers
Studios( Laika ,Pixar ,Aardman)
-Hire creative talent
-create the content
Production companies(aspect film/not scale)
-Manage logistics and finances
-Distribute the film
Examples
Animated features (stop motion)
Kubo
Fantastic mr fox
Shaun the sheep
Animated feature (2d)
Ethel and Ernest
The illusionist
Animated features
Toy story
Paddington
Pre school/ children
Twirlywoos
Peppa pig
Gumball
Tv series: Adults/ teens
Adventure time
Rick and Morty
Tv specials
Shaun the sheep
Watership down
Motion graphics
Advertising
Title sequences
Idents
Artistic
Education
Good books example for motion graphics
Blink productions and blink studios- Stopmotion
Day 3- Mystery box
Today I fixed the foot placement and the timing on my mystery box placement. With the placement of the feet I made sure that they were firmly planted on the floor before emphasising the heel roll. This was the best way to ensure that the foot would plant against the floor and not sink into it, therefore adding weight to the characters walk. After watching the reference videos again and trying to walk myself in the same way I realised that when someone sneaks they are on there tiptoes and then place the rest of the foot down when they take a step. To complete this in Maya I used the heel roll on impact and then proceeded to straighten the foot up. This helped emphasise the walk.
The next step for todays session was to adjust the timing to emphasise the step up and act of the body. To do this I spread the key frames out on the graph editor and began tweaking each of the poses so the emphasis was placed on the line of action of the character. I am pleased with the result of this as it adds to the weight of the walk. However there were difficulties with he legs as they began to pop and create a disjointed walk cycle. To amend this I tried to adjust the position of the waist but this would cause the leg to bend in the complete opposite way. I realised that there was something wrong with the knee controls and began to straighten that out to ensure that the leg remained in the right position. This then allowed me to bend each leg and create a realistic walk cycle.
To improve further on this walk cycle I feel like I should improve the movement of the arms as they remained fixed in a position for the entirety of the walk. In addition there are certain parts of the cycle where the movement is nominally quickly and this detracts from the overall smoothness of the cycle itself. To fix this I will have to look at the key frames in the graph editor again to ensure the timings are correct in both the legs and the waist.
Day 4- Mystery box
Today I removed a large amount of key frames from my walk cycle to fix the balance of my character as he walked. The previous walk made the character become off balance on the passing pose.To fix this I moved the waist back therefore arching the the back and making the character balanced. To further the animation and walk cycle I will have to fix the in-betweens of the character and the positioning of the feet as they begin to become sucked into the leg when the cycle is placed on spline.
I also looked at how to light and render my animation to give a polished feel to the animation. The position of the lighting intrigued me and also helps to develop the visual narrative being portrayed. I decided to place one light infant of the box so the shadow passes on the face of the character and two behind him. This gave the character a roundness and showed that he was three dimensional.
Overall I am happy with the progression I am making with Maya as due to me starting over again multiple times I become quicker in key framing. Also by starting again I begin to see the benefits of repetition and the ease of which I can now produce walk cycles more rapidly.
0 notes
Text
Not Even The Galaxy [Gray]
Artist: Gray | Word Count: 1.635
Have some fluff and a bit of jealousy from the biggest Star Wars fan in AOMG HAHAHA there will be some tiny spoilers ahead for ‘The Force Awakens’ movie. Hope you’ll like it:)
***
“Hey babe, why don’t you come here and join me?” Your voice managed to fight the beats that surrounded the living room and you saw Sunghwa perk up from his seat, “You’ve been in the studio since this morning.” Then there was a sigh coming from the black haired man, as he continued to mess with the musical instruments in the makeshift studio in the apartment.
“Just one more minute love, I’m starting to feel the beat,” There was a tint of tiredness in Sunghwa’s voice, causing a frown to etch on your face, “You should go and sleep, I’m sure work has been tiring for you.” This time it was you who huffed in annoyance, because when Sunghwa was too engrossed in his work it would have been hard to get him away from it. It was like his ass was glued to the chair with superglue.
“But HBO is going to play Star Wars in 10 minutes! And it’s their first screening for ‘The Force Awakens’,” There was a small smirk on your lips as Sunghwa finally turned around, his eyes showing inner confliction inside of him, “Don’t you want to watch it again with me? I also made popcorns as well.” And bribing the man with food was all that you needed for Sunghwa to step away from the studio, as he made his way to you and hugged your body close to his.
“You always won over me (Name),” Sunghwa chuckled, causing a smile to appear on your lips, “Come on, let’s go and watch it.” You held his hand and lead him to the sofa, where there were throw pillows stacked on it alongside a huge blanket. The bowl of popcorn was set on the coffee table in front of the sofa, waiting to be devoured.
The movie played five minutes later and you secretly watched Sunghwa’s eyes glow in excitement, as he sat comfortably while leaning forward slightly, focusing on the movie even though he already watched it. Soon you found yourself laying your head on his chest when Sunghwa’s high went down, with the blanket giving you warmth and the popcorn bowl on top of your crossed legs.
Rather than paying attention to the storyline like your boyfriend, you found yourself watching the details of every CG effects and also the actors and actresses. Movies would always make you gush in amazement, because the editing could make one’s imagination into realization. And the face of every actor and actress were so different, you found the uniqueness in their facial look and expression intriguing.
“Daisy Ridley really fits the character, her acting is spot on and she really portrayed Rey’s character well,” Sunghwa only nodded as you started rambling, his right hand moving to take a fistful of popcorn from your lap, “And her chemistry with John Boyega really shows, the both of them really made their new character interesting!” And your boyfriend nodded again, but you were used with Sunghwa being like this whenever he was too deep into a film, so you continued giving comments about the actors and actresses.
“And the guy who played Poe Dameron is really cool as well! What was his name again? I think his name started with Oscar?” There was a slight discomfort in Sunghwa as he gave a glance towards you, whose eyes were locked with Poe Dameron’s scene on the screen, “And he’s not that tall, yet he gives off this cutie vibe.” This time it was you who were oblivious to Sunghwa’s huff as the man rolled his eyes at you, and a small fire started in his heart as he shifted in his seat.
“What about the guys from the First Order then?” Sunghwa asked, his voice coming out like a spat more than he liked it to be, “What’s your thoughts about Kylo Ren and General Hux?” And you answered his question without looking at him, as the movie rolled to the scene where Kylo Ren took off his mask.
“Physically speaking, Adam Driver is very tall, and he looked much like a gangster since he’s very buff under those robes. And his face is odd— a good kind of odd— and it’s unexplainable but it makes him look kind of scary. He’s towering but packed with muscles and a ferocious face, I’d probably faint if I were Daisy during their light saber duel.” You finished the comment with a laugh, but in Sunghwa’s eyes you seemed like you were sending googly eyes to the actor who played Kylo Ren, which seemed to boil something in Sunghwa’s heart.
‘You’re just tired, dumbass,’ Sunghwa thought in his mind, although it didn’t help with the discomfort that was growing bigger inside him, ‘She’s just giving her two cents on the movie, no need to be so worked up.’
“And the actor who played General Hux! He played the chill Bill Weasley in Harry Potter, and to be honest it’s quite the shock watching him scream about ending the Republic and destroying planets. Honestly he fits the role pretty good, he’s shockingly good playing such an evil character. And there’s this grace in his steps and how he carry himself, which really suits someone who is an important general. These two evil characters are amazing. J.J Abrams really did a fantastic job on this movie.” At this point, Sunghwa was fuming with anger, yet he tried his best to look blankly to the television, although his fists were clenched and his jaw was tightening.
“Then why don’t you date someone like any of them?” The fury inside of Sunghwa snapped without him having control over himself, as the words that had slipped out of his lips were of declaration for war, “You could have gone for someone who’s cute, or maybe a tall hunk, or go for a ginger head instead!” He had moved from his seat to glare at you, feigning a look of hurt and from what you could see in his beautiful brown eyes: jealousy.
Never have Sunghwa gone mad like this after you spoken your opinions, he would either nod off as a silent agreement or put his own opinions for you. But from how he looked so riled up, from how his eyebrows were furrowed and his eyes looked like he had been betrayed, you may have gone a bit too far. Hell, you did go too far, and what’s worse is you went too far on his favorite movie, out of all the movies in the world! You could only stare at Sunghwa in agape, because the sudden change of situation still took you aback.
“I didn’t mean any of it! You know I never take these opinions seriously,” You started to talk, the nervousness seemingly clogging you to speak, “I just like to take in how every person in movies look very different from each other, how they can somehow merge with their characters, and how the uniqueness in them adds up to the perfectness of the movie! I only like them because they are all so exotic, and I don’t even love any of them.” Somehow hearing your reassurance dimmed the fire in Sunghwa’s heart as he sat silently, suddenly feeling lost in himself for his foolish act.
You took his silence to scoot forward, leaning in to gently cup Sunghwa’s face in your hand, making him take a good look at you. He looked so distraught, realizing that there really was no need for his outburst, but you found the jealousy that sparked inside of him was cute. It brought a smile to your lips and soon a giggle followed suit, although Sunghwa looked like he was about to faint because of embarrassment.
“It’s really cute when you get jealous like that babe-“
“I’m not jealous!”
“Well, whatever you call it,” Sunghwa’s cheeks were flushed pink as he lets out a groan, “But there’s really no need for that. I mean, sure they were hunks or cuties, but in my eyes you’re the perfect one here. None of those top class actors could beat you. So your outburst just now was really cute, but don’t ever doubt my love for you, okay?” You playfully ruffled his hair and grinned widely, as you kissed his nose and made the man flush brighter.
“I just- I really didn’t know what gotten over me (Name),” Sunghwa sighed, finally admitting in his heart that he was indeed jealous, “I could never be like them, you know? I’m too old to grow taller and I can’t even get as buff as Jay.” You sighed, since you’ve seen the damage you made had made him self-conscious of his own body.
“I never cared about your looks when I fell in love with you! Your handsome look was a bonus for me, I guess,” The both of you cackled into laughter hearing this, “But I fell in love with your heart, and please know that I won’t even trade the galaxy for you Sunghwa.” Somehow hearing your reassurance was a great way to calm him down, as he felt butterflies fill his stomach. And hearing yourself saying such a cheesy line made you blush yourself.
“Well I’m glad I’m dating a princess and not someone from the First Order,” Sunghwa leaned in to capture your lips in his, although you were smiling in the short kiss, “Like, wouldn’t it be a forbidden love if someone from the First Order dated a Resistance member?” You could only shake your head, because the Star Wars references were getting a bit too much for you.
“Why don’t we get back to the movie? It’s getting to the fun part.”
“But everything in the movie is the fun part!”
“Sure it is, you dork.”
#gray#call me gray#gray lee#sunghwa lee#gray imagines#gray lee imagines#gray lee scenarios#aomg#vv:d#aomg imagines#aomg scenarios#khh#khiphop#khh imagines#khiphop imagines#khh scenarios#khiphop scenarios#scenarios#lee sunghwa
174 notes
·
View notes
Photo


CG Animation: From Sketch to Screen
As a way to begin my research into the medium of CG animation, in this post, I’m exploring the process of creating an animated sequence through analysing the methodologies used by industry professional Jeff Gabor.
An animator who’s worked on the Ice Age franchise, and Epic amongst others, Gabor represents an experienced professional in computer-generated animation. In a special ‘webcast’ for AnimSchool on Youtube, the animator presents and discusses his entire workflow: from sketch to screen. With this, he describes the powerful use of live-action reference to his work, and some general tips when animating the character in Maya.
For our Mystery Box project, we will be provided with a rigged character to animate with, created by the 11 Second Club. This is a fully articulated biped rig, which allows for some customisation. With this, we will be introduced to the iterative process and pipeline of CG animation. Here, I’m analysing this process to get an initial understanding of the workflow ahead of me.
Referencing
As I’d expected, the first step is taking the storyboards and filming some video reference for the scene. Using his iPhone, Gabor films the reference in 24 frames per second, allowing us to break down the frames and key poses frame-by-frame and have it synchronise when animating in the same frame rate within Maya. He outlines the importance of reference, ‘make sure it’s as good as possible, check the spacing and environment of the frame - because you need to use that information in the reference.’ Whilst it’s not necessary to hire a completely empty room, we should be mindful of the background and position our props and ourselves just as we would want to animate them. Even at this initial stage, animators are thinking about posing: ‘how can I create an applying silhouette?’. Using a mirror, Gabor changes the pose whilst he’s working to get a clearer staging and appeal. In this early stage, he explores how to make the action appealing, through changing the pace. ‘An even pacing is boring’ he says, and considers timing, exaggeration and acting all within the reference.
It’s important to note, however, that this is an iterative process: ‘take around ten minutes of footage, and watch that’. The animator then writes down what it appealing and successful, and shoots it again. This process repeats for four or five times before reaching a performance that really works and conveys the feeling and mood of the scene. It’s key to test out different ideas and have plenty of iterative references to return to, but what we ultimately want for the animation process is a ‘master reference’, taking elements of all the reference footage and compiling them into a single sequence. If done right, this can actually be used as a first pass to show directors, as a way to pre-visualise the sequence and see if the performance conveys the desired emotion of the scene.
Interestingly, however, with fantasy creatures like the sabre-toothed squirrel Scrat in Ice Age, ‘you pretty much have to throw all reference out the window’ and work from the imagination. One final note about this first step is to remember the purpose of a live action reference - it’s there for timing, performance and posing - not for specific details and polish. This is where the artistic elements come in. It’s important to explore every single effort and avenue to make the sequence as best as possible’ - evidencing a need for iterative development even in this early stage of the process.
Stepping
From here, we then move onto the first aspect of the CG animation process: stepping, or blocking. Digital 3D animation follows a three-stage pipeline, with plenty of key steps in-between each one. CG is a long process, but it allows for smoothness and visual charm unique to the specialism. The process begins with this, describing the layout and blocking of the key poses. These are held to allow clarity for review, allowing animators to critique our own work and analyse whether or not the pose is able to communicate the desired narrative beat. This ensures clarity of key poses, and thus clarity of visual storytelling within the performance.
In this example from Epic, Gabor is taking the narrative beats outlined in the reference footage and establishing the key storytelling poses of the characters in conversation with each other. This is the stepped process, simply focusing on clear posing of the characters to convey the emotion of the shot. There’s no real animation happening here, it’s simply establishing the key poses of the scene.
One tip that the animator offers is to not get concerned with the three dimensionality of the frame. ‘I think students get too concerned with is what it looks like from all different angles - [we, as an audience] really don’t care’. The focus should instead be on making sure each pose is solid and clear, pushing it to the extreme to communicate the idea to the viewer.
Working with stepped keyframes allow us to focus on the key areas of the sequence: to establish the key storytelling poses of the shot. These will convey the story of the sequence, and thus have to be crystal clear to the viewer. This is where the iterative process begins, exploring how each pose communicates an idea best to the audience. This allows the program to focus on the key posing of the sequence: ensuring clean body language to tell our story in a minimal amount of keyframes possible. Here, we establish the important narrative ‘beats’ or stages of the animation. This first step is about blocking the key poses and seeing if the animation works through the body language of the character: having an overall clarity and explains the overall narrative of the sequence.
With the example from Ice Age: Continental Drift, Gabor instead was working directly from provided storyboards by artist Jerod Chirico. The stepping or ‘blocking’ process is still the same - simply moving between keyframes to tell the story through clear posing, but instead of working from video reference, the inspiration for composition and shot type comes from drawn illustrations. Despite the fact that it’s only blocking, the strength of Gabor’s posing make it an inherently funny sequence.
Splining
This then goes to the Spline process, in which animators convey stepped keyframes to ‘spline’: this is where the actual animation happens: adjusting the splined keyframes to create an appealing performance. Whereas working with the stepped process was effectively digital 3D pose-to-pose, splined animation allows us to work more straight ahead, with an organic quality. Here, we are able to get a feel for how the animation is going to be played out, using the computer to interpolate between each keyframe which allows us to get a strong grasp on the timing of the animation, and smoothen out the actions. The focus is placed on the performance of the character, moving from pose to pose. Here, we can incorporate the basic principles of animation such as follow through and anticipation.
In this example from Ice Age again, we can see that the animation now flows seamlessly as one organic performance. With the addition of smear frames, Gabor is able to add squash and stretch principles to further give a sense of life to the motion. The sequence is no longer a series of still keyframes, but a refined animated sequence. There’s no visual polish, but the main animation is effectively complete.
Final Touches
The final stage concerns adding a final polish to the sequence, refining the movements so the motion is smooth and fluid but also adding detail to the original keyframes - adding secondary actions, texturing and rendering the animation. This is almost endless, and the deciding factor in just how much time we can allocate to this final step largely depends on both the scale and budget of the project.
With a big budget production like Ice Age and Epic, we can see the level of post-production and polish in comparison to the actual animation. Using lighting and rendering engines, the creators are able to completely change the aesthetic of the sequence: adding a visual appeal through soft light and texture, taking away the sharp lines and feeling of the animation and adding a visual polish that audiences today expect from an animated feature film.
This final step brings the characters to life through visual representation: adding a real sense of depth and physicality through lighting and shadows, and immersing the audience into a whole new world through detailed backgrounds and moving cameras. This final polish is what gives CG feature films the refined, photo-realist cartoon-like aesthetic, and effectively completes the sequence pipeline.
With each of these steps, I will be needing to balance ideas of reality such as gravity and weight with dynamic animation, and using influence of pantomime performance to exaggerate the posing of each keyframe to clearly communicate the idea I want to portray. As a beginning animator, I will be needing to cover the whole process from idea to screen, meaning it’s completely understandable if my animations aren’t as polished and fine-tuned as Gabor’s.
Review
Here, I’ve presented my own independent research into CG animation: exploring the process of creating an animated sequence through analysing the methodologies used by industry professional Jeff Gabor. This is an area of animation I’ve been reluctant to really delve into considering research simply because I didn’t have the tools to create my own. However, having been introduced to the basics of Maya, I’m now eager to begin experimenting with the software.
Gabor describes the power of creating a successful reference, and this will be my primary effort moving forward with my project. Through iterations, I hope to film a series of live-action videos exploring a few different approaches to the idea of a character reacting to a mystery box. This and a new understanding of the CG pipeline is what I hope to take away from Gabor’s influence. Having explored this initial research into computer-generated animation, I can see the importance of using live action footage to support the timing and posing of my animation. Next, I will be acting upon this influence: attending an acting workshop introducing us to the idea of performance for animation.
References
Animation School - AnimSchool Webcast: Jeff Gabor, Parts 1-4. https://www.youtube.com/watch?v=0-WIRh7XZCs
Reference / Blocking / Timing. (2009). Jeff Gabor.
https://www.youtube.com/watch?v=ouaspd_dr5o&t=1s
Epic Comparison Reel. (2013). Jeff Gabor.
https://vimeo.com/81962062
Ice Age: Continental Drift Progression Reel. (2013). Jeff Gabor.
https://vimeo.com/70297665
Stepped vs Spline Curves When Blocking an Animation. (2014).
https://www.pluralsight.com/blog/film-games/stepped-vs-spline-curves-blocking-animation
0 notes
Text
Applications of 3D Essay
From CGI in movies to creating entire worlds in games, 3D Modelling has become an incredibly helpful asset to many sectors of the creative industry.
In product design, 3D modelling can be used to render packaging work for a client. A designer can simply create a model of a can, bottle or packet based upon the product that the client provides, the artists can design the packaging, and finally display it on the model to pitch that work to the client.
Before 3D modelling, these companies would need to create 2D renders in programmes like photoshop or illustrator. This provided a neat but less realistic image of the potential product and took significantly longer than simply applying the design to a model that had potentially been made weeks ago.
3D modelling has become crucial in the games industry for some of the worlds, characters and stories that many designers want to create. Before the application of 3D modelling, companies would make 3D spaces using 2D images and animations. This can be seen in classic games like Qbert which are entirely 2D but try to create 3D worlds. 3D has allowed the games industry to use photorealistic graphics and real-time raytracing which becomes more and more accessible with every generation of graphics cards and consoles. With designers and artists learning to make 3D models from the comfort of their homes, the games industry is seeing better talent and original work from younger people who are passionate about games and their creation.
Similarly, with the Visual Effects companies working in film and TV, 3D has provided a great number of opportunities. 3D modelling allows VFX artist to capture realistic scene lighting, create characters to visualise in the real world and create spectacles that completely defy reality. A fantastic example of this is Christopher Nolan’s ‘Interstellar’. The blackhole known as Gargantua was a 3D model that had painstakingly accurate physics simulated for it and the result of that simulation created a beautiful and awe-inspiring model to be used for the movie. Without 3D modelling, simulations for physics and lighting like this would be far more difficult or even impossible.
3D Development Software
3DS Max is a proprietary suite designed to do particle effects with 3D modelling. 3DS Max saves projects in .3ds format, which is made up of the textures, polies and lighting of a model. The programme can also support motion capture, resulting in more realistic animations. This can be seen in James Cameron’s Avatar which features a whole race of CGI people in a CGI world. However, the programme can also place CG images into a real-life scene. Other examples of films made using 3DS Max are Alice in Wonderland, 2012, Blade Trinity and Cats & Dogs.
Maya is designed to be used along-side 3DS Max, using the proprietary file format .mb. This format is lossless but saves space using binary algebra. Maya is used for loads of things from texturing, lighting and particle effects to modelling and animation. Maya has the capability to transfer files to programmes like Unreal or Unity for games. Maya is currently used by Rooster Teeth Animation to make the series ‘RWBY’ which is modelled and animated within the programme. Other films made using Maya are Finding Nemo, Hugo, Rango and Frozen. Games created with Maya include Mirror’s Edge, For Honor and Dead by Daylight.
Cinema 4D is used by a wider range of industries such as architecture and science, and has been used to make Inception, The Golden Compass and Monster House. The programme uses .c4d, which is another proprietary file format. C4D focuses on motion graphics and sciences because of its simulation capabilities with particles and fluids.
Plugins are added to these programmes to add features that the default suit couldn’t use. Maya features a number of plugins that make the application easier to use. In Maya, Massive has been used for games on the Wii and the XBOX wherein it simulated crowds which, before the plugin, would have needed to be created manually. When your project is facing a budget, Massive bridges the gap and saves you time and money.
Application Programming Interface
Games are written in one language and machines like your PC or console use a different language. The API acts as a translator between these systems so that the game can use all of hardware that it needs to be able to run. There are two key APIs made for this process. These are Direct3D and OpenGL.
Direct3D is a part of Microsoft’s DirectX. PCs running windows primarily use DirectX as well as Microsoft’s XBOX which is where it got its name.
OpenGL is open source, meaning it can be changed by anyone who has access to a copy. Open GL is cross platform and so can run on PC and consoles. This means a game can be made for PS and also be released for PC or XBOX.
These two programmes are the leaders in the API market because of their complex nature and ongoing support. Around 60% of all computers use DirectX as it’s Microsoft Windows proprietary software. However, OpenGL can also be used on Windows as well as all other operating systems it supports such as OSX, IOS, Android, Linux and Playstation. Being open source, OpenGL receives constant community support but no official support. On the other hand, DirectX is proprietary so receives no community support, but Microsoft is constantly working on it.
3D models are made up of lines, vertices, faces and polygons. Working as dimensions, a vertices is a dot anywhere on an x,y,z axis and creates a line when two vertices are connected. When you join 3 or more vertices together you make a polygon and when you join polygons together, they act as faces of a mesh. More complicated models have more polygons and therefore a higher ‘Poly Count’, making a model take longer to render book look far more realistic. 3D software usually features pre-made meshes called Poly Primitives which can be moulded and modified to make different shapes such as a sphere being turned in to a head. Basic primitives are a cube, sphere, cylinder, pyramid and a Torus (Ring). Starting with these primitives can save an artist a lot of time and effort; This is called Box modelling.
With Box modelling, the artist usually needs to create many subdivisions in the primitive to be able to model it concisely and flexibly. Another way of modelling is with extrusion, where you stretch individual faces of the model which creates more faces and doesn’t require subdivisions. Both these methods can be used together to achieve more complex models.
When an artist is creating 3D models, they face limits and constraints. One constraint is the polycount. Considering rendering time, polycount may need to be lowered to complete the project for a deadline. As well as time saving, lowering the polycount allows the model to perform better when used in console games. Limiting compatible platforms by heightening the polycount makes for a smaller market and having to high a polycount can cause performance issues as they take more processing power to load in. When a company wants to render high quality assets quickly, they use a Render Farm. Other effective methods are also used such as fogging and draw distance so that objects in the distance are either fogged out and invisible or dynamically changed to a lower poly to save on performance whilst still being immersive for the player and saving on memory.
Lighting in 3D space can be crucial and has 3 core types: Point Light, Spot-Light and Area Light. Point lights are common for studio lighting effects and are close to real life lightbulbs. In this way, they emit light in every direction and disperses over distance. Spotlights operate like torches, being mainly directional in a cone shape and is typically used as a torch that the player can use. Area lights represent windows or screens, with a square of directional light. In Portal 2, Windows with fully lit offices behind them provided a large light source for the level scene. When lighting has been built, shadows are created relative to the 3 types of light used. Shadows add depth and realism to a scene and can potentially be built with raytracing when a light source is added.
Texturing is also important to 3D models as it provides realism and feel to an object. An artist can add colours and materials to an object and the object can match the properties of the material. With clear materials like glass, light is reflected and dispersed differently to hard opaque surfaces. Changing aspects like these when modelling leads to photorealistic graphics and convincing immersive worlds. To simulate lighting for textures, normal mapping and UV mapping are used. This makes clear what parts of the texture to pop out, and that has an effect on how lighting affects the model. UV Mapping refers to opening out a shape as a 2D net to best apply a design and tailor it to each face.
Pixel shaders are used with normal mapping to create more detain without eating up processing power, determining the characteristics and colour of a pixel to bring out more detail in models during animations. When rendering a scene as a 2D image, projection and clipping come in to play. Essentially, only what the camera sees is rendered and anything outside of the frame or obscured by an object is ignored. ‘Rendering’ itself refers to creating the 3D model using the aforementioned tools, tricks and methods. In this process, raytracing or radiosity can be employed to create a more realistic image. Radiosity is mainly used for real time rendering in games as it takes less processing power and runs more smoothly. Raytracing, however, is best used when rendering a single image as it works out lighting down to the individual pixels. Raytracing is becoming more accessible as technology improves and is beginning to find its way into film, TV and some games; though the gameplay performance does suffer significantly.
When rendering many frames of an animation or many images under a strict time budget, Render Farms are used to distribute work between multiple servers. This saves a lot of time as one computer doing every frame of a CG sequence in a movie is ineffective and very time consuming. These servers will be running Rendering Engines, which translate the 3D model or scene into a two-dimensional image or frame. Many different engines produce different results as they use a variety of different methods. The three leading Rendering Engines are Lux, Maxwell and Blender. Lux is the fastest of the three, but the results are less detailed and blurrier with the poorest lighting. Maxwell handles colours the best, but each frame takes the longest to render. Blender produces images with sharp, crisp lighting and shadows and looks more realistic but lacks the colours that Maxwell can produce.
0 notes
Text
Mars Roberge and his movie 'Scumbag!'

I recently caught up with filmmaker Mars Roberge who has just launched 'Scumbag' in the UK. A movie which has been written about in over 60 publications, gaining somewhat of a cult status by randomly appearing on Top 10 lists of greatest club movies of all time, as well as best picture of 2017. It’s the first feature narrative by Canadian-American director Mars Roberge, born in Toronto, based in Los Angeles.
The story takes place circa 1990s. A young wannabe DJ, Phil, takes on a day job at a telemarketing company, working with crazy people, ex-prisoners, drug addicts and murderers. It looks at a time in his life where he battles addiction, fights the law and tries to maintain the only sane thing left in his life, his girlfriend, Christine. Roberge describes his film as a Rocktopia, a film genre he created and describes as
"an individual's struggle against the ideals of a Utopian society, where the only freedom of escape is to rock out."
Here is what Mars had to say!
My name is Mars Roberge and (as Bruno Wizard from the Homosexuals likes to say) I’m a Hellawood filmmaker living in Los Angeles who just finished my second feature film (first narrative) which is a comedy called “Scumbag”. BTW, ‘Hellawood’ refers to a new movement of Hollywood-based filmmakers that want nothing to do with the structure or system of Hollywood in the same way punk wanted nothing to do with mainstream rock. We shoot our films illegally and cast cool underground legends (Nick Zedd, Keith Morris, Kid Congo Powers, Nina Hartley, etc.) instead of mainstream A-list union actors. There are too many copycats and wannabes in the industry like wallpaper but we just tear through that and light them on fire. We make films from the streets for the streets. Otherwise, if you want to know about my background, I’m a Canadian-American dual citizen (born in Toronto, living in Los Angeles), graduated from York University Film School back in ’95 jumping straight into a 20-year career as an S & M dj which took me to NYC for 10 years where I also worked at Sex & the City’s stylist Patricia Field’s boutique working with club kids and drag queens, eventually making an award-winning documentary about it called “The Little House That Could” then moving to L.A. and making “Scumbag”.
Did you face many obstacles when you were starting out with the concept behind the film?
(Long sigh as I remember the years of hardships) I made “Scumbag” because it’s essentially a true story of my life (that most people can’t believe) about an awful job I had in the 90's at a telemarketing company in Toronto which was eventually shut down by the feds for fraud. I purposely put myself in a crazy situation with an odd bunch of characters so that one day I could write about it. However, I fell into the same pit of darkness with that partying lifestyle and almost never returned, getting very suicidal in the end. It took me 1 country change and 17 years of recovery for me to get my mind back and remember everything. Then one day, about a week after my divorce, it all came back to me in a week where I could remember everything verbatim and banged out my script over a month. The truth is, I was “technically” writing my film since 1995 but got detoured, losing my mind. Making “Scumbag” was a much needed therapy for me. It wasn’t like I set out to make an offensive film or a punk film, it’s just my life I guess is considered “restricted” or even “offensive” by many. It also helped that between my sister (Kid Congo Powers’ ex-wife), my club life, playing in bands, being bi-coastal and living a life in recovery that I was able to track down a lot of my old heroes to play roles in my film. So in a lot of ways, many of the musicians and people I looked up to when I lived the movie actually play my friends in the movie. Punk, especially hardcore punk when I was a kid, saved my life back then and it’s saving my life even today with “Scumbag”—I owe a lot to it. I grew up in a rough neighbourhood outside of Toronto called “Scarborough” (the area that Drake raps about having enemies in—or being too afraid to go to) and hardcore punk was my survival then. I’m 45 today.
As far as my drive for the film went, I had just gone through a divorce, living in Los Angeles (by accident, I am more a New Yorker at heart) thinking what am I going to do with my life, feeling that everyone lost their belief in me and that I had to start over in life. However, I had just finished touring with a documentary I made (which I also got into making by accident, never planning it originally) and said now is the time and I’m going to make this film no matter what. I ran a crowd-funding campaign, asked for $100k and only got $3900 and said “good enough”. From there I worked only with people who believed in the film and treated making the movie like a graffiti artist would on making a mural—it will be done no matter what. I also had it in me that if I have to perform every job (which I didn’t) and even act in front of a camera that I’m shooting I will make this. So, it was my stubbornness that made me do it. It’s like “you’ll have to kill me to stop me” and voila it was done! Took us a year of shooting though as my funds could only really handle 1 day/month after my first week of shooting. In the end, I have a 2-hour film shot with two 4k cameras in raw, a cast of 220 people and minimal film crews in Los Angeles and NYC (shot in both). Basically a lot of favours that I still owe and am slowly paying back.
As for roadblocks, I had a 140-page script, 220 cast roles, multiple locations including shoots across the country from each other with actors who have to act with people they will never see…. Yeah, most people thought I was crazy but we pulled it off. Also shooting with no permits in L.A. is very dangerous as you can go to jail so our P.A.’s acted as look out people. Then, if that wasn’t enough, having to fire one actor after shooting two-thirds of the film with him (because he wanted to extort the production company “like OB1 Kenobi in Star Wars” by not signing a release form). We had to go back and CG him out of every shot and replace him with another actor who basically did all the scenes by himself (in the office). I had a great Flame Artist (because I work in post-production) named Josh Kirschenbaum who was able to make the needed changes in a flawless way. That was probably my biggest roadblock but we succeeded. The only other roadblock I could think of was being worried that the people I based my movie off would be offended but in the end, even the oddest people out of the whole group loved the movie. It’s a nice feeling because I wanted to keep the movie as real as possible. Oh and I also had many conservative types say “you can’t make a movie called ‘Scumbag’ because nobody will go to it.” Well, we proved that actor wrong having our world premiere at the 46th International Film Festival Rotterdam (along with Academy Award-winning Best Picture “Moonlight”) in 2017. Funny enough, nobody was really saying “Scumbag” back in 2015 (when we shot it) and now if you Google “Scumbag”, our movie is the first thing that comes up.
Can you tell us about the greatest moment in making this film?
When we shot an award-winning song-and-dance number in one take on top of cars on a street in East Los Angeles. The song (written by the lead stars Princess Frank and Debra Haden) was written in like a week, the dancers with choreographer put it together in like a week and we filmed it in one take before the cops pulled up to take me away (literally). This was from a dream I had while we were making the movie and wasn’t even part of my script but I knew it had to be done. That scene won the lead actors Exceptional Emerging Artist award and Best Composing from Hollywood Film Festival. Funny thing is a real crackhead showed up during the shot and started screaming at the cast because he thought he was having delusions. We didn’t know if he was going to pull out a gun and start shooting but eventually he walked away and the cast continued like their professional selves as if he wasn’t there.
Can you tell the readers what they can expect when they go to see Scumbag?
You will quickly learn who your PC friends are and who has a sense of humour as half the audiences walk out offended while the remaining half stays, loving every second. There is no middle ground with Scumbag. It is a cult film and as people continue quoting the movie it won’t be long (I predict) where our audience (the scumbags) start talking to the screen. I really don’t doubt that will happen. The movie is meant to make you laugh while at the same time make you think. One reviewer said it’s an “intelligent film about stupid people” instead of the standard Hollywood format “a stupid film about intelligent people.” Also, if you catch Scumbag at screening in the U.K. soon, I can almost guarantee that at least someone from the film will be at it for a Q & A sessions (most likely someone from the soundtrack as there are many U.K. artists who lent their music to our film).
What is your greatest achievement to date?
It’s definitely Scumbag and standing on a stage in Rotterdam, introducing the film to a 500-seat sold out crowd at the World Premiere (3 nights in a row). The awards and praise we have been receiving have been amazing. It has given a lot of people hope too.
Can you tell us where we can see this movie or where it can be purchased from?
Scumbag is theatrically distributed in the U.K. by OurScreen so ANYONE can request the movie at their local U.K. theater by going to ourscreen.com, selecting Scumbag, picking the theater, date and time. You’ll even receive one free ticket for setting it up, you just have to convince about 23 other people to purchase tickets in advance for it to happen. If not enough tickets are sold, nobody is charged and it doesn’t happen. Our next set screenings are June 6th at VUE Reading 7pm; June 26th at ODEON (Brighton) at 8:30pm (presented by OriginalRock.net); July 29th at Crouch End Picturehouse (presented by Vive Le Rock) at 8pm.
The film is only available for purchase in North America on most VOD platforms such as iTunes by our distributor Freestyle Digital Media: http://www.freestyledigitalmedia.tv/film/scumbag/
Plus, it’s going to start playing theaters in Spain soon (with Spanish Titles) through our distributor there, Youfeelm (youfeelm.com), which does the same theater-by-demand thing we are doing in the U.K.
We also are continuing to play film festivals throughout the year. You can learn about screenings from www.scumbag-movie.com.
Before you leave to get back to your work can you share with us if you have any upcoming project(s)?
There are 2 films that I want to make back-to-back, both shot in NYC and both are completely different. One is a horror/thriller and the other is a coming-of-age LGBT comedy that would also appeal to everyone. My reasoning is I never want to lose my audience (if people support me, I don’t forget them). So, my first doc did really well in the LGBT world (having it’s world premiere in 2013 at Frameline (in San Francisco) and I also got my horror bug after attending the 23rd Lund International Fantastic Film Festival (in Sweden) for Scumbag. Both movies are also constantly coming to me in my dreams (like put in my head by someone else) and I’m writing them every night when I sleep. I can already see a bunch of music montages for both. See, I write, cast, direct, produce, edit and even sometimes score my films (with songs I have previously written) so I have to see the whole picture in my head before I start shooting and sometimes it’s hard for me to explain to people until the final product is done. My producers are just starting to trust me. Logic was always my enemy and will slow a guy down. I try to stay far from it cause magic can’t happen with logic. So, I don’t want to give away too much yet on those films but I’m expecting to start shooting them in 2 years and would love to do a double-feature world premiere at a big festival. I also believe fans of both worlds will be able to appreciate the other film. It’s like I’m the host of a party (like in Scumbag) saying “Keith Morris of the Circle Jerks, meet Lenny Dee the hardcore techno legend and there’s Penny Arcade from Warhol films over there…”. In the end, cool is cool…. Oh and why 2 films at once? I’m a master when it comes to First A.D.’ing (planning shoots) as I had experience doing it on several hip hop videos in Toronto during the late 90’s where these guys (like Ghetto Concept) would want entire neighbourhoods to show up and be in their videos and we would have to shoot several locations for a $4k Canadian art grant in 16mm film that the band would want a $100k video from. I pulled that off and my planning is pretty dead on so I always knew that if I had a couple of the same locations and could hang onto my crew for an extra week we could have probably made another movie. So, I’m going to give that a whirl.
We would like to thank Mars Roberge for taking time out to chat with us at The Punk Lounge and look forward to seeing the movie soon!
Read the full article
0 notes
Text
Pioneers in 3D Computer Graphics
https://www.lifewire.com/pioneers-in-3d-computer-graphics-1958
1) Ed Catmull
Texture Mapping, Anti-aliasing, Subdivision Surfaces, Z-Buffering
Because of celebrated status as one of the co-founders of Pixar Animation Studios, Ed Catmull is probably the most well-known computer scientist on this list. Anyone who's spent any amount of time following or reading about the Computer Graphics industry has almost certainly come across his name once or twice, and even folks uninterested in the technical side of CG may have seen him accept an Academy Award for technical achievement in 2009.
Aside from Pixar, Catmull's greatest contributions to the field include the invention of texture mapping (try to imagine an industry without texture mapping), the development of anti-aliasing algorithms, the refinement of subdivision surface modeling, and pioneering work on the concept of Z-buffering (depth management).
Ed Catmull was truly one of the first computer scientists to really begin laying the groundwork for a modern computer graphics industry, and his contributions to the field are truly staggering. He is currently acting president of both Pixar and Walt Disney Animation Studios.
2) Jim Blinn
Blinn-Phong Shader Model, Bump Mapping
Blinn started his career at NASA, where he worked on visualizations for the Voyager mission, however his contribution to computer graphics came in 1978 when he revolutionized the way light interacts with 3Dsurfaces in a software environment. Not only did he write the Blinn-Phong shader model, which presented a computationally inexpensive (i.e. fast) way of computing surface reflections on a 3D model, he is also credited with the invention of bump mapping.
3) Loren Carpenter & Robert Cook
Reyes Rendering
Our first pair, on the list, Carpenter and Cook are inseparable because they published their groundbreaking work as co-authors (Ed Catmull also contributed to the research). The pair was instrumental in the development of the photorealistic Reyes rendering architecture, which forms the basis of Pixar's monumentally successful PhotoRealistic RenderMan software package (PRMan for short).
Reyes, which stands for Renders Everything You Ever Saw, is still widely used in studio settings, most notably at Pixar, but also as a cluster of Reyes spinoffs typically referred to as Renderman-compliant renderers. For smaller studios and individual artists, Reyes has mostly been supplanted by scanline/raytracing packages like Mental Ray and VRay.
4) Ken Perlin
Perlin Noise, Hypertexture, Real-Time Character Animation, Stylus Based Input Devices
Perlin is another one of those industry heavyweights who's achievements are far reaching and invaluable. Perlin Noise is a popular and shockingly versatile procedural texture (as in, quick, easy, no texture-map required) that comes standard in virtually every 3D software package. Hypertexture—the ability to view changes to a model's textures in real time—is one of the great time saving techniques in an artist's toolset. I think real-time character animation probably speaks for itself. Stylus Based Input Devices—try separating a digital sculptor from their trusty Wacom tablet.
These are all things that a digital artist uses every single day that he or she makes art. Perhaps none of Perlin's advances were as groundbreaking as say, the invention of texture-mapping, but they're every bit as valuable.
5) Pat Hanrahan & Henrik Wann Jensen
Subsurface Scattering, Photon Mapping
Ever seen Pixar's Tin Toy,or any other early attempt at photo-realistic rendering of a human character? Something looks off, right? That's because human skin isn't entirely opaque—it actually transmits, scatters, or absorbs a large portion of the light that strikes it, giving our skin a subtle red or pink hue where blood vessels are closer to the surface. Early surface shaders were incapable of rendering this effect properly, causing human characters to appear dead or zombie-like.
Subsurface Scattering (SSS) is a shading technique that renders skin in layers, with each layer transmitting a different ambient hue based on depth-maps—this is Jensen & Hanrahan's greatest contribution to the field, and it's instrumental in the way human characters are rendered today.
The photon mapping algorithm was written by Jensen alone, and similarly deals with light passing through translucent materials. Specifically, photon mapping is a two-pass global illumination technique used most commonly to simulate light passing through glass, water, or vapour.
The two were Awarded Academy awards in technical achievement for their work on subsurface scattering.
6) Arthur Appel & Turner Whitted
Raycasting & Raytracing Algorithms
Although technically two separate breakthroughs, we're counting raycasting (Appel 1968) and later raytracing (Whitted 1979) as a single entry because Turner Whitted was essentially building on and adapting the work that Appel had done many years before.
Together, the one two punch form the basis of most modern rendering techniques, and have supplanted scanline renderers because of their greater ability to accurately reproduce natural lighting phenomena like color bleed, shadow falloff, refraction, reflection, and depth of field. Although raytracing renderers are highly accurate, their greatest disadvantage has always been (and still remains) their speed and efficiency. However with today's ultra-powerful CPUs and dedicated graphics hardware, this has become less of an issue.
7) Paul Debevec
Image Based Rendering & Modeling, HDRI
Because of his breakthroughs, Paul Debevec is solely responsible for tens of thousands of ill-advised "futuristic car sitting in an empty white room but still reflecting a full environment" images. But he's also responsible for simplifying the workflow of hundreds of environmental, automotive, and architectural visualization specialists.
Image based rendering makes it possible to use an HDRI image (a 360 degree panoramic image of an environment) to generate light-maps for a 3D scene. Generating light maps from a real world vista means that artists no longer need to spend hours placing lights and reflector boxes in a 3D scene in order to get a respectable render.
His work on image based modeling allows for the generation of a 3D model from a collection of still images—these techniques were initially used on The Matrix, and have been implemented in dozens of films since then.
8) Krishnamurthy & Levoy
Normal Mapping
Where to begin with these two. Their oeuvre may only consist of a single breakthrough, but boy was it a big one. Normal mapping, is built on the idea that it's possible to fit a highly detailed mesh (with millions of polygons) to a low resolution polygonal cage based on the model's surface normals.
That might not sound like much if you're coming from a visual effects background where it's not unheard of to dedicate up to 80 CPU hours of render time to a single frame of film. Just get a warehouse full of computers and brute force it, you might say.
But how about in the games industry where entire environments need to be rendered 60 times every second? The ability to "bake" highly detailed game environments with millions of polygons into a low-poly real-time mesh is pretty much the sole reason that today's games look so darn good. Gears of War without normal mapping? Not a chance.
9) Ofer Alon & Jack Rimokh
Founded Pixologic, created ZBrush
Just about ten years ago these guys rocked the industry when they founded Pixologic and introduced the revolutionary modeling application, ZBrush. They single-handedly ushered in the era of the digital sculptor, and with it came hundreds of fantastically detailed, impeccably textured, organic 3D models like the world had never seen.
Used in conjunction with normal mapping, ZBrush (and similar software like Mudbox built on the same concepts) has changed the way modelers work. Instead of laboring over edge-flow and topology, it's now possible to sculpt a 3D model like it's a piece of digital clay with little need to place polygons vertex by vertex.
On behalf of modelers everywhere, thank you Pixologic. Thank you.
10) William Reeves
Motion Blur algorithm
Reeves is one of those guys who has worn just about every hat you can imagine in the computer graphics industry. He worked as technical director on John Lasseter's seminal Luxo Jr. short film (the birth of the Pixar lamp) and has played major roles in eleven feature films. His contributions have usually been in technical positions, but he's occasionally lent his talents as a modeler, and even once as an animator.
His greatest technical achievement, and the real reason he's on this list, is for developing the first algorithm to successfully emulate motion blur in computer animation.
0 notes
Text
CG toolkit - Documentation of the Pipeline
Through out the three milestones, a really important experience that I've gained was having a better understanding of how to implement many different programs to create a better final composition. As for before, I wouldn't even have considered using After Effects to edit animated videos from Unreal Engine. I have also learnt to expand the tools used for each software. In maya, I have primarily focused on modelling but during this unit, I have gotten to learn animating rigs through it. In this unit, I've also gained experience in composing a scene using sequencer and implementing cameras, lighting and imported animations.
After working on the previous milestones, I am able to create a basic animated shot using the tools taught in class. I would need to further develop my skills in modelling and animating.
I was leaning towards either character design or asset design because personally I have inspiration of being a concept artist in which those two streams have more relation towards than VFX. Although concept design does not use 3D modelling, I would like to be able to create models or scenes which may improve my design knowledge down the track if the concept was ever created. I would be able to model and animate how that character would move or act. Although this stream will be provided with a reference character, I still find it important to develop my skills to be able to create and animate.
I have decided to choose the character development stream because in my past experiences, I have done work on asset modelling. I haven't had much experience in character modelling and rigging but I would like to learn and be able to model my own character.
I have always been a big gamer and in the recent years, game companies have stepped up their story telling and art designs which I personally think has impacted the success of those particular games more than just the gameplay itself. Blizzard games such as World of Warcraft and the recent Overwatch has been my inspiration for working on character development.

The character designs are a strong point to their games. Overwatch uses a hybrid of both realistic and cartoon styles which not only makes the game visuals look stunning, but also brings a new aspect of art style.
On the animation side, Blizzard games have always been good at creating lore and making stories which defines many of their main characters. The company first brings an understanding of their designed character to which they animate based on it's personalities and proportions. The level of animation that their animators go through makes their final outcome a huge success because of their knowledge of using arcs and how they throw in even the most subtle movements on an animation that could go for only half a second.
The main aspects for character development consists of character modelling, rigging and animating. The skills that I require would be to know how to use the right tools for creating a model and applying a rig for it to be able to move. The rig would require bones for every joint for it to properly animate. I would also need to create UV maps to correctly apply materials/textures onto the model. An understanding of movement is also required when animating the model, whether it is human or not, the movement must reflect the model.
In the state of my current ability, I have worked mainly on animating given rigs with only a small amount of knowledge on how to create a model from scratch. I am able to create and apply textures and materials onto objects at a basic level. In my past experience, I have only practiced with creating assets but would like to further learn about character modelling, rigging and animating.
I will be using video tutorials from Lynda to help me start and progress through this stream. I will also be learning through big industry character design talks and walk through processes that explain the steps and thought process of each action, and how it is applied. Youtube videos by the community is a good place for me to look for tutorials and guides, previously a lot of issues that I've come across when operating Maya have been resolved by videos there.
I hope to achieve by the end of this stream the ability to create, rig and animate a model and to further improve on my skills.
0 notes
Photo


Mystery Box: An Introduction to Animatics
In this week’s animatic masterclass, we were introduced to the idea of an animatic as a way to plan our animations. Whilst we had the opportunity to create our own animatic, I first wanted to delve into the use of animatics in the industry of animation, looking at a few examples and the purpose they serve in the production of an animated sequence. This isn’t in response to any points from Helen herself, who simply gave us the task and how to produce it in the given software, but instead, this post is an opportunity for me to develop my own independent research into the use of animatics in animation.
What is an Animatic?
Last week, we explored the idea of storyboards, and how these hand-drawn frames can show the stages of a scene in rough camera placements. Here, issues with the story can be fixed easily, and allow the director/s to tell if the story is clear and works as a visual narrative. However, storyboards cannot tell us the timing or pacing of the sequence. To do that, editors and artists take the storyboard panels and translate them into an animatic.
In its most basic form, an animatic is a collection of static storyboards edited together into a sequence. Using an editing package, we are able to put the storyboards into a timeline and see how the timing works for the animation, even adding cuts and camera movements which are often timed to any dialogue or music that will be used in the final product.
Similar to storyboards, animatics are used to bridge the gap between an idea and a finished animation. We need to see how it might feel, and ‘get more of a grasp’ of the scene. In contrast to storyboards, animatics are very particular to animation. They are a way to layout the timing, pacing and the visuals of the entire thing without having to create it in animation. Animatics are used to get the flow of camera work, pacing and characters interactions. Typically, the sketches in animatics are rough and instead focus on timing and pacing, rather than appealing illustrations.
Industry Practices
In an illuminating video revealing the entire CG animation pipeline at Dreamworks Studios, lead editor Nick Fletcher explains the process in a way better than I ever could, simply because it’s his job to create animatics for Dreamworks’ feature films.
‘We take the storyboard panels and build a sequence out of those. Some times, we don’t have any dialogue, so we record ourselves doing the voices. We add a little music, sound effects and whatever is needed to fully tell the story. Try to make it as polished as possible so that the storyboard reel [or animatic] becomes a sort of foundation for the movie.’
Nick Fletcher, Editor and Animatic Creator for Dreamworks
In this early stage, the actors haven’t yet recorded their performances, so the editors effectively produce a rough pass as a way to present a preliminary vision of the film to directors, producers and executives, who will then green light the project to the next stage if they like what they see.
Interestingly, the inclusion of sound is a characteristic of almost every animatic I’ve come across, whether it be for a feature film animation or fan-made short on Youtube. Sound is a key part of producing an exciting and engaging animated film, and it’s not something that I want to disregard for this project either. When filming my own reference, I had the opportunity to verbally act out the performance and as such, I’ve essentially already got a rough audio track for my animatic, if I choose to include it. Despite the fact that sound isn’t mentioned in the brief, I feel like it could only be a good idea to include this aspect as a way to again push the limitations of this assignment and produce a piece of work that is of an industry standard: this is something that I want to consider when creating my own animatic.
With animatics, the drawings are often loose and sketchy: the focus is on telling the story and simply working out the timing and pacing of the sequence. A common industry practice of both storyboards and animatics is the use of spot colours or shading to simply separate the background and foreground, rendering the main characters in a shade of grey different to the background and foreground elements to direct the eye to the most important information and focal points of the shot. In my own animatic, I plan to produce a sketched version using simple line work and develop upon this by adding a grey tonal value to each of the elements as a way to evidence an understanding of key industry practices.
One final aspect to consider when creating an animatic is the program itself. After doing a little bit of digging online, I’ve found that the industry standard for animatic production is a combination of Adobe Photoshop to draw the frames and to sequence them using After Effects or Premiere Pro, both of which allow us to add cinematic touches and camera movements in this early stage. Already, I’ve had the opportunity to explore the use of virtual cameras within After Effects, and I can see the potential for more complex shot types and camera movements to be created simply using this technique of changing 2D illustrations into 3D flat objects that a virtual camera can then move around to give the illusion of depth.
Into the Spider-Verse: A Cinematic Approach
This idea of a cinematic approach to animatics, making use of more complex shots even at this early stage in production, can be seen in Alberto Mielgo’s initial animatics for the massively successful Spider-Man: Into the Spider-Verse. Mielgo created the tests using the Adobe Creative Cloud suite, drawing with pencil and digitally in Photoshop, and compositing the sketches in After Effects before doing any final editing in Premiere.
The shots are intensely cinematic, presenting a new vision of a hand-drawn, 3D world. This example represents a more complex approach to an animatic, as Mielgo presents an inherently cinematic, hand-drawn 3D world. Through panning virtual cameras and zooms through converted 2D illustrations, the audience is able to get a sense of the scale of the film and the city of Brooklyn. Looking at these animatics, there’s a clear understanding of editing and cinematography here, with a mix of blurred lenses, fades and cuts that outline the overall look and feel of the final film.
Here, Mielgo was creating key moments and shot compositions that the final film still adheres to, with his initial animatics playing a key role in establishing the film’s stylistic visual language and a new, snappy approach to animation. The idea to use comic book panels, illustrated onomatopoeia and an experimental approach to composition was the work of Mielgo’s early development in the project, and within these, we can see how an animatic can be used to plan out the action not only in terms of layout and timing, but also the visual language of the film and even more editing elements such as how to cut a shot.
Gorilliaz: Animatics in Music Videos
Animatics can also be found outside of the realm of animated feature films, however. For example, we can take a look at an animatic from the legendary animated band Gorillaz, an experiment blending animation and a genre-bending array of musical tastes that has become a world-wide hit since they first dropped their debut single in 2001, with ‘Clint Eastwood’. The song and music video are one and the same, each working to build off the other, and exemplifies the band’s use of mixing musical styles: combining hip hop, electronic and dubstep influences to defy musical genre, and instead embrace storytelling.
In the animatic for ‘Clint Eastwood’, we can see how the creators were able to pre-visualise their sequence by moving the camera around the 2D illustrations, which instantly gives the flat designs a sense of depth and cinematic charm. The slow arcing motion of each of the band members is shown clearly in the animatic, a shot that is now iconic to the band itself. It’s important to note that for the more complex moves, still images of the characters are used to act as visual place holders for the animation. With this example, the focus is on getting that smooth arcing camera movement, and focusing on each singular band member, and as such are represented with still frames. This is a common industry practice, and as such, animatics typically have little actual animation. Rather than a series of frames to create the illusion of movement, an animatic presents the action across a series of storyboarded panels that convey the motion through rough drawings.
Something interesting to note about this particular animatic is the varied use of mediums that creates a very tactical effect that hammers home to the audience that these sequences are created by hand. In a music video, one important element is the use of lip-synching early on - and as such, the animatic presents a nearly fully-animated lip-sync, animated traditionally on paper. This allows the animators a more considered and polished visualisation of the sequence to work from, and since it is a focal point of the video, it seems natural to want to develop upon this early on in the project.
Looking at the animatic, we can see how the creators have used a mix of near-fully animated sequences and moving still images to convey the story of the video. With more complex shots including detailed landscapes and multiple characters, only a handful of frames are shown - but it’s enough for the directors and creators to work from. In these more dynamic compositions, the characters are rendered with simple stick-figure bodies, taking the focus away from staying on model and more on sketching the shot and timing correct.
Additionally, the animatic also uses a range of camera effects to give the illusion of depth to these 2D characters, using a shaky cam to demonstrate a character jumping and slamming down onto the ground or arcing pan-up movements that evoke a real sense of cinematic composition and camera work - going beyond the traditional animation approach. It was quite interesting to see how the editors would recycle animations and shots for the video, allowing creators to save time using cycle animations for certain shots. Comparing these animatics to the final shots demonstrates how crucial and helpful the animatic is to a project like this: despite the colours, final polish and smooth animation, the sequence has effectively stayed to the initial compositions and camera movements outlined in the animatic.
Summary
In this post, I’ve been able to explore the use of animatics in the animation industry, taking the time to delve into some examples that I personally find inspiring and exciting, and how these ultimately outline the final feature. As an animator, creating an animatic is interestingly something that I’ve never actually done before. However, I can really see a benefit and the purpose of doing so - and with this, my next move is to take the ideas that I’ve found here and apply them in my own creative practice: developing my own animatic based on my final storyboard.
References
Into the Spider-Verse Storyboards. (2019). Alberto Mielgo. https://vimeo.com/311716775.
Clint Eastwood (Animatic). (2010). Gorillaz.
https://www.youtube.com/watch?v=JPC0n_ml4kc
Clint Eastwood. (2001). Gorillaz.
https://www.youtube.com/watch?v=1V_xRb0x9aw
What is an Animatic? (2014). Pluralsight Creative. https://www.youtube.com/watch?v=3sE5ox9kkUg
CGI Dreamworks Animation Studio Pipeline. (2016). CGMeetup.
https://www.youtube.com/watch?v=ru0tQRJ4qKs&t=249s
0 notes
Last Seen Blogs

simplyerickac-blog
Simply Ericka C

joelcoen
taxi driver sax solo

rumenoshallo
FUTURE5000

pedrop61
dimensioni di un'icona

ressyfaerie
Welcome to Beyblade Hell