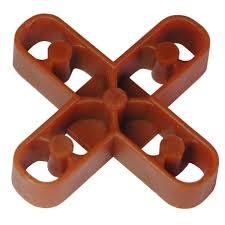
#tile spacers
Text
EVA Foam in Tile Spacers: Revolutionizing Precision and Efficiency in Tiling
Introduction
Tiling is an art that requires precision, patience, and the right tools. One such tool that has transformed the tiling industry is the humble tile spacer. While there are various materials used to make tile spacers, EVA (Ethylene Vinyl Acetate) foam has emerged as a popular choice. This article delves into the world of EVA foam tile spacers, exploring their advantages, applications,…

View On WordPress
0 notes
Text
The Triple Threat for Perfect Tiles Exploring Tile Cleaners Spacers and Grout

Tiles are an integral part of any well-designed space, be it residential or commercial. They offer durability, aesthetic appeal, and versatility, making them a popular choice for flooring, walls, and even backsplashes. However, achieving that perfect tile installation requires more than just selecting the right tiles. It involves paying attention to crucial elements like tile cleaners, spacers, and grout. In this comprehensive guide, we will delve into these essential components and explore how they contribute to the flawless beauty of your tiled surfaces.
The Importance of Tile Cleaners
Tile cleaners play a vital role in maintaining the longevity and appearance of your tiles. Over time, dirt, grime, and stains can accumulate on the tile surfaces, dulling their shine and diminishing their visual impact. Using an effective tile cleaner is crucial to restore the tiles' sparkle and keep them looking their best.
When searching for tile cleaners, look for products that are specifically designed for your tile type. Different tiles require different cleaning methods and formulas, so it's essential to choose a cleaner that is compatible with your tile material, whether it's ceramic, porcelain, natural stone, or any other type. Additionally, opt for environmentally friendly and non-toxic cleaners to ensure the safety of both your tiles and your health.
Tile Grout: The Unsung Hero

While tile cleaners enhance the appearance of the tiles, grout is the unsung hero that holds the entire tile installation together. Grout not only fills the gaps between the tiles but also provides stability, prevents moisture penetration, and protects against cracks or shifting.
To find the best tile grout at the best price in India, it's crucial to consider the specific requirements of your project. Factors such as tile size, joint width, and the environment in which the tiles will be installed all influence the choice of grout. Manufacturers in India offer a wide range of grout options, including epoxy grout, cement-based grout, and color-enhancing grout. It's important to select the right grout that suits your aesthetic preferences and functional needs.
Tile Spacers for Precision
Achieving a professional-looking tile installation requires precise alignment and spacing. This is where tile spacers come into play. These small, often overlooked tools ensure consistent spacing between tiles, resulting in a uniform and visually appealing finished look.
Tile spacer manufacturers in India offer a variety of spacer options to accommodate different tile sizes and joint widths. By using tile spacers, you can achieve symmetrical lines, equal spacing, and a seamless appearance. This attention to detail enhances the overall aesthetic value of your tiled surfaces and makes them stand out.
The Quest for the Best Tile Adhesive
To complete the trifecta of perfect tiles, we cannot overlook the importance of choosing the best tile adhesive. Tile adhesives ensure the tiles adhere firmly to the substrate, providing stability, strength, and long-lasting durability. With the right adhesive, you can avoid issues such as tile slippage, dislodgment, or premature damage.
In India, numerous manufacturers offer a wide range of tile adhesives to suit various tile types and installation conditions. When selecting a tile adhesive, consider factors such as tile material, surface preparation, and environmental conditions like temperature and humidity. Choose an adhesive that guarantees a strong bond, easy application, and compatibility with your tile and substrate.
Enhance Your Tiling Journey
In conclusion, achieving the perfect tile installation involves a triple-threat approach. By utilizing high-quality tile cleaners, selecting the right tile grout, and utilizing tile spacers for precision, you can create stunning tiled surfaces that elevate the beauty of any space. Remember to choose products from reputable manufacturers in India, ensuring the best quality and performance.
#agarwalbuildcare#tile cleaners#tile grout#tile spacers#Specialized Polymer & Admixture#Construction Chemicals#Waterproofing Products & implementation#buildings#dr.fixit#roof cleaning#roof replacement#rooftop
1 note
·
View note
Text
Leveling Wedges 101: Everything You Need to Know
Leveling wedges are essential tools for ensuring the proper installation of tiles, windows, and other construction materials. They come in different shapes, sizes, and materials, but their primary purpose is to help level surfaces and maintain consistent spacing. Here, we will guide you through the basics of leveling wedges, the different types available, and how to use them effectively.
What are Leveling Wedges?
Leveling wedges are small, wedge-shaped devices used in construction and remodeling projects. They help level surfaces and maintain consistent spacing between tiles or other materials. They are typically made of plastic or rubber and come in various shapes and sizes to fit different applications.
Types of Leveling Wedges
There are several types of leveling wedges available, each designed for specific applications.
Tile Leveling Wedges: These are used in tile installation projects to help ensure that the tiles are level and evenly spaced. They are typically made of plastic and come in different sizes to fit various tile thicknesses.
Wedge Spacers: These are used in place of traditional tile spacers to help maintain consistent spacing between tiles. They are usually made of rubber and come in different sizes to fit different tile thicknesses.
Window Wedges: These are used to level and support windows during installation. They are typically made of plastic or rubber and come in different sizes to fit various window widths.
How to Use Leveling Wedges?
Using leveling wedges is a simple process, but it requires some basic knowledge and skill. Here are some tips for using leveling wedges effectively:
Start with a level base: Before installing tiles or windows, make sure that the surface is level and free of debris. This will help ensure that the wedges are effective in leveling the surface.
Choose the right wedge: Make sure that you select the appropriate type and size of the wedge for your project. Using the wrong wedge can result in uneven surfaces or damage to the materials.
Place the wedge: Insert the wedge between the materials being installed and use a mallet or hammer to tap it into place. Make sure that the wedge is firmly in place and level with the surface.
Adjust as needed: If you notice any unevenness, adjust the wedges as needed until the surface is level and consistent.
Benefits of Using Leveling Wedges
Using leveling wedges offers several benefits, including:
Consistent spacing: Leveling wedges help maintain consistent spacing between tiles, windows, and other materials, ensuring a professional-looking finish.
Time-saving: Using leveling wedges can help save time by eliminating the need for extensive manual leveling or reworking uneven surfaces.
Cost-saving: Leveling wedges can help prevent damage to materials, reducing the need for costly repairs or replacements.
Leveling wedges are essential tools for any construction or remodeling project. They help ensure that surfaces are level, consistent, and evenly spaced. Whether you're a professional contractor or a DIY enthusiast, leveling wedges are an indispensable part of your toolkit. If you want to achieve such amazing-looking tiles, Acufloor can be your last stop.
0 notes
Photo
Ceramic Tile Spacers
Do you want to buy professional-grade tile spacers of the Raimondi brand? Rely on Ceramic Tiling Tools! We stock a wide range of spacers of the Raimondi brand for professionals. The best quality spacers help the professionals achieve the right pattern to fix the floor or wall tiles. Visit our website today to buy tile tool spacers at the best price!
0 notes
Text
Safety and Wellbeing of Workers Invest in Gloves:-
In the busy industrial world, the demand for high-quality personal protective equipment (PPE) is very much crucial. Gloves play a crucial role in ensuring the safety and well-being of workers across various sectors. To meet this demand, businesses and industries look for trustworthy suppliers who offer a full range of gloves in the UAE. Anamta LLC, one of the best in business in UAE for all PPE requirements. https://www.anamtallc.com/blog/safety-and-wellbeing-of-workers-invest-in-gloves.html

#Pile spacer dealers#Rubber hoses for hydraulics supplier#Entrance Mat Customised in UAE#Rubber hoses for milk#LED Tile Trim Supplier in UAE#Stauff clamps distributors#Made in Germany Stauff dealer#Made in Germany Stauff products in UAE
0 notes
Text
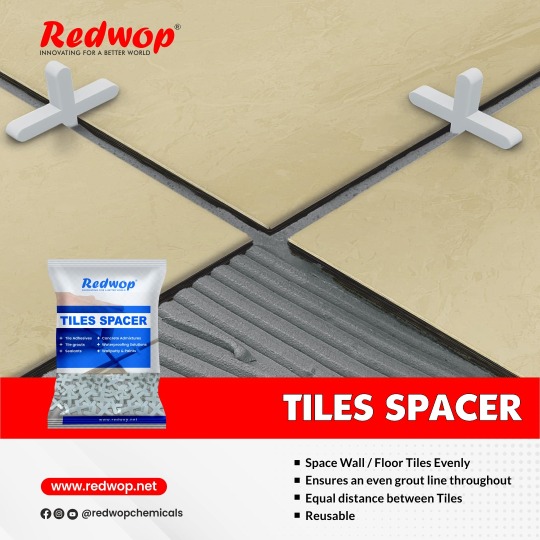
TILE SPACER
- Space Wall/Floor Tiles Evenly
- Ensures an even Grout line throughout
- Equal distance between Tiles
Size: 2, 3, 4, 5, 6, 8, 10 mm
ADVANTAGES
- Reusable
- Accuracy & Precision
- Easy way to Achieve a more professional Finish
Website: https://www.redwop.net/
#tiling#redwop redwopchemicals#concreteadmixturemanufacturerscompanyinindia#tiles#spacer#tilespacer#tileleveler
1 note
·
View note
Text

https://fevicrete.com/
0 notes
Text

If you're looking to level your tiles, then you come to the right place. tile levelers and spacers are a great option. They can help you ensure that your tiles are level, which will give your finished product a professional look.
0 notes
Text

For folks messaging me about what flooring I used: It's Traffic Master peel-and-stick-vinyl (so, the most cost-effective route we could go, lol). Except I wanted to fake the look of wood tile because I think it's super pretty with grout lines. AND I wanted to make sure the edges of the planks stayed down for a good long while (I'm hoping to get several years out of it, at which point we'll have the budget for something more long-lasting). We did B's office, the hallway, and the library floor (500ish sq feet) for less than $800 and I'm REALLY happy with it so far. We'll see how it wears, but my initial impression is that it's 100% worth the slightly tedious installation process.
You know that TikTok sound that's like, "I'm not going to hire someone to do something that I have no idea how to do. I'm going to look that shit up on YoutTube and do it myself." That's generally my philosophy for everything home-related outside of like, electrical stuff and plumbing. I've pulled up carpet and refinished concrete before, but I've never laid any flooring. I don't think this counts as "laying flooring" either because it's peel and stick and then I used tile spacers and grout to make it look fancier than it is. But I did spend quite a bit of time on YouTube while deciding what sort of flooring to do (I considered click-together for a bit) and I don't think any of it looked particularly difficult, just time-consuming. If you're good at following directions there are a whole heck of a lot of folks online who have posted exhaustive videos on floor installation processes.
47 notes
·
View notes
Text
where tf did i leave off
girl (nonspecific, just used here as an interjection, i know there are several of you reading this) i know it's been a lot and like shit got so hectic i updated that i had a backsplash and then nothing but
listen i've been unpacking stuff into my
NEW KITCHEN
which is fully operational and move-in ready it's just missing the door to one cabinet and a bunch of little pieces of trim and whatnot but
FEAR NOT
i will give you the scoop once i can figure out where i left off in the updates.

Image description: Picking up where we left off, here's the north wall looking east from the kitchen door, this time with the spacers removed from between the white tiles. The countertop is still covered with cardboard. You can see the underside of the cabinets a bit. The outlet has no faceplate on it.
Max mixed up a batch of grout and set to grouting the tiles, now that the adhesive or mortar or whatever had cured overnight. Jim, meanwhile, installed the dishwasher to be ready for the plumber, and installed the vent hood.
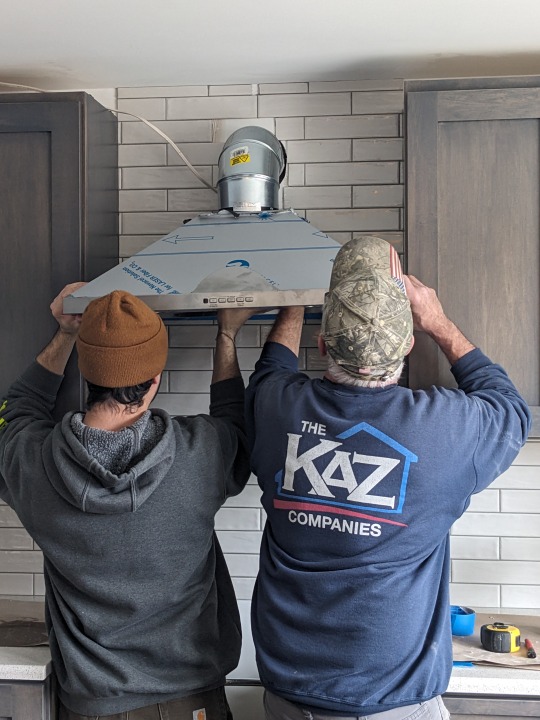
[image description: Two men are facing away from the camera, lifting a stainless steel vent hood up to hook it onto the screws it mounts to in a tiled wall.]
He also used a sheet of paper to cut out a template so he could cut the odd-sized piece of trim wood to cover the bay windowsill. "I got a whole roll of paper," he said, "but I only got one piece of wood." "Measure once, cut three times," Max interjected.

[Image description: Two men in a kitchen. The one on the left is standing on a stepstool to smear gray grout over the white tiled wall. On the right, the other man is bent over the countertop, with the offcuts of brown kraft paper curling away as he trims it with a utility knife.]
Finally the plumber rolled in-- Kyle, who'd been here before. He'd said he'd come Monday, but on Thursday when Jim called to confirm, he said he could push it up and come Friday instead. Which was huge, because it meant a working stove and working sink and working dishwasher and really, working kitchen, really really.
Jim bartered for a part from him, to hook the stove up-- he had one of Kyle's tools, left behind on an earlier job. Kyle was like ha I don't actually need it back I bought a replacement BUT i will give you the nipple you need anyway. (Yes! It was a nipple. That's a pipe fitting thing and I get a gold star for not giggling.)
So while Kyle was in the basement, hooking up my dryer and repairing my laundry sink (I had arranged to pay him separately for that, as neither thing were part of the kitchen job, and he figured he'd do those first so his boss would have a chance to send an invoice so I could pay him before he left, much easier all around), Jim and Max installed the stove and got it painstakingly leveled.

[Image description: a stove is pulled out somewhat from the surrounding counter. To the left a man is kneeling next to it; the other man stands to the right, leaning over to peer at a bubble level.]
They did a really thorough job on this, which involved pulling out that lower drawer so Jim could reach under to the rear adjustable feet with a wrench to fine-tune the position once the stove was shoved into place.
"Aw," I said, "now I gotta find the owner's manual to find out how to set the clock on this stove again," and Max wordlessly tilted his head, looked at the control panel, unerringly punched the button with a picture of a clock on it, and said "what time is it?" so I told him, he punched it in. "Kids," Jim laughed, and I said "so good with technology." Finished, Max hit the clock button again, and erased his work. "Oops," he said, repeated the process, and this time hit the "Start/OK" button at the end, which worked and actually entered the time.
Then the real excitement began, because Kyle finished mucking around in the basement and came up and put together the sink. Max, having now attached all of my cabinet door and drawer handles, had now mostly run out of work to do by then so he leaned on things and watched kyle work, which was also what I was doing, LOL.
But the moment of excitement came very soon.

[image description: two men standing by a kitchen counter. On the left, Kyle the plumber is staring down into the sink as the water runs. On the right, Max is leaning on the counter next to the stove, watching.]
No leaks! Hooked up! So exciting. He then ran a quick cycle on the dishwasher to make sure it didn't leak either, and lo and behold it did not.
Meanwhile Max lit the stove and ran it until the air was out of the line.
Literally, now we're cooking with gas.
So, everyone was done and wrapped up before 3pm on Friday afternoon, and they all left in high spirits. Jim will be back to put on the final cabinet door (they made it wrong! the custom cabinet people fucked up my door! I never knew because Jim had already sent it back) and all the crown molding, and a couple of other little details. He might come Monday but if the pieces aren't ready for him then he won't come until they are. In the meantime, I can use the kitchen to my heart's desire.
He gave me back my house key, since we were moving back into the house over the weekend, so I'd be present.

[image description: a kitchen! an actual kitchen, with grayish-blue cabinets, a white tiled wall, a dishwasher and a stove, a vent hood over the stove, and a hideous yellow flowered folding stool pulled up to the counter to be a makeshift chair. The knife block is on the counter, and the Instant Pot is sitting by the sink, and various other items are strewn around the counters. The floor is mottled gray and has a geometric blue and white mat in front of the sink.]
The first thing I did was put all my grungy old unwashable dishwares into the dishwasher to see if it melted them, hence my post on this topic. (Update: Nothing so far has actually gotten ruined! Amazing.)
But the second thing was that we went back over to dude's mom's to retrieve our cat. <3 <3 <3 and then i got to sleep in my own bed with my beloved cat.
39 notes
·
View notes
Text
Renovating part of the kitchen/the laundry room and once again being made to see some baffling choices made by the house flippers we bought this place from. Lads why am I finding 8 year old builder debris and a load of broken tiles/tile spacers underneath my kitchen cabinets.
40 notes
·
View notes
Text
transforming soffits
reorganizing keys
formalizing immersion joints
justifying kick extractors
advising aggregates
managing elbows
recasting connectors
achieving aluminum trowels
officiating disks
exhibiting absolute spigots
progressing coil hydrants
jerry-building reflectors
informing casters
inventing rubber hoists
performing wrenches
judging chalk adapters
upgrading ignition paths
regrowing flashing
recommending ratchets
approving barriers
sweeping impact fillers
sewing mirrors
detailing collectors
enforcing measures
distributing systems
presenting plugs
interwinding registers
piloting ash diffusers
gathering cranks
supplying eave pockets
undertaking scroll stops
accelerating straps
designing fittings
protecting diamond boilers
logging downspouts
correlating shingles
uniting mallets
qualifying electrostatic lifts
sharing clamps
obtaining circular fluids
ranking foundation gauges
sensing miter brackets
originating space networks
translating drills
regulating guards
selecting gable padding
utilizing pellet dowels
reconciling artifacts
altering pulleys
shedding space filters
determining vents
representing mortar
remaking flash rakers
supporting funnels
typecasting rotary chocks
expressing junctures
resetting auxiliary vises
professing strip treads
inlaying matter trowels
questioning drivers
forming edge fittings
sketching blanks
overshooting spark breakers
rewriting controls
playing tunnels
inventorying buttons
enduring joint handles
effecting ratchet bibbs
unwinding couplings
forsaking vapor conduits
defining sockets
calculating heaters
raising grids
administering tiles
measuring resources
installing ignition remotes
extracting corners
manufacturing ventilators
delegating consoles
treating mounting stones
enacting jig deflectors
intensifying alleys
improvising cargo
pinpointing bobs
prescribing arc masonry
structuring metal chucks
symbolizing lathes
activating plumb kits
adapting coatings
fixing channels
expediting cordage
planning compressors
enlisting hangers
restructuring keyhole augers
shearing ridge hardware
collecting reciprocating bolts
maintaining corrugated dimmers
whetting hole collars
conducting mandrels
comparing assets
compiling sealants
completing paths
composing equivocation wheels
computing dampers
conceiving electrostatic treatment
ordering cotter grates
organizing ties
orienting ladders
exceeding materials
targeting thermocouples
demonstrating emery stock
expanding latch bases
training wardrobe adhesives
overcomming[sic] fasteners
streamlining storm anchors
navigating springs
perfecting turnbuckles
verifying gate pegs
arbitrating arithmetic lifts
negotiating outlets
normalizing strips
building surface foggers
checking key torches
knitting grinders
mowing planers
offsetting stencils
acquiring bulbs
adopting rivets
observing avenues
ascertaining coaxial grommets
slinging wing winches
instituting circuit generators
instructing wicks
integrating pry shutters
interpreting immersion lumber
clarifying coils
classifying wood bits
closing cogs
cataloging matter strips
charting holders
conceptualizing push terminals
stimulating supports
overthrowing shaft spacers
quick-freezing connectors
unbinding ground hooks
analyzing eyes
anticipating gateways
controlling proposition rollers
converting power angles
coordinating staples
correcting benders
counseling joist gaskets
recording gutter pipes
recruiting drains
rehabilitating rafter tubes
reinforcing washers
reporting guard valves
naming freize sprues
nominating rings
noting straps
doubling nailers
drafting circuit hoses
dramatizing flanges
splitting framing compounds
refitting stems
interweaving patch unions
placing sillcocks
sorting slot threads
securing mode cutters
diverting catharsis plates
procuring load thresholds
transferring syllogism twine
directing switch nuts
referring time spools
diagnosing knobs
discovering locks
dispensing hinges
displaying hasps
resending arc binders
retreading grooves
retrofitting aesthetics portals
seeking stocks
shrinking wormholes
assembling blocks
assessing divers
attaining lug boxes
auditing nescience passages
conserving strikes
constructing braces
contracting saw catches
serving installation irons
recognizing fluxes
consolidating fuse calipers
mapping shims
reviewing chop groovers
scheduling lag drives
simplifying hoists
engineering levels
enhancing tack hollows
establishing finishing blocks
13 notes
·
View notes
Note
For the WIP ask: cold
(Love your writing!)
Thank you, I'm glad you enjoy it!!!
Here we have a scene from one of the later Galidraan fics:
~
Obi-Wan woke up on a cold tile floor, which was not where he’d fallen asleep.
He tried to get up, only to find that he was cuffed to a space radiator. He tried to reach for the Force…
It was gone.
He tried not to panic. Surely Qui-Gon must have noticed he was missing. He was probably on his way right now.
“Hello there,” a voice said sweetly, as the door to the room opened.
The person who entered was humanoid, around a hundred and eighty centimeters tall, and wore some of the most generic spacers’ clothes Obi-Wan had ever seen. They had a pilot’s helmet, goggles, and a filtration mask, so Obi could only guess at their species.
“What do you want?” Obi-Wan asked.
“Just to talk,” the spacer said. “I’ve heard a lot about you recently, Ben Kenobi.”
“Clearly not enough, if you’re mistaking me for my twin,” Obi-Wan said. “I’m Obi-Wan, not Ben.”
The spacer was silent for a moment.
“...twin?” they finally asked, getting way too close to Obi-Wan’s face.
“Twin,” Obi confirmed. “I’m not Ben.”
The spacer tapped fingers against their mask. “How interesting,” they said delightedly. “There’s not supposed to be two of you.”
#asks#thanks for the ask!#ask game#terrifyingtiny-t-rex#heeheehee#this is one of my favorite segments of the galidraan au tbh#obi wan kenobi
11 notes
·
View notes
Text
Follow the Steps to Use a Tile Leveling System Correctly

After going through a lot of readings about a tile leveling system and its benefits, you could have come across several options. Then, as you need to do your tiling job, you order the tile leveling system with the necessary wedge spacers and other tools. But before carrying out the process, you should know how to use them. Even though all of the products included in the system work similarly, you should know how to use the system. So, in this article, we will discuss the basic steps that advise you to install the tiles properly.
1. First, you need to ensure that the surface is perfectly leveled to install the tiles on it. Preparing the surface means you have to make it flat as possible.
2. Occupying the tile adhesive enough to fix some tiles at a time on the surface.
3. Consider some amount of adhesive on a tile with the help of the proper tool and place the tile on the surface before firmly pushing it in place.
4. After that, take two tile spacers and add them on each side of the tile exposed to you. Ensure that the base of the tile spacer should not placed below the added tile.
5. Now, carefully lay the next tile according to the spacers used on the tiles.
6. According to the tile system you are using, slide the tile leveling wedges or clips into a hole that you will find on the top of the spacer. If you push them firmly, you can ensure that tiles stay level at a certain height.
7. If you don’t know how to properly use wedges or clips, you can use caps in their place. Fit the caps on the top of the spacer and rotate them until you feel settled on the tiles. Observing the tiles can be beneficial for you so that you can make sure that there is no lippage condition.
8. Then add more spacers and keep repeating the same step but keep observing the alignment of the tiles even if you are using caps, clips, or wedges.
9. Repeat the same process until all tiles are laid properly, and then leave the adhesive to dry. Further, you can take help from product guidelines to determine the time until the adhesive is dried.
10. Once the adhesive is dried, remove the tools to align the tiles properly.
11. Grout between the tiles, and you are done.
Summarizing
If you are planning to buy window wedges or tile leveling clips, you can refer to the products offered by “Acufloor.” They have been active in their respective domain for the decades; the company has been providing unique and innovative products for the installation of tiles correctly. They offer different products such as leveling spacers, installation pliers, bubble spacers, EZ levelers, grout line products, and many more. Further, their products are affordable, easy to operate, and efficient enough to produce flat floors and walls. For more information about the products and the services, visit their official website https://acufloor.com.
0 notes
Text
Concrete spacer supplier:-
Looking for Renovation services, plaster, flooring, plumbing services or looking for bolts & nuts or pipe cutting tools, sales, and marketing, then contact us. Anamta LLC provides three divisions manpower recruitment, general trading, and building maintenance. Contact us for any type of service. https://www.anamtallc.com/concrete-spacers.html

#Tile edge stockist#Concrete spacer supplier#Pile spacer suppliers#Rubber hoses for food industry#Concrete pump end hose supplier
0 notes
Text
I want to make a lizardhouse. like a birdhouse but lizard. stack some flat stone or tile with small spacers in between in the garden. add extra mulch around it. maybe a lil water dish nearby?
5 notes
·
View notes
Last Seen Blogs

sukablatdachotutnezanuto
allviollo

milo-vic04
Emilio

blogreinesbeauteparis75005
Reines Beauté Institut de beauté spécialisé en Soins Esthét

shotimus
Praise Helix

beta9
Restricted for betas