#ts4 tutorial
Text
Batch Edit CAS Display Index w/ S4S v3.2.0.8 (Star) and newer

I was looking around S4S full changelog until my eyes caught something interesting 👀
+ Added a batch edit menu to folders in My CC
+ Added a batch edit option to set the CAS Display Index of all packages in a folder.
🆕 + Added another batch edit option to My CC Folder menu - "Change Display Index (sorted by package name)"...
Previously, the only way you can group CC creators together is if you edit their CAS display index per packages in S4CASTools. Now, with the new S4S update, you can do so with the batch edit feature in one go!
🆕 With the S4S v3.2.1.3 update, there's now an option to change all CCs in a folder to your assigned display index number, sorted by package name. If you're looking to sort your CCs alphabetically, now you can! More details later.
⚠️ Do note that for every batch fix you do, it will create a backup folder with all the unedited files stored in \Documents\Sims 4 Studio\Batch Fixes, which can bloat your storage quickly. Do your batch fix in small batches, regularly check in-game if it works correctly, and continue. You might need to delete the backup files in the Batch Fixes folder if you’re no longer using the unedited files.
Process below:
01. Have the most recent Sims 4 Studio (Star) installed.
02. Separate files into folders based on creators. Here I have Gorillax3 & clumsyalien's ccs into their own respective folders:
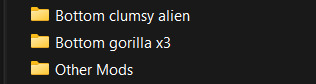
Whatever packages you put in a folder will all obtain the same CAS display index value. So if you want to have specific style of CCs sorted together, put them all in the same folder.
It's also recommended that you rename the folders to include the CAS display index value you plan to assign, so that it's easy to do batch edit again when new CCs are added into that folder.
03. Go into My CC, right click a folder, and it will show you the option to batch edit CAS Display Index & another one to sort by package name.

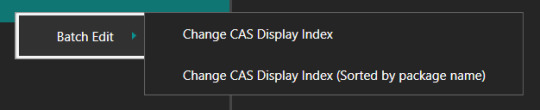
If you choose the first option: all packages in that folder will be assigned the same display index value.
Example: packageA to packageD will all be assigned 70 as its CAS display index.
If you choose the 2nd option (Sorted by package name): each package will be given the display index value you assigned + decimals so that it will be sorted alphabetically.
Example: packageA is assigned with 70 - packageB: 70,001 - packageC: 70,002 - and so on.
If you're looking to sort your CCs alphabetically or by release date (e.g. QRsims's / Rusty's CCs), the 2nd option will be best for you :)

extra info to keep in mind: it seems that if you number your creations, it will be sorted by how they're sorted in the My CC list, and not from the explorer itself. So N6 will be given a higher display index than N21.
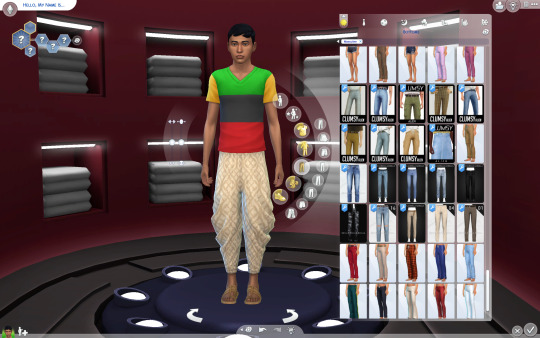
04. Once you've clicked the option, it will ask you which folder you're doing the batch fix on & the backup folder, and ask you what value you'd like for all packages in that folder. I set clumsyalien's folder to 70 and gorillax3's to 75.

There's no restriction on what value you choose. All that matters is that CAS CCs with lower CAS display index value will show up higher in the catalog than CCs with higher CAS display index value.
05. Click OK and it will tell you which files has been edited. Once you've successfully edited your files, you'll get a nicely sorted CAS CCs to browse :) Results are below:
Enjoy and happy sorting! :D
@thefoxburyinstitute
2K notes
·
View notes
Video
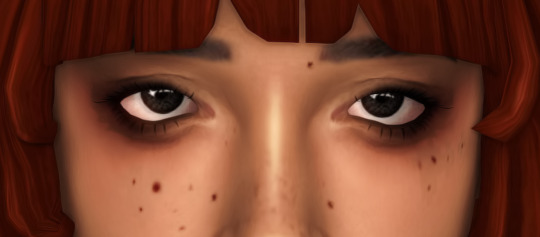
tutorial for how to update default eyes to be enabled for infants
you can use this same method to enable makeup & skin details** for infants, too.
the code i’m placing in the value box is 000030FE which was found by @fivesims (thank you, ur a GENIUS), & this code will enable something to be applied to all ages, infants included.
if you want to take eyes/makeup/a skin detail and enable it for just infants & toddlers, but keep it unavailable for all other life stages, the code you would need to use is 00003082 which was also found by fivesims!
if you want to make it so that something is available for only infants, i’m pretty sure the code you should put in is 00003080 (which i was proud of myself for being able to find myself haha)
** (i wouldn’t be surprised if it worked for other things that don’t have meshes, too—maybe eyebrows, teeth, etc, especially if they’re already able to be applied to toddlers—but i haven’t tested that for myself, so i can’t confirm or deny.)
3K notes
·
View notes
Text
Oh hey! How about another pro-tip?
Are you tired of your sims' 3D, skin detail eyelashes conflicting with their rings and other accessories? Are you fed up with downloading certain rings and other accessories only to find out you can't wear them with some skin details?
If you answered yes to either of these questions, this trick is for you! One of my dear OCs just got engaged and I found a beautiful ring for her! But when I put it on her, her eyelashes turned silver which made me want to throw large objects but then I remembered that Sims 4 Studio is our friend!
Take your eyelashes (we're probably all if not most of us, using Kijiko's skin detail version or the MM skin detail eyelashes but I only did this with Kijiko's) and switch them to a new category! I hardly ever use Occult Details so that's where we're going:
There's plenty of options to choose from here, it just depends on what you use and don't use.
Copy the file you want to relocate into your S4S mods folder and open it up:
Click on categories, find your Occult options, apply to all swatches, save the package, and BOOM!
*Note: The reason I used Kijiko's sunglasses version rather than the skin detail version is because for whatever reason, the skin detail version is tied to rings so even when I moved it, I got silver eyelashes with the ring she was wearing.
I used vampire cheeks because again, i'm not using anything in there that would conflict!
I did this same method with her engagement ring because Occult features stay on no matter what outfit you're in. So it saves time rather than adding the engagement ring to every outfit (unless you don't want them sleeping in it, makes sense).
Anyway, some of you may be on to changing categories in S4S to fit your gameplay, and some of you may not be. I hope this helps someone! Its super easy and will save you the headaches!
2K notes
·
View notes
Text
mutt's guide to using dsr on ts4, with pictures!!!
ok so, dsr is a thing available for nvidia gpus that allows you to take veeery high resolution screenshots of games without much trouble, like this
it's an alternative to srwe, as it plays nicer with a lot of reshade shaders and is just, generally more nice to use! let me teach you how to use it - full tutorial with pictures for every step under the cut (im sorry its too long without the cut)
step 1: right click your desktop and open the nvidia control panel
step 2: go here (adjust desktop size and position)
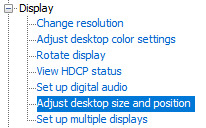
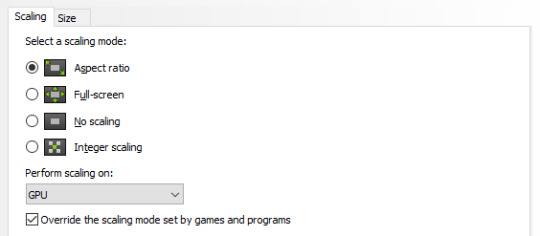
step 3: make sure your settings are set as follows! this is important
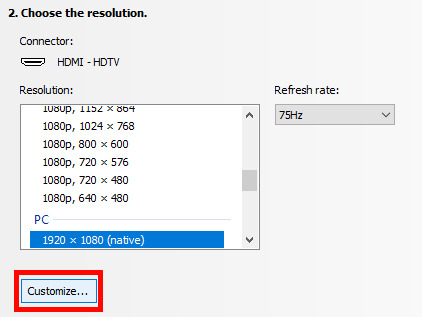
step 4: now, go here (change resolution)

step 5: under change resolution, click on this button (highlighted with a red square)
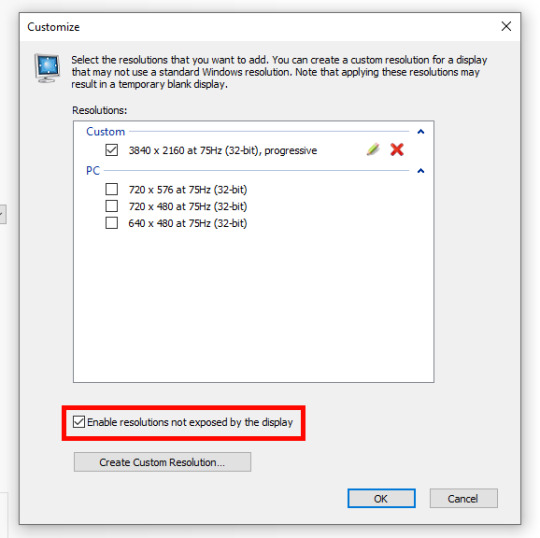
step 6: in the windows that appears, make sure that "enable resolutions not exposed by display" is ticked! this is very important! (again, highlighted in red - it should look like this)
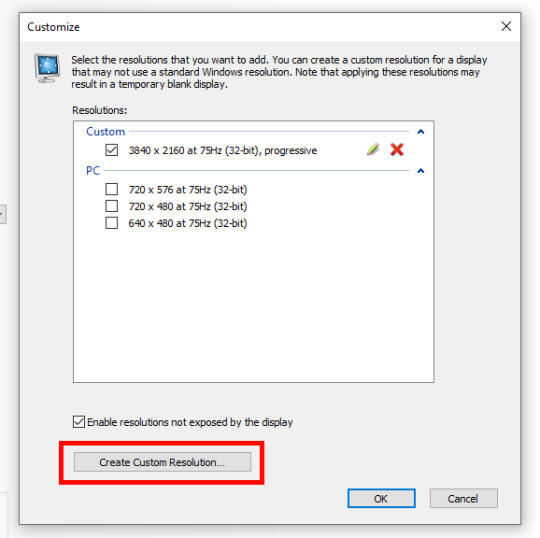
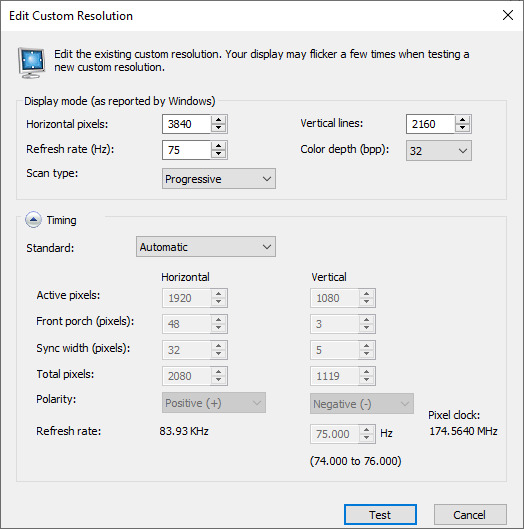
step 7: now, click on "create custom resolution"
step 8: this is where you set your desired resolution, and where i get a bit rambly; so, in my opinion, there is ZERO reason to go above normal 4K for TS4, as it's generally not a really high-poly game and it has rather simple graphics. you can fuck around a lot here, but if you don't feel like it, here are my settings - this will give you 4K screenshots. NOTE: THE REFRESH RATE DOESN'T NEED TO BE 75! SET IT TO WHATEVER THE REFRESH RATE OF YOUR MONITOR IS!
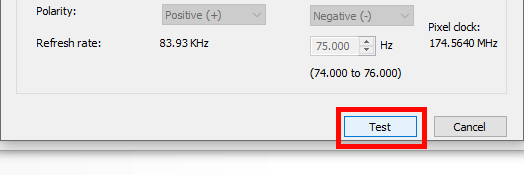
step 9: now, click on test
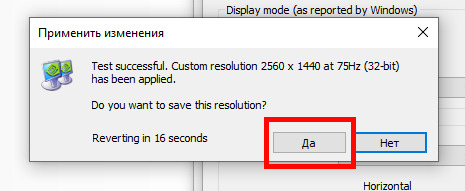
step 10: let the thing load, and after it's done, a window like this should pop up.. but yknow, in your language. click on "yes" (or accept or ok!! idk mine's in russian; basically, the button highlighted here!)
step 11: click "ok" in the window that pops up! like this! afterwards, close the nvidia panel

step 12: open the sims 4 and go into game options, then into graphics
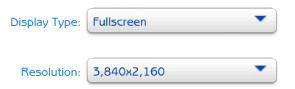
step 13: set your "display type" as "fullscreen", like this

step 14: under "resolution", select whatever resolution you setup earlier; in my case it's 4K, so if you used the same resolution, your settings should look like this
step 15: click on apply changes!
AND UR DONEE!! WAHOOIEE!! now, take your screenshot using reshade, and then go back into sims settings and set it back to what you usually play at, then apply changes!
every time you need to take an HD screenshot, simply open game settings and use your custom resolution! that's it, have fun :3
#sims 4 tutorial#ts4 tutorial#sims 4 screenshots#ts4 screenshots#sims 4 screenshot tutorial#ts4 screenshot tutorial#sims 4 hotsampling#ts4 hotsampling#srwe#nvidia#dsr#tutorials
601 notes
·
View notes
Text

Tutorial
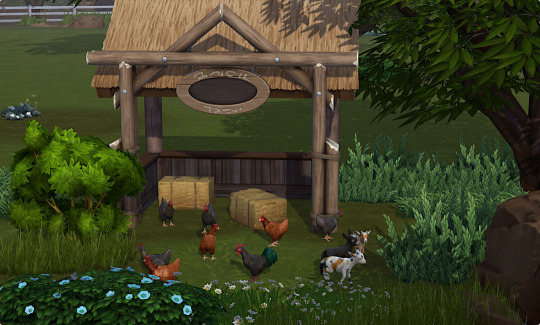
'Fenceless' goat/sheep enclosure
Use the 'Hazard Tape', the goats/sheep won't cross it.
Then decorate to your liking to cover up the tape :3
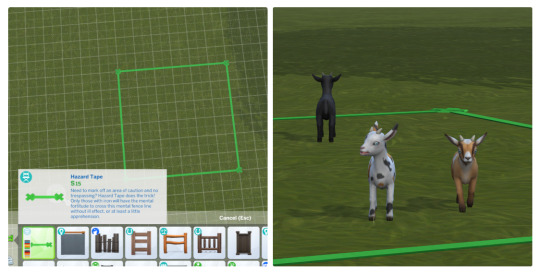
EDIT: Chicken stay inside too!
#ts4 tutorial#the sims 4 tutorial#simblr#sims 4 horse ranch#sims 4#ts4#goats#chestnut ridge#rider's glen
455 notes
·
View notes
Text
ts4 in hq | tutorial
this tutorial is for nvidia graphics card users only.
download & install geforce experience
open the geforce app and hover over the sims 4 in the games & apps panel. select the details option.
click the wrench icon beside the optimize button in order to customize your resolution settings.
from the resolution dropdown menu, select your desired resolution. mine is set to the highest dynamic super resolution of 3840x2160. be kind to your rig when making a selection and don't push too far if you don't think your computer can handle it.
from the display mode dropdown menu, select windowed borderless. i use this setting because i'm able to alt+tab out of ts4 to my desktop or other windows i may have open.
click apply and you're good to go. next time you launch your game it will open with these settings. should you change the resolution settings in your game for whatever reason, you'll need close the game and start from step #2 again for the game to display properly with these settings.
115 notes
·
View notes
Text
tutorial contents:
1 ‣ gshade & photoshop actions
2 ‣ template or cropping & colouring
3 ‣ notifs & pop-ups
okay hi! i have a really old editing tutorial from back in january that i've been linking people to, but it's pretty outdated by now. i also keep getting anons asking about the same things, which is fine, but i always have to go searching for the post explaining it, so having it all in one place will be a lot more convenient lol
i use a ☠ copy of photoshop cc 2017 to edit my screenshots, however the majority of everything i'm doing also works on photopea
photopea is an online version of photoshop that's 100% free and works very well! i can't recommend it enough, it's fantastic
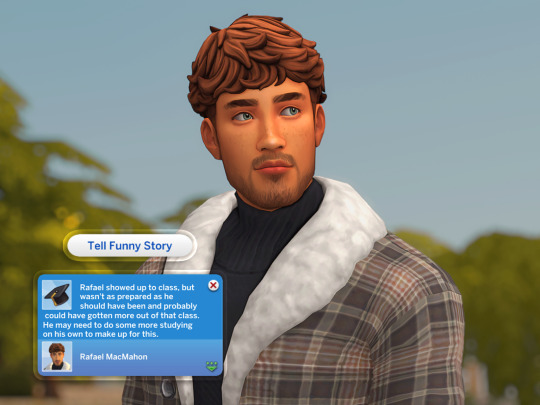
first things first, you're going to need some screenshots to edit. for the sake of this tutorial i'll be working with this one of raffy:
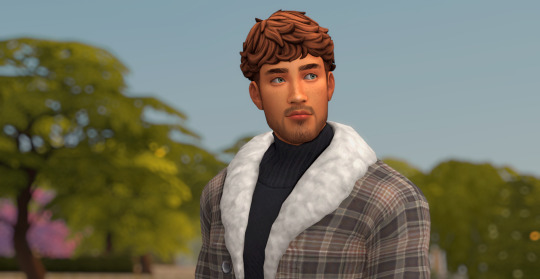
in all honesty, gshade will do most of the work for you. of course it's not needed, but i definitely don't think i could live without it! in this screenshot i used sunset n' vinyl by nesurii
when opening the screenshot, the first thing i do is run it through 2 photoshop actions:
butter action by early-grape
smooth sharp (no topaz) by poolbrop
to add actions in photoshop go:
windows > actions > the 4 lines at the upper right corner of the newly opened window > load actions > your downloads folder > open up the .atn files!
if you're using photopea, as far as i'm aware you can't use photoshop actions, but i've found that 'filter > stylize > oil paint' and 'filter > sharpen > smart sharpen' have a very similar effect when using the right settings. try these:
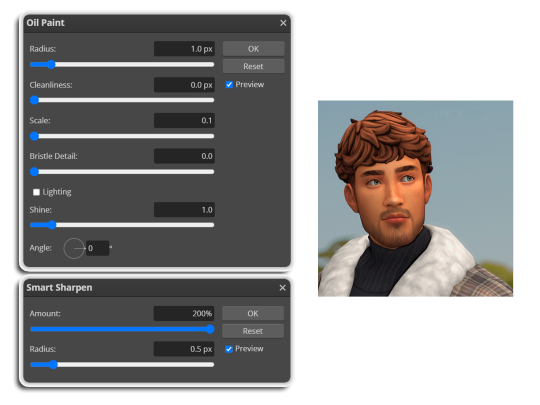
i like these two actions because they smooth everything out nicely, but keep it sharp at the same time! i always run butter before i run smooth sharp, however butter may leave you with 2 layers. make sure to merge these layers before running smooth sharp to achieve the full effect.
here's a before and after (of the photoshop action):

from here you can move on to step 2
before anything else i want to share the template that i use to make editing a lot faster. you don't need to use it but it's definitely made things a lot easier for me! it's a .psd file and will work perfectly in photopea
download (simfileshare)
if you're using the template you can skip right on to the next section, as it's already cropped to the right size and has the colouring folder included. just drag your screenshot into it and resize to fit the height.
if you're not using it, crop your edited screenshot to:
1707 width x 1280 height
then adjust the colours to your liking. it always varies slightly depending on the picture but my regular process for each screenshot would be:
up the saturation by 8%
up the lightness by 3%
up the contrast by 12%
all of this can be done by looking in the 'images > adjustments' tab
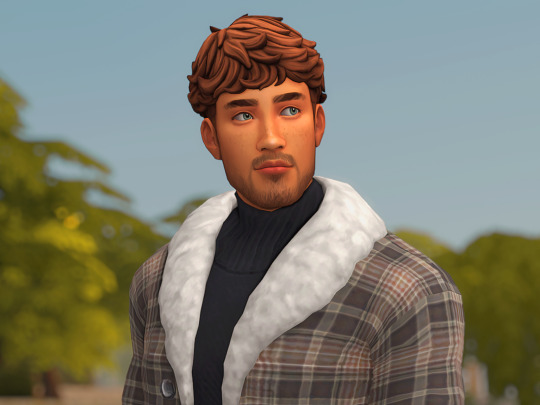
you should end up with something similar to this!
if you want to add a moodlet or social interaction or anything similar, it's all the same process. what you'll need is a screenshot of it straight from the game. i just press the 'c' key to capture them! i'll be working with these two:
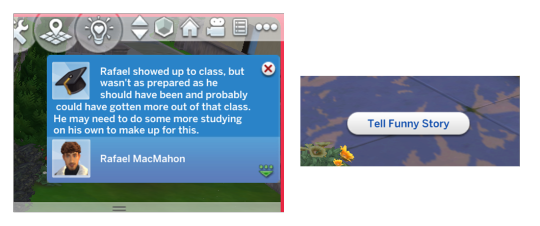
for the blue notification i'm going to select it using the box select tool. try to get it as exact as possible. one you have it selected
for photoshop users:
click on the 'select and mask...' option located at the top
adjust the global refinements at the side as follows:
smooth: 70
feather: 0.0px
contrast: 50%
shift edge: 0%
for photopea users:
go to select > modify > smooth
set it to 15
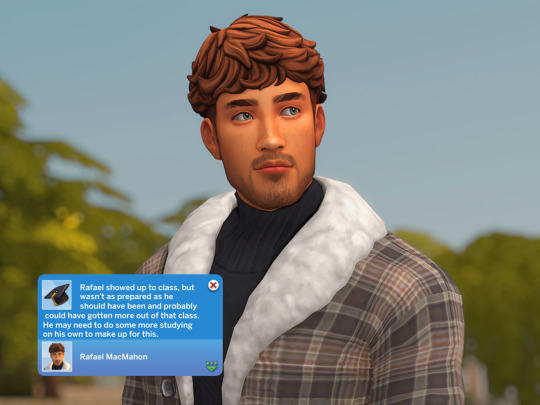
select 'ok' and press 'ctrl + c' to copy it, then 'ctrl + v' to paste it into your screenshot. adjust the size and position and you should end up with something like this:
next you want to add the transparent border around the notification. if you're using my editing template, right click on the reference notif in the layers tab and select 'copy layer style' (photopea > 'layer style > copy'). from there you can paste that layer style onto your own notif through the layers tab.
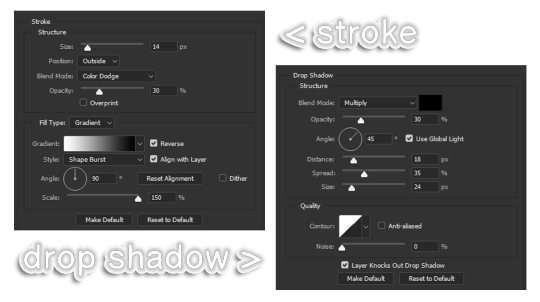
if you're not using the template, here's how to set it up on photoshop:
right click your notification layer and select 'blending options'
under styles, tick the checkboxes for stroke and drop shadow
input these settings:
on photopea, it should be more or less the same. repeat the exact same process with the social menu option, but instead of selecting it with the box select tool, use the magic select tool. in the end you should end out with this!
from here you're finished! thanks for reading! go to file and export as png
if you've got questions never hesitate to ask, just make sure to read the faq in my pinned. i might edit this post soon to include the gen intro traits and aspirations bit, but this is all for now. hope it helps, my editing process post has been in need of a revamp for a very long time. i haven't proof-read this so apologies for any mistakes!
#ts4#sims 4#ts4 tutorial#5 anons in my inbox asking the same question after not reading my faq#this ones for you#3 anons in my inbox asking about cas pics#ones coming for you soon#okay maybe not soon but sometime#all my free time has been eaten up#i signed up for extra saturday morning classes and not having a lie in is sucking the life out of me lmao#when i'm busy i just wanna play video games and when i get the chance#to play games i just wanna sleep#its a vicious cycle#i'm currently playing resident evil biohazard tho#enjoying it very very much#i've only got 2 and 3 left to play and i've played every mainstream re game 💪💪#it was a very fun journey! i played them all within this year#long post
1K notes
·
View notes
Text
wrixie's guide to default eyes 🤩
welcome to my guide on making default eye colors for the sims 4
this'll be my first ever tutorial and it's a big one so please bear with me!
if you have any questions please don't be afraid to send me a message!
here you will hopefully learn how to: make defaults for humans, aliens and vampires as well as cats, dogs and mini goats and sheep!
-> i'm unsure about how to do cottage living animals anymore due to s4s changing and the foxes are currently bugged to be gray :( BUT i will provide my files so you can just recolor them and merge them back together down below
you will need a few things to start:
sims4studio, photo editing software such as gimp or photoshop to create and edit your textures, some meshes that i've provided + these body templates
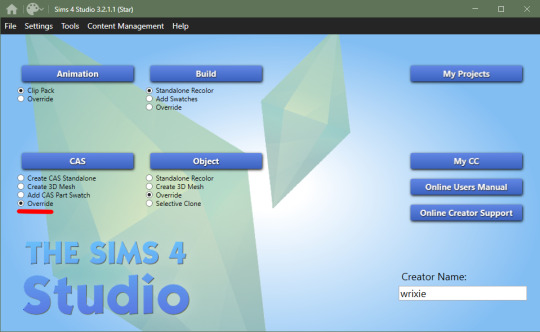
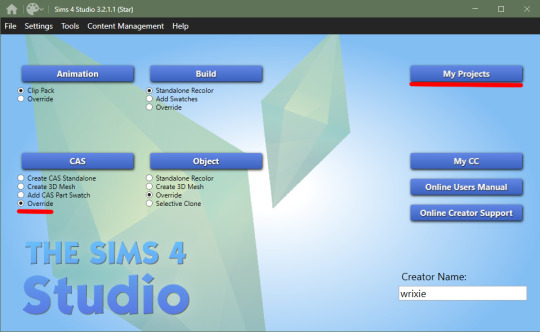
human defaults (and beginning steps):
open up sims4studio, locate the CAS button, under that you should have 'override' ticked instead of the default 'create CAS standalone' then click the big CAS button to go to the next step
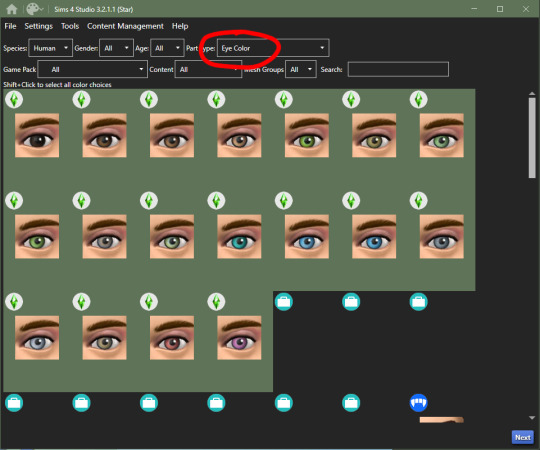
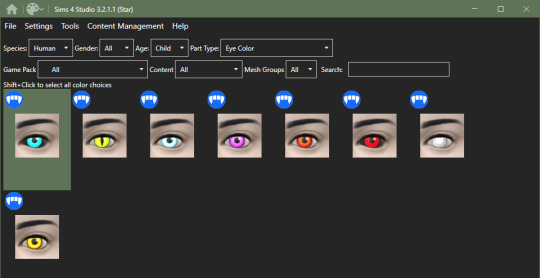
2. you'll see a few drop down menus, locate 'Part Type:', scroll down until you find 'Eye Color', we're doing human eyes so shift+click all of the base game default colors and click next
3. save your new .package file what ever you please i recommend something like -> yourname_eyename_default <- make sure to have it save into your mods folder or somewhere where you can easily access it (i saved mine into my mods folder)
4. this is where you'll import all your eye colors - assuming you've made your eye textures, locate the 'Texture' box in the 'Texture' panel, you'll see three maps: Diffuse, Shadow + Specular, import your eye texture in the 'Diffuse' texture for all of your eye colors, click on 'Specular' then click on the purple 'Make Blank' button to get rid of the cloudy shine on the default eyes (you'll have to do this manually for each swatch)


alien eyes:
you'll do the same as the human in terms of selecting 'override' in the CAS section then locate 'Part Type:', scroll down until you find 'Eye Color', but instead of selecting the human eyes, we'll select the all of the alien eyes with shift+click - they don't have previews for some reason

2. then you can follow the previous steps, save your file under yourename_eyename_aliens_default into your mods folder
3. same as the humans, import all of your alien eyes into their proper swatches but this time there's two more maps: Normal + Emission - you do not need to touch these for aliens as alien eyes do not glow and the emission map is for glowing textures (i have no idea how to do this)
4. make your 'Specular' maps blank and click save!
vampire eyes:
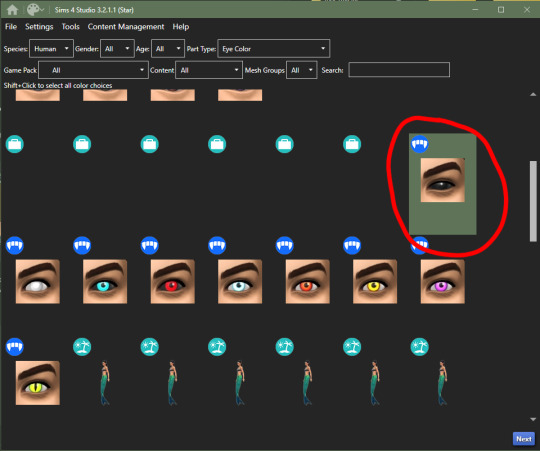
do the same as the others in terms of selecting 'override' in the CAS section of the main menu, locate 'Part Type:', scroll down until you find 'Eye Color', but instead of selecting the all of the human/alien eyes, we'll be selecting the black swatch for right now - this black swatch is for all ages
2. import your black swatch in 'Diffuse' and make the 'Specular' blank
3. this is where you can veer off and follow a different tutorial to get the glow of the vampire eyes or you can continue without it here; go into your photo editing software, create a 1024x2048 image and fill it in completely with black and save it as emission (this is what you'll use to lose the glow and make the eyes work)
4. in the 'Texture' panel, go to 'Emission' and import your black image you just made and save it as -> yourname_eyename_vampires_black < (or what have you)
5. now change the 'Age: All' to 'Adult', select the next eye color, save it as the color it is and follow steps 2 - 4
6. after completing all of your adult swatches, change 'Age: Adult' to 'Child' and repeat the steps you just took with each eye color you will have to do the same with toddler and infant eyes as well; save child files with _CU in the file name, _PU for toddlers and _infants for ya know... infants
7. once you have all your swatches done, make sure to test them before this next step (merging the files into one, this is an optional step but highly recommended) go back to the main menu and under 'Content Management' click 'Merge Packages..'

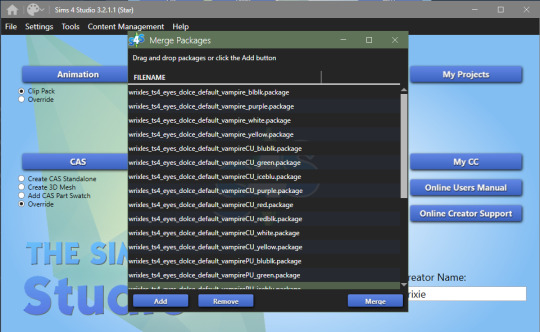
8. click 'Add' and select all of your vampire eye files, click 'Merge' and name it what you want
cats & dogs:
with sims4studio open, the CAS section should still have 'override' ticked, click CAS again and in the drop down menus, change 'Species: Human' to Large Dog, Small Dog, Cat, Foxes, or Horses; if you don't have the textures already, export the default texture so you have it as a base

2. import each of your textures in the 'Diffuse' map and make your 'Specular' map blank for each color and save
3. for heterochromia you can use these meshes - edit the textures to add your own, import your texture to the 'Diffuse' map and make your 'Specular' map blank for each color and save as _heterochromia
4. remember to test before merging - go back to the main menu and under 'Content Management' click 'Merge Packages..', add your files and merge them
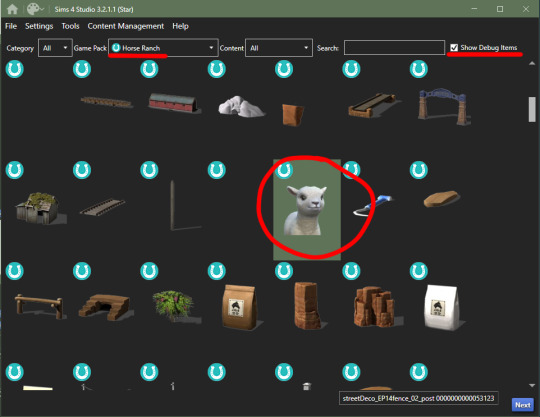
mini goats & sheep:
in the Object section of the main menu, tick 'override' and click the Object button

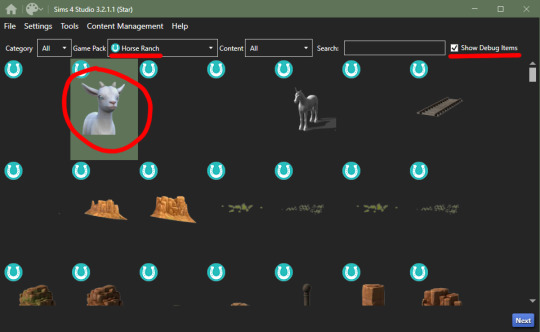
2. in the 'Game Pack' drop down menu, choose 'Horse Ranch' and tick 'Show Debug Items' and at the very top, you should see the mini goat, select this and click next save it as what you would like to
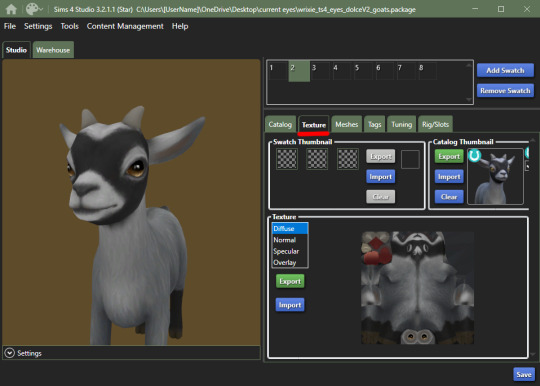
3. go into the 'Texture' tab and export all the goats textures if you haven't already made your eyes - when you have your textures done, import them into the 'Diffuse' map for each swatch and save
4. go back to the main menu and repeat steps 1 + 2 but instead of selecting the mini goats, scroll down until you see the mini sheep, should only be a tick or two down and then repeat step 3
cottage living:
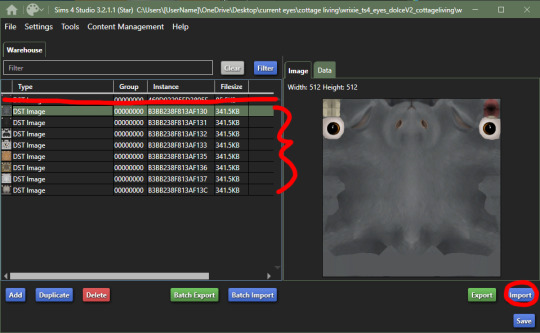
go to my folder and download the meshes you need here i'll go through recoloring each animal, we're going to start with the wild rabbits; open the rabbits file
ignore the top file you don't need to edit this
'Export' (not the batch export) each rabbit texture, open them up in your photo editor and add your own eye texture then 'Import' each of them in their proper swatch and save
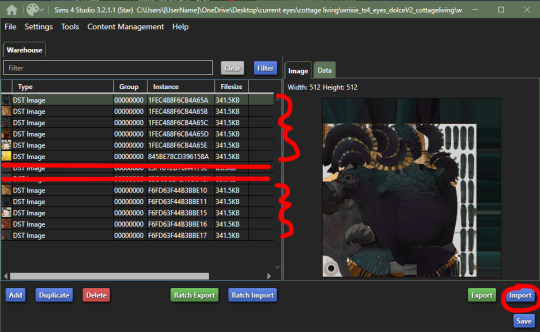
next will be the llamas, open up the file, you might be put into the 'Warehouse' tab, switch over to the 'Studio' tab
export all the 'Diffuse' textures of each swatch, open them up in your photo editor and add your own eye texture then 'Import' each of them in their proper swatch and save
cows are next, open up the file, ignore the top file and 'Export' the three textures then edit them in your photo editor to add your own eyes
'Import' each swatch in their proper place and save

lastly, for now, are the chickens, open up the file in sims4studio, 'Export' the first 6 image files, ignore the next 2, then export then last 5 and repeat editing and adding your own eye textures to them
once that's done, 'Import' all your swatches in their proper places and save
how to convert non-defaults/contacts to default:
1. open up sims4studio, locate the CAS button, under that you should have 'override' ticked instead of the default 'create CAS standalone'
2. before clicking on the CAS button, go to My Projects and open up the contacts you want to make default and 'Export' each color to save it on your computer
3. now you're going to basically follow the beginning steps again, go back to the main menu and click the big CAS button, then it's 'Part Type: Eye Color', shift+click all human eyes or vampire or alien eyes and hit next (i'll be doing human eyes) if you were put into the 'Warehouse' tab switch over to the 'Studio' tab.
4. 'Import' your textures to each swatch to the 'Diffuse' map and make the 'Specular' blank and save!
181 notes
·
View notes
Photo


With many of us now using the EA app instead of Origin, and with a pretty huge update to the game just around the corner, it’s worth checking if you have automatic game updates enabled.
If you use mods and/or cc in your game you can expect a hefty amount of breakage and chaos in the days following such a big update.
To avoid having to take out all your mods and cc, if EA app works the same way as Origin did, you can instead turn off automatic game updates so the patch doesn’t apply, and then go offline. That way you can continue to play with all your old mods and cc until the modders and content creators have updated them. It gives YOU control over when and how you update.
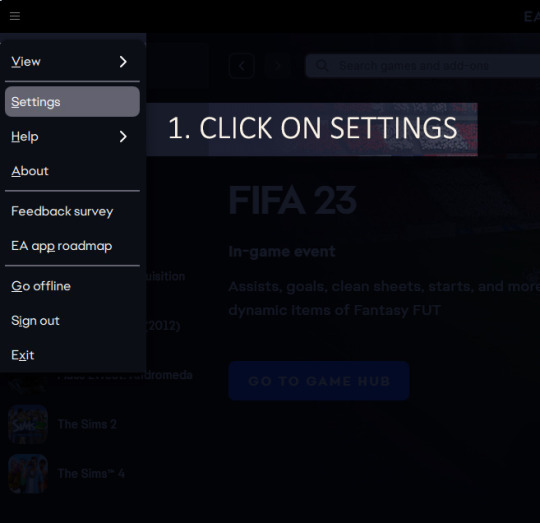
From the main menu icon (three horizontal lines) in the top left corner of the EA app click on SETTINGS
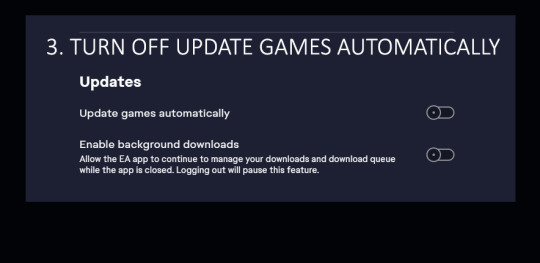
Next, click on DOWNLOAD
Underneath the Updates section, turn off UPDATE GAMES AUTOMATICALLY (it is OFF in my picture above)
Go back to the main menu icon and click GO OFFLINE
You can now play The Sims 4 without the latest update automatically installing.
Of course, if you simply can’t wait to play the new update (and I won’t blame you, it looks great!) remember to expect lots of broken things and consider removing your mods and cc and starting a fresh save while you check out the new fun things, and keep your regular save games on hold for when your favourite content is updated.
857 notes
·
View notes
Text
[ReShade 5.1+] No More CAS UI & More
Well, dang. I guess it is possible after all. I was looking for a way to hide the UI in CAS via some complicated method, but instead found a site which led me to this guide to a ReShade add-on called ShaderToggler 🤩 I haven’t found someone create a TS4 tutorial for this yet so here ya go.
If you find this useful, do share the word around! All I ask is that you link back here if you want to share outside of tumblr :-)
📌 UPDATE 31/03/2023: For tutorial on how to prevent shaders from affecting UI, please check out my new tut in Clear UI of Shaders & More! Have fun💖
📌 UPDATE 05/04/2023: I’ve added one additional step in the installation section for GShade users! Thanks to @loveatfirstsim for the new addition😁 I’ve also updated the previews gifs to reflect the current setup for shortcuts.
📌 UPDATE 15/08/2023: added new toggle groups to hide CAS BG & mirrors.

How it works:
One of the features of this add-on is the ability to toggle on/off in-game shaders: UI, geometry, post-processing effects, and more (not reshade shaders). You do that by putting certain shaders together into a group which you can then toggle on/off. This is quite useful for CAS shots as you can't hide the UI when you use ReShade/GShade (unlike build/live mode where you can simply press tab).
This add-on is made by Frans Bouma/Otis_inf so huge credit to him as without this add-on this wouldn’t be possible.
Keep in mind that this add-on doesn’t prevent shaders (bloom/dof/mxao) from affecting the UI, it just hides the UI shader from view. This, along with a shader like ChromaKey/DepthAlpha that allows for transparent backgrounds, makes a great duo! No more cropping to exclude the arrows and editing out the background manually 🙌 (unfortunately alpha hair suffers a bit from it.)
What you’ll get by the end of this post:
A ShaderToggler.ini file that will hide CAS UI elements with the option to either leave the sim/trait icons and trait selections intact for posing your sims, or hide everything except for your sim. Great for taking close-up shots.
There'll also be a toggle to hide infant pillow in CAS, hide CAS BGs & mirrors, and hide camera UI when your sim is taking a selfie/picture in-game.
ReShade/GShade requirement:
For Reshade users: tested on Reshade 5.8.0 (w/ full add-on support), but it should be compatible with ReShade 5.1+.
For GShade users:
To check if your GShade supports add-ons: check the ReShade version it's based on in the shader notification at startup, similar to the menu here (GShade x.x based on ReShade x.x). You can also check in the reshade panel and see if there's a menu for add-ons.

DOWNLOAD .ini file:
SimFileShare / Google Drive
📌 UPDATE 15/08/2023: Updated .ini file to add new toggle groups to hide CAS BG meshes and mirror reflections.

Installation:
First, make sure that you have the correct ReShade with full add-on support!
Grab the add-on from this github release. For non-legacy players, grab _v121.zip. For legacy players, grab _x86_101.zip
Extract the ShaderToggler.addon file into the game’s \Bin folder where your TS4.exe/TS4_64.exe is (where you had also installed ReShade/GShade).
Still in the \Bin folder, drop the ShaderToggler.ini file you downloaded. You’ll end up with both ShaderToggler.addon and ShaderToggler.ini in the same folder as TS4.exe/Reshade.ini.
The .ini file should be named ShaderToggler.ini for the add-on to recognize it. So, if you download another file from someone else with a different name, you should rename it back.
If you’re a GShade user: there’s a folder called gshade-addons; this is where you should place the ShaderToggler.addon file. Just move the add-on from the \Bin folder to the folder mentioned and you’re good.
Open up your game. If you see the add-on & list of toggle groups in the Add-ons tab, then you’ve successfully installed the add-on & settings! Restart if needed.
Shortcuts (Updated):
Toggle main CAS UI (traits & trait selections excluded): Ctrl+ ]
Toggle sim/trait icons & trait selections: Ctrl + [
Toggle pillow for infants: Ctrl + ; (semicolon)
Toggle camera UI when sim is taking pic/selfie: Ctrl+ ' (apostrophe)
Toggle CAS BG mesh: Alt + ]
Toggle mirrors: Alt + [
Previews:
in CAS:
🆕 Hide CAS BG & mirror reflections:

in Live mode (for Camera):
note: you can use the hide pillow toggle to hide the phone object.
Info:
Q: Will this work with custom CAS Backgrounds?
A: Yes, it will! CAS Backgrounds (and sims) are grouped differently than UI shaders so they won’t be affected by this toggler. For example, you can toggle off the hair, face mesh, body mesh, and parts of the CAS background separately as they’re all contained in their own shader group.
Q: Does this work on Detailed Edit Mode?

A: Yep :)
Q: Can I assign another shortcut key for the toggles?

A: Yup! In the Add-ons menu, expand the Shader Toggler tab, go to the List of Toggle Groups section, click Edit, and assign the Key shortcut to the button of your liking. Make sure to save all toggle groups so that you don’t lose your edits.
Q: I’d like to try out this add-on and make a toggle myself. How can I do that?

A: The Shader Toggler tab has all of the required information stored under the General Info and Help section, so best to read it as the info comes straight from the dev. There’s also a video example linked in the information page if you prefer that.
Do note that it requires a numpad to configure, so use the On-Screen keyboard with numeric keyboard active if you don’t have a physical one.
Q: Will this work in build/live mode?
A: Not fully, but yes. I’ve made this toggle with CAS in mind so I don’t see the need to cover all UIs in those modes as you can hide them easily with the tab button. It’ll most likely miss a few UI shaders here and there but it should work.
tagging @thefoxburyinstitute :-)
#ts4 tutorial#ts4 resources#ts4 reshade#ts4 cas#the sims 4#tutorial#t: shader toggler#reshade tutorial#t: reshade add-ons#hide cas ui#sims 4#vyx.resources
1K notes
·
View notes
Text
PXL'S Anatomy of Screenshots
So you want to take better screenshots? There are multiple factors to consider, and if you don't enjoy tweaking reshade settings for every image, my ultimate method may not be for you. That being said, there are tips and resources in this guide that are applicable to everyone and you can select to explore those that are useful to your specific situation.
Disclaimer: I am not claiming to be an expert, nor am I offering to provide troubleshooting on an individual basis. This is a general guide and if you are unfamiliar with any of the concepts, please use the mighty power of the internet to find tutorials. I promise everything that I have learned over the years has been published and documented a thousand times better than I ever could.
There are five factors to address:
Your computer's inherent capabilities
The game's limitations
The mods you're using
Reshade
Post Processing
Graphics Card Settings & Drivers:
Become familiar with your graphic options. If you don't have a dedicated graphics card (i.e. a desktop or gaming laptop, these features may be unavailable and you should skip.)
I have an AMD Radeon Pro card which is designed for workstation level systems. It's overkill for sims, but useful for 3D rendering and modelling work. I have changed the following settings for DirectX 9 applications:
anti-aliasing - enhance application settings
anisotropic filtering - enabled
anisotropic filtering level - 16x
texture filtering quality - high
surface format optimization - high
Consider overclocking your graphics card to unlock it's full potential. DO NOT pursue this venture unless you are ok with the risk of burning out your card prematurely. I use at present, overclocked Bootcamp Drivers from BootcampDrivers.com obviously, if you're not playing on an intel based mac through Bootcamp, this is irrelevant to you.
None of these settings are useful until you address the default games limitations, which leads nicely into the next factor.
Addressing The Sims 4's Graphic Limitations:
Everyone should be familiar at this point with lighting mods, 4k, textures, disabling ssao, etc. but, I'm still going to spell it out. None of this is new information and has been covered many a time by various players ad nauseum.
remove ugly blue toned lighting in the world by choosing a lighting mod from @softerhaze here
overhaul your graphics.cfg file (i use a custom blend with features specific to me), however @simp4sims has done a ridiculous amount of work in providing a simple to install file that can be found here - read through their tutorials!! they have provided an excellent oversight of exactly what this does and why it matters
improve the indoor lighting for your sims - previously i used @luumia's no blu, no glo - recently i switched to @northernsiberiawinds better in game lighting mod here, though i have tweaked some of the settings to suit my own personal preferences
i don't use the HQ mod, i don't find that it makes enough difference for the amount of effort it requires to convert CAS CC
It should go without saying, but tweaking your graphics config file is absolutely useless if you can't play TS4 at it's maximum in game graphic settings!
The Mods You're Using:
Now that you've put in all this work into getting the game ready to make use of quality mods where do you start? Well, the CC you install matters. Whatever your preference, whether it be maxis-match, alpha or somewhere in between, priority should be given to using items textured in 2k or 4k resolutions, and specific attention should be paid to using wall and flooring textures with bump maps, and or high quality resolutions (this is important later for reshade if you intend to learn about ray tracing).
I will separately post a guide to creators with crispy textures because that is it's own novel.
Reshade:
Phew. Still with me?
There are many many many reshade presets out there, most are alike, but none employ ray tracing, and that is because a) it needs to be manually adjusted for every screenshot, b) they are paid shaders, and c) this requires advanced knowledge of reshade and a decent enough graphics set up that won't overheat - games running native ray tracing recommend a minimum VRAM of 8GB (please note RAM and VRAM are not the same) - i therefore do not recommend pursuing this option if your system does not meet those minimum requirements.
Start here to understand what ray tracing for reshade is. In my opinion, the shaders are well worth the price of $5 for the amount of work that has gone into creating them by the talented Pascal Gilcher. That link is a comprehensive starting point into expanding your knowledge of reshade and it's capabilities.
I have always created my own reshade presets from scratch, and while the core colorization settings I utilize remain largely the same, using ray tracing and re-light means every screenshot needs to be manually adjusted (lights repositioned, bounce and AO factors adjusted, etc) before being captured. @pictureamoebae just published a very timely post discussing the re-light shader and you can read it here.
Post Processing
Reshade does 99.99% of the work that traditionally would be accomplished in a photo editing software like photoshop. Occasionally, I need to adjust exposure manually, add depth of field manually, or color correct. Beyond that I use it to scale images to fit the resolution and file size limits of various platforms. Conceptually this reduces the amount of uncontrolled loss encountered when platforms like tumblr auto compress files that are too large. In reality, tumblr still makes images crappy compared to how they appear in my file folder.
optimize your images for various social media platforms using this guide
fix exposure or colorization issues using a software like photoshop
I hope that this gives you a starting point into expanding your methodologies. My process is continuously evolving and I find this aspect of the game most entertaining. For others who don't enjoy this process, it's probably not worth it!
Thanks for reading ❤ PXL
267 notes
·
View notes
Text
How to create visual "custom categories" with the new Sims 4 Studio Batch-Edit
As discovered by @vyxated Sims 4 Studio now supports batch-changing the Display Index number which allows you to easily sort your CC (see post here)
Using that, you can create visual "custom categories" for any existing category to sort your CC into smaller groups that share a thematic.
━━━━━━ ・❪ ☾ ❫ ・ ━━━━━━
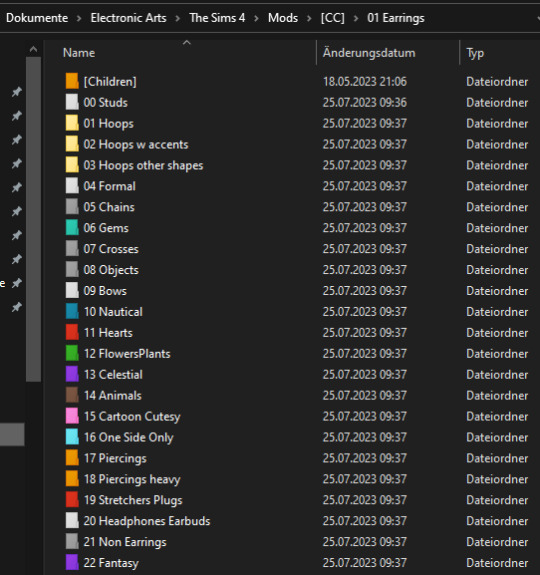
Step 1: Creating folders
First you need to sort your CC into whatever categories you want.
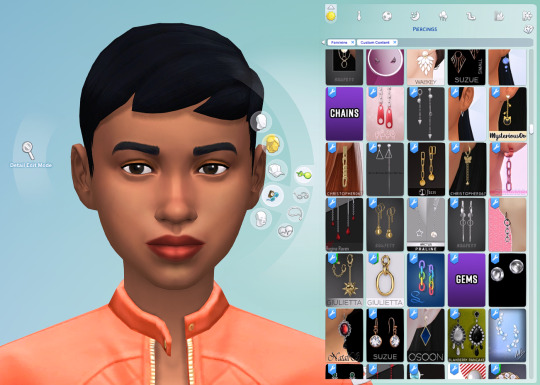
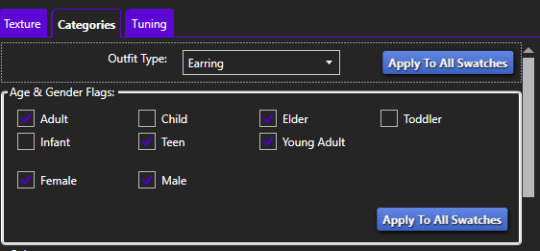
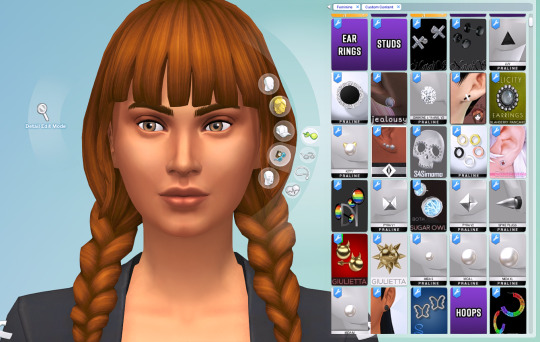
I am sorting my earrings.
( I use Folder Painter to get colored folders)
━━━━━━ ・❪ ☾ ❫ ・ ━━━━━━
Step 2 (Optional): Creating dividers
I highly recommend you to make some sort of divider for your categories (basically like my TidyCAS).
For that, in S4Studio start out by cloning any basegame CAS item.
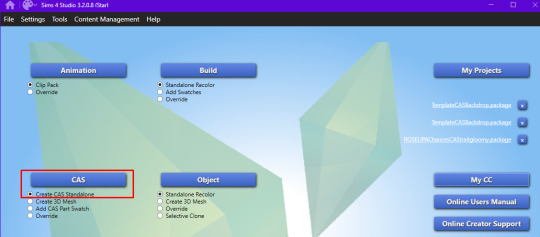
I usually always use the sunscreen facepaint, but it doesn't really matter, you shouldnt use smth with a mesh.
Or you can download this file and place it in Documents\Sims 4 Studio\Mods.
It has no texture, is enabled for a lot of things and disabled for random.
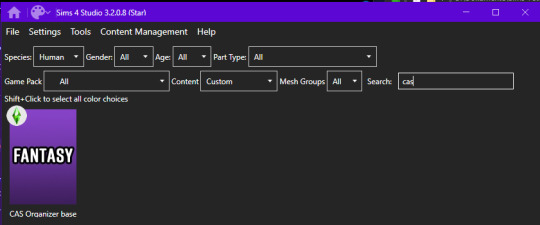
IMPORTANT: For every new divider you want to create, you have to clone the CAS item from S4Studio again. You cannot simply duplicate your divider CC and simply change it.
Save it as the number and name of your category. For me it would start with "00 Studs".
In that file, first import any type of custom thumbnail you want to use to display the category name.
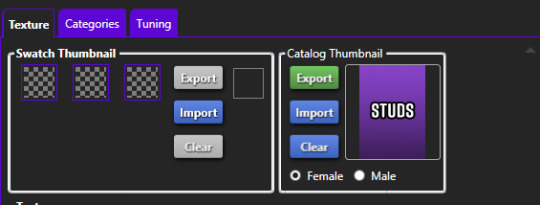
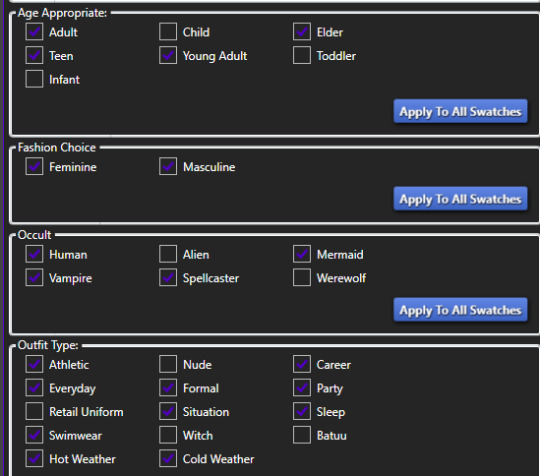
Then, change the category to whatever category you are working on and enable it for all ages, genders, fashion choices & outfit types you want and disable it for random.
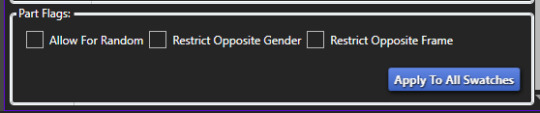
Now if you want, import an empty texture to get rid off the sunscreen, but since you won't apply that CC, it won't matter.
Download the empty texture here
Make sure to place the dividers OUTSIDE your sorted folders.
━━━━━━ ・❪ ☾ ❫ ・ ━━━━━━
Step 3: Batch processing in S4Studio
Now you want to batch process your folders in S4Studio.
First click on "My CC" and let it load.

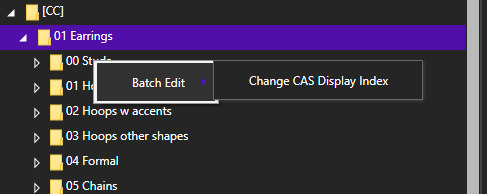
Now right click your first folder and select "Batch Edit - Change CAS Display Index"
In the next window, press "Run".
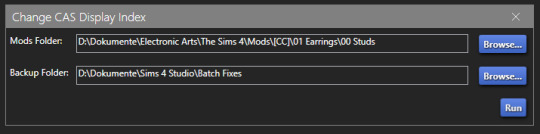
Then, enter whatever number you want to start with.
The smaller the number, the higher up the content is. You can go into negatives and the limit is a veeeeeeeeeery high number.
If you just want to sort some normal CC, I recommend starting with 0 simply.
For the next folder I then always go up by 10, so 0-10-20-30-etc.

Then press "OK".
You will then get a popup with all your changed files (I sorted mine before so it's non lol)
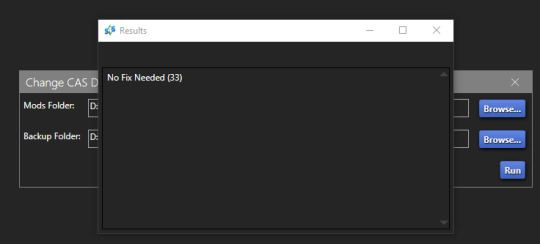
Note: Keep in mind that it does not sort your CC alphabetically.
Apparently it's by last modified date.
━━━━━━ ・❪ ☾ ❫ ・ ━━━━━━
If you have done step 2:
Step 4: Sorting your dividers
Lastly you want to make sure that your dividers show up at the beginning of the custom categories.
Open up your divider in S4Studio again if you closed it.
Click on "Warehouse", select the "CAS Part" and on the right in the "Filter" field search for "display".
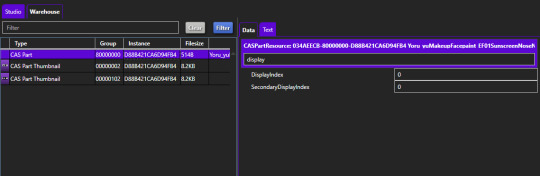
Under "DisplayIndex" you now want to input a number that's before your category.
My category starts at 0, so I will change it to -1.
If the category starts with 10, I input 9 and so on.
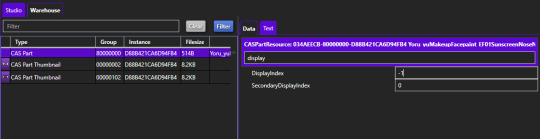
"SecondaryDisplayIndex" is swatch order, so it doesn't matter here.
Then just save it.
━━━━━━ ・❪ ☾ ❫ ・ ━━━━━━
And that's it!
@thefoxburyinstitute
#ts4 tutorial#ts4 resources#tutorial#sims 4 studio#sims 4 tutorial#s4 guide#ts4 guide#sims 4 cas#sims 4 organazation#ts4 cas#yorututorials
323 notes
·
View notes
Note
hello! would you be interested in releasing a little tutorial/guide on how to convert default skins for infants? i understand if you don't feel like it!

of course! it goes without saying that you need sims 4 studio (s4s) of course. also a photo editing program, you can use photopea for free! open s4s at the top click tools > create empty package. you should see this! click on add at the very bottom left...

line by line, copy and paste all the information down below into the "add" box that just popped up. Change the "type" to LRLE image, keep the group as is (it should be a bunch of 0s), and type in the instance numbers. (Ignore the red oval for now!) Make sure to double check! Save your package file!

Now all you need to do is important the images of the skin. All sim textures take up exactly the same amount of space and all their features are proportioned in the exact same spots so you can take any skin blend and slap it on top of a base and import it and you're done! The red oval above is the chubby state for infants and the other 3 are just default/average body states. (Even though I found like 8 separate instances of infant skin, only 1 was chubby and the rest default body states. The other 4 files didn't seem to change anything in CAS, I don't know why though!)
If you want to make more realistic alpha skin you'll need to make your own entirely from scratch, mix and match, or use another creators. (Even though all creators have open TOUs per EA's own TOU you should probably still ask just to be nice and absolutely give credit to them. And by credit I mean mention their name and/or link to their page, not any of that goofy "credits to all creators" nonsense!)
📂Download EA infant skin base!
Happy converting! 😊
❗ Postnotes: ❗ The instances for all the other ages didn't seem to change, so there's no need to update, only add-on. Also instead of creating a new package you can just add-on to an existing package file. It's just easier and safer to start brand new
435 notes
·
View notes
Text
Updated: How I edit my sims 4 screenshots (night-time edition)
A more detailed editing tut so you can understand my process as it may help you, i edited this relatively quickly and usually spend about 1-2hrs editing something...so let's goo.....
Before taking screenshots:
Help yourself as much as you can in-game, I always make sure there is some sort of light source in my pictures or something interesting that I can add to enhance something already there
Understand good/bad composition and add variety by using different angles
I take LOTS of photos just to end up with 1 or 2 good ones

I'll just be using photoshop for this, but i also like to use the procreate app as i'm more confident w it.
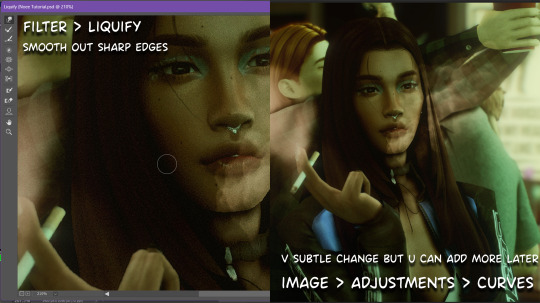
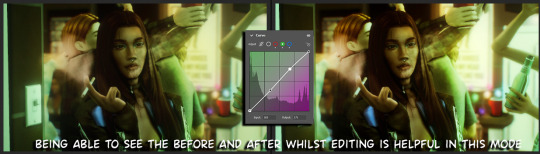
step1: I check if there are any major glitches or hard areas e.g, fingers elbows etc.. that have sharp points and pull them in liquify so they are smooth. Then use curves to change the contrast.
step2: *duplicates image* using the dodge and burn tools (keyboard shortcut: o ) i'll add emphasis to highlights and shadows (be careful with these as the dodge tool can ruin the image if used in excess) *merges image* (i duplicate and merge as i go, utilise using lots of layers so you can go back if you mess up/ want to change the opacity of an effect.)
step3: making light sources POP. *new layer* change blending mode to overlay or soft light and choose a colour you like.

step4: *new layer* draw hair strands. i just use a basic round brush in photoshop and change the hardness or i'll use a sharp caligraphy type brush depending on my sims hair type. (i try not to overdo it as i like maxis hair and don't want it to look too realistic)
step5: i would then add a new layer and set the blending mode to multiply to add more shadows, but i don't feel like i need to at this point.
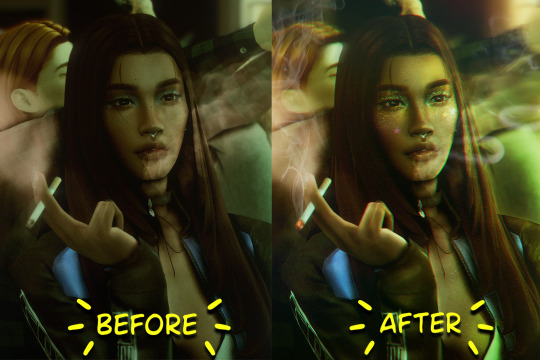
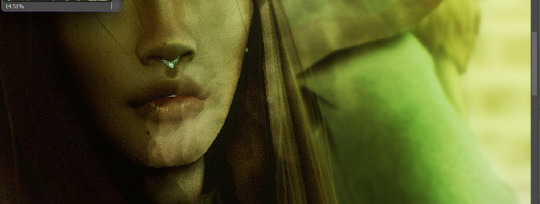
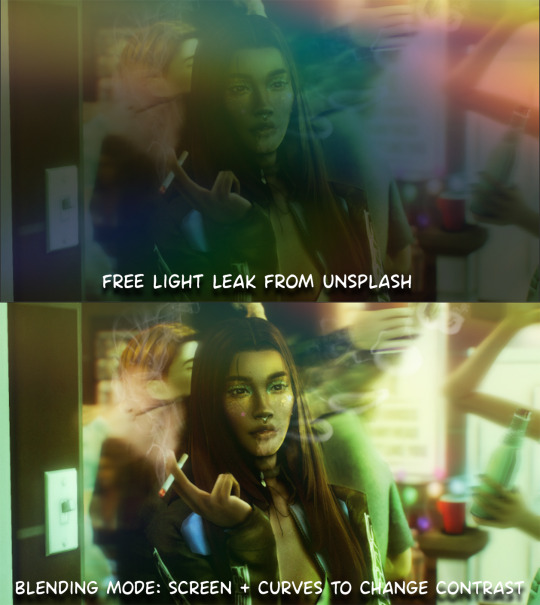
step6: *duplicates image* go to filter > camera raw filter, i change the "light" and "curve" panels, i like green tints in my screenshots especially the night ones. (this is where all the magic happens really so just adjust all the channels to your liking, lightroom is also really good to use)
step7: *create new layer* blending mode: screen or linear dodge (add) / makeup and finishing touches! - for this look i'll get stars and glitter pngs off google or unsplash same for the smoke, though if i'm using procreate they have free brushes for that :')

step8: add light leaks as they add some fun dynamic lighting and textures to your screenshots. (i also flip my image horizantally [image > image rotation > flip canvas horizontally] whilst editing as it's like a "fresh pair of eyes" when you've been editing for a while so you can see what looks off)
final step: merge all the layers (though i do merge along the way once i'm happy with something) go to filter > sharpen > smart sharpen. I leave it as the default setting.
extra step if u want: for party pics i might add chromic abberation here is a 60 second tutorial on youtube it makes the pic look cool and trippy.
And you're done!! congrats on surviving. if you have any questions please send them in my ask box so others can see and get help too.
119 notes
·
View notes
Text
finished a render and realized there's a tiny mistake. don't re-render the whole thing: a tutorial
realized a lot of people don't know that you can do this so here's a quick post on it!
so let's say i didn't notice the hair was clipping with the ear like this:
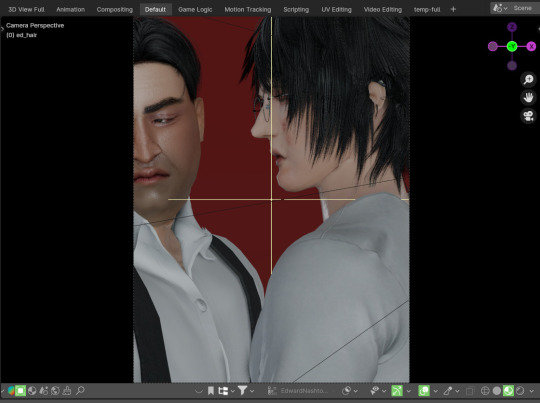
i render out the whole thing and it takes like 30 minutes. only after do i notice. save the messed up version! then do this:
fix whatever's clipping or messed up or you just want to change. so now let's only render what we fixed. use control + b to draw a square around the part you changed.
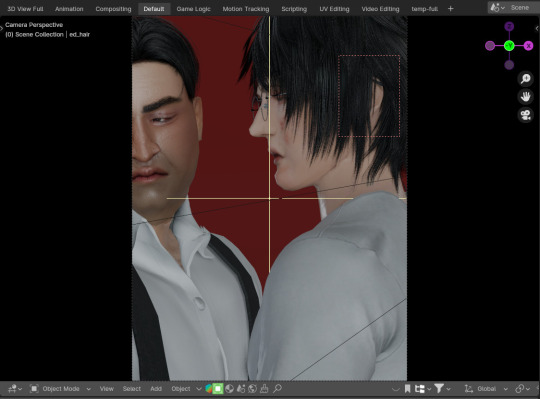
this will only render what's in that box. it only took a minute in cycles! (it's usually shorter than this, honestly. i was just doing some weird things in this render. also you couldn't even see his ear in the lighting lol)
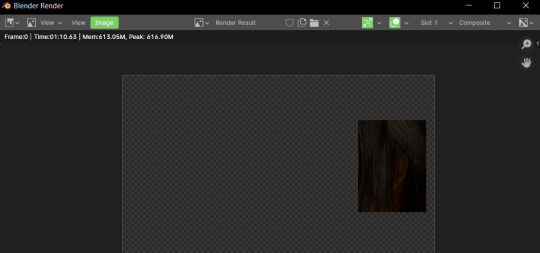
save this piece, and then in photoshop, you can lay the fixed part over the clipping version, and there!!!
if for whatever reason you need to clear the mask, you can just hit control+alt+b.
(minor problem if you use ambient occlusion or glare compositing nodes, there will be a slight border on the edges, but you can just erase it! make sure to give yourself enough room on the edges!)
72 notes
·
View notes
Text
youtube
How To Create A Realistic Sims 4 Save File (Step-by-Step Tutorial + Tips) | The Sims 4
In this video, I demonstrate how I create my realistic and detailed save files, starting with the charming town of Henford on Bagley.
#bougiechloe#bougie chloe#bougiechloe cc#bougie chloe builds#sims 4 gameplay#the sims community#sims 4 save file#sims 4 saves#the sims 4#ts4#ts4 simblr#my sims#Youtube#sims 4 screenshots#sims 4 cc#sims 4 custom content#simblr#the sims 4 tutorial#ts4 tutorial#sims 4 tutorial#sims 4#the sims#the sims 4 cc#henford on bagley#cottagecore#cottage aesthetic#simblog#ts4 simbrl#show your sims#ts4 save file
59 notes
·
View notes
Last Seen Blogs

rae-sparda
rae-sparda
brokenadventurez
Broken Adventurez

windowinstallationservice
Christensen Windows & Stucco


shireyishunjian
湿热一瞬间 / shireyishunjian - 众筹互免分享