#we practice a little painting. we practice a little lineart
Note
Kinda a random one, but how much time per day and/or week would you say you spend working on your webcomics? I want to eventually make my own webcomic, but the idea of having to draw 24/7 to make a good comic is honestly pretty intimidating.
Not random at all! I love chatting webcomics! :D
Hmm, it really depends on so many factors here. Webcomics can take as much or as little of the day as you'd need- but if we're thinking project longevity and the hopes of finishing such a huge feat, we need to consider some pre-production and project timelines- as well as how to handle scope.
Let's break it down:
-Figure out the length of your work (even in a general sense) This can help you keep an eye on the size of your project, where to trim and where to add, as well as get a general sense of a timeline for completion. Say you do a comic for 200 pages- once you figure out your general output page wise, you can get a sense of how long it will take to get from point A to point B (with some breaks added of course!)
-Understanding Your Process . You need to dive in head first with this one! Start making some pages, don't get hung up on too much at first, and get a general idea of where you spend the most amount/least amount of effort and time. This can help narrow down where you need to focus your time with. (this includes writing/scripting, thumbnails, pencils- etc etc)
-Don't compare your output to others! Some people are just really REALLY fast with output, others (like me) are quite slow on that. This is why understanding your own limits and strengths is important (and why it's a good idea to do some practice rounds with making comic pages to see how you feel about it first)
-Working in a way that makes YOU happy. if you dont like inking/lineart, get that OUT of your process! you are allowed to have a comic that has pencils, painting, just colours- its all about YOU! One of the biggest 'slayers' of webcomic production is adding a part that the creator hates. Make it fun!
Figuring out all of these steps took me a while to do. I am also lucky in that I work as one solid half of a team with @spacerocketbunny. We both write, draw, ink, promote, etc etc in equal amounts- But that also means that I can spend more time on details with the aspects that I enjoy- like inking.
As far as the time it takes- I try to keep it a set amount of time a day. When at the day job, Webcomics can get 3-4 hours a day. On days where i am without obligations, i work a 'full work day' on them with 8 hours! I also give myself a 'weekend' off from comics too.
Limiting yourself with hours to work on a project is necessary to last throughout the entirety of the project, and to prevent burnout. I've done webcomics for over 15+ years, and Ghost Junk Sickness turns 10 this year (and is on the way to being completed).
Understanding your process, output, and scope of the project will create a better roadmap for the time needed to create your comic- and remember- it has to be for YOU the most, in the end.
I hope this helps, always willing to chat more!
Happy creating!
14 notes
·
View notes
Text

@wild-moss-art Hi there! I'm more than happy to share art philosophy about lineart! You are correct, I am definitely spending less time than usual on my lineart to get these requests done, but I'm still glad with the final results. :3
Here are the three stages that I take to achieve clean and polished lineart.
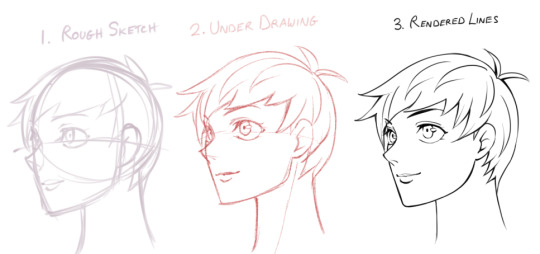
1) The Rough Sketch is used to figure out what the final product may look like. No fine details yet, only guidelines and basic shapes. I make sure the proportions, alignment, and composition is correct. The completed Rough Sketch gives me a good idea of what the rendered lines may look like, but is a bit too messy to follow. While I do have the option of erasing all of the guidelines and cleaning up the lines, what I usually do is lower the opacity of the rough sketch and start on a new layer.
2) The Under Drawing is done in a non-black color on top of the rough sketch. Here is where I get into finer detail with expression and anatomy. However, because we are following the messy lines of the rough sketch, the Under Drawing will still look a little unpolished. It is still very suitable for coloring if you plan to render all of the details in the painting stage, or if you are going for a more sketchy style.
In order to get sharp, detailed, finely rendered lines however, an additional stage is required.So lets lower the opacity and start a new layer using black ink this time.

3) When Rendering Lines, I carefully follow all of the details provided by the Under Drawing, which shows exactly where each line should be placed. I take my time going over each line, using the zoom tool and rotating the canvas when needed to get the best angle.

Because the final product should have a sharp and clean look, it can be very time consuming and pain staking to go over all the details. That said, I have a few tips that will help this stage go along faster while adding visual appeal to the final product.
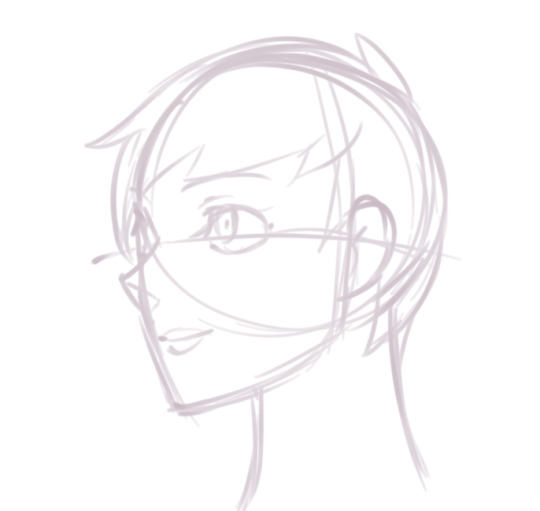
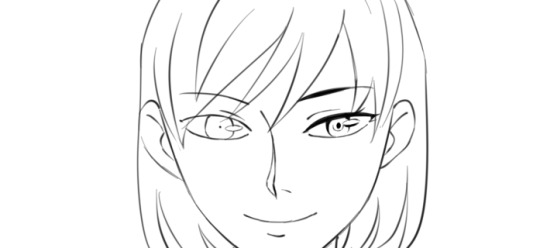
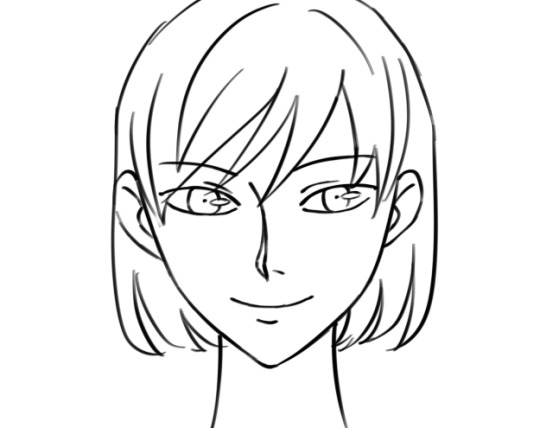
Let's use an example. Suppose you place down your lines and end up with something that looks like this.
It's not bad, but it could use a little work. The expression and level of detail that we want isn't there yet, but it's actually a good starting point. If you are new to line art or still practicing, you may wish to aim something like the drawing above so that we can take it a step further using the steps I will demonstrate in the tutorial below.
So how do we make clean lineart into something even greater?

Here is what I mean by line weight. Lines of lower weight are lighter and thinner. Lines of heavier weight are darker and thicker. Then there are modulated lines, which gradually increase or decrease in weight.
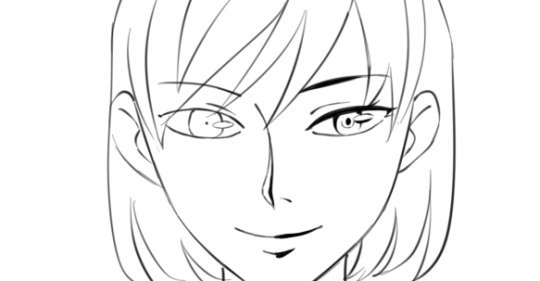
In the example drawing, all of the lines are of equal weight. We can make the line art less monotonous by increasing the weight of certain lines. For demonstration purposes, I will only make changes to the right side of the drawing so that you can see the difference.
To start, we will add another line to the upper eyelid and fill in the gap, creating a new, bolder line.

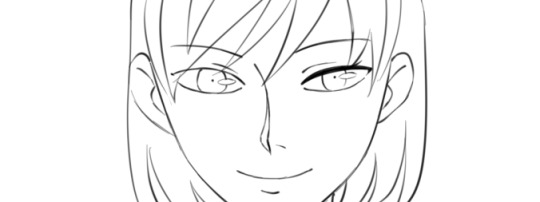
We will also build up the iris, pupil and highlight, adding details as we go. Already, it is looking more expressive.
Lets build up the nose and mouth lines while keeping the ends nice and thin.
Then, we can add weight to the face and ear lines. For the hair outline, we want to make the lines heavier closer to the roots while keeping the ends thin. Hair lines on the inside can be left alone.
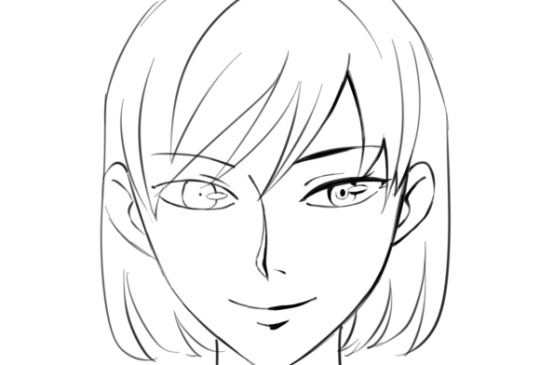
Finally, we make the outside line of the character heavier. With these small changes, we have a much more expressive, detailed, and visually appealing product.
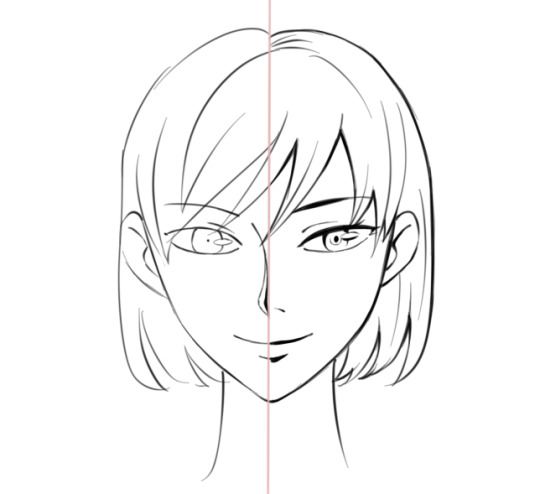
Here I've highlighted in red where the lines remained unchanged. You will definitely want to leave some lines alone while building up others. As a rule, outlines should be thicker while the detail lines on the inside should be thinner.
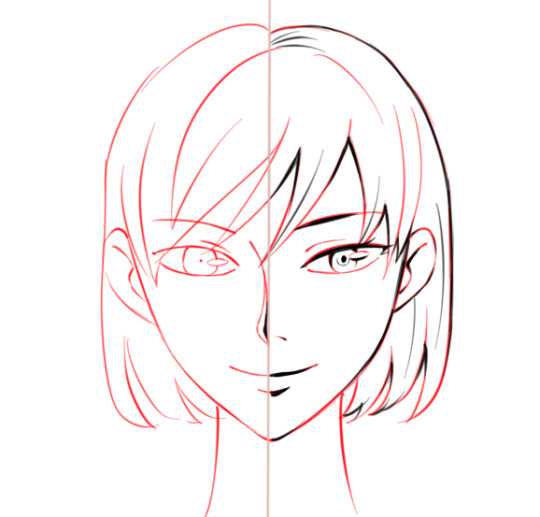
If you increase the weight of all lines with the same amount, it will remain flat.
So, you should aim to have a variety of light lines, heavy lines, and modulated lines. You may wish to use the eraser to lighten up heavy lines or create modulated ones.

If you can do all the steps above, then a lot of detail and expression will be preserved even when the image is shrunk down

Hope that helps :3 Let me know if there are any other questions I can answer.
81 notes
·
View notes
Text
Someone commented on an old video recently asking me (genuinely) if one of my speed paints was AI because 1) it was broken up into highlights for TikTok, and 2) I have a very unorthodox sketching process. So, I have decided to show the entire ass backwards way I sketch out the nearly incomprehensible nonsense that my mush brain spits out at me.
To preface, I use Ibis paint x on a cell phone.
I do not have a fancy program like procreate or clip studio, or even a tablet and a lot of how I work has evolved from what I have found works the best for drawing on my tiny, little, shitty phone screen.
That being said....
A speed paint video
To begin, I rarely map faces more than just very basic shapes. (Though, I will admit the structures can get more complex the less comfortable I am with drawing the face.) I usually start with a very basic framework that I implement half from just years of practice in drawing faces and becoming more comfortable with those base shapes, as well as the fact that I'm already aware I will inevitably be over using the liquify pen. Now, I would like to say this is a crutch and I just do it because it's easy, but unfortunately it's actually just because I have fat fingers and a tiny screen (sometimes I can place lines better with my pen but it's still a really small surface to work with) and it's just less of a headache to address the lines with liquify than redoing them a million times or zooming in so close that I lose the rest of the picture.
I will often start with faces because they tend to have the most small details. From there, I will then usually shrink the drawing down and place it about where I think it'll need to be to draw the next part, all while less than strategically erasing the piss poor guidelines I had originally given myself.
SOMETIMES I will save my guides of a second layer in case I might need them later, but that's about as far as I ever plan ahead to be honest...
And we can see that in the next part where after scribbling in a few vague marks for their hair I then IMMEDIATELY regret erasing my head guides and hastily sketch them back in so I can proceed to poorly map out their bodies (most of which I will inevitably be covering up anyway, which I KNEW was going to happen with this one and I cursed myself the entire time). I then fill in where I want all the glorious hair, which fills up the rest of the blank space in the art with fun and interesting shapes and conveys the lore of the AU.
After this, and to take this from a sketch to actual lineart, I will clean up some of the lines on a second layer and keep some of the original sketch features where I like them. This helps me keep the life of the original sketch while also allowing me to clean up the more scratchy lines, which usually produces a pretty nice, clean looking line work.
Should I do a lore drop for my AU next??
Kinda want to...
7 notes
·
View notes
Note
Can i ask how u do lineart so well,, it looks so smooth,,
I've always been very big on keeping my lineart clean and smooth! :) I'm very inspired by comic and graphic novel illustration, so naturally, I try to take notes from that sort of aesthetic in a lot of my art.
The short answer is that I just have a lot of practice, and am very picky about how my lineart looks. So, I'll often spend a long time making sure it looks just how I'd like it, before moving on, even if the lines aren't necessarily going to be the focus of the final drawing.
The longer answer kinda depends on what lineart you're asking about! The style of my lineart tends to change to fit whatever mood I'm going for, so I have a lot of different line styles with varying levels of smooth-ness.

On the super-smooth end of the spectrum, we have these bubbly, cartoony lines! These are a pain to draw, to be honest. But they really contribute to giving that cute look :) For these, I used the Clip Studio Paint G-Pen, with some minor adjustments to the settings, mainly so that there's not too much line width variation. The uniform, thick lines are important for this look! :) Drawing in this style really just a lot of trial and error. Usually when doing lineart, I'll erase away at lines to get them to the right thickness, or even just clean up a sketch and call that lineart, rather than doing lines on a new layer. But, that's a lot harder to do when the line thickness has to stay consistent. So, I end up just drawing the same line 7 times over, un-doing my work and re-doing it until i'm satisfied. Again, it's a pain! I used to draw like this a lot more frequently, but I stopped because I found that other approaches are often a lot more satisfying and rewarding. This is still great, for that cutesy look, though.

Next, we have what I would affectionately call my ref sheet lines. As much as it's probably a bad idea, I have a habit of just kinda skipping the lining stage of art. I'll just take my sketch, and tidy it up until it's clean enough. But for a drawing where there's only going to be flat colors, that sort of roughness can look sloppy, In my opinion. So, particularly when doing ref sheets, or other art which I don't intend to render, I will actually go through the effort of fully sketching out my idea and lining on a separate layer. The result is a lot cleaner and more deliberate, and looks a lot nicer when colored! Especially if I take the time to color the lineart :) I also really like doing small details with thin lines, particularly body/facial hair, elastic cuffs on clothing, and the seams of clothes, too. I like drawing those little details a lot, and I think they shine the most in my cleaner line style :D
For this, and for most of my lineart, I use these brushes which you can find on the Clip Studio Asset Store:

I'll bounce back and fourth between these, and Kozmo's Scratchy Scribbler brush, which you can find on Ko-fi!
Additionally, I have a modified G-Pen with a pencil texture that I think I made myself? I don't remember making it, but I also don't know where it came from! So i guess I did, lol.
A little more messy than my ref-sheet lines, we have the line style which you probably see most often on my page. As mentioned before, I usually kinda skip the sketch step for these? I don't encourage that, it's a bad habit of mine. But I make it work! I feel like the best way to explain my process with this is to just offer you a timelapse of my lineart process:
I just kinda... go. and it works out! most of the time. lots of cleanup and tweaking, and as you can see with Bdubs and Etho here, sometimes I do actually just. do a sketch and then line over it. So maybe I have no idea what my own process even is, LOL.


Now, to completely abandon your original question here's how i don't do smooth lineart! :D In this style, for the most part, I ignore the cleanliness of my lines, only really erasing with the lasso fill tool, when lines get too cluttered to actually read. Usually I'll only go for this when I'm already planning on painting over the lines. Because sometimes an idea doesn't need or want clean lines, and sometimes I just want to paint some values or slap some colors together and call it a day. Love my clean lines, but scratchy, messy lines are fun too! :)
Not sure if any of this really explained how i do smooth lineart, but I sure did talk about lineart for a while. I hope you could find something interesting or insightful in here! :) thanks for the ask, and I hope you have a great day <3
#inbox#digital art#art process#timelapse#lineart#another ~1k words on my art process?#yippee!!!#askeliyips#ask
17 notes
·
View notes
Note
When thinking of your trademark in your writing, I think it is the way you go into details and paint a picture for the mind's eye. The way you balance descriptive imaginations and realistic detailing is just very captivating.
Your art has a funky loose feel to the lining that just feels fitting to the enigma that is your brain, too full to truly poor it all out onto the paper no matter how hard you try. But boi do we love the attempts that give us any slightest peek into that brilliant mind of yours.
You clearly don't draw or write without thinking it over thoroughly.
Bwaaaaaaaa

Thank u! that's super sweet of you to say.
I do tend to overthink a lot of things.
I'm not very good at making like... Outlines or roughs of poses. I very rarely make base outlines, like I usually just start drawing and the rough sketch becomes the final lineart. So I often rely super heavily on references when I draw. For some reason over my 28 plus years of drawing, I never really gotten a grasp on how the torso, legs and fingers all really connect and form one entity. I know I could try with enough discipline and practice, as art is a skill. So I have this weird blend of like... Super confident lines, but not knowing how a torso, shoulders and legs connect which make a really interesting balance, and leads to things like this:


Like I can always see the framework of what I want, especially when little reference is used, but it really seems like nothing connects. Like the understanding of SHAPES is there, but not the understanding of how they are coherent together, if that makes sense? And you can kinda see that in my more high profile art, but I feel there was a period where It did click and I understood how it all connected but I forgot it all.

Like at some point, with these two, (rest in peace. the ship tag has not been updated since I left the naruto fandom) around 2019 I was getting it! Like I felt I was really getting it, Like I MADE THESE!!!! but then I kinda forgot it all. Like I still didn't use a base outline for these and did rely on heavy references, but I feel I was getting a grasp on shading and autonomy and how the human body works and fits together. And then it... Just kinda vanished from my brain, and I regressed to a more chibi simple art style. Either because it was easier, or because I was experiencing more chronic pain in my back and hand.
At the end of the day, I think my art style regressed a lot due to lack of practice, and lack of encouragement from outside sources besides the internet likes and reblogs like RL friends or Family. That, and I feel my attention span and patience for things has just gotten worse as I've gotten older. I'm guessing my Dad's death had a lot to do with that. As, I am over the loss of my Dad as a person. but mentally, I am not over coming the fact that mortality is very fleeting. You think I would spend most of my time living life to the fullest. But that isn't the case. I kinda feel like I've been stuck in that "What is the point of anything if anyone can die suddenly without warning for any reason" Stage of grief that I have NEVER really got over.
Needless to say my Dad suddenly dying with no warning due to a ruptured aurora was just something everyone was unprepared for. He wasn't sick from an illness, no one knew he was in poor health. It wasn't even a car accident. Like he just suddenly died cus part of his heart exploded essentially.
I mean, I know I rarely talk about it, other then mentioning "My Dad died Eight years ago. Haha I'm over it tho, it was awhile ago"
And, While I think I'm over it in the sense with, I'm at peace with always missing him a little bit, and don't think about him constantly... I'm not over it in the sense of how fragile mortality is and how it can be taken away. For no just cause or reason.
I guess I'm over it, in that I'm over that my Dad, the person is dead. I am NOT over the fact of HOW he died. And I think it'll be a long time till I cross that hurtle.
And yeah, that's a heavy part of life, that we all get old and die one day, but some people don't even get to grow old. you think it would make me more.... "make time with what you have, enjoy what you like."
but if anything, it makes me more fearful in "what is the point of doing anything if I were to die tomorrow, what have I done. Folks will miss me, sure. But I will still be gone." So then I just end up doing nothing for long periods of time, and that's mostly why my art skills suffer because I don't see the point of doing a discipline or working towards any goal whatsoever. And I'm just going through the motions. And yeah, sometimes, I will be super productive and be happy and do a lot of things for a bit, but they're always short lived moments and it's hard to stick to things.
Looool sorry if that's all just too heavy.
Oh, if this sounds too complaining... Or "pity party. Woe is me, Dana is Depressed again" ahahahah. Like, that's not the point of this. I mean, it's my blog and I can talk about my feelings I guess, and I feel that Depression, even before my Dad's death impacted my art journey. So I'm still trying to struggle to remain consistent in my endeavors.
Or I could just be lazy. XD That too. XD
Anyways... Moving on in terms of my writing style, that's very nice of you to say.
I am a deep appreciator of inner monologues if it wasn't obvious. I like to dissect what characters are thinking and I sometimes feel I overdo it, and justify every single action and breath they take by getting so close in their own head that there's hardly any breathing room for error.
But I just write how I tend to think in terms of Overthinking, so I don't think I've ever written a character from a close third person (or first person) perspective that hasn't overthought every action before they speak.
But usually within the context of the story, their inner monologue spanning 20 pages actually takes place in the span of less then a few seconds.
I don't think I could write from Bob's POV if I tried. He's a man of action rather then overthinking. And if I held his hand as a third person narrator, he would sho me off and do his own thing gladly without my interference. XD
Anyways. Didn't mean to get so venty on this ask.
Thank you so much for the lovely compliment. Also some insight into my process I guess. XD
2 notes
·
View notes
Note
Hi Red, you mentioned a few days ago that you’ve honed your style to your own liking so I was wondering how you think your style has changed over time?
Re reading the comic the only thing I can concretely nail down as different from the very start with my limited knowledge of art is the lines seem a lot thinner in the early pages?
So anyway I thought I’d just ask you yourself how your art is different, did you change it consciously or did it just evolve as you got your eye in or something? Why did you change if it was deliberate etc
Thanks!
As a side note btw holy crap the newest pages are beautiful, it’s just struck me again how amazing every single one seems to be with magical effects and backgrounds and the rain over everything dude they’re so good
Good question! Tbh it's a good sign if the change isn't horrendously visible to anyone but me.
The lines are definitely thinner early on, and that's both a stylistic change and a result of the fact that I was less confident. Drawing several hundred pages will really get the muscle memory going, so now I'm less hesitant about the lineart stage, but early on I was thinking a lot harder about relatively simple parts of the visuals. Foreground poses, hair, fabric. It took me a lot more thought to get those looking good. The lines are thinner, less confident and a little more sketchy.

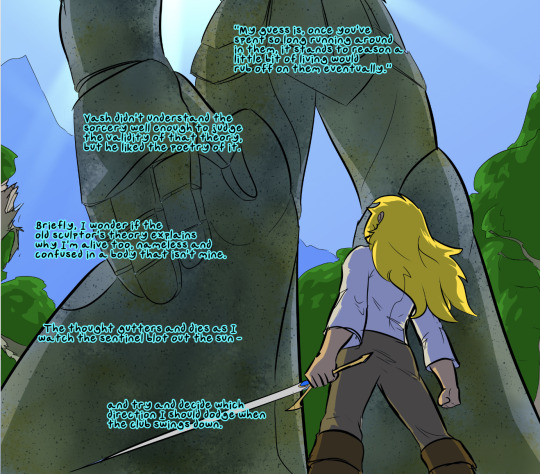
Could've easily thrown some building silhouettes in the background, drawn actual figures instead of the black mass of vaguely head-shaped things, etc - but nope. I was too busy figuring out how to make Vash's hair look. The backgrounds were pretty darn unpolished. They do their job, but at the time I wasn't really sure how to shade natural environments in ways that implied texturing. Even the way I was shading the foreground figures was pretty basic and unpolished, and I occasionally screwed it up - I hadn't quite refined my order of operations, so sometimes I'd miss regions with the paint bucket and just. not notice because of all the everything else I was focusing on.
Relatively simple visual concepts were taking me a lot longer because I hadn't yet worked out how to do them, so I had to figure them out on the fly. Erin's lightning bubble took a whole workday just trying to figure out how to strike the right glow balance that communicated "dome shield" without fully obscuring him behind the light. It's always a lot harder to draw something for the first time, and this comic has so much stuff in it that I was dealing with a lot of firsts in those first few chapters.

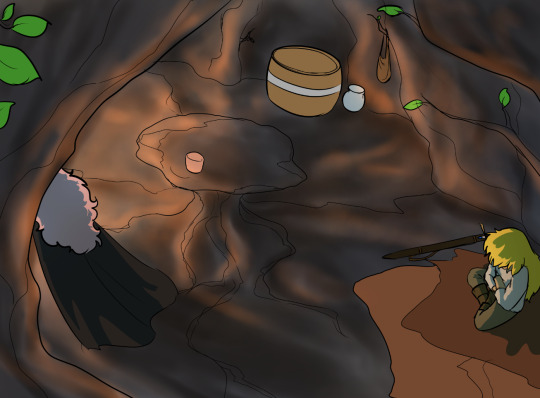
That also meant I had less time or focus to spend on cleanup, so sometimes shading would be a bit intermittent - like the barrel in this shot that hurts my soul.
I did figure out some foliage-shading shortcuts during the sentinel fight - layering rough-edged cel-shading produced the illusion of sunlight on leaves without having to hand-draw the darn things - but the science of making forest backgrounds look like Not Ass was still difficult for me. I really didn't like hand-drawing fully-lined trees for the background of shots, but I wasn't yet sure what the alternatives were.
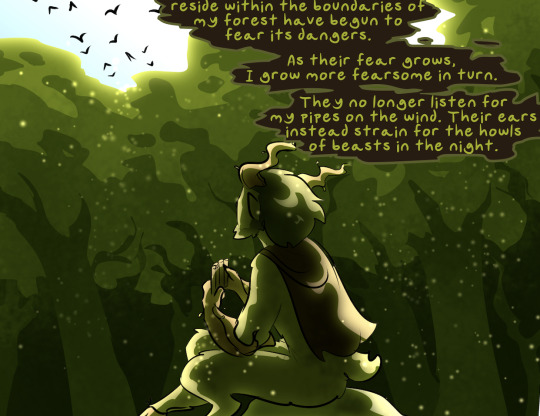
When I did Falst's intro arc, however, I had a ton of forested backgrounds, and that gave me a lot of practice very fast at refining the forest background stuff and experimenting with the use of filtered sunlight and particle effects, and I finally found a shortcut I liked for drawing tree trunks.

By this chapter I was starting to feel good about how it looked. The colors balanced better, light and shadow felt integrated into the scene, I was getting a feel for the use of soft-edged glow and particle effects, and I wasn't struggling to make the shots feel coherent. Even the sentinel fight, which I'm overall surprisingly happy with, feels a little overly bright to me in hindsight - I would've shaded under the trees a little more aggressively if I were coloring it now.
When we hit Zuurith I had to start drawing very complex urban environments, but I used some of the tricks I'd learned for drawing forests to make things easier - simple color-block silhouettes for background shapes coupled with more detailed foreground elements for things I couldn't justify making featureless color blobs. If they were in the same plane as the detailed foreground characters, they had to be just as detailed. It was a pain in the butt, but the rest of my style had gotten intuitive enough for me that I could afford to spend more time playing with that. If I were still struggling to draw every foreground character pose, I wouldn't have had the brain bandwidth to get creative with the backgrounds.

It wasn't really an intentional thing. I started the comic doing as good a job as I could, because I really wanted this to work. I was familiar with the medium of digital illustration, I'd been doing large numbers of chibi illustrations for the channel for years, and I had some of the process down to a science. But parts of it were new and unfamiliar, and that meant I needed practice and a chance to refine what I was doing into a more efficient form. In the process, things got smoother and looked more consistent, because I was developing techniques to do certain effects that I could then rely on going forward.
When I had to draw the Paladin Archive as a background, I used a mix of techniques I'd had a chance to test and refine on previous pages. The glowing dust mote and sunbeam effects from Gleicann's forest made the archive feel dusty and helped add depth. The occasional painstakingly hand-drawn background shelf was an acceptable price to pay, because for most of the bookshelves I'd figured out a pretty quick and efficient brush trick to draw a large row of color-scattered rectangles, skew them, duplicate and blur them sideways, and use that to create a serviceable illusion of three-dimensional rows of books of various sizes.

Anyway, yeah. If the change isn't super jarring that's good news for me, because the process of improving my style has been complicated but very rewarding, and my only frustration with the process has been retroactively seeing everything I'd be able to do better now.
130 notes
·
View notes
Note
I love your work! Do you happen to have any tips for artists looking to get into digital art using procreate?
Sure! I absolutely love using procreate. For whatever reason it’s considered a lowbrow art tool by major studios and companies??? But I can do pretty much anything I’d want to do in Photoshop in Procreate at a fraction of the cost. Plus working on an iPad means portability— If I want to draw in the car, on a plane, in a cafe, etc. I totally can. Glad to see more people are getting into using it! 💖 Alright, onto some tips.
The best way I can think to give tips is leading by example and offering points of reference through my own work and process. If you have follow up questions or are looking for something specific definitely send them my way. ✨😊✨
1. Know Yourself; Know Your Art Style
Whether you’re a long time digital artist or a traditional artist porting over to the digital medium it’s very important to know your work, your strengths, and your personal style. For example, I was very much a traditional artist who delved into digital artwork to keep up with career demands. For a LONG time there was stylistic dissonance between how I drew on paper and how I drew on SAI (the desktop paint tool where I got my start) because what I was subconsciously doing was keeping my style to myself traditionally and just mimicking the artwork I saw online when trying to make digital art.
Here are two pieces I made back in 2018, one traditional and one digital. They're both nice pieces, but if someone was asked which one was definitively one of my pieces they're much more likely to say the traditional piece because it's consistent with my style: limited colors, lineart heavy, etc. I kept trying to divorce from my traditional style when what I should have been doing was taking the extra time to learn how to do what I could already do traditionally in a digital program.
It's especially important to know your style and practice maintaining it regardless of media because the next tip is
2. Invest Time In Watching Others
In nearly every hobby, profession, skill, or interest one of the best ways to hone your craft is to see how other people do it. Hozier said in a recent interview when he's not writing or performing his music he's listening to someone else's music. It's very important to our ability to learn to see how a task can be done to help influence how we ultimately do it.
I of course do not mean try to copy someone else's work, which was something I had to learn the hard way when I was starting out in digital art. One of the things I frequently did early on was tried to copy someone's painting technique as closely as I could which resulted in some less-than-inspiring artwork that didn't look much like my usual body of work.
Which is again, something that is easily prevented by just knowing your style.
Some places I go when looking to see how other people draw are YouTube, Tiktok, Artbooks, and Pinterest. Youtube and Tiktok are fabulous sharing platforms usually dealing in quick media where a single search for "procreate" or "speedpaint" yields THOUSANDS of results. Artbooks require a little more financial dedication, but they're great visual references that frequently come with some kind of tutorial in them. Some in my personal collection are Gothic Lolita Punk, Japanese Comickers, and The Complete Masters of The Poster. And Pinterest is frequently painted as a digital piracy war zone, but searching "art tutorial" or "digital art techniques" yields lots and lots of valuable information.
I've been professionally illustrating since 2017 and I STILL go back to these points of reference to see how other people are drawing, painting, etc. Who knows? I may learn something new that takes my art one step further.
3. Explore Brushes!
There are literally Tens of Thousands of brushes that are available all across the internet and I highly recommend taking the time to search google for packs of them. For the first year or so of working with procreate I ONLY used the default brushes that came with the program and while the art was decent I definitely could have used more experimentation to make more cohesive pieces.
As of right now I use a Frankenstein pack of lining and painting brushes that are a mess of brushes I made myself, brushes I got in art packs I found on itch.io or etsy, and some default brushes I've heavily modified to match my style.
I highly recommend playing with brush settings, searching for new brushes, and trying literally every brush you come across to see if you can find a use for it.
I've mentioned it several times throughout but it deserves its own bullet point, so my final tip is
4. Don't Ever Be Afraid To Google It
No artist knows everything. No one who claims to be an expert on Procreate knows absolutely every function, every application, and every trick all on their own--- but between all of us you can find practically anything just by googling it.
I have found super specific pattern brushes, youtube tutorials for pattern creation, configurations for pressure sensitivity, ideas for color palette building, templates for sticker making-- whenever I personally can't figure out someone else likely knows what to do. That's what community is all about!
You are not beholden only to your personal knowledge, so remember google is your friend!
I hope this helped! I tried to pair down the tips as much as I could but I just love getting asked about how I draw. 💖 If you or anyone else reading this has any specific questions you're more than welcome to DM me or send another ask. 😊 Have fun! Good luck drawing!!!
14 notes
·
View notes
Text
Art Masterlist
#i do a little art
Monthly art collections:
August art
September art
Inktober Linktober
October art
November art
December art
2023 art summary
January art
Full pieces:
LU Wild (first post)
"You were late, and you failed to protect her"
"I am still your Zelda"
Zelda's awakening
Miles Morales
A terrible fate
Zom 100
Gone with the wind(fish)
Oshi no ko character drawings
Lights on the horizon
Triforce heroes
Clay ocarina (+WIP)
Dark world forms (individual drawings included)
Oshi no ko poster repaint
Legend LU
Every other star (lu au fic) fanart
Warrior cats original island map redraw
2 year warriors oc redraw
Sammer's kingdom piano cover
Super paper mario characters
Warrior cats oc comic page
Bigender wooden heart
Song of the hero (sketch)
Skyward sword 12th aniversary
Alttp 32 | Albw 10 | Aniversary
Gremlin
Bowie! (The OctoBEAR)
Legend's scars
Lu/sksw pannel redraws
2nd quarter quell
SideQuest! Character sketches
New pfp
Painting a bigender badge
Subtle bigender n genderfluid badges
Marin & Legend comic
Sksw poster progress: sketch 1 2 lineart colour
Tiny- fairy Hyrule & minish four (sketch)
Old pieces
Even older pieces
The legend of Zelda 38th anniversary
Doodles:
LU boys doodles
LU doodles
Toilet hand
Doodle dump (English)
Doodle dump (Maths)
Skyward sword scribbles
Doodle dump (Science)
Ghirahim and demise
Improvement
Totk history doodles
Pose practice
Legend's proposal
Ono...
Picrew tag game 2 3 4 5 6 7 8 9
Toon binkus plush
Legend doodles
Collection o' old doodles
Zelda dungeon concept & sketches
Merry Christmas!
If we get caught...
Pronoun braclets
Genderfluid forest
Flag squares
Merleg
Mindless brainrot doodles
Hermes Hermes Hermeson
Ravioli valentines doodle
Favorite loz/lu ships
Memes:
A chaotic mess
4 DAYS
That's rough buddy
Hyrule punching Legend
Man (twi)
The island has provided
Peeta getting stoned
Ballad of the aunt's fridge
#i do a little art#artwork#Art#fanart#doodle#doodles#the legend of zelda#loz#linked universe#lu#oshi no ko#zom 100#skyward sword#sksw#breath of the wild#botw#spider man: across the spider verse#majora's mask#link's awakening#dark world#totk#tears of the kingdom#warrior cats#warriors#some lost links#sll#lu legend
5 notes
·
View notes
Text
Holli’s Commission Info!!!

Welcome to my commission sheet :)

Option 1: Sketch - A messy sketch with no color
Headshot: 1 USD
Bust: 2 USD
Half Body: 3 USD
3/4th Body: 4 USD
Full Body: 5 USD
Option 2: Clean Color Sketch - A cleaner sketch with simple coloring
Headshot: 3 USD
Bust: 5 USD
Half Body: 7 USD
3/4th Body: 8 USD
Full Body: 10 USD

Option 3: Simple Painting - A flat and simple painted style with minimal shading
Headshot: 15 USD
Bust: 18 USD
Half Body: 21 USD
3/4th Body: 24 USD
Full Body: 27 USD
Option 4: Complex Painting - A more robust painted style with more shading, depth, and detail
Headshot: 18 USD
Bust: 21 USD
Half Body: 24 USD
3/4th Body: 27 USD
Full Body: 30 USD
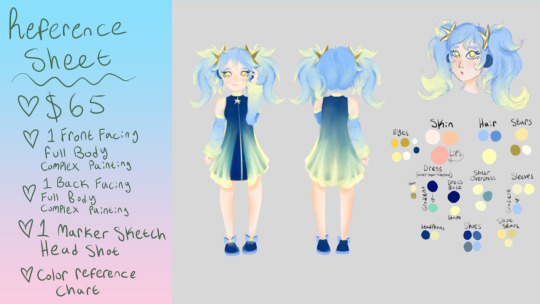
Option 5: Reference Sheet. A flat rate of 65 USD. Includes 1 Front facing and 1 back facing full body complex paintings, 1 color sketch headshot, and a color reference chart.
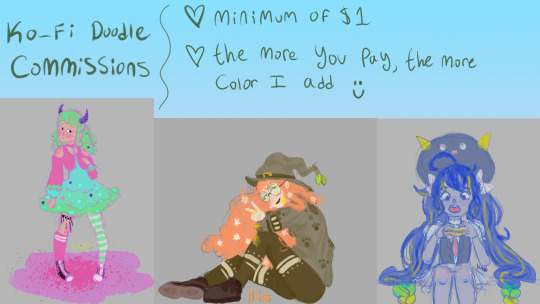
Option 6: Ko-Fit Doodles - Pay what you want starting at 1 USD. A color sketch, the more you pay the more color and detail is added. No changes or updates will be given for these sketches. You get what you get.
You can find my Ko-Fi here
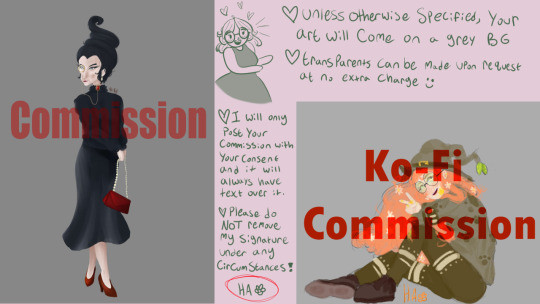
BG Option 1: Grey - this is the default option if you don't specify. This is free of course.

BG Option 2: Super Simple - Colors, Textures, and Patterns. These are free of charge, just specify what you want.
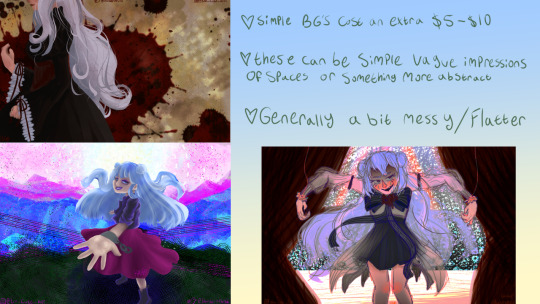
BG 3: Simple - A vague impression of space or something more abstract. Tends to be messier. These are an added 5 - 10 USD depending on complexity

BG 4: Complex - A specific space. Only for painted styles. I need to know upfront if you want this. These are an added 20 USD. Complex BG’s are very labor intensive so please be patient with me if you order one.
Extra Info:
- Transparents can be made of character commissions at no extra cost
- Yes I did get rid of my lined options. If you're deadset of having my lineart please contact me privately. Line art is very strenuous on my wrists and I don't like doing it.
-Extra characters are the same price as the first character
Won't draw:
- NSFW (Nudity is fine)
- Mecha
- Very buff people (I'm sorry I need more practice first)
- Animals (believe me you don't want me to)
- Hate-speech
- Furry (I struggle)
Ask if you're unsure :)
**Terms of Service and other such details:**
- I hold the rights to all finished illustrations. If you would like to have commercial rights we can discuss an appropriate fee.
- You are free to post your finished commission wherever you'd like without the big red commission watermark so long as you give proper credit and do not remove my small signature (the little HA with a flower next to it.)
- Using my works for the production of NFT's or anything Crypto-Currency related is prohibited.
- I will give up to 3 revisions per commission, any additional revisions will come at a small extra cost.
- No major revisions such as pose changes can be made once the coloring stage has begun. Small changes such as colors or small details can be altered.
Thank you for considering me for your commission <3


3 notes
·
View notes
Text
#10 : One done, one to go.
Commission 1 is finally finished. It took some time but it's here.
I'm quite happy how this turned out in the end. Due to the facts that I take quite some time to finish some, I rarely get a whole practice in where I do all the steps. From thumbnail, sketching, lineart and render. So there is always a sense of unease here. But, in the end, it still okay.
I loved doing their characters and when I'm done doing both of their commission, I'll show you guys the talk we had and how it led to here.
But for now, I'll show you what I did here this week.
Here's a little timeline on how the commission work went visually.
Thumbnail is for the overall composition .
Sketch is for going in depth.
Lineart is cleaning the lines
Flat color is, well, flat colors and the overall shadows of the piece.
Render is all the render passes I do.
This is the process I do when I make art. I copied the process since it's quite similar on how others do it, minus the painting-esk thumbnail. As I revisit the rendering stage for another time. It always carried a feeling of slowness. Like my mind was going faster then what my hands can do. Especially when I have the change the lines and then picking the line layer was such a hassle. So for this commission, I tested the workflow on merging all the colors and lines into one layer.
And I like it a lot.
It makes me stay in focus for far longer than my old ways did. I'm going to try to attempt this in the next composition to render things this way.
Two things of note here. I have made the canvas size too small and testing out more color jitter effects.
For the canvas size one, I actually I'm fine when doing art in this resolution since I was going to post it online anyways, but only now when I was going to export this did I realize that I made the canvas size way too small. The client deserved a higher rez pic. Thankfully he did'nt complained about it and in fact loved it but for the second commission, I am going to make sure that I increase it.
For the color jitter one, if you notice in the hair, there is more color variation there. I wanted to experiment to add more texture to place and I thought adding color variation would be a fun way to do it. It didn't go for the look I was going for but in the end I did like how colorful it looked,
1 note
·
View note
Text
Doing my belated 2023 art review. Putting it below a read more because a lot of stuff happened this year and some of it is kind of heavy.
2023 was a pretty good year for me, both personally and artistically. I had a couple of annoying minor medical issues that I'm still dealing with, but I'd say I was able to maintain my goal of drawing at least one little doodle a day for most of the year. I will say though that the vast majority of what I drew this year - probably like 95% - was personal art. Hopefully someday I'll be satisfied enough with it to post it. I'd also like to spend 2024 focusing more on painting and practicing landscapes.
I spent the first three months of the year working on a piece for a local art gallery competition, which actually ended up getting accepted and subsequently spent the rest of the year touring around the state in several different exhibitions. That introduced me to the wonderful world of trying to figure out how the hell digital prints and shipping work, but everything turned out fine in the end. It remains the largest piece I've ever made at 18"x24", and hopefully once I get it shipped back to me I'll be sending it off to my parents. I also found out that I HATE writing artist's statements, like fuck off you don't need to know my background, just interpret the piece however. I'd like to post here, but I want to make sure first that it hasn't been uploaded to the internet by any of the galleries since I'd like to keep my personal info off this blog lmao
What's funny is that I feel like I've come so far as an artist ever since I submitted that piece, that every time I look at the B-grade prints I have lying around I'm like "oh my god this looks terrible, I can't believe this got accepted". I guess that's just what being an artist is like
Following that, I took the next month off from art, which was a nice little break. I did a bunch of art parties in FFXIV, which are always great for improving, because as counter-intuitive as it seems the best way to get good at art is to be forced to draw a whole bunch of different things under strict time limits. I feel like I can definitely see my lineart improving as the months go on. I also started working more with color, my eternal nemesis, and I'm hoping next year I can really start to nail down a style.
I did Art Fight for the first time ever in July and it ROCKED, definitely going to do it again this year and I'm still pretty proud of the drawings I did. I love an event where it's socially acceptable for me to draw people's OCs. I think I'll probably focus on doing more WoW OCs this year. Unfortunately July is the busiest month for me at work, where I'm waking up at 5AM for basically the entire month straight and working in 100+ degree weather, so we'll see if I can maintain the energy for it.
And now the heavy stuff. Some of you might know that I'm pretty involved in the secret finding community in WoW, and back during BFA when we spent 11.5 months trying to find Jenafur, I did paint-overs of a bunch of cat memes to try and keep spirits up during the hunt. Unfortunately, the Make-A-Wish kid who created the pet ended up passing away in April. You can read about her life here in this article that will make you want to guillotine a chemical executive, and this older interview from 2020 about the secret. But what really got to me was this one line from the PCGames interview:

And like, I don't want to be presumptuous but like. I think she was talking about my art. Every time I posted on she'd comment on it, and she even DMed me about them.
This line fucking destroyed me. I'm not even going to exaggerate. For several days after we found out about her death I was a wreck. The thought that my silly little drawings actually had an impact on someone and made their life a little brighter just ruined me. The bill she was fighting for ended up passing, and I hope that someday the idea of 'forever chemicals' will cease to exist.
Downer ending but I'm kind of too bummed out to write more
0 notes
Text


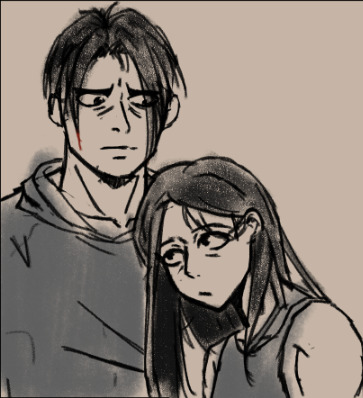
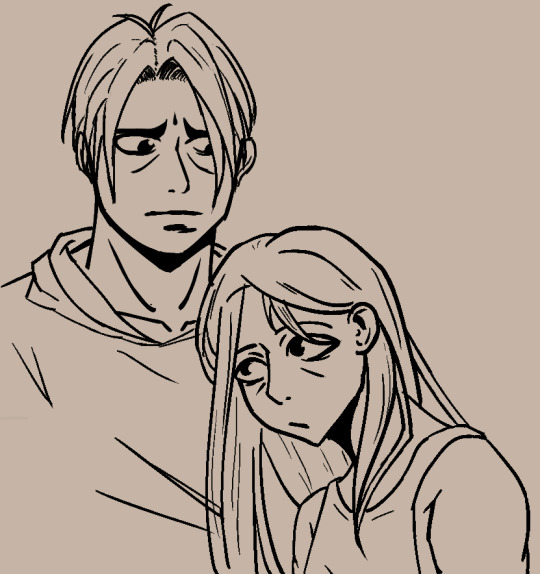
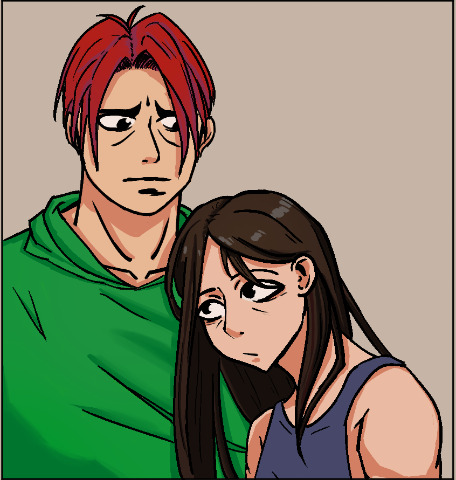
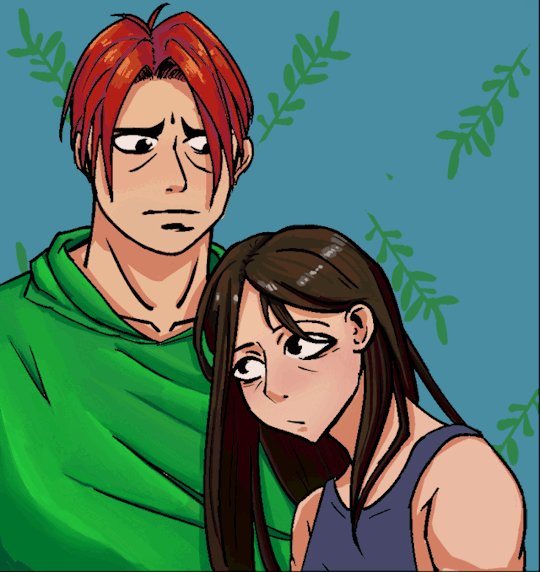
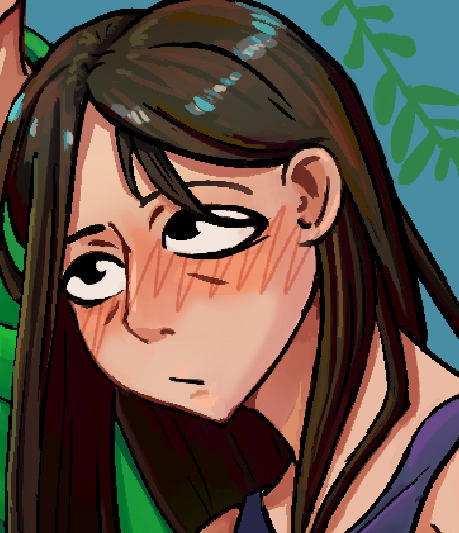
3k style duping has arrived! artists i admire + seek 2 emulate:
@joupey, @art--harridan, @commieinnit, @yuker, @viceravermillion, @ghostpajamas, @he-destroyed-my-dreamxd-journal, @ranboo5!
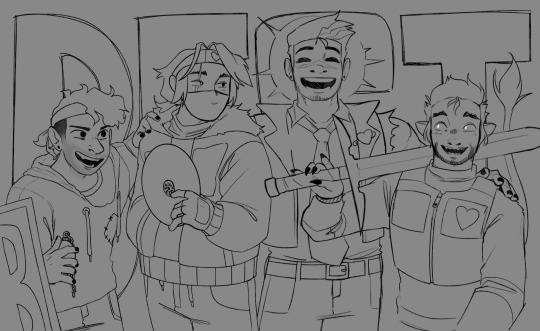
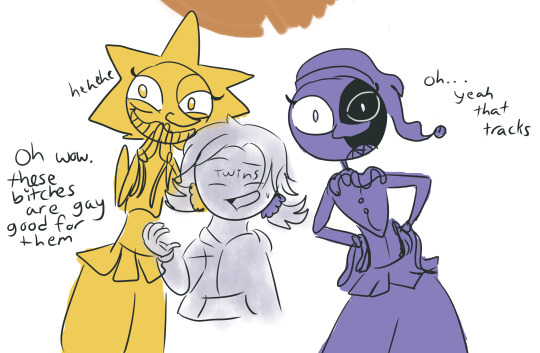
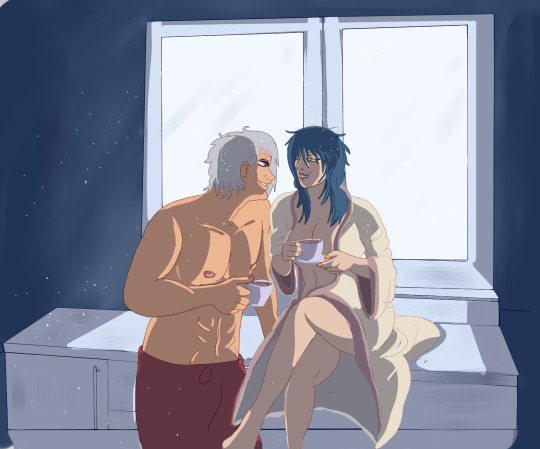
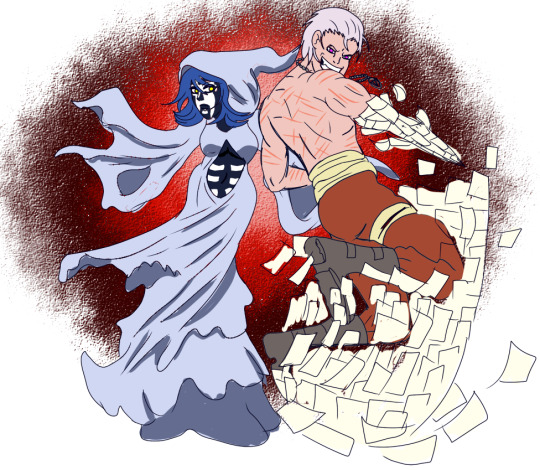
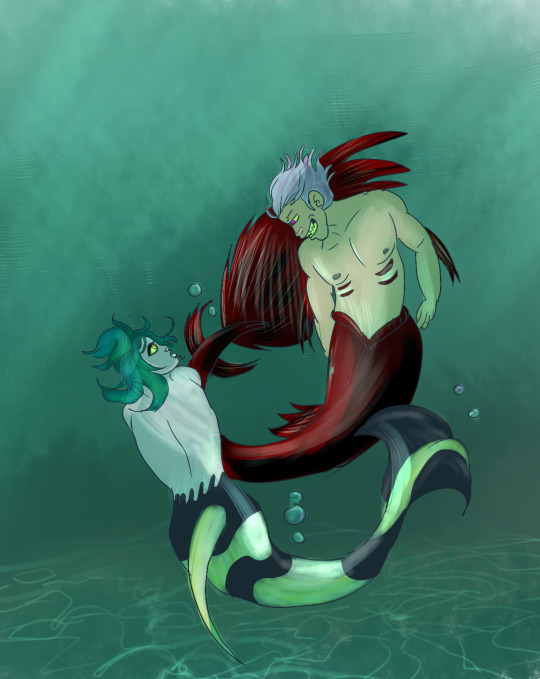
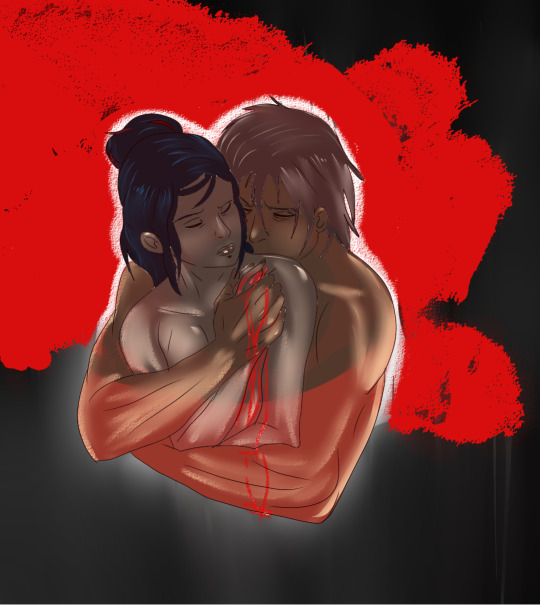
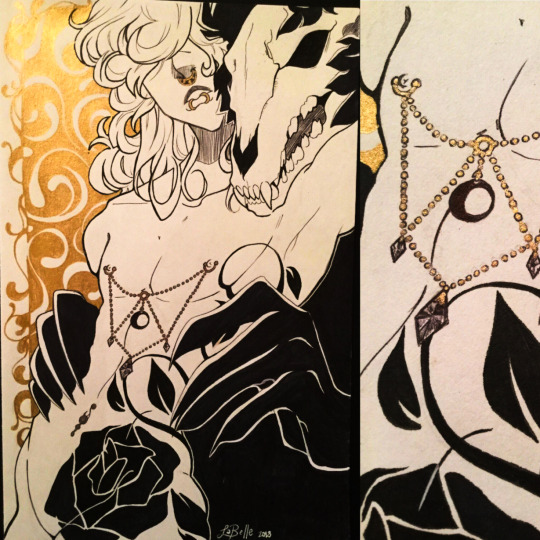
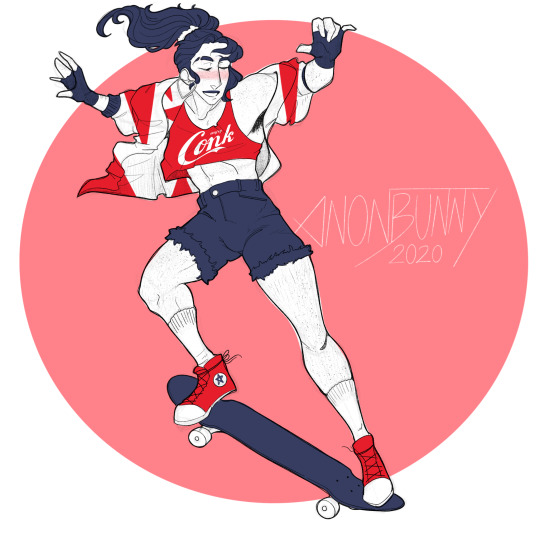
#wilbur soot#tommyinnit#badboyhalo#quackity#ranboo#tubbo#technoblade#dsmp#dream smp#dream smp fanart#dsmp fanart#woo!! wouugouoU!!!!#this was so fun i havent worked this concentratedly in AGES#we practice a little painting. we practice a little lineart#hardest to get right: all of them oh my god jaw/cheekline is still so hard#now#now art#milestone#3k
2K notes
·
View notes
Text
Art Block tips that helped me
I’ve recently experienced art block after 3 or so months of overcoming my last one. Thankfully this block only lasted a few days thanks to some things I’ve observed and noted down from the previous time. So I’m sharing these few tips in hopes that it might help someone get unstuck :D!
First and foremost if you’re tired, sad or anxious don’t be surprised that you can’t make art, go and take care of yourself by treating yourself with kindness and patience, the sketchbooks and canvases will wait for you :)
The tips are under here:
Separate art studies from the creative time: When you do art studies you’re there to focus on specific things, learn and understand how things work so you can apply them later in your art. Studies take a lot of energy and focus and are the opposite of the creative "flow” of making your own pieces. If you combine the two the results are either unfocused studies or stiff drawings. When you sit down at your desk ask yourself “Do I want to learn something new or do I want to create something of my own?”
When you have an idea don’t be afraid of being messy: Let’s say you want to make a picture of several cats kolo dancing in the moonlight. How do you go about doing this? Well since you came up with the idea you already have a vague image in your mind, sketch it out with simple shapes, stick figures, circle and spheres etc Don’t worry about cat anatomy, or the dancer’s moves, sketch out the essence of it. This method removes the need to be perfect or accurate.
Ok after the messy sketch then what? Well now that you have sketched out the essence of your idea (and hopefully had fun doing so) now you go on to look for references! You put the creative process on pause and you can do a few brief studies if you need to: anatomy, color schemes, values, poses. Pick out a few of your favorites but don't obsess over them, they are a guide, a tool.
You know much more than you think. You’ve probably been drawing for a few years now. You’ve probably done some studies and drawn more than one type of subject. Then you have already internalized some of that information. I used to be obsessed with capturing the minute detail of the subject, and not be able to draw ANYTHING without reference. Instead of a useful tool, references became another obstacle to my creativity. That’s perfectionism my friend, and that’s no good. Here is an exercise a good friend of mine offered: Draw a few characters, animals and objects from imagination. Make sure that the subjects have no personal value to you (no ocs for example) so that if you make a mistake you won’t feel bad about it. Make the process relaxed and comfortable, pour a nice cup of joe, listen to your favorite music ... You will notice that you do indeed know how to draw some things without reference, and it’ll help with your confidence.
The more you do studies the more you understand This seems evident but the more you understand your subject the freer you can be and the easier it’ll be to draw it from imagination in the future. If you really struggle with something to the point of frustration (as in you can’t get it right even with reference) It means you have to study it. Have a study list, for example: hands, perspective, color theory etc. And one of those days you want to study pick something from the list, and look for videos on youtube or useful sites like line of action etc. Only study one thing at the time. You can go from studying hands to studying arms since they’re more immediately connected, but you can’t study hands and then jump to learning perspective right after. Trust me you can learn perfectly fine with the resources online, and I’m sure you’re clever enough to do it :D
Mistakes don’t mean you “suck” I’ve noticed that the two most common causes for art block are perfectionism and lack of self-confidence. The two can often go in tandem which is worse :’D But let me remind you of something, you can fix your piece along the whole process. Use erasers, lasso tools, liquify , select, paint it all over etc If something looks off to you then you also know deep inside how to fix it. Useful ways to see what clunks: flip canvas horizontally (helps with placement, proportions), turn the image to grayscale (helps to check values and where your eye tends to look), look at your image in thumbnail size and ask yourself if it’s clear, see the pose’s silhouette and ask yourself if you can tell what the character is doing etc. Don’t fret, everything can always be fixed :)
Perfectionism, sometimes it stops you before you begin Perfectionism causes you to overwork a piece, it makes you draw less, it makes art stressful, it brings insecurity. Let’s remove it with a simple exercise. It can be combined with the “draw things from imagination” once you’ve drawn something you like: dont do line art, don’t shade it, keep it as simple and crude as possible and then...post it. Yes, post it. You’re not at your best? You’re only human, this will help you embrace that very human side of you. You make mistakes. So what? The more mistakes you make the more you know what you need to study and the better at art you become. Mistakes are there to show us what we need to learn. See them as another tool and not a sign of failure.
Make the process as enjoyable as possible: You like art. You love drawing. Never forget this. Otherwise why are you drawing if you don’t enjoy it? It’s easy to fall prey to the mentality of those relatable memes that “art= suffering” or “I can’t even draw the other eye”. No no no my friends, these messages are fueling your insecurities instead of overcoming them. Let me tell you what, art is fun. It is. Art is fun, because I decided to make it fun again. And you should decide on that too. Personally I adore lineart but my hand-eye coordination is lacking to do it digitally, so....I just skipped it. Yes. I skipped it. I do the sketch, I clean it up a bit and then jump onto color which I adore. It allowed me to draw more and more freely. When I draw I listen to music, make strokes with the rhythm, I take breaks often and I drink my favorite iced teas. If you don’t like coloring do it in grayscale, if you love lineart then do that etc It doesn’t mean you won’t learn your weak points in the future with studies and practice, but you won’t let your weaknesses prevent you from drawing at all. No no, you won’t let them. You draw because you want to, despite of them.
Don’t wait for inspiration, provoke it Inspiration is not a divine and capricious muse. You make inspiration. It’s easy just collect all the things you like, music, artists, objects, characters, animals, patterns, plants etc Make boards on pinterest or similar sites, combine things you like. You like suits? You like birds? You can draw a bird in a suit, or a bird-inspired suit design, there is frankly a lot of ideas that can spring up from little things like these.
When a project stops being enjoyable either pause it for now or move on to the next thing. Pieces aren’t precious. They’re not “the one time I got x right” they are one of many. This advice goes mainly to hobbyists who can afford the luxury of passing to a new project. I have a WIP of a character who is overly complicated (I enjoy a challenge from time to time) sitting for half a month. I sometimes come back to it and add something... but as soon as it starts to create discomfort and insecurity instead of enjoyment I move onto something else. In the meantime I created 3 or 4 new pieces. If I had waited on finishing that piece I would have been severely creatively and physically exhausted. The art comes from you, not inspiration. The more art you make the better you become.
That’s about it :D I know it’s long but I prefer to be thorough and cover all the possibilities. If you have read of this: Thank you so much I hope this helps you at least a bit, if it helps only 1 other person I’d still be very happy. Have a nice one, and kick art block’s butt!
#art block#art block tips#art block advice#art advice#art help#BloggityDiary#art reference#I hope this will help someone out#This will also help me remember my own advice sksksk
200 notes
·
View notes
Photo
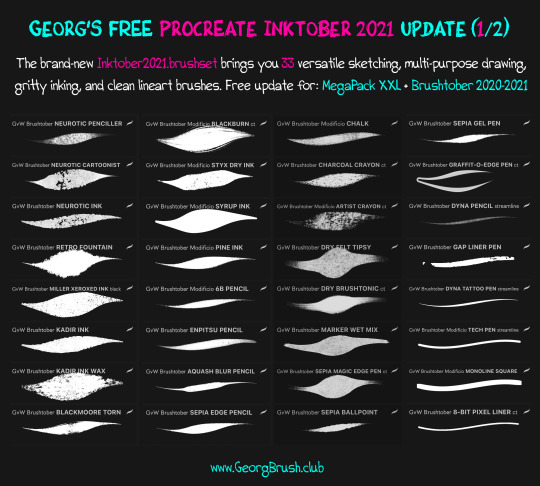

70+ New Brushes/Free Updates: Georg‘s Procreate INKTOBER + BRUSHTOBER 2021 Brush Sets
Hi guys! I hope you’re all well and enjoying a creative #Inktober. I just uploaded more than 70 amazing new Inktober/Brushtober brushes as a free update to my 2000+ Brushes Procreate MegaPack XXL (Gumroad + Sellfy versions) as well as to my Brushtober 2020-2021 Brush Bundle. (Note: To avoid confusion with my first Inktober 2017-2019 brush bundle, I renamed this second Inktober 2020-2021 bundle “Brushtober 2020-2021” since it includes many inking as well as matching drawing and painting brushes.)
My free Inktober/Brushtober 2021 update brings you 2 exclusive new Procreate .brushset files, each one containing a broad variety of awesome brushes:
Brushtober2021.brushset - 38 amazing natural media, dual color, wet mix, and creative painting brushes
Inktober2021.brushset - 34 versatile sketching, multi-purpose drawing, gritty inking, and clean lineart brushes
Free Procreate “MODIFICIO” Bastard Brush Family
Both .brushset packs include a variety of popular MODIFICIO brushes from my Procreate brush making workshops. They evolved from our favorite Procreate default brushes, which we combined with dual brush passion, tweaked with drainting love, and optimized together with international artist friends.
Optimize Your Favorite MASHUP MODS In Procreate Brush Studio
The MODIFICIO brush series is also great if you who want to start making your own cool brushes! If you compare the brush dynamics and strokes with those of the respective default version, you’ll get a very good feeling for the different brush settings and how they modify the original brush to fit your needs. Just play around with your favorite brushes in the Procreate Brush Studio - I’m really curious what you come up with. You can always use the “Reset brush” option to reset all changes to your last saved version. I recommend keeping a backup copy of the original brush nonetheless.
Georg’s Inktober 2021 Favorites
You’ll also get some of my personal favorite brushes which I designed for my latest UTOPIA comic book projects to give the drawings a loose, hand drawn look and feel.

Quick character doodles with the new Inktober 2021 SEPIA EDGE PENCIL brush

Quick portrait sketch doodles with the new Inktober 2021 KADIR INK WAX brush
Introducing The “NEUROTIC CARTOONIST” Sketch’n Ink Brush
The NEUROTIC CARTOONIST multi-purpose brush is one of my go-to brushes for loose sketching and dynamic gritty inking as well as for details, cross hatching and consistent erasing. The brush is pressure, tilt and speed sensitive closing the gap between pencilling and inking with broken lines and lots of “happy accidents”. I barely used the brush size and opacity sliders for the shown sketches and drawings. All variance in the different strokes can be achieved just by pressure, speed, and tilt angle of your stylus/Apple Pencil.
Cover/Illustration detail sketched and inked with the Inktober 2021 NEUROTIC CARTOONIST brush
Love Your Symptom Like Yourself: NEUROTIC DRAINTING
BONUS Brushes: You’ll also get a matching pencil as well as an ink brush from my NEUROTIC DRAINTING dual brush series (“Drainting” = Drawing + Painting). Enjoy the ride! 😊
Comic pages sketched and inked with my beloved NEUROTIC CARTOONIST. Colored with the new Brushtober 2021 GEORG WATERCOLOR brush.

Featuring Georg’s Favorite Procreate Dual Watercolor Brush
The Brushtober GEORG WATERCOLOR dual color brush is awesome for watercolor and aquarelle painting in Procreate. You can easily mix and pull colors using low pressure, pencil tilt will add secondary color flow. It may take a little practice to master, but I think it’s one of the most natural and versatile watercolor brushes out there.
I included three versions for you: “normal”, “multiply” (natural color darkening for overlapping strokes), and “screen” (color brightening, unusual for real watercolors but great for highlights and natural color shading).
Use “Color Tilt” For Beautiful Dual Color Strokes
Like many of my favorite paint brushes the Brushtober2021.brushset makes use of a feature I called “Color Tilt”. The suffix “ct” in a brush name indicates that you can add any secondary color flow to your brush stroke just by lowering the angle of your Apple Pencil. Check out this blog post to learn more about using my color tilt brushes and how to de/activate this amazing feature.
youtube
Time-lapse illustration for our upcoming comic book with the new NEUROTIC CARTOONIST and GEORG WATERCOLOR brushes.
Free Downloads For MegaPack XXL and Brushtober 2020 Brush Set Owners
As always, you can download all updates for free in case you already purchased one of my updated Procreate brush sets:
Procreate MegaPack XXL (Gumroad + Sellfy versions)
Brushtober 2020-2021 Brush Bundle (renamed “Inktober 2020” bundle, Gumroads, Sellfy, and Creativemarket versions)
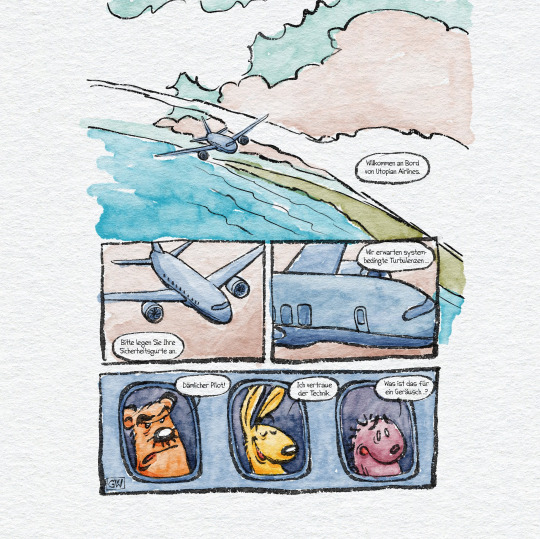
I’m sorry that I didn’t have the time for social media activities and updates lately. I was working with amazing artists on different comic projects and exhibitions. Our Cologne comic anthology just hit the stores while I’m doing research and sketching for a 200+ pages science comic book.
Please apologize that I couldn’t answer all emails and react to social media postings in a timely manner. To address the most common installation/download/support questions I set up a brush wiki with FAQs and step-by-step instructions: wiki.georgbrush.club (work-in-progress)
In case you can’t access your account/orders/purchases or have troubles downloading free brush set updates please contact support@... (gumroad.com / sellfy.com / creativemarket.com) depending on where you placed your order.
How To Download & Install Procreate Brushes?
.ZIP File Troubleshooting
Re-Downloading & Updating Georg's Procreate MegaPack XXL
Check out my new GeorgBrush Wiki for more info, brush demos, tipps & tricks
Hope you enjoy the new brushes and find them useful!
If you like to support my work, please feel free to check out georgvw.gumroad.com and spread the word about my brushes.
Best wishes and happy inking!
–Georg
#Procreate#MegaPack XXL#MegaPack Updates#Inktober#Brushtober#ink#waatercolor#pencil#pen#marker#brushpen#illustration#drawing#painting#dual color#oil paint#acrylic#wax#Modificios#featured#free update
52 notes
·
View notes
Note
Hi Chekhov! Really enjoying your white diamond au! I had a quick art question: How do you start comissions? I've been improving my drawing skills and thinking about drawing for others after having fun in artfight, but I don't know where to start? How much to charge, how to get paid, etc. Do you have any tips? Hope you're doing well! :)
Alright, since a few people have asked, I’ve decided to put together a few things about how to get started on commissions - what you need, what you should make, and how to keep things organized.
This will get a little long, so I’ll divide it into 4 main sections:
1) Draw Art - Getting started
2) Get Commissioned - Making a commission sheet, Advertising
3) ??? - Communicating, Setting Limits, Running the Business
4) Profit - Pricing Yourself and Getting Paid
* Disclaimer: I’m an artist, so this How-To will be illustration-focused. I’m sure many of these tips can apply to ANY types of commissions, but I will be focusing on the type I know best. If you are proficient in other types of commissions for other types of art - music commissions, photography, etc - feel free to chime in and leave a comment or make your own tutorial!
1) Draw Art
I think this is probably the most obvious part, but it needs to be said:
Before you start making art for other people, you must first be comfortable making art in general.
I’m not saying your art has to be Disney-quality, or industry-level! Not at all.
BUT! You must be comfortable creating what you sell. If you try to sell something you have little confidence in, you will stress yourself out and possibly end up losing time AND money.
Don’t shoot for the moon if you haven’t landed on it even once. Sell what you know you’re good at. Your commissions don’t HAVE to include full-body illustrations if you don’t know how to draw feet/solid stances. Limit yourself to what you can do.
Things you need to should probably have before starting commissions:
1. Access to art materials or a fully downloaded art program
DO NOT - Use a free tutorial version that will expire in a month and leave you without a way to draw! If you are having trouble finding a program, try free ones like MediBang Paint Pro.
2. Free time to complete the amount of commissions you want to take.
DO NOT - Take on or offer commissions if you KNOW you’re going to be overwhelmed with school or personal life for the next 2+ months. Pace yourself, otherwise you’ll burn out, get stressed, and get discouraged.
3. A reliable way to communicate with your customers like a commissions-only email
DO NOT - Use your friend/family/college email. It’s hard to keep track of things as it is, and creating new emails is easy and free. And keep it professional if you can! Not many people will reach out to dong-wiggles20434 to ask for a design. Ideally, your email should be close to your brand - however you want to brand yourself. Usernames are fine!)
DO NOT - Use Instagram/Twitter/Tumblr to collect commission info unless you are ready to do the organizing yourself. Some people make it work, but in my experience, if you use these SNS sites to communicate with friends and network... you’re going to be losing commission inquiries right and left and accidentally ignoring people. Email is much easier to organize and sort into folders.
4. A portfolio or at least 2-3 pieces of each type of art you’re planning to sell.
DO NOT - Advertise commissions without having any examples of the art you plan to sell. People will find it difficult to trust you if you can’t even give them a vague idea of what sort of drawing they’ll be getting.
Disclaimer: These are not hard ‘do not’s. If you have had a different experience, I respect that. I’m simplifying for the sake of streamlining this advice.
.
2) Get Commissioned
So - you have your art, you have your art program, and you’ve got all the time in the world. That means.... that’s right! It’s time to let the world know you’re taking commissions.
One of the most common ways artists signal to their audience that they can do commissions is by creating a commissions sheet. There are MANY ways to make this - and they range from simple and doodly ones to VERY complex designs. For example, here’s mine!
There are many ways to organize a commission sheet. At its core, a commission sheet should display the types of art you WANT to be commissioned to make. Let’s go over a few ways they can be done!
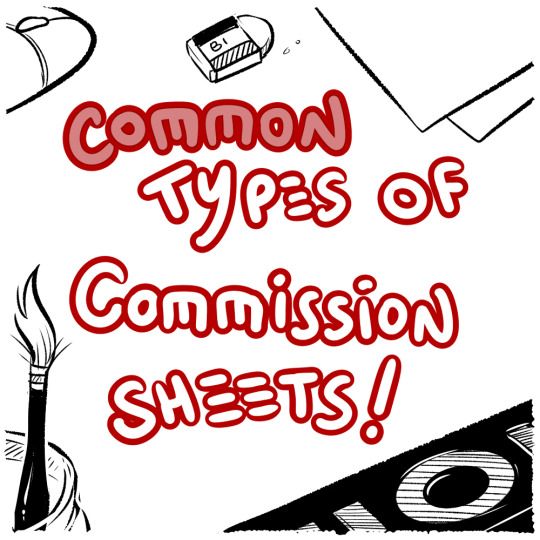
#1.... Body Portion Dividers!

This sheet is most common with those who want to capitalize on drawing people and characters. If you want to draw lots of characters, this is a great way to offer several tiers of pricing based on how much of their character your customers want to see.
#2... Complexity Scale
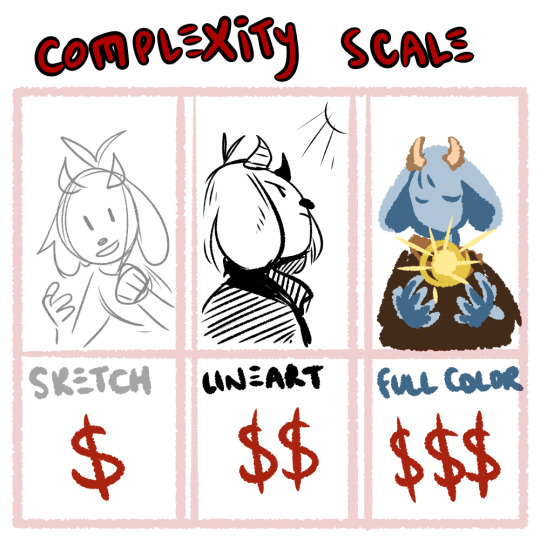
If you’re open to drawing many things but want to base your pricing off of how complex something is, you can split your tiers into done-ness. This type of commission is popular with those that draw characters AND animals, furries, etc.
#3.... Style and Type

If you’re more on the design side of things, or if you have various niche art styles that you can’t quite lump together, display a variety of your skills alongside each other! It helps if all the ones you have can be organized under a common customer - like those looking to advance their own business and get logos, websites, or mascots made for them!
.
3) ???
You got your first commission... what happens now???
Well, ideally you have the time, tools and motivation to make things happen! Now all you have to do is... sit down and... draw.......
I’m going to say something that may be a little controversial:
Commissions aren’t fun.
No, no, hear me out: I have fun doing commissions! I genuinely enjoy drawing characters and coming up with designs. But even with all that said, commissions are, first and foremost: WORK
I’m not saying this to discourage you, I’m saying this to keep things realistic. When I first began commissions, I thought it would be just like any other type of drawing. I would sit down, imagine a thing, draw it... it would be fun!
But then I realized that I couldn’t just draw what I wanted - another person had an idea in mind and had asked me to do it. I stressed over getting the design correct from descriptions. I stressed over not having the right reference for the pose the commissioner wanted. I stressed over not being able to draw the leg right in the way I had promised I would do. I stressed about billing. I stressed about digital money transfers. It was difficult, and time-consuming, and I did not enjoy it. At all.
And a part of that is definitely on the commissioner - we, as artists, NEED to demand proper references or descriptions. We, as artists, NEED to limit the amount of changes we’re going to make at the flick of a finger. We NEED to demand clear instructions and set boundaries. That’s also super important.
But also - don’t be discouraged if you find yourself exhausted drawing your first commission. MANY artists go through this. Adjust your rules, fix up your limits, practice putting your foot down on finicky commissioners who expect you to read their mind! It does get easier, but you have to communicate and put in the effort and act as your own manager AND your own customer service AND your own accountant. That’s what you’re looking at.
Good limits and boundaries to set:
Limit the amount of changes a person can ask to make. “I want blue hair.” Next email: “No wait, yeah, make it red.” Next email: “Actually I changed my mind, can I get the blue but like, lighter?” Next email: “No, not that light.” ... At some point, we have to stop. I personally allow 2-3 changes on the final stages of a commission before I start refusing or start asking for extra money.
Demand clear instructions and/or references. If something isn’t described, you have to take artistic liberty and design it, but that’s difficult! And if the customer is not happy with it but can’t tell you more? That’s not your problem - the burden of reference is on THEM. You cannot read their mind, and that’s not your fault.
Get at least half the payment up front! This is a good balance between the ‘pay before art’ and the ‘pay after art’ conundrum that will limit the amount of woes between artist and customer. (I’ll touch upon this a little more in the Profit section.)
Organization:
Where possible, create good habits! Tag your emails and organize your folders. I have a tag on my emails for active and finished commissions. I also keep my emails on Unread until I have time to sit down and properly look at/reply to them.
My Commissions in the folder are also organized chronologically and I mark down which ones are paid and which ones are not.

(I understand not everyone can do this, but if you want to give it a try, it does make things easier in the long run. Again, this advice is just what I have found personally helps.)
One last thing - I do not want to shame ANYONE for taking their time with commissions! Commissions are complex, and they take time and work. You can draw in 8 hours, but some things take research, materials, etc. Some illustrations realistically take up to half a year, or, depending on what’s involved, several years!!
THAT BEING SAID - it’s good manners to be upfront with your customers about how long you expect the commission to take. If you think you’re busy, just say that! Explain that you have a lot going on, and you will probably take (insert time period here).
And if your commissioners are worried, work out a system to keep them updated! I send my commissioners updates when I finish the lineart/flat colors/etc and I try to be clear about how long everything will take. I try to estimate with a +3-5 days buffer to give myself extra time... and recently I’ve been using it. Always say a bigger number than you think you’ll need.
If someone wants a rushed commission... make them pay more. If ANYONE wants a commission done ‘by the end of the week’ - that’s an automatic rush-job for me because I’m juggling an irl job and several commissions at once. I WILL charge a rush fee and I won’t feel bad about it.
If someone wants a commission within 24 hours...... Well, they better be paying you 3x your normal amount, or more. And remember - you CAN refuse! It’s perfectly reasonable to say ‘No, sorry, that sort of turnaround time is not realistic for me.’
Food For Thought - Invoicing
Many artists I’ve commissioned in the past have not used Invoicing, but I’ve recently begun to fill out invoices and file them in my Commissions folder just to keep track of things. It’s not necessary until you start getting into the Small Business side of Freelancing, but it’s not a bad idea to get into the habit early in case you might need to do it later for tax purposes.
Here’s what my Invoice looks like, for example.
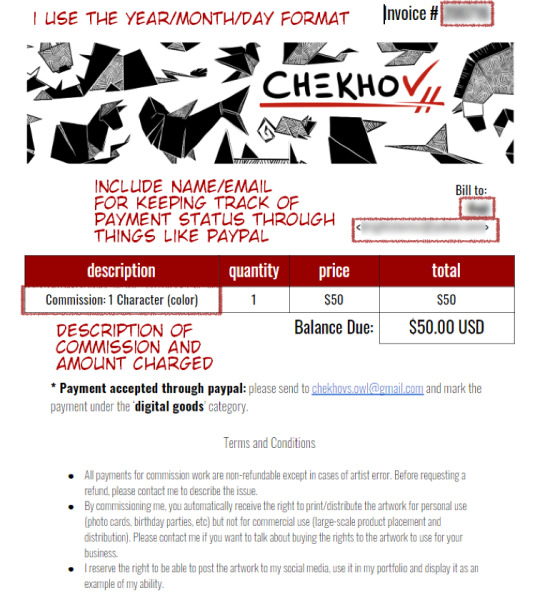
I’ve optimized it to help me remember who, what, and how much is involved! It also contains important info for my customers like where to send the money.
Which brings us to...
.
4) Profit
One of the hardest things for artists is pricing themselves. I’m not going to tell you which way is BEST - there is no BEST way, only the best way for YOU.
One of the options available to you is pricing by the hour. It includes averaging out how long it takes you to draw a specific type of art (whatever you’re offering as a commission) and multiplying that by an hourly wage you’ve decided on.

When you do this, I stress - do NOT price yourself below minimum wage if you can help it. When you first start out, aim for the $15/hour mark and adjust accordingly.
Other ways to price your art:
- Per complexity: Portraits vs full body should be scaled based on how difficult you find one vs. the other. You can also easily decide on a price for a sketch and double it for lineart, triple it for full color, etc.
- Per type: Look up for industry prices for website design and logo design. They may surprise you! You don’t have to charge that much, but it helps to keep things in perspective.
It’s okay to change your prices! Keep your commission sheet image handy so you can update the amounts as you grow. :)
Payment up front or after completion?
Some artist take full payment up front. Some only demand payment after they’ve finished and sent out the piece. I personally think these are both risky for everyone involved.
I recommend doing at least HALF of the payment BEFORE you start the commission. Calculate your full price and ask for half before you start working on it in earnest, to make sure the person can actually pay you. Then, when they receive the full piece and are satisfied, they can complete the payment.
I personally work in this structure:
> Someone emails me with their idea/reference
> I send back a rough draft sketch that shows the idea/pose (only takes me 10-20 minutes so not a huge loss if they ghost) and quote them a price
> They can pay the full thing upfront OR pay half
> I finish the commission and send updates when I do the lineart/colors to double check anything so they have multiple chances to spot any errors
> If the person paid only half on completion, I send them a low-res version of the finished thing, they finish up their payment and THEN I send them the full-res version plus any other filetypes/CYMK proofs, etc.
Many of the people who commission me pay me up front even though I offer they pay half - and I’m really flattered that they trust me that much! Because of that, I feel encouraged to update them frequently and ask for their input as I work, so they have the peace of mind knowing I’m actually doing their commission.
Great, but how do I get PAID????
There are NUMEROUS ways - these days money is relatively easy to transfer over digital means, and you have a few options.

Paypal is perhaps one of the oldest digital wallets and is geared towards businesses. By setting up a PayPal and connecting it to your debit card of bank account, you can tunnel a pathway from your online business directly into your hands in a matter of days.
Paypal also offers Invoicing - you make an invoice, price it and send it to the person’s email and they can pay whatever way they need! (It also allows partial payments.)
Pros: transfers from PayPal to bank account are free, and take a couple of business days. It also has no upper limit to the amount of money you can move in/out each month. It can force refunds due to the nature of its business-oriented payment system.
Cons: Because it’s used by businesses for larger transactions, PayPal may demand a more rigorous proof of your identity. It may also take longer to set up and be harder to get used to. I’ve also heard that they can be a hassle when it comes to closing your account.

Venmo is another type of digital wallet that acts much like paypal, except for a few key differences - it is NOT made for businesses (so depending on whether you’re officially registered as a freelancer, you may not be able to use it). I personally don’t use venmo, so I cannot speak to its usefulness, but I know a few people that use it for casual transactions. It’s easy and quick! :)
Keep in mind that you cannot force a refund over venmo! The transactions are final.
There’s also CashApp, GooglePay (which could load gift cards but also allows peer-to-peer transactions) and I’ve heard good things about Due, though I’ve never personally used it.
Other ways to pay: I’ve had people pay me over Patreon by upping their pledge, and I’ve had people pay me over Ko-Fi by donating a specific amount.
Many people even use Etsy - the website specialized for independent small businesses selling art - by listing their commission sheet and offering up several ‘slots’ of commissions, which allows you to track taxes AND allows your clients to pay using whatever they feel comfortable with.
If you’re in Canada, you can even pay by emailing money directly from bank account to bank account - check whether your country offers this type of service! There’s no shortage of ways to move money in the digital world.
Just like everything else, there’s no singular ‘Best’ way. It just depends on what works for you.
I think that just about wraps it up! I can’t quite think of what else to put here - but I’m sure other artists will chime in with their own advice. :) I’m very sorry this became so long but I hope it was helpful!
Obligatory Disclaimer: I’m not qualified to give legal or accounting counsel. Please double-check the laws in your own country/state in regards to taxation of freelancing work and do your own research. If you are underage, DEFINITELY get an adult’s permission before you start doing commissions, and have the adult help you through the process.
. . . . . . . . . . . .
OTHER POSTS YOU MAY FIND USEFUL:
An Extended Post on Pricing Yourself for Commissions
Dealing with Imposter Syndrome/Feeling ‘Not Good Enough’
Growing Your Audience
Advice for Starting Digital Art
2K notes
·
View notes
Note
Did you study the art of comic somewhere? If so, where did you study? I love the way you work!
I've mostly learned by doing a LOT of comics, but I have some experience from school too! Also being surrounded by incredibly talented friends helps a lot, so I always have someone to ask for advice and to talk about ideas etc.
I've actually thought about making a series of tutorials or studies, and post them on patreon for free (it’s the easiest place to archive stuff right now imo) I'm not yet sure if I have anything important to say but if it turns out to be useful to at least one people I think it’s going to be worth it haha!
so far I have planned on writing about the following;
the most important thing first... learning how to learn! figuring out your goals is the first step, and then thinking about how to get there. Are you a visual person, or more of a storyteller? there are so many aspects in comics, and it took me a while to come terms with the fact that I'm not really a drawing person, but more of a storyteller and writer, for example. sometimes people mix up illustrations with comics, which can lead in comics that are incredibly pretty but hard to read.
I also have some pretty extreme practises I learned in school that have been helpful to me, but they might not be helpful to everyone. most of my art teachers I've resonated the best with are from Russia or Eastern Europe, and they have usually a very different approach to art and the practice of making art that I see discussed online these days. so I hope people will read those parts with this in mind.
the next part would be about tools. I still consider myself a traditional artist, even if I paint my comics digitally these days. the lineart is still drawn on paper, and I only make colour work on traditional media, so there’s going to be a lot of talk about that! I don’t see too many trad media tutorials online so I hope it’ll be helpful for people wanting to try entry level stuff, as well as for people who are more familiar with trad art. I also started out as poor trad artist, so in this tuto I will also talk about how to get into trad art with literally zero budget lolol...
the last part I've thought about is the making of comics itself. and in my tutorials the emphasis will be heavily on the storytelling aspect, not the drawing. mostly I will write about how to use different storytelling techniques to cut time and focus on the parts that matter and will keep you, the creator hopefully satisfied with your work. these are more like little tidbits that I've used in Tiger, Tiger to make the progress faster, like making montages, and cutting the doing part of the action off, so we get from starting to finish right away etc etc.
these might seem a little self explanatory, but man I wish I had realized some these things earlier myself hehe! I will show some examples from Tigers, and I hope some people will find those things helpful!
EDIT// also feel free to suggest any topics that you think I might be able to give some insight on!
126 notes
·
View notes
Last Seen Blogs
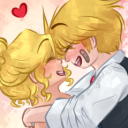
kg2hub
The Biggest Theonny Stan
samaelwinchester
just woke up and im canky

dasturimmigration
Untitled

haveyouseenthisseries-poll
Have you seen this series?

mqultra
Untitled