#wireguard
Text
How to Set Up WireGuard VPN on Amazon Linux 2

Here is complete guide about setting up WireGuard VPN on Aws Cloud EC2 or Lightsail instance running on Amazon Linux 2.
3 notes
·
View notes
Text
Excited to share our experience installing WireGuard in the RK3588 Forlinx Desktop image!
Successfully mounted the image to a directory and used the chroot command to install WireGuard.
0 notes
Text
La VPN para cubanos que acepta Qvapay como método de pago
¿Estás buscando un servicio económico de VPN que puedas pagar desde Cuba sin ningún tipo de problema? Pues tengo la solución, conoce a: https://www.is-remote.dev, un servicio que cumple.
Con un módico precio de 1 usd mensual o 10 usd anuales, una sola ubicación (EEUU) y tráfico ilimitado. Y puedes pagarlo usando Qvapay, el proceso es automático.
Para los usuarios que deseen probar el servicio de manera gratuita, de vez en cuando salen cupones de descuentos que permiten usarla 1 mes sin pagar. Aquí les dejo uno: 2023-coupon-gJ78tTy-29, apúrate que son limitados los cupos.
0 notes
Text
QNAP + WireGuard: Einrichtung eines VPN-Servers mit QVPN Service
In diesem Artikel konfigurieren wir einen WireGuard VPN-Server auf Netzwerkspeicher von QNAP mit dem QTS und QuTS hero Betriebssystemen. Dafür installieren wir die Anwendung QVPN aus dem AppCenter. Alternativ bietet es sich auch an, WireGuard auf klassische Weise unter Linux zu installieren, z. B. über die Virtualization Station oder als Container mit der Container Station...[Weiterlesen]
0 notes
Text
0 notes
Text
Wireguard with Netmaker VPN
If you've ever wanted to set up a #wireguard mesh network then #netmaker might be for you. I've written up a blog post here: https://tech.davidfield.co.uk/2023/03/25/netmaker-wireguard-mesh-vpn/ which shows how to do this.
There is also included in this some work I'm doing with #tailscale which might help resolve part of my ask.
#blog#vpn#network#selfhosted#homelan#homelab#howto#tech blog#opinion#techblog#linux#tech#wireguard#tailscale#netmaker
0 notes
Text
Docker, Mullvad, Socks Proxy, and Automatic Networking Configuration
Mullvad runs their Socks proxy server on 10.64.0.1. But our wireguard is running in a container so the system does not know how to reach this IP address.
We need to tell our system how to reach this IP address via our container's IP.
To selectively route traffic via the proxy, we need to provide a .pac file to Firefox. A .pac file contains a function which decides which URL/host should be proxied. Under network settings Automatic proxy configuration URL it accepts a URL or we can specify a local file using file:////path/to/proxy.pac.
The linuxserver/wireguard image expects a wireguard configuration under /config/wg0.conf. Get your mullvad config from here https://mullvad.net/en/account/#/wireguard-config, and extract the downloaded zip into a wg folder. Rename the config you want to use to wg0.conf. If you don't have IPv6 then remove the IPv6 addresses from the wg0.conf file, otherwise the connection might fail.
Lets create the required files.
Copy the following into docker-compose.yml:
--- version: "3" services: wg: image: lscr.io/linuxserver/wireguard container_name: wg cap_add: - NET_ADMIN - SYS_MODULE environment: - PUID=1000 - PGID=1000 - TZ=Europe/London volumes: - ./wg:/config - /lib/modules:/lib/modules ports: - 51820:51820/udp - 1080:1080 #for socks proxy sysctls: - net.ipv4.conf.all.src_valid_mark=1 restart: unless-stopped
Copy the following into start.sh:
#!/bin/bash #start wg service docker-compose up -d docker exec wg curl --no-progress-meter https://am.i.mullvad.net/connected #enable nat inside the container docker exec wg iptables -t nat -A POSTROUTING -o wg+ -j MASQUERADE #get ip address of wg network wg_ip=$(docker inspect -f '{{range.NetworkSettings.Networks}}{{.IPAddress}}{{end}}' wg) echo "wg container ip is $wg_ip" #add route to mullvad socks ip sudo ip route add 10.64.0.1 via $wg_ip
And, make the script executable:
chmod 700 start.sh
Copy the following to `mullvad.pac':
const proxyList = new Set(); //add domain names below proxyList.add("mullvad.net"); //proxyList.add("anotherdomain.com"); function FindProxyForURL(url, host) { return proxyList.has(host) ? "SOCKS5 10.64.0.1:1080" : "DIRECT" }
Open Firefox's network settings and add the path to mullvad.pac file under Automatic proxy configuration URL.
file:////path/to/mullvad.pac
Now if you visit https://mullvad.net/en/check, it should be all green.
0 notes
Photo

哎呦,不错呦。远程操作电脑速度还可以哦! #wireguard #RDclient #ipad https://www.instagram.com/p/ClDXU4FJADW/?igshid=NGJjMDIxMWI=
0 notes
Link
Mozilla VPN is a security feature by Firefox that gives you the ability to connect confidently and keep your information safe from prying eyes and data thieves when you’re online. It uses advanced WireGuard® protocol to encrypt personal data on your laptop or desktop computer — for up to 5 devices. Stream shows, play games, shop, and go about your daily life online.
#zero-day exploit#security#data#mozillavpn#technology#computing#cloud#dataprotection#safety#online#digital#digitalonline#network#web#internet#streaming#vpnprotocol#encryption#wireguard#firefox#mozilla#vpn
0 notes
Text
Mikrotik Wireguard Site to Site
As you might be aware wireguard offers speed and security (over 35% faster over Openvpn). Apart from that Wireguard offers clients for most common platforms, ie Windows, Linux, MacOS, iOS, Android. In that in mind decided to upgrade the hexS to the RouterOs 7 (beta2) and test it with another hexS (which literally takes 3 mins to setup)
For more info visit Mikrotik Wireguard Site to Site
0 notes
Text
Setup Wireguard VPN Server and Client in Linux (Ubuntu / Linux Mint)
Setup Wireguard VPN Server and Client in Linux (Ubuntu / Linux Mint)
This a guide on setting up Wireguard Server on Ubuntu and setting up a Wireguard client.
Requirements:
1. Ubuntu Server 20.04 used in my lab. (20.04 or higher is required for Policy routing)
2. Ubuntu Client (Ubuntu 20.04)
3. Root access to the server.
4. Network Access
Note: This should also work on Linux Mint 20.04
Setting up the Wireguard Server
Login to the In my lab, I have set up a EC2…
View On WordPress
0 notes
Text
Dựng máy chủ VPN với Raspberry Pi và WireGuard

WireGuard là một giao thức VPN khá mới, an toàn hơn và nhanh hơn nhiều so với OpenVPN hoặc IPsec. Nếu bạn đang tìm kiếm một giải pháp VPN an toàn, WireGuard là một trong những lựa chọn tốt nhất. Bạn có thể thiết lập WireGuard VPN của riêng mình trên Raspberry Pi và kết nối tất cả các thiết bị của bạn với máy chủ mà không cần lo lắng về vấn đề băng thông hoặc bảo mật dữ liệu. Hướng dẫn từng bước này sẽ chỉ cho bạn cách thực hiện việc đó.

Ứng dụng WireGuard VPN có sẵn cho tất cả các nền tảng chính, chẳng hạn như các thiết bị Windows, Mac, Linux, Android và iOS. Bạn có thể sử dụng VPN an toàn cho các thiết bị của mình với DIY WireGuard VPN.
Yêu cầu hệ thống:
Bạn sẽ cần những thứ sau để tạo VPN của riêng mình với WireGuard.
- Raspberry Pi 3 hoặc 4 với nguồn điện và case.
- 8GB microSD card hoặc lớn hơn.
- Cáp Ethernet để kết nối Raspberry Pi với bộ định tuyến của bạn.
- chuột và bàn phím USB
Bước 1: Chuẩn bị SD Card
- Tải tool Raspberry Pi Imager trên một máy tính khác và kết nối thẻ SD với máy tính đó
- Chạy Raspberry Pi Imager và nhấn vào Choose OS > Raspberry Pi OS (Other) > Raspberry Pi OS (64-bit).
- Nhấn Choose Storage và chọn thẻ nhớ microSD của bạn. Đảm bảo rằng thẻ trống hoặc không có dữ liệu quan trọng.
- Nhấn Write. Xác nhận khi lời nhắc xuất hiện. Quá trình này có thể mất một lúc để hoàn thành.
- Sau khi hoàn tất, ngắt kết nối thẻ và kết nối lại.
- Mở File Explorer hoặc cửa sổ Finder sau đó mở boot partition.
- Tạo 2 file: ssh and wpa_supplicant.conf (nếu bạn định sử dụng Wi-Fi để kết nối mạng).
- Trong tệp wpa_supplicant.conf, hãy dán thông tin sau (thay đổi AU thành mã quốc gia của riêng bạn và thay giá trị ssid và psk bằng thông tin wifi của bạn) rồi lưu nó.
country=AU
ctrl_interface=DIR=/var/run/wpa_supplicant GROUP=netdev
update_config=1
network={
ssid="MyWiFiNetwork"
psk="StrongPassword"
key_mgmt=WPA-PSK
}
* Mẹo: Bạn nên kết nối Raspberry Pi với mạng hoặc bộ định tuyến của mình bằng cáp Ethernet để cải thiện tốc độ và bảo mật.
Bước 2: Thiết lập và cài đặt PiVPN
PiVPN là một tập lệnh nhỏ mà chúng ta có thể sử dụng để cài đặt và thiết lập WireGuard trên Raspberry Pi. Các bước thực hiện như sau:
- Gắn thẻ nhớ microSD vào Raspberry Pi.
- Kết nối cáp HDMI với Pi và màn hình.
- Kết nối bàn phím và chuột.
- Bật nguồn và boot vào Raspberry Pi.
- Cấu hình các thiết lập ban đầu cho Hệ điều hành Raspberry Pi, tạo tài khoản người dùng cục bộ, cài đặt các bản cập nhật, sau đó khởi động lại. Hãy nhớ tên người dùng và mật khẩu cục bộ mà bạn tạo ở đây.
Sau khi khởi động lại, hãy mở cửa sổ Terminal và chạy lệnh sau để cập nhật các gói.
sudo apt update && sudo apt full-upgrade

Nhập Y để xác nhận (nếu xuất hiện lời nhắc). Quá trình này có thể mất một lúc để hoàn thành. Sau khi cập nhật các gói, hãy chạy lệnh sau trong cửa sổ Terminal để bắt đầu cài đặt PiVPN và WireGuard.
curl -L https://install.pivpn.io | bash
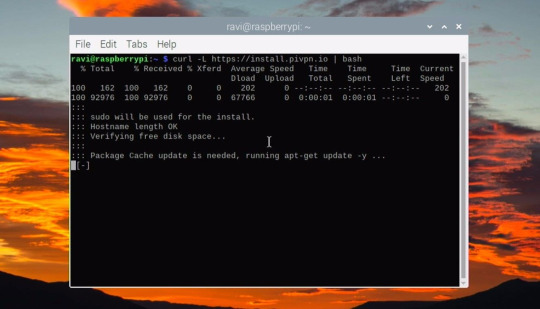
Thao tác này sẽ tải xuống và mở trình hướng dẫn thiết lập PiVPN mà chúng tôi sẽ sử dụng để cài đặt WireGuard VPN. Nếu bạn gặp lỗi curl, hãy đảm bảo rằng curl đã được cài đặt bằng cách chạy lệnh sau trong cửa sổ Terminal rồi thử lại.
sudo apt install curl -y
Sau khi PiVPN được tải xuống, một cửa sổ trình hướng dẫn thiết lập sẽ xuất hiện (như hình bên dưới) hiển thị thông báo “This installer wizard will transform your Raspberry Pi into an OpenVPN and WireGuard server.”

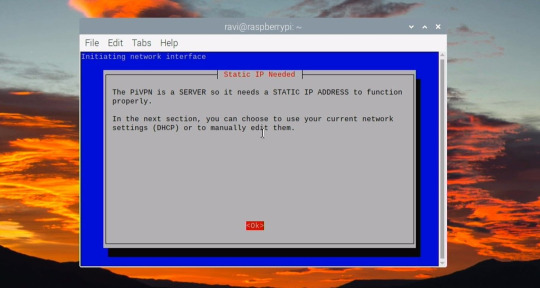
Bạn cần thiết lập địa chỉ IP tĩnh cho Raspberry Pi của mình để ngăn chặn bất kỳ sự thay đổi IP nào sau khi mất nguồn hoặc khởi động lại. Bạn có thể cấu hình IP tĩnh từ cài đặt DHCP của bộ định tuyến. Nếu bạn đã đặt trước IP trong bộ định tuyến của mình, hãy chọn Yes. Nếu bạn không thể làm điều đó, hãy chọn No để thiết lập địa chỉ IP tĩnh trên Raspberry Pi.
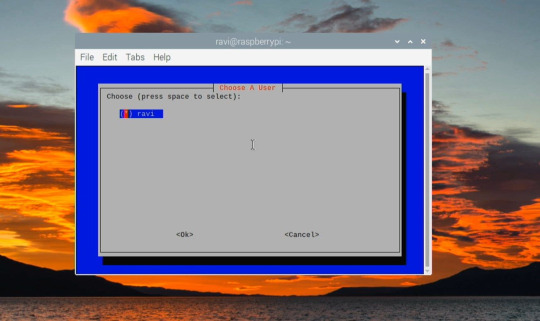
Tại bước này, tên người dùng của bạn sẽ xuất hiện ở đây. Sử dụng các phím mũi tên để đánh dấu và phím cách để chọn User, sau đó nhấn phím Enter hoặc chọn OK.
Chọn WireGuard và nhấp vào OK.

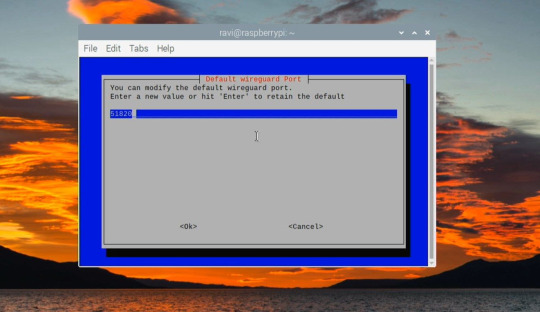
Xác nhận cổng mặc định và chọn Yes.
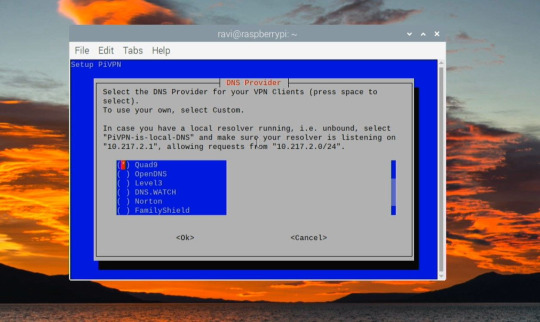
Trên màn hình tiếp theo, bạn cần chọn Nhà cung cấp DNS. Bạn có thể chọn bất kỳ dựa trên sở thích và vị trí của bạn. Nếu bạn sử dụng máy chủ DNS chặn quảng cáo, chẳng hạn như Pi-hole, bạn phải chọn Tùy chỉnh và sau đó nhập địa chỉ DNS theo cách thủ công.
Lúc này sẽ có hai tùy chọn: bạn có thể sử dụng IP công cộng hoặc DNS công cộng. Chọn sử dụng IP công cộng này nếu bạn có IP tĩnh do nhà cung cấp dịch vụ chỉ định. Nếu không, hãy chọn Mục nhập DNS để sử dụng DNS công cộng (cho IP động) và thiết lập DNS động. Bạn có thể chọn từ các nhà cung cấp DNS động miễn phí tốt nhất.

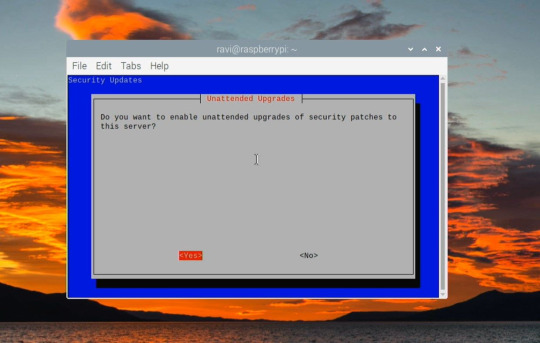
Xác nhận IP hoặc DNS công cộng bằng cách chọn Yes. Ở giai đoạn này, các khóa máy chủ sẽ được tạo. Trong bước tiếp theo, bạn cần thực hiện nâng cấp không cần giám sát. Điều này sẽ tự động cài đặt các gói cần thiết. Chọn Yes để tiếp tục
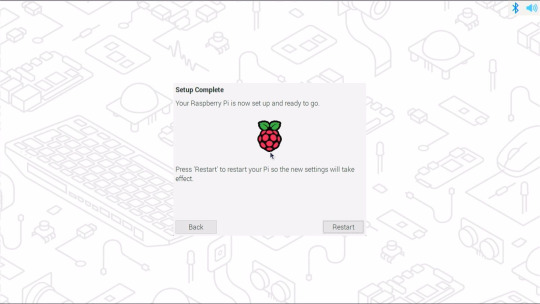
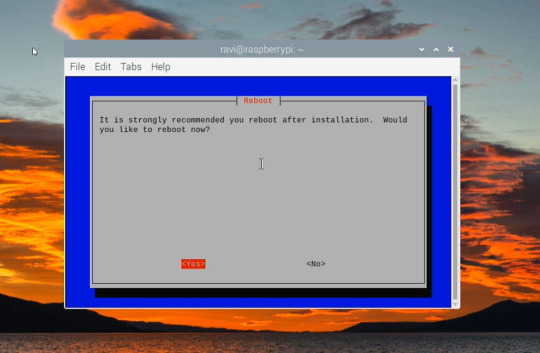
Đến giai đoạn này, bạn đã hoàn thành việc cài đặt WireGuard VPN. Bạn phải khởi động lại Raspberry Pi để các thay đổi có hiệu lực.
Bước 3: kết nối thiết bị với Raspberry Pi WireGuard VPN
Để kết nối thiết bị với Raspberry Pi WireGuard VPN, bạn phải tạo một hồ sơ VPN. Trong cửa sổ Terminal, nhập lệnh sau,
sudo pivpn add

Nhập thông tin của bạn. Bạn có thể đặt tên bất kỳ, chẳng hạn như "MyVPN". File cấu hình được lưu tại /home/pi/configs.
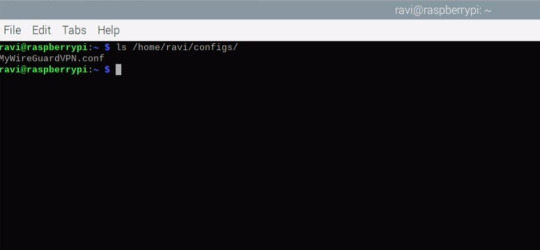
Bạn có thể sử dụng thông tin cấu hình này này hoặc tạo mã QR cho kết nối WireGuard VPN. Để kết nối, bạn cần cài đặt ứng dụng WireGuard VPN trên thiết bị Android hoặc iOS của mình. Để tạo mã QR, hãy chạy lệnh sau trong cửa sổ Terminal trên Raspberry Pi của bạn.
pivpn -qr MyWireGuardVPN

Trên ứng dụng WireGuard trong thiết bị Android hoặc iOS của bạn, hãy nhấn vào biểu tượng + (dấu cộng) và chọn SCAN FROM QR CODE để quét mã QR. Nhập tên hồ sơ và nhấn Save.
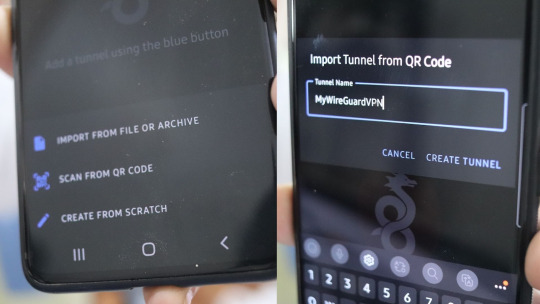
Giờ đây, bạn có thể sử dụng hồ sơ này để kết nối với WireGuard VPN đang chạy trên Raspberry Pi.
* Chú ý: Hiệu suất và tốc độ của WireGuard sẽ phụ thuộc vào tốc độ mạng của bạn.
Duyệt web an toàn với WireGuard trên Raspberry Pi
Trong hướng dẫn này, chúng tôi đã chỉ cho bạn cách thiết lập WireGuard trên Raspberry Pi 3 hoặc 4 để kết nối các thiết bị di động của bạn với VPN an toàn. Giờ đây, bạn có thể sử dụng máy chủ Raspberry Pi WireGuard VPN của riêng mình để truy cập an toàn vào web và mạng gia đình của bạn từ xa.
Read the full article
0 notes
Text
¿Conoces lo que es una VPN?
Si te llaman la atención estas siglas, puedes entrar a la siguiente publicación que lo explica muy bien: https://blog.is-remote.dev/desmitificando-el-uso-de-vpn
Si lo que buscas es disfrutar de un buen servicio te recomiendo que lo hagas aquí: https://www.is-remote.dev
No olvides compartir para que otras personas interesadas puedan acceder a la información.
1 note
·
View note
Text
Einen Fritzbox WireGuard VPN Fernzugang einrichten (Tutorial)
Seit der Veröffentlichung von dem Fritz!OS 7.50 gehört die WireGuard VPN für die Einrichtung eines Fernzugangs über einen Tunnel zur Grundausstattung der meisten Fritzbox-Modelle. In diesem Beitrag möchte ich euch anhand eines einfachen Tutorials zeigen...[Weiterlesen]
0 notes
Last Seen Blogs

rfitness403
Untitled

healthy-lifestyle-for-me
Healthy Lifestyle

rip-euphemia
💖333💖

liketrianglehead-butspaghetti
pressing my face against the bistro window