#witchy diy
Text
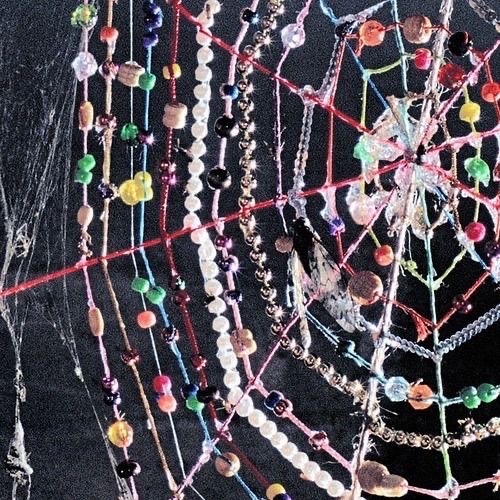
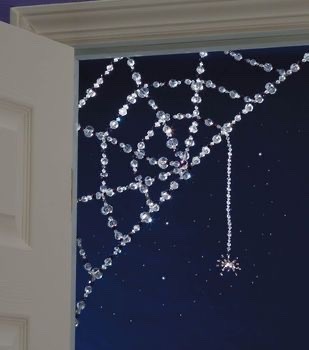

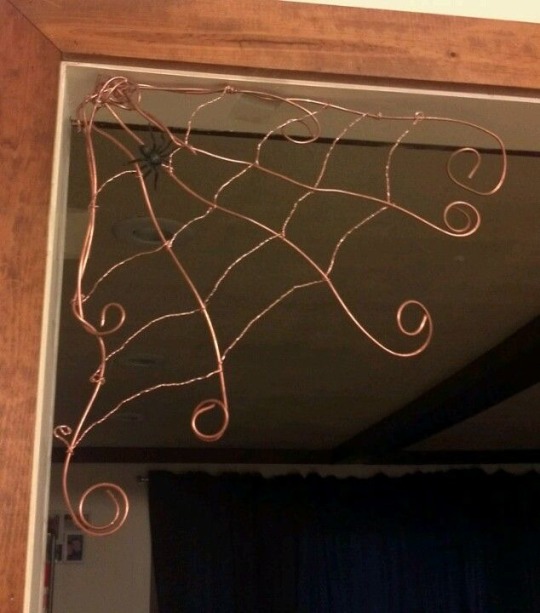
I've been seeing THESE photos and others like it floating around and other diy bead/wire/string spiderwebs and ooooh I wanna DIY one
Also I don't care that these are trending cause I wanna make one
(︶^︶)
{ I have no idea who made these because they're internet floaters so if y'all know or know how I can find them then please message me (〒▽〒)}
#babacore#goblincore#witchy#witchy things#witchythings#witchcore#witchyvibes#fairycore#dark fairytale#witchy vibes#witch DIY#witchy diy#hagcore#dark grandmacore
399 notes
·
View notes
Text

healing ritual ✨🔮
things used:
a bowl of water from a waterfall
dried roses
rosemary oil
sage oil
crystals
floating candles
#hayleyisdumb#witchblr#hellenic pagan#paganblr#baby witch#witches of tumblr#witchcraft#pagan ritual#witch tips#witchy diy
60 notes
·
View notes
Text

This is a great time of year to start thinking about making infused herbal oils as you hopefully have some dried herbs laying around that you’ve collected throughout the harvest season.
The first thing you need to make an infused oil is dried herbs. It is very important that the herbs are totally dry before you combine them with oil, as they can cause rancidity otherwise.
Many different types of herbs work well for making infused oils, especially lavender, rosemary, calendula, plantain, yarrow, comfrey, and mullein.
If you don’t already have your own dried herbs, Mountain Rose Herbs (a local herb business for me ) has a great selection of medicinal herbs to choose from.
Then you will need to choose the oil that you want to use. I usually use a high quality, light sunflower oil, but there are many types of carrier oils that you can choose from.
Once you have those two simple ingredients, there are several ways of making infused herbal oils.
While making an infused oil sounds like it could be complicated, it really is as easy as putting two ingredients together and letting them sit in the sun for a few weeks.
INFUSED HERBAL OIL: WINDOWSILL METHOD
The first one is probably the easiest, but it does take the most time.
This method is best when using oils that don’t go rancid quickly, like coconut or jojoba, as exposure to sunlight can degrade some oils more quickly.
Simply put the dried herbs of your choice into a jar and cover them with oil.
Stir the mixture gently with a spoon to get as many of the air bubbles out as possible.
Then put in a sunny windowsill for several weeks to steep.
Alternatively, you can put the jar in a cool place out of direct sunlight. This will help to preserve the quality of more light sensitive oils, like sweet almond oil.
When you feel it’s ready, simply strain the herbs from the oil.
Cap with a lid and use as soon as possible. Once oils have been infused they have a shorter shelf life, so I try to only make as much as I’ll use within a few months.
Any extra you might have should be stored in the refrigerator for future use.
INFUSED HERBAL OIL: HEAT METHOD
There are quicker ways of making infused herbal oils, as well.
You can use a double boiler by putting the herbs and oil in a metal bowl over a pot of simmering water.
Make sure that the oil doesn’t get too hot as to fry the herbs, and it should be done in a matter of hours.
I’ve also used a mini slow cooker on the warm setting to make calendula oil with good results.
A box style dehydrator would also work well, especially if you are already using it for something else.
INFUSED HERBAL OIL: OVEN EXTRACTION METHOD
The last method is oven extraction.
Put the dried herbs in oil, cover, and put in a low temperature oven for several hours, making sure not to cook the herbs.
12 notes
·
View notes
Photo

⋆☆⋆ Shower Steamers ⋆☆⋆
Don’t have a bath and still want to relax? Want the spa-like experience without the high costs? Want a lovely way to pamper yourself? Then go ahead and try out this DIY bath steamer recipe.
Ingredients & Necessary Items:
❅ Silicone Mold
❅ Glass Bowl
❅ Whisk
❅ Measuring Utensils
❅ Face Mask
❅ Baking Soda (8oz or 1cup)
❅ Citric Acid (8oz or 1 cup)
❅ Polysorbate 80 (Can also use Sorbitan Oleate)(2.5oz or 1/3 cup)
❅ Essential Oils of Your Choosing (Minimum of 10 drops per scent, adjusted to your smell preference.)
❅ A Colorant of Choice (Plant Power, Flower Dye, etc)
❅ Dried Herbs and/or Flowers (Optional)
❅ Nitrile Gloves
Prep Work:
❅ Grab your gloves and mask. It’s not the best to inhale the dry ingredients so a well ventilated space (at least a window open) is needed. Gloves are necessary because direct contact with the dry ingredients can cause dryness in skin or irritate it.
Initial Instructions:
❅ Mix your dry ingredients together (Baking Soda & Citric Acid) into a class bowl. I recommend sifting the Baking Soda into the Citric Acid as it will combine better. Stir with a whisk to further combine. Add in half of the herbs and/or flowers you think you’ll want.
❅ If you choose to have colored steamers, stir in the Flower or Plant Powder. If you don’t add in a colorant, they’ll be white and can still be really pretty.
❅ Mix the wet ingredients together (Polysorbate 80/Sorbitant Oleate and Essential Oils) until the Essential Oils blend evenly with Polysorbate 80/Sorbitant Oleate. There should be little to no streaking of the Oils in the mixture.
❅Add the wet ingredients into the dry material little by little while mixing with a whisk. Once initially combined, begin to mix with your gloved hands, kneading until the liquids are nicely distributed. This mixture should have the consistency of wet sand-- just moist enough to hold its shape when pressed together.
❅ Adjust mixture as needed
Silicone Mold Usage:
❅ Add in herbs and/or flowers to mold before you add in mixture. Go lightly and be sure to avoid the edges of the mold.
❅ Fill the mold(s) with the mixture and press the mixture into the mold with your fingertips, paying attention to any edges in the mold. Fill and compress bit by bit until mold is completely full. Then take the bottom of something flat and hard (like a measuring cup) to further flatten and compress.
❅ Let dry overnight for a 24 hour period. Room temperature is OK and the mold can remain uncovered. Do not leave in a moist/humid area.
❅ Gently demold, tapping the mold to check if it sounds and feels solid. If so, continue with the demolding process. Very gently loosen the steamer from the mold by carefully pulling away the silicone while using your thumbs to gently push out the steamer.
Notes:
❅ Feel free to check out this post of mine for essential oil combinations to use. There’s more essential oils for those associations than I have in that post so if you have questions or want more options, feel free to ask.
❅ All ingredients can be found locally in grocery stores, in specialty shops or even online.
#witchcraft#witchy#witches#kitchen witch#green witch#baby witch#beginner witch#pagan#pagan witch#Pagan Community#witch community#witch diy#witchy diy#shower steamers#at home spa#herbal#herbs#herbalism#spell#spells#spellwork#spellbound#spellbook#book of shadows#book of secrets#witch blog#witchy blog#eclectic pagan#eclectic paganism#witches of tumblr
105 notes
·
View notes
Text

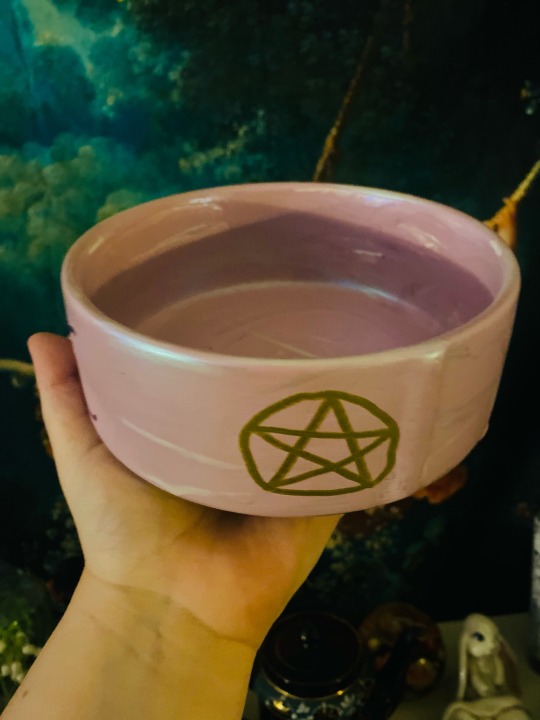
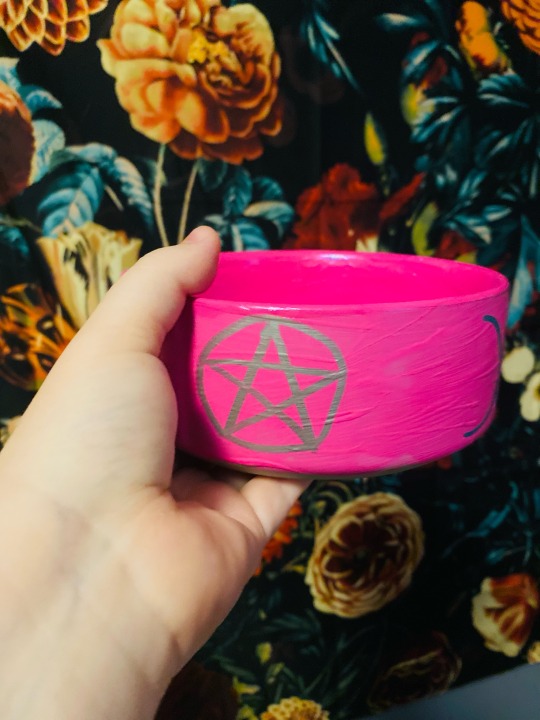
Hello lovelies! I wanted to share a little project I’m working on. My mom gave me these big bowls that used to hold candles! We cleaned them out and then I painted one hot pink and one lavender. I drew some symbols on the outside and sealed each bowl with this iridescent paint topcoat! Now I’m wondering if I should paint some flowers 🌸 and other cutesy things cause they seem a bit plain. I’m planning on using them for offering bowls to God and Goddess, and whatever else I see fit lol! We shall see! Highly recommend reusing candle containers tho!
#witchblr#beginner witch#pagans of tumblr#witch life#paganlife#aesthetic#spirituality#witchcraft#witchy blog#witchy crafts#witchy decor#witchy diy#kawaii witch#kawaii hippie witch#kawaii cottagecore#cottagecore crafts#cottagecore witch
9 notes
·
View notes
Text

I made a feather display out of a found slice of wood and bore some holes into it to put each feather in.
#feathers#feather display#natural objects display#collection#feather collection#witch#witchy#witchcraft#magic#spells#witch aesthetic#witchy diy#project
15 notes
·
View notes
Text
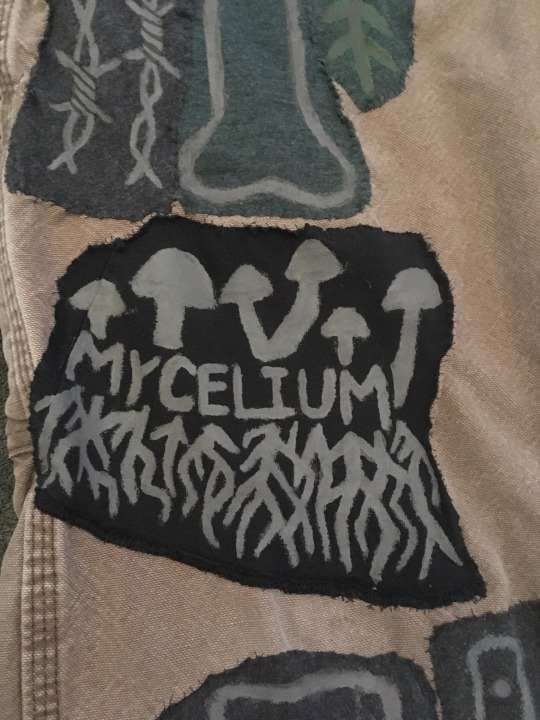
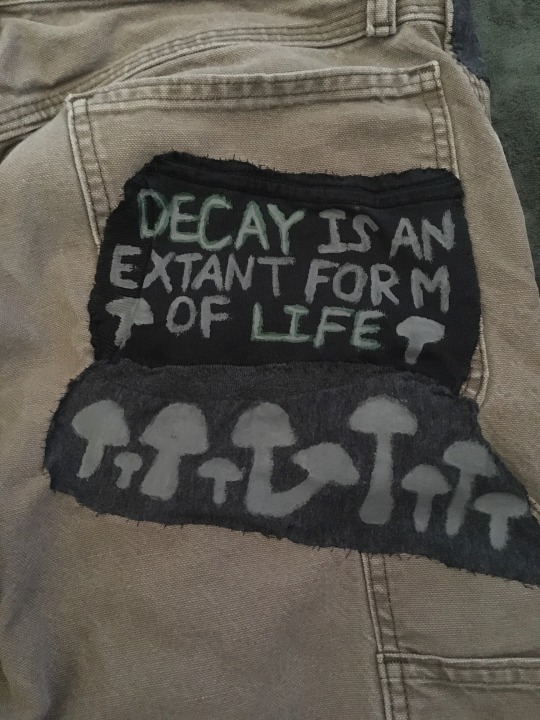
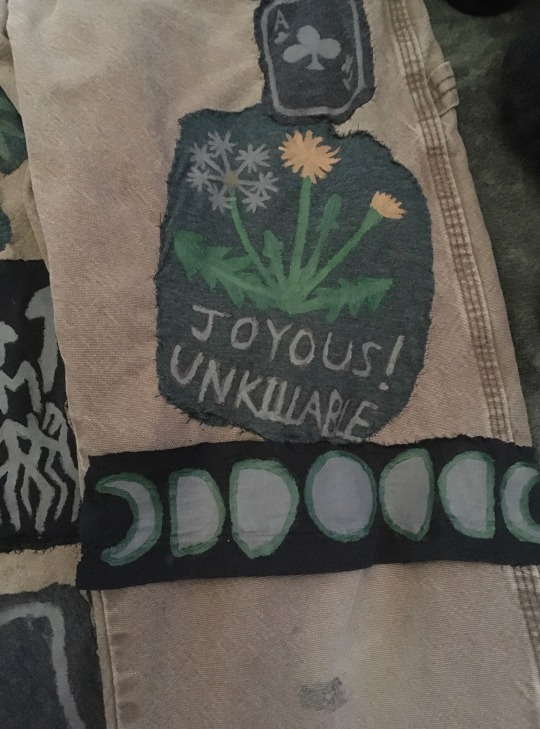

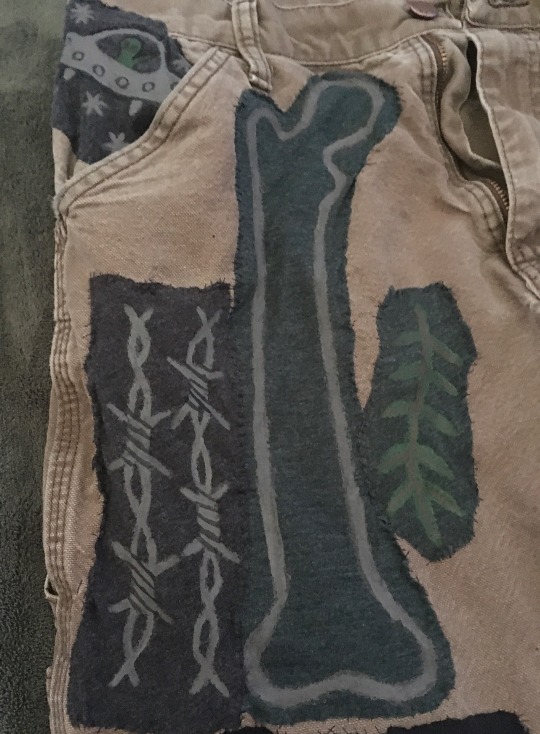
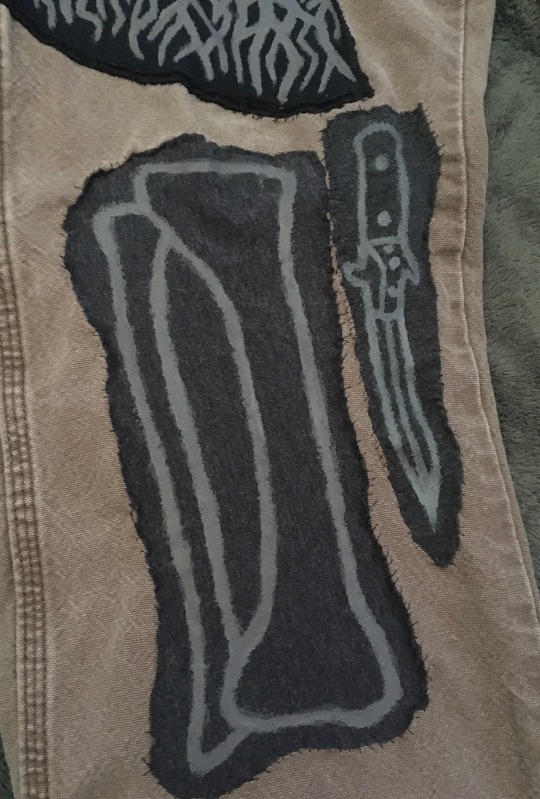
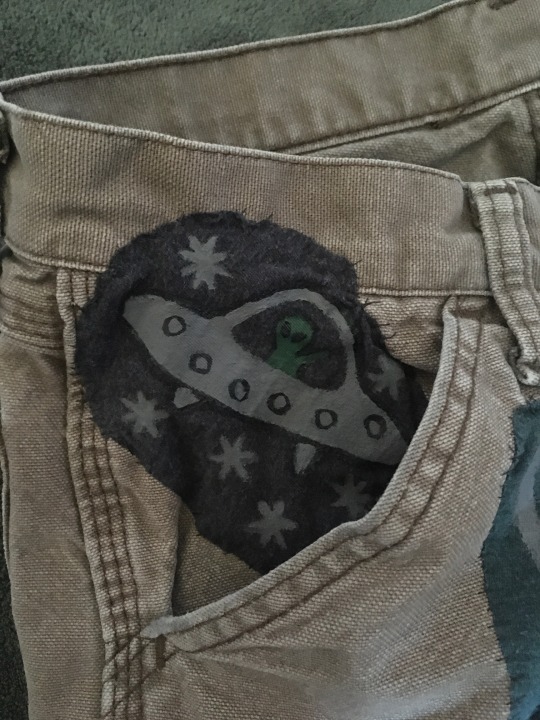
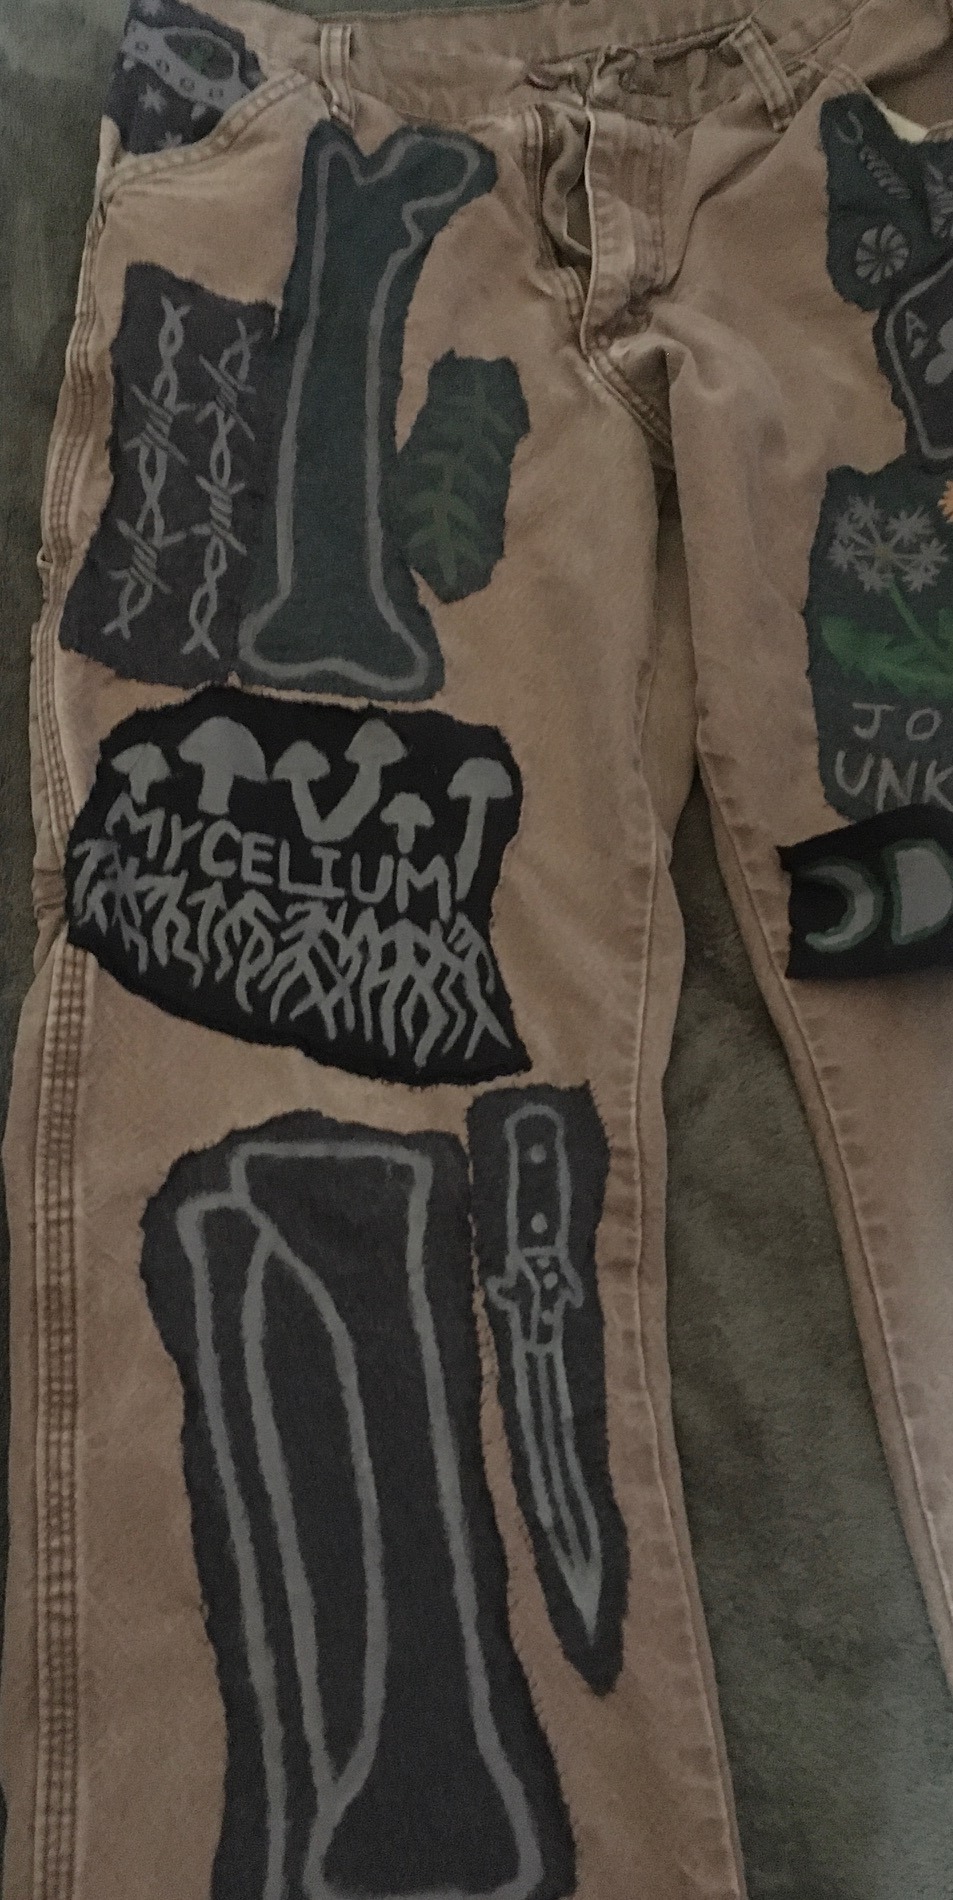
Here's some progress on my patch pants. These are a pair of old work pants that used to be my brother's, they've got some pretty good pockets! ✧d(•̀ v•̀ )
There's still more patches to add, and still some holes and stains I'd like to cover up, but I think they're coming along quite nicely! (๑^ω^๑) <3
#patches#diy patches#patch pants#sew on patch#patchwork#my post#my crafts#my photos#dirtcore#forestcore#gremlincore#crowcore#corvidcore#fairycore#cottagecore#mosscore#mushroomcore#fungi#decay#witchy#witch aesthetic#patch#goblincore#goblin community#goblin culture#goblin aesthetic#cryptidcore#cryptid aesthetic#diy punk#punk diy
841 notes
·
View notes
Text

I made Yule ornaments today!
They're available in the shop.
#yule#christmas#ornaments#christmasornaments#yuleornaments#diy#witchcraft#witchy#wicca#pagan#witches#spellwork#spells#etsy#etsy shop#spell jar#spell jars#spelljar#witchblr#mine#foragewitch
222 notes
·
View notes
Text
Gonna learn how to sew a knit and crochet for the sole purpose of making things to wrap my friends in
#for the usual friend reasons#and also the witchy ones#love is stored in the “i made this for you”#diy#diy crafts#sewing#knitting#crochet#queer#love my friends#folkwitch#folk witchcraft#folk witch#folk magic
191 notes
·
View notes
Text
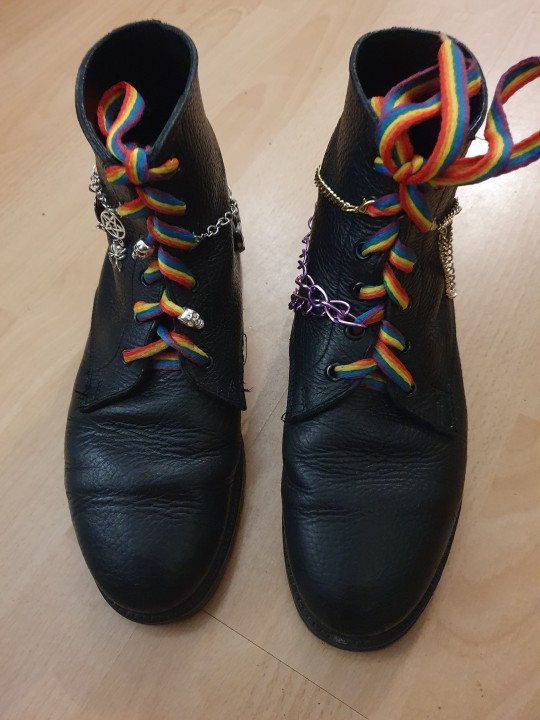

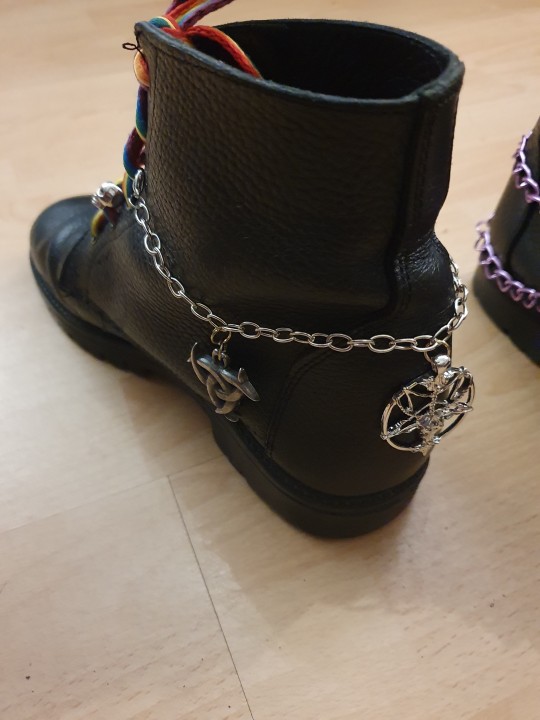


Gave the boots a little glow-up!
One is gay, one is goth. Together, they are me.
#things i made#boots#leather boots#not in fact#doc martens#but just nice leather boots#punk diy#diy#goth diy#diy jewelry#diy fashion#pentagram#witchy vibes
161 notes
·
View notes
Text
New Project! DIY/Collaged Tarot Deck

Over the past few weeks, I have been pulling together a group of local witches in my area to form a very casual coven! We all ended up revealing that we are very crafty, so naturally, one of the first projects we wanted to take on as a group was to make our own tarot decks! Right now we are scheduled to make around 8 cards a month, which means we should be finishing the project by the end of the year!
Materials used:
Double-sided tape
Playing card (for the base)
Matte mod podge (for the top coat)
Magazine clippings
To start off with, obviously, we have The Fool. In researching for this card, the main keywords that stood out to me was "new beginnings" and the start of a "journey". When paging through my magazines, one of the first photographs I came across was this beautiful, snowy mountain range with skiers dotting along the bottom of a slope. This image seemed perfect to me and really conveys the image of a new journey and optimism.
Next, I reviewed the Rider-Waite deck for more inspiration - I saw lots of yellows, and of course, the iconic sun. I decided to add a sun shining in the corner of this card as an ode to the original Rider-Waite deck; also representing bright optimism as the Fool begins his journey.
If you want to follow along this crafting journey with me to learn more about tarot (and probably a LOT about collaging/DIY), be sure to subscribe to my Patreon for only $2/month!
I'll probably be posting updates on Patreon weekly, and updates on Tumblr around once every other month.
Please let me know if y'all give this a try! I find that this is a great way for me to connect with tarot and learn more about the cards. I've always struggled with memorizing them/reading cards without a guide, so I'm hoping that this project will help!
#thevirginwitch#witchcraft#witch#witchblr#witchy#witches of tumblr#tarot#tarot cards#tarot deck#diy#witch crafting#witchcrafting#divination#tarot card#the fool
113 notes
·
View notes
Text
Oooh idea
#babacore#witchcraft#cottagecore#witch#goblincore#pagan witch#witchy#witchy things#witchythings#witchcore#witchyvibes#darkcore#goth#alternative goth#gothic#whimigoth#diycrafts#diy inspiration#diy ideas
2K notes
·
View notes
Text
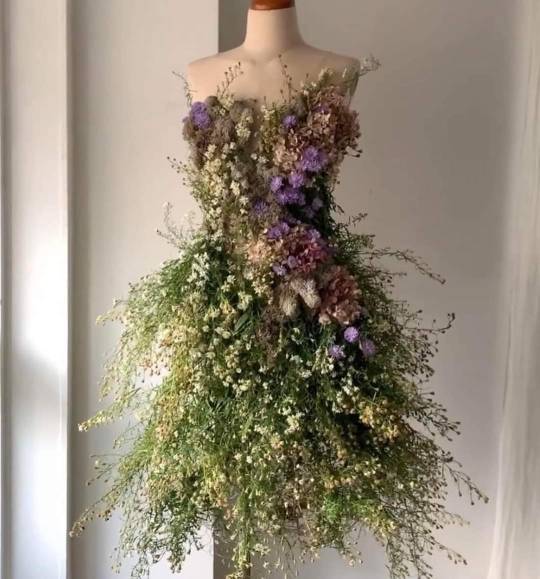
🌼🌱Dresses made out of real flowers and foliage🌱🌼
Credit : midsummer__k on ig.
#crafts#craftblr#hand crafted#diy craft#naturecore#forestcore#cottagecore#green witch#witchblr#cottage witch#dark cottagecore#goblincore#gremlincore#floral#flowers#fairy dress#swampcore#witchy#floral dress#flower dress#light academia#cottage aesthetic#cozy cottage
83 notes
·
View notes
Text

Making pine oil is really easy and can be done with fresh or dried pine needles.
Follow these steps:
Place your pine needles into a 4-oz / 115 ml mason jar. You need approx. 1/8 cup of needles.
Fill the jar with 1/4 cup carrier oil. Any carrier oil will work. I used jojoba oil.
Place the jar into a small saucepan filled 1/2 in / 1 cm with water.
Bring the water to a mild simmer.
Let infuse for 20 minutes, check regularly, and add more water as needed.
After 20 minutes, strain the pine oil through a fine-mesh sieve. Discard the needles.
You can prepare infused oil with the needles of other conifer trees, such as spruce, fir, or juniper.

Magickal Aspects
Luck
Joy
Balance
Purification
Banishment
Healing
Fertility
Prosperity
Longevity
Happiness
Energy
hot
cold
Planet
Mars
Saturn
Element
Air
Deities
Pan
Diana
Bacchus
Cybele
Attis
Saturn
Zodiac
Aries
Scorpio.
Gender Aspect
Masculine
Gems/Metals
Citrine
pyrite
moonstone
3 notes
·
View notes
Text


DIY Beaded Crescent Moon
✖✖✖✖✖✖✖✖
sew-much-to-do: a visual collection of sewing tutorials/patterns, knitting, diy, crafts, recipes, etc.
100 notes
·
View notes
Photo
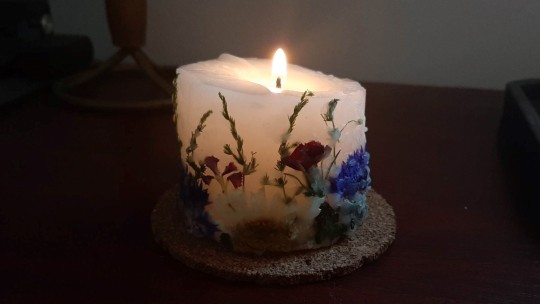

I tried my hands at decorating candles with pressed flowers and I’m in love. I’m definitely gonna do more of them!
Edit: The comments made me ralize I should probably include some warnings. Don’t leave your lit candles unattended, especially if they are DIYs! Always keep an eye on them! Also, don’t put them under/near curtains and other objects that can easily catch fire!
#whimsigoth#whimsigothic#witchy#diy#pressed flowers#mine#pls don't burn your house down because of me
352 notes
·
View notes
Last Seen Blogs

mindfullofyoga
A mind full of yoga.

ballisticswife
mal

nemuikawaii
NEMUI Kawaii

adventuregoats
Adventure Goats

saudbilal-blog
Untitled