#worbla
Text
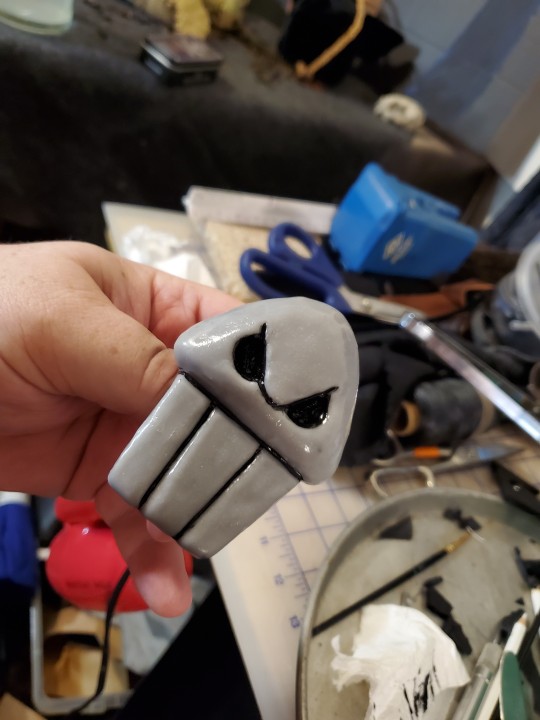
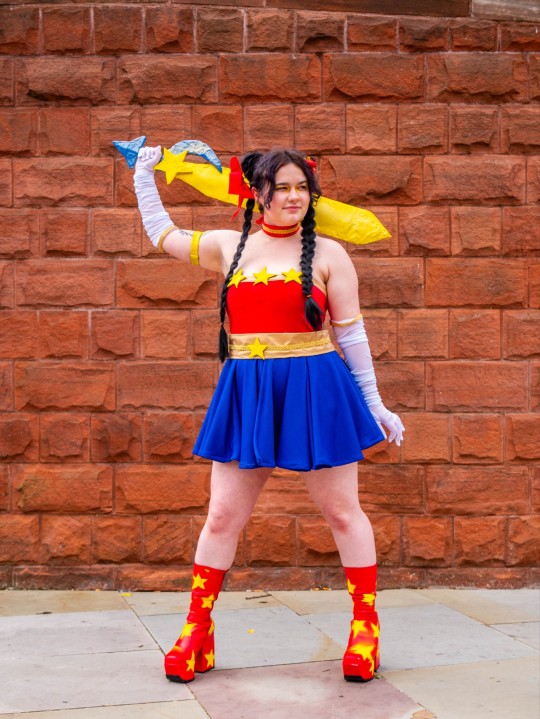
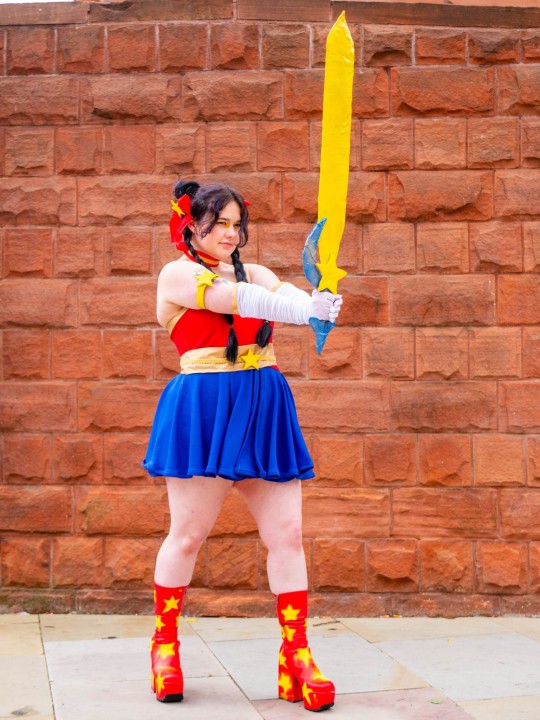
Very rarely I take non cat commissions for family Halloween costumes.
( Hand sculpt, foam-worbla base with ThermoMorph top over an Industrial strength cloak clasp. )
133 notes
·
View notes
Text


The gauntlets for my Guild Wars 2 cosplay are done, other than sanding and painting! I still intend to finish this costume lol, it's just taking me extra time because life. All pieces are made of worbla over foam or cardboard, or by itself. The gloves are made from the same fabric (hand-dyed by me) as the rest of the costume. Everything is fully articulated to move with my hand and arm.
The only armor piece I have left is the upper arm. Then it's just wiring, sanding, painting, and styling the wig! Woo!
I'm pretty excited for this cosplay. Not only is it the most complex and difficult costume I've built, but it has also been with me through some tough times. At some point, I'll have to put all the pieces on and share some pictures :-)
#cosplay#cosplay wip#cosplay progress#guild wars 2#gw2#arenanet#costume making#armor#armor making#worbla#thermoplastics#gauntlets#bracers#fantasy#crafting#wip#diy#costume#norn#royal guard#guild wars character#gaming#video games#my cosplay
88 notes
·
View notes
Text
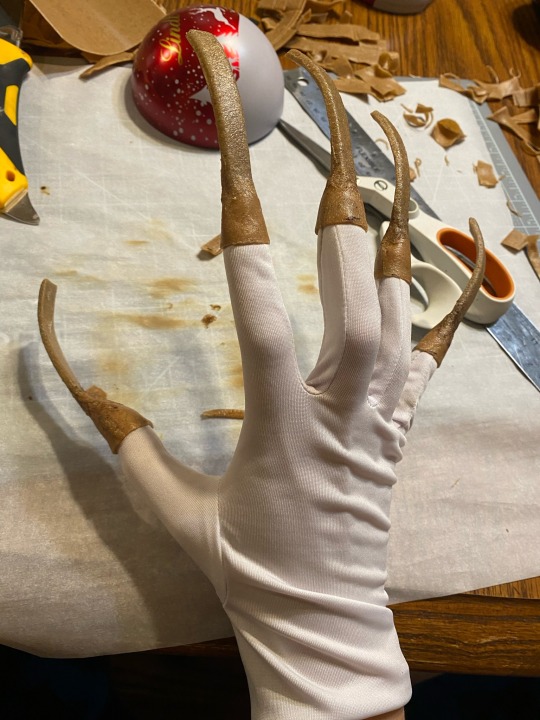
How i made xenos nails!!
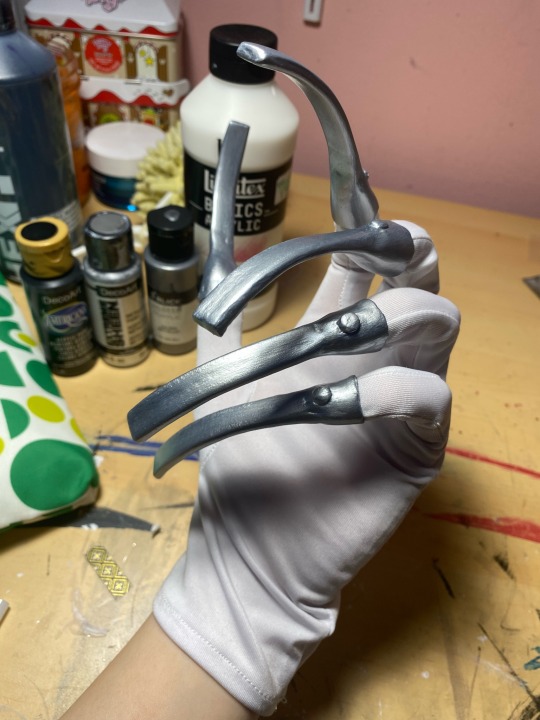
Materials
-worbla
-2mm eva foam
-scissors
-heat gun
-soldering iron (technically optional but helps A LOT)
-gesso (i used regular gesso, but if you can id buy heavy body gesso)
-P400+P600 sand paper
-acyrlic paint (just silver is ok, but black will help)
-white gloves
-hot glue
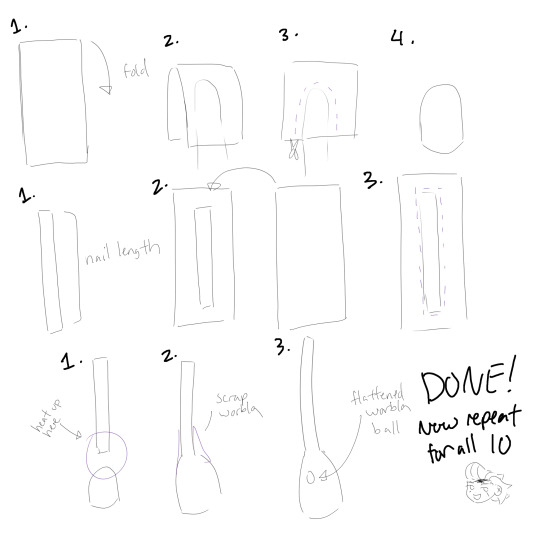
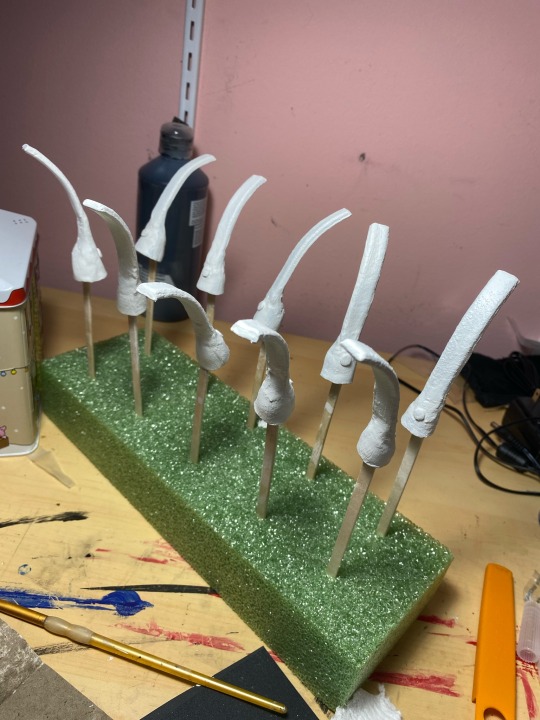
PART 1- forming the base
This part is VERY hard to explain so hopefully the diagram helps- ill explain every step here
Finger tips
1. Cut out a piece of worbla thats double the length of the finger tip you want + a little extra.
2. Heat it slightly and fold that piece of worbla in half around your finger.
3. Form it slightly around your finger, leaving a little extra space for the glove material, then cut it out with good scissors. (NOTE- if you try to form it on your finger while wearing gloves, the worbla MAY stick to the gloves. Id recommend just doing it on your bare finger)
4. Heat it up again until its very soft and round out the shape, making sure the sides stick together. If its too small when you test fit it around the glove, try to push out the walls a bit more.
Nails
Watch this video before starting this part-
youtube
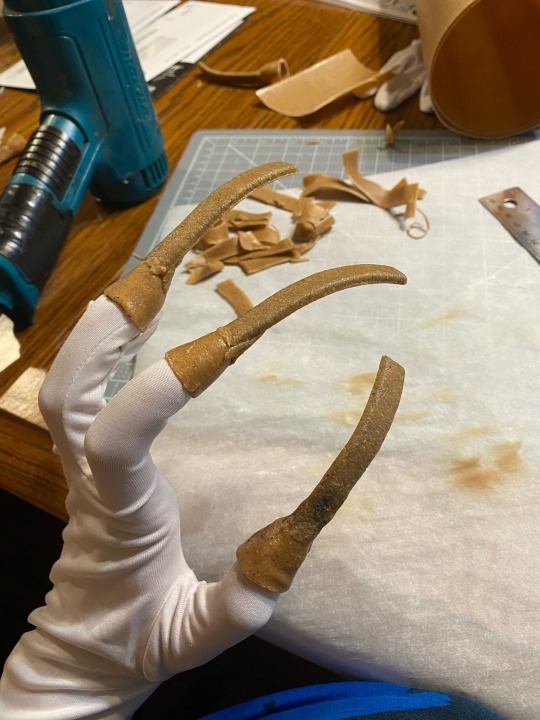
1. Find a good length for your nails- mine are approx. 3 inches. Make a template and then cut the shape out of eva foam.
2. Cut out TWO pieces of worbla a little bigger then the nail strip and heat one up, sticky side up (the sticky side is shiny). Put the eva foam strip in the middle. Heat up the second piece of worbla and put it on top, sandwiching the eva foam.
3. Score all around the eva strip then cut AS CLOSE as possible to the edge.
Attaching the pieces
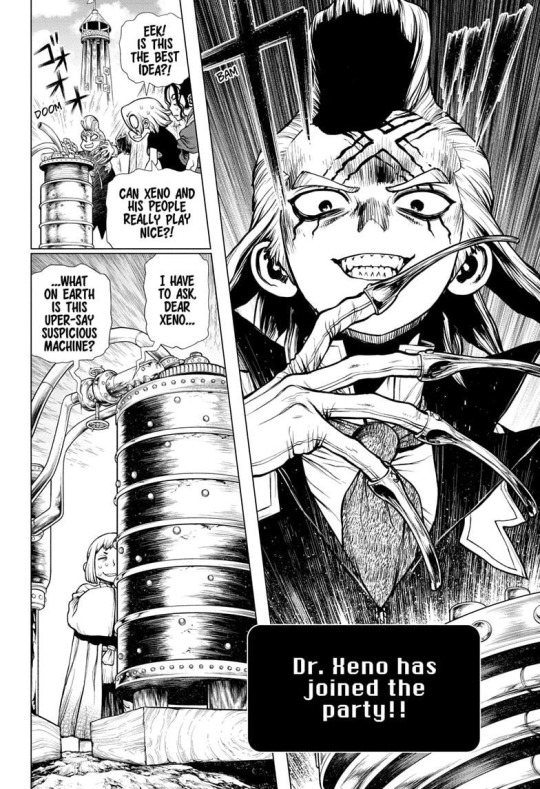
1. Heat up the finger tip and half of the nail. Attach the nail to the finger tip while wearing it to make sure it doesnt cave in. Use a picture from the manga as reference while doing this part
2. Once again, using a manga reference, use scrap worbla to fill out the sides and smooth everything down. This is the part where you can use a soldering iron to smooth everything out- be careful though, because you can easily burn the worbla.
2.5. I forgot to make a diagram but dont forget to curve the nails! I used a little metal dome to get a consistent curve for all of them.
3. Make little worbla balls, flatten them with something flat, then attach them to the nails while still hot.
Now repeat ALL these steps for all 10 nails! Yay!
PART 2- priming

For priming i used regular gesso because I was impatient, but if you have plenty of time I recommend heavy body gesso. It took me 12 layers to get everything decently smooth, but if you used heavy body it would probably take 3-5 layers.
I also used floral foam, craft sticks, and sticky tack for my painting setup- if you can think of a better method without sticky tack id recommend trying something else- just because i had to pick out the sticky tack with tweezers, and it took forever lol
Two things to note about gesso-
1. It doesnt self level so you need to sand it smooth
2. DO NOT DRY SAND!! Always wet sand gesso
My exact steps were this-
4 layers of gesso -> sand with P400 -> 4 layers of gesso -> sand with P400 -> 4 layers of gesso -> sand with P600
This part is very time consuming if you use regular gesso, but its definitely worth it for the smooth finish.
PART 3- painting
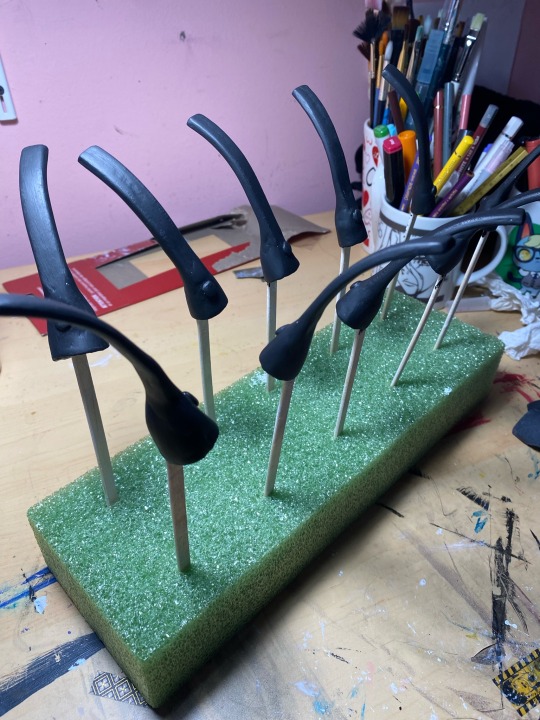
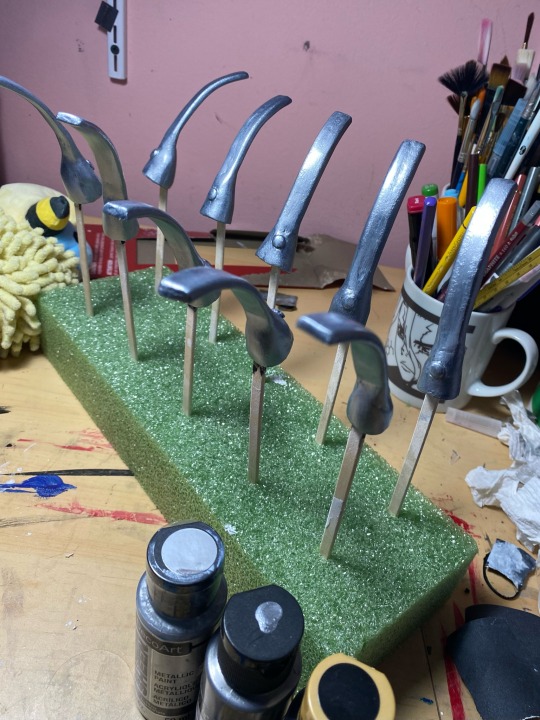
Before adding silver, I threw down a quick matte black layer. It tends to make metals look much better and it wont take long to dry, so I highly recommend it.
For the silver, i used decoart extreme sheen in silver, which i highly recommend. Relatively cheap and can be found in any craft store
Id also recommend having all your brush strokes go vertically if you can- it looks much cleaner.
PART 4 (final part)- attachment
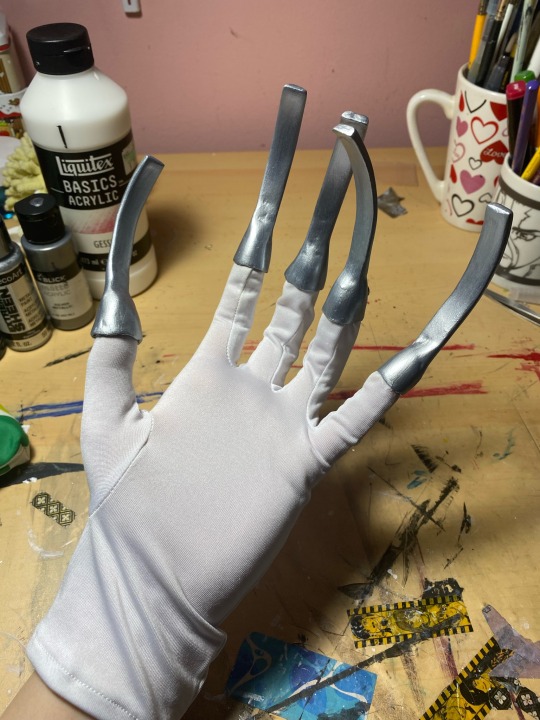
I used a pair of white gloves i bought a while back at spirit halloween, but you can make them or buy them- doesnt matter as long as you like them.
This part is kinda dumb but I genuinely dont know if theres a better method… i put hot glue in the nails, let it cool for a couple of seconds, then put them ON MY FINGERS while wearing the gloves. It gets you the best fit possible but also burns a little so watch out.
And thats it! Thats all there is to it. Let me know if you found this helpful, and if anything was confusing leave a comment and ill try to help you.
As a bonus heres a picture that works very well for reference
#dcst#dr stone#cosplay#cosplay tutorial#worbla#xeno houston wingfield#xeno cosplay#xeno dr stone#xeno#Youtube
59 notes
·
View notes
Text
I missed working with worbla. Another Loki piece in progress!
30 notes
·
View notes
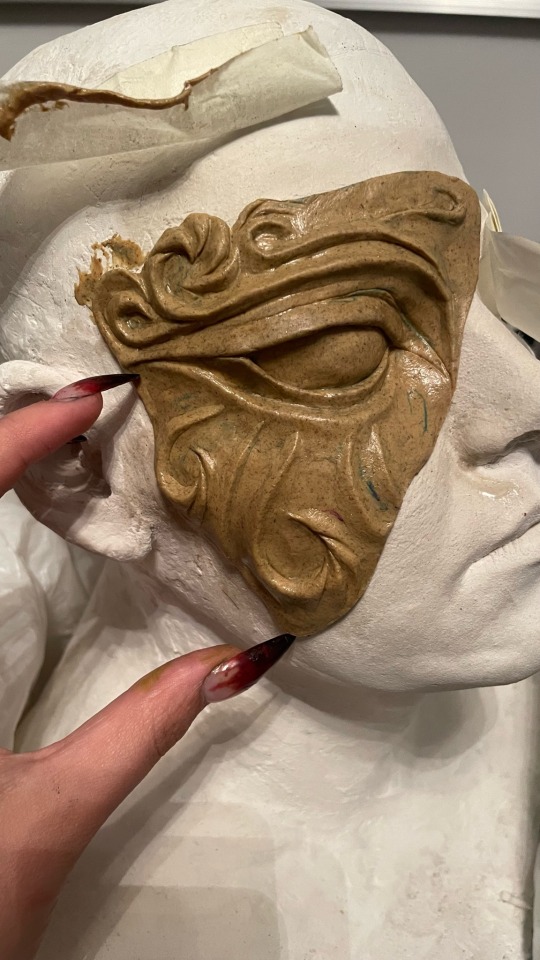
Text

WIP of TOTK Charged Set Headdress. Almost done with sculpting the details on the Zonai pieces
33 notes
·
View notes
Text
youtube
How to make Robo Arm for Cosplay | Vriska Homestuck
No sewing, no worbla or other thermoplastics, easy and quick
I did a thing :D
#homestuck#cosplay#mycosplay#homestuck cosplay#captaincrunchcosplay#video#youtube#tutorial#how to#crafts#worbla#cosplay tutorial
140 notes
·
View notes
Text
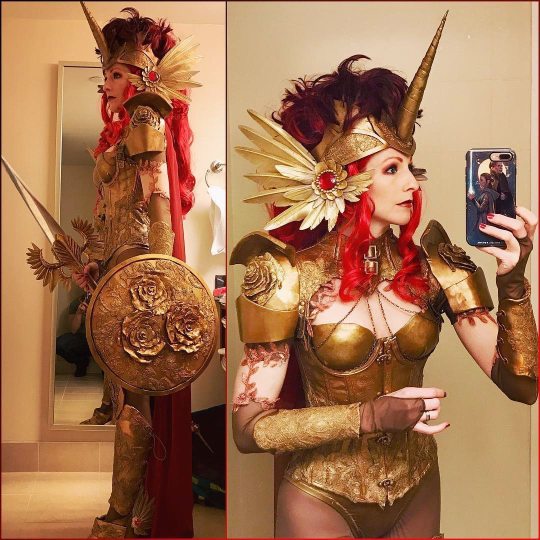

I miss that feeling when you put an entire costume on with makeup all for the first time after working so hard on it. I have Manon done and need to find a fun place to shoot her!
This is my Unicorn Knight, based on artwork by Sakizo.
13 notes
·
View notes
Text

Not pictured is me almost breaking my ankles when the platform of one of the boots fell off in artist's alley but that's what I get for thrifting them on Vinted.
📸: @/sal.cosplay.photos
Megacon Manchester, 2023
9 notes
·
View notes
Photo
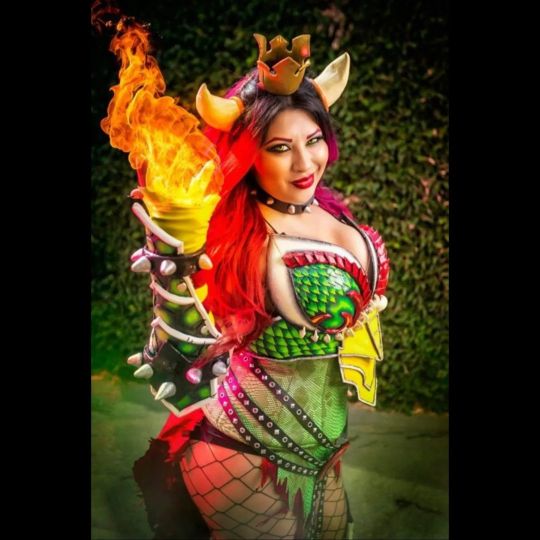
In honour of the trailer release of @supermariomovie , here's my Bowser costume! Are you guys as excited as I am? I made this roughly 7 years ago and it all started with my turtle shell and horn design and @zachfischerart helped make that into a glorious art piece reference made for me that I could use to create and make the costume, along with base breastplate by @jackicraft . I loved painting all my armour pieces and making each individual shell piece for the armor the most! It's definitely one of my favourites! Photo @steamkittens #supermario #supermariobros #Bowser #kingkoopa #luigi #jackblack #diy #fyp #latina #worbla #comiccon #nycc #universalpictures #handmade #Halloween #costume #cosplayofcolor #poccosplay https://www.instagram.com/p/CjbDWVlpqJN/?igshid=NGJjMDIxMWI=
#supermario#supermariobros#bowser#kingkoopa#luigi#jackblack#diy#fyp#latina#worbla#comiccon#nycc#universalpictures#handmade#halloween#costume#cosplayofcolor#poccosplay
57 notes
·
View notes
Text

Oh hello. I guess it's time to be on Tumblr again.. and TBF, I did really like Tumblr back in the day LOL so I am not sad to return to it.
So hello again!
Here is Chandra taken by Alexandra Lee Studios during C2E2 2023!
11 notes
·
View notes
Text


today again Craft from an ancient game on a character whose character was seen by three people and that’s not a fact х))))
2 notes
·
View notes
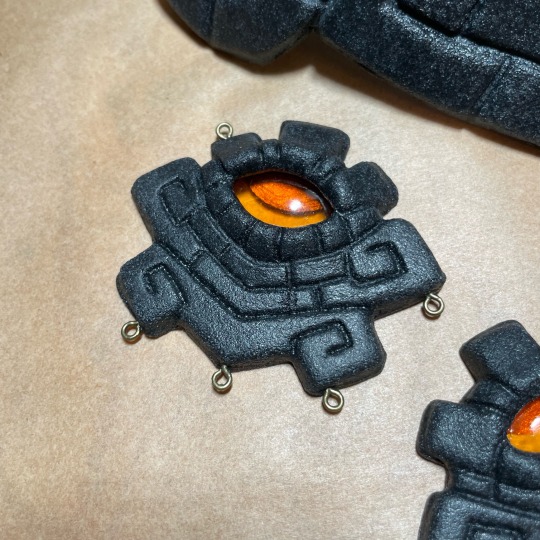
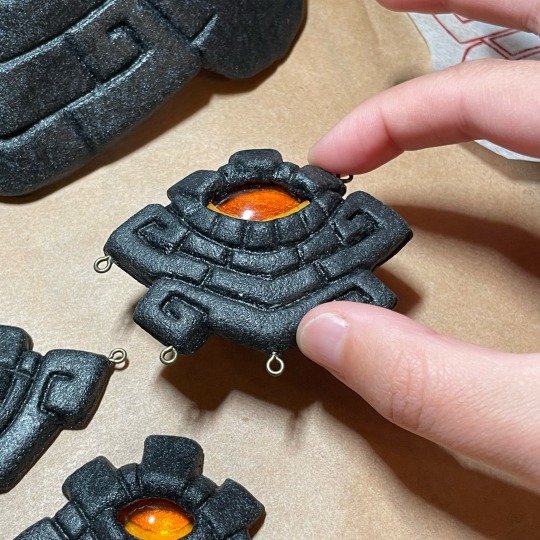
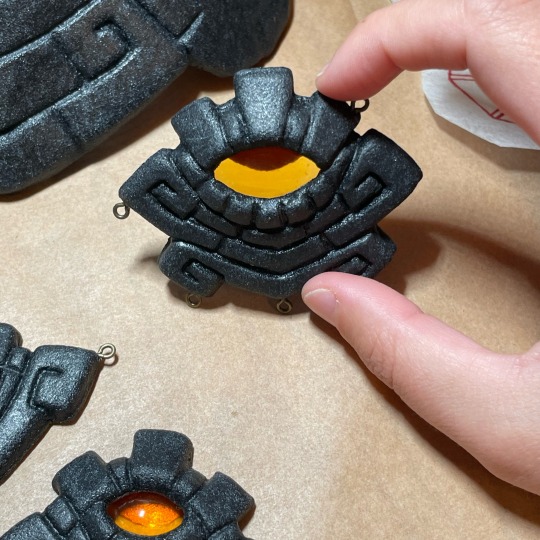
Text

That right there 👆
Is the bane of my existence and my current reason why my carpal tunnel is acting up.
I HAND CUT the stain glass windows on the top of the cup. 2 times. It's Worblas pearly art. I used a pair of scissors and a scalpel.
This is for the Hellish Debut project. Which is due this Saturday!
I still need to add the stain glass, add the filigree, paint and gild with gold leaf. (Plus weather it) in 2 DAYS.
It better be worth it.
#costume#costume design#original character#current wip#baldursgate 3 fanart#thermoplastic#worbla#worblas pearlyart#worbla's crystal art#cosplay
3 notes
·
View notes
Photo

I had a great time at SiliCon last weekend, and as always David Ngo did an excellent job capturing my Abyss Watcher cosplay!
I can't believe it's been three years since my last big con D= Covid and some other things put a damper on my motivation, but I'm ready to be back and better than ever!
Photographer: David Ngo
#cosplay#dark souls#dark souls 3#abyss watchers#undead legion#farron greatsword#from software#gaming#costume#armor#badass#silicon 2022#san jose#bay area#bay area cosplayer#worbla#leatherwork#costume making#david ngo#cosplay photography#video games#git gud#you died#armor making
149 notes
·
View notes
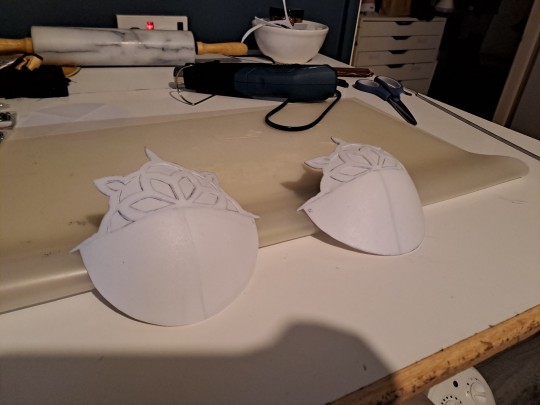
Text
Bo Katan Helmet (Finished)
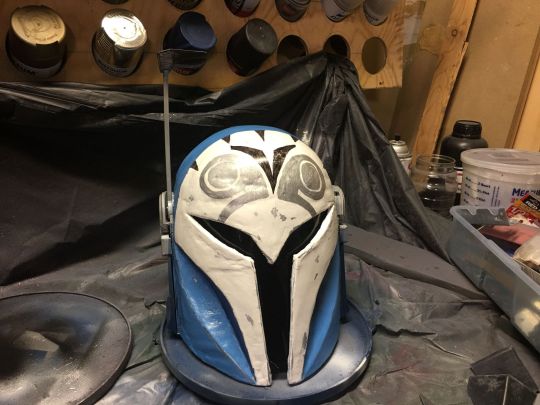

Not a lot to say that I didn't already say in the previous post. I had hoped that getting it painted would help further cover up a lot of the imperfections and roughness of this Worbla-coated 3D printed helmet, and it did, but it still wasn't quite enough.

The plan was to use Worbla in hopes of cutting out the sanding/filler step and achieve a smoother helmet much faster. Unfortunately, the jankiness of the rushed print created a lot of spaces the heated Worbla would fill in a bit too much and leave bumps and creases on the outer shell. So I STILL had to do a lot of filler and sanding to try and even it out, and it STILL didn't make it much better. (But at least I did finally manage to get those seams filled in and smoothed over.)
I tried to do a layer of Plasti-Dip before the other paint, but I ran out before even getting a full coat, so I just had to hope the actual paint would fill in the rough surface of the Worbla. And it...mostly did.
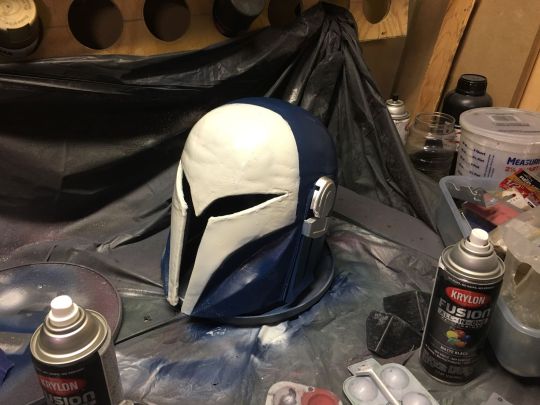
I knew the blue paint I had would be too dark, but I thought "maybe...?" It's too dark. I actually ended up repainting about 80% of the thing by hand. Tried making a painter tape stencil. Screwed it up, and just did the pattern by hand with silver and black permanent markers.
Then I gave it one last scrub with some fine sandpaper. Partly to scuff it up and get the worn look, and partly in hopes of getting it just a BIT smoother before the final finishing spray for which I employed my rarely used glossy finish.
So yeah. Quite the learning experience, like most projects. The lessons I learned from this will make future projects that much better.
7 notes
·
View notes
Photo
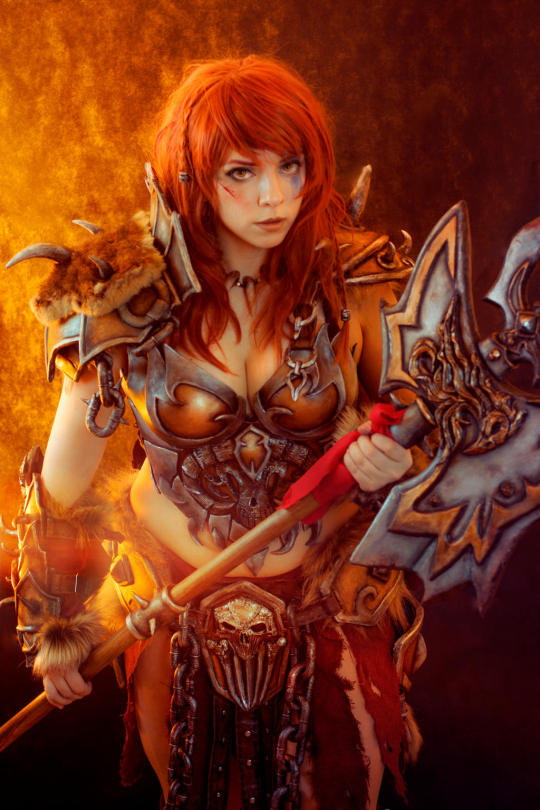
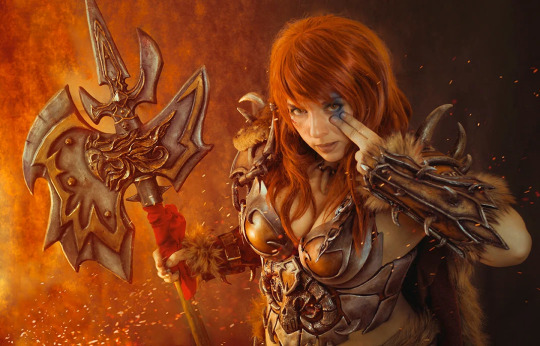
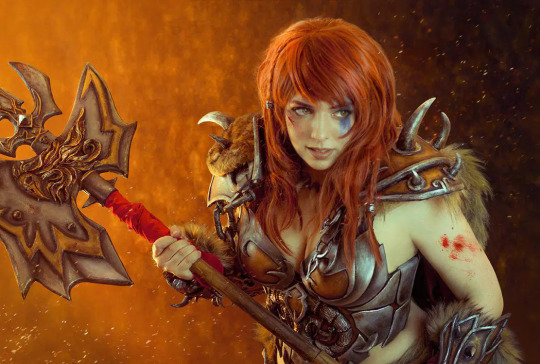
My barbarian cosplay from Diablo III . I made this cosplay in 2017 using worbla and eva foam.
#barbarian#diablo 3#thicc#cosplayer#cosplay#evafoam#worbla#armor#female armor#armored#woman#redhead#red hair#blizzard#diablo
19 notes
·
View notes
Text
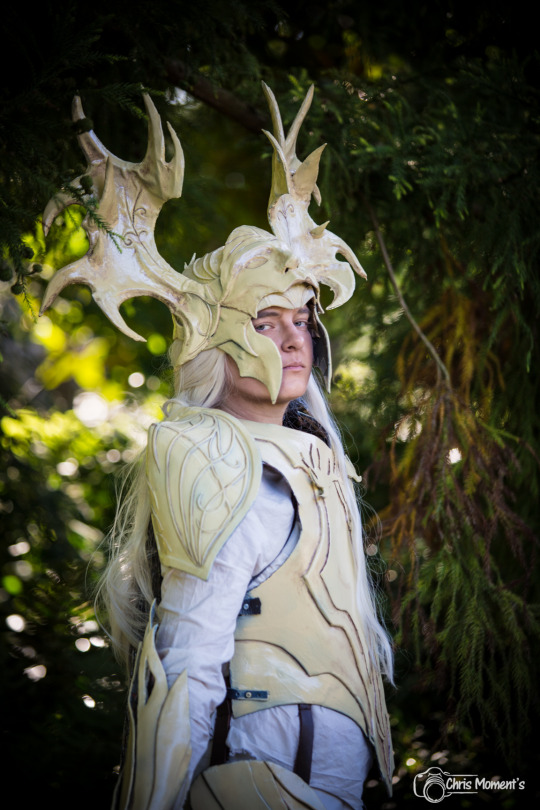
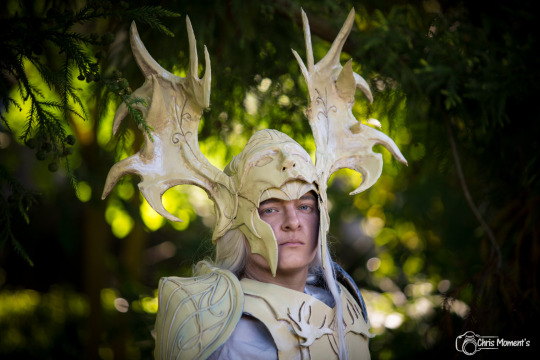
"One hundred years is a mere blink in the life of an elf. I am patient. I can wait." (Thranduil, The Hobbit, Desolation of Smaug)
Cosplay: Foedhrass
Photo: Alain_sergeys
#Thranduil#Thranduil cosplay#the elvenking#king thranduil#the silmarillion#The Hobbit#Hobbit#Hobbit cosplay#Tolkien cosplay#Silmarillion cosplay#weta workshop#Hobbit Chronicles#elf armor#worbla#worbla armor#fantasy helmet#fantasy cosplay#Lee Pace#leeepfrog#thrandy#lotr
59 notes
·
View notes
Last Seen Blogs

rolitabjd
Rolita BJD

stidental-blog
Buy Dental Instruments, Endodontic Tools, Dental Scalers, Oral S

weezeranitsweezy
you take your car to work, i'll take my board

jindhamanee
Untitled