
thebakeclubla
The Bake Club LA
Baked goods make the world go round.
204 posts
Don't wanna be here? Send us removal request.
Last Seen Blogs


Text
Raspberry Custard Tart with Cornmeal Crust
Summer. Luscious. Bright.


Ingredients:
For the Crust:
1 Cups All Purpose Flour
½ Cups Cornmeal, finely ground
½ tsp Salt
½ Cup Granulated Sugar
2 Large Egg Yolks
For the Filling:
2 Tbsp Unsalted Butter
1 tsp Vanilla Bean Paste
3 Large Eggs
2 Large Egg Yolks
1 ½ Cups Granulated Sugar
1/3 tsp Lemon Zest, finely grated
Pinch of Kosher Salt
¼ Cup All Purpose Flour
3 Cups Raspberries, washed and separated in half
Directions:
For the Crust:
1. In a small bowl, whisk together the flour, cornmeal, and salt. Set aside. In a stand mixer fitted with paddle attachment, beat the butter and sugar until light and fluffy. Beat in egg yolks. Add the dry ingredients and mix until dough just comes together. Flatten into a disk, wrap in parchment, and refrigerate for at least 20 minutes. (Can store overnight).
For the Filling:
1. Preheat oven to 375° and grease a 11-inch tart pan.
2. In a small saucepan over low heat, melt the butter. Add the vanilla bean paste and stir until butter is golden brown, about 5 minutes. Set aside to cool.
3. In a medium bowl using electric beaters, mix the eggs, egg yolks, and sugar until thick – about 3 minutes. Beat in the cooled butter, lemon zest, and salt. Then stir in the flour until just blended.
4. Remove crust from fridge and roll out into a circle, about ½ inch thick. Lay into tart pan and use your fingers to press into the bottom and up the sides. Spread 1 ½ cups of raspberries into the bottom and then pour the custard over the top, filling almost to the top of the pan.
5. Bake in center rack for 40 minutes. If a merengue forms over the top you can crack it off. Wrap the edges of the crust with foil and return to oven for another 15-20 minutes until top is golden brown and a knife inserted into the tart comes out clean. Let cool completely. Serve cold or at room temperature with the remaining 1 ½ cups fresh raspberries spread over the top.

#raspberry#raspberries#tart#custard#custard tart#fruit tart#Summer#summer baking#mothers day#mothersday#homemade#foodie#food52#dessert#brunch#recipe#recipes#treatyoself#recipeoftheday
259 notes
·
View notes
Text
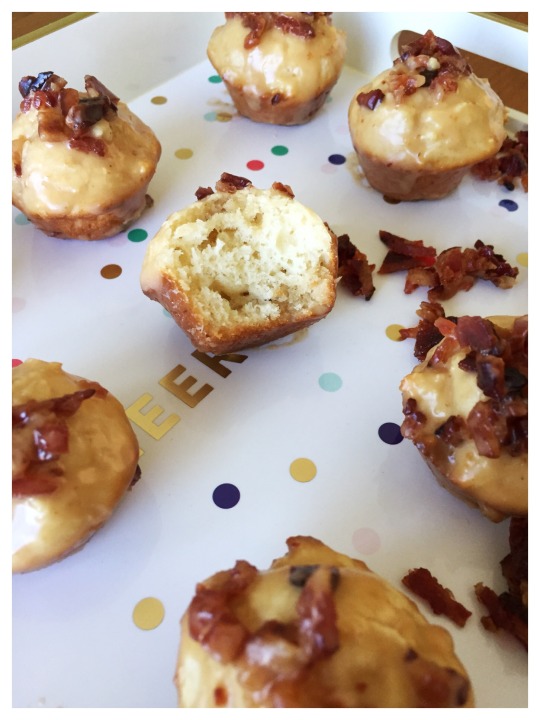
Maple-Glazed Mini Muffins with Candied Bacon
Sweet. Savory. Bite-sized.


Ingredients:
6 Slices Bacon
1/3 Cup Brown Sugar
1/3 Cup Maple Syrup
1 ½ Cups Powdered Sugar
¼ Cup Maple Syrup
¼ Cup Water
¼ tsp Maple Flavoring
¼ Cup Unsalted Butter, softened
¼ Cup Granulated Sugar
½ Cup Brown Sugar
1 Large Egg
½ Cup Buttermilk
1 tsp Vanilla Extract
1 ½ Cups All Purpose Flour
1 ½ tsp Baking Powder
¼ tsp Salt
Directions:
For the Candied Bacon:
1. Preheat oven to 325° and line a baking sheet with parchment paper or a silicon mat.
2. Pour maple syrup into a bowl and brown sugar onto a plate. One piece of bacon at a time, dunk bacon in the maple syrup, coat with brown sugar and lay flat on the prepared cookie sheet. Continue until all the bacon is coated. Place in center rack and bake for 15-20 minutes until bacon is just crispy. Remove from oven. Once cool, use a sharp knife to dice into small bits. Set aside.
For the Maple Glaze:
1. Using electric beater or a stand mixer fitted with whisk attachment, beat the powdered sugar, syrup, water, and maple flavoring until smooth. Stir in the candied bacon bits. Set aside.
For the Mini Muffins:
1. Grease a mini muffin tin with Pam spray, coconut oil, or butter.
2. In a stand mixer fitted with paddle attachment, beat the butter and sugars until cream, about 2 minutes. Add the egg, buttermilk, and vanilla. Beat well, scraping down the sides of the bowl as necessary.
3. Add flour, baking powder, and salt to the butter mixture. Beat until just combined, continuing to scrape down the bowl as needed. Dough will be sticky. Use a Tablespoon to scoop dough into prepared muffin tin, filling each well about ¾ full. Bake in center rack for 8-10 minutes until muffin edges are golden brown. Remove from oven.
4. While still hot, dunk the muffins in the maple bacon glaze, making sure to top each muffin with some of the bacon bits. Set on a sheet of wax paper to cool. Continue until all muffins are coated and topped.
*Eat same day or store in airtight container for up to 4 days.

#superbowl#superbowl snacks#Super Saturday#superbowlsunday#superbowl50#mini muffins#muffins#recipe#recipes#treatoftheweek#treat of the week#thebakeclubla#the bake club la#muffin recipe#bacon#bacon bits#candied bacon#maple syrup#maple#maple glaze#maple bacon#sweets#foodie#food52#dessert#brunch#snacks#bite size#homemade
110 notes
·
View notes
Text
Coconut Banana Bread
Hearty. Homey. Crave-worthy.


Ingredients:
2 ½ Cups All Purpose Flour
1 ½ tsp Baking Powder
½ tsp Baking Soda
½ tsp Salt
½ Cup Coconut Oil, melted
1 Cup Granulated Sugar
2 Large Eggs
1 tsp Vanilla Extract
1 tsp Coconut Extract
1 Cup Bananas, mashed (about 3 bananas)
1 Cup Coconut Milk
1 ¼ Cup Unsweetened Coconut Flakes separated.
Directions:
1. Preheat oven to 350° and grease a 9x5 loaf pan with coconut oil or butter.
2. In a small bowl, whisk together the flour, baking powder, baking soda, and salt. Set aside. Combine the coconut oil and sugar in the bowl of a stand mixer fitted with paddle attachment and beat well on medium speed. Add the eggs and beat on high for another 2-3 minutes. Mix in the vanilla and coconut extract.
3. In another small bowl, mash the bananas and stir in the coconut milk until fully incorporated.
4. Alternating between the banana mixture and the flour mixture, gradually beat both into the egg mixture. Use a wooden spoon to fold in 1 cup of the coconut.
5. Pour batter into prepared loaf pan smoothing evenly to all corners. Top with remaining ¼ cup coconut, pressing down slightly so the flakes stick into the batter. Place on center rack and bake for 65-75 minutes until a knife inserted into the bread comes out clean. (At about 45 minutes I covered the top with foil to avoid burning).
Let cool completely before removing from pan.
*Store in the fridge for up to 10 days.
#banana bread#banana#coconut#coconut banana bread#homemade#comfort food#coconut oil#treatoftheweek#treat of the week#thebakecl#the bake club la#recipe#recipes#baking#baker#loaf#Banana Loaf#foodie#dessert#treats#treatyoself#brunch#breakfast#food52
82 notes
·
View notes
Text
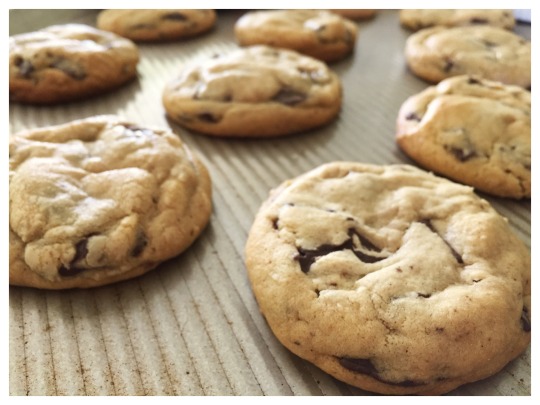
Super Soft Bakery Style Chocolate Chip Cookies

Gooey. Buttery. Heaven.


Ingredients:
¾ Cup Unsalted Butter (1 ½ Sticks), softened
¾ Cup Golden Brown Sugar, packed
¼ Cup Granulated Sugar
1 Large Egg
2 Tbsp Maple Syrup
1 tsp Vanilla Extract
2 Cups All Purpose Flour
1 tsp Baking Soda
1 tsp Corn Starch
¼ tsp Salt
2 Cups Chocolate Chunks or Discs
Directions:
1. In the bowl of a stand mixer fitted with paddle attachment, beat the butter, sugars, egg, syrup, and vanilla on medium speed until light in color and fluffy, about 3-4 minutes, scraping down the sides of the bowl as necessary.
2. Turning speed to low, mix in the flour, baking soda, corn starch, and salt. Beta until just combined. Use a wooden spoon to fold in the chocolate chunks until evenly distributed.
3. Line a baking sheet with a silicon mat and scoop out heaping spoonfuls of dough (about ¼ cup each) forming them into a ball with your hands. Place on cookie sheet about 2 inches apart. Cover with saran or foil and refrigerate for at least 2 hours.
4. Preheat oven to 350°. Remove cookie sheets from fridge and bake on center rack for 12-15 minutes until just golden brown around the edges. They might look a bit light in color in the center, but they will firm up as they cool.
*Store in airtight container for up to 5 days.
#cookies#chocolate#chocolate chip cookies#cookie recipe#recipe#recipes#recipe of the day#homemade#butter#gooey#cookie#comfort food#thebakeclubla#the bake club la#treatoftheweek#treat of the week#foodie#dessert#treats#treatyoself#sweet tooth#food52
1K notes
·
View notes
Text
Gluten Free + Paleo Banana Coconut Oatmeal Muffins

Fresh. Nourishing. Comfort.

Ingredients:
2 ½ Cups Gluten Free Oats, roasted and separated
3 Ripe Bananas (about 1 cup mashed)
2 Large Eggs
¼ Cup Maple Syrup
¾ Cup Coconut Milk (I used a carton, not the canned coconut milk)
2 tsp Vanilla Bean
2 tsp Baking Powder
½ tsp Baking Soda
½ tsp Salt
1 tsp Cinnamon
½ Cup Unsweetened Shredded or Ground Coconut
½ Cup Almond Butter
Directions:
1. Preheat oven to 325° and grease a cupcake tin with coconut oil. Spread oats in one layer on a cookie sheet and roast until lightly toasted, about 7-8 minutes. Let cool. Increase oven temperature to 350°.
2. In a food processor, pulse 1 ½ cups of the oats until they resemble flour. Set aside.
3. In a large bowl, mash the bananas until no lumps remain. Beat in the eggs, maple syrup, milk, and vanilla until mixed well. Stir in the oat flour, remaining 1 cup whole oats, baking powder, baking soda, salt, and cinnamon until incorporated. Fold in the coconut until just blended.
4. Spoon batter into the prepared cupcake tin until wells are ¾ full. Using a knife or fork, swirl about 1 Tbsp of almond butter into the top of each muffin.
5. Place in center rack and bake for 18-22 minutes, until a knife inserted into a muffin comes out clean. The edges should be golden brown. Let cool and then remove from baking tin.
*Store in an airtight container in the fridge for up to 1 week.

#muffins#oatmeal#oatmeal muffins#banana#coconut#almond butter#banana muffins#gluten free#gluten free recipes#glutenfree#gf#paleo#paleo recipes#healthy#healthy eating#healthy recipes#health food#healthy snacks#clean eating#cleaneating#homemade#recipe#treat of the week#treatoftheweek#the bake club la#thebakeclubla#foodie#foodstagram#breakfast#brunch
194 notes
·
View notes
Text
Paleo Snickerdoodle Cookies
Hearty. Aromatic. Spice. Protein.


Ingredients:
1 ½ Cups Almond Flour or Almond Meal
3 Tbsp Coconut Flour
1 tsp Ground Cinnamon
1 tsp Baking Powder
¼ tsp Salt
¼ Coconut Oil, melted
¼ Cup Maple Syrup or Honey
2 tsp Vanilla extract
1 Tbsp Coconut Palm Sugar
1 tsp Ground Cinnamon
Directions:
1. Preheat oven to 350° and line a cookie sheet with parchment paper or a silicon mat.
2. In a large mixing bowl, whisk together the almond flour, coconut flour, cinnamon, baking powder, and salt. Stir in the melted coconut oil, syrup or honey, and the vanilla. Mix until well blended and a dough begins to form.
3. In a small bowl, use a fork to mix the coconut palm sugar and cinnamon. With clean, slightly wet hands, scoop out about 1 Tbsp of dough and form a ball by rolling dough between your palms. Coat with cinnamon/sugar mixture and place on prepared baking sheet. Repeat with remaining dough, arranging cookies about 1-inch apart. Use the bottom of a flat jar, clean and slightly wet, to press down the cookies into flat discs, about 1-inch thick.
4. Bake on center rack for 8-10 minutes or until bottoms are slightly golden. Let cool for 5 minutes before transferring to a baking rack to cool completely.
*Store in airtight container for up to 10 days or freeze.
#cookies#paleo#paleo recipes#glutenfree#gluten free recipes#gluten free#snickerdoodle#snickerdookookie#paleo snickerdoodle#Holidays#new years#2018#clean eating#healthy#health food#healthy recipes#dessert#treats#treatyoself#homemade#Almond Flour#coconut flour#cinnamon#cinnamon sugar#coconut palm sugar#treatoftheweek#treat of the week#thebakeclubla#the bake club la#Chrismas
344 notes
·
View notes
Text
Chocolate Peppermint Shortbread

Merry. Crispy. Buttery. Festive.

Ingredients:
¾ Cup Powdered Sugar
1 Cup Unsalted Butter, softened
1 tsp Vanilla Extract
1 tsp Peppermint Extract
1 ¾ Cups All Purpose Flour
½ Cup Unsweetened Cocoa Powder
2 Candy Canes, crushed
3 oz. Dark Chocolate, melted
½ tbsp. Coconut Oil or Shortening
Directions:
1. In a stand mixer fitted with paddle attachment, or using an electric beater, cream the butter and powdered sugar until light and fluffy, about 3 minutes. Add the vanilla and peppermint extract and beat until smooth. Mix in the flour and cocoa powder and stir until just incorporated. (Dough will be very thick). Turn dough onto floured parchment paper and press into a disc. Refrigerate at least one hour.
2. Preheat oven to 350° and line a cookie sheet with parchment paper or a silicon mat.
3. Remove dough from fridge and turn onto a floured surface. Roll to about ¼ inch thick and use a cookie cutter to cut into desired shape. Arrange on prepared cookie sheet about ½ inch apart.
4. Crush the candy canes in a ziplock bag or bowl. Use your finger or the back of a spoon to gently press crushed candy into the center of each cookie. Bake in center rack for 9-11 minutes. Let cool completely on a cooling rack.
5. Combine chocolate and coconut oil or shortening in a microwave safe bowl and microwave in bursts of 30-seconds, mixing after each, until melted and smooth. Use a fork to drizzle chocolate over the cooled cookies. Refrigerate for 15-20 minutes until chocolate has hardened.
*Serve immediately or store in airtight container in fridge for 5 days.
#shortbread#shortbread cookies#chocolate#chocolate cookies#chocolate shortbread#chocolate peppermint#peppermint#mint chocolate#candy cane#dessert#homemade#holiday#Holidays#chrismas#Christmas Cookies#merry christmas#Home for the Holidays#treats#the bake club la#thebakeclubla#treat of the week#treatoftheweek#festive
14 notes
·
View notes
Text
Paleo Coconut Almond Brownies

Rich. Crunchy. Fudgy. Amazing.

Ingredients:
¾ Cup Dark Chocolate (65% or more), chopped
5 Tbsp Coconut Oil
2/3 Cup Coconut Palm Sugar or Monk Fruit Sugar
2 Large Eggs
1 tsp Vanilla Extract
2/3 Cup Almond Flour
¼ Cup Unsweetened Cocoa Powder
½ tsp Baking Soda
¼ tsp Salt
½ Cup Almonds, roasted and chopped
½ Cup Shredded or Flaked Unsweetened Coconut
Directions:
1. Preheat oven to 350° and grease an 8x8 baking pan with coconut oil.
2. In a microwave safe bowl, melt the ¾ cup chocolate and coconut oil, stirring after every 30-minute burst, until smooth. Set aside to cool.
3. In a medium bowl, whisk the almond flour, cocoa powder, baking soda and salt. Set aside.
4. In a large bowl, whisk together the sugar and eggs, beating well for about 2 minutes. Once the chocolate mixture has cooled, gradually whisk in the egg mixture until blended. Stir in the vanilla and then gradually add the flour mixture until just incorporated. Fold in the almonds and coconut.
5. Pour batter into prepared pan and bake on center rack for 20-25 minutes until a knife inserted into the brownies comes out clean. Let cool before slicing and serving.
#paleo#paleo recipes#brownie#brownies#paleo brownies#coconut#almonds#glutenfree#gluten free recipes#gluten free#holiday baking#homemade#dessert#clean eating#healthy eating#healthy recipes#thebakeclubla#the bake club la#treatoftheweek#treat of the week
86 notes
·
View notes
Text
Pumpkin Sugar Cookies with Cinnamon Cream Cheese Frosting
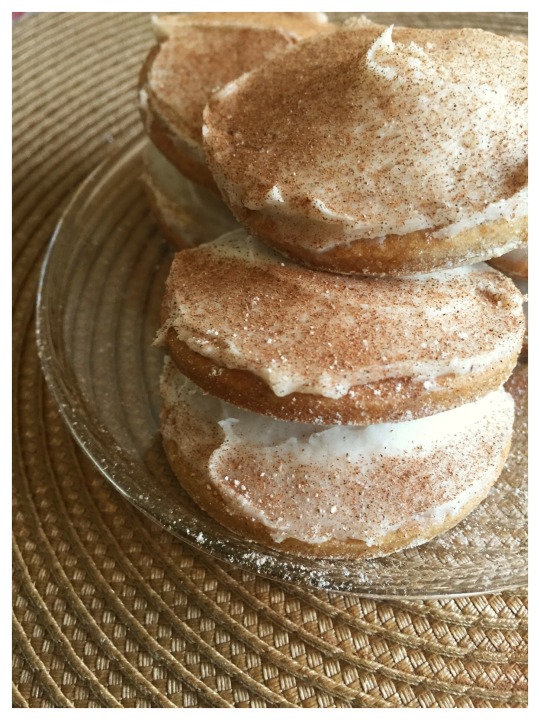
Butter. Sweet. Spice. Holidays.

Ingredients:
For the Cookies:
2 Cups All Purpose Flour
1 tsp Ground Cinnamon
½ tsp Ground Ginger
¼ tsp Ground Nutmeg
Pinch of Ground Cloves
½ tsp Kosher Salt
¼ tsp Baking Soda
½ Cup (1 Stick) Unsalted Butter, room temp
½ Cup Granulated Sugar
½ Cup Brown Sugar
½ Cup Pumpkin Puree
2 Large Egg Yolks
1 tsp Vanilla Extract
For the Frosting:
3 Oz Cream Cheese, softened
3 Tbsp Unsalted Butter, softened
1 tsp Ground Cinnamon
½ tsp Vanilla Extract
2 ½ Cups Powdered Sugar
1-2 Tbsp Milk
Directions:
1. In a medium bowl, whisk together the flour, cinnamon, ginger, nutmeg, cloves, salt, and baking soda. Set aside.
2. In the bowl of a stand mixer fitted with paddle attachment, beat the butter and sugars until light and creamy. Add the pumpkin and mix well, then beat in the egg yolks and vanilla until smooth and fluffy, about 2 minutes.
3. Reduce mixer to low speed and gradually beat in the dry ingredients. Mix until just incorporated. Turn dough onto a floured surface and roll or pat into a disc. Wrap with saran and refrigerate at least 1 hour.
4. While in the fridge, make the frosting: In the bowl of a stand mixer fitted with paddle attachment, whip together the cream cheese and butter until pale and fluffy. Mix in the cinnamon, vanilla, and powdered sugar. If necessary, beat in milk, 1 tsp at a time, until desired consistency is reached.
5. Preheat oven to 350° and line a baking sheet with parchment paper or a silicon mat.
6. Turn hardened dough back onto the floured surface and roll to roughly ¼ inch thick. Use cookie cutter to cut into desired shapes and arrange on prepared baking sheet about 1 inch apart.
7. Bake 10-12 minutes until the edges are just starting to brown. Let cool completely on wire racks before frosting and sprinkling with cinnamon.
#cookies#cookie recipe#recipe#Pumpkin#pumpkin recipes#pumpkin everything#pumpkin cookies#cinnamon#cream cheese frosting#cinnamon frosting#Fall#fall baking#thanksgiving#Thanksgiving Recipes#holiday#holiday baking#sugar cookies#christmas#Christmas Cookies#thebakeclubla#the bake club la#treatoftheweek#treat of the week#homemade
132 notes
·
View notes
Text
Vegan Pumpkin + Sage Biscuits with Cranberry Butter
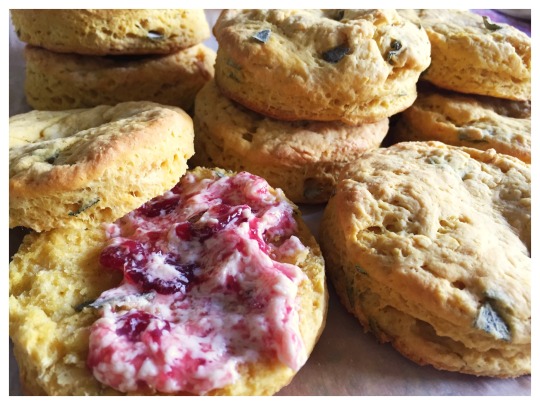
Savory. Vegan. Sultry. Comfort.

Ingredients:
¾ Cup Nut Milk, unsweetened
1 Tbsp Fresh Lemon Juice
¼ Cup Pumpkin Puree
2 ¼ Cup All Purpose Flour
1 Tbsp Baking Powder
½ tsp Baking Soda
¾ tsp Salt
½ tsp Ground Cinnamon
¼ tsp Ground Nutmeg
4 Tbsp Coconut Oil or non-dairy unsalted butter, cold
3 Tbsp Fresh Sage, chopped
¼ Cup Non-dairy butter ( I used Earth Balance), softened
1-2 Tbsp Canned Cranberry, whole berries
1 tsp Maple Syrup or Agave (optional)
Directions:
1. Preheat oven to 450° and line a baking sheet with parchment paper or a silicon mat.
2. Mix together the nut milk and lemon juice in a small bowl, set aside and let curdle for about 5 minutes, then mix in the pumpkin puree until smooth.
3. In a large bowl, whisk together the flour, baking powder, baking soda, salt, cinnamon, and nutmeg. Cut in the cold coconut oil or butter until mixture is coarse. Add the chopped sage and mix well.
4. Using a wooden spoon, gradually stir in the liquids into the flour mixture, about ¼ cup at a time. Mix until just combined. Turn dough onto a lightly floured surface and, using flour on your hands, gently knead a few times.
5. For dough into a 1-inch thick disc and use a round biscuit cutter to slice dough into 2 or 3 inch rounds (depending on size preference). Arrange biscuits on baking sheet so they are barely touching and brush with melted non-dairy butter. Press your thumb slightly into the center of the biscuit to help them raise uniformly. Bake 14-17 minutes or until golden brown.
6. While baking, beat the softened non-dairy butter with the cranberry and sweetener until smooth. Store in fridge to harden.
* Serve biscuits warm with butter on the side.

#vegan#veganism#vegan recipes#biscuits#Pumpkin#pumpkin biscuits#vegan biscuits#sage#sage biscuits#pumpkin sage#sage recipes#fresh sage#pumpkin recipes#pumpkin emoji#thanksgiving#Thanksgiving Recipes#christmas#christmas recipes#holiday#holiday baking#baking#baker#recipe#thebakeclubla#the bake club la#treat of the week#treatoftheweek#homemade#comfort food
7 notes
·
View notes
Text
New Paltz, NY: Apple Picking Cinnamon Scones
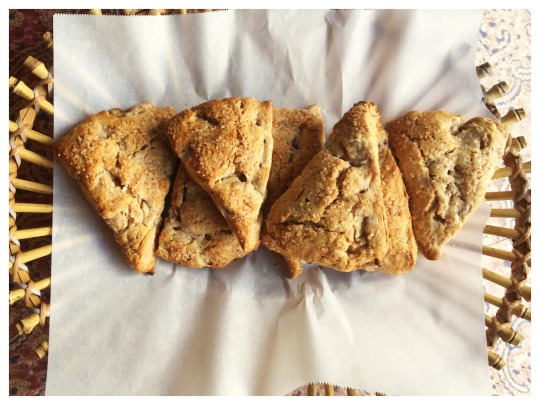
Three years ago I went apple picking for the first time… in upstate New York. Needless to say, I will never be able to top that. The colors were more vibrant than anything I had ever seen; the apples more bountiful than anything on the West Coast. And my friend and I ended the day with a giant German feast in Gardiner, NY. It cold and clear and simply perfection.
In memory of that incredible day trip, I whipped up some easy and delicious apple scones. These are a wonderful fall treat and will make your home smell of the season. I used local Winesap apples, but a variety of different baking apples will work just fine!
Serve at your next get-together brunch, warmed and with some cinnamon butter on the side.
APPLE CINNAMON SCONES:

Ingredients:
2 Cups All Purpose Flour, plus more for hands and work surface
2 ½ tsp Baking Powder
2 tsp Ground Cinnamon
½ tsp Kosher Salt
½ cup (1 stick) Unsalted Butter, cold or frozen
½ Cup Heavy Cream, plus 1 Tbsp for topping
1 Large Egg
½ Cup Golden Brown Sugar, packed
1 tsp Vanilla Extract
1-2 Cups Apples, chopped into small cubes
2 Tbsp Turbinado Sugar (sugar in the raw)
Directions:
1. Preheat oven to 400° and line a baking sheet with parchment paper or a silicon mat.
2. In a large bowl, whisk together the flour, baking powder, cinnamon, and salt. Either cut or grate the butter into the flour, combining with your hands until mixture resembles coarse sand.
3. In a small bowl, whisk the cream, egg, brown sugar, and vanilla until well-combined. Pour it over the flour mixture and stir with a rubber spatula until just combined. Gently fold in the chopped apples, careful not to over-mix.
4. Sprinkle a flat surface with flour and with flour on your hands, work the dough into a 8-inch disc. If you need to use a roller, make sure that is floured as well. Using a sharp knife, cut into 8 equal wedges. Arrange on prepared cookie sheet about 2 inches apart. Brush scones with the cream and sprinkle with turbinado sugar. Bake 20-25 minutes until lightly golden.
#scone#scones#scone recipes#recipe#homemade#apple#apples#apple scone#cinnamon#cinnamon scones#apple cinnamon#treatoftheweek#treat of the week#thebakeclubla#the bake club la#Fall#fall baking#new paltz#new york#apple picking
18 notes
·
View notes
Text
Tartine Bakery’s Pumpkin Tea Cake
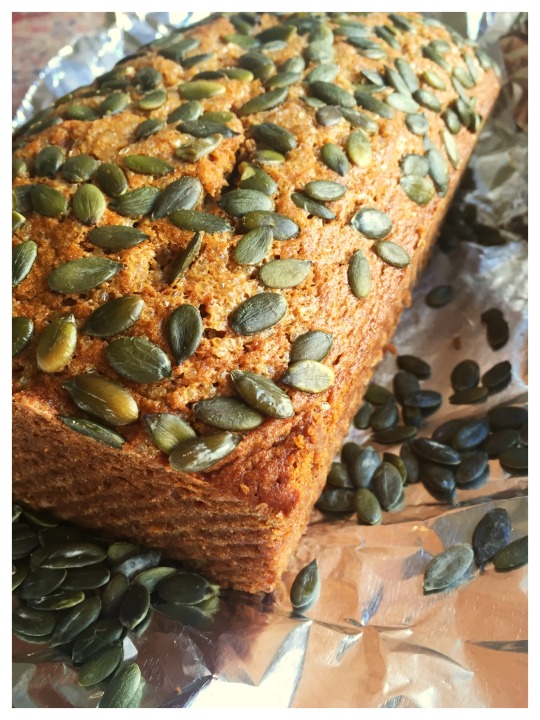
I will be spending this year’s Thanksgiving with my brother and family in the Bay Area. And while I cannot wait to see them and my adorable niece, I am almost just as equally excited to be close to San Francisco’s Tartine Bakery. This infamous shop on Guerrero Street has the most beautiful and delicious pastries you could ever hope to enjoy. I can’t make a trip up North without stopping in for a large to-go box.
But, Thanksgiving is still 3 weeks away and I simply could not handle the thought of waiting that long. The below recipe is from Tartine’s own cookbook (although I swapped out vegetable oil for coconut oil) and makes an amazing pumpkin bread that will give you all the fall season feels. It’s better than a PSL, scout’s honor.
Enjoy with a hot cup of coffee and a moody weather morning.
PUMPKIN TEA CAKE:

Ingredients:
1 2/3 Cups All Purpose Flour
1 ½ tsp Baking Powder
½ tsp Baking Soda
1 Tbsp plus 2 tsp Ground Cinnamon
2 tsp Nutmeg, freshly grated
¼ tsp Ground Cloves
1 Cup plus 2 Tbsp Pumpkin Puree (about 9 oz)
1 Cup Coconut Oil, melted
1 1/3 Cup Granulated Sugar
¾ tsp Kosher Salt
3 Large Eggs
2 Tbsp Turbinado Sugar
¼ Cup Raw Pepitas (Pumpkin Seeds)
Directions:
1. Preheat oven to 325° and grease and flour a 9x5 loaf pan.
2. In a medium bowl, whisk together the flour, baking powder, baking soda, cinnamon, nutmeg, and cloves. Set aside. In a large bowl, whisk the pumpkin, oil, sugar and salt until smooth. Add the eggs, whisking well after each addition.
3. Combine half the dry ingredients into the pumpkin mixture, folding together with a rubber spatula. Continue with the remaining dry ingredients until batter is just mixed.
4. Pour into the prepared loaf pan, smoothing to all sides evenly. Top with turbinado sugar and pepitas. Bake in middle rack for 55-60 minutes or until a knife inserted into the cake comes out clean. Let cool 15-20 minutes before removing from pan.
#pumpkin cake#Pumpkin#pumpkin bread#tartine#tartine bakery#san francisco#bay area#recipe#homemade#pepitas#thebakeclubla#the bake club la#treatoftheweek#treat of the week#foodie#baker#sweet tooth#Fall#fall recipes#fall baking#nutmeg#thanksgiving#Thanksgiving Recipes
5 notes
·
View notes
Text
Oak Glen Apple Picking: Vegan GF Apple Tart
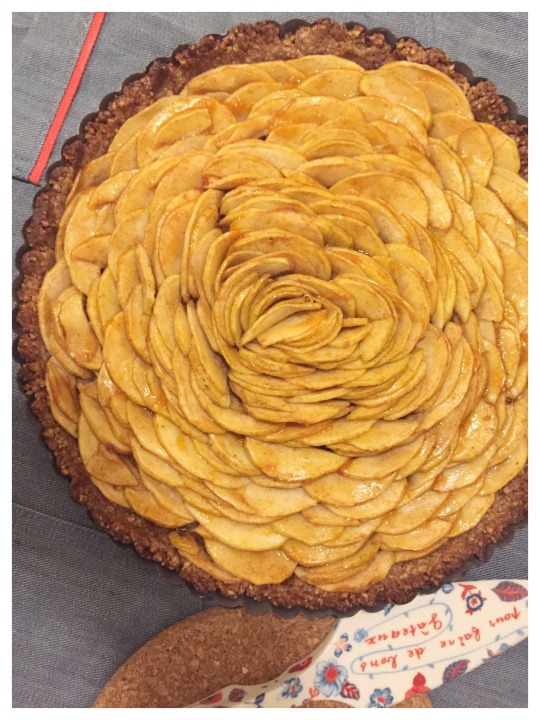
After the traditional visit to Oak Glen a few weekends ago, I had a crop of fresh Winesap Apples that I needed to use quickly. Having made a giant and very butter/flour filled slab pie last year, I figured something a bit healthier was in order this October. (Don’t get me wrong - I love that slab pie and you should definitely make it as well... just nice to have options).
So, this tart is completely gluten and dairy free and can be served to your most discerning friends. Except of course those with a nut allergy - this crust is basically all pecans and its amazing, just reserve it for those who can enjoy nuts. And feel really sorry for those who can’t :(.
Vegan + GF Apple Tart:

Ingredients:
For the Crust:
3 Cups Raw Pecans (Or nut of choice)
3-4 Tbsp Coconut Oil, Melted
2 Tbsp Maple Syrup
2 tsp Cinnamon
For the Apple Filling:
4-5 Apples, peeled, cored, and sliced thin
3 Tbsp Granulated Sugar (optional)
3 Tbsp Brown Sugar (optional)
3 Tbsp Maple Syrup
2 tsp Cinnamon
2 tsp Fresh Lemon Juice
1/3 Cup Apricot Fruit Spread
Directions:
1. Preheat oven to 350° and grease an 10 inch tart pan with coconut oil.
2. In a food processor, grind the nuts, coconut oil, syrup, and cinnamon until fine. Pour into the tart pan and press evenly to all edges and up the side of the pan. Place in freezer while you prepare the filling.
3. Mix sliced apples with the sugars, syrup, cinnamon, and lemon juice. Stir until well coated. Remove crust from freezer. Arrange slices in a circular pattern at an angle, overlapping until tart is completely full. Pack the slices tightly as they will shrink when baking.
4. Place in center rack and bake for 35-40 minutes or until apples are bubbling and crust is just browned.
5. While baking, combine apricot jam with 1-2 tsp of water in a saucepan over low heat. Stir until thinned. Once tart is out of the oven, brush jam generously over the apples and crust to form a glaze. Let cool 15-20 minutes before slicing.
#thebakeclubla#the bake club la#treatoftheweek#treat of the month#apple tart#apples#apple picking#oak glen#vegan#vegan recipes#glutenfree#gluten free#gf#gluten free recipes#healthy#healthy eating#healthy recipes#dessert#homemade#food52#apricot#cinnamon#recipe
75 notes
·
View notes
Text
Irish Halloween: Malteser Malted Cupcakes

Halloween is this coming Tuesday and while I don’t even know what my costume is, I do know what I want to be snacking on. Malt balls have always been one of my favorite candies. As a kid I always searched for those mini three-packs and wished someone would give away a full box. And while Maltesers aren’t the common brand in the states, I happened across a bag of them at work last week. I was thrilled… and thought how perfect – my favorite Halloween candy, the Irish import brand, on a holiday that started in Ireland. That’s right, according to legend, Ireland is the birthplace of Halloween. And while it has arguably become more popular in the states, this seems like the perfect excuse to bake something up inspired by this bag of Maltesers.
These cupcakes are super moist with both a malted cake and malted frosting. You probably can’t hand them out to the kids stopping by, but what the hell, that just means more for you!
Enjoy with a glass of chardonnay while waiting for Trick-or-Treaters.

Ingredients:
For the Cupcakes:
1 ½ Cups Cake Flour
1 ½ Cups All Purpose Flour
½ Cup Malted Milk Powder
1 ¾ Cups Granulated Sugar
2 ½ tsp Baking Powder
1 tsp Kosher Salt
1 Cup Unsalted Butter, cold and cut into small cubes
4 Eggs
1 Cup Milk
2 tsp Vanilla Bean Paste
For the Frosting:
12 oz. Milk Chocolate, chopped
1 Cup Malted Milk Powder
1 Cup Heavy Cream
½ Cup Unsalted Butter, chopped
Directions:
For the Cupcakes:
1. Preheat oven to 350° and grease and line a cupcake tin with liners.
2. In the bowl of a stand mixer fitted with paddle attachment, mix the flours, malted powder, sugar, baking powder, and salt. Stir until combined. Add the cold and chopped butter and beat until mixture resembles coarse sand. One at a time, add the eggs and beat well, scraping the bowl down as necessary.
3. In a small bowl, combine the milk and vanilla. Pour half into the stand mixer and beat for 1-2 minutes. Add the remaining milk mixture and beat for another 30 seconds.
4. Fill the cupcake tins about ¾ full and bake on center rack for 18-20 minutes or until a knife inserted into a cupcake comes out clean.
5. Frosting: Place the chopped chocolate into the bowl of a stand mixer and set aside. In a medium saucepan, whisk the malted milk powder and heavy cream. Place over medium heat and bring to a simmer while whisking constantly. Remove from heat and pour over the chocolate. Mix until melted and smooth. Cover with saran and refrigerate for at least two hours.
6. Once frosting is cooled, return to your stand mixer and beat with whisk attachment until spreadable and smooth. If necessary, you can add a few Tbsp. more of cream.
7. Spread frosting generously over the cooled cupcakes (or pipe with a pastry bag) and top with Malt Balls. Store in an airtight container in the fridge for up to 1 week.
#cupcakes#treatoftheweek#thebakeclubla#treat of the week#the bake club la#malteser#maltesers#malt balls#malted milk powder#malt#cake#chocolate#buttercream frosting#homemade#Halloween#Candy#Ireland#Irish#recipe#recipes
1 note
·
View note
Text
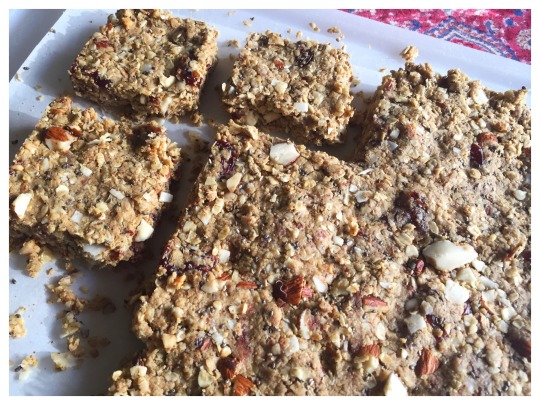
Set Life: Coconut Almond Protein Squares

Not only have I been on set for the last 2 weeks, but I’ve been on a sport’s series set. What does that mean? 14 hour days on a lacrosse field in 90° heat. And what does that mean? It means myself and the crew need easy, accessible, healthy snacks to keep us running.
Now, regardless of if you’re on a film set at a hotel in Italy or a sport’s field in Van Nuys, protein packed foods are a necessity when you’re shooting.
So, I whipped up a batch of these easy and delicious protein squares to share with my crew this coming week. The beauty of these is that you can customize them endlessly - I went with almond butter and coconut, but feel free to switch it up to your heart’s content. Some other enticing options: cashew butter and dates, peanut butter and cocoa nibs, sunflower seed butter and pepitas…get creative with it!
Enjoy with a pick me up cup of iced coffee or tea.

Coconut Almond Protein Squares:

Ingredients:
1 Cup Almond Butter
¼ Cup Coconut Oil
1/3 Cup Honey
2 tsp Vanilla Extract
2/3 Cup Vanilla Protein Powder
1 Cup Oats
½ Cup Raw Almonds, roughly chopped
½ Cup Dried Tart Cherries, roughly chopped
½ Cup Shredded, Unsweetened Coconut
2 Tbsp Chia Seeds
Directions:
1. Line an 8x8 baking pan with parchment paper.
2. In a medium saucepan over low heat, mix together the almond butter, coconut oil, honey, and vanilla until melted and a bit runny. Transfer to a large bowl and mix in the protein powder until smooth. Fold in the oats, almonds, cherries, coconut, and chia seeds.
3. Pour mixture into prepared pan. Refrigerate for at least 1 hour until set. Remove from fridge, let soften for about 10 minutes. Use a 2-inch square cookie cutter or a knife to slice into squares. Store in airtight container in the fridge for up to 10 days.
#treatoftheweek#treat of the week#thebakeclubla#the bake club#protein powder#protein#protein bars#recipe#recipe of the day#healthy eating#healthy recipes#healthy snacks#setlife#set life#tv series#crew#film crew#almonds#almond butter#Almond Butter Recipe#coconut#tart cherries#oats#granola bars#granola bar#homemade
26 notes
·
View notes
Text
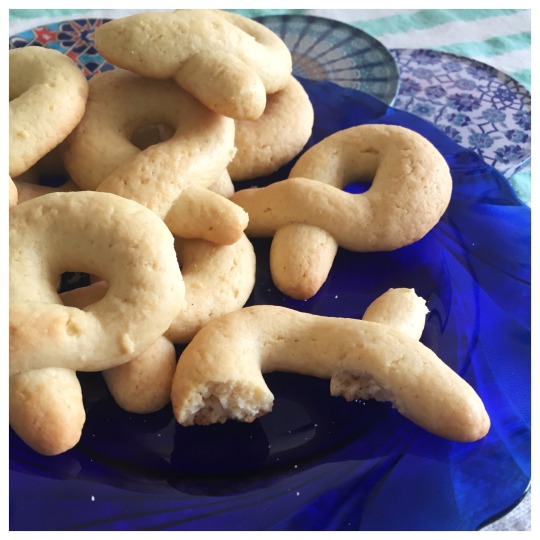
Biscoitos: Portuguese Citrus Butter Cookies

After spending a wondrous week in Portugal over Labor Day, it was a challenge to decide what to make for the blog. The traditional egg custard tarts would be the obvious choice, but they actually weren’t my favorite sweet I had while abroad. Traveling from Lisbon to the seaside town of Ericeira to the wine region of Alentejo, there were a few meals that stood out. In the breathtaking, inland wine town of Vidigueira, our extended family spent 3 days at the incredible wine hotel Herdade do Sobroso. Every evening consisted of multiple course meals made from local ingredients, most coming straight from the hotel’s own land and farm…and of course AMAZING wine, both the whites and the reds. And, each morning, we would all gather in the large dining room for a spread of fresh bread, croissants, cheese, meats, yogurt, jams, etc. It was perfection and I will fantasize about it for years to come. At breakfast, they always had a plate full of these little golden brown, looped cookies that I loved. They were crispy, buttery, and popping with a bright citrus flavor. They were the perfect treat to dip into my coffee or tea. These were the biscoitos. And below is my homemade version, adding some browned butter of course, that will always bring me back to my time in Portugal.
These cookies are so surprisingly easy to whip up and are perfectly enjoyed at any time of day. I plan on having one in the morning, reminiscing about wine hotels in central Portugal, and one at night on top of a small scoop of vanilla ice cream.
Bring these to your next dinner party and you’ll have everyone dreaming of Portugal vacays.
Biscoitos (Portuguese Citrus Butter Cookies)

Ingredients:
3 Cups All Purpose Flour
1 Cup Granulated Sugar
2 tsp Baking Powder
1 tsp Salt
1 Stick Plus 2 Tbsp Unsalted Butter, browned and cooled
3 Large Eggs
¼ Cup Fresh Squeezed Orange Juice
1 Tbsp Lemon Zest
Directions:
1. Preheat oven to 350° and line a cookie sheet with parchment paper or a silicon mat.
2. Melt the butter in a small saucepan over medium/low heat, stirring occasionally. Butter should start to crackle and pop, continue heating and stirring until it stops and butter has a nutty aroma with small golden flecks in it. Remove from heat and transfer to a Pyrex bowl. Place in fridge to cool for about 10-15 minutes.
3. In a stand mixer fitted with dough hook attachment, combine all ingredients in the order listed above and beat on lowest setting until dough comes together and is not sticking to the sides of the bowl, about 5-6 minutes.
4. Roll about a walnut sized piece of dough between your palms and then roll into a long, skinny stick, about 4 inches long. Place on baking sheet and cross one end over the other to create the shape you see in the pictures. Repeat with all remaining dough.
5. Place cookie sheet in center rack and bake for 20-25 minutes, just until cookies start to brown a little. Remove and let stand for about 5 minutes before moving to a cooling rack. Store in airtight container for up to 1 week.

#portugal#portuguese#cookies#biscoitos#citrus#butter cookies#brown butter#browned butter#homemade#treatoftheweek#treat of the week#thebakeclubla#the bake club la#travel#vidigueira#alentejo#herdade do sobroso#wanderlust#recipe#cookie recipe#recipe of the day#treatyoself#dessert#Easy recipes#easy dessert recipes
48 notes
·
View notes
Text
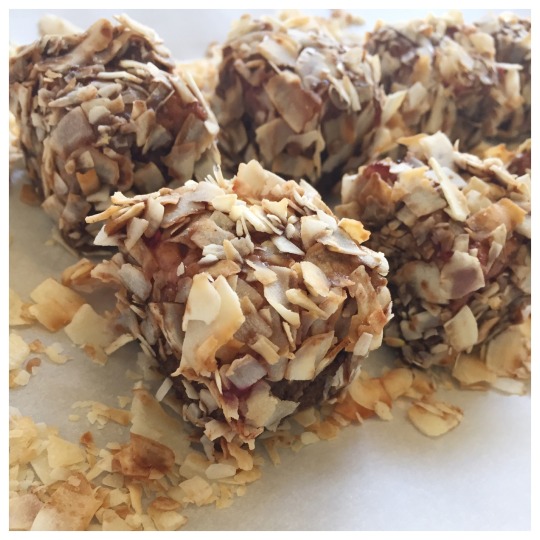
Australian Treats: Raspberry & Toasted Coconut Lamingtons
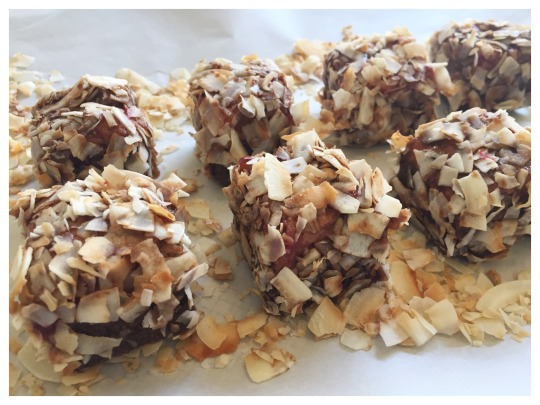
I should have made these to align with Australia Day, but alas, here they are. And I promise you won’t be disappointed when you try them! Lamingtons are an Australian dessert that originated in Queensland sometime in the late 19th century and have become a very common dessert all over the country. Traditionally made with yellow sponge cake and dessicated coconut, there is good reason for their well-known status in Aussie-land. These little chocolate dipped cakes are moist and light and satisfying all at the same time. I wish I was in Sydney right now enjoying one with a cold beer.
Instead, I made my own version at home and I’m quite happy with how they turned out. I adjusted the cake to a raspberry sponge cake and toasted my coconut flakes to really bring out their flavor. I’ll be enjoying these little squares for dessert all week!
Enjoy with sunny afternoon and some iced tea.
Raspberry & Toasted Coconut Lamingtons:

Ingredients:
For the Cake:
4 Large Eggs
1 Cup Granulated Sugar
1 tsp Vanilla Extract
1 1/3 Cups All Purpose Flour
1 ½ tsp Baking Powder
½ Cup (1 Stick) Unsalted Butter, melted and cooled
1/8 tsp Red Food Coloring
½ Cup Fresh Raspberries, chopped
For the Topping:
6 Cups Shredded or Flaked Coconut
For the Chocolate Icing:
3 Cups Powdered Sugar
1/3 Cup Unsalted Butter
1 Cup Whole Milk
½ Cup Cocoa Powder
Directions:
For the Cake:
1. Preheat oven to 350° and grease an 8x8 baking pan with butter and flour. Line with parchment paper.
2. In the bowl of a stand mixer fitted with paddle attachment, beat the eggs, sugar, and vanilla until light in color and thick, about 3 minutes. Sift the flour and baking powder over the egg mixture and use a rubber spatula to gently fold into the batter until just combined.
3. Once the melted butter has cooled, gradually add to the egg and flour mixture about 1/3 at a time. Fold in the red food coloring until mixed throughout. Pour batter into the prepared cake pan. Chop up the raspberries and sprinkle over the top. Bake on middle rack for 25-28 minutes until a knife inserted into the cake comes out clean. Turn onto a wire rack and cool completely. Wrap in foil and store in fridge for at least 1 hour.
4. Before you turn off the oven, spread the coconut on a large sheet pan. Toast in the oven for 5-10 minutes until golden brown.
For the Chocolate Icing
1. Sift the powdered sugar into a large bowl and set aside. Sift the coca powder into a small bowl and set aside.
2. In a large saucepan over medium heat, melt the butter. Once melted, stir in the milk. Using a whisk, mix the cocoa powder into the mixture until dissolved. Then whisk in the powdered sugar, one cup at a time, until it has also completely dissolved. Pour chocolate into a separate bowl to cool.
To Assemble:
1. Remove cake from fridge and cut into roughly 1 ½ -inch squares. (I used a square biscuit cutter to get even sizes).
2. Use a fork to submerge each piece into the chocolate until completely covered. Let drip and then roll in the coconut.
Store in air tight container in the fridge for 7-10 days.

#thebakeclubla#the bake club la#treatoftheweek#treat of the week#lamington#recipe#recipe of the day#dessert#treatyoself#treats#australia#sydney#queensland#coconnut#chocolate#raspberry#sponge cake#cake#lamingtons#lamington recipe#food52#homemade
3 notes
·
View notes