
unidentifiedmammal
Meen Yeen
• Aleris • 22• They/them or whatever • white/USA/GA Piedmont/zone 8 • @cosmicyeen@scuttlingpebbles ~~~~~~~~ Fiber arts, vulture culture, drawing, flora & fauna, natural art materials, collecting shiny things, and much more ~~~~~~~~ I post stuff I find and make, often long-winded captions & info dumping. Not an expert by any means but do my best to give an accurate breakdown of what I'm learning. Note, there will be animal parts on occasion (hides/bones)
132 posts
Don't wanna be here? Send us removal request.
Last Seen Blogs

braces-burglar-blog
dont forget to floss

ainsleylovesgreen-blog
ainsley

sharpening-fangs
show me your teeth

rep5
Rep 5

crocheteuse
crafts journal and inspiration
Text
I've been meaning to make more posts about this, but there's so much i have to say/images to show that this will be a part 1 out of ??? and this one focuses mainly on the first batch of Purple Iris watercolors and the pH mystery they made me unravel through chaotically-organized researching.
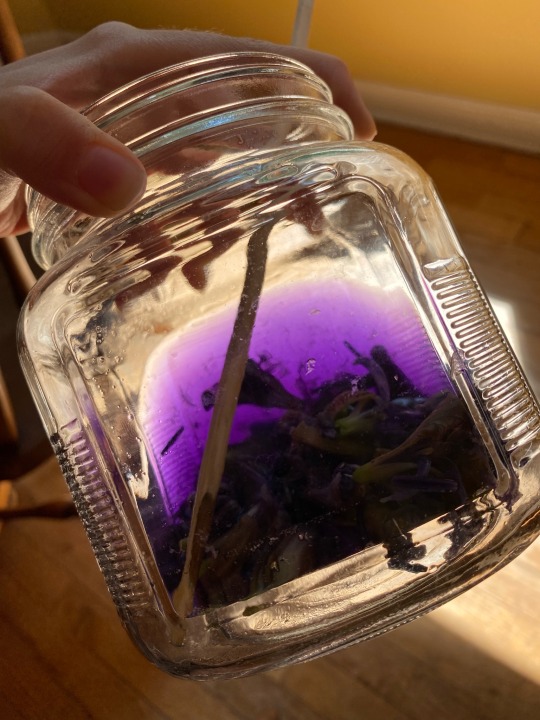
Basically, I've been messing around with anthocyanins, a common class of plant pigments that are pH sensitive/can be used as a pH indicator. The first source I've tried has been purple irises, which i've only vaguely been familiar with in the past. The ones I picked were the ones that had begun to shrivel slightly, to the point where they were still a deep purple but picking them they would almost be leaking a purple liquid that stained my hands. I put them in a thing of hot tap water (not boiled, just the hot setting on the faucet), enough to cover the flowers, and let them steep. they began changing the color of the water almost immediately, with the fresher ones not losing their color as quickly as the ones that had begun to wilt on the plant. within 30 minutes i decided it was extracted enough.

This left a strong purple in the water, which i then poured off into three other containers, two of which i would alter the pH of.
The purple is due to delphinidin, a type of anthocyanidin that forms the building blocks of anthocyanins. Note i italicize the word anthocyanidin just so it's easier to tell apart the two.
there are anywhere from 16-31 anthocyanidins depending on what source you find, but they are basically the backbone structure of anthocyanins, of which there are over 600 something. The main thing that turns an anthocyanidin (aglycon) into an anthocyanin (glycoside form) is a sugar attached to it.
Realistically, that distinction isn't useful when simply extracting things from flowers in hot water, but i thought it was a fun fact to note. Anthocyanidins also come in handy for knowing what builds the anthocyanins in your flowers/plant part;
cyanidin (30%), delphinidin (22%), and pelargonidin (18%) make up the base for a good majority of all the anthocyanins in plants (~60% collectively),
peonidin, malvidin, and petunidin being runnerups (20% collectively)
the 20-something remaining anthocyanidins make up the rest
So basically, they all have slightly different colors that are pH reactive, and can provide anything from red to pink to orange to purple to blue. But, for our purposes, if you have a blue/purple flower, that likely means it has some amount of delphinidin-based anthocyanins in it! there can also be more than one anthocyanidin type present in the same plant.
Other well-known sources of anthocyanins are grape skins, red cabbage, red onions, butterfly pea tea, and purple violets. However, they're also very abundant in many many other plants, these are just the common ones i can think of that lots of people are probably familiar with to some degree.
Fun fact, grape skins are actually really well-studied as far as anthocyanins go (i believe they mainly have malvidin-based ones) because they're so important for the coloration of wine!
Anthocyanins as a whole are also studied as a natural source of food dyes, along with other flavonoids such as carotenoids.
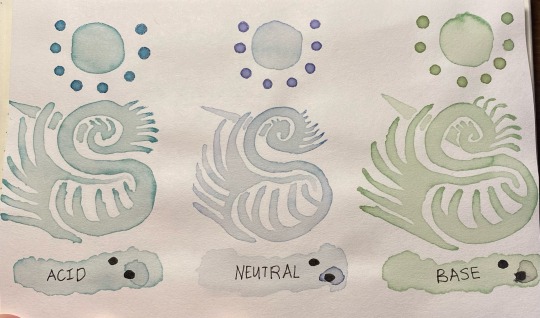
As for why it turns colors, this is because of the way the anthocyanin changes structure in different pHs. The short answer is it turns red/pink in low pH (acidic) conditions, purple in slightly acidic/neutral conditions, and blue/green in slightly high pH conditions.
The long answer is something I'll explain in a moment, but for now here's the acid/base colors:


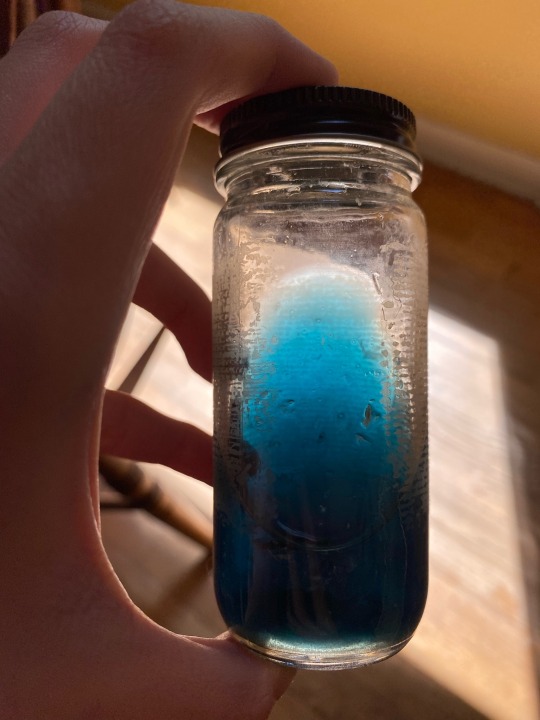
(on the left, i altered it with vinegar and it became a bright magenta color; on the right, i altered it with baking soda and it became a sea green/blue cyan that refused to show up accurately on camera). That's one thing I've noticed, and others have too, is that when working with pigments (especially natural ones) the color accuracy of the camera often just completely fails. there's only so many colors a digital camera can capture!
Here's a slightly more accurate color due to different lighting, note how it's more a malachite green than a pure blue. off the bat this was interesting becuase I wasn't expecting as green of a liquid as i got.

Anyways, the first thing i did with them was use them as-is, no alterations past the addition of the respective vinegar and baking soda. I painted with them just as one would paint with watercolors, and interestingly enough, when i put them onto paper, they began to change from their pink/purple/malachite colors to a teal/indigo/emerald set instead.
This seems to be the result of something in the paper itself, likely calcium carbonate (which i only recently learned is added to "buffer" paper against acidic substances; the cellulose in paper is more stable long term when there's no acid present, and the calcium carbonate neutralizes any acids applied to a degree).
It's still interesting that even though the acids are neutralized, they give a unique color when compared to the basic paint.
I also tried soaking some of the same paper in vinegar water, which got rid of that buffer and let me paint with the pinks intact, but that's for another post.
Also, note that i said "neutral" for the middle, this is just what i wrote down for the tap water sample; in actuality the tap water is actually a bit closer to pH 6 instead of a true neutral 7, which i only found out after i had gotten this far. So whenever i say "neutral," i mean "tap water that's slightly acidic"
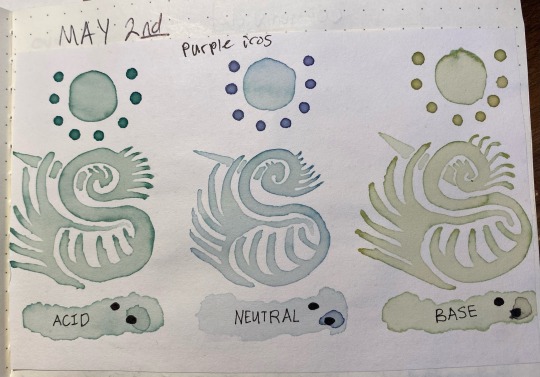
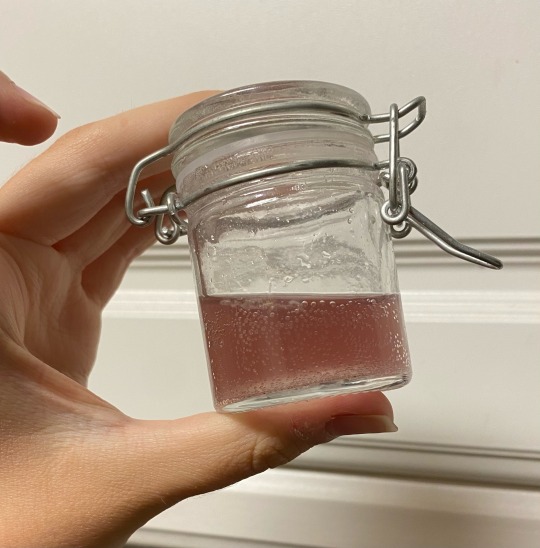
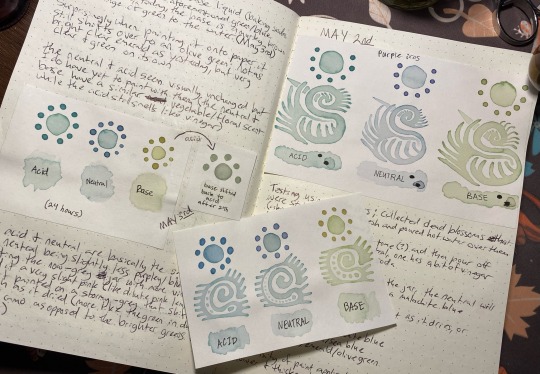
Here's something interesting that happened, though. Overnight i left the jars on my desk, and while the acid and neutral colors were the same when I came back ~24 hours later, the basic had degraded into a murky brown. this was interesting since that meant the instability was pH-dependent.
So, i made another color swatch with the acid/neutral/base, and used that as a comparison to look at how it had changed. Surprisingly, it painted out a yellowy-green instead of a murky gray-brown
here's the murky water that the once-malachite-green turned into:

I also poured off a bit into another container, and shifted it back into a low pH with a bit of vinegar to see if it would still change color. Surprisingly, it turned a slight pink, like pink lemonade, which means there were still anthocyanins in there but they were likely a lot less concentrated than they used to be.
Here's the pink, with a few leftover bubbles from the baking soda/vinegar reaction:
Here's the results of painting with these:

the acid was basically unchanged after sitting in a jar for 24 hours, the neutral had lost a bit of its purple color but was still about the same, and the base was now a lot yellower/tanner with a bit of green still showing through. The shifted sample was a pale stormy gray that ended up taking on a green color as it dried, as though following the trend of pink shifting to a bluer color but on a much more muted scale.
Now obviously, i wanted to figure out what caused this, so i dug around both on wikipedia and other sites but found myself eventually reading into scientific papers on the topic, at which point it became very clear that i would need to learn like, organic chemistry and such to be able to say for sure what was happening.
I did eventually manage to figure out a few things despite the dense terminology; for one thing, anthocyanins are more unstable than other plant pigments such as carotenoids. there are plenty of things that can affect their stability, including the pH of the substance they're stored in. Any higher than pH 7 (basic pHs) and theyll begin to degrade. This explains why the high pH sample lost its blue/green color, and why there was very little left to be shifted back to a pink color.
I also found out that the pH color shift isn't as simple as it seemed. Rather, there are multiple chemical forms of anthocyanins.
At the lowest pHs, basically all of them are in the "flavylium cation" state, which basically means it's positively charged and this is what gives a red color
still at a low pH (2-4), there's anothe chemical form that appears, the "quinoidal" structure that gives a blue color. Note that the red cation is still present, just no longer the only form
the more the pH rises, the more forms start to coexist, with some of those forms being colorless (one of which is a "colorless carbinol"
so, between 4 and 6 there are the cations (red) quinoidal (blue) carbinol (colorless) and something called a chalcone that gives a pale yellow
and then past that, I'm unsure, but of course that's around when the anthocyanins begin to degrade
There are also a lot more than these that i've encountered in various contexts but these seem to be the basic ones.
Do note that i do not fully understand these terms (flavylium, quinoidal, carbinol, chalcone, etc.) and have only recently begun to actually try to learn what they mean and the context surrounding them as i only had a class of basic high school chemistry under my belt prior to this. The main paper i combed over to try to find info on it seems to be behind a paywall but the DOI is:
doi.org/10.1016/j.foodchem.2008.09.001
for anyone curious and able to access it, whether through legit means or what have you.
That being said, to me, the takeaway here seems to be that there's a yellow form that appears around the time that other color forms begin to disappear, and as those degrade it makes sense that the resulting degraded forms also contribute to a murky color. This helps explain why it changed color in the jar and also retained a bit of yellow and green.
This also explains why the blue form seems to also be slightly green, it's got the blue quinoidal chemical form as well as the yellow chalcones.
There are also interesting things of note that I will get into at a later date, such as the texture/reflectivity of the way it dries, the differences in extraction ease between this and purple violets, the addition of a genuinely neutral/pH 7 sample later, a sample from a plant that doesnt seem to have delphinidins, and sample the seems to genuinely sparkle??? Much more of interest to come soon!
#art#traditional art#anthocyanins#watercolors#purple irises#painting#science#natural dyes#pigments#dyes#pH indicators
61 notes
·
View notes
Note
Hi, I tried to make paint from grape Hyacinths a few days ago and it didn't really work. I just stumbled across your blog and you really look like you know what you're doing! Do you have any advice?
Sure, I'd be happy to help! I'm new to a lot of this myself but I have found a good bit of info that I'm glad to share
To help specifically, I'd need a bit more info on what you did or didn't do, but you're also on the right track as grape hyacinths do have anthocyanins and it seems like they're around the same type (delphinidin-based) that I've been using
Were you able to get some color, or did it not show up at all? Did you put them in cold/warm/hot water, or did you add something to the water right off the bat?
When extracting the flower from the purple irises, i just had to put the flowers in hot tap water (not boiled) and they dropped a bunch of pigment quickly
However, i also tried doing the same thing with purple violets, and they didn't change the color of the water at all. I had to simmer them by putting their glass into a larger water bath to get the pigment to drop (and even then it was lighter than the purple iris). So if you're having trouble getting the pigment out of them in the first place, lightly simmering them could get them to release their colors
I'd also say to not full-on boil the flowers, as anthocyanins are more unstable than other pigments. I only used the simmering once i realized the violets didn't give any color from a gentler extraction. If you overheat them the chemical structure will degrade quicker and turn yellow/brown. They will also degrade in high (basic) pHs but this takes longer
If it's something else like the colors not being like expected, do let me know and i might be able to help!
8 notes
·
View notes
Text

Watercolors made from ammonia fermented lichen that bears dye precursor acids, and boiled onion skins of differing pH. Pigma micron pen.
I imagine painting ammonia water directly onto the paper isnt ideal for archival quality, or the vinegar water either. But sometimes things are ephemeral and that's okay.
ammonia dyebath for the darkest purple, vinegar neutralized dyebath for a lighter purple, and then two shades of yellow/orange/tannish for the two onion pH results.
(obligatory chemical disclaimer, don't go mixing chemicals even if theyre common household chemicals, you never know what they might turn into)
#art#crafts#paint#watercolors#orcein#lichen dyes#onion skin dyes#traditional art#natural dyes#I havent found any issues with ammonia/vinegar/baking soda reactions but i was also working with very small amounts#so while i am not confident enough to say it's safe for OTHERS to do im also cool with it myself#as there are no immediate chemical issues i can see looking into those three chemicals#or their reaction products and their reaction potential
76 notes
·
View notes
Text


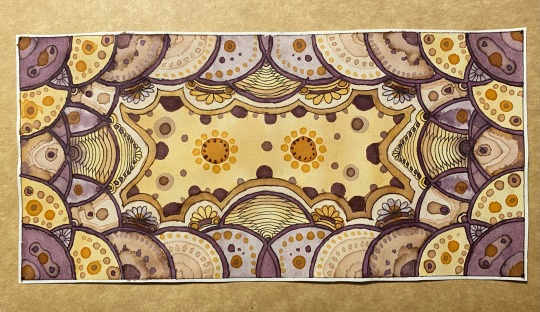
Current sample sheets and a couple pics of the liquid i've been using as watercolor, all extracted from purple iris or common violet in slightly different ways, and pH altered to give different colors due to anthocyanins (which i have been reading a bunch about and they ended up being a lot more complex than expected, and deserve their own text-heavy post, this is merely a pretty pictures post to prove i'm alive)
#art#watercolors#painting#anthocyanins#purple iris#common violet#flower paint#flower pigments#homemade paint#crafts#traditional art#natural dyes
1K notes
·
View notes
Note
for lichen dyes, is it better to spin the fibres before or after dyeing?
Thank you for the question! Both methods will work, but they do act a bit differently.
With dyes of any kind, I (personally) try to dye the "cloud" of fiber on its own before spinning. this lets the dye settle on the fibers more evenly, since the fibers themselves have more space between each other to let the dye move freely.
The evenness of dyeing also depends on whether or not you're using a crottle-method/other brown/orange lichen-in-the-pot boiling water method, as those mean the dye materials are in direct contact with the wool during the dyeing; this unevenness (both on unspun or spun wool) could also be an aesthetic choice but that's another can of worms. However, I imagine this a question about the purple AM-lichen dyes, in which case the dyebath (at least how I make it) is evenly mixed so tends to give an even dye by default.
Dyeing before also lets any bits of detritus from the dyebath fall out after drying and during carding and/or spinning, but this is less relevant for AM-specific lichen dyes since I strain those pretty finely.
Dyeing the yarn after it's spun also works, you just have to balance between keeping the yarn loose enough to dye evenly and organized enough to not tie itself into a knot in the pot. If the yarn is tightly cinched at any point then it could fail to absorb dye and give a patchy effect, although again this could be an aesthetic choice to make stripey yarn.
For lichen dyes specifically, I dye before it's spun like the other dyes I make; however, I have also heard of using it only on yarn to stretch the dyebath, since archil/orcein dye is so hard to come by, and some folks say that less dye is absorbed by pre-spun yarn due to the density of the fibers.
So, to summarize, it depends on what you're going for and which factors you care about! Even colors might favor a cloud-dyed fiber, pattern-dyed yarn might favor a yarn-dyed fiber. Reusing the dyebath might favor yarn-dyeing. Being able to blend colors or fix colors or pick out detritus can favor cloud-dyeing. Knowing exactly what length of yarn youll end up with is a bonus of yarn-dyeing. Many things to consider!
18 notes
·
View notes
Note
Hey! Just wanted to say I stumbled on your posts a few days ago and you've inspired me to try yarn spinning, just got my first drop spindle today and it's so cool! I thought I'd just give it a little go before dinner but got so absorbed that I left my pizza baking for almost two hours... burnt to a crisp, but it was a sacrifice I was ok with haha Thank you for sharing all your awesome projects and skills, I'm so impressed, and so happy I discovered them!
Thank you so much, and this makes me so happy to hear! I'm glad you're trying out a drop spindle for the first time, good luck learning on it! It's such a relaxing tool to use (most of the time) and I'm so glad to share drop spindles and tools and projects even when I'm still learning on them as well. The fact that can help others find their own hobbies is incredible!
I only slightly remember the first time i got to use a drop spindle, it was much like what you shared, i had a new spindle and roving and i had spun it all up and wanted to spin more haha
The sacrifice of your pizza will be well-remembered, i hope you got another one! Thank you and happy spinning!
7 notes
·
View notes
Text
Alrighty so this is the post on lichen dyes!
this particular bath of lichen dyes was originally started over a year ago scraping a tentatively-ID'd lecanora and/or ochrolechia genus lichen off of a fallen branch (remember, don't gather lichen when it's still growing! it's very slow growing and easy to overharvest)
to start off, this particular type of dye is made through the ammonia-fermentation method, also known as ammonia maceration. No actual bacterial fermentation occurs though. Rather, the compound orcinol (and precursor compound to orcinols) react with ammonia (N2) and oxygen to form the compound orcein (also called orchil/archil) which is what makes the final dye!
this process takes anywhere from 3 weeks to 16+ weeks depending on the lichen species, its constituent acids, the temperature, and the frequency of aeration.
This batch was set aside for several months and neglected a good bit, but it still works. I strained out the crumbled lichens (which i set aside for later) and diluted it 1:4 as instructed by a very good book called Lichen Dyes: The New Source Book by Karen Diadick Casselman. This book is basically omnipresent everywhere you see lichen dyes mentioned, especially the orcein-based dyes. I also used several websites/videos/papers and such that i've hunted down over various internet crawls.
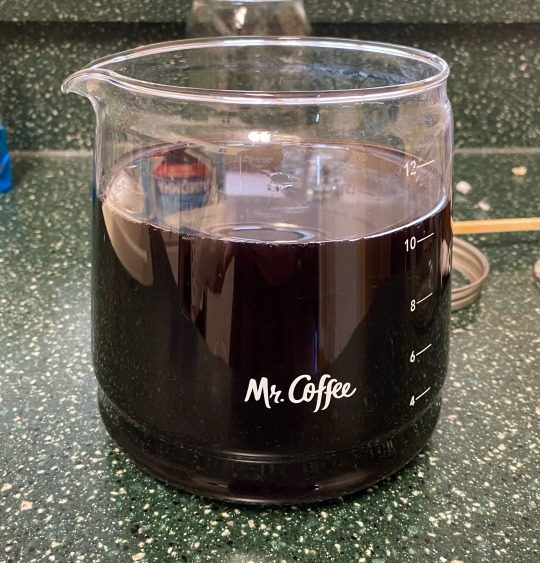
I use an old coffee pot for this as it's both a non-reactive material (glass) and is built to withstand heat. Ironically i also scraped the lichens off the branch using a tool i made out of a metal band from the broken handle of this same coffee pot!

I decided to dye some eri silk cakes that i fluffed up and scoured. these have been very good at absorbing dye in the past so i would hopefully get a good result from them. As lichens are a substantive dye i don't have to put a mordant on them, but i did soak them in an alum solution just before adding them to the dye bath to hopefully maximize dye uptake as well as improve fastness as lichen dyes are also fugitive and can fade in sunlight.
Substantive dyes contain mordants already embedded in them; fugitive dyes are a bit fuzzy to me but my understanding is they end up trapped in the fiber instead of actually bonding to the fiber in a stronger way. Mordants are used to help the dye "bite" onto the fiber better, improving both fastness (the ability of a due to resist fading from sunlight/washing/time) and the brightness of a color. Alum is useful in that it typically doesn't affect the end color of a dye more than simply making it slightly more strong!
it was pretty successful i'd say! i warmed up the dyebath, added the silk, let it simmer for a few hours, let it cool down overnight, and then warmed it back up the next day for a few hours; then, when it cooled, i took it out, let it dry, then rinsed it, and let it dry a second time. At that point, it was ready for spinning!
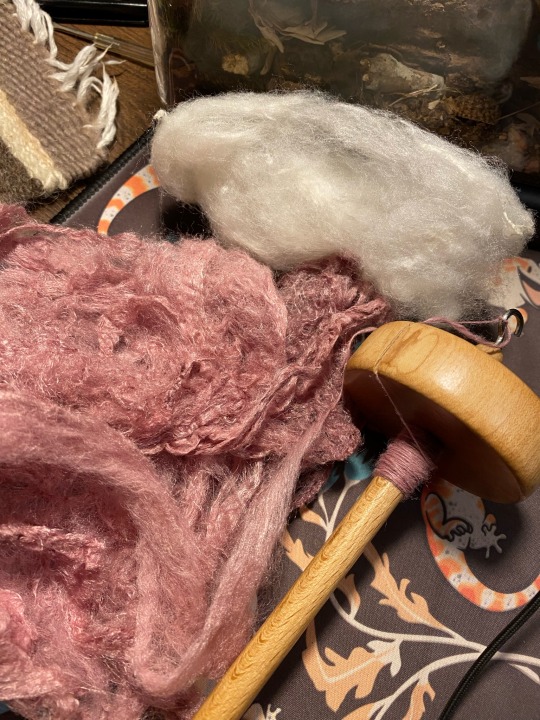
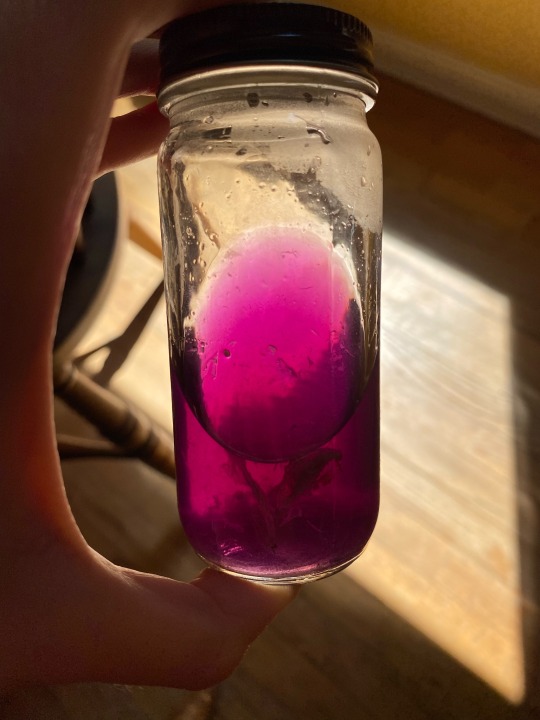
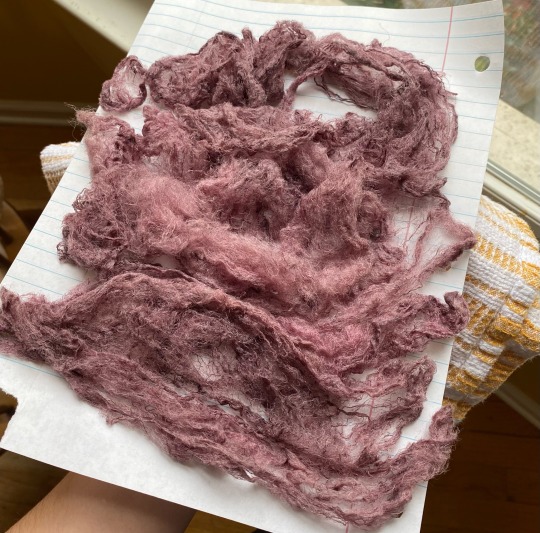
It was a lovely pink color that's not fully captured by the camera like most dyes, and eri silk is lovely because you can spin the clouds directly and easily without carding and make lovely relatively threadlike yarn

this was the first skein i got! i love how shiny the silk is. Some dyes can get really purple or even magenta-like!
next, i had the leftover lichens that i had set aside. They were a crumbly texture and dark black and i dried them out, crushed them up more, set them back in a jar, added more ammonia and water, and did the ammonia fermentation method a second time! this was after reading about the method for making french purple, and while this is definitely a very pale imitation of the method, the double-soak is the key feature here
here it is (on the left); it was already way darker purple than an in-progress lichen dye i had yet to crack open and use

speaking of which, heres a shot of various test lichens i had while working on this, you can see the blue-capped jar that has the second-soaked lichens. the foam will often give a preview of whether or not the dye will be red/purple or not!

Here it is, i forget how long i let it soak but i think it was a bit over a week. i strained the material out, diluted it, and then repeated the same warm/cool/warm/cool/dry/rinse/dry method with more eri silk

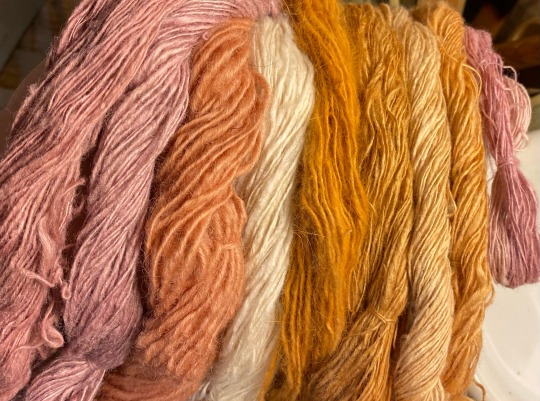
And below you can see the difference, it's definitely slight but still cool!

the left is from the original dyebath, the right is the second-soaked one. the first one is more salmon-colored while the second is a tad more blue-purpled!
I'm extremely excited about this, these dyes have such a fascinating history and have multiple historical uses everywhere from florentine orchil to norwegian korkje to scottish cudbear and more, and it was often used in tandem with the roman murex/tyrian purple dyes that come from a mussel. Some folks used the lichens to pre-dye the fabric before dyeing with tyrian purple, both to stretch the expensive tyrian purple and to make the end color more vibrant. It's all such a great topic that's mightily confusing and could take up a post of its own, same with the underlying chemistry of what makes these dyes work in the first place!
Anyways that's all for this post, i have more i'm working on involving actually turning these dyes into paint that i'll hopefully turn into a post on its own soon! I've also got other lichen dyes I'm waiting to get through the ammonia fermentation process that will hopefully give other colors, whenever that may be!
#bumping this again for the not nighttime#yarn#natural dyes#fiber arts#lichen dyes#ammonia dyes#silk#eri silk
603 notes
·
View notes
Text
Alrighty so this is the post on lichen dyes!
this particular bath of lichen dyes was originally started over a year ago scraping a tentatively-ID'd lecanora and/or ochrolechia genus lichen off of a fallen branch (remember, don't gather lichen when it's still growing! it's very slow growing and easy to overharvest)
to start off, this particular type of dye is made through the ammonia-fermentation method, also known as ammonia maceration. No actual bacterial fermentation occurs though. Rather, the compound orcinol (and precursor compound to orcinols) react with ammonia (N2) and oxygen to form the compound orcein (also called orchil/archil) which is what makes the final dye!
this process takes anywhere from 3 weeks to 16+ weeks depending on the lichen species, its constituent acids, the temperature, and the frequency of aeration.
This batch was set aside for several months and neglected a good bit, but it still works. I strained out the crumbled lichens (which i set aside for later) and diluted it 1:4 as instructed by a very good book called Lichen Dyes: The New Source Book by Karen Diadick Casselman. This book is basically omnipresent everywhere you see lichen dyes mentioned, especially the orcein-based dyes. I also used several websites/videos/papers and such that i've hunted down over various internet crawls.
I use an old coffee pot for this as it's both a non-reactive material (glass) and is built to withstand heat. Ironically i also scraped the lichens off the branch using a tool i made out of a metal band from the broken handle of this same coffee pot!
I decided to dye some eri silk cakes that i fluffed up and scoured. these have been very good at absorbing dye in the past so i would hopefully get a good result from them. As lichens are a substantive dye i don't have to put a mordant on them, but i did soak them in an alum solution just before adding them to the dye bath to hopefully maximize dye uptake as well as improve fastness as lichen dyes are also fugitive and can fade in sunlight.
Substantive dyes contain mordants already embedded in them; fugitive dyes are a bit fuzzy to me but my understanding is they end up trapped in the fiber instead of actually bonding to the fiber in a stronger way. Mordants are used to help the dye "bite" onto the fiber better, improving both fastness (the ability of a due to resist fading from sunlight/washing/time) and the brightness of a color. Alum is useful in that it typically doesn't affect the end color of a dye more than simply making it slightly more strong!
it was pretty successful i'd say! i warmed up the dyebath, added the silk, let it simmer for a few hours, let it cool down overnight, and then warmed it back up the next day for a few hours; then, when it cooled, i took it out, let it dry, then rinsed it, and let it dry a second time. At that point, it was ready for spinning!
It was a lovely pink color that's not fully captured by the camera like most dyes, and eri silk is lovely because you can spin the clouds directly and easily without carding and make lovely relatively threadlike yarn
this was the first skein i got! i love how shiny the silk is. Some dyes can get really purple or even magenta-like!
next, i had the leftover lichens that i had set aside. They were a crumbly texture and dark black and i dried them out, crushed them up more, set them back in a jar, added more ammonia and water, and did the ammonia fermentation method a second time! this was after reading about the method for making french purple, and while this is definitely a very pale imitation of the method, the double-soak is the key feature here
here it is (on the left); it was already way darker purple than an in-progress lichen dye i had yet to crack open and use
speaking of which, heres a shot of various test lichens i had while working on this, you can see the blue-capped jar that has the second-soaked lichens. the foam will often give a preview of whether or not the dye will be red/purple or not!
Here it is, i forget how long i let it soak but i think it was a bit over a week. i strained the material out, diluted it, and then repeated the same warm/cool/warm/cool/dry/rinse/dry method with more eri silk
And below you can see the difference, it's definitely slight but still cool!
the left is from the original dyebath, the right is the second-soaked one. the first one is more salmon-colored while the second is a tad more blue-purpled!
I'm extremely excited about this, these dyes have such a fascinating history and have multiple historical uses everywhere from florentine orchil to norwegian korkje to scottish cudbear and more, and it was often used in tandem with the roman murex/tyrian purple dyes that come from a mussel. Some folks used the lichens to pre-dye the fabric before dyeing with tyrian purple, both to stretch the expensive tyrian purple and to make the end color more vibrant. It's all such a great topic that's mightily confusing and could take up a post of its own, same with the underlying chemistry of what makes these dyes work in the first place!
Anyways that's all for this post, i have more i'm working on involving actually turning these dyes into paint that i'll hopefully turn into a post on its own soon! I've also got other lichen dyes I'm waiting to get through the ammonia fermentation process that will hopefully give other colors, whenever that may be!
#lichen dyes#ammonia fermentaion#handspinning#natural dyes#eri silk#yarnmaking#fiber arts#vegetable dyes#orcinol#art#orcein#archil#crafts#yarn#silk#drop spindle
603 notes
·
View notes
Text
Okay i am still procrastinating on a larger/more comprehensive post but heres some of the colors i have so far from lichens, both AM and BWM (Ammomia method, sometimes called ammonia fermentation but there's no actual bacterial activity; then the boiling water method, literally what it sounds like)

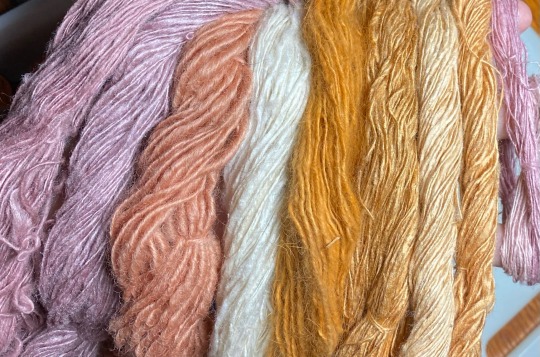
I took them under 3 different indoor light sources to try to show the variance of the colors, sadly not the sun as it is hiding behind the clouds as of late
from left to right: first two lavender-like purple are silk, dyed with an fuzzily-ID'd lecanora/ochrolechia like lichen that was AM prepared; the second one used the same lichens but prepared different (second ammonia soak)
the third one is wool using a similar lichen that was also AM prepared, i was almost worried it wouldnt work/i messed up the vat because i set the pH too low but surprisingly it didn't brown out and turned a lovely pink salmon color
the white is the base color of the silk
the fifth one is some french angora rabbit that i dyed using ruffle lichens via the BWM method; a lovely intense orange
the 6th and 8th were dyed with ruffle lichens (BWM) as well a long time ago so i don't recall the details
the 7th was dyed with usnea lichens (BWM) around the same time as 6 and 8
Finally, the last two tiny strings were AM dyed a long time ago and i almost forgot about making them!
Of course, all lichens should be collected from deadfall, not directly from a tree/rock/etc to avoid overharvesting. It's also important to keep chemical safety in mind if you work with ammonia, or even things like alum and vinegar!
All the yarn was spun myself on a drop spindle too, after dyeing the fiber clouds (very technical term i know)
I have more posts i want to make on lichen dyes and the making/using thereof once i get my head screwed back on correctly, specifically some recent shenanigans concerning the first three yarns! the chemical pigment itself, the history, the troubleshooting, etc. Which i think will be very cool
Bonus drop spindle, and a ruffle lichen comparison!

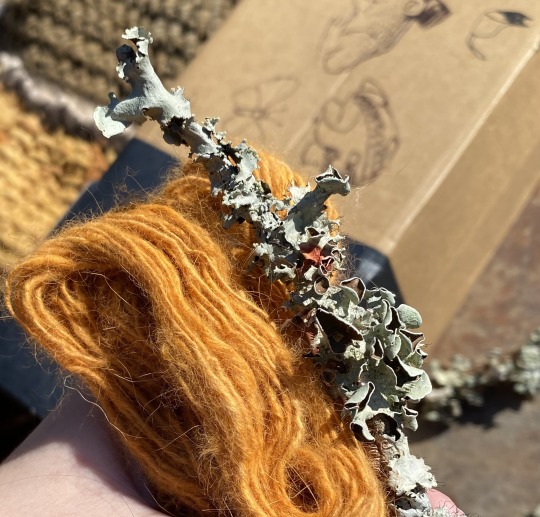
You can even see an orange spot on the otherwise minty slate green of the ruffle lichens where it had started to decompose!
#fiber arts#yarn#eri silk#wool#angora fiber#handspinning#natural dyeing#art#earth skills#crafts#ammonia fermentaion#lichen dyes#drop spindle
450 notes
·
View notes
Text
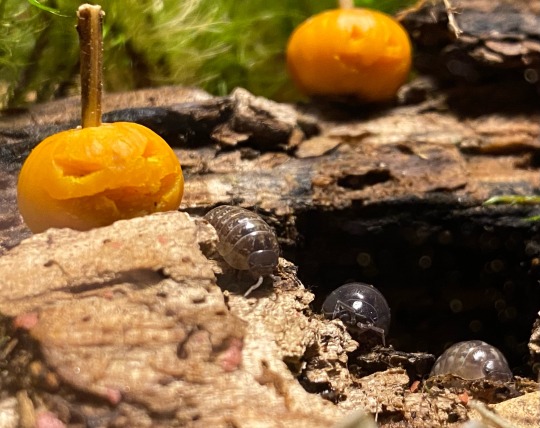
the gang's all here


Water oak acorn shenanigans in the roly poly terrarium
Three little "pumpkins" made from the cracked and peeled nutmeats, as well as a little potted plant made from a hollowed out shell + moss. Something simple and decorative!
#halloween#roly polys#isopods#terrarium#invertebrates#pets#bugs#creatures#acorns#mini worlds#jack o lantern#crafts#art#good vibes
102 notes
·
View notes
Text
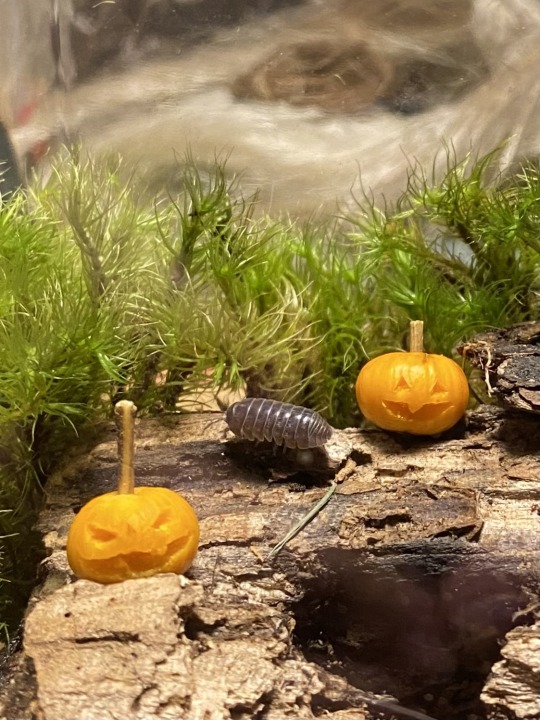
WE HAVE OUR FIRST CUSTOMER!
Water oak acorn shenanigans in the roly poly terrarium
Three little "pumpkins" made from the cracked and peeled nutmeats, as well as a little potted plant made from a hollowed out shell + moss. Something simple and decorative!
102 notes
·
View notes
Text
Water oak acorn shenanigans in the roly poly terrarium
Three little "pumpkins" made from the cracked and peeled nutmeats, as well as a little potted plant made from a hollowed out shell + moss. Something simple and decorative!
102 notes
·
View notes
Text
Ok quick post but heres a closeup of the "good" milkweed barks ive gotten just now and the "bad" milkweed barks. the good ones were from the larger mystery species and the smaller ones were poorer quality. I do want to try retting the poor quality ones still but you can tell the good ones are easily separated once dry. Theyre also beautifully shiny
Anyways enjoy!
(the first one is the best batch, the second one is the bad/inseparable batch)
to get them to that point i just cracked them lengthwise back and forth (using pliers this time since i dont feel like aggravating my back on the floor) and then snapped them off like normal
29 notes
·
View notes
Text
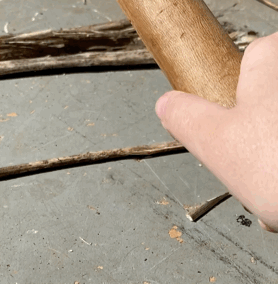
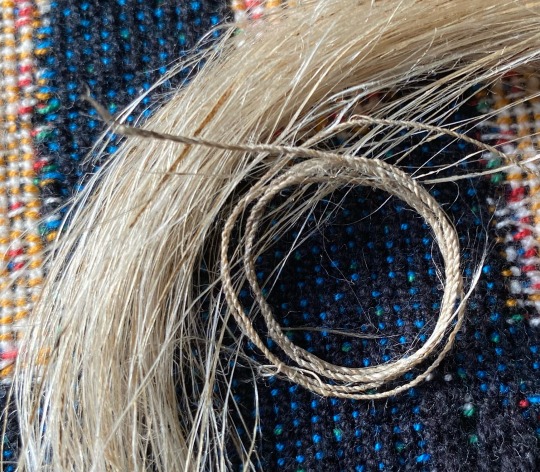
breaking open dried milkweed stalks to collect their bast fibers.
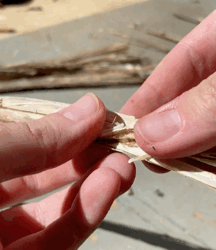
i pounded them with a makeshift billet against a smooth surface to break them similar to how ive broken brambles before, and then snapped the pith in order to get only the outer fibers.
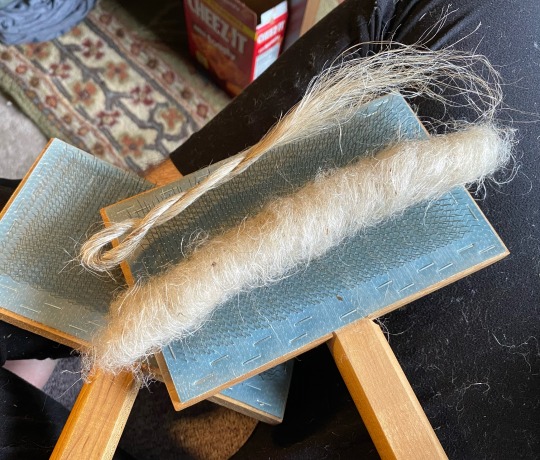
At this point i had a bunch of the papery skins attaching all the fibers together, like the image just below. But peeling them off is both inefficient and can lead to breaking

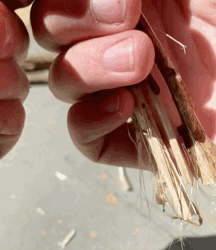
in order to get rid of the outer layer, i rubbed/rolled them vigorously between the palms of my hands, breaking it into flakes that either fell off or can be combed/carded out. it was too difficult to film but basically the same as making a friction fire (although easier for sure).
At this point i had a handful of fibers, still long but in need of combing. I have a fine-toothed comb i use for a lot of fiber stuff, and ran that through it
I'll leave the sound on this one because it's an interesting auditory experience, some might like it some might hate it. Note, be prepared to sweep afterwards!
i used to worry about combing stuff like this too much, and i sort of still am, but its important to remember that what im removing are fibers that would otherwise be too short or fragile to include in a refined long-fiber bundle. What im going for is a line flax/fluff flax-like combo; aka i comb out the short fibers and then i have a bundle of extra long ones to work with!
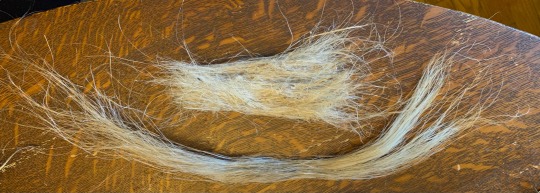
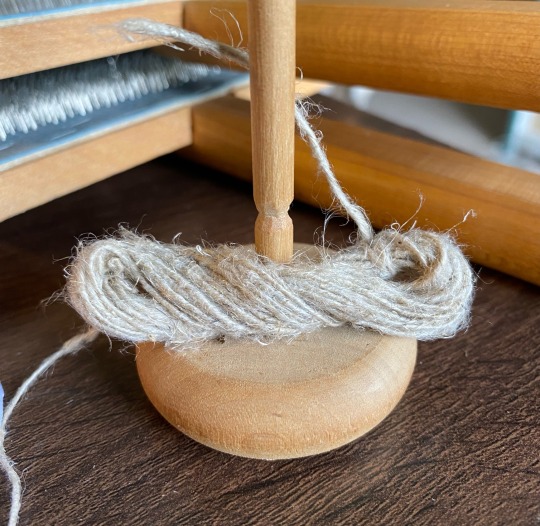
the result is two bundles of different textures and potential
i made a little test string with the "line" milkweed, but i have yet to do anything more with it
as for the fluff, i carded it out!
i made it into a rolag that i then spun up on my tiny spindle
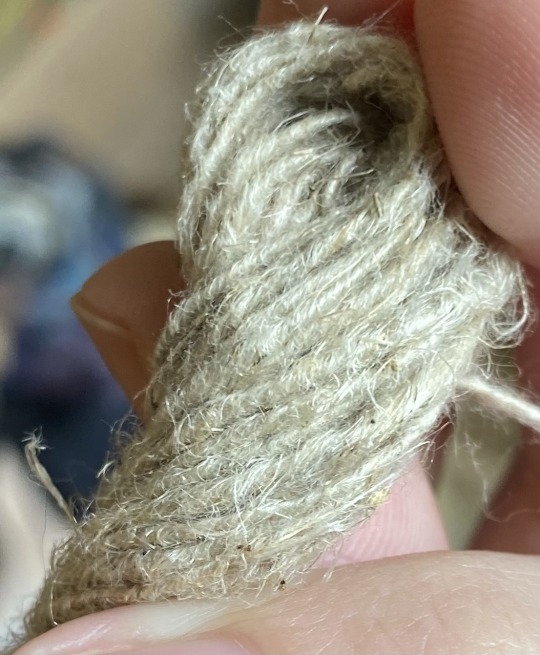
I quite like it. It definitely reminds me of flax/linen, which makes sense since it's also a bast fiber. Milkweed is often known for being extremely strong; i've heard from a fiber class instructor that you can tow a car with a finger-sized rope of it
I don't know exactly what kind of milkweed this is , but i've heard swamp milkweed is top of the class for fiber. orange butterflyweed is a bit weaker than this one (which might be swamp, might not)
(Also note, if you plant milkweeds, don't plant tropical milkweed outside of its native range! it's not as good as the native ones and can even increase disease in monarchs since it doesnt die back in warm winters)
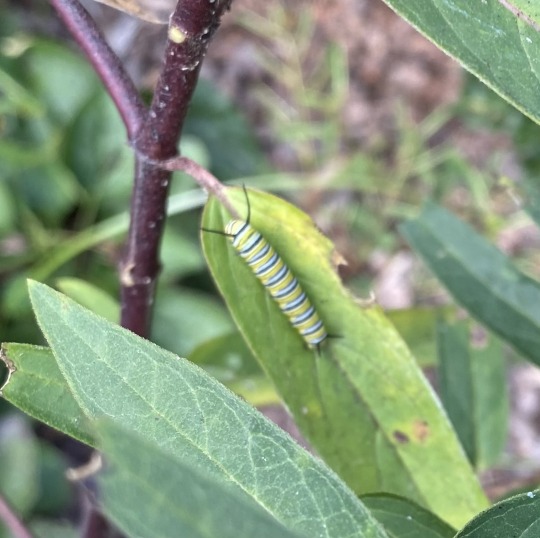
anyways, have a lil monarch caterpillar!
5K notes
·
View notes
Note
What is the ideal growth at which to harvest milkweed for fiber? Theres showy milkweed all over the place where i live
When i harvested mine, i made sure they were dry all the way down to the base of the stem. I've also tried harvesting it a bit earlier, but that doesn't process easily and will probably need retting, while the completely dry stuff is processable right away!
Of course if you leave them too long, they'll become too fragile, but thats not easy to do in my experience. You'd have to wait for it to be dead for like a month i think.
It also might change depending on the type of milkweed, since some seem to be weaker than others. Good luck!
12 notes
·
View notes
Text
Nice, I've made some bramble cord myself, it reminds me of the plastic twine folks bale straw with. I haven't worked with those other two yet, but i've heard good things about both! I also have yet to find a nettle patch to work with, but here's to hoping that changes!
I also want to find things like dogsbane, fireweed, and basswood. Lots of options out there!
breaking open dried milkweed stalks to collect their bast fibers.
i pounded them with a makeshift billet against a smooth surface to break them similar to how ive broken brambles before, and then snapped the pith in order to get only the outer fibers.
At this point i had a bunch of the papery skins attaching all the fibers together, like the image just below. But peeling them off is both inefficient and can lead to breaking
in order to get rid of the outer layer, i rubbed/rolled them vigorously between the palms of my hands, breaking it into flakes that either fell off or can be combed/carded out. it was too difficult to film but basically the same as making a friction fire (although easier for sure).
At this point i had a handful of fibers, still long but in need of combing. I have a fine-toothed comb i use for a lot of fiber stuff, and ran that through it
I'll leave the sound on this one because it's an interesting auditory experience, some might like it some might hate it. Note, be prepared to sweep afterwards!
i used to worry about combing stuff like this too much, and i sort of still am, but its important to remember that what im removing are fibers that would otherwise be too short or fragile to include in a refined long-fiber bundle. What im going for is a line flax/fluff flax-like combo; aka i comb out the short fibers and then i have a bundle of extra long ones to work with!
the result is two bundles of different textures and potential
i made a little test string with the "line" milkweed, but i have yet to do anything more with it
as for the fluff, i carded it out!
i made it into a rolag that i then spun up on my tiny spindle
I quite like it. It definitely reminds me of flax/linen, which makes sense since it's also a bast fiber. Milkweed is often known for being extremely strong; i've heard from a fiber class instructor that you can tow a car with a finger-sized rope of it
I don't know exactly what kind of milkweed this is , but i've heard swamp milkweed is top of the class for fiber. orange butterflyweed is a bit weaker than this one (which might be swamp, might not)
(Also note, if you plant milkweeds, don't plant tropical milkweed outside of its native range! it's not as good as the native ones and can even increase disease in monarchs since it doesnt die back in warm winters)
anyways, have a lil monarch caterpillar!
5K notes
·
View notes
Text
Awesome, is that nettle i spy? it's cool to see others making cord like this!
breaking open dried milkweed stalks to collect their bast fibers.
i pounded them with a makeshift billet against a smooth surface to break them similar to how ive broken brambles before, and then snapped the pith in order to get only the outer fibers.
At this point i had a bunch of the papery skins attaching all the fibers together, like the image just below. But peeling them off is both inefficient and can lead to breaking
in order to get rid of the outer layer, i rubbed/rolled them vigorously between the palms of my hands, breaking it into flakes that either fell off or can be combed/carded out. it was too difficult to film but basically the same as making a friction fire (although easier for sure).
At this point i had a handful of fibers, still long but in need of combing. I have a fine-toothed comb i use for a lot of fiber stuff, and ran that through it
I'll leave the sound on this one because it's an interesting auditory experience, some might like it some might hate it. Note, be prepared to sweep afterwards!
i used to worry about combing stuff like this too much, and i sort of still am, but its important to remember that what im removing are fibers that would otherwise be too short or fragile to include in a refined long-fiber bundle. What im going for is a line flax/fluff flax-like combo; aka i comb out the short fibers and then i have a bundle of extra long ones to work with!
the result is two bundles of different textures and potential
i made a little test string with the "line" milkweed, but i have yet to do anything more with it
as for the fluff, i carded it out!
i made it into a rolag that i then spun up on my tiny spindle
I quite like it. It definitely reminds me of flax/linen, which makes sense since it's also a bast fiber. Milkweed is often known for being extremely strong; i've heard from a fiber class instructor that you can tow a car with a finger-sized rope of it
I don't know exactly what kind of milkweed this is , but i've heard swamp milkweed is top of the class for fiber. orange butterflyweed is a bit weaker than this one (which might be swamp, might not)
(Also note, if you plant milkweeds, don't plant tropical milkweed outside of its native range! it's not as good as the native ones and can even increase disease in monarchs since it doesnt die back in warm winters)
anyways, have a lil monarch caterpillar!
5K notes
·
View notes