#BUT i'm JUST under a new milestone so i'm gifting this early because i had the patience to do it today lmao
Text

For this gif tutorial I’m going to try to keep it as basic as possible, I may add a few tips for coloring at the end, but for the most part this is going to be how I make my basic gif. Also I’m not going to use my vapoursynth to process the video beforehand, just because I know not everyone uses it and it’s harder to learn. This is going to be just a downloaded mp4 video through the gif process. Don’t let the idea that this is a BASIC TUTORIAL fool you, I’m going to try to teach you a lot of things. It’s gonna get wordy, but i will try my hardest to keep the process easy. I’m just going to explain what things do instead of having you just copy + paste my method and not know what it means. okay? okay.
Before we start though, if you plan of giffing live stages you either need to accept the they will not be super crisp and clear OR learn how to use avisynth/vapoursynth to resize the videos without quality loss.
If you just want to gif music videos or variety shows then this should still give you HQ gifs.
Other notes:
try to ONLY use 1080p and up video if possible, maybe 720p if you’re really desperate, but anything under that... it’s not going to look good at all, so try to avoid using them.
The Photoshop I am using is PS 2020, so all my screenshots will be from that version and with my weird set up. But I’ve been using pretty much the same method since cc 2015 so other than the fact that some placements and names are tweaked, it’s the same. (If you can’t find something on your version shoot me an ask and I’ll try to help! And asks I get on this tutorial I’ll link HERE for future reference)
CUTTING VIDEO
To cut videos I’ll just use my quicktime player.
I use edit > trim to select the portion of the video I plan to gif and save that as it’s own new mov file.
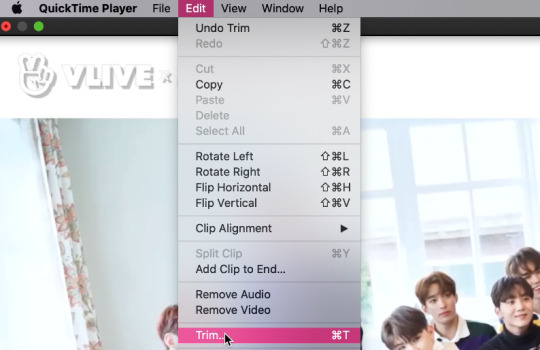
which pops up this tab

that you just slide until the part you want to gif is selected

then just save it as a new video and your done with part 1
ENTER PHOTOSHOP
Now what we’ll do is open our photoshop and import that clip into layers
FILE > IMPORT > VIDEO FRAMES TO LAYERS and select your video.
A small pop up will appear to show the clip you’re opening, you can trim it further here or just keep going by clicking okay
my setup is weird for drawing BUT you should have it looking remotely like this:

The things you will DEFINITELY need to see are TIMELINE, LAYERS, ADJUSTMENTS. If you don’t have these sections you can add them to your screen by clicking on the WINDOW tab at the very top menu bar and clicking on them

LAYERS - this is pretty self explanatory but each row is a layer in the gif. the more layers the bigger the gif will end up, the longer it plays. So bigger clips will have more layers and end up as larger gifs in the end.

TIMELINE - This is where you can edit the gifs timing (make it faster or slower)
We’ll be doing a bit of work with it so it’s important to know it well
ADJUSTMENTS - Best friend and worst nightmare. this is where ALL the tedious recoloring is done. VERY rarely would you not use these. 99.9% of kpop things are filmed through a green or blue lense so you’ll want to fix that to not have ghost idols
So, Let’s make a gif
Step 1 - In the top right corner of your timeline is a set of lines, click there and then click SELECT ALL FRAMES

under each frame is a time stamp (this video’s is 0.04) this decides how fast each clip goes by, or how quickly the gif moves. Personally I prefer slower gifs, but I say anywhere between 0.04-0.06 is a decent speed.
Step 2 - with all the frames selected, click on the small down arrow next to any of the frames and change the speed to your liking. (I’m going to use .06)
Step 3 - in that same tab of lines we’ll now click CONVERT TO VIDEO TIMELINE, which will change our Timeline to look like this:

Step 4 - Back in our very TOP menu we’ll click SELECT > ALL LAYERS, then on the TOP menu click FILTER > CONVERT FOR SMART FILTERS (this might take your computer a minute since our File is still pretty large.) Now our Time line will look like this:

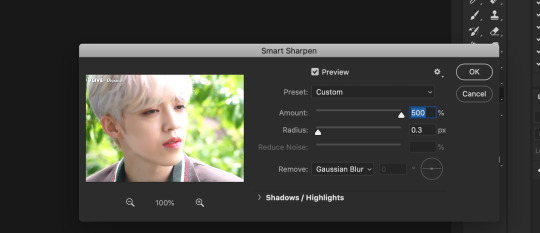
Step 5 - Sharpening
This one is VERY MUCH something you’re going to have to play with to get your settings to be how you like them. It’s also where I’d use topaz adjustments, BUT since I said we’re doing basic PS gif we’re just going to be using smart sharpening. SO:
in the TOP munu again, click FILTER > SHARPEN > SMART SHARPEN
A pop up window will appear and you can edit the settings to your liking. Mine:
Step 6 - Resize your gif or crop it to tumblrs standards: big singal gifs have a 540px width || Two gifs use 268px || and three gifs use 177/178px
To do this we’ll use the crop tool and type in our dimensions in the menu bar:

and then crop to your liking. (this doesnt resize the gif it just crops to the correct ratio so we still have to shrink the gif)
Next, we’ll resize the gif to that size in the TOP menu click IMAGE > IMAGE SIZE a pop up menu will appear and you’ll type in your resize ratio and click enter.
Now technically thats a gif. it’s TECHNICALLY done. but mine is white washed and there are words on it that I dont want so onto the coloring and blurring.
First I’m going to show you how I blur text on gifs. because text is EVERYWHERE in kpop content and it’s hideous and I hate it. so lets kill it.
BLURRING LETTERING
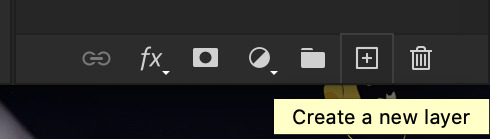
First we’re going to add a new blank layer to our LAYER TAB by clicking the little box with the + inside at the bottom
Sometimes doing this can mess up the timeline’s selection but its SUPER easy to fix so lets do that.
So in our timeline we have these two bars on each side that select what part of the gif will play. this is also where you can readjust your gif if it has extra frames at the end, or it ends up being too large and you have to make the gif smaller to save it. Just click and drag the bars back to where our gif actually ends, and all is fixed!

Now on our new layer we’re gonna take a paint brush (one of the ones with a lot of fade NOT the solid circle ) and paint over where the words are like so:

MAKE SURE ITS ON OUR BLANK LAYER AND NOT THE GIF LAYER!!
I know it looks stupid but trust me okay.
Now in your LAYER tab we’re going to duplicate our gif layer by right clicking on it and selecting duplicate.
Then we’re going to drag the new gif layer so that it’s above the paint layer in our LAYER tab :
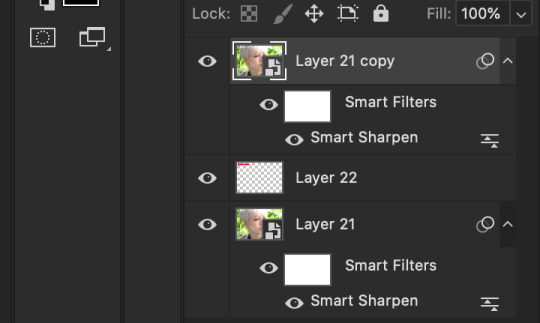
Now, right click on the top gif layer and select CREATE CLIPPING MASK. it should put a little down arrow to the left of the picture, toward the paint layer. This means the gif is ONLY visible where that paint is now.
So we’re going to click on FILTER in the TOP menu again (while we still have that top gif selected!) and Go to BLUR > GAUSSIAN BLUR. a pop up menu will appear and you can just drag the radius until the text is as blurry as you want it to be. (also IF you missed part of the text, you can just go add more paint to your paint layer and it will blur wherever you paint!)
so now my gif is like so:
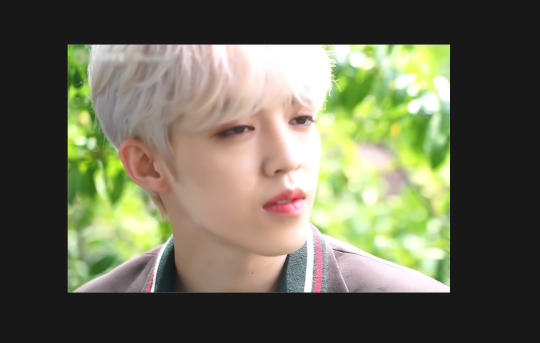
So now we’ll color him, because he’s pretty washed out.
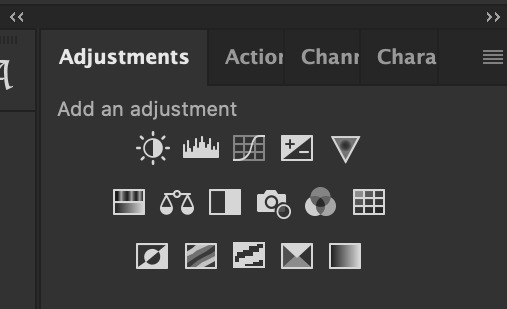
ADJUSTMENTS
This is where I’m going to be the least specific about what I do and more about what tools do, so that you can learn how to color things the way you like them!
The Adjustment tab on Photoshop has 16 options but I’m really only going to talk about 6 of them. We’ll do it in order though. All the actual adjustment tools will open in the PROPERTIES tab
Brightness / Contrast - Pretty self explanatory, but definitely should be toward the end of your coloring, as if can effect the quality a lot. Small adjustments do A LOT so don’t go crazy,
Levels - Levels is all about the balance of how dar or light your gifs will be if you adjust in the RGB layer it will adjust for the entire image, but if you change the selection to RED/GREEN/BLUE it will adjust just those colors hues. Also there are three small droppers to the left of the graph. using those you can select which part of the gif you want the image to recognize as the lightest/darkest part of the gif, and the tool will adjust the gifs coloring to that point. ( play with those droppers! magic happens i swear!)
Curves - Kind of like levels but instead of how light or dark the entire image is it works more on contrast. REALLY play with the curves options, i’m sure most things you can do with other tools can also just be done in curves if you’re patient enough to learn
Vibrance / Saturation - Vibrance will make duller parts of an image higher contract and brighter and saturation will make everything a more neon shade. or in reverse lowering vibrance will dull out the things that were already neutral and saturation will dull out the more vibrant parts of the image (usually reds)
Color Balance - Good for fixing tones. so if a live stage is SUPER BLUE!!!!! you can readjust and calm down the blues to dull them out or get rid of them completely. Again play with this its insane what it can do
Selective Color - adjusts the different colors in your image without touching the other colors. if you wanna touch the reds, make them pinker but not change the blues and greens, you do it here
If you want MORE drawn out explanations of what each of the 16 adjustment layers do here and here are actual articles you can look at. But it’s all about practice. playing with all the adjustments alone and together. Finding out what you like to do!
Now when you gif is ALLLLL colored and you’re ready to save it we do FILE > EXPORT > SAVE FOR THE WEB and a whole new window of options pops up. I’ll give you two examples of how to play with those options and then we’re done!

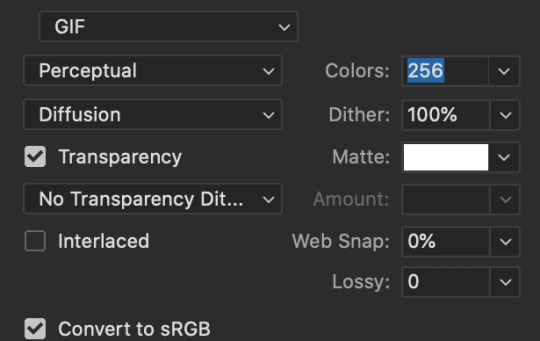
keep in MIND tumblr’s gif limit is 10MB which is pretty huge now, but still watch your gif size!!!!
AND SAVE your done!

I hope this was helpful! Let me know if you have any questions,again I’ll have an ask tag for it and it’ll get linked HERE if people end up needing help!
Happy giffing!!!
#drm.pst#drm.txt#Gif tutorial#this is LONG okay please be aware of that before you open it#als i did NOT reread it because it took me 3 hours to type out so it's probably a grammatic nightmare#BUT i'm JUST under a new milestone so i'm gifting this early because i had the patience to do it today lmao
98 notes
·
View notes
Photo

My Top 5 All-Natural Anti-Aging Secrets
We are all going to grow older. Only you can control how you will age. The following advice will help you learn how to keep your youth for the longest amount of time possible.
Having healthy relationship is vital to growing older healthy. Being involved in local community activities has been proven to increase both your health and your life span. In order to get the greatest benefit of your social interactions, you should focus on those which involve intimacy with people you can pour your heart out to.
Challenge your mind often to keep it healthy. Older people are wiser, so you should work on furthering your intelligence as you grow. Taking a course through your local college or filling out a crossword puzzle can exercise your mind, and make you feel great.
One of the keys to successful getting older is to always be willing to learn new things. It is important to always learn through life.
Step up your workout routine. As you get older, your body requires more time and energy to maintain its strength and flexibility. Walking every day for at least thirty minutes is a great way to start keeping your body healthy. Try adding in strength exercises about two times a week. This keeps your body healthy and fit, and helps you avoid other age related problems.
Wherever you are, bring your happiness with you. Making others smile will make you feel great. Being happy does not cost a thing, it is a priceless gift to others.
Life is an adventure; enjoy and explore! Set milestones for yourself, and when you reach them feel proud of yourself.
Keep only the positive people in your life. Research indicates that smiling and laughing results in fewer wrinkles thus keeping you looking younger. So you want to spend your time with friends that will make you smile and laugh, not ones that make you frown!
Hormone balance is of the utmost importance to all men and women as they age. Hormone imbalances can cause a slew of problems as we age. Depression, weight gain and insomnia are a few problems caused by out of whack hormones, and these can lead to additional medical problems. If you find yourself suffering from any of these symptoms, please see a doctor in order to find the best treatment to balance out your hormones, so the aging process is a much more pleasant experience.
Have a little fun! Now is the time in your life where you have freedom to do as you choose with the power and ability to make it happen. Fill your days with the people and things you love.
After you have retired you will have time to pick up those dear hobbies that you had to leave behind. Now that you finally have plenty of time to focus on yourself, it is important to renew your interest in the things you once enjoyed. These activities will keep your mind sharp, active, and interested in life.
Check your blood pressure often. There are many times no symptoms are present if you have high blood pressure, which is why it is often referred to as "the silent killer". As you age, it becomes more important to have your blood pressure checked on a regular basis, because your cardiovascular system can deteriorate over time. If you catch your blood pressure spiking, this allows you to address the issue immediately.
Smoking will prevent you from looking your best - so quit! Smoking contributes to wrinkles, especially around the mouth. It also makes you age faster and can put you in the grave before your time.
Be sure to improve your diet in general. This is a big step toward combating the growing older process. You need to eat fruits, vegetables, dairies, meats, and avoid fats, sodium or large amounts of refined sugar. You may also want to try cutting back on snacks and eating three moderate meals.
Visit your doctor annually and complete all the tests that he recommends. Being proactive about your health can be beneficial to you in the long run. Early detection of disease or cancer is important. By taking care of your problems now, you have a better chance of getting proper treatment.
Anti-oxidants are something you should take every day. If you do so, you will have less free radicals. Most antioxidants can be found in dark-colored veggies and fruits such as spinach, carrots, tomatoes, squash, blackberries and blueberries.
Get hip to injection therapy! This procedure is specifically designed for wrinkle treatment. Through this treatment, the muscles of the face are relaxed and wrinkles are reduced. This process is more appealing then surgery because it is safer. However, it is not necessarily a "one and done" treatment. Multiple treatments might be needed.
Give priority to getting to routine doctor visits for check-ups. Checkups allow your doctor to see how your vital signs are and identify any potential problems. It helps to identify problems early before they become serious. Every condition or disease can be treated more effectively when caught in the earliest stages.
Taking care of your skin is especially vital as you age. Young people need to constantly protect their skin from the harmful UV rays of the sun. Spending time exposed to the sun increases the speed at which wrinkles or even skin cancer develop.
Stress causes premature growing older, so stay stress-free as much as you possibly can. Exercise is also a great stress reliever, and working 20 minutes of it each day into your schedule can be a great relaxant and health tonic.
Eat foods with a lot of fiber to curb getting older effects. If you eat fibers, your digestive system will be free of toxins. Additionally, it helps to remove bad cholesterol, slow digestion and stabilize blood sugar. In short, fiber keeps your stomach and other parts of your digestive system healthy so that they work as efficiently as possible.
The ideas in the article should give you some great tips on slowing the aging process and feeling younger. Best of luck to you and stay young!
Read more interesting informations visit:
anti aging solutions
hey everybody its Angie and welcome to hot and flashy today I'm going to share with you my top 5 all-natural anti-aging skincare secrets now this kind of a video with that kind of a title I feel like you are here because you're hoping to see some super all-natural magical thing that you've never heard of before that's going to erase all your lines and wrinkles all your age spots firm
up your skin and make you look ten years younger I don't want to bait-and-switch you but since this is about all natural anti-aging secrets guess what they are all lifestyle changes so if you're not into making lifestyle changes you might be disappointed in what I have to say in this video but I want you to stick around and watch it anyway because I think that or at least I hope that you'll learn something
from the video and you'll learn that lifestyle changes really can make a difference in how you look as you get older it's not that I'm afraid of Aging or you know there's anything wrong with aging obviously we can't avoid it it happens no matter what you do every second of your life the time is ticking away the point for me is to be the best I can be at every age to look
as youthful as I can to be as healthy as I can so that as I do get older I can enjoy my life so I take my anti-aging very very seriously I'm also an equal-opportunity anti-ager which means that while I do live anti-aging in my lifestyle with the tips that I'm going to show you in today's video I also do other things some of the other things that I have done in
the past are Botox fillers IPL treatments laser treatments I have never had any surgery whatsoever so I don't want you to be sitting there watching me wondering well issue full of Botox right now the answer is no is she full of filler right now the answer is no I'm going to be 54 next week in general I think that my skin looks pretty good for its age I think that it could also
look a lot better for its age if I had started doing these five things that are going to tell you today when I was a lot younger and that of course leads me into my number one all natural anti-aging secret and that is to avoid UV radiation that is good old mr. sunshine I spent plenty of time in my youth baking in the Sun I don't do that anymore I stopped baking about 20
years ago now I'm not saying live in a cave obviously I lead an active life I bike I garden I paddleboard the point is to protect your skin while you're outside so I wear sunscreen every single day on every single part of my exposed skin it doesn't matter to me if it's winter or summer high noon or six o'clock in the evening if the Sun is out I have my sunscreen on and
that's because the UVA rays are the invisible Agers that we didn't really know about until recently and they are the same strength at all times of the day and at all times of the year they come through clouds they come through windows so definitely apply sunscreen every day of an SPF 30 or higher now I've got a couple of natural ones that I wanted to show you today this one is one that
I found in my recent roundup of all mineral sunscreens this is the my shell replenishing solar defense SPF 30 this is a great one it works really well under makeup this is burn out eco this is an SPF 35 also all mineral and then there are these think sports sunscreens this is a great brand all natural all mineral sunscreens Reap safe so if any of these sunscreens can help you to wear a
sunscreen every day I highly recommend them if you want to see my sunscreen roundup video from this year I'm putting the links to all the associated videos in the information box below this video so just click that show more button that box will open up and you'll get to go over to those videos afterwards alright so the other thing that I do besides sunscreen I always have a hat with me so I want
to show you a couple of my favorite hats this is an Eric Javits Fedora this has an SPF value of 50 this saved my skin on my recent trip to Spain where I was out there outdoors pretty much all day every day that with a cute pair of sunglasses and you're protecting your face and your eyes from the Sun so it's a great look it's very hip and youthful now sunglasses I definitely
recommend for everyone because of course as you know our eyes are the first area of our face that start to show aging so sunglasses can go a long way to protecting the skin around your eyes so putting on a nice big pair of sunglasses whether it's you know a spending pair of Tory Burch aviators like these or an inexpensive $9 pair of sunglasses from Target these have 100% UV protection so wearing sunglasses every
time you're out in the Sun prevents squinting it reduces crow's feet and it also protects against cataracts so you can anti-age your eyes on the inside as well tip number two is to sleep on your back with your head elevated now this is probably going going to be one of the more difficult things to accomplish if you're a side sleeper but I can tell you it will change your skin for the better
I used to be a side sleeper I would wake up in the morning look in my bathroom mirror and I would have this v of wrinkles edged into my chest and that was over four years ago my wrinkles should be worse because I've aged but look I don't have any chest wrinkles and the reason is that I switched from sleeping on my side to sleeping on my back the clincher to have me
do it was that I was visiting my dermatologist one day and she actually said oh you sleep on this side of your face don't you and I was like what how can you tell and she was like well your wrinkles on this side are way deeper than they are on this side and I was like oh my god you could tell just by looking at me it took me around 3
to 6 months to finally train myself fully to sleep on my back but now that I've done it I am so glad I did and when I look at it over the long term like I'm planning on living probably another 40 years or so with any luck three months is a drop in the bucket compared to 40 years of comfortable back sleeping but I ended up buying a sleeping wedge and this is
like one of the best things that I ever bought I picked this up on Amazon it's just like a big wedge of foam it has this nice bamboo cover that comes off and I can wash it but I put my pillows on top of that and I sleep actually kind of with my upper body elevated and that really helped to train me to sleep on my back I sleep better because my
hips don't hurt I'm not tossing and turning and when I wake up I don't have pain in my shoulders like I used to the other thing is that sleeping with your head elevated will help with dark circles and puffiness and eye bags because those three things are mainly caused by fluid pooling under your eyes while you sleep who knew and so sleeping with your head elevated actually helps those to drain out of your
face and so it keeps your eye area looking younger longer and who doesn't want that tip number three is to feed your skin from the inside as it turns out what we eat directly affects how our skin looks and how our skin ages some foods actually help our skin to age slower and look better and some foods speed up the aging process oh my gosh and of course don't you know it's the
things that we love the most that speed up the aging process so the foods to avoid are refined sugars unfortunately refined sugars promote glycation which damages cells and causes wrinkles alcohol is pro-inflammatory and it speeds up the aging process of course you've probably also heard those recent studies where resveratrol and ingredients in red wine actually help to slow the aging process so if you're going to have that glass of red wine every day to help
with your heart and your aging then go ahead and do that just everything in moderation I love sugar I can't cut it out of my diet completely but I have cut way back on the amount of refined sugar that I'm eating so onto the foods that actually help us look younger antioxidant and vitamin rich foods that can protect your cells from free radical damage those are things like raw almonds dark chocolate so there
you can get some sweets in there but without a lot of refined sugar blueberries blackberries strawberries dark berries green tea actually any tea all the teas have polyphenols and antioxidants and dark leafy green vegetables like kale and spinach now the other foods that I eat a of our salmon and fishes that contain healthy fats and omega-3 fatty acids and omega-6 fatty acids those fats work inside the cells to help protect the moisture barrier and
so of course I have a video on what I eat in a day I've actually done two of them and I'm due for an update and the link for that will be in the information box below the video as well so you can see how I've worked all of these things into my diet tip number four is to nourish skin from the outside so just like I talked about nourishing skin from
the inside with vitamins and antioxidants you can do that from the outside as well so while your skin's main function is to keep things out it is a little bit absorb and things do make it in there and some of the things that are the best and absorbing into your skin and making a change our vitamins and antioxidants my number one vitamin to use on my skin is vitamin A now I use
a prescription vitamin A you've heard of this is called retin-a or this is the generic tretinoin that I get I can't say that this is 100% all-natural I'm not sure if it is so if you don't want to use a prescription retinoid you don't have to but you should definitely use some kind of vitamin A and vitamin A fortunately comes in all different forms obviously the other forms are not going to be
as strong as this they're not going to work as well or as fast but they will work over time one great source of vitamin A is rosehip seed oil it's 100% natural you can get yourself some rosehip seed oil put that on your face your neck your chest there's also over-the-counter retinol creams I don't have a hundred percent natural one to recommend to you but one that I really do like a lot is
this CeraVe skin renewing cream serum and what vitamin A does is it works at the cellular level to help your skin to generate more collagen and it helps to reduce wrinkles another vitamin that I love for topical skincare is vitamin C vitamin C is a very potent antioxidant it helps to scavenge free radicals that go around breaking down the scaffolding that holds our skin up it helps to brighten our skin on the surface
and to reduce the appearance of age spots the one that I use in love and I believe this is all natural this is made in the US this is by timeless skincare it's their twenty percent C plus E Plus Peru liqu acid serum and this is a great way to get vitamin C into your skin it will absorb right in so it really works well the other vitamins that I look for our vitamin
b3 which is niacinamide that's another antioxidant that is showing really great things that it does for skin it can reduce your pores it can reduce wrinkles it can brighten the skin it helps with skin cell turnover so that's wonderful a product that is all-natural that I like very much that contains niacinamide is the mad hippie face cream this has so much good stuff packed into it I love this stuff I brought the box over
just so I could read you a couple of the ingredients so it's got the niacinamide it's got Matrixyl 3000 it's got argan oil it's got green tea extract it's got grapeseed extract it's got resveratrol acai berry vitamin E coenzyme q10 coconut oil I mean it is just packed with so much great stuff this is a great product especially if you are into all natural skin care products and all natural anti-ager number 5 is
the one you guys have probably probably been dreading hearing but it is exercise exercise really is an anti-ager it helps your skin to produce more antioxidants to fight those free radicals it also helps with blood flow so as you exercise you know how your skin gets flushed that is the blood rushing to the surface of your skin and that helps to bring more of those nutrients in your diet to your skin to deliver
those things to the skin cells where it's needed it also helps to flush out toxins and free radicals so increasing blood flow is really great for you especially as you get older now there wasn't really any clinical evidence of this before it was all kind of anecdotal but there was a study done that I just stumbled upon that they actually took a small group of people who were over 65 they were sedentary people
and they took a little biopsy of their skin they examined that under a microscope and they found that their skin pretty much looked like the standard old person's skin where the stratum corneum the top layer was thickened and that's kind of what makes the skin look dull and more wrinkled and that the dermis the inner layers were thinner which also makes your skin look older so they took this group of people and they had
them start exercising two times a week for 30 minutes after three months of that they went back took another biopsy of their skin and guess what their skin resembled the skin of a twenty to thirty year old so their stratum corneum had thinned and their dermis had thickened and so the guy that did the research was like I I don't want to say that exercise is the Fountain of Youth but you know
I kind of think it is so when I saw that I was like yes I knew exercise made me feel better and I had this sense that it helped me to look better but there was no confirmation before and now that I've seen this study I'm like yes these are things that you can start doing at any age and they will have an effect on your skin of course if you started
them in your 20s that would be better but what you'll find out is that research has shown that you are never too old to start doing these things if you start even when you're in your 60s it can still improve the look of your skin and your skin is such an amazing organ that you can turn back the hands of time on it even though you're getting older so those were my
top five all natural anti-aging secrets so thanks for tuning in today everybody I really appreciate your time and I'll see you in the next video so take care bye
0 notes
Last Seen Blogs

hatanoatsuko
ATSUKO HATANO'S NEWS

lilyplantstore
فروشگاه گل و گیاه لی لی

lady-z-writes
Haunted City
andreacardona-blog
El blog de Andrea Cardona
kaif-ene
Phil