#Histogram Plugin (PC)
Text
Xnviewmp windows 10

#Xnviewmp windows 10 full
#Xnviewmp windows 10 portable
#Xnviewmp windows 10 software
NConvert - command-line batch convert tool (32-bit or 64-bit).
Nview - the DOS4GW predecessor of XnView.
XnView MP - the designated successor of classic XnView, current version 1.30.
The author published various other products using the classic or the multi-platform XnView code base, some examples are: As of 2018 XnView also supported HEIF and FLIF.
#Xnviewmp windows 10 portable
Version 2.30 released in 2015 supports the Netpbm PAM format, can read Better Portable Graphics, and offers an add-on for Imgur uploads. XnView 2.13 (2013) was the last version for Windows platforms older than Windows XP. Ĭlassic XnView is also distributed in the PortableApps format. These features are available in the multi-platform edition XnView MP based on Qt. Classic XnView does not support Unicode, and SVG requires a commercial CAD plugin. Support for vector graphics ( EPS, PS, PDF) can be integrated with Ghostscript. Support for most raw image formats is based on dcraw.
#Xnviewmp windows 10 full
8bf Photoshop plugins such as the Harry's Filters 3.0 included in the full version. Typical image editing tools are included, for instance color and size manipulation, several filters and effects. Lossless (without new encoding) turning, flipping and cropping of JPEG files is supported. Creation of advanced slide shows is also possible. Scripts can be created to convert, manipulate and rename a batch of images in one go. The display of the histogram of a picture is possible. XnView can search files that have the same filename or data, and can search for similar graphics as well. It also supports file comments ( 4DOS descript.ion). It can write XMP metadata partly together with IPTC metadata. XnView can show IPTC, Exif and XMP metadata, and write IPTC metadata (It can also do batch writing of IPTC metadata). Classic XnView can read image formats resulting in more than 32 bits per pixel, but write support is limited to 32 bits. XnView also supports ICC profiles in JPEG, PNG and TIFF files. XnView can read more than 500 image file formats, some audio and video file formats, and write 50 image file formats. XnView is customisable and multi-lingual. Research papers about DICOM and digital watermarking used XnView for image processing. In 2006 Sveriges Television (SVT) recommended XnView in their High Definition Multi Format Test Set. XnView has received five cows from Tucows. The extended version of XnView, called XnView MP, is available for Windows, macOS and Linux. For other uses, it is licensed as commercial software.Īlthough originally deployed only on Unix-like systems, it is now also available for Windows, Windows Mobile and Pocket PC. It is licensed as freeware for private, educational and non-profit uses. It comes with built-in hex inspection, batch renaming and screen capture tools. XnView is an image organizer and general-purpose file manager used for viewing, converting, organizing and editing raster images, as well as general purpose file management.
#Xnviewmp windows 10 software
Freeware for private, educational or non-profit use otherwise commercial software
0 notes
Photo

Lịch Sử Hình Thành Của Adobe Photoshop
Hôm nay GenZ Academy sẽ mang đến cho các bạn một chủ đề vô cùng hấp dẫn có tên là “Lịch sử hình thành của Photoshop”. Một trong những phần mềm kinh điển trong làng thiết kế đồ họa đó chính là Adobe Photoshop.
Ngày xửa ngày xưa, phần mềm Photoshop được hai anh em Thomas và John Knoll phát minh vào năm 1988 với tên gọi “Display”, đến năm 1990 được Adobe mua lại và được đặt tên là “Adobe Photoshop 1.0”. Kể từ đó, Photoshop đã tạo ra một cuộc cách mạng trong ngành thiết kế đồ họa và trở thành phần mềm thiết kế hình ảnh được sử dụng nhiều nhất trên thế giới. Và cứ như thế, Adobe Photoshop hiện nay đã sống được hơn 30 năm, với phiên bản mới nhất là “Adobe Photoshop CC 2021”.
Hãy cùng GenZ Academy nhìn lại hành trình phát triển của phần mềm Photoshop, qua chuỗi Infographic sau đây nhé!
Giai đoạn sơ khai
Adobe Photoshop 1.0 (1990)
Phiên bản đầu tiên Photoshop 1.0 được phát hành, một thời gian sau nâng cấp lên phiên bản 1.07 và chỉ chạy riêng cho dòng Mac của Apple với giao diện thô sơ, có dung lượng 728 KB. Được phát hành ở dạng đóng gói, gồm một đĩa mềm và tài liệu hướng dẫn.
Adobe Photoshop 2.0 (1991)
Photoshop 2.0 bao gồm các tính năng Paths với sự hỗ trợ của line based drawings, trong đó cho phép người sử dụng để chỉnh sửa xung quanh một đối tượng một cách dễ dàng và mở ra hướng phát triển mới trong tương lai. Tính năng này đã được Mark Hamburg bổ sung và phát triển trên các ứng dụng.
Adobe Photoshop 3.0 (1994)
Với phiên bản này Adobe đã bổ tính năng Layer và Tabbed palettes cho Photoshop, chúng giúp thao tác ảnh dễ dàng hơn. Tháng 9/1994, phiên bản Photoshop 3.0 này đã ra mắt cho Mac và tháng 11/1994 cho Microsoft Windows, IRIX, Solaris .
Adobe Photoshop 4.0 (1996)
Adobe Photoshop 4.0 được phát hàng vào 11/1996. Đáng chú ý nhất trong phiên bản lần này là sự xuất hiện của chức năng Adjustment layers và Macros, dùng để thiết kế các giao diện giống như những sản phẩm khác của Adobe. Ngoài ra còn có màn hình màu với card đồ họa 8bit, ổ CD-ROM và chỉ hỗ trợ Mac và Windows.
Adobe Photoshop 5.0 (1998)
Được phát hành vào 5/1998, chỉ hỗ trợ Mac và Windows, với một số tính năng mới như: Editable Type, Colour Management và Multiple Undo (khả năng hoàn tác hành động lại nhiều lần trong bảng “Lịch sử”). Hơn thế nữa, công cụ Magnetic Lasso giúp cho việc chọn một khu vực của hình ảnh để chỉnh sửa trở nên đơn giản và trực quan hơn.
Adobe Photoshop 5.5 (1999)
Phiên bản Photoshop 5.5 đặc trưng tiết kiệm thời gian, “Save For Web”, chỉ hỗ trợ Mac và Windows.Thêm vào những chức năng lưu lại trang web và extract xuất hiện, chức năng Image slicing property lần đầu tiên được giới thiệu kèm với hiệu ứng rollover.
Adobe Photoshop 6.0 (2000)
Adobe Photoshop 6.0 chỉ hỗ trợ Macintosh và Windows. Bổ sung một số chức năng như Vector shapes, Liquify Filter, Layer styles, Dialog box, và User interface được nâng cấp.
Xem thêm: Cách học Photoshop Cơ bản tại nhà hiệu quả trong thời gian Giãn cách xã hội
Giai đoạn phát triển
Adobe Photoshop Elements (2001)
Trong giai đoạn này, Adobe nhận ra rằng Photoshop đang dần trở thành một công cụ quá phức tạp, họ lo sợ người dùng sẽ hoang man và sẽ sử dụng những phần mềm tối ưu hơn.
Vì thế Photoshop quyết định lược bỏ các tính năng phức tạp, chỉ để lại những tính năng cần thiết với phiên bản Adobe Photoshop Elements vô cùng hấp dẫn chỉ có hai ứng dụng chính là yếu tố tổ chức và biên tập hình ảnh.
Với Photoshop Elements, giao diện người dùng đã được đơn giản hóa để thân thiện hơn với những người dùng không am hiểu về máy tính. Photoshop Elements đã rất thành công và vẫn được Adobe phát triển cho đến ngày nay.
Adobe Photoshop 7.0 (2002)
Phiên bản này hỗ trợ cho Mac OS ‘Classic’/Mac OS X, Windows.
Giới thiệu công cụ mới như: Healing Brush, Designed Text bằng vector. Photoshop file browser được giới thiệu lần đầu tiên.
Adobe Photoshop CS (2003)
Photoshop CS chỉ hỗ trợ Mac OS X và lần đầu tiên sử dụng các CDS (hệ thống ngăn chặn giả mạo) đã công nhận.
Phiên bản này hỗ trợ cho các ngôn ngữ web khác nhau, bao gồm JavaScript.
Tính năng Camera RAW 2.x và Slice Tool được cải tiến, cho ra mắt các câu lệnh mới như: Shadow/Highlight, Match Color, Lens Blur filter, Smart Guides, Real-Time Histogram
Adobe Photoshop CS2 (2005)
Phiên bản CS2 hỗ trợ Mac OS X, Windows 2000/XP. Nhiều tính năng, bộ lọc và công cụ mới xuất hiện như Red Eye Removal, Smart Object, khả năng chọn nhiều Layer. Hơn thế nữa, Memory management cho PC G5s 64.
Adobe Photoshop CS3 (2007)
Adobe Photoshop CS3 hỗ trợ Mac OS X, Windows XP. Phiên bản lần này không tập trung bổ sung thêm nhiều tính năng mới mà tập trung nâng cấp và tối ưu hóa chương hình.
Tận dụng thời điểm Smartphone đang khá phổ biến, CS3 cũng đưa tính năng tối ưu hóa này vào các thiết bị di động.
Ngoài ra, CS3 còn nâng cấp tính năng cho Adobe Camera RAW, một công cụ chọn nhanh, thay đổi độ sáng, độ tương phản và chuyển đổi màu sắc. Những tính năng mô phỏng, chỉnh sửa cũng được nâng cấp.
Adobe Photoshop CS4 (2008)
Trong phiên bản CS4, giao diện người dùng được đơn giản hóa đáng kể và có đính kèm các tài liệu hướng dẫn đã giúp người dùng dễ dàng sử dụng hơn.
Tính năng Mask, tùy chỉnh màu sắc và điều chỉnh bảng điều khiển đã được bổ sung. Hơn thế nữa, các công cụ chính đã được thêm vào thanh tiêu đề để dễ truy cập và sử dụng.
Adobe Photoshop CS5 (2010)
Adobe Photoshop CS5 Extended là bản photoshop với nhiều tính năng mới, giải pháp tuyệt đỉnh cho các tác vụ xử lý ảnh số cao cấp, cung cấp mọi tính năng phối ghép và biên tập, cộng thêm những công cụ đột phá cho phép tạo lập và chỉnh sửa các nội dung 3D và chuyển động.
Xem thêm: 10 Cách Hiệu Quả Nhất Để Giảm Kích Thước Tệp Photoshop
Giai đoạn chuyển mình
Adobe Photoshop CS6 (2012)
Adobe đã không còn hỗ trợ cho Windows XP và sẽ chuyển sang đăng ký Creative Cloud cho các phiên bản tiếp theo.
Adobe Photoshop CS6 thu hút được sự chú ý đặc biệt từ phía cộng đồng designer nhờ giao diện hoàn toàn mới và bổ sung một số tính năng hữu ích. Trong khi đó các bước xử lý ảnh phức tạp và mất nhiều thời gian trước đây đã trở nên đơn giản và dễ dàng hơn đối với cả người không am hiểu về phần mềm này.
Adobe Photoshop CC (2013)
Photoshop CC là một bước ngoặt lớn trong lịch sử Photoshop. Ứng dụng và các chương trình sáng tạo khác của Adobe đã chuyển sang dịch vụ Creative Cloud. Cho phép người dùng đồng bộ hóa các tùy chọn trên các thiết bị. Phiên bản này cũng bao gồm một số tính năng mới liên quan đến độ sắc nét. Nó cũng bao gồm Adobe Generator, một công cụ để tạo các plugin cho Photoshop.
Adobe Photoshop CC (2014)
Phiên bản 2014 của Photoshop CC tiếp tục sử dụng mô hình Creative Cloud và bổ sung các cải tiến cho các công cụ nhận biết nội dung, công cụ làm mờ và các cải tiến nhỏ khác giúp tăng tốc độ của các tác vụ.
Adobe Photoshop CC (2015)
Năm 2015, nhân dịp kỷ niệm 25 năm của Adobe Photoshop họ đã phát hành của Photoshop CC 2015, giới thiệu Adobe Stock, một thư viện hình ảnh tích hợp hoàn toàn với hệ sinh thái Adobe.
Phiên bản này đã thêm khả năng sử dụng nhiều kiểu Layer và chỉnh sửa giao diện người dùng nhất quán hơn. Tận dụng thời cơ máy tính bảng ngày càng phổ biến để thiết kế đồ họa khi đang di chuyển, phiên bản CC 2015 cũng đi kèm các cử chỉ cho các thiết bị cảm ứng.
Adobe Photoshop CC (2017)
Được công bố vào tháng 11/2016, phiên bản này bắt đầu hỗ trợ phông chữ SVG OpenType. Ngoài ra, Photoshop CC 2017 có bộ chọn mẫu mới, chức năng tìm kiếm và nhiều cải tiến nhỏ khác để hỗ trợ cho MacBook, Pro Touch Bar đã được tích hợp.
Adobe Photoshop CC (2018)
Photoshop CC 2018 là một phiên bản lớn tập trung nhiều vào công cụ vẽ. Ví dụ, mỗi Brush có thể lưu một màu và độ mờ khác nhau.
Phiên bản mới nhất mang đến một tính năng mới được gọi là làm mịn nét vẽ với hơn 1000 Brush. Công cụ Curvature Pen, lấy cảm hứng từ Illustrator, cho phép tạo các đường Bezier. Các công cụ nâng cao, hỗ trợ HEIF, quyền truy cập Lightroom Photo, các Layers sao chép, ảnh toàn cảnh 360 và cải thiện kích thước hình ảnh, bộ lọc, nét vẽ,.. là những tính năng hấp dẫn khác.
Adobe Photoshop CC (2019)
Phiên bản Photoshop này đánh dấu việc giảm hỗ trợ cho phiên bản 32-bit của Windows. Thêm công cụ Frame cho phép tạo các khung giữ chỗ hình ảnh. Một trong những thay đổi đáng chú ý nhất là đối với công cụ Transform – giờ đây các Layers sẽ được chuyển đổi theo tỷ lệ theo mặc định, trong khi các nhà thiết kế trước đây phải giữ phím Shift trong khi chuyển đổi để duy trì tỷ lệ của Layers. Giao diện người dùng đã được điều chỉnh để một số thông tin nhất định hiển thị rõ ràng hơn.
Adobe Photoshop (2020)
Mặc dù Photoshop 2020 loại bỏ thương hiệu CC trong tên, nhưng chức năng của Creative Cloud cũng không bị loại bỏ. Photoshop 2020 với một công cụ lựa chọn đối tượng nâng cao, bảng thuộc tính và các phím tắt mới tạo tính linh hoạt, dễ sử dụng hơn.
Phiên bản này cũng đã có mặt trên iPad đầu tiên, cho phép chỉnh sửa các tệp PSD giống nhau trên iPad và máy tính để bàn, tuy nhiên phiên bản iPad vẫn còn bị hạn chế một số tính năng.
Adobe Photoshop (2021)
Adobe gọi phiên bản mới là Photoshop 2021 hay phiên bản 22.0 được coi là “ứng dụng AI tiên tiến nhất thế giới dành cho quảng cáo”. Với nhiều công cụ sức mạnh hơn như Sensei AI và cả tính năng phát trực tiếp lên Photoshop cho iPad.
Ngoài ra các tính năng mới chính là Neural Filters, Sky Replacement, cải tiến Refine Edge Selections và bảng điều khiển Discover hoàn toàn mới. Các cải tiến khác bao gồm các cải tiến đối với Properties Panels và plug-in.
*Một phút dành cho quảng cáo:
Hiện GenZ Academy đang có khóa học “Photoshop cơ bản” cho các bạn sinh viên với rất nhiều ưu đãi như sau:
Ưu đãi 10% khi đăng ký các khóa học trong tháng 7 – 8
Ưu đãi lên đến 20% khi đăng ký nhóm trên 5 người
Tặng ngay giáo trình tự soạn của GenZ Academy
Link đăng ký giữ chỗ: https://bit.ly/3jW68Ko
Tham khảo thêm lộ trình: https://genzacademy.vn/photoshop-co-ban/
Ngoài ra hãy cùng GenZ tham gia Cộng đồng Digital Design để có thêm kiến thức về Thiết kế đồ họa nhé: http://bit.ly/2Mj1acf
0 notes
Text
Grafana Metabase

If you’ve ever done a serious web app, you’ve certainly met with a requirement for its monitoring, or tracking various application and runtime metrics. Exploring recorded metrics lets you discover different patterns of app usage (e.g., low traffic during weekends and holidays), or, for example, visualize CPU, disk space and RAM usage, etc. As an example, if the RAM usage graph shows that the usage is constantly rising and returns to normal only after the application restart, there may be a memory leak. Certainly, there are many reasons for implementing application and runtime metrics for your applications.
There are several tools for application monitoring, e.g. Zabbix and others. Tools of this type focus mainly on runtime monitoring, i.e., CPU usage, available RAM, etc., but they are not very well suited for application monitoring and answering questions like how many users are currently logged in, what’s the distribution of server response times, etc.
When comparing Grafana and Metabase, you can also consider the following products. Prometheus - An open-source systems monitoring and alerting toolkit. Tableau - Tableau can help anyone see and understand their data. Connect to almost any database, drag and drop to create visualizations, and share with a click.
Here's what people are saying about Metabase. Super impressed with @metabase! We are using it internally for a dashboard and it really offers a great combination of ease of use, flexibility, and speed. Paavo Niskala (@Paavi) December 17, 2019. @metabase is the most impressive piece of software I’ve used in a long time.
时间序列,日志与设备运行数据分析选 Grafana;企业生产经营数据分析则可以选 Superset。 Metabase. Metabase 目前在 GitHub 上受欢迎程度仅次于 Superset,Metabase 也是一个完整的 BI 平台,但在设计理念上与 Superset 大不相同。. Kibana and Metabase are both open source tools. Metabase with 15.6K GitHub stars and 2.09K forks on GitHub appears to be more popular than Kibana with 12.4K GitHub stars and 4.81K GitHub forks.
In this post, I’ll show you, how to do real time runtime and application monitoring using Prometheus and Grafana. As an example, let’s consider Opendata API of ITMS2014+.
Prometheus
Our monitoring solution consists of two parts. The core of the solution is Prometheus, which is a (multi-dimensional) time series database. You can imagine it as a list of timestamped, named metrics each consisting of a set of key=value pairs representing the monitored variables. Prometheus features relatively extensive alerting options, it has its own query language and also basic means for visualising the data. For more advanced visualisation I recommend Grafana.
Prometheus, unlike most other monitoring solutions works using PULL approach. This means that each of the monitored applications exposes an HTTP endpoint exposing monitored metrics. Prometheus then periodically downloads the metrics.
Grafana
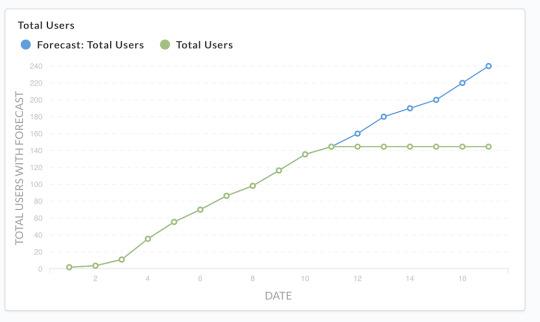
Grafana is a platform for visualizing and analyzing data. Grafana does not have its own timeseries database, it’s basically a frontend to popular data sources like Prometheus, InfluxDB, Graphite, ElasticSearch and others. Grafana allows you to create charts and dashboards and share it with others. I’ll show you that in a moment.
Publishing metrics from an application
In order for Prometheus to be able to download metrics, it is necessary to expose an HTTP endpoint from your application. When called, this HTTP endpoint should return current application metrics - we need to instrument the application. Prometheus supports two metrics encoding formats - plain text and protocol buffers. Fortunately, Prometheus provides client libraries for all major programming languages including Java, Go, Python, Ruby, Scala, C++, Erlang, Elixir, Node.js, PHP, Rust, Lisp Haskell and others.
As I wrote earlier, let’s consider ITMS2014+ Opendata API, which is an application written in Go. There is an official Prometheus Go Client Library. Embedding it is very easy and consists of only three steps.
Free microsoft office download for mac full version. The first step is to add Prometheus client library to imports:
The second step is to create an HTTP endpoint for exposing the application metrics. In this case I use Gorilla mux and Negroni HTTP middleware:
We are only interested in line 2, where we say that the /metrics endpoint will be processed by Prometheus handler, which will expose application metrics in Prometheus format. Something very similar to the following output:
In production, you would usually want some kind of access control, for example HTTP basic authentication and https:
Although we have only added three lines of code, we can now collect the application’s runtime metrics, e.g., number of active goroutines, RAM allocation, CPU usage, etc. However, we did not expose any application (domain specific) metrics.
In the third step, I’ll show you how to add custom application metrics. Let’s add some metrics that we can answer these questions:
which REST endpoints are most used by consumers?
how often?
what are the response times?
Grafana Metabase On Pc
Whenever we want to expose a metric, we need to select its type. Prometheus provides 4 types of metrics:
Counter - is a cumulative metric that represents a single numerical value that only ever goes up. A counter is typically used to count requests served, tasks completed, errors occurred, etc.
Gauge - is a metric that represents a single numerical value that can arbitrarily go up and down. Gauges are typically used for measured values like temperatures or current memory usage, but also “counts” that can go up and down, like the number of running goroutines.
Histogram - samples observations (usually things like request durations or response sizes) and counts them in configurable buckets. It also provides a sum of all observed values.
Summary - is similar to a histogram, a summary samples observations (usually things like request durations and response sizes). While it also provides a total count of observations and a sum of all observed values, it calculates configurable quantiles over a sliding time window.
In our case, we want to expose the processing time of requests for each endpoint (and their percentiles) and the number of requests per time unit. As the basis for these metrics, we’ve chosen the Histogram type. Let’s look at the code:
We’ve added a metric named http_durations_histogram_seconds and said that we wanted to expose four dimensions:
code - HTTP status code
version - Opendata API version
controller - The controller that handled the request
action - The name of the action within the controller
For the histogram type metric, you must first specify the intervals for the exposed values. In our case, the value is response duration. On line 3, we have created 36 exponentially increasing buckets, ranging from 0.0001 to 145 seconds. In case of ITMS2014+ Opendata API we can empirically say that most of the requests only last 30ms or less. The maximum value of 145 seconds is therefore large enough for our use case.
Finally, for each request, we need to record four dimensions we have defined earlier and the request duration.Here, we have two options - modify each handler to record the metrics mentioned above, or create a middleware that wraps the handler and records the metrics. Obviously, we’ve chosen the latter:
As you can see, the middleware is plugged in on line 8 and the entire middleware is roughly 20 lines long. On line 27 to 31, we fill the four dimensions and on line 32 we record the request duration in seconds.
Configuration
Since we have everything ready from the app side point of view, we just have to configure Prometheus and Grafana.
A minimum configuration for Prometheus is shown below. We are mainly interested in two settings, how often are the metrics downloaded (5s) and the metrics URL (https://opendata.itms2014.sk/metrics).
A minimal Grafana configuration:
Note: As we can see, a NON TLS port 3000 is exposed, but don’t worry there is a NGINX in front of Grafana listening on port 443, secured by Let’s Encrypt certificate.
Monitoring
Finally, we get to the point where we have everything we need. In order to create some nice charts it is necessary to:
Open a web browser and log into Grafana
Add Prometheus data source
Create dashboards
Create charts
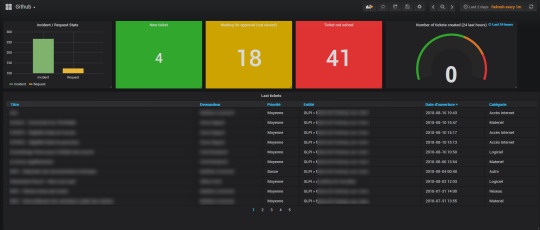
An example of how to create a chart showing the number of HTTP requests per selected interval is shown on the following figure.
Similarly, we’ve created additional charts and placed them in two dashboards as shown on the following figures.
Summary
In this post, we have shown that the application and runtime monitoring may not be difficult at all.
Prometheus client libraries allow us to easily expose metrics from your applications, whether written in Java, Go, Ruby or Python. Prometheus even allows you to expose metrics from an offline applications (behind corporate firewalls) or batch applications (scripts, etc.). In this case, PUSH access can be used. The application then pushes metrics into a push gateway. The push gateway then exposes the metrics as described in this post.
Grafana can be used to create various charts and dashboards, that can be shared. Even static snapshots can be created. This allows you to capture an interesting moments and analyze them later.
Reports and Analytics
Powerful Enterprise Grade Reporting Engine
Elegant SQL interface for people who need a little more power
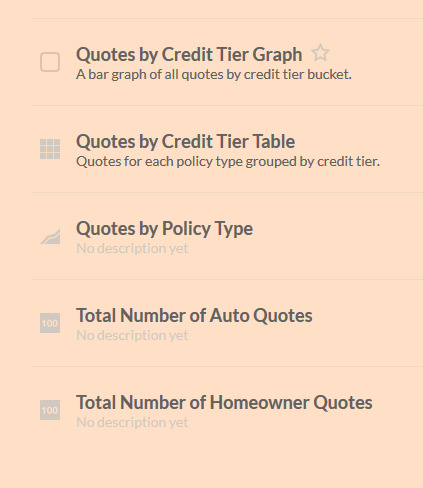
Widgets for Creating Bar Chars, Pie Charts, Line Graphs
Multiple Dashboards with different personal widgets
Create, organize, and share dashboards with others
Dashboards
Open Source
Completely Open Sources
Community Contribution Available
Simple to Use even for beginners
Install on premises or in the Cloud
Free and Simple to Use
Integrations
Integration with any Data Source in SQL
PostgreSQL, MySQL, Maria DB
Oracle, MS SQL or IBM DB2
Ready Plugins Available
Metabase Vs Grafana
Altnix Advantage
Metabase Consulting Services
Altnix provides Professional services for Consulting on Metabase products. Following items are covered:
Consulting Services for Metabase business intelligence tool
Best practices and guidelines on how to adopt the Metabase business intelligence tool
Architecture Design for Metabase
Technology Roadmap for Metabase adoption at your organization
Solution Design on using Metabase business intelligence tool
Metabase Implementation and Deployment
Altnix will implement Metabase based business intelligence and Analytics solution keeping in mind the business requirements. Implementation includes the following:
Integration with different databases and data sources
Extract Transform Load (ETL) Design
Designing Queries to be used in Metabase
Widgets and Dashboards design in Metabase
Reports Design in Metabase
Development and Design Implementation
UAT and Testing Activities
Production Implementation and Go Live
Warranty Support Period Included
Metabase Customization
Grafana Metabase On Twitter
Altnix will customize your Metabase installation so that it is a better fit for your business environment.
Creating new visualizations and dashboards as per customer needs
Creating custom reports and charts as per customer needs
Adding new scripts, plug-ins, and components if needed
Third-Party Integration
Altnix will integrate Metabase business intelligence tools with other third-party tools to meet several use cases.
Ticketing systems such as LANDesk, BMC Remedy, Zendesk, and ((OTRS)) Community Edition
ITSM Tools such as ((OTRS)) Community Edition, GLPi Network Editon, ServiceNow, and HP Service Manager
Monitoring tools such as Zabbix, Nagios, OpenNMS, and Prometheus
IT Automation Tools such as StackStorm, Ansible, and Jenkins

24x7 AMC Support Services
Altnix offers 24x7 support services on an AMC or per hour basis for new or existing installations on the Metabase Business intelligence tool. Our team of experts are available round the clock and respond to you within a predefined SLA.
Case Studies
Knute Weicke
Security Head, IT
Fellowes Inc, USA
Altnix was an instrumental partner in two phases of our Security ISO needs. The first being a comprehensive developed Service/Ticketing system for our global offices. The second being that of an Asset Management tool that ties all assets into our Ticketing systems to close a gap that we had in that category. They are strong partners in working towards a viable solution for our needs
The Altnix team was very easy to work with and resolved our needs in a timely manner. Working with Altnix, allowed us to focus on our core business while they handled the technical components to help streamline our business tools. We have found a strategic partner in Altnix
Johnnie Rucker
General Manager
Encore Global Solutions, USA
White Papers
0 notes
Link
image © musictribe.com/Behringer
With the relatively recent releases of the Loupedeck devices, my interest was piqued to see if something like this would indeed enhance the develop module workflow in Lightroom.
The original Loupedeck and software comes in at around $179, while the newer Loupedeck + device and software is $250.
What does this device do, exactly? Well, it is an alternative control that allows Lightroom modifications and controls through dials and switches instead of using a mouse and slider controls.
I was a bit skeptical at first, so as I normally do - I hit research mode. I watched YouTube videos of people using and setting up the Loupedeck devices. I could definitely see the value in it. What I could also see was related videos about Loupedeck alternatives.
OK, I'm intrigued. Basically for $50, you can get a similar device with free software to do something similar. Digging deeper into that side of the research brought us to the Behringer X-Touch Mini USB MIDI controller board and the MIDI2LR open source software.
For a $50 investment, I figured it was worth the gamble.
An Amazon Prime order and 2 days later, the X-Touch Mini is delivered.
Installation:
All the drivers for the X-Touch Mini are built into the device, so plugging it into my Windows 10 PC, had it connected, recognized and ready for use within seconds. I even went and checked the Behringer website to see if there were any newer drivers. No, on that.
Next I went to the GITHUB site for MIDI2LR and downloaded it. I did some research on what it would take to get this up and running. A lot of the instructions out there seem to be a lot older than the version of software that is out there as of now. There is a proper installer and all I needed to do was download the EXE file and run it. MIDI2LR installed the plugins to the proper directories. I then just went into Lightroom and made sure that it was in the plug-in manager.
Sure enough, it was there. There were also some instructions that showed the need to start and stop the MIDI2LR server. This automatically starts and stops when I run Lightroom, so no need to do anything else.
image © musictribe.com/Behringer
Full Board
Setup:
Setup for the board is plug and play, no need to do anything else than have it plugged into the USB port.
MIDI2LR will need some initial setup. You can either find a profile XML file on the internet to start with or setup the buttons on the X-Touch yourself. I chose to setup the buttons myself.
With the MIDI2LR interface running, the board plugged in...press a button on the board and it is highlighted in the panel. From there, you click the button and select what you want to assign to that button or dial.
Here is how I setup my board initially:
image © musictribe.com/Behringer
Row Of Dials
DIALS
(all dials can be clicked down as well, and those are setup to do a RESET to that dials function)
Bank A
#1 - Exposure
#2 - Contrast
#3 - Highlight
#4 - Shadow
#5 - White
#6 - Black
#7 - Vibrance
#8 - Clarity
Bank B
#1 - Sharpening Amount
#2 - Sharpening Detail
#3 - Sharpening Masking
#4 - Luminance Noise Reduction
#5 - Color Noise Reduction
#6 - Dehaze
#7 - Vignette
#8 - WB/Temperature
image © musictribe.com/Behringer
Button Row 1 and 2
BUTTONS
Row 1/Bank A (these are my custom built presets)
#1 - Preset 1 = APSC/FF Basic
#2 - Preset 2 = APSC/FF Hi ISO
#3 - Preset 3 = Nikon RAW
#4 - Preset 4 = Olympus Basic
#5 - Preset 5 = Olympus Hi ISO
#6 - Preset 6 = Olympus RAW
#7 - Preset 7 = CellPhone
#8 - Preset 8 = B&W Finisher
Row 2/Bank A
#1 - before/after toggle (MC)
#2 - copy develop settings
#3 - Previous Image (<<)
#4 - Next Image (>>)
#5 - Before/After (loop)
#6 - Auto Transform ([])
#7 - Show Crop (>)
#8 - Add to quick collection (record symbol)
Row 1/Bank B
#1 - currently unmapped
#2 - currently unmapped
#3 - currently unmapped
#4 - currently unmapped
#5 - currently unmapped
#6 - currently unmapped
#7 - currently unmapped
#8 - currently unmapped
Row 2/Bank B
#1 - create virtual copy (MC)
#2 - paste develop settings
#3 - 3 Stars (<<)
#4 - 5 Stars (>>)
#5 - currently unmapped
#6 - currently unmapped
#7 - Export (>)
#8 - currently unmapped
image © musictribe.com/Behringer
non-powered fader
Fader dial is not used because it is not motorized. The other dials and buttons are capable of taking on the value they are assigned to in Lightroom. You'll notice this when you switch images. The lights around the dials will change to match the value setting on the commands they are mapped.
image © musictribe.com/Behringer
Layer A/B Buttons
The layer buttons found on the far right are the selections between the 2 different banks.
Once you have the buttons setup, you can save it as a profile that is loaded every time the MIDI2LR program is started.
The board is completely USB powered, so only one cord is needed for connections. I've seen some ingenious YouTube videos where people have connected a small power bank and bluetooth device to it, allowing for it to be used sans wire.
image © musictribe.com/Behringer
side view showing USB port
I'll probably change around some of the button assignments in the future to better suite my workflow, putting the most used buttons and dials on layer A, then using the backup functions on layer B.
Here is my board, labeled using the Brother P-Touch PT-H110 label maker:
That brings me to the benefit I see of using the Behringer over the Loupedeck. While it is nice to have the buttons pre-labeled on the Loupedeck device - they are pretty much stuck there. I've heard you can re-program them with the provided program. I'd much rather have blank buttons like on the Behringer and use a label maker.
The downside is that the MIDI2LR software is open source and the developer could stop supporting it at any time. To a lesser degree, the same thing could hold true for Loupedeck, if the product doesn't take off the company could abandon it.
It just seemed to me that the $50 investment at this time was a better choice.
So, we've talked a lot setup and hypothetical. What about this thing in action?
So far, I've only used it to edit and post process a handful of photo shoots. Right now, I've not gotten my label maker and I'm not always hitting the right dial or button every time, but I did not have any time lost versus just using the keyboard and mouse.
With that being said, once I use it for a bit longer, I definitely see me getting through a set of images faster. I really only need to look at the histogram on the right side. The dials go right to it and work excellent.
One small change I've done that is different from my old workflow is turn on the visual clipping indicator in the histogram. This makes clipped blacks glow in blue and clipped highlights glow in red. This makes using the black/white/highlight/shadow adjustments quicker.
All I know right now is that this is fun to use, easy to setup and inexpensive enough to have taken a chance on. It will decrease my time in front of the computer when doing culling and post processing tasks. That alone is going to recoup the $50 spent. I'm even going to donate some money to the developer for the effort. It is well worth it!
0 notes
Text
Photoshop CS3 and ACR (Adobe Camera RAW) Guide
Photoshop CS3 and ACR (Adobe Camera RAW) Guide
Photoshop is a very powerful program! If you’re in the market to purchase photoshop, some things to consider when purchasing the version that will suit you are…
MAC
Photoshop Elements 4.0 or CS3 — if Elements 4.0 or CS3 — if you’re doing simple photo editing or graphic design work PSE4 will be enough program for you that you won’t feel like you’ve outgrown it anytime soon. If you’re planning on processing batches of photos at a time spend the extra money and go for CS3.
PC
Photoshop Elements 6.0 is the most current version for PC, this will be perfect for you if you are doing simple photo editing or graphic design work. If you’re planning on processing batches of photos at a time spend the extra money and go for CS3.
Educational discounts are available for both versions if you look.
To the meat of the program.
Editing a JPEG or TIFF
Open up CS3 and when it’s fully loaded go to File>open and navigate to your photo on your hard drive and click open. When your photo comes up on the screen the first thing I do is adjust the Curves. Hold down your control (option on the MAC) M button and curves will come up. I like a slight S curve to my photos. Pull the curve up on the right-hand side and down a bit on the left. Make sure the preview button is clicked so you can watch the effects you are having on your photo. A little goes a long way, be gentle.
Next, I work with Levels. Contro (option on the MAC) L and Levels will come up. Make sure you click the preview button. Depending on your photo you will use this differently each time. I usually have to take the middle slider and push it to the right a bit but really this adjustment will all depend on the photo you have but 90% of the time I use Levels on my photos.
Now, you need to look at your photo, do you have any color casts? If so, now would be when I go to Image>adjustment>match color. Make sure you click the preview button. Now click the neutralize button and slide the FADE slider back until it looks better. I find 66 is the magic number usually but it will depend on your photo. On this menu, I also adjust the luminance slider to the right a tad.
Now, basic edits to my photo are done. Stay tuned to future articles by me on various tips and tricks for using CS3 and preparing your photos for print.
Melissa Roth Cherniske
http://ift.tt/2uTl93v
Editing a RAW photo file
Open up CS3 and when it’s fully loaded go to File>open and navigate to your photo on your hard drive and click open. If you have more than one photo to edit (a batch) you can open them all up now. A number of files you are able to open will depend on your computer’s memory/RAM setup.
RAW files will trigger CS3 to open up a plugin called ACR (Adobe Camera RAW) if you get an error message at this point you may need to reinstall the latest version of ACR on your computer. This is NOT hard. Go to Adobe’s website and type ACR in the search and it will come up to the page that you need to download. The directions for this really are clear from Adobe…trust me.
OK, so if it worked and the files have opened in ACR you need to do a couple things the first time you edit to set some defaults. In the bottom center of your screen, it’s going to say something about RGB(1998) click that and switch it to SRGB. Unless you know about color modes you should work in SRGB. No matter what color mode your camera is set to, RAW files come in unassigned to an ICC profile, you need to assign it. SRGB is an industry standard for web viewing and also commercial photo printing. This may change in the future but for now, I use SRGB but you may want to check with your printer to see what “color mode” they print in. If they say they “CAN” print in any color mode verify that they aren’t converting your images to their ICC profiles, you want to control this yourself or else you’ll have pictures that won’t match your screen. 90% of the web browsers can only see SRGB colors so if people are using IE or one of the other browsers that aren’t color managed, they will be seeing your photo as SRGB even if you embed a different color mode.
SO…. my conclusion on this is to change the color mode here to avoid any problems in the long run. This setting only needs to be made once and then it will be the default.
OK, now to begin your RAW editing. If your editing one photo, select the photo on the left and click on the white balance dropper. You can click this dropper on a black portion of the photo, a white portion of the photo, or an 18% gray portion of the photo and it will adjust the White balance and temperature of the photo. Alternatively, you can look on the right-hand side of your screen and tell ACR to use the AUTO WB, AS SHOT, or one of the preset WB settings. If your editing multiple photos click on select all on the upper left-hand corner OR if you want to select just a couple from a large batch just hold your shift key down and select a couple and you can do this as many times as needed until you’ve gone through your entire batch. A nice thing that ACR has when doing batches is a +++++ rating system. You can rate your photos to mark which you like and dislike so if you are running a large batch and see pictures you just don’t want to take the next part of processing, mark them and you can ignore them in the future. This ++++ thing is below the thumbnail on each photo on the left-hand side of your screen.
On the top right of the screen above the histogram are to buttons that I push. One gives you indicators when your blacks are clipped, shadows are too extreme. The other gives you indicators when your highlights are clipped/blown. These indicators are both VERY useful and I leave them on all the time. Again this is a setting that you only have to do once and then it is set as your default next time you open up CS3.
Next thing I adjust here is exposure. I use the AUTO button here to get a baseline for where to start my editing on this next set of controls. If the WB is set correctly this AUTO seems to work fairly well for my style. I usually need to adjust very little. Exposure, brightness, fill, recovery, clarity in that order.
Exposure, Brightness, and fill really are self-explanatory. Sliding them gives you a really good idea of how they should be used and how far a little shift left or right changes things is important to note. The more you use exposure, the more grain you are introducing into your photo. When shooting in RAW I tend to overexpose ever so slightly since I find it is easier to SAVE a photo then if you were to severely underexpose or overexpose. Spot on exposure is ALWAYS ideal.
Recovery, this is a great tool. If you have blown highlights (indicated with the RED warnings) slide this to the right and you’ll gradually be able to bring some of the details back.
Clarity, I always set this at 5. I really like how that brig back a bit of shine back to the photo (removes a little haze) without any real loss of data.
At this point I don’t use any other controls in ACR, if I’m editing one photo I click OPEN here if I’m editing a batch, I click Select all in the upper left-hand corner and OPEN ALL.
Now the photos will all open in CS3. At this point, go up to my directions above on Editing a JPEG or TIFF and continue with my editing directions.
Stay tuned for future articles from me on Actions, Scripts, Batches and other tips and tricks of CS3.
echo $variable;
The post Photoshop CS3 and ACR (Adobe Camera RAW) Guide appeared first on Photoshop Online.
0 notes
Last Seen Blogs

casp-and-greg
Reisebericht von Casp & Greg

i-eat-directioners-for-breakfast
Easily Defeated By Bread

inurclosets
Inurclosets

jessmaybe
Jessmeow

whoranaroundtheworld
If music be the food of love, play on.