#This one is definitely looser in sketch form than some of the others but I’m honestly congratulating myself for that DFBJDGHNK
Text
Just as with watches, when you start diving into the world of shoes and boots, you get to discover all sorts of interesting brands that are out there, just doing their thing at the top of their game. What I’ve found interesting is that, looking across the boot reviews we’ve been doing, they’ve been quite different styles, and a variety of price points. Today, we’re moving into something a bit dressier with the Helm Boots Zind.
Since this is the first time we’re showing you Helm Boots on our pages, it’s worth it to dive into their history a bit. The Austin, TX-based brand started up in 2009, and has being going since then with a commitment to creating quality, versatile boots that will go for the long haul and work just as well in the workshop as they do in the office. And, with 14 master bookmakers at the benches, they’re hitting that mission. One of their visual identifiers is the white rubber midsole component, which provides a bright white line running around the sole (and something I rather dig). That’s the thumbnail sketch of what they’re about, and you can explore more about the brand on their site. Now, let’s move on to the boot.
While I did initially find myself drawn to the style of the Helm Boots Zind, it was when I began digging into the materials used that I found myself hooked. For starters, they use Horween Chromexcel leather which, along with being made in my hometown, is a leather that’s widely known to be high quality and long lasting. With the natural finish that our review pair came in, this is a leather that should pick up a lovely patina and just look great as it ages and wears. Past that, the construction of the boot is key. Here, they’re using a Blake Rapid Stitch construction. While not quite as well-known (or -used) as the Goodyear welt, it still makes for a boot that is able to be resoled. This is important in a quality part of boots (or shoes) as that means once you’ve got the leather broken in, you can wear them for decades with simply getting a new sole popped on. Another nice thing is that, with Helm’s resoling program, you don’t have to use the same sole the boot came with. Want to change it up, say, to a lugged sole? They can do that for you. You can also get just a basic resole (which will also replace the sock liner) or get into a full refurbishment of the boot. It’s a great commitment to your investment, and shows you the brand is definitely intending to be around. You can find more details on the resoling program here.
Before you need to worry about resoling anything, though, you first need to start wearing the boots. For this part, I did have a bit of trepidation when I first slipped on the Helm Boots Zind. It’s been quite some time since I’ve had to break in a pair of boots with robust leather, but I clearly remember how it’s gone in the past. Now, I’m not going to sugar coat it – you will be dealing with some aches and soreness as the leather breaks in and learns how to bend and crease to how your feet move. That’s actually a good thing with a quality, thicker leather as it will be formed to your feet, and be ready to last over the years. For my test, the two boots actually broke in a little differently.
A brief note on quality leather shoes – they are something you should really try to only wear every other day, at most, with shoe trees in them when not being worn. This helps the leather (inside) to air out from having your feet in them, and should help them last longer. When breaking in new shoes (or boots) that, of course, gives your feet a welcome break as well. For the first day out, I wore a thicker pair of wool socks, and then went to normal thickness after that. The left boot was feeling pretty comfortable by the third day of wearing it. For the right boot, though, I kept having this pinpoint of pain over my right arch. I tried adjusting the lacing, tighter, looser, and so on. Finally, I broke out the flashlight and felt around, and found a hard bit of adhesive near the base of the tongue that was the culprit (likely from attaching the liner). Took that out, and it was so much better. So, another two or so days, and I had a pretty comfortable pair of Zinds to stroll around in. One other quick “quality” note – I did notice a few lose threads on the double stitching. Nothing that made it seem like the boot was coming apart, but still some cleanup necessary.
The Helm Boots Zind are definitely a dressier profile than many boots, as a lot of boots these days seem to pull more from the workboot side of things. With the Zinds, you’ve got a narrower profile with the last, and that, combined with the smooth toe and slimmer soles just makes it feel a bit dressier. I’ve not tried these with a suit, but I think they could easily pull it off. What this means is that these boots are perfect for me for the office. They’re dressier to wear with a pair of khakis or slacks, but not totally out of the question to wear with jeans. You definitely have the dress shoe sound when you walk with them as well, given the fact that the heel is only half rubber (the other portion is leather), and it resonates through to heel into the floor.
The leather portions of the soles on the Helm Boots Zind do get scuffed up, but that’s to be expected. That will actually give you a little better grip, though there are good bits of rubber on there to help in that regard as well. Perhaps not for trail hiking, but for walking around the city, it’s perfect. And with the natural finish of our review pair, these are boots that should pick up a lovely patina over time (for those wanting a brighter color, there’s an orangey Teak color). This is a much different shade of brown than I’d normally go for (I tend towards chocolate browns) but I was surprised by how much I liked the natural tone. And of course, if you wanted to darken it some, that could be accomplished with some shoe polish, or even just some winterizing protectant (I find myself partial to Obenauf’s LP which has a lovely honey smell), or even just leather conditioning products. Other than basic clean and care, though, I’m curious to see how the leather colors and ages.
Speaking of color – it’s a good rule of thumb to match your shoes and belt, in terms of color. Well, you can pick a belt that’s the exact same as your boots, as Helm offers belts made from the same leather and finishing. I did notice that the belt was a touch darker than the boots, but given the separation between the two, it’s close enough for me. And, like the Helm Boots Zind, the belt should darken up over time a bit as well.
Thinking about the long-term longevity of leather products like this is something you need to do. Or, at least, you should want to. Why is that? While I think the pricing of the boots and belts are quite reasonable for what you’re getting, they’re not what you would call an impulse buy. The Helm Boots Zind carries a price tag of $399, while the belt (either wide or slim; we went with a wide) is $98. Now, if you sign up for their mailing list, you’ll get a quick $50-off code, so that’s a nice pickup there. If you’re used to picking up a pair of $40 boots from your local department store, the Helm Boots Zind are going to feel expensive. And they’re not inexpensive, but with the quality of leather and construction, along with the ability to resole them, means you’ll have a pair of boots that’s with you for the long haul (be sure to check out the gallery at the end of the article for a closer look at some of the detailing). It’s not unreasonable to expect that you’d get an easy 10-20 years (or more) out of them if you care for the leather. Which means, over time, a pair of boots like the Helm Boots Zind will actually be more affordable than buying a new cheap-o pair every year. Counter-intuitive, but it’s the basis of why you should look to buy the best quality you can afford at the time.
I’ve got other pairs of shoes that can be resoled, and one other pair of boots. So far, the boots (a pair of Red Wing workboots that I had from my time in glass plants) are the only ones I’ve had to resole, but it’s an interesting experience. You send your worn out boots off, and you get back ones that you recognize all the creases and scuffs in, but have had the leather reconditioned and the new soles in place. It’s a great way to really maintain your investment, and have a pair of shoes that are identifiably you, as they’ll reflect all the adventures you’ve taken them on. I can’t wait to see what these Helm Boots Zind look like a few years down the road. And with the slimmer, almost dressy profile to them, these are boots that will fit in across a wide variety of situations – suited or casual, warm weather or cool. In other words, a great go-anywhere, do-anything sort of a boot. Color me a fan of what I see coming out of Austin with Helm Boots. If you agree (or, if for some reason you don’t) let us know in the comments below, or over in our Slack channel. I’m just a sample size of one, so I am curious to see what others have thought as well. helmboots.com
Review Summary
Brand & Model: Helm Boots Zind (in Natural) and wide belt
Price: $399 ($98 for the belt)
Who’s it for? You are looking for solid everyday, all-around boot that will go the long-haul
Would I wear them? Undoubtedly!
The best thing about the boots: Along with the slimmer profile, I like the visual pop that you get from the white midsole
Watch they pair best with: The Helm Watches Vanuatu, naturally
Specifications from Helm Boots
SHELL: Full-grain Natural Horween Chromexcel® leather
LINER: Fully lined with black leather
STITCHING:
Blake Rapid Stitch welt construction
Black double stitch throughout
MIDSOLE: HELM signature white midsole
SOLE: Fineline sole for added grip and durability through all seasons
EYELETS: Antique brass eyelets
LACES: 46 in Brown waxed cotton laces
LAST: 415 lasted
SHAFT: 6 1/2 in.
WEIGHT: 2 lbs.
FEATURES
Handcrafted in the U.S.A.
Resoleable
Seasonally updated sock liner quote and tongue stamp
Reinforced leather pull tab
Kicking around with the @HelmBoots Zind Natural #boots #belt #mensstyle #mensfashion (@HorweenLeather) Just as with watches, when you start diving into the world of shoes and boots, you get to discover all sorts of interesting brands that are out there, just doing their thing at the top of their game.
1 note
·
View note
Text
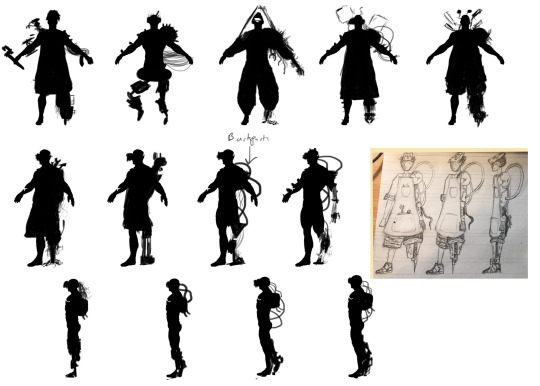
Character Design - Silhouette Designs
Since I’m not the most amazing drawer and tend to spend way too much time on the smallest of things, Jon suggested I should look into creating my character designs/sketches in Photoshop through the use of silhouette design. Instead of drawing the character fully out, all that I would be doing is adding props to an already existing mesh and creating character ideas and ketches this way. Having mention before I wasn’t the best at drawing, i was very willing to try this method out and give it a go to see if the process stuck with me.
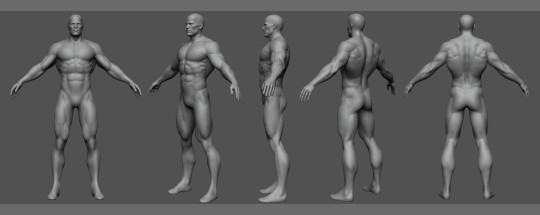
Firstly, I had to find some pre-made meshes for me to draw and place images on top of. From casually browsing on the internet, I found this really great turnaround online of the same mesh that’s in an ‘A-pose’. I found this to be just what I was looking for as I could cover all aspects of deign with this mesh at different angles. In addition to finding the perfect mesh for the silhouette ‘drawing’, I also made a library of different objects that I could use to build my character up from scratch weather that be using one object as the basis of a design or used as an extra detail. The images i’ve chosen are influenced from the mood boards I’ve previously made in the past for the character design project.
Mesh Turnaround
Images that i placed on top of the pre-existing mesh

Once my image library had been completed and the meshes ready, i then started to combine the props and human mesh together to create my weird and wacky character designs. To achieve a true silhouette image for some of these designs, I applied a black and white filter to them which I decreased the saturation creating a fully model which was very hand for me if i wanted a deign added on very quickly to the mdoel.
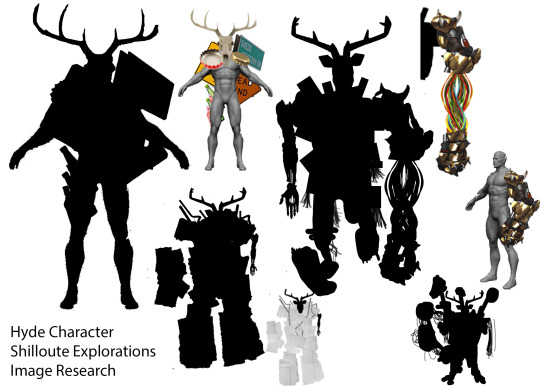
But enough of how i got myself ready to do the designs of the characters, the actual drawing and placement of these props was actually really fun to do as it was a very simple but really effective process if i wanted to get ideas out as quick as possible. Looking at the first shilloute sheet I made, it focused on the character Hyde due to him being the character I would love to model for hand in. Using the shilloute technique, his deer skull was an essential piece to his design being made up from natural debris and junk from my story as this posed as the menacing piece of his design. This si why he has items and materials like bottles, signage and general junk scattered across forming a beast like no other.
Through this process I noticed I wanted the skull to be a lot more hidden and cramped into the design of the character giving off the vibe this is a humongous character approaching you. in a lot of these designs I made on the first sheet, I had what each character was comprised of shape wise and how they were used to create a unique-looking character. Taking influence from Doomfist’s gauntlet form ‘Overwatch’ for one of my Hyde designs was a really good idea as it expressed who I might want to model a particular element for the character (like the fist and wires) as well as giving a vague representation of what it should look like. Knowing this fact, I began to be a lot looser in my design process because of it.
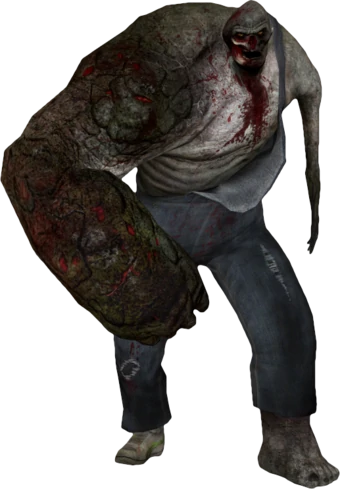
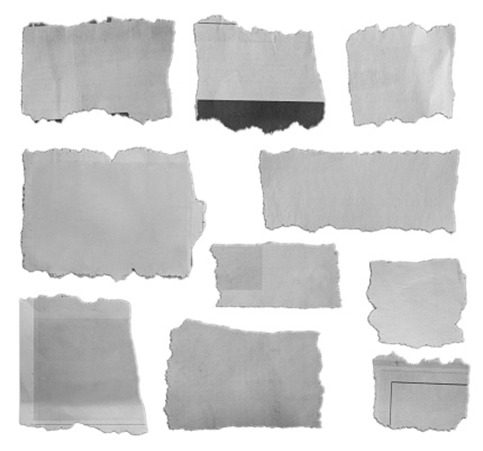
To further expand on my Hyde character’s design, I looked up paper scraps online to see a section of them clustered together. I thought because my Hyde character is very janky and uneven in appearance, these ripped up pieces of paper could emulate how the character will look if it was metal plates attached to him instead. Whilst the process was very tedious to do, I was really happy with the entire process as it really did capture what kind of character Hyde would look like if I was to sketch his silhouette out. Details like Jekyll’s arm being still show reminded me a lot of the Charger's character design (Left for Dead - Game) which is what influenced me to retain some of the Jekyll’s character into the design of him. In addition to the paper scrap method it influenced me to have his big mechanical arm separate fro, his body with only wiring connecting it. Although whilst I really liked this idea, I had to make sure it was a conventional design too as my Jekyll character as to fit inside him sorta snug and not detaching his limbs in the process. All these ideas felt like I needed to expand this particular character design.
Charger Character (Left for Dead - Game)
One slight issue I had when making any of the designs as soon as I got into the groove with it all, Photoshop kept on crashing on me or at least be really slow in placing my props onto the mesh meaning the process turned from really enjoyable to really tedious and tiring to make as across all three silhouette sheets I made, it took me quite the couple of days to make due to how badly my laptop runs Photoshop. Never the less, I still had to keep pushing on as the shilloute drawing is slowly starting to grow on me.
First experimentation sheet on the Hyde character
Ripped up pieces of paper to assemble the rough character designing of the Hyde character
Working from the paper based shilloute, I used the pre-made meshes that I found at the beginning and made 5 versions of them each specifically the front, side profile and the 3/4 angle meshes. This was to allow me to have a wide range of different ideas covering different angles of the character as they weren’t made to be consistent to all form one design all together. Because I found placing objects on top of the models to be really slow and tiresome for my computer, I thought I would create sketches using very loose sketches on my graphics tablet.
Starting off with the front facing first row of experimental sketches, one common theme I had here was to establish what the final design was going to be. Whilst this may seem really early tor try and find, it was because I could dedicate the rest of the angles to much more experimental sketches playing around the from and accessories that the Hyde character is attached too. One design aspect that you could probably already see in the sketches in the first row is with the feet as one foot is larger than the other. The way I’ve been able to communicate this I really like as it express the incompleteness that the chracter has in the world as one of my sub-themes for the story is that my Hyde character wants to be apart of human society but can’t due to his looks and always scary the city folk away.
Going back to the character design process, I like how I’ve played around with the different sizes of the leg shapes specifically with the fourth model as I love how beedy the left leg looks in comparison tot he right one which you can definitely also see in the first design I did for the Hyde character. Another aspect of the design I really like was the right arm itself as I already knew that the left arm was going to be Jekyll's own arm. So for contrast, I wanted his arm to be this huge ginormous figure that overshadows the tiny arm to emphaise the deadlier side of him.
With the second and third row of designs as previously mentioned before, these were a lot more experimental sketches to play around with poses or aesthetics that I want to add onto the already final design. I think the only takeaways from the second and third row of designs were the use of signage as I want a combination of pipes and signage to cover the back of the character as he patrols around the world fully expressing the mess he becomes off of Jekyll’s hatred in my story.
Second Shilloute Drawing Sheet

In addition to looking at Hyde, I thought I would look at using the same silhouette process in my Jekyll character working from my turnaround that I made before Christmas. Thinking about how I wanted to exapnd the character, it was mainly looking at how I could make the back look better as that was my only gripe with the turnaround for my Jekyll character due to not being too impressed with it. Through the sketches I made here, I really liked the idea for having either a portable spotlight that can emerge from the back of his back that can be used like a surgeon's light in a operation but for a mechanic. The other idea was to have a leathery school backpack to keep all his tools and spotlights in depending on the work he has to do. I think personally, I’m leaning more into the backpack design as it’s the most simplest and the easiest on the eyes for the turnaround if I was to end up modelling the character fully.
Third Shilloute Drawing sheet - Jekyll Character
Overall despite the process of shillouting these experimental character designs took far longer than expected as Photoshop really couldn't handle the process at all. I think it went rather successfully in terms of developing my ideas and coming up with new ones so quickly. I think if ti wasn’t for my computer acting up the way it has been since the start of January, I would proabley keep working in silhouette deign especially for the final sheets as they would look a lot nicer and prettier to understand.
0 notes
Last Seen Blogs

finirr
Probably as mad as the Hatter

nb-sides
Non-binary pride!!!

yvngthvgsclvb
khh vibes
artful-aries
✤ Welcome ✤