#also it works fine on mobile (ios) it's just desktop that's being weird
Text
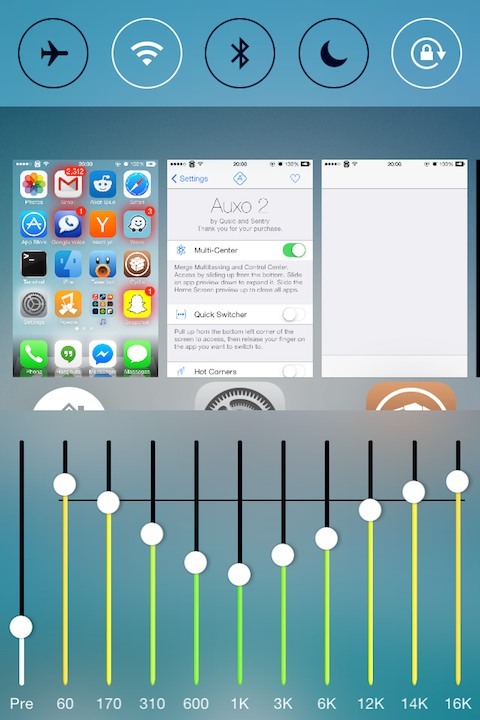
anyone having trouble seeing spotify links on desktop? i'm on mac and using chrome if that matters
#don't bully me for being a mac and chrome user i know it's cringe#i do need to switch to firefox tho just keep procrastinating#also it works fine on mobile (ios) it's just desktop that's being weird#soapbox
2 notes
·
View notes
Text
Spotify Equalizer Mac 2014

Spotify Equalizer Desktop
Spotify Equalizer Download
Spotify Equalizer Mac
EQ, or equalizer, settings are a very overlooked feature of the iPhone. If you’re not happy with the sound being delivered out of your built-in speakers or even through headphones or a third-party speaker, you can alter it using EQ settings.
Spotify is a digital music service that gives you access to millions of songs. Spotify is all the music you’ll ever need. Skip to content. Spotify Click the install file to finish up. If your download didn't start, try again. Bring your music to mobile and tablet, too.
Step 1: Open Spotify on either your Android or iOS devices. Step 2: Visit settings on your Spotify app and tap on “Playback.”. Step 3: Proceed to tap on “Equalizer” to open the Spotify.
I'm using AirPods on a daily basis combined with Spotify, which features a built-in equalizer on mobile so I can change the sound the way I want. My only regret was the absence of this feature on Mac, I just discovered this app called «EqMac». This is life changing if you're using high quality headphones for example.
There’s no true way to have the perfect EQ settings because everyone’s taste is different, but you can use the settings for either Apple Music or Spotify to customize sound to your liking. The presets adjust frequencies in sound that affect properties like treble and bass, and optimize them for your listening preferences and environment. So yes, adjusting EQ might be able to improve the sound coming out of your inexpensive or low-end speakers.
Adjusting EQ for Apple Music
Since Apple Music is baked into iOS, the settings to change EQ for your Apple Music playback (or just standard iTunes playback) is found in the Settings app.
So that was how you can get the equalizer for Spotify on Windows, and on iOS and Android. Though it’d have been better if it was available natively, this tool worked quite well in my tests. If Spotify admins are listening it would be nice to include a link to the mac app mentioned above in the March update post notifying the user community that this feature is.
Tap Settings and scroll down to select Music. Scroll once more to select EQ under Playback.
Free spotify 2018 premium. We hope you like the article on Spotify premium accounts free 2018, On behalf of my search related to Spotify, I can say that it is best songs and video streaming app. It has two types of accounts. First one is free and second one is premium. Free accounts have limited features. Spotify is a digital music service that gives you access to millions of songs. Spotify is all the music you’ll ever need. Listening is everything - Spotify.
Apple doesn’t let you fine-tune EQ settings for music playback in the same way Spotify does, so instead you’ll have to choose from one of the presets. (Though on your desktop, you can also customize EQ for each individual iTunes song.) The presets are crafted based on the genre of music best suited for that particular sound arrangement. EQ is off by default, but your choices are:
Acoustic
Bass Booster (makes the booming lows more prominent)
Bass Reducer (makes the booming lows less prominent)
Classical
Dance
Deep
Electronic
Flat (overrides any preset iTunes setting in favor of flat frequencies)
Hip Hop
Jazz
Late Night (turns down typically loud sounds and boosts quiet parts; ideal if you’re at a distance)
Latin
Loudness
Lounge
Piano
Pop
R&B
Rock
Small Speakers
Spoken Word
Treble Booster (makes the highs more prominent)
Treble Reducer (makes the highs less prominent)
Vocal Booster
Tip: Before settling on one that seems most appealing, play one of your favorite songs — something you think largely represents your music collection. Then while the song is playing, start switching through the different EQ settings to get a feel for which one complements the song sound best.
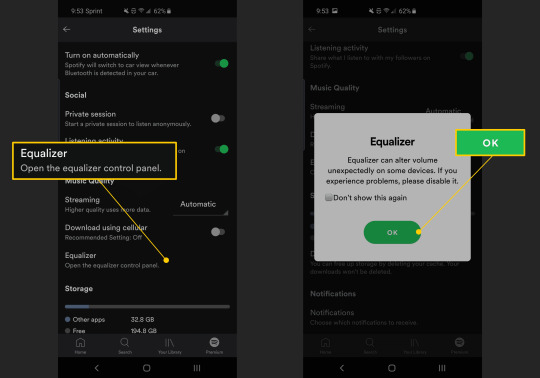
Adjusting EQ for Spotify
To adjust the EQ settings in your Spotify app, tap the Menu icon on the top left. Then tap the small Settings icon next to your name. Choose Playback and finally choose Equalizer.
Spotify features all of the same EQ presets as the iOS Settings except for Late Night. (See above for those options and some explanations.) But unlike Apple’s options, Spotify also includes a visual equalizer that you can drag to your liking.
Spotify Equalizer Desktop
A word on frequencies: all you really need to know about them is that the lower the frequency, the lower the sound that knob will control. For instance, the 60Hz and 150Hz controls on the left will primarily work the bass, so dragging up will increase the bass sounds and dragging down will decrease. On the other side, the 2.4KHz and 15KHz frequencies surround the treble, or highs.
If you aren’t happy with any of the presets but still want to turn on EQ, once again I recommend playing one of your favorite songs. While it’s playing, start dragging the different frequencies up or down to see what you like best.
READ ALSO:How to Experience Hi-Fi Audio on Your Mobile Device
The above article may contain affiliate links which help support Guiding Tech. However, it does not affect our editorial integrity. The content remains unbiased and authentic.Also See#Apple Music #iphone
Did You Know
Oppo used to make portable media players before they ventured into the field of mobile phones.
More in iOS
Top 5 RSS Reader Apps for iPhone
Spotify is gaining popularity at a very fast pace and I would not be surprised to know if it has completely replaced the default music player on your desktop and smartphones. But one thing that I am sure you might be missing on Spotify is a sound equalizer.='grcorrect'>
Sound equalizer is one of the very basic features of a music player but still after tons of updates, it continues to remain absent on Spotify. However as Steve Jobs once told, “There’s an app for that”, so today I am going to show you how can get sound equalizer for Spotify across all your devices using third-party software/apps.
First let’s have a look at how we can get the equalizer for Spotify on Windows.
Spotify Equalizer for Windows='grcorrect'>
Getting the equalizer for Spotify on Windows is simple enough. All you need to do is to download and run the installer of Equalify and install the package. The installer can be run without the admin access but then you will have to provide the path to Spotify Windows user profile manually. Running the installer as administrator will take care of that on its own.
After the application is installed, restart Spotify. You will not notice any change until you play the first song after installing the package. Once you have done that, you will see a small EQ button next to the search box.
Click on the button to expand the equalizer. You can now edit the bands manually or choose from one of the many presets available. The option to save a manual setting is also available.
Note: If your sound card configuration supports sound enhancements, you can use it to modify any sound that’s coming out of your speakers or headphone. This can help you not only with the Windows Spotify application, but also the web based player that Spotify has started rolling out.
After configuring it on Windows, let’s now have a look at how we can get the similar feature on Spotify app for Android and iOS.='grcorrect'>
Spotify Equalizer for Android and iOS='grcorrect'>
When I was doing my research work for this article, I came across many online posts which claimed that Spotify introduced the equalizer feature in one of its latest app update on Android. But when I tried it on my own, I didn’t find the feature. Further when I read the comments, it seemed that I was not alone whose app was missing it. Best couch to 5k app that works with spotify. But now I know a way we can get it working and that’s by installing the Equalizer app.
Spotify Equalizer Download
There are many equalizer apps available for Android that can modify the sound, but the best thing about this eponymous app is that it integrates seamlessly with the Spotify app. Spotify tool apk. After you have installed Equalizer, navigate to Spotify settings and select the option Sound settings. Once you select the option, the equalizer app will open up and you will be able to change the sound settings. The app comes in both free and pro versions, and the only limitation of the free version is that you cannot save the manual settings you do on the equalizer.
Surprisingly the iOS version of Spotify has a built-in equalizer but there’s no button or option using which you can access it. To open the equalizer you will have to draw a weird gesture while the song is playing and it’s very hard to explain that in words. This video should do a better job of it.='grcorrect'>
Don’t worry if you don’t get the equalizer in the first few attempts, I too failed quite a few times before I got it working. This built-in equalizer is very basic and lacks presets and the ability to create one manually.
Conclusion
So that was how you can get the equalizer for Spotify on Windows, and on iOS and Android. Though it’d have been better if it was available natively, this tool worked quite well in my tests. Try it out and enhance your music listening experience on Spotify.
Top Image Credits: fcstpauligab
The above article may contain affiliate links which help support Guiding Tech. However, it does not affect our editorial integrity. The content remains unbiased and authentic.Also See#music #Software
Did You Know
The Apple Watch lets you stream music even if you don't have the phone with you.
More in Android
Spotify Equalizer Mac
5 Best Gallery Apps With Hide Photos Option for Android
0 notes
Text
Essential Equipment For Online English Teachers
When starting any new job, it’s normal to worry about what supplies or equipment you’ll need in order to successfully do your job. Luckily, as an online English teacher, you won’t need a ton of specialized tools or resources.
I’ve been an online teacher with VIPKID for 3 years now and have mastered my online classroom! In this post, I’ll break down exactly what equipment you’ll need and how to choose the best supplies and resources for teaching online.
Must-Have Technology For an Online Classroom
If the name didn’t give it away, your new job as an online English teacher will involve a bit of technology. Though there is some variation between companies, you’ll definitely need a teaching device such as a laptop or tablet, a headset with a microphone attachment, and a strong internet connection.
Here’s a list of the must-haves.
Laptop Or Tablet
For most online ESL companies, having a relatively new desktop or laptop computer will be sufficient for online teaching. Some companies like VIPKID will allow you to teach from an iPad. Companies such as Palfish even let you teach from your smartphone.
No matter which device you’re using, make sure you’ve updated your operating system. On a laptop or desktop, you’ll need to use at least Windows 7 or Mac OS 10.x. You’ll also need to make sure you’re running the latest version of Flash.
HD Camera
Most modern computers have a built-in HD camera that will work just fine for your online English classes. If you’re using an older computer or a desktop without a built-in camera, you’ll need to buy an HD External camera so your students can see your face and teaching resources — in focus.
Click here to compare costs and brands of HD Cameras on Amazon.
Headset With Microphone
All online teaching jobs will require some kind of headset with a microphone attachment. This is because teaching without one can cause a weird echo sound for you or your students. This is distracting and should be avoided.
Some companies are particular about their teachers using over-head headsets, but other companies are more flexible.
With VIPKID, I’ve used Apple earbuds and a regular headset from time to time. I typically use the regular headset when I’m home and the Apple earbuds while I’m travelling. So far, I haven’t had any problems with the sound.
Click here to compare costs and brands of headsets on Amazon.
☞ SEE ALSO: Working As A VIPKID Teacher: An Insider’s Review
Internet Connection
If possible, you’ll want to make sure you have an internet connection of at least 20 megabytes per second (Mbps) for teaching online. This is recommended by most online teaching companies.
I’ve been able to teach successfully on less than that when absolutely necessary, but slower speeds can cause lags. It’s harder to have a conversation with a student when there is a delay, and you could get in trouble with your teaching company if the delays are significant.
Teaching at slower speeds can be stressful, so aim to teach with 20 Mbps of internet speed if possible.
You can check your internet speeds on websites like speedtest.net. When you use the speed test website, look at the download speed section. Don’t worry if your upload speed is much lower than your download speed. That’s normal. Also, a low ping score is a good thing!
Ethernet Cord And Adapter
One way to improve your connection while teaching is to use an ethernet cord. An ethernet cord will allow you to connect directly to your router and reduces the risk of internet connectivity issues. When I’m not travelling, I try to always use an ethernet cord.
It’s important to note that some newer laptops don’t have a designated ethernet port. If this is the case for your laptop, you’ll need to purchase an adapter to plug in your ethernet cord.
Click here to compare costs and brands of ethernet cable adapters on Amazon.
☞ SEE ALSO: Teaching English in China: Get Paid $2,900 / Month
Backup Internet Source
Even if you’ve set up your technology perfectly and have the fastest internet money can buy, sometimes things happen that are beyond our control — especially when you’re travelling and teaching abroad.
The power goes out. A storm comes through and rattles the internet connection. Your router just stops working for no apparent reason. You forgot to pay the WiFi bill…
When that happens, you’ll be so thankful you have a backup internet source.
The easiest way to get connected in a pinch is to use a hotspot from your mobile phone. Make sure you have a plan that allows you to enable a hotspot and a few gigs of data available. In general, you can teach about ten, 25-minute video classes on 1GB of data.
When the WiFi isn’t strong enough, or the power is cut, go to the settings on your phone and turn on your hot spot. Then go to the internet icon on your computer and click it so you see the different options. You should see one called “[Your Name] iPhone” or something similar. You can now connect to this hotspot just like you would any other WiFi network.
What Equipment I Use For Teaching With VIPKID
According to the VIPKID official website, they require:
Computer: Desktop, Laptop, Mac, PC, or Surface Device
Camera: HD Integrated Camera or HD external Camera
System: Windows7 or higher, Mac ios 10.x or higher, latest version of flash
Internet: At least 20 Mbps, ethernet cord recommended
For VIPKID, I use:
Computer: 2015 Macbook Pro with Mac OS Operating System
Camera: Built-in HD Camera that came standard on my Macbook
Headset: Apple Earbuds or MPow headset
Internet: Ethernet cable when I’m home, WiFi when I’m travelling, Mobile HotSpot for back up
Looking For Teaching Jobs?
If you’re from Canada, the United States or the UK, there are some excellent companies that you can work for. Earn $22 per hour, and in some cases, teach from anywhere in the world!
For Americans and Canadians, VIPKID is by far the best option for you if you want to earn good money and have the freedom to work outside of your home country.
If you don’t mind living and working in Canada or the USA, Qkids is another option. For UK citizens, EF Education First is a great bet! For all other native English speaking countries, check out our article: Teach English Online – Get Paid With These Top 7 Companies.
How To Make Your Online English Classroom Comfortable and Professional
You have the technical gear, but how do you put it together into something that resembles a classroom? In this section, I’ll talk about what you need to make your classroom comfortable and professional looking in no time.
Desk and Chair
Since you’ll be spending a lot of time in your online ESL classroom, it’s important to have a comfortable space. A desk and quality desk chair will save your back and shoulders during long teaching stints.
I love teaching from a desk with plenty of legroom and a chair with proper back support.
Lighting For Your Online English Classroom
Having good lighting is a critical part of online teaching.
Lighting allows your students to see your mouth movements. This is critical to language acquisition. Good lighting makes your classroom looks more professional. It also allows students to see your teaching resources when you’re using them.
To get good lighting, you have a few options:
Overhead Lights And A Desk Lamp: One easy option is using the overhead room lights as well as a desk lamp for teaching. Make sure to put the lamp directly behind your computer with the light pointing toward your face.
This prevents shadows on one side of your face. If you have a white lampshade, this also helps soften the light on your face, giving you a more natural look.
Selfie Ring Light: If that’s not enough, you can use a selfie ring light that can clip on to your laptop for additional lighting. Selfie ring lights are usually rechargeable and offer a ring of bright white light for several hours at a time. Clip one of these portable teaching lights to your laptop for extra bright lighting in a pinch. Compare brands and costs on Amazon here.
Professional Photography Lights: If you want something of higher quality, You can also use freestanding lights designed for photographers or videographers.
Just type YouTube lighting into Amazon and you’ll see plenty of kits that are more than enough for your online teaching needs. You’ll see halos with different color filters, photoshoot-ready soft lightboxes, and bright white lights with umbrellas to soften the glare.
With options like these, you could go as simple or complex as you want.
Full disclosure, I’ve never used anything this luxurious in my own classroom and it’s never been a problem. If I had a more permanent classroom area, I’d consider using some of the softboxes as the ring light can be too harsh after a few hours.
That being said, I’d only recommend using this kind of lighting if you have a larger classroom area and won’t be moving your classroom set up often. Trying to relocate a large lighting rig every few days would not be worth the slight improvement in light quality.
If you plan to travel while teaching, definitely stick to the ring light.
☞ SEE ALSO: Teaching English in Japan – A Guide To Finding Jobs
Laptop Stand
Proper posture is the key to feeling good during your lessons. A laptop stand puts your computer at a better height so you sit up straighter and put less strain on your back.
I’d recommend a laptop stand for anyone who works on a computer because it reduces the need to hunch over.
A laptop stand is also an awesome resource if you plan to teach and travel as it allows you to put your computer at the proper height no matter what your desk situation is.
Click here to compare prices and brands of laptop stands on Amazon.
☞ SEE ALSO: 15 Pros and Cons Of Being an Online English Teacher
Educational Resources For Online Teachers
Now that you have the technical basics down, it’s time to get creative! As an online English teacher, you have the unique challenge of making your lessons interesting and engaging through a tiny screen.
Especially if you’re teaching young children, your classroom should allow you to explain difficult concepts in a way that’s fun and effective — otherwise, your students will lose interest, quickly.
Classroom Background
Your classroom background is a great way to get creative and show your students your personality. While many companies are fine with you just having a blank wall behind you while you teach, other companies prefer that you have something kid-friendly and academic behind you.
No matter what, you want your background to be clean and non-distracting. It should enhance the class rather than detract from it. You shouldn’t teach with your camera showing a room in your home behind you as this can be very distracting for students.
For classroom background ideas, here are a few of my favorites that I’ve used over the years. All of these can be hung with command strips and poster putty.
Paper World Map: You can reinforce the corners with tape to allow for multiple hangings
ABC Posters and Other Academic Classroom Signs: These can often be found in the dollar store or at school supply stores
Shower Curtain: Pick one with something kid-friendly on it, like world flags, animals, ABC letters, etc.
Felt or Fabric Backdrop: Attach felt letters to a large piece of fabric to welcome kids to class.
Decorated Poster Board: You can use markers, paints, and other crafting supplies to make a unique poster board background.
If you plan to make your own classroom decorations, you can include things like the name of your teaching company, your name, and phrases like “Welcome to Class.” Click here to find some teaching supplies and ideas on Amazon.
3D Props
While you don’t need a lot of bulky teaching items, you should plan to have a few 3D props in your bag for teaching online. My most useful 3D props are:
A small dry erase board and markers
One large puppet or a set of small finger puppets for demonstrating conversations (I have a set of ten small finger puppets from IKEA and they are amazing)
A set of ABC Flashcards
2D Props
While relying on too many 3D props will clutter your classroom fast (and are more difficult to travel with), 2D props are another story. 2D props are my bread and butter.
Making them is simple. Either draw or find pictures of images you’d like to use in your classroom, print them out, and laminate them so they’re durable. I usually have the following 2D props:
Flags for the USA, Canada, and China (adapt this to match the nationality fo the students you teach)
A picture of a family
Pictures of different foods
Photos of nature and national monuments around the world (for example, a beach, mountains, the Great Wall of China, the Statue of Liberty, etc)
Pictures of different clothing items
2D props are awesome because they don’t take up a lot of space in your teaching area.
When I’m home, I organize my pictures in a little set of drawers on my desk. By labeling each drawer, I can quickly grab the props I need during a lesson without disrupting the flow of the conversation.
When I’m travelling, I have a Ziploc bag for my laminated pictures. Since all the pictures are jumbled in there together, I have to pick out which props I’ll need at the beginning of my workday.
When it’s time to travel, the bag of pictures is easy to pack and it slides in right next to my laptop, taking up essentially no extra space.
To determine exactly which 2D props you should make, keep a note pad next to your computer while you teach for a few days. Whenever you teach a concept and think “hmm, I’d like to have a picture of that” make a note on the note pad.
After a few classes, you should start to see some themes emerge for concepts that would be easier to teach with a visual aid.
Rewards
If you’re working with children, classroom rewards can be a fun way to keep kids interested in the lesson. I started using rewards with my youngest learners.
When they did a good job, I would add a heart-shaped sticky note to my whiteboard. At the end of class, we would count up how many sticky notes they earned. It was simple, but it worked.
Over time, this evolved into more complex games and more exciting rewards, but the concept stayed the same: give students something external to look forward to during class and use this as a way to reinforce good behavior and progress.
If you’d like to incorporate rewards into your classroom, start with something simple like sticky notes or little erasers or stickers.
☞ SEE ALSO: 10 Things To Know Before Becoming an Online English Teacher
Tour My Classroom!
After talking through all the online teaching classroom requirements, let’s see how this looks when put together! I’ll talk you through two of my classroom setups over time to give you some ideas of what yours can look like.
Admittedly, my classroom for online teaching is a little pared down because I usually throw it into a backpack and travel. Still, I have used some more stable elements when teaching from home so I’ll show you both.
My Home Classroom
In my home classroom, I sit at a table with my back to the wall. On the wall behind me, I have a world map and a welcome banner for decorations. I use my 2015 MacBook Pro for my teaching device with the built-in camera and either my Apple earbuds or an over the ear headset.
For lighting, I use the overhead lights in the room as well as the selfie ring light to make sure my face is nice and bright. I have my laptop on a laptop stand so I don’t have to hunch over. Using a variety of 2D and 3D props like the ones pictured keep my students engaged.
My Travel Classroom
I took this picture while travelling and teaching online. Since I was staying in a hotel room, I didn’t have a proper desk and chair to teach from. In this arrangement, I used an end table as my teaching surface and sat on the floor with pillows for support. Behind me, I used a piece of felt that I decorated with felt letters and ribbons.
For lighting, I used a lamp I found in the room set up behind my laptop. My Apple earbuds worked great for travelling since they packed down small. I used my laptop without a laptop stand because the table was high enough as it was.
As you can see, I prefer to use 2D printable props while travelling so they don’t take up so much space in my bag. I’ve got a small dry erase board and a few helpful printables ready to go beside my teaching space.
When To Set Up Your Online Teaching Equipment
Ideally, you should have your classroom set up before your first interview with a prospective online teaching company. I totally understand not wanting to go out and buy a ton of gear just for a job interview, but you have the best chance of getting hired if you have all your equipment ready in advance.
Plus, many of the props and resources you’ll need can be made yourself or purchased from the Dollar Store or some other affordable shop.
Before you do your online ESL job interview, you should have
Your laptop or iPad teaching device
A headset, either earbuds or an over-the-head version
Good lighting
A classroom background
Teaching props
Reliable internet connection
Most companies are looking to see that you meet their requirements from the get-go. You have a much better chance of getting hired if you can show that you have the right gear and a strong enough connection for teaching.
You don’t have to go too wild with it. No need to convert your guest bedroom into a full-fledged educational experience. But you should make an effort to show that you’re ready to teach as soon as possible.
Before you fill your shopping cart on Amazon, take a look around your house and see if you can find things that will work in your classroom. This is especially helpful for finding props and teaching materials. I taught my first month of classes with a dog toy as a prop, no questions asked.
Final Thoughts
By taking some time upfront to gather the best equipment for teaching English online, you’ll have an easier time getting started with your awesome new job.
For the technical aspects, give your devices a tune-up and make sure you have good video, audio, and reliable internet no matter where you teach.
For the more creative aspects of your classroom, you’ll have some flexibility. You can choose to go more minimalist with a plain wall and simple dry erase board as your prop, or unleash your inner artist and create your own classroom masterpiece.
Look around your house, take a field trip to the Dollar Store, or break out the markers and draw some teaching visuals. The sky’s the limit.
At the end of the day, you’ve succeeded if you’ve created an environment free from technical mishaps where students can learn and can have fun doing so.
I hope this article helped to give you some good ideas for teaching resources and equipment. If you’re an online English teacher, what did I miss? Which props do you use? Leave a comment below!
Images in this article are courtesy of Shutterstock — a top website for finding royalty-free photos and videos.
The post Essential Equipment For Online English Teachers appeared first on Goats On The Road.
Essential Equipment For Online English Teachers published first on https://travelaspire.weebly.com/
0 notes
Link
Let's see here...the first major thing I have to write about is foobar2000!!!
I'm perhaps ages late to the party (?), but I've finally taken the plunge and switched from using iTunes to foobar2000! This was not a decision I took lightly, but I decided to pull the trigger after working with foobar2k and considering the pros and cons, and I've been pretty satisfied so far!
Foobar2000 is a free windows-based audio player that is known for many for its customizability, advanced features, modular design, and basically being the dream of anyone who is not scared of complexity and wants to really have their music player function the way THEY want. It's also available for OSX as of ~1.5 years ago, though I have not tested that build yet.
Perhaps more importantly, foobar2000 now (as of ~a year ago I think) has a mobile client, available for all of iOS/Android/WindowsPhone. This is key as one of the primary things tying me to iTunes has always been the fact that my ecosystem includes a lovely iPhone SE running iOS and of course I'd really like to have my music readily available on that.
Right, so let's first talk about the things I'm losing during the move to fb2k:
First off, syncing music to iOS is a bit more involved. Unfortunately, foobar2000 has no way of directly interfacing with the iOS media library, so instead you write music to the foobar2000 app's sandbox and only fb2k can access it. There is no "automatic" way to do this, but fortunately the iOS fb2k app includes an FTP server that you can use to transfer files via FTP. This is as far as I can tell the best way to transfer music to fb2k mobile as you can't access the foobar2000 app sandbox directly (without jailbreaking your phone).
Of course there's no built-in "sync management" like there is with iTunes, so instead I first use foobar_onewaysync to copy out the relevant playlists (and their associated music files) to a temporary directory, then use WinSCP to mirror that on the iPhone over FTP. So like I said, this is "a bit more involved", but now that I have that flow set up it's as simple as running those two commands and waiting for them to complete.
Like with all things in foobar2000, I have so much more =confidence= in what is happening here with the sync. There would be all kinds of uncommon weird annoyances back when iTunes was in the picture -- you'd find it transferring old files again and again (why?), you'd find that certain songs were missing and showed up on the device but weren't actually playable (why?), you'd find that every time you did a sync one of your playlists mysteriously duplicated itself (why?). I think a recurring theme so far with foobar2000 is that you have to spend some effort setting up your workflow for doing certain things, but once you do, it Just Works.
The REAL main thing I'm losing during the move to fb2k is actually a significant one: it's bluetooth media browsing via the AVRCP protocol. In other words, browsing music via my car's on-board display (or through the controls on the steering wheel). I can still trigger playback and track skips via bluetooth, but any attempts to browse the tracks/playlists/etc from my car's bluetooth interface will result in it looking at the native iOS music library, which is now empty (as all of the music is in foobar2000). This is actually a pretty major loss as it means that I can't really fire up a music playlist in my car unless I'm parked or stopped for a good minute, as I have to actually do that browsing on my phone itself.
As far as I can tell there's no real way around this. foobar2000 used to have an iPod management module but that is looooooooong defunct and iOS tends to be very closed off in terms of these sorts of things anyways. The only way I could really get this functionality back would be to bring iTunes back into the picture, and then use iOS music as my mobile app while still using foobar2000 as my desktop/laptop music player. We'll see if it comes to that, but I don't think it will. foobar2000 mobile is a better media player anyhow, and I don't see an efficient way to sync from foobar2000->through itunes->to the iOS device for anything more than maybe a single playlist.
That being said, what I'm =gaining= in the transition to foobar2000 feels well worth the loss so far:
- A =working= ReplayGain implementation! I now use replaygain to play music at adjusted volumes for normalized listening. iTunes has a proprietary "Sound Check" feature that is supposed to do this but completely fails on VBR-encoded files. This is super useful for social dance DJing in particular as having normalized (normalized as in equal perceived loudness, not as in peaking at 0dB) volumes is pretty important.
- I've customized my UI to include a clickable waveform display that shows the current song progress and can be clicked to seek to any point in the song. Super useful for visually seeking to a given point in the song!
- The ability to work with ID3 tags and file metadata in a very fully-featured and rich way. Want to convert all ID3 tags to ID3v2.3? Want to batch-append a genre or grouping tag to 500 songs? fb2k can do it all!
- The ability to ensure that your media library's files are organized correctly and robustly. iTunes of course attempted to do this automatically, but it wasn't customizable at all and there were a lot of times when it would come up with filenames and/or paths that seemed a little....off. fb2k gives you the option to organize your paths however you want and will give you a preview of what files need to be moved where before actually reorganizing everything.
Anyhow, that's sort of been an ongoing pet project of mine, but I'm basically done with the switch now and have been enjoying not only the new functionality but most of all the peace of mind and robustness that fb2k offers.
=====
Alongside that big customization project, I also spent quite a while looking at mechanical keyboards and finally decided to get myself a pink Filco Majestouch 2!!! I first started thinking about buying a new keyboard when I saw the Razer Huntsman Quartz Pink edition, but after some research I figured that I'd probably be much happier with a less "consumer-y" brand and decided on the Majestouch 2.
Just look at that beauty! It's possible I might replace the keycap color scheme with something a little more exciting in the future, but I'm happy to just try going with the all-pink for now. I decided on Cherry MX 'brown' switches, as I'm not a huge fan of the infamous clickety-clackity noises of the blues, and I'd still like some tactile feedback (so not going with the reds). I also decided to go with a "TenKeyLess" size -- you'll notice that it has the arrow keys and home/end/printscreen/scrolllock/etc but no numpad. Having full arrow keys around I think is still very useful and necessary but I think I can actually live without a numpad as there are only really a few cases where I really use it and I think the prospect of having that additional desk space freed up (and having the mouse be closer to the keys) is pretty exciting. (if I REALLY miss the numpad I could always buy a standalone numpad, but I get the feeling I really won't miss it that much)
Anyways, that should theoretically arrive in a couple days -- super exciting!!!
I've also already gone ahead and got a Quartz Pink Razer Basilisk to go along with it:
Unfortunately for getting an aesthetically-pleasing pink mouse there are wayyy fewer options than keyboards, so it was pretty much between this and the pink Razer Lancehead (which has a symmetrical design), or perhaps a pink Zowie mouse, but that seemed to both look worse and have a worse scroll wheel/etc. (despite being lighter/etc). Razer's Synapse software is.....a bit shady to say the least, but unfortunately that is an evil I ended up having to swallow for now.
On the plus side, the mouse itself is working great. I was previously running a Logitech MX Revolution and this mouse feels more sensitive/smoothly responsive, and the control mapping is actually a step up as well. There's an optional thumb trigger (they give you two different sizes!) that you can use as a modifier to give yourself a whole other set of mappings, so for example thumbswitch + mouse wheel up increases my volume, thumbswitch + mouse middle click triggers a pause/play in whatever media player is open, etc. The media controls also work better than that of Logitech's -- no annoying onscreen display and it is also pretty intelligent about looking for media players to send the command to. I miss having the scroll wheel free-spin function, but I'm fine living without it to be honest.
No bluetooth version so I'm back to having a cord, but I don't actually find myself minding that too much either. Plus, it's got two multicolored lights (one in the scroll wheel and one on the logo display) and I have them set up to react to whatever audio is playing from my computer, which is pretty spiffy as well. If I wanted I could have gotten a keyboard that also has fancy backlighting (basically the corresponding Razer model) but I really didn't consider that a priority, so just the mouse lights will have to do.
Oh, related to mice: I downloaded Smooze for OSX and am happily using it for one thing and one thing only: disabling scroll wheel acceleration! I'm not super against scroll wheel acceleration in theory, but in practice the way OSX handles scroll wheel acceleration for mouse has just never seemed to be sensible for any mouse I've used (maybe it's different for an actual apple mouse). Now that I've completely disabled it, I can go back to sensible scrolling, yay!!!
=====
In other news, our game Goodnight Meowmie has gotten quite a lot of attention since I posted it on itch.io, which is really great to see, especially because I feel like this is the most significant game I've ever worked on. It's gotten about 2.5k views on itch since I threw it up there, which is pretty amazing. It's also been really cool watching people's video playthroughs of it on youtube, seeing their reactions and interpretations of the game. It really makes me feel like we did something worthwhile, that we were able to reach out to people and have them listen to our story, and perhaps take it to heart.
=====
In other other news, I'll be DJing at Friday Night Waltz this Friday! Be sure to come out if you're in the area, it's gonna be great!
Life has actually been going pretty fantastically lately -- this weekend was a lot of fun, between FNW, spending time with good friends, and just being in a good place. I feel as if I'm not losing my attachment with the past because of it either. Things are really good right now.
0 notes
Text
25 secret WhatsApp tricks you (probably) didn't know about
Byline
Elissa Loi
25 secret WhatsApp tricks you (probably) didn't know about
There are over a billion WhatsApp users worldwide right now. The bad news? Your mum has already found her new favourite way to spam you. The good news? You can easily avoid her on the down-low, and that’s just one of the messaging service’s many secret tips you probably don’t know about.
From disabling its ‘last seen’ feature to bookmarking messages you don’t want to forget about, there are loads of tricks to make your favourite IM app more useful than ever. You just have to be in the know.
Luckily enough, we’ve scoured every inch of WhatsApp to gather up its most useful features. Read these top tips and you’ll be a pro in no time at all.
We've rounded up some top tips for everyone's favourite instant messaging service
Add to video view
1. Begone, blue ticks of misery
We know how it is. You're at figure skating practice, your phone buzzes, and you glance down briefly before nailing a spectacular triple axel.
Clearly, you've not got time to respond immediately. But at the same time, you don't want the sender to realise that you've already looked at the message, lest they think you're ignoring them when you fail to reply for two more hours. That's the privilege the blue ticks take away.
Recently though, the chat app has realised the error of its ways and silently come up with a workaround. The liberty of message-mulling is ours again.
How: Users can just access Privacy via Settings and disable Read Receipts. There, now it's time to iron out the kinks in your friendships that the blue ticks have caused.
YOU MIGHT ALSO LIKE
The 35 best things on Netflix right now
2. Figure out your BFFs
What’s the difference between a casual acquaintance and a bezzie mate for life? How often you message them on WhatsApp, of course. If you’re not sure how to divvy up the members of your social circle, then why not check how often you’ve messaged them.
How: Head to Settings > Data and Storage Usage > Storage Usage and you’ll see a list of your most important groups and contacts ranked according to the data you’ve expended on their behalves. Ah, the romance of modern living.
3. See when your messages are read
Think the double-blue ticks are the worst thing to happen to relationships since Tinder? Think again. Here's another way you could annoy your loved ones.
In addition to finding out the exact time your messages are delivered, you can also choose to see the exact time your message was read (assuming you choose to stick with the ticks).
How: Go to any of your WhatsApp chats, tap and hold on any of the messages you’ve sent in that chat, followed by the Info option. For iOS users, you can also drag towards the left to reveal a window which will show the time your message was delivered and subsequently read.
It works for group messages too, with the window listing the time each participant read the message.
YOU MIGHT ALSO LIKE
Ten-and-a-half weird things you won't believe Apple made
4. Hide your profile pic
Batman. David Bowie. Pepe the Prawn. All people who have built their much-vaunted careers on an air of mystique and otherness. You can bet they’d have their WhatsApp profile pics set to private, instead of treating the world to a bedraggled photo of them and a bottle of Lambrini. So, as the saying goes, always be yourself unless you can be like Batman.
How: Head to Settings > Privacy > Profile Photo > Nobody.
5. Mute group chats
We’re all in at least a few group chats at any one time, created because someone (likely the group admin) was bored. People tend to get overzealous in chats, especially since WhatsApp allows group conversations of up to 50 participants. Who hasn’t woken up to the horror of 100+ unread messages fuelled by a night of boredom?
How: To prevent yourself from being woken up by the constant lighting up of your smartphone screen, you can (a) either flip your phone over and ignore it or (b) mute the offending group chat. Tap on the group chat of your choice, then the name to bring up Group Info where you will find the option to Mute the chat for eight hours to one week or a year. Alternatively, you can exit it altogether.
YOU MIGHT ALSO LIKE
The 20 best kids TV shows and films on Netflix
6. Get shortcuts to conversations
If there are certain people you chat to more often, it might be a good idea to create a shortcut for them directly on your homescreen, so you don’t have to keep opening and closing WhatsApp.
How: Tap and hold on the chat (group or individual) of your choice and a tab will pop up. Select the Add Conversation Shortcut option and the chat in question will appear as the person's profile photo on your mobile desktop. Unfortunately this only applies for Android users and not iPhone ones. Sorry guys.
YOU MIGHT ALSO LIKE
The 35 best free apps on iPhone and iPad
7. Find out the truth about where your friend is
We've all been a victim of that “on the way” lie when the person in question is still in bed. To prevent yourself from ever getting duped again, insist that the contact shares their current location with you by tapping on the arrow icon next to the text box and then Share Location. There's also a way of preventing them from manually entering their location...
How: The way the location appears is a clue. If it’s a real GPS-based location, the location share will appear as a dropped pin, but if it’s a location they entered, its address will appear beside the dropped pin. Feel free to call them out on it.
YOU MIGHT ALSO LIKE
I swapped my Nexus for a cheap Chinese smartphone - and won
8. Go incognito by switching off 'last seen'
WhatApp’s ‘last seen’ feature is a nightmare for anyone with self-esteem issues.
‘Why are they online and not replying to you right now? Do they have someone more important to be talking to? Surely it’s not Joel? That devilish son of a gun.’
If you’d rather your people didn’t think this way of you, there’s an easy ‘get out of jail’ card to be deployed. Just turn off the ‘last seen’ feature altogether, or restrict it to only your contacts.
How: Head to Settings > Privacy > Last Seen > Nobody.
9. Send messages hands-free with Siri
Ugh! Typing is a right faff when you want to use your hands for other stuff such as eating, cooking or fine embroidery. Once again WhatsApp has come to the rescue to this most first-world of problems via compatibility with both Apple’s Siri and Google Assistant. So you can now dictate any missives to your phone instead of punching them in with your digits like a total chump.
How: Shout out ‘Hey Siri’ or ‘OK Google’, then name the contact you want to send a message to and the contents of that message.
10. Send public messages privately
If you’ve got a generic announcement to make - an invite to a weekend BBQ or an intervention about your friend's unhealthy obsession with KFC - and you don’t want to do it on the loudmouth platform that is Facebook, this feature works in pretty much the same way as BCC-ing people in an email.
Your recipients will get the message as if it was a privately composed one, oblivious to the fact that you’ve sent the exact same invite to 342 other people. Sincerity? What's that?
How: On the top-left-hand corner of your WhatsApp Chats window, just below the search bar, you’ll notice a Broadcast Lists. Tap on it for the option to create a new list of contacts you want your message to go out to, and message away like you would normally.
YOU MIGHT ALSO LIKE
17 of the most entertaining distractions hidden in Google Chrome
11. Stay selectively notified
Not all group chats are created equal, as some are filled with nothing but white noise. And it’s exactly those group chats you want to ignore until you get some downtime to sieve through everything that’s been said. On the flipside, there are the group chats you want to stay on top of, such as the ones deciding dinner plans for the night and so on. Here’s how you can stay selectively notified.
How: Go to the significant group chats, tap on the name to bring up Group Info and then Custom Notifications. There, you can select a custom message alert for the group chats of your choice. All you have to do now is remember which alert tone you assigned to which group chat. This customisation is only applicable for group chats though.
YOU MIGHT ALSO LIKE
The 30 most anticipated games still to come in 2015
12. Back it up
Worried about losing a year’s worth of messages? You don’t have to. WhatsApp knows how precious your chat history is to you and secures it all for you in the cloud.
How: iPhone users get the option of backing their chat history to iCloud automatically on a daily/weekly/monthly schedule. If it’s only selected chat histories you desire, click on the chat you want, then the user’s name and finally email conversation to yourself.
Android users can go to 'Settings', 'Chats and calls', and select the 'Chat backup' option, which will let you setup an automatic Google Drive backup. The next time you install WhatsApp from fresh on any device, you can simply select the Google Drive backup option at the setup screen, to have all your up-to-date messages injected into your device, straight from the cloud.
YOU MIGHT ALSO LIKE
Apple's 17 biggest keynote surprises
13. Save your media (and data allowance)
When you’re on a 1GB data plan, every MB counts. You don’t want to be slapped with a hefty bill at the end of the month from sending stupid shareable memes and screenshots of every little thing. There’s a way to make sure that all that heavy-duty image sending won’t eat up what little complimentary data you might have in your plan.
How: Go to Settings, then Chat Settings and then Auto-Download and tweak the settings for how you want your received media to be downloaded. Choose Wi-Fi if you don’t want to overload your data plan. Alternatively, you can trigger downloads manually by switching Auto-Download to Never. You can also save the hassle of having to clean up your camera roll every so often by tweaking Save Incoming Media off.
YOU MIGHT ALSO LIKE
The 25 best things to watch on Amazon Prime Instant Video
14. Tie the app to your number
If you’re overseas and you get a new data sim, there’s no need to go through the hassle of registering the new number attached to the SIM and faff around adding contacts. Just carry on using WhatsApp with your regular number.
How: When you put your new SIM in and activate WhatsApp, you’ll be prompted by the messaging service to register the new number. But doing so will mess up your contacts list. Just ignore the pop-up or cancel it, and your WhatsApp should work linked to your old number, while using your new data SIM.
[Image credit: Hongkiat.com]
YOU MIGHT ALSO LIKE
iCheapskate: 35 amazing free games for iPhone and iPad
15. Star messages
When dinner time rolls around, the last thing you want to do is scroll through 352 frivolous messages to find the address of the restaurant you're meeting your friends at. Luckily WhatsApp lets you bookmark certain messages for easy access.
How: Double tap on any message and tap on the star icon to mark it. To find it again, all you have to do is tap on the chat’s name, and tap on Starred Messages to see all the messages you’ve marked out.
To see conversation context, just tap on the arrow next to it and you’ll be brought back to the exact place in the chat. When you’re done with it, just double tap the message, and hit the star icon again to unstar it. It’s only available for iOS users for now, so fandroids, wait your turn.
16. Make calls
WhatsApp is more than just a run-of-the-mill instant messenger. You can use it to make calls too.
How: Make sure you're using the latest version of WhatsApp. You should see a new Calls tab alongside the usual Chats and Contacts. Just send a voice call invite to another WhatsApp user and you'll be chatting away in no time.
17. Instantly add dates to your calendar
It’s easy to forget appointments when you’re a busy bee. You make vague plans for drinks, settle on a date, then promptly forget about it as the conversation rolls on. This handy little shortcut makes sure you commit to an appointment.
How: Just state a date and you get an automatic link to add it to your calendar. It also recognises words like ‘today’, ‘tomorrow’ and days. But it's still best to use specific dates, just in case you get the day wrong. No more excuses for forgetting drink dates anymore, then. At least, not for iOS users. Android users have to wait a little while longer we're afraid.
18. Use Whatsapp on the web
WhatsApp Web is the best creation since...WhatsApp itself. It’s not an entirely new feature (as any smug Android user will tell you), but their gloating days are over, as it's now available on iOS too.
How: To enable inconspicuous chatting on the web while you do your work, all you have to do is go to Settings and tap on WhatsApp Web. Then head to web.whatsapp.com on your computer and scan the QR code that appears using your phone. Commence chatting on the sly without downloading anything. Handy, and also very, very distracting.
19. Save data on calls
Making calls via WhatsApp is a very convenient feature, but it can also consume a lot of data. Thankfully, there's a new option to help those of us with data shortage problems.
How: Pop into Settings then Chats and Calls. Right at the bottom, you’ll find Low Data Usage. Turn that on to decrease the amount of data used during calls made via WhatsApp. We’d still advise using WhatsApp calls sparingly on data if you’re on a limited data plan, but you can still save on calls when connected to Wi-Fi abroad.
20. Locate group chat
You can find old group chats by searching for individual members that were in the chat group, rather than the group name itself. This is useful for when you want to revisit old topics, as chances are you'll remember who was in the chat, more than the hilarious bants-laden group name that seemed so funny at the time.
How: Just tap on any individual chats, and tap their name for more information. From there you’ll be able to see all the groups you have in common with said individual, even if they go way back.
21. Back up everything including video
There was a time when you could only backup images in your chats, but not videos. Now that’s changed.
How: Get into Settings, then Chats and Calls, and pop into Chat Backup. This is the control centre for backing up your wordy memories.
You can choose when you want Auto Backup to happen (but make sure you disable backing up using data within your phone’s settings or there will be hell to pay). You can also choose to include videos in your backup by toggling Include Videos. Would it be greedy of us to ask for voice messages to be included in the next update too?
22. Visual reminders
Have the habit of reading messages then forgetting to reply to them? Now you have no excuse to neglect them as there's a new Mark as unread feature which lets you mark chats with a blue dot so that you can come back to them later.
How: Just swipe any of your chats to the right and the option to Mark as unread will show up. Tap on it and a blue dot will appear on the chat as a visual marker. Once you’re done with it, just swipe the chat to the right to unmark it. Simple.
P.S. Android users can achieve the same thing by long-pressing on a chat.
23. Stop people from accidentally reading your messages
Theoretically, all messages on WhatsApp are private - but not when you leave your phone on the table, and a new message notification pops up. How many times have you unintentionally read someone’s message just because you’ve curiously looked over when their phone screen blinked to life with a new message notification? Admit it, we’ve all done it, and sometimes read something we've regretted.
How: Go to Settings, then Notifications, and disable Show Preview. Now you can gossip in peace, without anyone accidentally reading your conversations by glancing casually at your phone when a notification comes in. Your notification still reveals who has just messaged you, without divulging any of its super secret contents.
24. Reply directly from a popup
Oh, new message! Swipe down the notification bar, tap the message and reply. Sounds simple, right? It is, but there's an even faster way - cut to the chase and reply directly from a notification.
How: Go to Settings, Notifications, then Popup Notification, and choose from four different options. You can change this setting for both individual messages and group messages respectively. Unfortunately, this feature is only available for Android. For now, anyway.
25. Send an attachment
Unlike EPMD’s hip-hop classic, WhatsApp’s ethos is by no means Strictly Business. If you do need to quickly send a document to a colleague, and email isn’t an option, it’s easily done. Just select the file you want from Google Drive, Dropbox or iCloud and WhatsApp will fling it onwards as a pdf.
How: Tap the + symbol > Document > select your cloud storage service of choice and then the file itself. Bosh!
Features
Liked that? Read this...
7 things we love about the Samsung Galaxy S8 - and 3 we don't
Slide to unlock: 28 iPhone tips and tricks to make your life easier
Sponsored Content
Section Collapse
Facebook Instant Article
Source link
0 notes
Last Seen Blogs

ttconnor-blog
fun duck

sryclkworld
-sryclk-

blogmintz-blog
Fragnance Review

eazyitemexetat
Eazy-Item Exétat

incorrect-mdzs
Nobody Is Straight