#hope the postproduction is going smoothly!
Text
Catch Me If You Can
Brief


Research:
Freezing motion:
Fast shutter speed to get a sharp photo even if my subject isn’t moving a lot. It might mean that you have to increase your ISO if there is not enough light around (or you to use a high speed flash). In terms of aperture, the smaller your aperture, the greater you’ll get in focus in your picture. Once you’re a little bit more experienced, you may reduce your aperture (getting more light in and also a nice blurred background that would visually help your viewer to focus on the action).
(https://digital-photography-school.com/how-to-capture-motion-blur-in-photography/)
Blurring motion (Panning)
The reason for movement blur is simply that the amount of time that the shutter of a camera is open is long enough to allow your camera’s image sensor to ‘see’ the movement of your subject.
So, what you’ll need if you want to do a panning shot, is to have a slower shutter speed (1/15, 1/30?) The exact length of your shutter speed will depend on various factors, including the distance between yourself and your subject.
Panning a moving subject: the idea here is to follow the moving subject during the exposure, so that the subject appears relatively sharp, while the background is blurred and streaky, giving a sense of movement. You can position yourself so that you can track your subject smoothly from one side to the other in a roughly parallel path. You can consider using a tripod that would allow your camera to move smoothly, and avoid any camera movement. You’ll need to plan ahead how your subject is going to move though.
Background: Best background for panning have a color that contrasts with your subject. Darker backgrounds will cause lighter subjects to stand out, and vice versa. The background shouldn't be too dark or light, though, or the motion blur will lose impact. Look for bright highlights within the background—they'll show up as long streaks that will underscore the motion.
Autofocusing:
Drive Mode: AI Servo,
Back button focus setting: They allow the photographer to keep the focus on one subject of the image when other subjects are moving around. It enables you to focus by separating the focus and shutter activation of the shutter button.
(https://www.learningwithexperts.com/photography/blog/panning-photography-panning-techniques)
https://www.youtube.com/watch?v=Fwg8iNeA-Po
Low Light situation
When shooting with a subject in low light situations you generally have two options; either to shoot with a flash or to shoot with a slow shutter speed/high ISO

Organising photoshoot:
> I got in touch with different clubs (boxing, Muay Thai...) and asked them if I could come over and take pictures. Two clubs accepted and let me come over.
> They anticipated my photoshoot by letting people know I’d be taking pictures of them.
> I also got in touch with some Capoeira clubs, as I wanted to take pictures of a few different sports and experience different “rythms” and “styles” of sport photography.
Photoshoot 1:
> I went there. I decided I’d use high speed flash (mostly because we were also working on Unseen and I wanted to get more familiar with HSF but also because I didn’t know what the light conditions would be). I hoped to take some pictures of frozen movement.
[CONTACT SHEET]
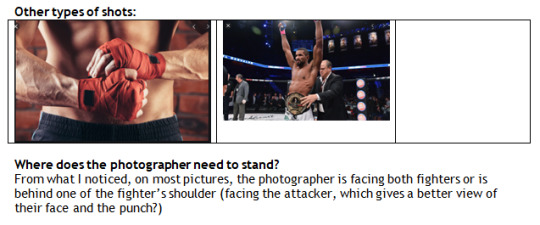
Conclusion: High speed flash weren’t ideal altough they may be used at times. I also felt I didn’t get enough research done beforehand, and didn’t know where to position myself (how do you get the best shots? Where do you need to stand?). I felt flashes were not ideal either because they could be a problem to people training.
Photoshoot 2:
> Second time, I decided not to use flashes and made more research on what a good shot is when you’re shooting boxing/martial arts. I also felt more confident regarding people training and I felt my time there was more effective.
[CONTACT SHEET]
Conclusion: Not using a HSP meant that my ISO was a lot higher. I was also using a smaller aperture, which I later identified as probably a lack of confidence: I wanted as much as I could into details and was apprehensive about having a larger aperture/blurred background and not having sharp images at all. I also had a fast shutter speed. Overall, pictures were quite noisy but the shoots were better taken.
2) Capoeira Experience:
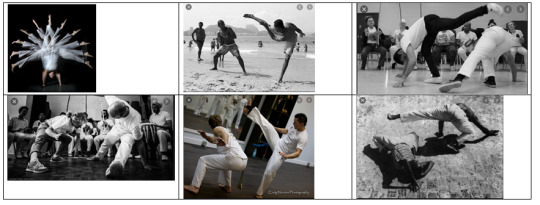
What I noticed was that most effective to me were taken from ground level, unless enough space to move back. I picked a 24-105 lens from the store. The person in charge with the club told be the walls were quite green/yellow and that the light conditions were pretty poor as some photography students had tried to take pictures in the past and had warned him on that (although it turned out to be better than what I imagined)!
[CONTACT SHEET]
3) Basketball experience
Inspiration:
Research:
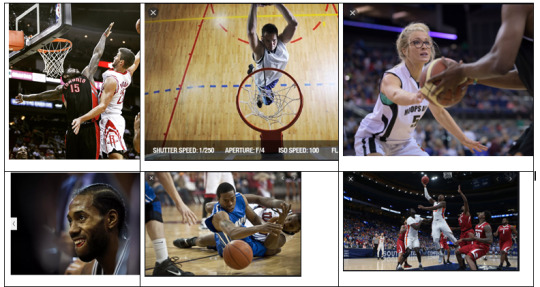
> The space was bigger. Where would I get the best shots from? Where would phoographers stand, and I could do the same? What lenses were they using? I had a look at some pictures and websites to give me ideas on what standards were in terms of basketball photography.

I booked two lenses: 24-105 and 70-200. 2 extra battery. After discussing my 2nd boxing photoshoot, I decided to not exceed 4000 ISO and adapt my other settings according to that, use a wider aperture (as wide as possible knowing that my maximum aperture was f4).
[Contactsheet]
[final images]
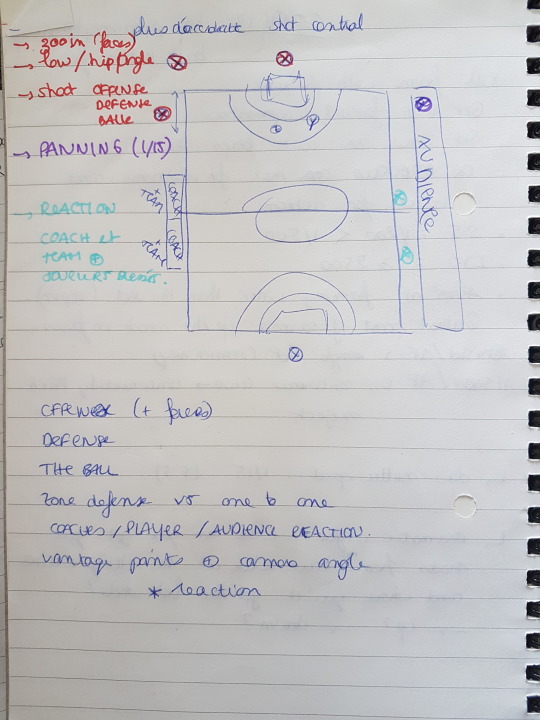
Conclusion:
Postproduction, my pictures were for many underexposed and I had to work on that on bridge. I felt I got confused with the boxing photoshoot as my ISO was way up and my pictures super noisy but now, my photos were undereposed but less noisy until I brought the highlight up on bridge. I felt I still needed to work on finding the right balance between ISO, shutter speed and aperture.
I also truly enjoyed this project: from finding people to shoot but also the emotions coming from players, audience, and coaches. This is definitely something I would love to redo in the future !
I think my next challenge would also be to focus less on the players and getting good actions shots but also, capturing this pressure and more emotional reactions from the audience and players themselves.
1 note
·
View note
Text
Production Work: The cameras are rolling!
For all of our filming, we used Jin’s Nikon D80 as well as her dolly and slider. The tripod, and external lighting kits were all borrowed from the university.
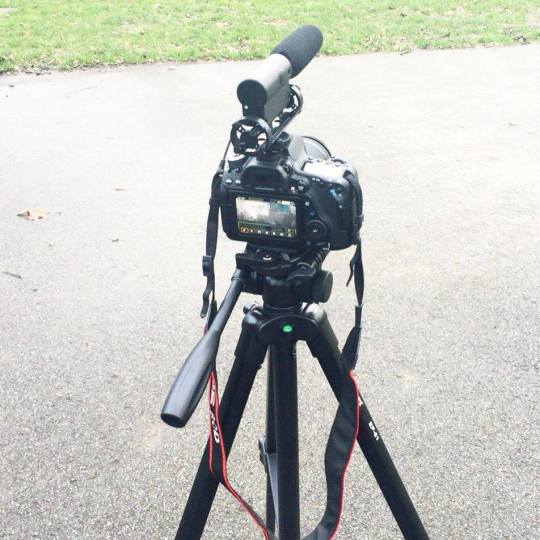
(Jin’s Canon D80)
General Filming Overview (January 20 2017)
Jin and I had multiple different shoot dates across January and February. Because all of the participants for series 1 were confirmed, we went ahead and shot the interviews for each of them. Jin’s phenomenal camera work managed to capture the interviews using different angels and we positioned each of the participants differently after answering a question. Instead of just placing them in front of a boring white wall, Jin and I tested out various spots for our interviewees to sit in while we filmed them so that the background complimented the video appropriately (see the fonts/colour scheme section down below in postproduction). We shot each of the interviews on our university campus and in different flats of friends we know. While Jin handled the camera, my contribution was to prep the participants and manage the lighting. Several months before shooting we had master classes on both sound and light techniques that we used during our shoot sessions. Brendan Crehan, an industry professional led a workshop to teach us more on the use of diegetic and non-diegetic sound. He helped us prep for interviews and went in depth about various mic placements for effective sound recording. During these classes, Jin and I practiced constructing our shots and used appropriate lighting and microphones to practice setting up for our interviews.
As theory suggests, “A lavalier microphone is the small mic you often see attached to the lapel, tie or blouse of news anchors. These small mics are ideal for recording audio from a single individual during an interview or presentation. The pickup pattern of a lav mic is generally omnidirectional, but because it is placed so close to the speaker’s mouth, nominal background noise be unnoticed once the levels are set on the recording device” (Harrington, 2011: 43).
It was clear that we had to use a lav mic for our interviews but Brendan gave us a tutorial of how to use shot gun mics so we could get a feel of how both mics work.
The trickiest part of shooting was trying our best not to capture the background noise. All of our interviews were in locations where there was air conditioning and as a result, the sound that we captured was not as clear as we hoped because of the excessive background noise. Luckily, we managed to fix that in the postproduction stage in Audition.
For all of our participant’s interviews, we wanted them to be placed in different backgrounds that had neutral colours. Jin and I had agreed that our film would stick with a certain colour scheme and we wanted to make sure that our footage would gel well with the text on screen. My contribution in the actual shooting of the film was to ensure that the lights and backgrounds were perfect for the shot, placed the microphones onto each of our participants and help Jin by placing the cameras in different angles.
On Set Experience
My experience on set was simply fantastic. I personally found it to be the most fun and I enjoyed seeing my film come together in real time. Jin and I experimented around a little with backgrounds and move things here and there to ensure that we made best use of the space and so that we could get a clearer shot of our participants.
I also suggested to Jin that we should film our participants from different angles as it was one of the features we liked from the above Buzzfeed video and so that our viewers could focus on our interviewees but not get bored of the same exact view. We integrated a bit of theory while onset to help us frame out interview shots. As suggested in Shoot to sell, “staying on the same shot, like a medium shot, of even the most interesting person soon gets boring. If a person is using their hands to communicate, include them, they help tell the story. During more intense or intimate times, slowly zoom in for a drastic effect. Frequently you see the shot framed so that the interviewee is looking not at the viewer but off axis, at the interviewer who is out of the frame. In this case there should be more space in the frame in front of the interviewee’s face than behind their head, otherwise they will look claustrophobic. In other words, they should be looking out of the frame with more room in front” (Smith and Miller, 2012: 133).
We used framing tips to help guide us and set up our camera in order to shoot our participants.
Shooting series 1:
We used some of these rules from the above book and found them to be quite useful as they helped us get very good and “not so boring” interview shots. The whole point of series 1 was to instil in the viewers that there is a problem of too much screen time and so focusing in on the interviewees and capturing what they had to say was extremely important. A combination of good angles, strong lighting and neutral backgrounds ensured that we got clean and professional looking footage. Each participant was placed in one spot against a background that we liked for the entire interview. All we simply did was change the angle of the camera so that we captured their responses from different perspectives. However, on set we realised that the air conditioning was a big problem and caused our audio to have a lot of unnecessary background noise despite using good quality lav mics. Unfortunately, one of our interviews with Mariah (one of our participants) was shot outside on a very windy day and as a result, we had to re film her indoors because the sound quality was just terrible. After filming our participants for series 1, we were ready to move into filming series 3. Unfortunately, we still did not find a specialist for series 2 but decided to worry about that only after filming series 3.
Shooting series 3:
Series three was all about alternatives to screen time and we had to travel around London to get good footage to complete this series. Jin and I travelled to: Canary Wharf, Canada Water Library, Southwark Park, Sky Gardens, London bridge and even did a bit of filming in Jin’s flat. Before going out to film, we had made a set list of alternatives to put in the last series and that list generated our list of shots needed. From making tea to going for a run to even exploring local hotspots, Jin and I had a great time going around London to capture and film the various alternatives however, it was a bit more challenging than filming the first series. How so?
Jin and I had to film a few scenes outdoors, and the weather along with background noises were all unpredictable. Jin and I planned each outdoor shoot by checking the weather in advance and tried to position ourselves in all of these locations where there were fewer people and cars. We were delighted to know that the footage we captured did not have too much unwanted background noise and since we planned on putting some music on in the background for series 3, we did not have to clean too much of the audio for this series in Audition. My biggest contribution for filming series 3 was organising the locations for the shoot and filming most of the shots at Southwark Park. Jin also introduced some new equipment for us to use while filming: a dolly and a slider. The camera work included moving the camera in unique ways for which we required this apparatus. For instance, one of the alternatives was to visit a local hotspot in the area and so we visited Sky Gardens in London to capture some gorgeous footage of greenery and flowers. We used a slider to capture flowers from inside plant pots and found it to be a successful way of of adding visual creativity to our shots. We also used a dolly as platform on the surface of a rocky concrete floor to create smooth movements of someone posting a letter inside a postbox.
Finally after obtaining footage for series 1 and 3, we were ready to start editing what we had. And.. there was finally hope in finding a specialist.
Shooting series 2:
FINALLY and LUCKILY, a week before moving everything into Premiere, I managed to get in touch with a friend of mine who works for a technology company and has a minor in psychology. He was the perfect person to ask! It was extremely silly of me to have not remembered contacting him before. After very little persuasion, my friend Akash Hirani agreed to be our specialist. We filmed Akash in a meeting room at Landale House in Canada Water, with orange and yellow sofas and the background fit very well with our colour scheme… (see the fonts/colour scheme section down below). We filmed Akash from different angles and I helped brief him on what sort of information we were looking for. I had also set up the lighting kits around Akash because the room in which we filmed him in was fairly dark. Akash gave us some insightful views on what too much screen time does to our eyes and outlined the social, physical and emotional (three subtopics) caused by too much screen time. Each of these subtopics was shot at different angles so that our viewers would not get bored and this way it would give them a three dimensional immersive experience. Jin and I planned to incorporate graphics and icons with each of the subtopics discussed and therefor planned our interview with Akash such that there was a little headroom as well as some empty white wall space in our footage so that we would place these icons smoothly in postproduction.
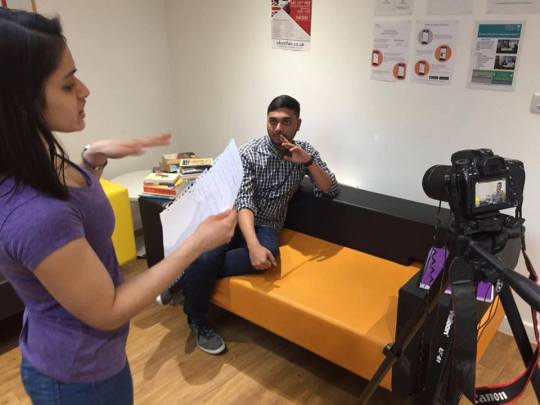
(Me briefing Akash)
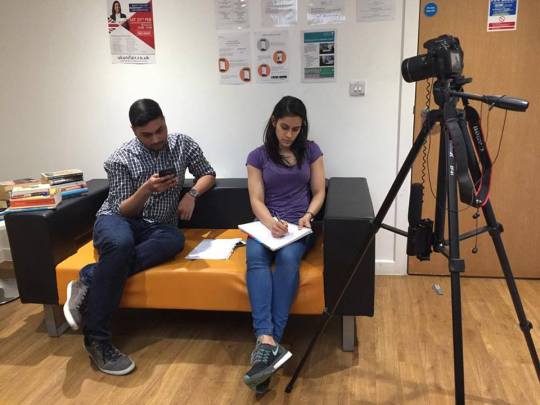
(The sofas that we used at Landale House to shoot out specialist on)
Scroll down to read more about editing...
0 notes
Last Seen Blogs
vintage-fashionnn
VINTAGE FASHION

murrisseysworld
🎈Murrissey🎈

chescaleigh
FranChescaleigh's blog

deliciademaduro
Todas as espécies de maduros se encontram aqui...

berlindebiryazilimci
Zor Hemen,İmkansız Zamanla..