Last Seen Blogs

secretbeautyclub-blog
Secret Beauty Club

ohlatinswag
DANIELA
teathattast
TeaThatTast®

sweet-taste-of-skin
Through the darkness and the pleasure

duranttoolcompany
Durant Tool Compnay
Photo

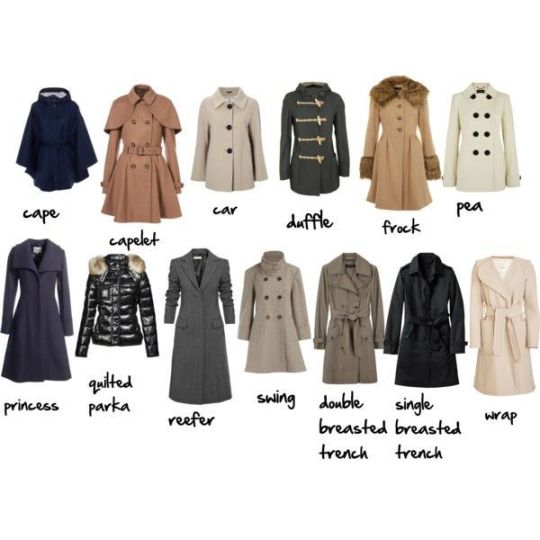


My collection of clothing references for writing.
89K notes
·
View notes
Photo
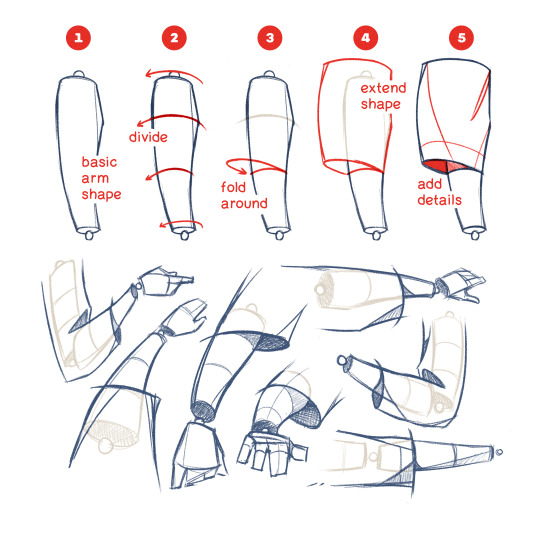
A quick guide on how I draw sleeves. Especially oversized ones. To figure out the arm’s direction, I’ll divide the arm into three sections by drawing two curved lines. I use these lines to figure out how to draw the end of the sleeve. Works every time!
MY COURSE: Dynamic Character Illustration
Learn professional drawing and coloring techniques for creating dynamic characters full of movement!
7K notes
·
View notes
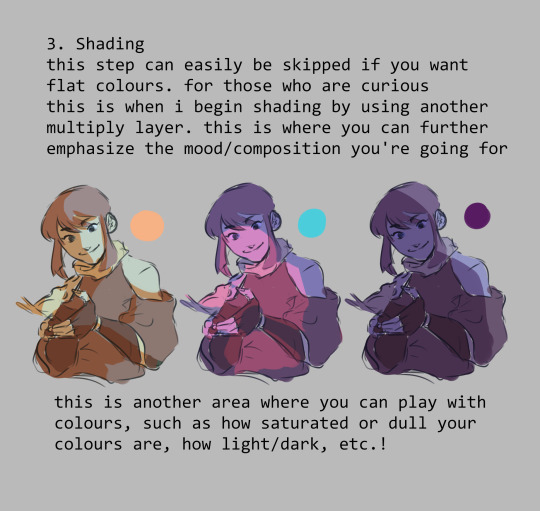
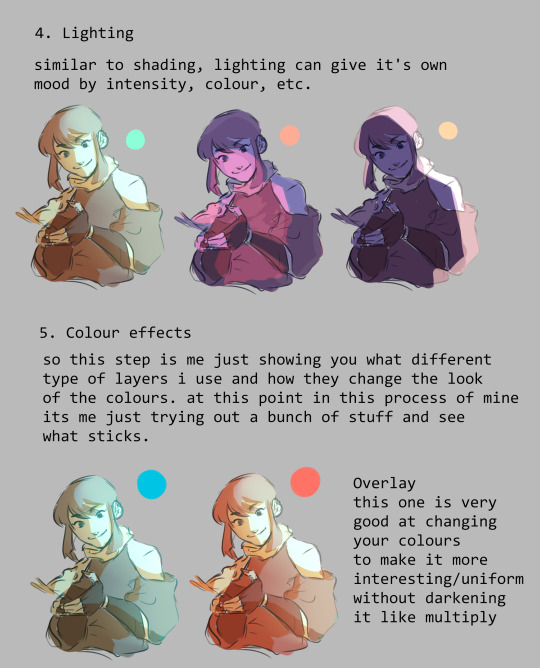
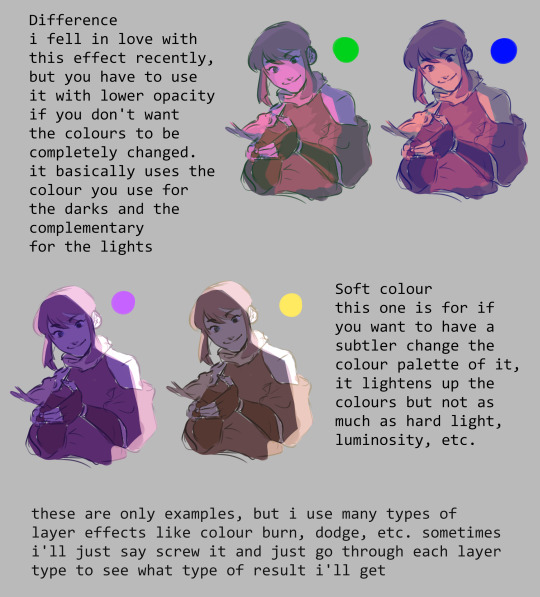
Note
i literally love how your color and shade if it’s ok do you have any tips on digital coloring? you don’t have to answer this if you don’t feel like it :) thanks!!
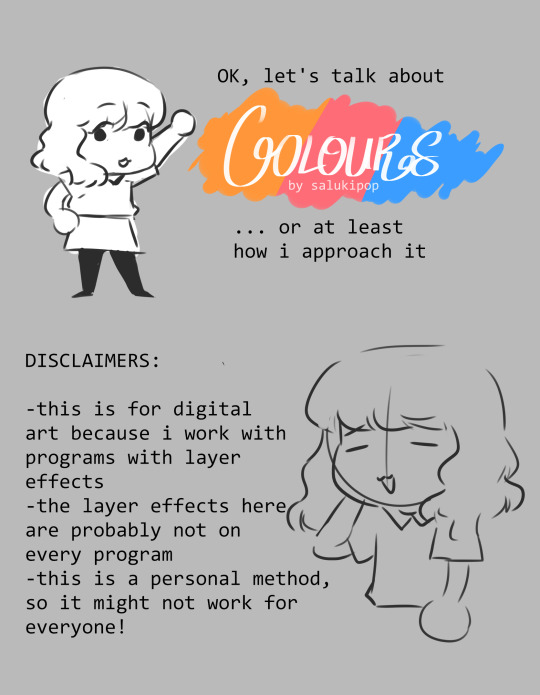
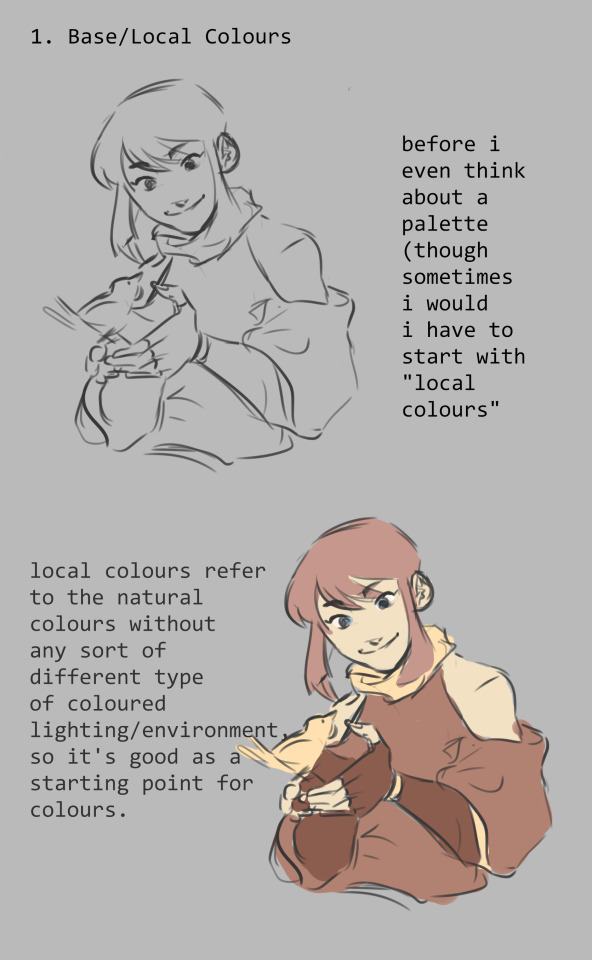
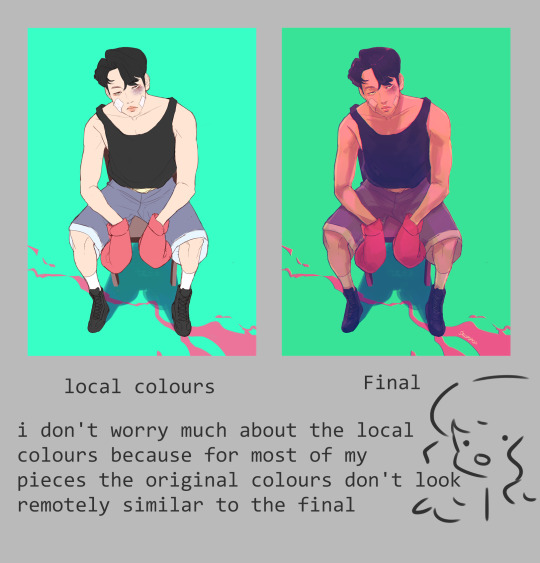
hello friend!! i have a tutorial i made on twitter a while ago which is more or less how i make my colours more interesting. i still use the technique and in general it’s just a lot of colour adjustment nothing too special LOL here!!


16K notes
·
View notes
Photo

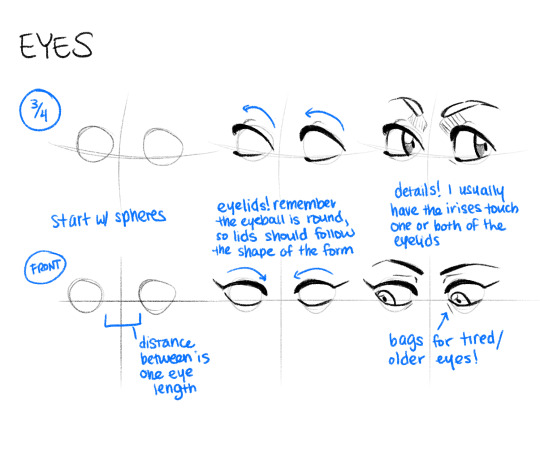

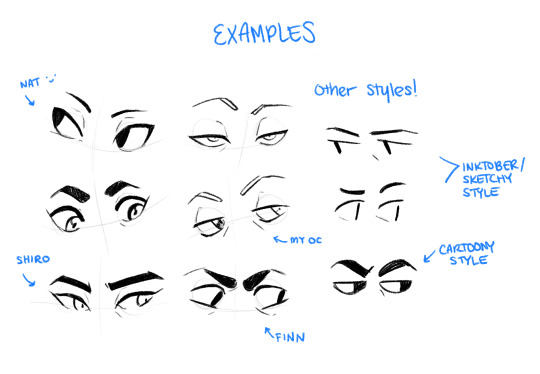
I get a lot of asks for tutorials so here’s a little quick one for eyes. Nothing fancy really haha. Additional notes under the cut!
Keep reading
7K notes
·
View notes
Photo
Want LOADS MORE like this? Today I’m posting TONS of EXTRA tutorials, tips and references on OUR MASSIVE INSTAGRAM HERE and OUR GIANT TWITTER HERE!
PLUS! THREE HUNDRED EXTRA FREE TUTORIALS RIGHT HERE!
Lorenzo!
321 notes
·
View notes
Photo
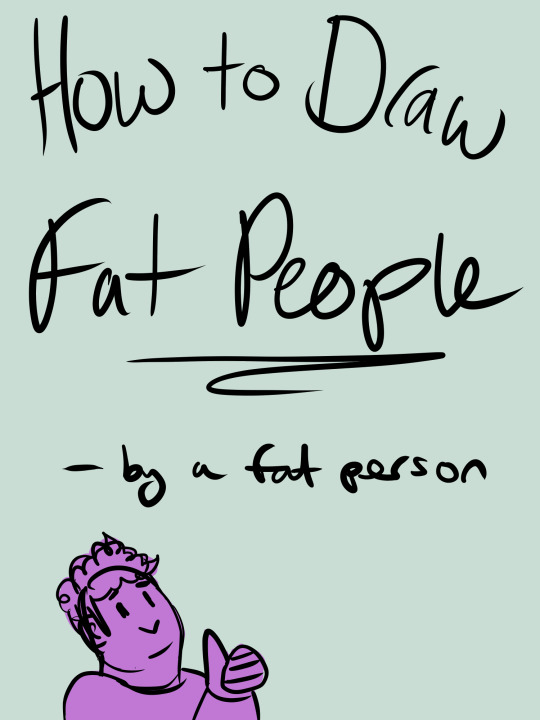

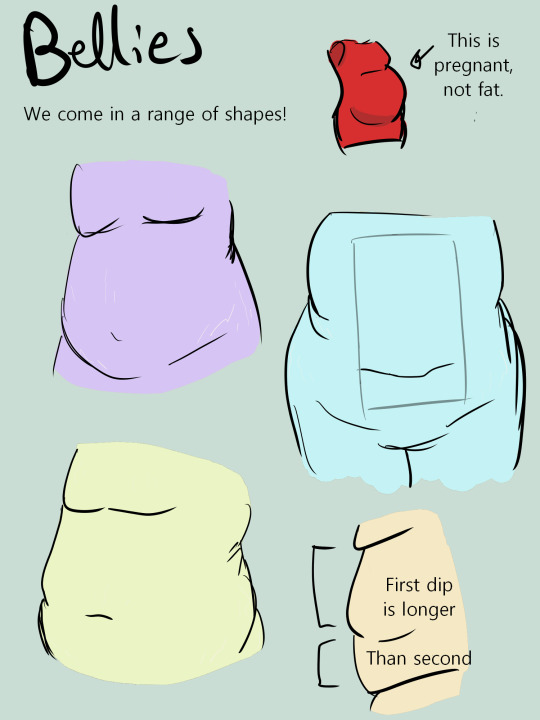
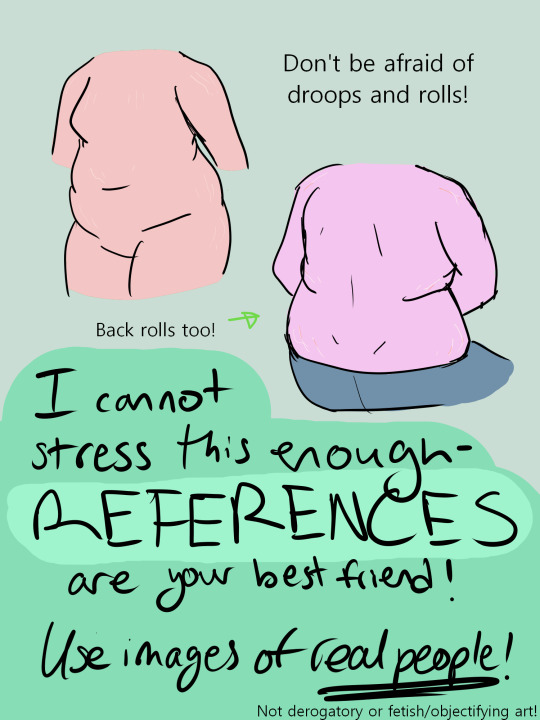
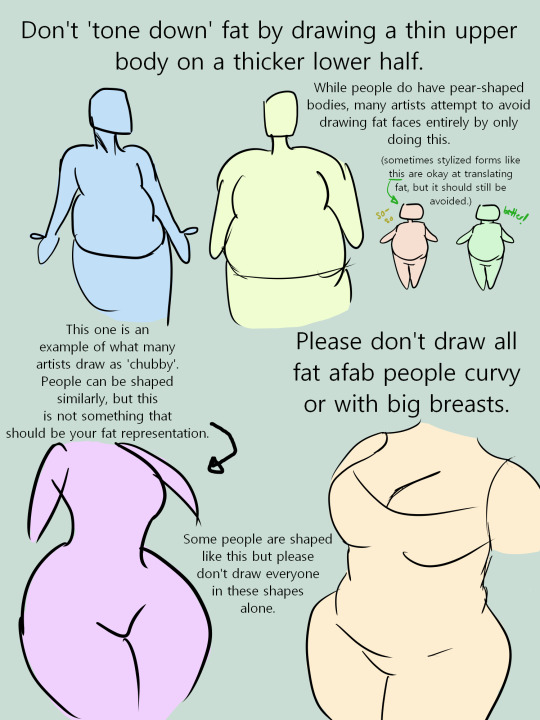
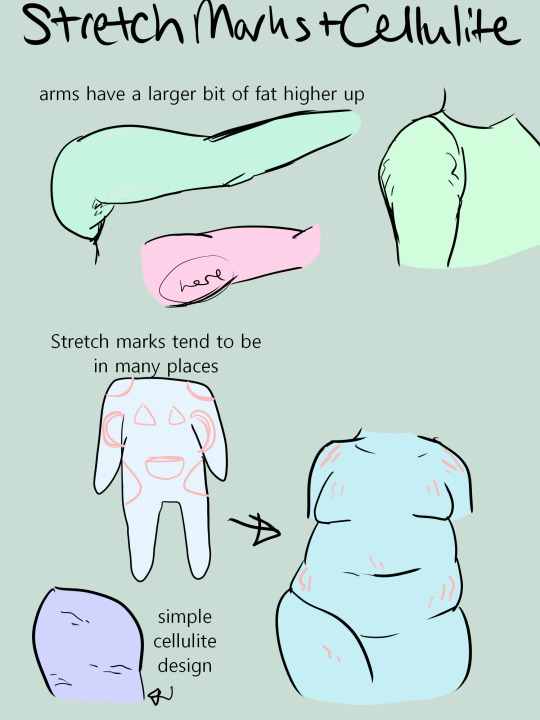

following my meme post the other day, and talking to friends further on the subject of fat characters in art, especially in fandom, i figured some people might like a tutorial on how to draw them.
37K notes
·
View notes
Photo
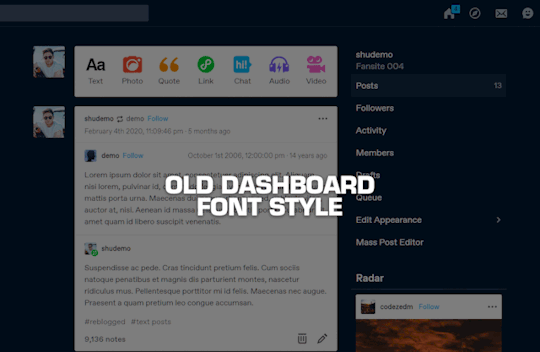
I’m pretty sure I’m not the only one who found the new dashboard layout really disturbing - especially the confusing font choices. Therefore I’ve created a Stylus style to overwrite the look. You can download it here. (make sure you have installed the extension for your browser first!)
Please note that this was created in a hurry so I’m pretty sure there are some mistakes I might have missed. Feel free to drop your feedback!
8K notes
·
View notes
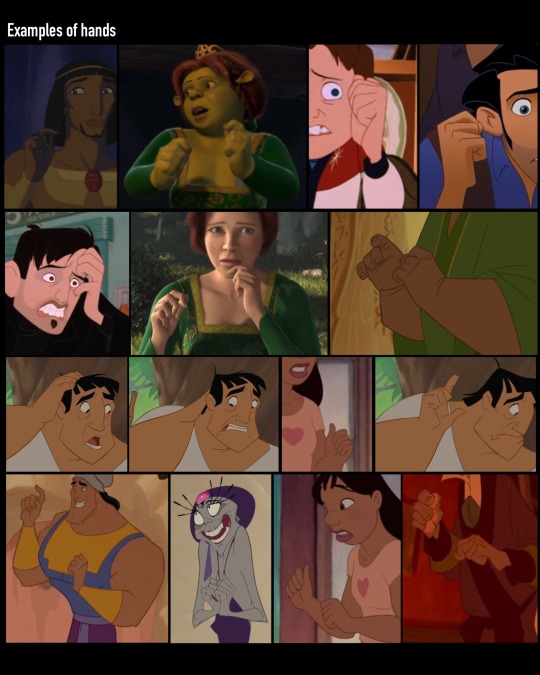
Text

So you might be saying: Lion why a guide on drawing black people? Well young blood it’s because a lot of people cant…seem…to draw…black people..Amazing I know.
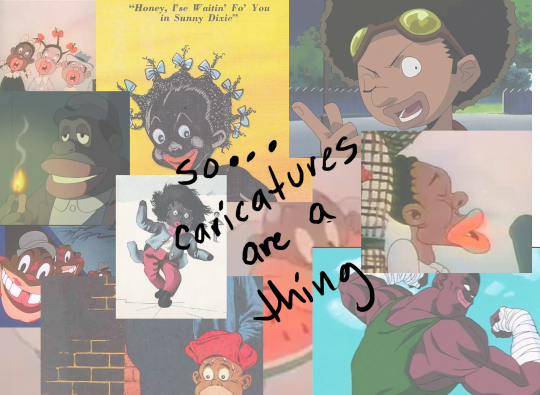
Racist (caricatures) portrayals of black people have been around forever, and to this day people can’t seem to draw black people like they are human. If your artwork resembles any of the above even remotely your artwork is racist and offensive. If you try to excuse that as a stylistic choice you’re not only a terrible artist, but racist too!!! Congrats.
Whitewashing is also a problem. A lot of people refuse to draw black features on canonly black characters. While this example isn’t colored, lightening the skin-tone of a character is also considered whitewashing. So lets start with features!

Now all black people have different noses thats a no-brainer, but black noses tend to have flatter bridges, and wider nostrils. Please stay from triangular anime noses and small button noses. Your drawings should not depict black people with abnormally large noses. (Especially if you do not draw other characters this way)
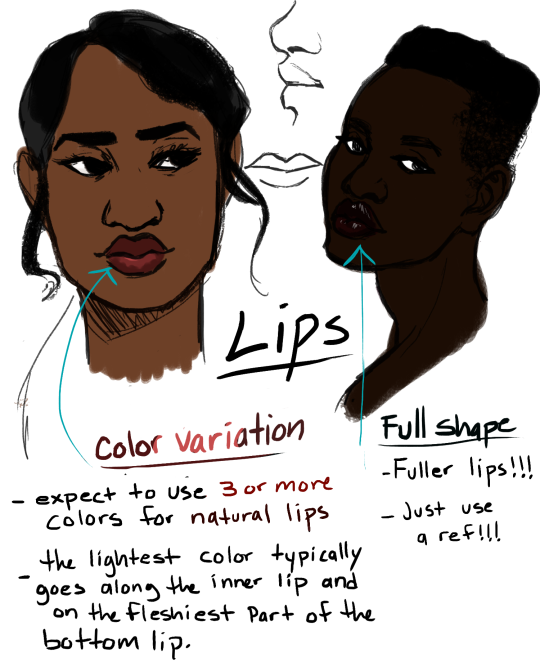
If you feel like the way you draw lips on black characters is offensive or resembles a caricature,it probably does and you should change it. ABSOLUTELY AVOID PLACING LIPS AT THE BOTTOM OF THE FACE.
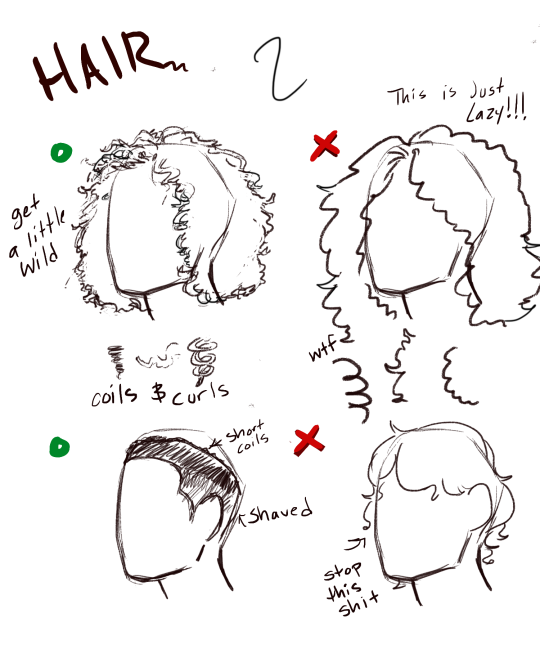
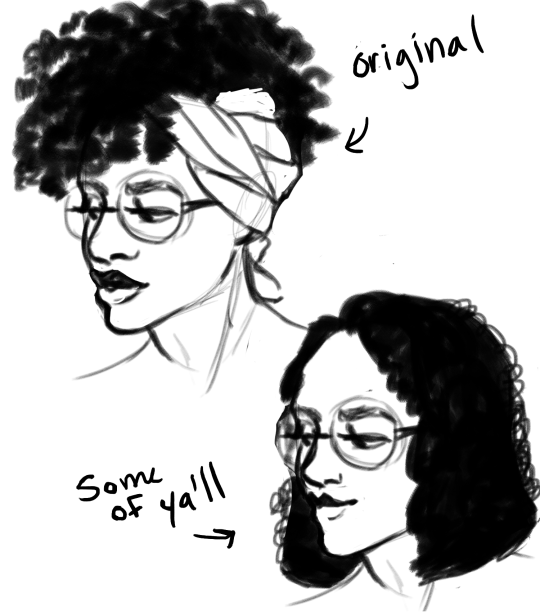
Hair is so diverse! Please get used to drawing braids, locs,kinks and coils! If you can learn to draw ringlets and long waves you can learn how to draw black hairstyles.

Add clips! Learn how to draw baby-hairs and never be afraid to add color Pinterest and Google are free my dudes! Also try using square brushes for blocking in coils.
OK THAT’S ALL YOU GUYS
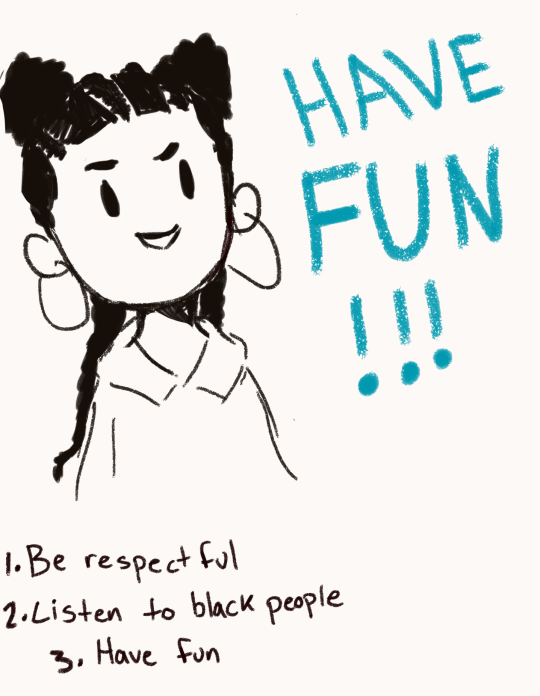
P.S Take a screenshot of hate/ ignorance in the comments and dm it to me for 10% off a commission
125K notes
·
View notes

Note
Teach me how to draw hair holyyy
I GOT YOU, FAM!
It’s ironic that I work in education but I don’t know how to make an art tutorial, so here’s my sad attempt! Forgive me if it’s useless.
I LOVE drawing hair, it’s always been my favorite, although I’m a bit of a perfectionist and therefore hair is usually the part that takes me the longest when I work on a piece. It involves a lot of experimentation and drawing the same lines over and over until I get the right shape or flow and it requires a lot of patience (at least for me). Is there a right way to draw hair? Of course not! That’s the beauty of it. Every artist is unique and will have their own style, it’s all about trying new techniques to see what works best for you. *blows kiss*
Okay here we go!
I generally have three main steps: a loose sketch, a more refined sketch to build a cleaner design, then the final lineart. I also tend to make about 3 or 4 sketches to find the right hairstyle or flow. (I’m also indecisive as f**k)
Things I think about:
Action, dimension, shape, flow, movement and how it’ll interact with the body or what’s around it
Is there wind? Is the character outside? What are they doing and how would the hair respond to that? Is it pulled behind the ear? Wrapped around the neck? Tied up?
Texture, length, hairstyle. Thick hair? Thin hair? Curly? Straight?
References and inspiration - I always use a reference of some kind just to remind myself what I like or what I want to see, it’s the best tool to keep myself on track. Sometimes I even use my own art just to see what how I’ve done it before and what I liked about it. Don’t be scared of reference! (Example: Alphonse Mucha’s art is a major inspiration, I LOVE his use of line weight, shape and flow)
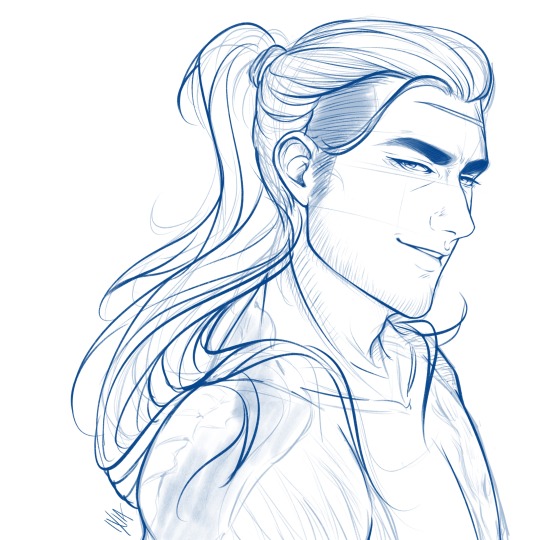
Using Gladio’s face from a wip I’m currently working on, I tried to draw some of my process out:
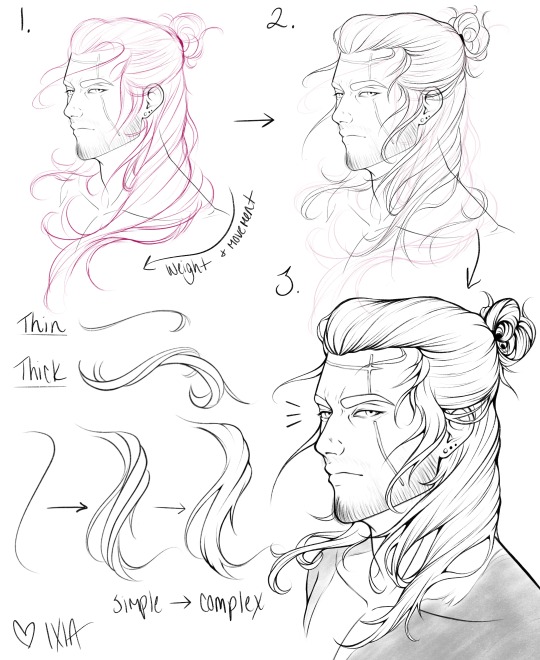
(Is it blurry!? Did I screw this up? Oh well, let’s keep going!)
Steps:
Sketch - Loose and messy gesture lines to show the general shape and movement. It’s okay if your sketch looks like a hot mess, it’s supposed to!! I have a hard time staying loose myself, so I’m working on that. Usually my sketches are very dramatic haha.
Refined Sketch - This is where I start to actually define the strands and the general shapes. By using my sketch as a guide, I can then build the design and the more individual strands and how they interact with each other. This can take a while (like it takes me hours). I try to go slower and I’ll end up reworking it a few times before I’m happy. Tip: reverse your canvas! It helps you see if your hair is more or less balanced or if something looks off.
Final Lineart - At this step, I strengthen my lines and erase lines where I want the flow to be more continuous. I also add detail lines and extra strands or flyaway hairs for a more interesting or complex design. The example above is still too messy or simple for what I normally like, but that’s okay. Also, what the heck is up with that messy bun? What am I even doing?
Final points:
Find inspiration and examples of what you like! This can be from other artists, movies, nature - literally anything. References are your best friend.
Experiment and try new things - I’m always trying to push my designs further and learn new skills
Keep your sketches loose and messy! I like to warm up by drawing circles, ovals or like the infinity/8 shape over and over again.
Play with line weight and thin vs thicker hair strands. Have the hair interact with something, whether it’s an ear or a shoulder or itself. Push yourself for an interesting design. (Gotta push myself too! It can be a frustrating process)
The more you practice, the better you get (cliche, but it’s so true)
Honestly, I don’t even know what I’m doing half the time and my skills have a long way to go. So we’re on this hair journey together!
BONUS!
Here are a couple Gladio sketches that I never posted on tumblr as an example of a messy sketch vs a more refined sketch
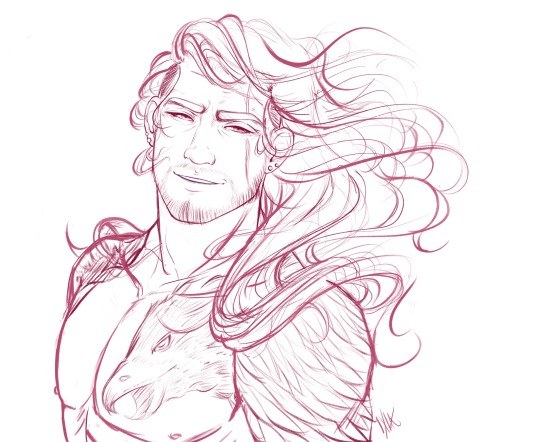
Apparently I really like drawing Gladio shirtless Okay hope this was somewhat useful!
2K notes
·
View notes
Photo

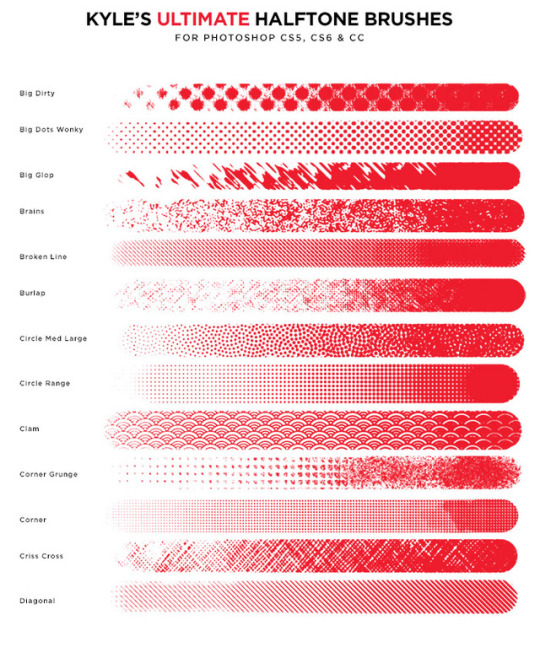
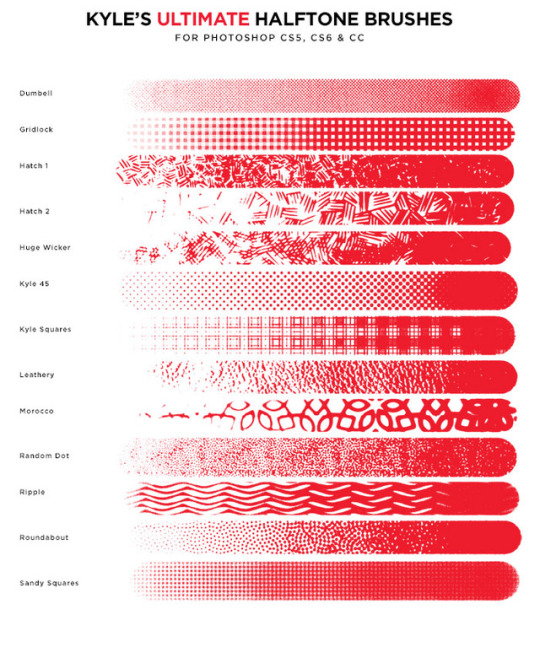
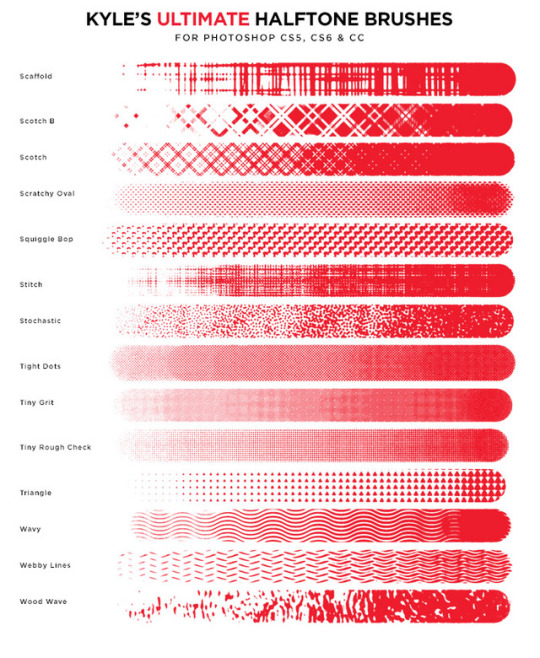
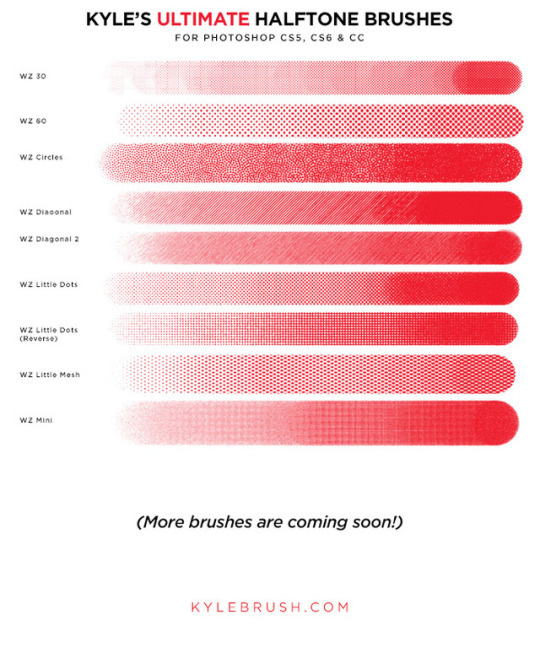
Real, pressure-responsive halftone painting is now possible in Photoshop, with my new Halftone brushes.
25K notes
·
View notes
Text
do you ever just
“no that’s not dramatic and cheesy enough”
“getting warmer”

“t HERE IT IS”
206K notes
·
View notes
Photo

I’m working on a character who’s been grieving for…oh, a quarter of a century. And I was thinking about that old notion that your wrinkles show the kind of life you’ve lived - ie, you can tell if someone has spent more of their life laughing or scowling. Those zones of the face will be more indelibly “etched” so to speak.
1K notes
·
View notes
Text
HOW NOT TO DRAW ARCHERY: AN ART TUTORIAL.
DISCLAIMER: I was going to make this “how to draw archery”, but that would probably have taken the rest of my life. This is all stuff I’ve learned from practicing archery in the past, and the tips I’ve given should translate to many, if not all styles of archery. If you take issue with any of the information given here please contact me, as I’m aware I’m not an expert!
Okay, I’ve seen too many bad drawings of archery online. Most of the time I can overlook it, but I’ve made this guide to address drawings where a) the character would hurt/maim themselves if they shot like that, or b) if you tried to shoot like that, the arrow would just make a sad trajectory to the ground, the aerodynamic equivalent of a “WAH-WAH” on a trumpet.
With this in mind:
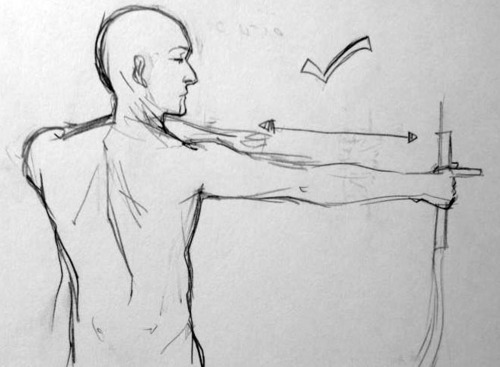
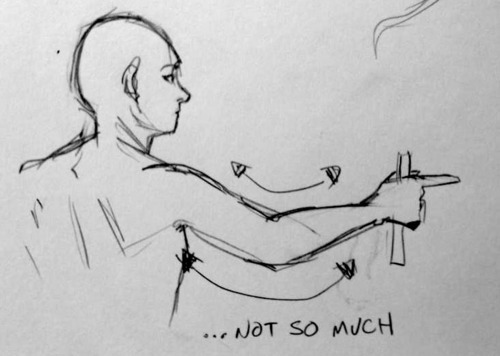
POINT ONE: WHY IS YOUR ARM LIKE THAT
If successful archery is about one thing, it is about consistency - being able to make your body take exactly the same stance over and over and over again. Your body is a key part of the weapon, and just as you wouldn’t want a gun that had components that wobbled and shifted, you don’t want your body to.
With this in mind, characters shooting, particularly at full draw (this is when the arm pulling the string is stretched all the way back), should have the arm that is holding the bow straight. Not locked - I’ll get into that - but straight. A straight arm is easy to replicate - a bent arm could be at a different angle each time. Simple as that.
POINT TWO: DON’T SHOOT YOUR TIT OFF
See this diagram
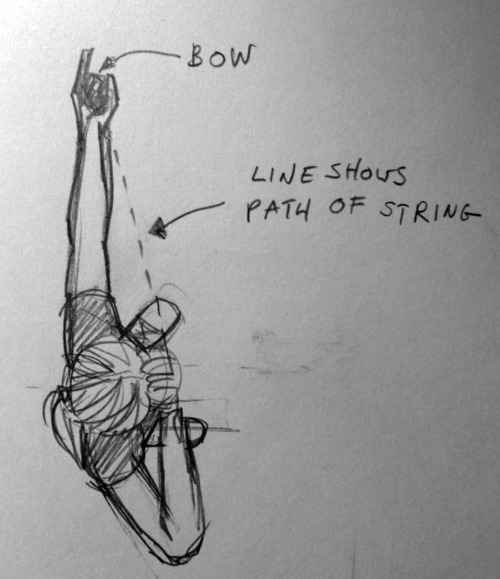
the dotted line is the path the string will take. The string is extremely tight - it has to be for the bow to work. It will therefore move extremely fast. Do you want any part of your body to be in the way of that.
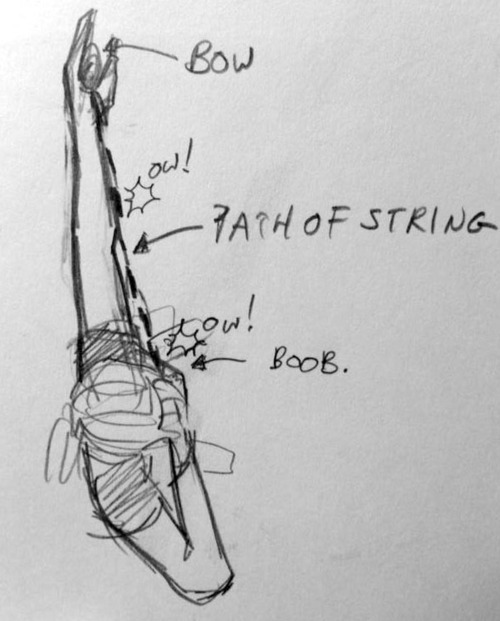
if you have any part of your body (elbows and breasts/pectoral muscles tend to be the worst offenders) in the line of the string, they will get hit. And this will hurt. A LOT. Google “archery bruise” to see how. Yikes. Furthermore, if your arm or chest gets in the way, it’ll knock the arrow off course, and in addition to having sliced your nipple off you’ll have missed your shot too. So KEEP STUFF OUT OF THE PATH OF THE STRING.
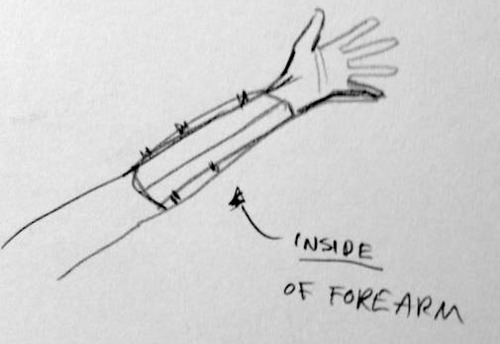
side note: this is where the myth of amazons chopping their boobs off came from. Also, why archers sometimes wear chest-guards - this looks like a one-cupped unisex bra. Stylish. Also why archers often wear protective gear called a bracer. This goes on the tender inside of the arm and wrist that might get clipped by the string, not the outside that is nowhere near it.
POINT THREE: WHAT ARE YOU DOING WITH YOUR FINGERS STOP THAT
Okay I keep seeing this

Having the fingers clasping the arrow like this makes it highly likely that the pressure from them will send the arrow off-course.
Many modern bows have an arrow rest so you needn’t rest the arrow on your hand at all. If that isn’t the case, it works better to rest the arrow on the first knuckle of the index finger (where it meets the hand). If it’s just being used as a platform, the finger shouldn’t be able to exert enough pressure to make the shot go all over the place. Also you won’t end up shredding your fingers with the fletchings.
Talking of that…
POINT FOUR: DON’T SLICE YOUR FINGERS OFF
remember what I said earlier about how incredibly taut bowstrings are
imagine pulling that back with your soft fleshy fingers
it is basically like cheesewire through…soft fleshy fingers.
Use protection. Illustrated below are the tab and archery glove, or just go to google or something, stop the madness.

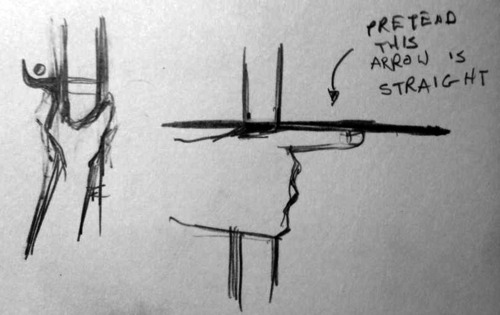
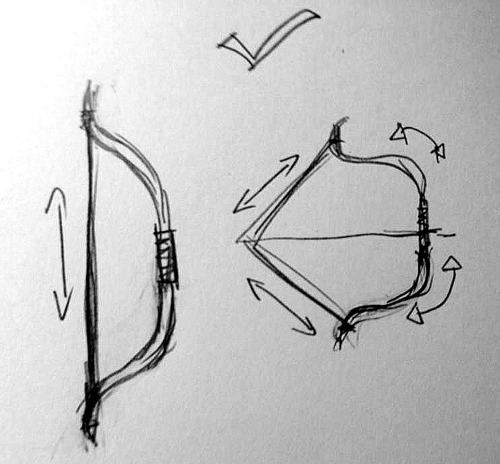
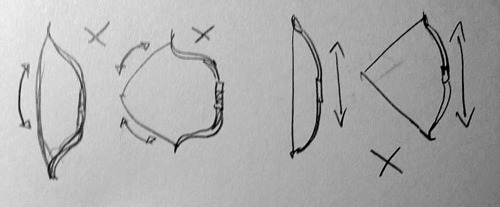
POINT FIVE: PHYSICS DOESN’T WORK LIKE THAT
A strung bow is taut. The body of the bow is pulled by the (very tight) string, making a D shape. An unstrung bow will be straighter.
The tension in the string means a string should always be a straight line. If the bow is drawn, it’s two straight lines.

If there is any curve in the string, the arrow will probably fall limply to the floor.
ALSO. When the string is drawn back, it exerts more pressure on the bow, creating that really exaggerated curve. This is where the power comes from. (I think. I am not physics). Basically, if you’re drawing a character at full draw, the string should be straight and the bow should be curved. If the opposite is true something very wrong has happened and you should be sad.
OKAY! I hope this has been helpful, if you have any questions or concerns let me know. And if in doubt, doctor google will help you - look at olympic or professional archers, and see how they’re standing and how their bows behave.
GOOD LUCK DRAWING!
16K notes
·
View notes
Text
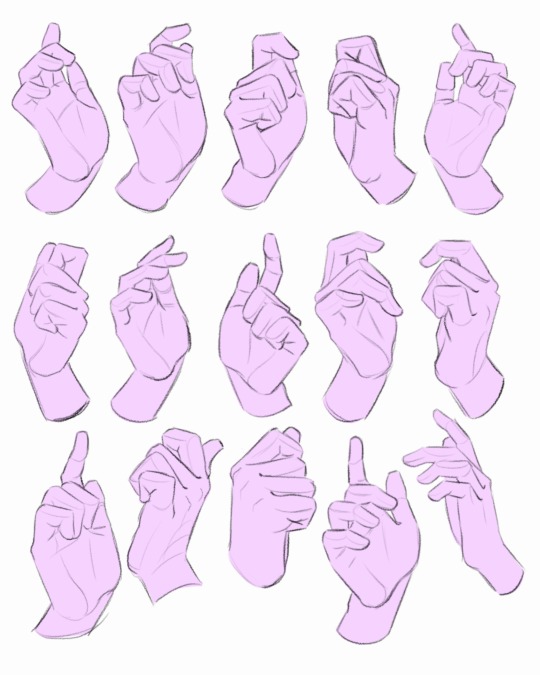
WHY IS DRAWING HANDS SO FUCKING HARD
151K notes
·
View notes