
badgalkatzha
ALL My CC is deleted links don't work
2923 posts
Don't wanna be here? Send us removal request.
Last Seen Blogs
robabkyaa
Robabkya
oohmychanel
Pretty hurts
dopeboysclub
Underground

just-equine
Equestrian Life
1otaku
1OTAKU
Text
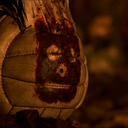
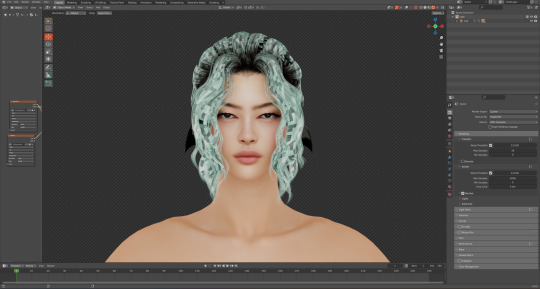
Hair Clipping in Cycles
No one asked for this, but I figured I'd share because it's pretty helpful. So, in the pic below, you see Eve's got some fucked up hair. It looked perfectly fine in Eevee, but after switching over to Cycles, a bunch of ugly shadows showed up all over my girl's do.
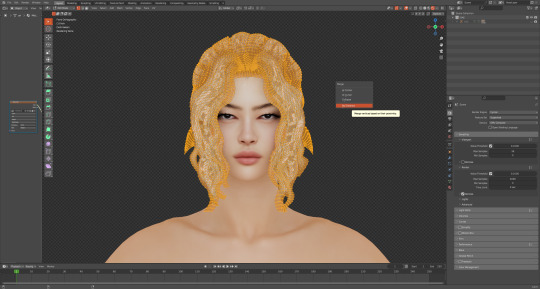
To fix this, go to Edit mode, select all (press A), then press M. You'll see a menu pop up on the side, go to the last option 'By Distance.'
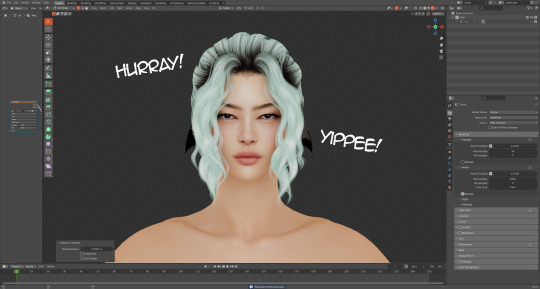
And there you go, no more shadows. In my case, I didn't have to mess around with the 'Merge Distance.' But sometimes you'll have to because Blender is weird and inconsistent. I'll usually enter 0.001, 0.002, etc. and keep moving up or down until it looks right.
105 notes
·
View notes
Text
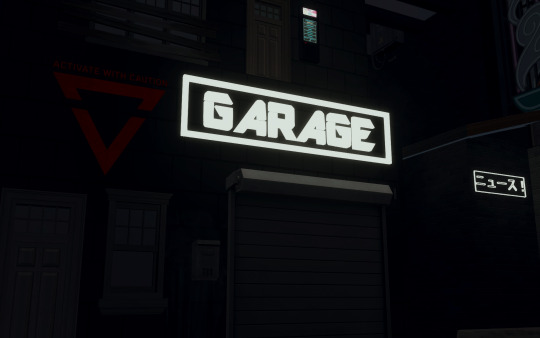
A Simple Neon Sign Tutorial [TS4]
By Networksims [Twitter / YT / TSR]
You will need:
Sims4Studio
Blender 2.9
Any image editor
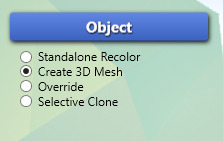
1. Open S4S. Under “Object”, select “Create 3D Mesh” then click “Object”
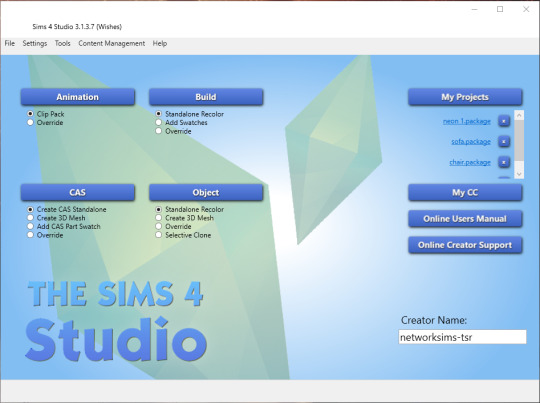
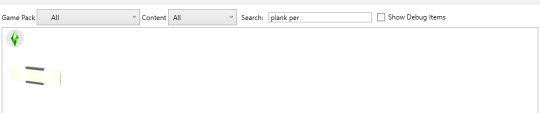
2. Search for “plank” and select the wall light.
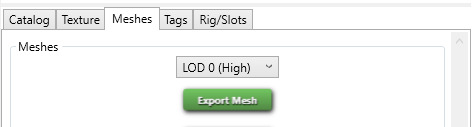
3. Under the meshes tab, click export mesh (make sure LOD 0 is selected in the dropdown).
4. Open the exported file in blender.

5. Select “s4studio_mesh_1″ from the top right menu. Then press TAB to go into edit mode, and then press A to select it all.
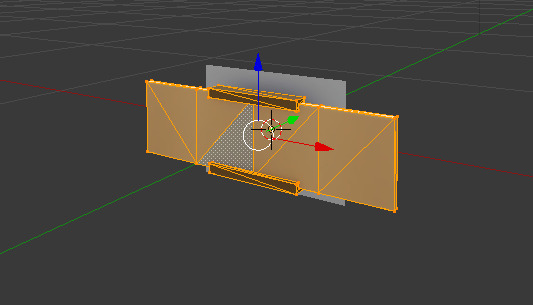
6. Press X and select “Vertices” in the menu that appears to delete the object. Do not delete the object from the top right menu.

7. Now press TAB again to go into object mode, and add a text object using the bottom left menu.
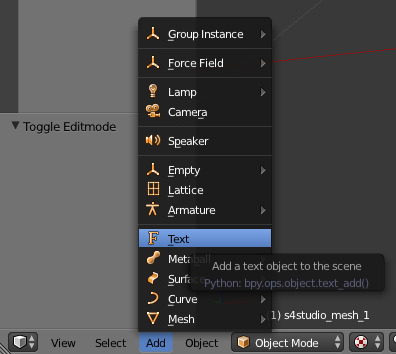
8. This will add a generic text object to the mesh. Press TAB again to edit it and enter whatever text you’d like.
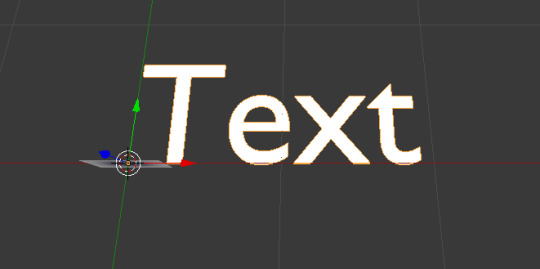


9. Now press TAB again and select the font menu from the top right menu.
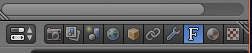
10. Find these options and press the folder icon next to “Regular”.

11. Navigate to your font folder and select the font you’d like to use. (Windows users: open “Font Settings” from your settings and you can preview all your fonts).

12. Now your text should be in your selected font.

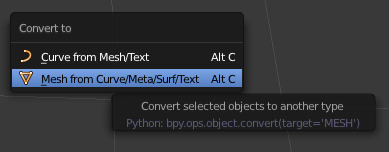
13. Press ALT C and select “Mesh from Curve”
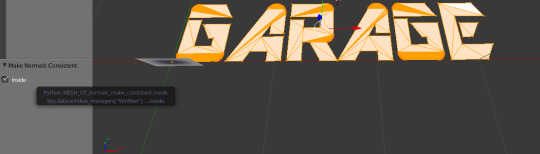
14. Press TAB then CTRL + N, and tick the “Inside” box that should appear in the bottom left.
15. Press TAB again and select the modifiers menu from the bottom right. Then click “Add Modifier” and find “Decimate”. Make sure you’re in object mode, not edit mode.

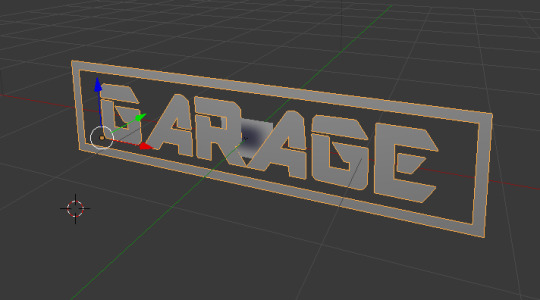
16. Select the “Planar” option and increase the angle limit as much as you can before the text becomes too distorted. 15o is generally your best bet.

17. I’m now adding a border around my text. If you don’t want to do this skip to step 20. In edit mode, add a “Plane” to your mesh. Drag the edges in till it fits around your text and raise it so it lays flat with the text.

18. Press I and drag your mouse towards the centre of the mesh until you get the desired border width.

19. With face select on, select the centre face, press X and select “Faces”.

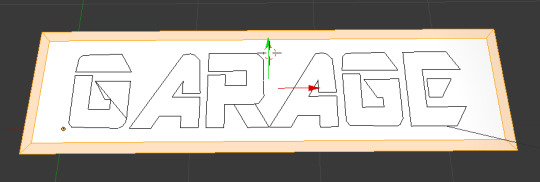
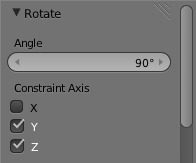
20. With all the mesh selected, press R and click wherever. In the bottom left menu, enter 90o as the angle and tick the Y and Z boxes under “Constraint Axis”. Drag it around until it’s fairly centred and lines up with the shadow box.
21. In edit mode, press E and drag forward until the desired depth.
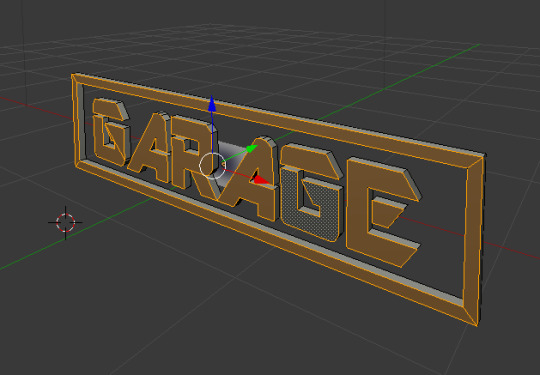
22. In the top right menu, click on “Text” and shift-click on “s4studio_mesh_1″, then press CTRL + J.
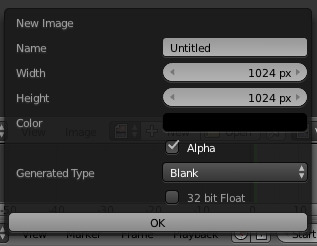
23. In edit mode, make sure all your sign is selected, then click “Image” > “New Image” in the far left corner. Click OK. You should get a weird set of lines and the texture on your mesh should look terrible. This is normal.
*This is UV-mapping. Normally faces are selected one-by-one to create a nice clean texture map which can then be used to create beautiful textures. However since our sign will be flat white with no shading, it doesn’t really matter.


24. Press SHIFT + CTRL + S to save your file.
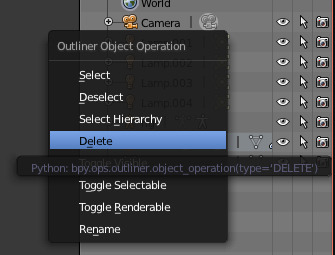
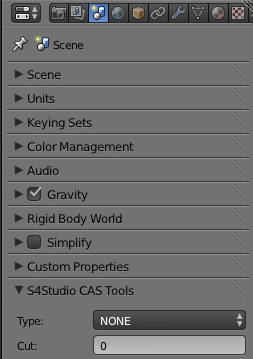
25. In the top left, delete “s4studio_mesh_0″. Then select “s4studio_mesh_1″, open the “Scene” menu and change “Cut” under “S4Studio CAS Tools” to 0. Repeat step 24 but do not override your other mesh.
26. Open S4S again. Under the meshes tab, for each of the non-shadow LODs, import your first mesh. For the shadow LODs, import your second. You may need to make different LODs depending on your mesh’s complexity.
27. In an image editor, make a 64x64 white png.
28. In the “Textures” tab in S4S, import your white square as the texture.

29. And we’re done! Save in S4S, put the package into your mods folder and enjoy your new light :)
544 notes
·
View notes
Text
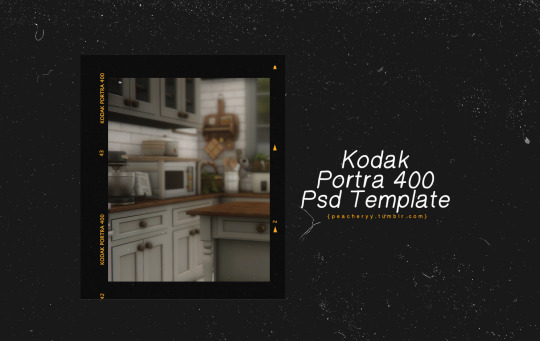
📷 Kodak Portra 400 Psd by Peacheryy
Tag if you use! Please dont claim as your own
Font Used : Lucida Sans Unicode
Dl : Sfs Always free
234 notes
·
View notes
Text
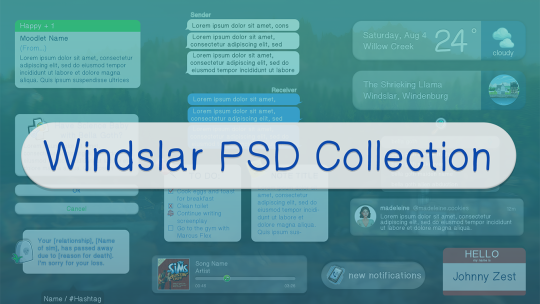

Here's my collection of UI-ish templates that I've been working on and have used in some of my recent posts. This file includes 15 or so templates that you can copy and paste into your screenshots. Before I had this "workspace" I used to have multiple tabs and windows open, and I often forgot which templates I had. I tried my best to organize, label, and colour-code each template for easy customization. For sample images, tips on how to use PSDs, "hidden" features, and other download links, keep reading.
TOU: Feel free to use and edit as you wish but please don't reupload and claim as your own. If someone asks where they're from, please link to this post.
DOWNLOAD (SFS) (42.7mb)

beginner-friendly tips for using these PSD templates and some fun, little features:
open the windslar PSD collection in a new Photoshop window, drag and drop the folder/group of the template you want to use onto the image you’re editing OR select the folder/group of the template you want to use and ctrl+c / cmd+c then ctrl+v / cmd+v to the image you're editing
download the helvetihand font linked in this post so you don't get that constant pop-up that the font will be replaced
resize by selecting the folder containing the template. if you resize individual layers, things may start to look wonky
play around with blending layers and opacities for your template backgrounds. if readability is important, stick with normal, 100% opacity and a contrasting font colour. feel free to change the blending modes and fonts if you feel comfortable doing so
drop shadows and other effects may look slightly different if copying the template to another image because Photoshop, by default, has 'use global light' checked off; just double click the layer style to customize shadows or the click the eye icon by the effect layer to make it invisible
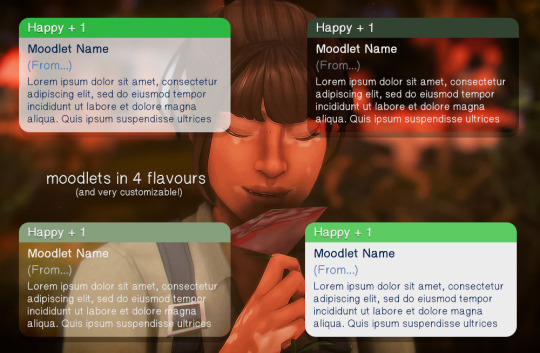
moodlets come in four different styles: classic, soft, dark, and bright and include all emotions plus a neutral one
the announcement template includes the following events (and their corresponding icons): birth, marriage, divorce, death, and news/neighbourhood story
imessage templates have the tails of the speech bubble on a separate layer so they don't get squished when you resize them
want to put an album cover or a profile pic? use a clipping mask. select the appropriate layer (ALBUM or USERPIC) on the template you want to use, drag the image you want to use and position it on top of the layer. right click the image and select 'create clipping mask'. now just resize the image to fit in the confines of that shape.
the tweet / social bunny template has bonus social bunny reaction icons in an invisible folder
the weather template has a folder including icons for multiple weather events. similarly, the location template has an icon for all the worlds (base game worlds all the way to Tomarang). there's also a location pin icon if you choose not to use the game's worlds icons.
edit this to your heart's content. change the fonts, the colours, the shapes and hit 'save as' so you can always have your personalized template workspace to use during your editing process. but if someone asks you where you got your templates, i'd appreciate if you linked back to my original post

Helvetihand Font
TS4 icons* - TheSimKid, deathbypufferfish, w-sims,
Tutorial on how to extract icons (i.e. how I got some of the world icons)
*I have L'Universims' icons from before the site was targeted by hackers, but I've included other places where you can download TS4 icons.
DOWNLOAD (SFS) (42.7mb)
1K notes
·
View notes

Text
“FUCK MY LIFE TO DEATH” — Ancient Italian proverb, unattributed
3K notes
·
View notes

Text
Here's my collection of UI-ish templates that I've been working on and have used in some of my recent posts. This file includes 15 or so templates that you can copy and paste into your screenshots. Before I had this "workspace" I used to have multiple tabs and windows open, and I often forgot which templates I had. I tried my best to organize, label, and colour-code each template for easy customization. For sample images, tips on how to use PSDs, "hidden" features, and other download links, keep reading.
TOU: Feel free to use and edit as you wish but please don't reupload and claim as your own. If someone asks where they're from, please link to this post.
DOWNLOAD (SFS) (42.7mb)
beginner-friendly tips for using these PSD templates and some fun, little features:
open the windslar PSD collection in a new Photoshop window, drag and drop the folder/group of the template you want to use onto the image you’re editing OR select the folder/group of the template you want to use and ctrl+c / cmd+c then ctrl+v / cmd+v to the image you're editing
download the helvetihand font linked in this post so you don't get that constant pop-up that the font will be replaced
resize by selecting the folder containing the template. if you resize individual layers, things may start to look wonky
play around with blending layers and opacities for your template backgrounds. if readability is important, stick with normal, 100% opacity and a contrasting font colour. feel free to change the blending modes and fonts if you feel comfortable doing so
drop shadows and other effects may look slightly different if copying the template to another image because Photoshop, by default, has 'use global light' checked off; just double click the layer style to customize shadows or the click the eye icon by the effect layer to make it invisible
moodlets come in four different styles: classic, soft, dark, and bright and include all emotions plus a neutral one
the announcement template includes the following events (and their corresponding icons): birth, marriage, divorce, death, and news/neighbourhood story
imessage templates have the tails of the speech bubble on a separate layer so they don't get squished when you resize them
want to put an album cover or a profile pic? use a clipping mask. select the appropriate layer (ALBUM or USERPIC) on the template you want to use, drag the image you want to use and position it on top of the layer. right click the image and select 'create clipping mask'. now just resize the image to fit in the confines of that shape.
the tweet / social bunny template has bonus social bunny reaction icons in an invisible folder
the weather template has a folder including icons for multiple weather events. similarly, the location template has an icon for all the worlds (base game worlds all the way to Tomarang). there's also a location pin icon if you choose not to use the game's worlds icons.
edit this to your heart's content. change the fonts, the colours, the shapes and hit 'save as' so you can always have your personalized template workspace to use during your editing process. but if someone asks you where you got your templates, i'd appreciate if you linked back to my original post
Helvetihand Font
TS4 icons* - TheSimKid, deathbypufferfish, w-sims,
Tutorial on how to extract icons (i.e. how I got some of the world icons)
*I have L'Universims' icons from before the site was targeted by hackers, but I've included other places where you can download TS4 icons.
DOWNLOAD (SFS) (42.7mb)
1K notes
·
View notes


Text
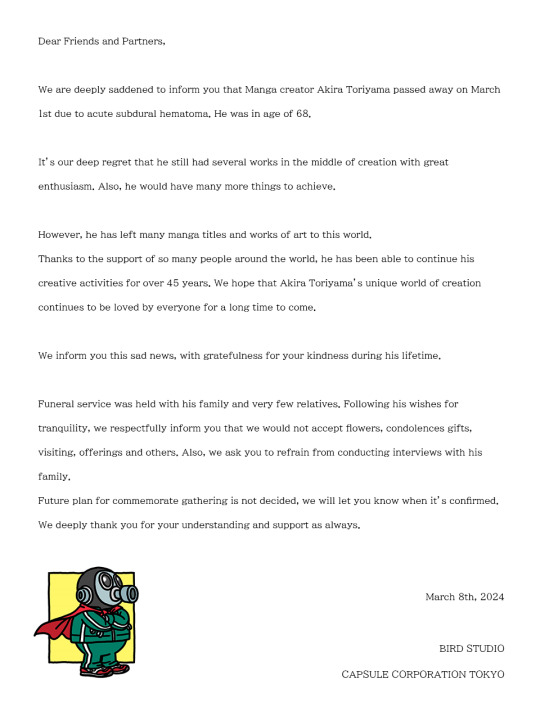
Akira Toriyama, creator of Dragon Ball and Dragon Ball Z, dies at 68. Absolutely tragic. Rest in peace Legend.


15K notes
·
View notes
Text

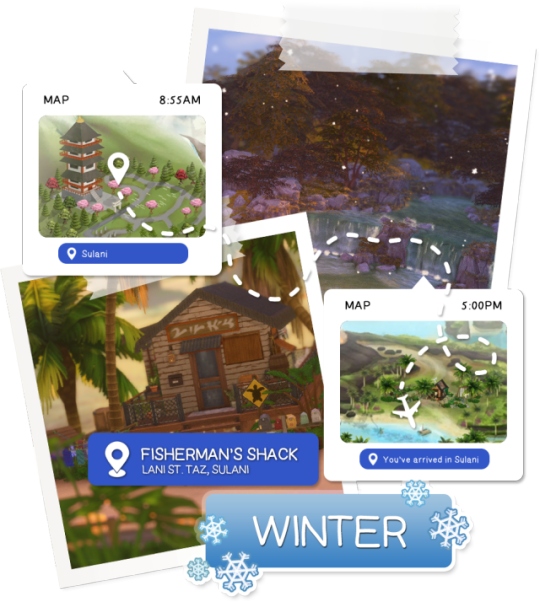
In celebration of reaching 900 followers!
Ever since I started playing the Globetrotter challenge by @moonfi; I've been creating a collection of UI Widget style templates. This collection includes 20(ish) different templates for you to use in your gameplay screenshots. I'm hoping I did my best to make this as user-friendly as possible; but if you have any questions or notice something off - don't hesitate to message me or send an ask!
[Terms of Use]
Do: Use & edit as much as you want and/or know how to.
Don't: Reupload & claim as your own.
Do: Link back to this post if asked where they're from.
[You Need]
Fonts: April | Lemonmilk | Kids Handmade
TS4 Icons: deathbypufferfish | w-sims | TheSimKid
(I've had L'Universims' icons before they were hacked but as far as I know they've moved to a new website so download from there at your own risk.)
DOWNLOAD (SFS) 66.3mb **FIXED** (Missing moodlet)
[Tips & Hints]
Open the awkwardwhims psd collection file in Photoshop, then drag & drop the folder or group of templates onto your image.
The photo album template was inspired by @folkbreeze (definitely check out their resources, they're all so nice!) & other various examples I saw online.
Resize the template by selecting the folder as a whole; resizing individual layers may makes things unaligned.
Feel free to change background colors/fonts/etc as much as you want.
The text message template has 3 styles: sender, green receiver & blue receiver. There are also reaction icons & a separate reaction bar.
For the to-do list template I didn't include every aspiration icon (I was trying to keep this file as small as possible) but you can download this pack by @deathbypufferfish that has all the aspiration icons you'll need. However, it may be missing some of the newer aspiratons.
When adding photos (album cover/recent photos/etc) use a clipping mask.
The weather template includes all the different weather icons, so be sure to hide/unhide the one that applies.
For the new transaction template, make sure to only change the number of the price otherwise the Simoleon symbol will get changed to Times New Roman.
The notification message template is for life events, bad events & default game notifications (ie: legacy player, etc).
DOWNLOAD (SFS) 66.3mb **FIXED** (Missing moodlet)
@alwaysfreecc @maxismatchccworld
1K notes
·
View notes