
Last Seen Blogs

trashnutt
Y I K E S

fuzzypainterfanflower-blog
My Savage Page

fleshboy-mccoy
heck

pocapoesia
Poca poesía

localdisabledwitch
Local Witch
Text
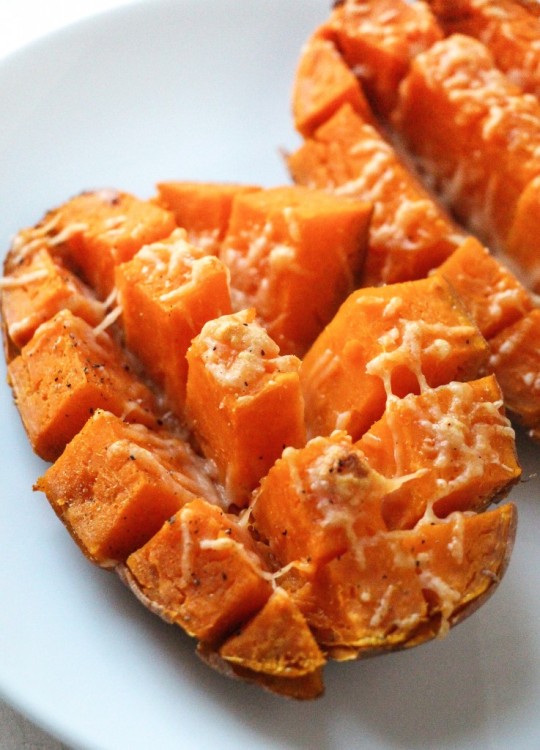
Tie Front Top
As my sewing skills continue to improve with practice, practice, practice, it is an awesome feeling to start to see ready to wear clothing items and think, “I’ll find a way to make that myself.” This tie front top with diagonal stripes was inspired by a top I bought for Caroline this year. I knew I wanted one for myself but with red stripes instead of blue. I opted for this organic double gauze fabric and I love it!
This was a fun project that definitely challenged me, mainly in carefully cutting my fabric pieces so the diagonal slant of the stripes would line up just so. I experimented with using my serger to finish the seam allowances as well. I also had to modify the sleeves because my very built arms could barely squeeze into the sleeves for my given shirt size. Read on below for all the details, links to resources, and a few more photos.
Source: https://everydayannie.com/lifestyle/tie-front-top/
0 notes
Text
IKEA Is Celebrating National Meatball Day With All of the Meatball Deals
Tomorrow is National Meatball Day, my friends. And for this special holiday, IKEA is celebrating by offering a whole platter of meatball-centric deals and festivities across the country.
What’s on the menu? On March 9, all IKEA restaurants will exclusively serve its full range of meatballs, from its classic Swedish version to the veggie, salmon, and even chicken varieties for the occasion. Each store will have free samples of all IKEA meatballs throughout the day, and if you choose to dine in, you have the option to build a meatball plate with your choice of meatballs, plus a soup or salad, and a drink. If you’re an official IKEA Family Member, you’ll get $1 off the Swedish meatball plate.
After you reach your meatball lunch or dinner quota, you’ll still be able to grab three bags of frozen meatballs for $19.99 and take advantage of $5 off $25 worth of anything in the Swedish Food Market. Depending on location, your nearest IKEA might also be celebrating the day with other special offers and activities.
However, if for some reason you can’t make it to IKEA tomorrow for this special meatball appreciation event (seriously though, the chicken meatballs are only back for one day), here's a whole pile of meatball recipes you can make for your own private Meatball Day celebration.
What's your favorite meatball? Let us know below!
Source: https://food52.com/blog/23903-national-meatball-day-ikea-meatball-deals
0 notes
Text
How to get a free Slurpee at 7-Eleven this week
It’s 7-Eleven’s birthday, and it’ll give away free Slurpees if it wants to. On July 11, also known as 7-Eleven Day, the chain will serve an estimated 9 million small Slurpees to customers across the U.S., and nobody has to pay for a single one.
These 33 Restaurants Will Give You Free Food on Your Birthday
In Beyoncé’s hit song “7/11,” she says, “Man it feel like rollin’ dice, seven twice, seven twice,” which may or may not have been a bit of foreshadowing for this day because 7-Eleven is giving out not one but two Slurpees to each person who rolls through on “B’Day.” Get it?
To receive the additional freebie, sign up for 7-Eleven’s 7Rewards app. When you claim the first Slurpee, have the cashier scan your phone and then you’ll be credited for a second one of any size redeemable within 30 days. The virtual coupon for that can be found in the app.
Last but not least, customers can use the 7NOW app now through July 12 and receive a free medium Slurpee, but they still have to pay small basket and delivery fees. There is no delivery charge on the first three orders for newcomers, though. 7NOW staffers will bring your items to your home, work or thousands of other pinpoints in parks, beaches, entertainment venues and other public locations.
So yeah, go get your free Slurpees, people.The convenience store chain will honor the annual promotion on the 11th day of the seventh month from 11 a.m. to 7 p.m. while supplies last. On the same day, you can also get Big Bite Hot Dogs, Hot Pizza Slices, limited-edition Cherry Slurpee Cookies and Nashville Hot Chicken Tenders all for just $1 each. If you’d rather spend a pretty penny on quick eats, check out the world’s most expensive burgers, cheesesteaks and other “cheap” dishes.
Source: https://www.thedailymeal.com/drink/free-slurpee-day/071019
0 notes
Text
Burger King is bringing back a fan-favorite sandwich with a twist
Burger King isn’t chickening out when it comes to new menu items. The fast food chain is bringing back its chicken Parmesan sandwich in a big way: with three different versions of the sandwich to choose from.
America’s Most Expensive Burgers
Chicken Parmesan, that tasty Italian-American comfort-food classic, has been on BK menus before. A crispy fried-chicken version of the sandwich was offered in 2017. But now the chain has expanded its chicken parm horizons threefold.
Chicken Parmesan usually features a breaded chicken breast covered with rich tomato sauce, Parmesan and mozzarella cheese.
The classic Burger King crispy chicken parm offers a fried chicken fillet topped with marinara sauce, melted mozzarella and shaved Parmesan. The grilled version flame-grills the chicken fillet and marinates it with spices before adding the toppings. And the spicy chicken Parmesan sandwich breads the fried chicken fillet but spices it up with a little heat in the breading. All three sandwiches are served on toasted potato buns.
The recommended prices for the crispy and spicy versions are $4.99, and the grilled version costs $5.49. The sandwiches are available for a limited time only at participating Burger King locations. Didn’t know that Burger King loved chicken parm enough to offer three varieties? Add that factoid to the list of 25 things you didn’t know about your favorite fast food chains.

Source: https://www.thedailymeal.com/eat/burger-king-chicken-parmesan-sandwiches/052119
0 notes
Text
Skillet Summer Vegetable Lasagna
This skillet vegetable lasagna is packed with summer veggies and is so fast to put together. Made start to finish in one skillet, it is a summer dinner staple…and wow, is it tasty!
This skillet vegetable lasagna is hands down one of my favorite meals to make during the summer. For, like, a million reasons. First and foremost, it’s fast, which means you aren’t slaving over a hot stove for hours OR turning on your oven to heat up dinner and the house.
But mostly, my one-pot dinner loving heart appreciates that it is made start to finish in the same little skillet; the result is a super delicious veggie-loaded pasta dish that is equal parts comforting and refreshing.
I’ve been making this skillet vegetable lasagna for years (and years and years). Even when my garden is pathetically pathetic, I still find a way to harvest and save zucchini and yellow squash for this dish (that is, if I have any leftover after hoarding it for this best-ever zucchini bread).
And it’s one of the main recipes that leads me to plant fresh basil every year even though I rank as one of the worst gardeners in the history of ever. That fresh pop of basil flavor is magic.
This recipe also adapts very well to other vegetables, like fresh tomatoes, spinach, broccoli, asparagus, bell peppers, etc. And if you use a larger pot (read on for details), you can load as many vegetables in there as you like without fear of overflowing the skillet. I’ve learned with my kids that if I throw enough pasta and cheese in with their veggies, they’ll eat just about anything.
This lasagna recipe is written to use a 12-inch nonstick skillet. I’m not going to lie, it’s a pretty full skillet by the end, but it gets the job done. However, many times when I make it, I pull out one of my wider saucepans or pots and use that. Works like a charm, although if the pot is stainless steel, you want to stir it often to ensure the pasta isn’t sticking.
So basically, if you don’t have a 12-inch skillet, that should not be the reason to avoid making this dish. A 6-quart pot (or thereabouts) will work great. I guess it makes me feel better to hash that out so that this skillet lasagna is accessible to one and all.
If it’s been a while since you’ve made this recipe, be sure to read through the recipe and the recipe notes in full; I’ve added a few details to make it all a bit easier and offer a few substitute suggestions. And yes, an update on this sister recipe: meaty skillet lasagna is coming soon – those pictures! Yikes!
There’s a reason this skillet vegetable lasagna has been on repeat for the last 7+ years around here. It’s incredibly delicious. Promise me you won’t let this summer end without making it, ok?
Divine Breadsticks
Honey Lime Fruit Salad (or a big bowl of fresh watermelon)
One Year Ago: Grilled Hawaiian Chicken
Two Years Ago: Mediterranean Quinoa Salad
Three Years Ago: Dan Dan Noodles 30-Minute
Four Years Ago: Blueberry Custard Pie with Buttery Pecan Streusel
Five Years Ago: Peach Frozen Yogurt Quick, Easy, Healthy
Six Years Ago: Black Bean Hummus
Seven Years Ago: Sweet and Spicy Pork Tenderloin
Eight Years Ago: Festive Fruited Cheesecake Flag
Yield: 4-6 servings
Prep Time: 15 minutes
Cook Time: 20 minutes
Total Time: 35 minutes
Ingredients
1 to 2 tablespoons extra virgin olive oil
1/2 cup chopped yellow or white onion
4 garlic cloves, minced or 1 teaspoon garlic powder
28-ounce can diced tomatoes (see note)
1 teaspoon salt (I use coarse, kosher salt)
10 curly-edged lasagna noodles, broken into 1 or 2-inch lengths
1 small zucchini, cut into 1/2 inch chunks
1 small yellow squash, cut into 1/2 inch chunks
1/4 cup chopped fresh basil
1 cup ricotta cheese, whole milk or part skim
1 cup freshly grated Parmesan cheese
Instructions
In a large 12-inch skillet heat the oil over medium heat until hot and rippling. Add the onion and cook until softened, 2-3 minutes. Add the garlic or garlic powder, and cook until fragrant, about 30 seconds.
Drain the diced tomatoes into a 2- or 4-cup liquid measure. Add water to the tomato liquid to make 2 cups. Add tomato/water mixture and 1 teaspoon salt to the skillet.
Scatter the broken noodles into the skillet, layer the drained tomatoes over the noodles and bring to a simmer. Reduce the heat to medium and cook, covered, stirring occasionally (so the noodles won’t stick!) for about 10 minutes.
Stir in zucchini and squash. Cook, stirring occasionally (again, to prevent sticking - add broth or water, if mixture seems dry), until noodles and squash are tender, 6-8 minutes.
Off the heat, add the basil, half of the ricotta cheese and half of the Parmesan cheese. Stir until creamy. Dollop the remaining ricotta cheese over the noodles, season with salt and pepper to taste, and sprinkle with remaining Parmesan cheese and fresh basil, if desired.
Notes
If you don't have a 12-inch skillet, a 6- or 8-quart saucepan or pot works great for this recipe. Also, you can sub in or add a variety of different vegetables (especially if using a larger pot). Broccoli, bell peppers, asparagus, fresh tomatoes, just to name a few!
Sometimes I get lazy and instead of using diced tomatoes, I sub in a 28-ounce can of crushed tomatoes (no draining), add about 1/2 to 1 cup of water or broth, and toss it all in the skillet in step #2.
Recommended Products
As an Amazon Associate and member of other affiliate programs, I earn from qualifying purchases.
Recipe Source: adapted slightly from America’s Test Kitchen
Recipe originally published July 2011; updated June 2019 with new photos, recipe notes, etc.
Posted on June 23, 2019 by Mel
Source: https://www.melskitchencafe.com/skillet-summer-vegetable-lasagna/
0 notes
Text
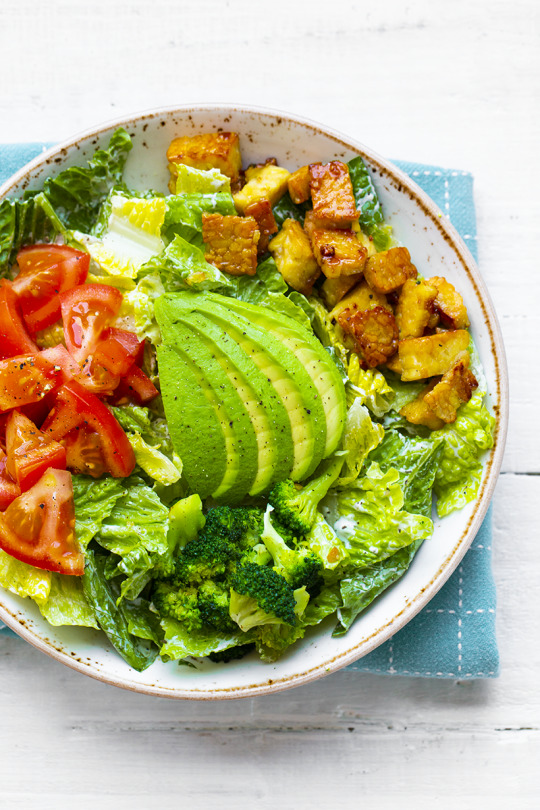
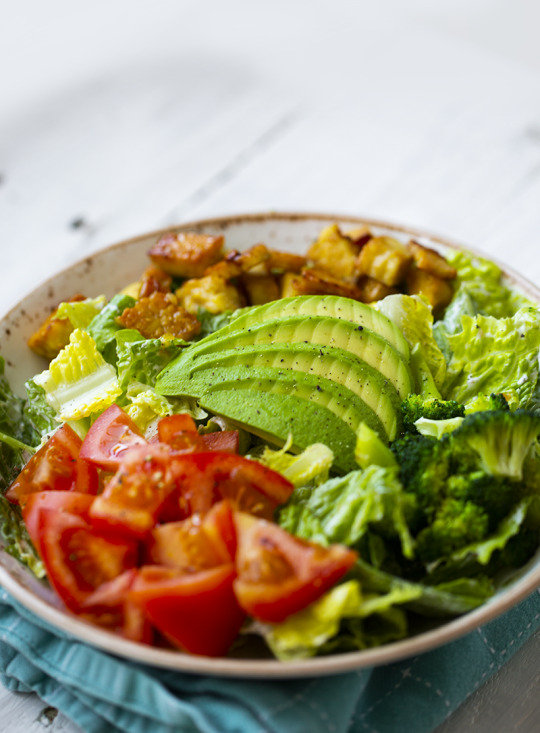
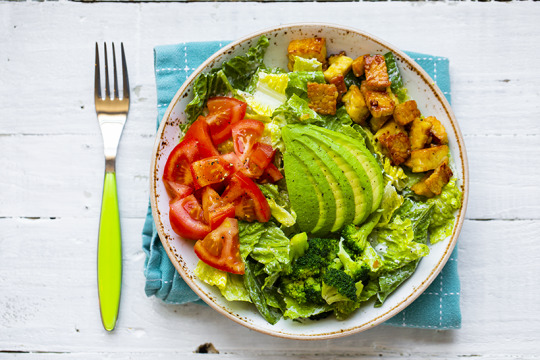
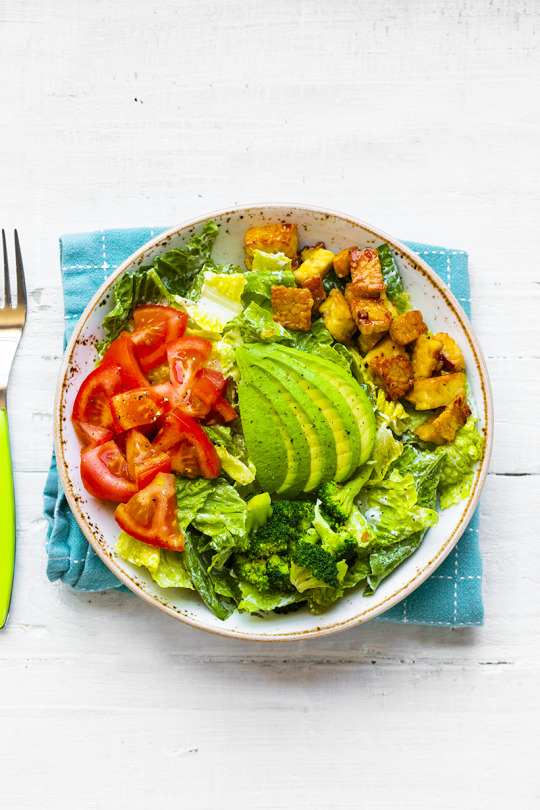
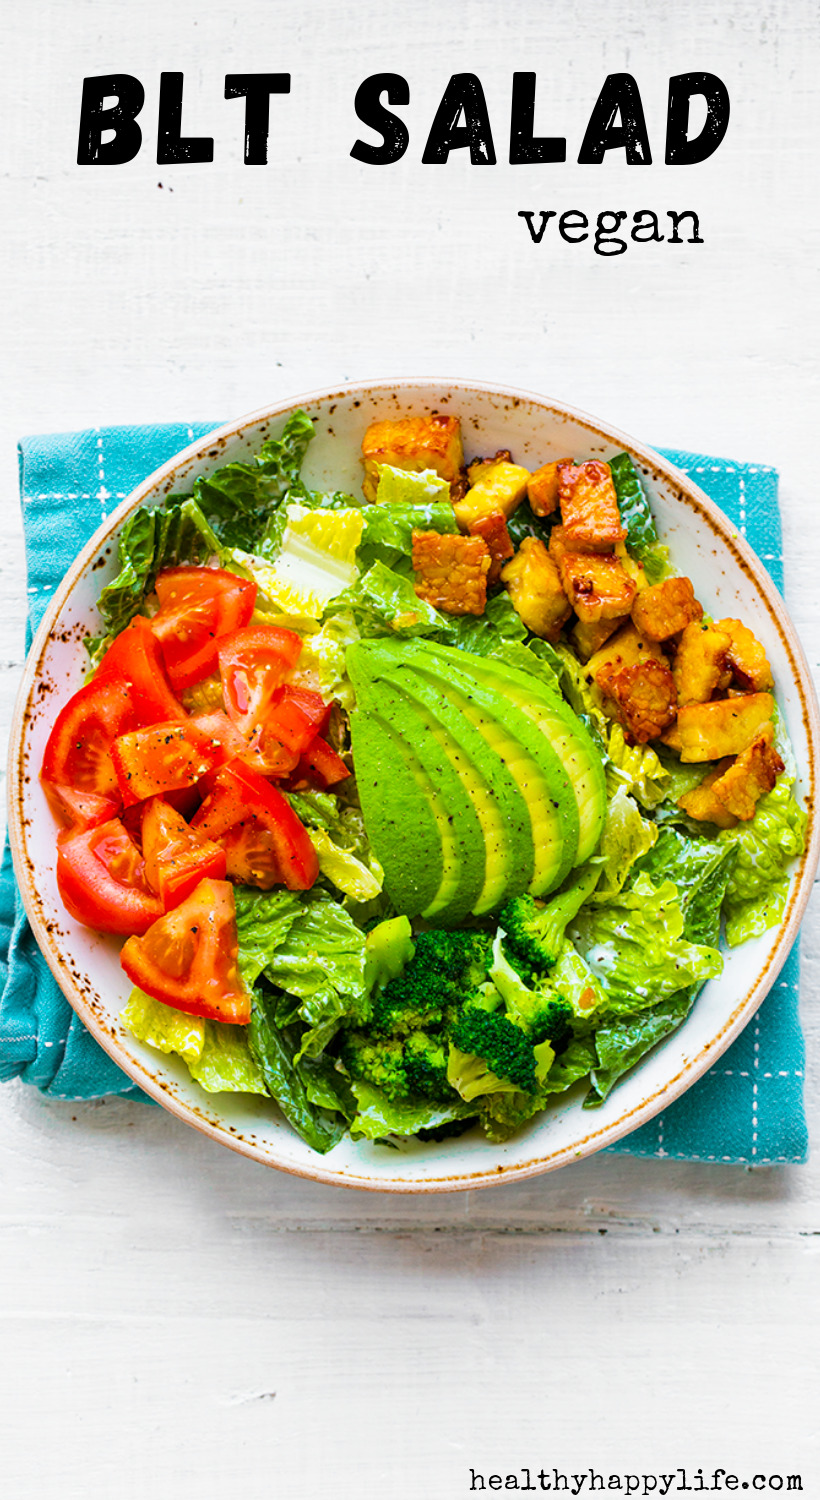
BLT Salad
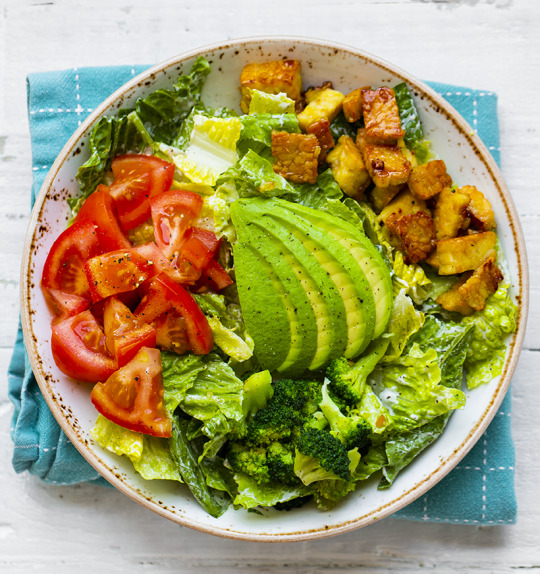
This fast, easy and flavorful BLT Salad is perfect for lunch. You could also serve it alongside a pizza or pasta at dinnertime. Or you could double the portion size for a full on entree salad. Creamy vegan ranch dressing coats crisp romaine lettuce, juicy summer tomatoes and tempeh bacon bits too. Add some steamed broccoli if you'd like and a hefty portion on buttery avocado on top...
Post-long weekend mood...
Sochi gets it..

Blue sky, yes and yes.

Long weekend over and summer is on the way. I had such a chill long weekend! We didn't go anywhere or do anything really special and that made it lovely. Friday through Sunday was a bit rainy, which made for perfect writing and creative projects weather. A nice run at the gym (I'm actually working out again after a looooooooong hiatus) and I even got back in the kitchen and cooked a bit (also a bit of a hiatus). Then Monday opened up with this beautiful powder blue sky and soft streaks of sparkly warm sunshine. I went with a friend to get a facial at HeyDay in Brentwood - super cute spot for natural skincare - and then home to make this salad.
Breakfasts for me have still been super simple - oatmeal and blueberries. I think I may have tested the limits of how many pints of blueberries one person can eat in one weekend these past few days. I think we went through four pints! Yup. They were so good!
And I only have a few more weeks left of my UCLA writing class, which is so sad since I've loved it so much these past eight or so months.
Oh, and the kitties loved their long weekend as well - so many sunbeam naps and snuggle time on the couch. I binge-watched Dead to Me, which was pretty good. And I also watched the GOT documentary which was great. Still sad it's over, but FYI the soundtrack from this last season is SO great. I love it as work music!
So, that was my weekend, I hope you guys had a nice one as well.
BLT. And these salads are just super with their easy romaine leaves and a creamy vegan ranch to flavor things up. My tempeh bacon provides heartiness and loads of protein too.
Ranch. You can DIY your dressing or use a store-bought version. Follow Your Heart High-Omega Ranch is one of my faves.
You can totally use any greens you'd like and play around with the veggies on top.
PS. I have been listening to so many Podcasts lately. I sometimes daydream about starting one, but have no idea what topic I would want to commit myself too. And do I really need another project right now? Hm. Thinking outloud I guess, but curious what your fave Podcasts are.
Hope you love this salad! Happy almost-summer. PS. Snag this PDF for recipes!

BLT Salad
By Kathy Patalsky
Published 05/28/2019
This vegan BLT salad has ranch, romaine, tomatoes and vegan tempeh bacon on top.
Ingredients
4 cups romaine lettuce, chopped
1 avocado, diced or sliced
1-2 tomatoes, diced or sliced
tempeh bacon (4-8oz)
side veggies - optional (I used some broccoli)
vegan ranch dressing, to taste - DIY or use a store-bought version for ease
Instructions
Cook your tempeh bacon in a skillet. You can use 1/2 - 1 package of tempeh, depending on how big of a serving you'd like.
Toss the lettuce with the ranch. Pour into serving bowl(s).
Add the tomato, tempeh and avocado over top the lettuce. Add any other veggies or toppings you'd like. Nuts and seeds are also great additions.
Serve!
Yield: 2 servings
Prep Time: 00 hrs. 05 mins.
Cook time: 00 hrs. 10 mins.
Total time: 15 mins.
Tags: salad,entree,easy,lunch,tempeh, avocado,blt,vegan,recipe,food,
Pin for later!
Source: http://kblog.lunchboxbunch.com/2019/05/vegan-blt-salad.html
0 notes
Text
Summer Melon and Apricot Salad
Last summer, we signed up for a fruit CSA. I had always wanted to love CSAs, but candidly, they never really worked for me before. There were always too many beets, or not enough carrots. Just enough ingredients to make a soup, but still require a trip to the store to pick up celery. Ultimately, I felt like we wasted more than we were actually saving. But the fruit CSA I could really get on board with.
Not a week went by when a single piece of fruit went to waste. Our pickup location was just a few blocks from our house, so we made it a weekly tradition to stroll over as a family to pick it up, often returning home and letting the kids each have a piece while we prepped dinner. Some weeks, I’d cut up peach after peach, as we lounged in the backyard. Nothing is better in life than having a piece of ripe stone fruit drip juices down your arms in the middle of July. Nothing.
We signed up again, this time for an even bigger box. Because the truth is, a lot of summer fruit just doesn’t taste as good when it comes from the grocery store. Often, it’s underripe and not nearly as sweet as it should be. Years of frequenting farmers markets taught me that speckled peaches mean they’re extra sweet, and bruised apricots are delicacies; fragrant and tasting of honey.
In the summer, we consume fruit and vegetables by the pound. Now that all of our kids are eaters, we can barely keep up with flats of strawberries and avocados by the bagful. And most summer nights, I throw whatever fruits and vegetables we have on hand in a bowl, drizzle everything with olive oil and a bit of sea salt, and call it dinner (often served alongside some grilled chicken or fish). This kind of eating is truly my favorite.
This salad, inspired by both Bon Appetit and Alison Roman’s cookbook, Dining In, is a riff on the above, but topped with an addictive and generous dusting of sumac, a Middle Eastern spice that has become a favorite of our kids. They eat it atop rice, beans, and even noodles. Even if you don’t have a summer CSA where you live, seek out the drippiest, most bruised fruit, locally grown cucumbers, and ripe avocados, and let the produce do the talking.
Summer Melon and Apricot Salad
For the salad:
2-3 apricots, pits removed, halved, then sliced in half
1 English cucumber, sliced into half-moons
1 large avocado, pit removed, then cubed
1/2 small melon, cubed
For the dressing:
1/4 cup of lime juice
1/4 cup of olive oil
1 tablespoon of honey
Kosher salt and freshly ground black pepper, to taste
Sumac, for dusting
Handful of toasted pistachios
1 tablespoon of chopped fresh mint
1. Combine all of the salad ingredients in a large serving bowl.
2. Combine the dressing ingredients in a small bowl and whisk until emulsified. Drizzle the dressing over the salad. Sprinkle with pistachios and freshly-chopped mint. Toss gently to coat, then give it a generous dusting of sumac, just before serving. Eat right away.
Source: https://www.turntablekitchen.com/recipes/summer-melon-and-apricot-salad/
0 notes
Text
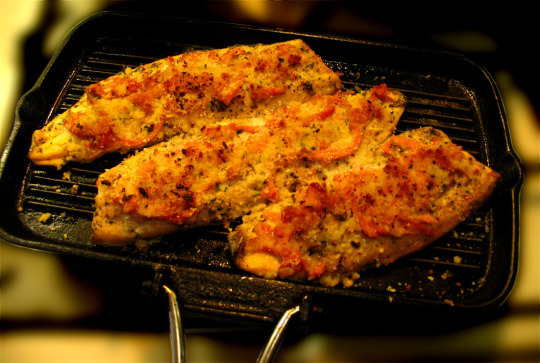
Cabbage Patch Halibut – Come On, Use Your Head
Don’t worry; this cabbage-wrapped fish recipe has nothing to do with those creepy dolls. I just thought “cabbage patch halibut” sounded a little more enticing that the other names I was considering.
Although, anything with the word cabbage in it isn’t going to have people’s mouths watering, which is how we got “coleslaw.” Despite all that, this really is one of easiest, and most delicious ways you can cook fish.
The leaf not only keeps the halibut moist, but also holds all your assorted garnishes and seasonings tight against the meat, which creates an even more intensely flavored final result. Just be sure to save the rest of the head, since once chilled, and sliced thin, it makes for a very interesting salad. Or simply slice it thickly, and fry it up with a few sausages.
This technique should work no matter what fish and ingredients are used, but you may have to adjust the cooking time. The type, size and shape of your fish filet are all variables that affect how long this is going to take. Best to check with a thermometer, and I generally go to for something between 130-135 F. for halibut, but other fish have different target temps, so do some research.
One last tip is to make sure you cut your other ingredients nice and thin, so they’re able to cook during the relatively short roasting time. Other than that, you are only constrained by your imagination. So, whether you put your own twist on this or not, I really do hope you give it a try soon. Enjoy!
youtube
Ingredients for 2 Portions of Cabbage Patch Halibut:
2 teaspoons butter for the pan
2 boneless, skinless halibut filets (about 7 ounces each)
salt and cayenne to taste
2 large steamed cabbage leaves
1 tablespoon thinly sliced fresh ginger
1 Fresno chili pepper, thinly sliced
2 tablespoons sliced green onions
1 tablespoon soy sauce
1/4 teaspoon sesame oil
fresh cilantro leaves to garnish
2 tablespoons miso butter (2 tablespoons butter mixed with 1 or 2 teaspoons of white miso, or to taste)
<![CDATA[ <!-- /* Font Definitions */ @font-face font-family:"MS 明朝"; panose-1:0 0 0 0 0 0 0 0 0 0; mso-font-charset:128; mso-generic-font-family:roman; mso-font-format:other; mso-font-pitch:fixed; mso-font-signature:1 134676480 16 0 131072 0; @font-face font-family:"MS 明朝"; panose-1:0 0 0 0 0 0 0 0 0 0; mso-font-charset:128; mso-generic-font-family:roman; mso-font-format:other; mso-font-pitch:fixed; mso-font-signature:1 134676480 16 0 131072 0; @font-face font-family:Cambria; panose-1:2 4 5 3 5 4 6 3 2 4; mso-font-charset:0; mso-generic-font-family:auto; mso-font-pitch:variable; mso-font-signature:-536870145 1073743103 0 0 415 0; /* Style Definitions */ p.MsoNormal, li.MsoNormal, div.MsoNormal mso-style-unhide:no; mso-style-qformat:yes; mso-style-parent:""; margin:0in; margin-bottom:.0001pt; mso-pagination:widow-orphan; font-size:12.0pt; font-family:Cambria; mso-ascii-font-family:Cambria; mso-ascii-theme-font:minor-latin; mso-fareast-font-family:"MS 明朝"; mso-fareast-theme-font:minor-fareast; mso-hansi-font-family:Cambria; mso-hansi-theme-font:minor-latin; mso-bidi-font-family:"Times New Roman"; mso-bidi-theme-font:minor-bidi; .MsoChpDefault mso-style-type:export-only; mso-default-props:yes; font-family:Cambria; mso-ascii-font-family:Cambria; mso-ascii-theme-font:minor-latin; mso-fareast-font-family:"MS 明朝"; mso-fareast-theme-font:minor-fareast; mso-hansi-font-family:Cambria; mso-hansi-theme-font:minor-latin; mso-bidi-font-family:"Times New Roman"; mso-bidi-theme-font:minor-bidi; @page WordSection1 size:8.5in 11.0in; margin:1.0in 1.25in 1.0in 1.25in; mso-header-margin:.5in; mso-footer-margin:.5in; mso-paper-source:0; div.WordSection1 page:WordSection1; ]]>


Source: https://foodwishes.blogspot.com/2018/08/cabbage-patch-halibut-come-on-use-your.html
0 notes
Text
No Bake, Chewy Peanut Butter Granola Bars
Jan 09
Homemade healthy no bake peanut butter granola bars will be your new favorite snack. These chewy granola bars are packed with wholesome ingredients like peanut butter, honey, chia seeds, flax, almonds, and drizzled with dark chocolate. YUM.
I can’t get by a day without a snack or two. If you reached into my jacket pocket, you’d surely find an RXBar wrapper. I’m known to have a banana in my purse and a packet of peanut butter with me wherever I go. Why? Because without food, I’m HANGRY and it’s bad. Throughout the years, I’ve learned to be prepared for when hunger strikes.
Good news is that I’ve got an incredible nourishing snack recipe for you: I’ve officially made these peanut butter granola bar multiple times since I first developed the recipe. They’re just so good! The best part is that they’re incredibly customizable. You could make a new version every week and never get sick of them.
Let’s chat about the base of the recipe:
Nut butter: We’re all about the healthy fats here! I like to use an all natural peanut butter (just peanuts + salt). If you wanna switch it up, you could try almond butter, cashew, pecan or even sunflower seed butter for a nut free version (without the addition of almonds of course).
Honey: naturally sweetened and just the way I like it. I love using manuka or raw honey because if it’s healing properties, plus I find that it’s a little less sweet than most commercial honey (such as clover). I also recently discovered Soom Foods Silan date syrup that’s only made with dates! YUM.
Flaxseed meal: a natural source of protein, fiber and good for you vitamins. I love adding it to granola bars because it adds a nice nuttiness. It’s also great for mamas who might be nursing.
Chia seeds: another great source of fiber and protein and helps to keep you feel satisfied as chia actually expands in your stomach. It also helps to keep the bars together.
Oats: I love using gluten free old fashioned oats in this recipe. They’re pretty easy to find and are a wonderful complex carb to help provide you with energy.
The rest of the recipe is very flexible. Stick to the base but from there you can adapt!
Adapt these peanut butter granola bars to make them your own:
You can use any kind of nuts you want instead of almonds, or sub dried fruit such as raisins, dried cranberries or dried cherries.
You can also skip the unsweetened coconut (though I think it adds a nice bulk to the recipe and natural sweetness).
If you’re trying to reduce your sugar intake, simply skip the melted chocolate on top.
SO MANY options and I’m incredibly excited for you to make these bars your own.
If you make this recipe, let me know how you liked it by rating the recipe and leaving a comment below. And don’t forget to use the hashtag #ambitiouskitchen on Instagram so I can see your creations!
No Bake, Chewy Peanut Butter Granola Bars
Author: Monique of AmbitiousKitchen.com
Nutrition Information
Serving size: 1 bar
Calories: 263
Fat: 19.4g
Saturated fat: 6.7g
Carbohydrates: 16.7g
Sugar: 8.4g
Fiber: 4.3g
Protein: 7g
Recipe type: Snack, No Bake
Prep time: 45 mins
Total time: 45 mins
½ cup creamy natural drippy peanut butter (just peanuts & salt)
1 1/2 tablespoons virgin coconut oil
3 tablespoons honey
1 teaspoon vanilla extract
1/2 teaspoon cinnamon
⅓ cup flaxseed meal
1 tablespoon chia seeds
½ cup old fashioned rolled oats, gluten free if desired
1/3 cup roasted almonds, roughly chopped* (or sub chopped pecans)
¼ cup unsweetened shredded coconut
For on top:
2 tablespoons roasted almonds, roughly chopped
2 tablespoons dark chocolate chips
½ teaspoon coconut oil
Add peanut butter, coconut oil, honey, vanilla and cinnamon to a medium saucepan and place over low heat. Stir every so often until the mixture is smooth and creamy. Remove from heat and immediately stir in flaxseed meal, chia and oats. Fold in almonds and shredded coconut and stir until combined.
Line an 8x4 inch loaf pan with parchment paper; pour granola bar mixture in and spread out evenly, then press down in the pan very firmly. Press remaining roasted almonds on top.
Place dark chocolate chips and ½ teaspoon coconut oil in a microwave safe bowl. Microwave on high in 30 second increments, stirring in between until chocolate is completely smooth and melted. Drizzle diagonally over bars.
Cover the bars with foil, and place bars in the fridge for 30 minutes-1 hour or until mixture has hardened. Remove bars from pan and cut into 8 granola bars anyway you'd like. Store bars in the fridge, either individually wrapped in plastic or in foil. Bars will last up to 1 week in the fridge.
To roast almonds:
Stove top method: Place almonds in a small pan over medium heat. Stir until toasted and fragrant, about 3-4 minutes. They are done as soon as they start looking darker and smell toasty. Immediately remove the pecans from the pan to a bowl or paper towel to prevent burning.
Oven method: You can also toast the almonds in the oven on a baking sheet at 350 degrees F for 7-9 minutes. I prefer this method
To make bars vegan: Use coconut palm syrup or date syrup instead of honey.
To make bars nut free: Use sunflower seed butter and sunflower seeds in the recipe. Please be aware there is coconut in this recipe if you are sensitive to it.
Feel free to double the recipe and place in an 8x8 inch pan.
Feel free to use any natural nut butter you’d like.
3.5.3251
Recipe by: Monique Volz | Photography by: Yoga of Cooking
Pin these granola bars:
Source: https://www.ambitiouskitchen.com/no-bake-peanut-butter-granola-bars/
0 notes
Text
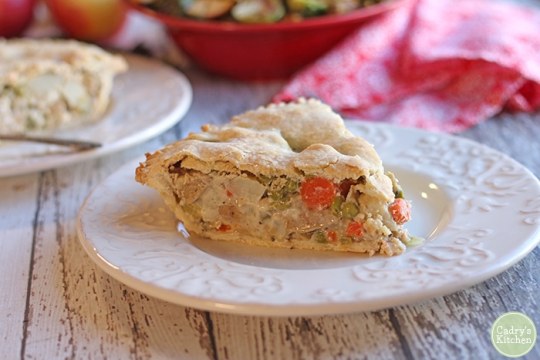
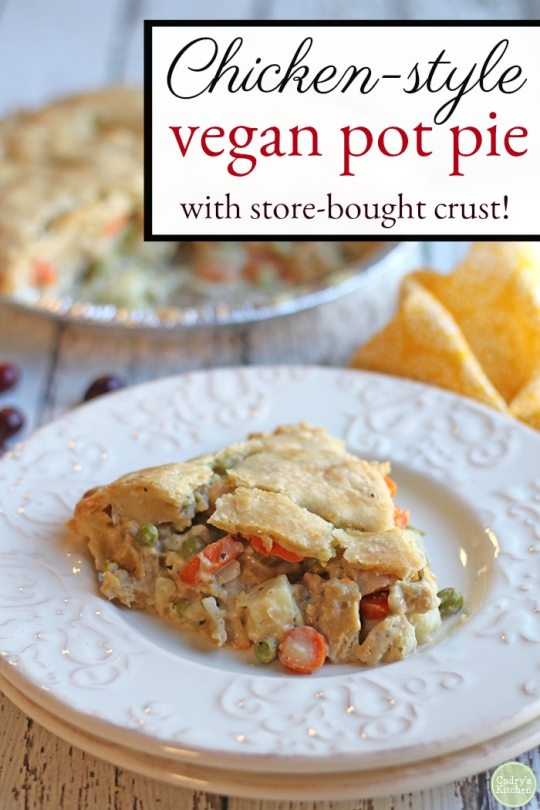
Chicken-style vegan pot pie (Using frozen pie crust!)
It doesn’t get cozier than vegan pot pie. It is loaded with carrots, onions, celery, peas, and chicken-style seitan. Then it’s bundled up in a creamy cashew sauce.
This holiday-worthy dinner got a whole lot easier since it’s made with store-bought frozen pie crusts! And yes, there’s a top and bottom crust for maximum yum factor. Vegan & gluten-free option.
One of my favorite things about food blogging is seeing how my recipes take on a life of their own.
Food blogging is largely a solitary pursuit. (Except for my orange roommate who regularly comes by while I’m working – eager for treats, cuddles & fetch time.)
There’s recipe testing, food photography & editing. There’s writing, pin making (for Pinterest), and social sharing.
Then my recipe goes out into the world. And the people who make it in their homes take it and make it their own. It becomes a part of their special occasions or daily routines.
One example of this is my mini vegetable pot pie recipe. I shared it back in 2016.
In that recipe, vegetables in a cashew cream sauce are ladled into mini cocottes. Then they’re covered with homemade pie dough.
What results are individual pot pies. Perfect for Thanksgiving, Christmas, and winter dinner parties.
Use frozen store-bought pie crusts for easy vegan pot pies
A reader and fellow Iowan, Janis, has made that recipe loads of times with just one difference. She uses frozen store-bought pie crusts for a full-sized pie.
Genius!
Plus, frozen pie crusts usually come two to a pack. So you get both a top & bottom crust out of it. That makes it doubly cozy!
As I’ve mentioned before on my blog, I’m not the pie maker in our family. That falls to my husband, David, who has been making pies from scratch since childhood.
So using a pre-made dough option is right up my alley! (In fact, until this post, I don’t think I’d ever put a pie crust on top of a full-sized pie. So if I can do it, you can too!)
I’ve had Janis’ substitution on my to-do list for a long while now. As we’re speeding into the holiday season, I made it a priority this week.
I knew there would be a lot of you, like Janis, who would like to make a pot pie for your holiday gatherings. It would be a terrific main course on Thanksgiving or Christmas.
And we can all use some shortcuts every now and again – especially this time of year.
Where to find frozen vegan pie crusts
There are a surprising amount of vegan options these days when it comes to pie crusts. Check out the frozen section of your favorite co-op, natural grocery store, or the health market of your mainstream grocery store.
I picked mine up at Natural Grocers. The pie crusts I used are from Wholly Wholesome. The 9 inch crusts come two to a pack.
(By the way, they also have a gluten-free vegan pie crust. Although, I’ve never tried it. )
There are lots of options, though. Just read the ingredient labels to find a pie crust that will work for you.
You don’t have to thaw the pie crusts until you are ready to cook.
What makes using frozen pie crust especially convenient is that you don’t need to thaw it until you’re ready to start cooking!
Frozen pie crust doesn’t take long to thaw. So as soon as you’re ready to cook, pull the frozen pie crusts out of the freezer, and put them on the counter. By the time you are ready to fill them, they will be thawed.
Since I was making a new version of my vegan pot pie, I decided to make another switch this time around. Instead of chickpeas or Great Northern beans, which I used in the individual pot pies, I went with seitan instead.
Seitan gives a wonderful chew to vegan pot pie. It’s reminiscent of the chicken pot pies I grew up eating.
I used an 8-ounce package of Upton’s Naturals traditional seitan. But feel free to use 1 ½ cups of the chicken-style seitan of your choice, chopped in bite-sized pieces.
Gluten-free option
If you’d prefer to keep this vegan pot pie gluten free, just use gluten-free pie crusts. Then opt for 1 ½ cups of chickpeas or Great Northern beans instead of seitan. Your call!
With rosemary, thyme, garlic, and onions, this vegan pot pie is loaded with warming flavors. The cashew cream sauce coats all of the vegetables in a way that’s incredibly satisfying.
How to make vegan pot pie
Start by preheating the oven to 400 degrees. Then pull a double pack of frozen pie crusts out of the freezer to thaw. Put them on the counter.
Now it’s time to make cashew cream. Blend raw cashews and water in a high speed blender.
If you don’t have a high speed blender, you’ll need to help your standard blender. You can either soak the raw cashews for several hours ahead of time, then drain the cashews before continuing with the recipe.
Or grind the dry raw cashews in a clean coffee grinder until they become like a flour. Put the ground cashews into your blender. Then continue the recipe as written.
Sauté onions, garlic, and spices in a soup pot. Then add water, vegetable bouillon, carrots, potatoes, green peas, seitan, and salt. Cover and cook for 7 minutes, until the potato has softened slightly.
Then it’s time to add the cashew cream from the blender, stir, and cook for another 5 minutes.
Carefully ladle the pot pie filling into the bottom pie crust in its tin.
Take the second pie crust, and invert it over the top of the pie. Pull off the tin from the top crust. Then carefully pull at the crust to lay lightly over the top.
If the top crust has any tears, dab your fingers into aquafaba (chickpea liquid) or water. Then use your moistened fingers to smooth out the tears.
Remove any excess crust from the top. Press the tines of a fork along the edges of the crust all the way around to secure the top and bottom crusts.
Then dab your fingers into chickpea liquid or water (or use a pastry brush if you prefer), and add a very light coating to the top of the pie.
(Aquafaba is what vegans use instead of egg wash. It helps the crust to brown.)
Cut a few slits into the top of the pie. They will be air vents, so that steam can escape while cooking.
Put the pie onto a baking sheet. It will catch any filling that may bubble over. It also makes it easier for putting the pie into and out of the oven. (The aluminum pie tin is a little wobbly otherwise.)
Bake on the bottom rack for 30 minutes.
The pie interior will be bubbling hot when you remove it from the oven. So wait at least 15 or 20 minutes before slicing into it. The longer you wait to slice into it, the firmer the filling will be.
Serve the pot pie with roasted Brussels sprouts with apples, delicata squash salad, and/or orange cranberry sauce.
Cadry Nelson
Makes 1 pot pie
Serves 5 to 8, depending on slice size
45
Chicken-style vegan pot pie
Comfort food at its best - vegan pot pie with chicken-style seitan in a creamy cashew sauce. This cozy dinner is a great main course for Thanksgiving, Christmas, or holiday get-togethers. But since it's made with frozen, store-bought pie crusts, there's no need to wait for a special occasion! Enjoy this main course anytime you need something soothing.
20 minPrep Time
50 minCook Time
1 hr, 10 Total Time
5 based on 5 review(s)
Ingredients
2 (9-inch) frozen pie crusts
1/4 cup + 2 Tablespoons raw cashews*
2 cups water, divided
1/2 teaspoon extra virgin olive oil
1 cup chopped onion in medium pieces
2 cloves garlic, minced
1/2 cup sliced celery
1/2 teaspoon dried rosemary
1/2 teaspoon dried basil
1 vegetable bouillon cube or 1 teaspoon no chicken base Better Than Bouillon
1/2 cup thinly sliced carrots, cut into coins
1 medium Russet potato (about 6 ounces), chopped in small to medium pieces
1/2 cup green peas (Fresh or frozen are fine)
1/2 to 3/4 teaspoon salt
1 1/2 cups chopped chicken-style seitan (I used an 8 ounce package of seitan)
Aquafaba (liquid from can of chickpeas) or water, to use as vegan egg wash on top of pie crust
Instructions
Preheat oven to 400 degrees.
Take the frozen pie crusts out of the freezer, and put them on the counter to thaw.
Make the cashew cream. Put the raw cashews into a high speed blender with 1/2 cup of water. Blend until it is completely smooth, a thick cashew cream. Set aside.
Bring a soup pot to a medium heat with extra virgin olive oil. Saute onion in oil for about 5 minutes, until it has softened slightly and is fragrant. Add garlic, celery, dried rosemary, dried basil, and saute for for a minute more. Add remaining 1 1/2 cups water, vegetable bouillon cube or Better Than Bouillon, carrots, potato, green peas, 1/2 teaspoon salt, and seitan. Bring to a simmer. Then lower heat, cover, and cook for 7 minutes, until the potato has softened slightly.
Add cashew cream from blender and cook for 5 minutes more over a low medium heat, so that the cashew cream can reduce slightly and flavors can combine. Stir occasionally. Taste for salt. Add the remaining 1/4 teaspoon, if necessary. But keep in mind, the filling will continue to condense while it bakes.
Use a ladle to put the filling into one of the crusts.**
Then take the second crust and invert it over the top of the bottom crust. Remove the tin from the second crust. Gently pull the top crust, so that it lightly lays evenly over the bottom one. If the top crust has any tears, dab your fingers into aquafaba (chickpea liquid) or water. Then use your moistened fingers to smooth out the tears.
Remove any excess crust from the top crust. Press the tines of a fork along the edges of the crust all the way around to secure the top and bottom crusts. Then dab your fingers into chickpea liquid or water (or use a pastry brush if you prefer), and add a very light coating to the top of the pie. (Aquafaba is what vegans use instead of egg wash. It helps the crust to brown.)
Cut a few slits into the top of the pie. They will be air vents, so that steam can escape while cooking.
Put the pie onto a baking sheet. It will catch any filling that may bubble over. It also makes it easier for putting the pie into and out of the oven. (The aluminum pie tin is a little wobbly otherwise.)
Bake on the bottom rack for 30 minutes.
The pie interior will be bubbling hot when you remove it from the oven. So wait at least 15 or 20 minutes before slicing into it. The longer you wait, the firmer the filling will be when you slice into it.
Notes
*If you aren't using a high speed blender, you'll need to soak the raw cashews in additional water for several hours to soften and then drain before continuing with the recipe. Or grind the dry raw cashews in a clean coffee grinder until they are fine like a flour. Then add them to your standard blender with the water. If you're using a high speed blender, you can skip this step.
**Some people say that warm filling going into a cold pie crust will make for a soggy bottom crust. If you're concerned about it, you can let the filling cool on the stove before ladling it into the pie crust. Or you could make the filling ahead of time, chill it in the refrigerator, and then put the crust out to thaw for a while before putting the whole thing together. Personally, I didn't have any complaints with the warm filling going into a cold crust.
7.8.1.2
269
https://cadryskitchen.com/2018/11/16/vegan-pot-pie/
Thank you to Janis for the great tip on using frozen pie crusts to make vegan pot pie!
Disclosure: Post contains Amazon affiliate links.
Source: https://cadryskitchen.com/2018/11/16/vegan-pot-pie/

0 notes
Text
Frothy Matcha Latte (Made in a French Press)
I have been meaning to tell you about this super frothy matcha latte since…oh, February. I’ve been so excited about this method for making a matcha latte I’ve shared it with cashiers at Trader Joe’s, coworkers, and my parents. But then we got hit with the snowstorm of the century. And then life got in the way. And then we went to Hawaii. So, here I am!
Speaking of Hawaii, we spent a glorious 7 days in Oahu, mostly on the North Shore and the Windward (east) Coast. Truth be told, I was pretty anxious about the trip. A 9+ hour travel day with all three kids, and just the two of us (no school, no babysitters, no grandparents). But, it was actually turned out to be one of my very favorite vacations. Despite the fact that I’ve always believed that a vacation with kids is just a trip, it actually felt like a vacation. With kids. That’s saying a lot. Surely, we all had our moments (myself included) but overall, I came home rejuvenated and relaxed. Maybe a little too much, as I’m finding it hard to get back into the swing of our routine. I’m hoping to share a travel guide with you soon.
Getting back to matcha lattes, though. I’ve been a fan of matcha since Matt and I went to Japan 6-ish years ago. Ever since, Matt has basically mentioned Japan as a possible vacation every time I suggest going anywhere. We loved it THAT much. Over the years, I’ve slipped matcha into everything from smoothies to crepes. And this winter, I started regularly making matcha lattes at home. My technique, though, got a major upgrade. All thanks to my French Press.
Matcha benefits
Matcha is an incredible source of antioxidants. Its benefits include boosting metabolism, lowering cholesterol and blood sugar, improving mood and concentration, and providing your body with fiber, chlorophyll, and vitamins. A lot of people have successfully switched from drinking coffee to matcha. For me, coffee will always be #1, but I love supplementing my diet with matcha, particularly when I need an afternoon boost.
Matcha basics
Matcha ranges in price, depending on whether you’re using the highest quality ceremonial grade or culinary grade. But when it comes to matcha lattes, I recommend choosing something in the middle. I personally really like Mizuba Tea Co.’s Daily Matcha.
You can make traditional matcha with just water, but a matcha latte hardly requires more time and is so delicious. I’ve made this matcha latte using whole milk, almond milk, and oat milk. All came out fabulously but the whole milk latte was the frothiest / creamiest. I’ve also made it sweetened and unsweetened, and do prefer a bit of honey in my lattes.
You can definitely play around with flavors — adding homemade syrups, maple syrup…I like to keep things simple: good quality matcha, milk (or milk alternative), honey, and a little dusting of bee pollen (which gives you an added boost of minerals, enzymes, anti-oxidants, and protein).
Matcha tools
If you think you’ll find yourself making matcha tea or matcha lattes regularly, I would invest in some tools. Specifically, you’ll want a matcha whisk and a chashaku (hooked bamboo scoop). You can buy these tools separately, or as part of a set. And although I’ve successfully used breakfast bowls to whisk my matcha, a chawan is the traditional bowl used to prepare (and drink) matcha.
French press basics
I’ve had my French Press now for years, but I had never considered using it for anything other than making coffee. That is, until I stumbled upon an ingenious YouTube video that showed me how you can make homemade lattes using a French Press. I pretty much immediately ran to my French Press to test the method and lo and behold, it worked like a dream.
This recipe is for a matcha latte, but you can easily use it to make any type of homemade latte at home (like our lavender latte). The key here is to not burn the milk before transferring it to the French Press. I recommend watching it like a hawk and/or using a candy thermometer to make sure the temperature stays below 180 degrees F (that’s when milk starts to boil).
Frothy Matcha Latte (Made in a French Press)
1 1/2 teaspoons of matcha powder (I used Mizuba Tea Co.)
1 tablespoon of hot water
1 cup of whole milk (or milk alternative)
1 tablespoon of honey
Bee pollen and more honey, for topping
1. Add the matcha powder to the bottom of a French Press pitcher. Pour in 1 tablespoon of hot water and use a matcha whisk to make a paste, continuing to whisk until no clumps remain. Add a bit more water, if needed.
2. Add the milk and honey to a small pot and bring to a simmer over medium-low. You want to ensure that the milk doesn’t burn: use a candy thermometer to ensure the milk doesn’t reach a temperature of 180 degrees Fahrenheit (when it starts to boil). Watch closely for tiny bubbles and remove it from the heat when it reaches around 160 degrees F.
3. Next, add the steamed milk to the French Press. Carefully place the lid over the pitcher.
4. Place your hand on the pull of the stem and pump it (slowly at first, then a little faster), until you achieve your desired amount of foam. Remove the filter and slowly pour the latte into a mug.
5. Sprinkle with some bee pollen and give it a good drizzle of honey. Drink right away.
Source: https://www.turntablekitchen.com/recipes/frothy-matcha-latte-made-in-a-french-press/
0 notes
Text
Caramel Brownie Cheesecake
You know those recipes that your friends and family ask you to make again and again for every occassion? Well I think this recipe might just be one of them.
This cheesecake combines the best elements of the dessert world for one dreamy result. Every bite is such an explosion of amazing tastes and textures… I can’t wait for you to try it!
What I love about cheesecakes particularly is that you have to make them ahead of time so they’re perfecting for entertaining or serving a group. Plus they’re always such crowd pleasers… who doesn’t love cheesecake?!
So, grab the ingredients the next time you’re at the grocery store, find a fun playlist to jam to in your kitchen, and get to baking this sweet treat!
Caramel Brownie Cheesecake Recipe Tips
Here are my baking tips for creating a beautiful cheesecake! If you have questions, read through this because I may have already answered them 🙂
Cream Cheese
Be sure to use full fat high quality bricks of cream cheese (not the stuff you spread on a bagel). The most important part? The cream cheese should be at room temperature. This will create a smooth and creamy cheesecake without any lumps and bumps.
Brownie Bottom
This brownie bottom layer is super simple but creates a ridiculously fudgy and rich brownie with tons of chocolate flavor. It uses cocoa powder, so no chopping or melting chocolate. You bake it for about 15 minutes, or just until it begins to set, before adding the cheesecake batter so it cooks through completely into two distinct layers.
If you wanted to take a shortcut and use a brownie mix, you can but I think making this layer from scratch is worth the extra effort!
How to Bake Cheesecake without a Water Bath
There is no water bath required for this recipe! I decided to skip that hassle because even if some cracks form, we’re covering the cheesecake with caramel which will help camouflage some imperfections. Be sure to use a quality springform pan for this recipe.
To prevent cracks without the need for a messy water bath, we use the oven door trick. Once the cheesecake is almost done baking, turn off the oven but leave the cheesecake inside. Crack the oven door just slightly to allow the oven to lose some of that heat. The key to preventing cracks is to coddle the cheesecake. Any dramatic changes in temperature will cause cracks to form!
If you want more tips for baking cheesecake without cracks, check out my free Ultimate Cheesecake Guide.
That’s why it’s also important to allow the cheesecake to cool to room temperature completely before chilling. When it comes to baking cheesecake, it’s always better to err on the side of underbaking than over-baking. The edges should be set and dry, but if the center is still slightly wobbly or jiggly that’s fine. The residual heat will continue to cook the cheesecake even once it’s removed from the oven.
In my online baking class The Magic of Baking, I go in-depth in this concept and others so that you can bake with confidence.
Serving & Storing Cheesecake
The hardest part of this recipe is mustering the patience to let it chill for at least 4 hours before eating! I usually like to let it chill overnight, just to make sure it’s completely set and I’m able to cut clean slices. Use a sharp knife and run it under hot water in between cuts for beautiful bakery-quality slices. Drizzle the caramel on just before serving.
Store the cheesecake in the fridge for up to 2 days.
Salted Caramel Sauce
You can use store-bought or homemade caramel sauce for the topping. I have a whole blog post & quick video on how to make caramel sauce here. If you’re using store-bought, I like Trader Joe’s salted caramel sauce!
Photos by Ashley McLaughlin.
Source: https://www.handletheheat.com/caramel-brownie-cheesecake/
0 notes
Text
5 Canned Goods Kitchn Editors Never Buy — Shopping
I am not ashamed to admit that I consider Shop Rite's annual Can Can Sale to be a national holiday. The blowout promotion has been around for almost 50 years, and for nearly half of that I've either witnessed (or participated in) the sacred ritual of loading up as many cans as can fit into one cart. Consider my pantry STOCKED.
While I love canned tomatoes for sauces, canned beans for chili and meal prep, and canned tuna for salads and melts, there are a select few canned items that I just can't bring myself to buy. My fellow Kitchn staffers agree.
Here are the canned items you probably won't see us stocking up on anytime soon.
1. Canned Soup
"Canned soups are just way too salty for me. I even find the low-sodium versions to be over-salted. The ones that are considered 'the best' still taste processed to me. I'd rather just make a quick soup myself (like this roasted tomato soup)." — Sheela Fiorenzo, Assistant Food Editor
2. Canned Fruit
"I usually stay far away from canned fruit because it's often drowning in syrup, which is just a code word for copious amounts of added sugar. I'd rather buy the frozen stuff instead." — Lisa Freedman, Lifestyle Director
3. Canned Mushrooms
"It took me awhile to come around to fresh mushrooms, so the thought of buying them in a can really freaks me out. I imagine them to be slimy and gray. Maybe I am missing out, but I don't see myself trying them anytime soon." — Grace Elkus, Senior Food Editor
4. Canned Beets
"I grew up eating canned beets doused in vinegar and sprinkled with dried oregano. Is that weird? But ever since I figured out the best way to peel roasted beets (hint: you'll need some paper towels!), I refuse to make them any other way. Also, in adulthood, I find canned beets to be way too mushy." — Lauren Masur, Staff Writer
5. Canned Pasta Sauce
"I firmly believe that you should either buy canned tomatoes and make sauce yourself or get it in a jar. I don't know why this middle ground of canned tomato sauce exists." — Ariel Knutson, News & Culture Editor
What about you? Are there any canned goods you just don't ever buy?
Source: https://www.thekitchn.com/worst-canned-food-261500
0 notes
Text
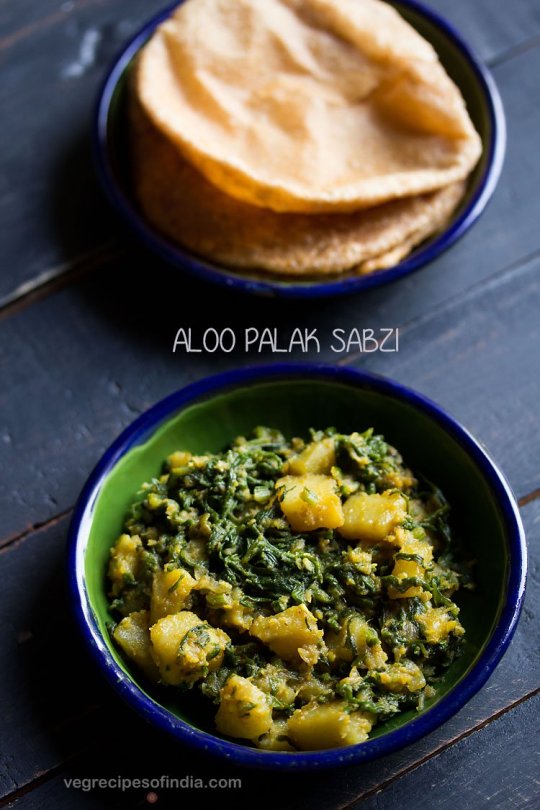
A detailed guide to cook an elaborate Tamil Vegetarian Menu
How to cook a Tamil Vegetarian Menu in 2 hours – includes entire step by step process of the meal I cooked and an alternate menu plan. The meal is naturally gluten free and vegan if you avoid the raita and use of ghee.
My publisher (now, also a friend) was coming over for dinner last night. I asked her if she would prefer a small plates kinda dinner, which is my jam these days, or a traditional Tamil vegetarian meal. She opted for the latter.
I love showcasing my cuisine for anyone who is half interested. So I carefully worked out a menu featuring some favourites and a couple of new creations. Here’s the menu I cooked for 4 people.
Tamil Vegetarian Menu
Rice / Millets
Onion Sambar (with freshly ground masala)
Tomato Pineapple Rasam
Curry leaf powder (Karuveppala podi)
Bottle gourd chutney (Dudhi thogayal)
Potato curry (Urulai Podimaas)
Instant green mango pickle
Carrot Cucumber Yogurt (Thayir Pachidi)
Banana Chips
This Tamil Vegetarian menu is easy to prep ahead for, with fairly basic ingredients. It showcases the cuisine well with a variety of dishes, using different vegetables, flavours and techniques. I haven’t included a dessert here due to a shortage of time and also because we had got some Theobroma brownies 🙂 But any payasam (Tamil style kheer) would be a good fit in this menu.
The thogayal, podi and pickle can also be made on the previous day, even though the instant mango pickle just takes two minutes in the microwave.
I also pressure cook the tomato-pineapple mix and the potatoes a few hours ahead so that it can cool completely before handling and pureeing. I hate to burn my hands while removing the peels of tomatoes and potatoes.
While I did not cook everything at one go, this entire meal can be put together with around 2 hours of work, as long as you use a pressure cooker.
Entire list of ingredients for cooking this Tamil Vegetarian Menu
serves 4
PANTRY
1 cup rice
1 cup foxtail millet
3/4 cup tur dal
vegetable oil
coconut oil
ghee
11-12 dried red chillies
2 tbsp coriander seeds
2-3 tsp fenugreek seeds
2-3 tsp mustard seeds
1/2 tsp black pepper corns
3 tsp cumin seeds
3-4 tsp powdered jaggery
1/2 tsp turmeric
1/3 cup urad dal
2 tbsp chana dal
1 tsp tur dal
salt
VEGETABLES
5 medium potatoes
20-25 sprigs curry leaves
3-4 green chillies
1” piece ginger
4 large onions
4 large tomatoes
200 grams pineapple
1 small bottle gourd
1 green mango
1 medium carrot
1 medium cucumber
1 small bunch coriander leaves
1 lemon
DAIRY +OTHERS
1.5 cups yogurt
1/3 cup grated fresh coconut (chutney + potato curry)
3 tbsp desiccated coconut (sambar)
Watch some of these videos to help you with the cooking:
How to make curry leaf powder
How to make arachuvitta sambar (sambar with freshly ground spices)
How to make Potato Podimaas
Batch Processing
Batch processing the tasks is the fastest way to cook any elaborate menu. I have batched up all the pressure cooking, masala preparation, vegetable prep and final tadka steps together. This makes a lot more sense can cooking recipe after recipe, which takes way longer time.
PRESSURE COOKING
3/4 cup toor dal + 2 cups water + 1/2 tsp turmeric
4 large tomatoes + 1 cup pineapple chunks + 1 cup water
3 – 5 medium potatoes
Rice and millets are best cooked just before serving –go to the last step.
TAMARIND
Soak 2 tbsp tamarind flakes in 1 cup boiling hot water for 30 minutes. Extract all the pulp and discard the tamarind flakes after squeezing well. You can also use 2 tsp ready tamarind paste, but the flavour from using freshly extracted puree makes it worth it.
VEGETABLE PREP
Potato curry: Peel and grate or crumble the boiled potatoes.
Raita: Peel the veg. Grate carrot and finely dice the cucumber for raita.
Pickle: Chop one green mango into juliennes or small cubes.
Chutney: Peel and thinly slice a tender bottle gourd (small size~200 grams). Saute this in 1 tsp oil for 5-6 minutes until almost tender.
Sambar: Peel 4 large onions. Cut into half and then into thick slices. In a pan, heat 2-3 tsp oil, fry 1 tsp mustard seeds, 1/4 tsp fenugreek seeds and add the chopped onion to this. Saute on medium-low flame, keep covered and cook for 10-15 minutes until onion is softened. Do not try to cut time on this step as the sambar flavour depends entirely on how well the onions are cooked. To this, add the tamarind extract and bring to a simmer.
MASALAS / MIXER / BLENDER
Sambar: 4-5 dried red chillies, 2 tbsp coriander seeds, 1/4 tsp fenugreek seeds, 1 tbsp chana dal, 3 tbsp desiccated or fresh grated coconut – all dry roasted until aromatic (7-8 minutes on medium flame). Grind to a fine powder. Mix this in 1/2 cup water and add it to the pan with the onions and tamarind puree.
Podi: Dry roast washed and dried curry leaves until they turn crisp ~Around 5-7 minutes on medium flame. Remove and cool. Dry roast 3 dried red chillies and 1/4 cup urad dal until dal is golden brown. Grind all of it together to a coarse powder along with some salt. Store in airtight container.
Rasam podi: Dry roast 1 tsp tur dal, 1.5 tsp cumin seeds and 1/2 tsp black pepper corns until the dal turns golden brown. Remove, cool and grind to a fine powder.
Rasam: Remove peels from cooked tomatoes and discard. Grind the cooked tomato-pineapple mix into a fine puree. Pass through a sieve. Mix in the prepared rasam powder, salt and 1-2 tsp powdered jaggery and simmer for 2-3 minutes.
Thogayal / chutney: In 1/2 tsp oil, fry 3 dried red chillies, 2 flakes tamarind, 2-3 tsp urad dal until dal is golden brown. Grind this along with sautéed bottle gourd and 1/4 cup grated coconut + salt to a coarse paste. Thogayal is ready.
FINAL STEPS
Sambar: add the cooked dal to the onion-tamarind-sambar paste mix in the pan. Bring to a simmer, adding some water to thin down if required. Check for salt and adjust. Heat 2 tsp oil in pan. Fry curry leaves, mustard seeds and a pinch of asafoetida and transfer to the pan. Keep covered until ready to serve.
Rasam: heat 1 tsp ghee. Fry 1/2 tsp cumin seeds, few curry leaves and transfer to the rasam. Garnish with finely chopped coriander.
Potato curry: Heat 1 tbsp coconut oil. Fry 2-3 finely chopped green chillies, curry leaves, 1 tsp grated ginger, 1 tsp urad dal, 1 tsp chana dal until the dal turns golden brown. Add grated potatoes, salt, juice of 1 lemon, 2-3 tbsp grated coconut and finely chopped coriander. Toss gently to combine it all together.
Pickle: in a microwave safe bowl, mix chopped green mango, 2 tsp pickle masala (you get this in supermarkets), 2 tsp powdered jaggery and microwave for a total of 3 minutes. Give the pickle a stir after every 1 minute mark so that it cooks evenly and is coated with the sweet-spice mix.
Raita: Mix cucumber and carrot in 1.5 cups whisked yogurt with salt. Heat 1 tsp oil in a pan. Fry 1/4 tsp mustard seeds, curry leaves and 1 tsp urad dal until dal is golden brown. Transfer over raita. Garnish with finely chopped cucumber.
RICE AND MILLETS
Lastly, cook the rice and millets. Wash the grains separately, combine with twice the water and cook for 5-6 minutes on sim after the first whistle. Serve hot with all the above sides.
Serve papads or store bought banana chips with the meal.
Another Tamil Vegetarian menu which can be prepared similarly
Some more tips when you cook an elaborate meal:
Use the pressure cooker as much as possible
Keep a big bowl to collect all the peels and vegetable waste which can be discarded in the bin at one go.
Clean as you go, returning bottles and ingredients back to the place, so that the final clean up job becomes easier.
Try and use the same pan for the tasks, one after the other. For example, I use the same small pan to prepare tadka for each of the dishes.
When using the mixer, grind all the dry mixes first, so you can wipe it with a kitchen paper and move on to the next task. Reserve the wet grinding for the last, as you can see in my task detailing above.
Prepare tadka / garnishing of all dishes at the end just before serving.
If you liked this post, you will also like:
80+ Tamil Vegetarian Recipes – categorised
11 Traditional Tamil Vegetarian Lunch menus
——-
To get all my latest recipes and news straight into your mailbox, subscribe to my mailing list here and get a free copy of my e-book specially put together for you – The Ultimate Salad Master Table that will have you making salads like a pro HERE
For more such healthy recipes, get my book The Everyday Healthy Vegetarian! Get all the info about my book and order it here.
Like what you see here? Stay connected with me on Instagram, Facebook, BlogLovin’ and Pinterest.
Source: https://www.saffrontrail.com/tamil-vegetarian-menu-how-to-cook/
0 notes
Text
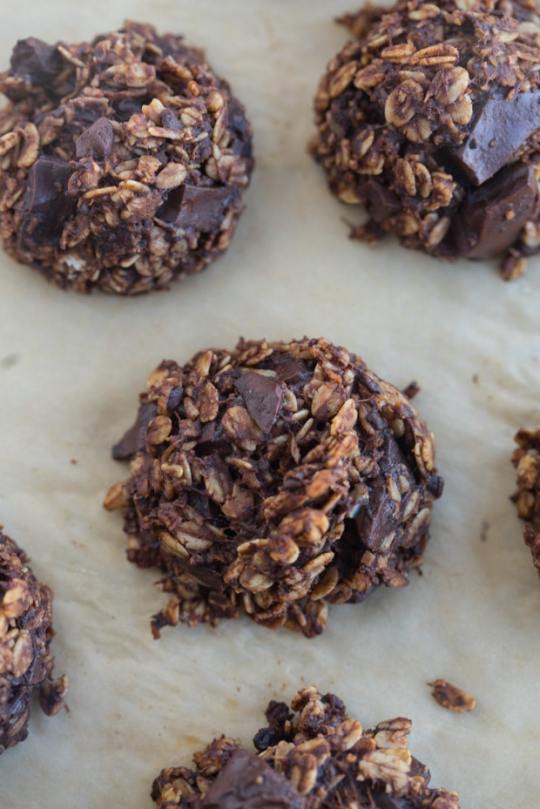
Healthful Double Chocolate Cookies
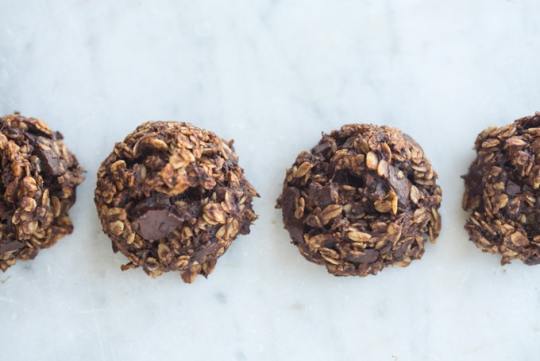
A lot of people have baked these cookies over the past decade. People love them because they're free of any added refined sugar, egg-free, no butter, and gluten-free. They're studded with generously with chocolate, and they're fantastic. The number one question related to them is how to make them nut-free - so kids can take them to school. I took a trip to Tucson last week (I'll post the video soon :), and took the opportunity to remix the recipe. The originals are favorite travel snacks, and I was confident that experimenting with a chocolate version wouldn't be a bad idea. The new version is double chocolate (chips and cacao), and made with crushed sunflower seeds, in place of almond meal. Enjoy! -h
SUBSCRIBE TO VIDEOS

Healthful Double Chocolate Cookies
PRINT RECIPE
0 from 0 votes
You can use unsweetened carob, or grain sweetened chocolate chips, or do what I did and chop a bar of 70% dark chocolate. You can make your own crushed sunflower seeds in a mortar and pestle or by in a food processor until it is the texture of sand - don't go too far or you'll end up with sunflower seed butter. Ground pepitas will also work in this recipe. And lastly, the coconut oil works beautifully here, just be sure to warm it a bit - enough that it is no longer solid, which makes it easier to incorporate into the bananas. If you have gluten allergies, seek out GF oats. You can watch a video of this recipe here.
Ingredients
2-3 large, ripe bananas, well mashed (about 1 1/2 cups)
1 teaspoon vanilla extract
1/4 cup coconut oil, barely warm - so it isn't solid
2 cups rolled oats
1/3 cup ground sunflower seeds
1/3 cup cacao powder
1/3 cup coconut, finely shredded & unsweetened
1/2 teaspoon fine grain sea salt
1 teaspoon baking powder
6 ounces chocolate chips or dark chocolate bar chopped
Instructions
Preheat oven to 350 degrees, racks in the top third.
In a large bowl combine the bananas, vanilla extract, and coconut oil. Set aside. In another bowl whisk together the oats, sunflower seeds, cacao powder, shredded coconut, salt, and baking powder. Add the dry ingredients to the wet ingredients and stir until combined. Fold in the chocolate chunks/chips.The dough is a bit looser than a standard cookie dough, don't worry about it. Drop dollops of the dough, each about 1 - 2 tablespoons in size, an inch apart, onto a parchment (or Silpat) lined baking sheet. Bake for 13 - 15 minutes. Until golden on the bottoms.
Notes
Makes about 2 dozen cookies.
Serves
24
Prep Time
5 mins
Cook Time
15 mins
Total Time
20 mins
PRINT RECIPE
nutrition info nutrition info
January 11, 2019 permalink icon
Per Serving: Calories 114
Total Fat 6g
Saturated Fat 4g
Cholesterol 0mg
Carbohydrates 12g
Sodium 57mg
Fiber 1g
Sugars 3g
Protein 2g
instagram icon
If you make this recipe, I'd love to see it - tag it #101cookbooks on Instagram!
Share this...
Pinterest
0Facebook
72
Google+
0email

WEEKNIGHT EXPRESS features 10 Vegetarian, Plant-centric Recipes for Feel-Good Food — Fast!
Subscribe to get 32-pages of recipes to view on your tablet, e-book reader or phone.

Follow Me:
Instagram
Youtube
Facebook
Pinterest
Related Recipes

Nikki’s Healthy Cookie Recipe
A remarkable healthy cookie recipe. And SO popular! Banana-batter, shredded coconut, dark chocolate chunks, and oats. The recipe is butter-less, flour-less, egg-less, and potentially sugar-less cookies make great after school or after work treats. Healthy cookies!
Chocolate Puddle Cookies
I came across a cookie when I visited Portland, it was a crackle-edged puddle of chocolate with a texture that made me think of the collision between a soft meringue and a fudgy brownie.
Inspiring Hand-painted Cookies
Hand-painted cookies are incredibly special, and these are some of the coolest.
Itsy Bitsy Chocolate Chip Cookies
The perfect bite-sized chocolate chip cookie. Tiny, thin, golden, crisp, a bit nutty with plenty of shaved chocolate.
More Recipes
Whole Grain
WFPB
Vegetarian
Vegan
Soups
Side Dishes
Sandwiches
Salads
Pasta
Quick
Main Course
Low Carb
Instant Pot
Holiday
High Protein
Gluten Free
Drinks
Dinner Ideas
Desserts
Cookies
Chocolate
Breakfast
Baking
Appetizers
Follow Me:
Instagram
Youtube
Facebook
Pinterest
Popular Ingredients
avocado
egg
herb
kale
lemon
lentil
quinoa
pasta
tomato
turmeric
yogurt
zucchini
arugula
asparagus
basil
broccoli
buttermilk
cauliflower
chickpea
chocolate
curry
tempeh
tofu
ALL
© 101 Cookbooks 2019
Use of this site constitutes acceptance of its User Agreement and Privacy Policy.
Source: https://www.101cookbooks.com/healthful-double-chocolate-cookies/
0 notes
Text
Ginger Spiced Apple Cake + Maple Tahini
If you follow me over on Instagram, you may know that back in early September I spent some time visiting Israel. I somehow was granted the great privilege to travel there with Vibe Israel, a non profit organization dedicated to providing the world a look into what the country truly is.
FRIENDS.
Every second I spent in that country was truly magnificent and I really can’t even think about the trip without wanting to burst into tears because I had such an incredible experience. I was immersed in the culture for 8 days of heaven where we toured historical sights, shopped the colorful markets, visited different cities, learned to cook all sorts of incredible meals, toured goat farms and ate amazing cheese, gazed out over the Galilean hillsides at the award winning Shirat Roim and Lotem winery, and ate more food than I ever thought possible.
We ate the best hummus, falafel, and kabob of my life, walked the Via Dolorosa, made ice cream with market fresh spices and produce at Buza, one of the most popular ice cream shops in the country, watched and prepared the most incredible baba ganoush I think I’ll ever have (the rest of the group loved the moussaka) with chef Nadav Malin, watched bread being made by slapping risen dough rounds on a vertical oven WALL. We prepared an unforgettable vegan lunch with Hagit Lidror and Insaf Nator, and I personally got to spend a morning with an outrageously talented pastry chef, watching her prepare STUNNING desserts for the restaurant Messa. I don’t know how I got so lucky.
I’ll share more details of the trip in future posts, but today’s takeaway?
EAT MORE TAHINI.
Tahini is a STAPLE in Israel. It’s like ketchup to Americans. They put it on everything. I quickly realized within a day of being there that I was not including tahini in my diet anywhere near the level that I should be. It can and should be incorporated into so many things. I mean, my favorite treat in the world is tahini based (I’m talking about halva folks, and if you don’t know what that is I suggest you find yourself some STAT). By the way, I bought another suitcase before leaving Israel and stuffed that thing full of halva and tahini. The tahini bottles all busted in transit, but the halva made it home just fine. Quite the mess when I unpacked, though.
Today I’m sharing a recipe with you that is based on that tahini love – this spiced apple cake with a tahini maple.
The cake itself is gluten free, super soft, and ginger scented, with fresh apples thinly sliced and baked all through the batter. The tahini maple that is drizzled on top really makes it pop, though. And that’s literally all the sauce is, tahini and maple. Its nutty and sweet, smooth and creamy, and guaranteed to be different from anything you’ve ever tried before. I’ve had a lot of apple cakes in my day, but this middle eastern-inspired version is really pulling at my heart strings (and taste buds)!
You’ll want to eat this apple cake within a day or two of making it (not that that will be difficult) as the fresh fruit baked into it will cause it to become soggy after awhile.
Happy Fall baking and here’s to trying new flavors and visiting new places!
Ginger Spiced Apple Cake + Maple Tahini
Cake is best served at room temperature or slightly warmed.
Ingredients
FOR THE CAKE:
⅓ cup Oat Flour (make sure package states that it's gluten free, if needed)
½ cup Coconut Yogurt (if dairy is not a concern, regular yogurt can be used)
½ cup Millet Flour
⅓ cup Sweet Rice Flour
1 tablespoon Baking Powder
¼ teaspoon Salt
½ tablespoon Xanthan Gum
1½ teaspoons Cinnamon
2 teaspoons Ground Ginger
½ cup Coconut Palm Sugar
¼ cup Maple Syrup
2 Eggs
2 teaspoons Vanilla
½ cup Coconut Oil, melted
½ cup Applesauce (unsweetened)
3 Small Apples
FOR THE SAUCE:
⅓ cup Maple Syrup
2 tablespoons Tahini
Instructions
FOR THE CAKE:
Preheat the oven to 350 degrees.
Grease and flour a 9" round baking pan.
Place the oat flour and yogurt in a bowl and whisk together. Let sit for 15 minutes (I find that hydrating oat flour before using in recipes helps to cut down on the somewhat gritty texture found in gluten free baking).
Add the millet flour, rice flour, baking powder, salt, xanthan gum, cinnamon, and ground ginger to the hydrated oat flour along with the eggs, vanilla, coconut oil, and applesauce. Whisk together until a smooth batter forms.
Spoon the batter into the prepared pan and smooth the top.
Peel and core the apples(skin can be left on, if desired), then cut in half. Thinly slice each half, Then press each half into the batter (I placed one half in the center of the cake, then fit the other five halves in a circle around that center apple.
Bake the cake in the preheated oven for 40-50 minutes, or until a tester inserted into the center of the cake comes out clean.
Let the cake cool for 20 minutes in the pan, then remove and place on a platter. Dust with powdered sugar, if desired. Slice, and drizzle servings with the maple tahini sauce.
FOR THE SAUCE:
Place the maple syrup and tahini in a bowl and whisk together until smooth. Drizzle over the finished apple cake. Can be stored in an airtight container at room temperature for several weeks.
3.2.2925
Source: https://www.thekitchenmccabe.com/2018/10/25/ginger-spiced-apple-cake-maple-tahini/
0 notes
Text
Ribs 101: Everything you need to know to make THE BEST Ribs
Everything you need to know to make the best ribs this summer! Tips for making them in your slow cooker, instant pot, smoker , on the grill or in the oven!
Everything You Need to Know to Make the Best Ribs
Marrying Parker meant I was marrying a grill master! We have been dining on ribs and incredible grilled and smoked meats all summer long. If you’re like me, I was in the dark about cooking ribs. I wanted to know how to make the best ribs! So Parker taught me everything I need to know to make the best ribs! Here’s what he taught me…
How to Make the Best Ribs
Ribs are a classic summer barbecue food and they’re not as difficult as most people think. I’ll give you the in’s and out’s of ribs in this 101 tutorial so you can wow your family during your next backyard barbecue. You ready to learn everything you need to know to make the best ribs?
What Type of Ribs should I Buy?
Let’s start of simple. Where do you even buy a good rack of ribs? Some people may think you need to go to a fancy butcher, and you can! But we also find great ribs just at our local grocery stores! They cost anywhere from $7-$10 and can feed a whole family, so it’s actually a fairly cost effective dinner! The main types are Baby Back (these are very common and the smallest), St. Louis (which are larger and flatter than the rounded baby back), and the Spare Ribs (which have slightly less meat and are just the St. Louis with the rib tips and skirt meat). So which should you get? The Baby Back or the St. Louis would be my suggestion. Personally, I would go with the Baby Back only because they are smaller (plenty of meat though!) and are just easier to work with for beginners.
Here’s a photo comparing the large Spare Ribs with Baby Backs! The St. Louis ribs are between these sizes.
How to Prep a Rack of Ribs:
Everything you need to know to make the best ribs starts with prepping your meat. Remove the ribs from their packaging (preferably in the sink) and drain any of the extra fluids. Rinse the ribs under cold water briefly and pat dry with paper towels. Then set the ribs aside on a large cutting board. If you do not have a cutting board large enough to hold the ribs I recommend using a jelly roll pan or a baking sheet.
The next step is crucial for good ribs!
You will need to remove the membrane (sometimes called the membrane sheath, or the peritoneum if you want to be anatomically correct) which is located on the underside of the ribs. This is a thin layer of connective tissue that will not only act as a barrier preventing the rub from seasoning the meat but will make eating the ribs a more difficult and unpleasant experience. The membrane is easiest to remove from a rack of baby back ribs, but shouldn’t be too difficult on the St. Louis or spare ribs. Flip the ribs so they are bone side up and run the tip of a sharp knife down the middle of one of the bones towards the center of the rack. To separate the membrane from the meat you can use a butter knife or a flathead screwdriver to pull up enough to then grip with your fingers. The easiest method is to grab a paper towel and pinch the membrane and pull toward the end of the rack slowly, taking care not to rip it to early. It’s just like taking a sticker off of something. Repeat this process on the other half of the ribs so the entire membrane is removed.
The Secrets to the Best Rib Rub:
Depending on where in the country you are you will hear different opinions on the perfect dry rub. Some people swear by their mustard powder and others prefer to leave it out. Meanwhile, there are people who live by the simple salt and pepper rub. Either way, the rub makes all the difference! I’ll give you our secret rub recipe but also a run-down on the science behind making a rub in case you decide to venture off and create your own masterpiece.
Salts:
These make up the bulk of your rub and make a huge difference.
Table Salt – Fine grain, regular table salt. Pros: incorporates best into rub mix, great for smoother rubs. Cons:
Sea Salt – Usually very coarse but you can find fine grain as well. Pros: great for finishing dishes, gives added texture. Cons: hard to incorporate into a rub, likely will not stick to meat during the rubbing stage
Kosher – Coarse and flakey. Pros: great for seasoning meats, dissolves quickly. Cons: None that I have found
Seasoned Salt – Different flavors incorporated into the salt (ie celery salt, garlic salt, sugar etc.) Pros: quick and easy since it contains many of the other spices used in a rub. Cons: you don’t know the exact amounts of other ingredients making it difficult to use as the main source of salt.
My pick: Kosher salt. It is predictable and incorporates into the rub as well as table salt but seasons the meat better.
Runner-up: Table salt
Sugars:
White Sugar – From refined cane or beet sugar. Pros: gives the same sweet flavor needed in barbeque. Cons: burns at higher temperatures.
Brown Sugar – White sugar combined with molasses during the manufacturing process. Pros: gives you the classic BBQ flavor and a noticeable crust on the meat after cooking, blends well with spices Cons: none
My pick and the safe bet: Brown sugar
Spices:
There are spice snobs who know their stuff and can tell you exactly how to make a rub and guarantee success. Follow them or the rub recipe below and you’ll get a safe, great tasting rub. If you want to venture out of the ordinary and make your own, here’s a list of the most common ingredients and how each changes the rub.
Here are the essentials:
Black Pepper – A necessity in any rub. Can be coarse or fine, pre-ground, or freshly cracked. If you’re making a large batch of rub to keep and save for later you may want to give your arms a break and use the pre-ground pepper.
Cayenne Pepper – Whether you like it spicy or not, add this to the mix to accentuate the rest of the flavors in the rub. The more you add the more heat you’ll get. Cayenne provides a direct noticeable heat, but keep in mind it is one of many spices so you really have to add a lot if you’re trying to make it obvious.
Chili Powder – A blend of various spices and ground chile peppers. Gives your rub a more earthy and sophisticated flavor. You can find different varieties such as chipotle chili powder
Paprika – You can’t forget this one! It gives a distinct red color to your rub and meat and will help develop that gentle smokey flavor. If you like a noticeable smoke flavor then grab the smoked paprika.
The extras:
White Pepper – Light in color and offers a mild pepper flavor. Helps add a little heat but more as a background flavor.
Cumin – Common in Latin American foods but gives barbequed meats a flavorful earthiness with a light but noticeable warmth and aroma.
Onion Powder – Adds a subtle onion flavor without being overbearing.
Garlic Powder – Because everything needs garlic!
Mustard Powder – For a, well, mustard flavor. Complements the rest of the blend.
The Special Flavors:
If you want to get creative there are plenty of additional spices and seasonings you can add to give your meat that special secret flavor.
Ground Ginger – Tangy and fresh with a mild heat but noticeable sweetness.
Dried Oregano – Adds a pungent and sharp peppery flavor.
Coriander – Gives a roasted nutty flavor.
Thyme – Gives a slight mint flavor with a gently dry aroma
Keep in mind it is all about balance. The goal is to have a blend where all the components work together without having one overpower the other.
The Go-To Rib Rub:
Ingredients
1 C Brown Sugar
1/4 C Smoked Paprika
3 Tbs. Kosher Salt
2 Tbs. Black Pepper
2 Tbs. Garlic Powder'
2 Tbs. Onion Powder
2 Tbs. Cumin
2 Tbs. Mustard Powder
1 Tbs. White Pepper
1 Tbs. Chipotle Chili Powder
1 Tbs. Cayenne Pepper
Directions
Mix all of the ingredients in a medium bowl or shake in a large ziplock back. This rub will give you enough to season 3 regular size racks of ribs. If you are making less you can save it for later or halve the recipe.
3.1
Copyright © YourCupofCake
Now that the hard part is over it’s time to rub those ribs! Get out your pre-made Go-To Rib Rub and sprinkle it over the ribs evenly and then gently pat or rub it around so it has a nice even coat. Flip the ribs and coat the bottom. You don’t have to be as precise or thorough on the bottom since it is mostly bone but you definitely don’ want to miss it! It generally takes about 1/4 to 1/2 cup of rub to season a rack.
Let the ribs rest for anywhere from 1 hour to 72 hours. If you plan to let them rest for longer than an hour put them in the fridge to keep them fresh. I usually just do one hour but a lot of people recommend 24 hours as the perfect amount to let the flavors sink in deep. If you are in a bind and need to cheat the time, you can get away with 30 minutes and I won’t tell anyone.
The Ultimate Guide to Cooking Ribs:
Meat thermometers are incredible for cooking! We cook ours too 200 degrees to melt all the connective tissues… that makes them super tender! We could go on and on about meat thermometers but we’ll get back to everything you need to know to make the best ribs.
How to Smoke Ribs:
Smoking the ribs is my personal favorite because it gives that classic barbecue taste. You might even be able to convince your kids you picked them up from a nearby barbecue restaurant. Follow this simple procedure to guarantee yourself some tasty ribs that fool-proof:
1) Preheat your smoker to 275 degrees
2) Place the ribs bone side down for 90 minutes, spraying with apple juice or cider every 30 minutes. The juice will keep the ribs from drying out and add to the flavor of the rub.
3) Pull the ribs off and wrap them in foil. Brush 2 tablespoons of honey butter (equal parts honey and room temperature butter mixed) over the top of each rack before sealing the foil.
4) Place the ribs back on the smoker in the foil, bone side up, for an additional 90 minutes.
5) Pull the ribs off the smoker and place them in a cooler for 15-30 minutes to let the juices redistribute in the meat. Don’t worry the ribs will still be piping hot!
6) (Optional) Place the ribs on a baking sheet. Brush your favorite sauce over the top and put them under the broiler for 3-5 minutes or until the sauce tightens with the ribs and becomes nice crust.
Takeaways for Everything You Need to Know to Make the Best Ribs in a Smoker:
Smoking ribs (and any meat in general) is all about low and slow. Keep that heat low to ensure your ribs stay tender and full of flavor. I prefer to smoke with hickory because it is a versatile wood and works well with ribs. Just be sure not to over smoke the ribs because too much hickory can result in a slightly bitter flavor. Oak is another good option and is very easy to work with.
How to Grill Ribs:
The grill is the classic way to go and there’s no better place to be during the summer than out on the back porch grilling. Follow this guide for the perfect grilled ribs:
1) Preheat your grill to 325 degrees using an indirect heat method. If you are using a gas grill using only half of your burners leaving one side of the grill off. If you are using a charcoal grill, keep the coals on one side of the grill and add soaked, drained, hardwood chips to the charcoals.
2) Arrange the ribs on the grill away from the direct heat and fire.
3) Cook the ribs until you can easily insert a toothpick between the bones, or the internal temperature reads 200 degrees on a thermometer.
4) Brush the ribs with your favorite sauce and finish them over the direct heat for 3-5 minutes.
Takeaways for everything you need to know to make the best ribs on the grill:
Indirect heat is crucial. If your grill is too hot or the ribs are over direct heat your ribs will cook quickly and be tough. Or worse, your ribs will burn on the outside will the inside is not yet done. The last few minutes over direct heat will give you a great crisp texture on the outside with perfectly juicy, tender ribs.
How to Cook Ribs in a Slow Cooker:
This is the perfect solution to great ribs without having to babysit the smoker or the grill! Toss the ribs in before leaving the house and come back to great smelling delicious barbecue. It doesn’t get easier than this:
1) For one rack of ribs, cut the rack in half and put the first half in laying flat. Coat ribs with your favorite barbecue sauce and repeat with the other half laying on top of the first. For two racks of ribs, place the ribs standing up against the walls and brush with sauce (see picture).
2) Place the lid and set the slow cooker to low for 8 hours or high for 4 hours.
3) Spoon the sauce at the bottom of the pot over the ribs before removing and cutting.
How to Cook Ribs in an Instant Pot:
Craving ribs and you only have an hour? This is your solution. Break out your instant pot and follow this simple guide:
1) Pour 1 cup of water into the Instant Pot.
2) Place the trivet in the Instant Pot (the wire rack that should have come with it) so the ribs aren’t touching the bottom of the cooker.
3) Place the ribs on the trivet.
4) Place the lid on the cooker and cook for 25 minutes on Manual > High-Pressure Cooking.
5) Once finished, allow the steam to release naturally (about 10 minutes).
6) Finish the ribs on the grill or under the broiler for 5-10 minutes (optional).
How to Oven Bake Ribs:
Just as easy and convenient as the slow cooker, baking ribs a good alternative if you don’t feel like firing up the grill or smoker:
1) Preheat your oven to 275 degrees
2) Wrap the seasoned ribs in foil and bake for 2 hours
3) Remove the ribs from the foil, brush with sauce and rewrap
4) Continue baking the ribs for an additional 1 1/2 to 2 hours or until the meat falls off the bones
How to Cut Ribs:
I find it easiest to turn the ribs on their side so you can see the bones clearly, and then run a knife between each bone. Now your ribs are ready to devoure!
So there you have it, everything you need to know to make the best ribs this summer!
Other Recipes You'll Love!
Source: http://www.yourcupofcake.com/2018/06/ribs-101-everything-you-need-to-know-to-make-the-best-ribs.html
0 notes