Last Seen Blogs

bunnie-online
bunnie? online~!

atd-sportscars-blog
ATD-Sportscars

takeclaire
AN INDIVIDUAL WITH THE OCCASIONAL UNREALISTIC IDEA

damiimakinwa
Untitled

twistingjupiter
my aesthetic is clusterfuck
Text
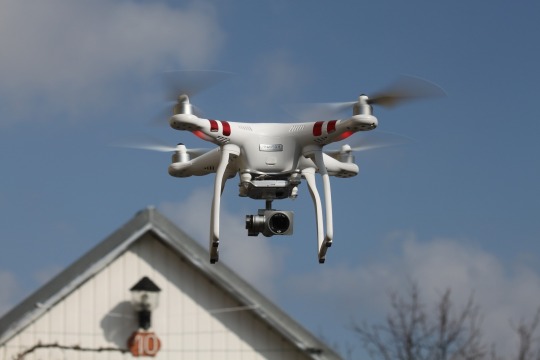
How The Hover Drone App Can Enhance Your Drone Piloting Experience in 2023 ?
Drone Apps
The drone is a newly launched science. They are common in civil and professional environments. There is a huge take-off of drones in the world which means there are several types of drones available in the world. But all of these types are different from each other and they are used for various purposes. In this article, we’ll discuss some types of drones and the best drones to use for various purposes. Moreover, we’ll discuss drone apps.
One thing about these drones is that they can be controlled by apps. There are several drone apps available for ioS and Android. One of the best drone apps is Hover. In this article, you will also see the complete guidance and features of the Hover app. So, why are you waiting?
Let’s take a look at Drone types and Drone app specially Hover App.
Drone Definition
It is a flying vehicle which can fly without a pilot. It is controlled by remote software.
There are several terms which refer to this type of aircraft.
•RPA stands for Remotely Piloted Aircraft and RPAS stands for Remotely Piloted Aircraft System.
•Drone stands for unmanned aircraft.
•UAV means unmanned Aerial Vehicle and UAS means Unmanned Aerial System.
Types of Drones
There are different types of Drones.
The following are the main types of drones.
Multi-rotor Drones
Fixed wing Drones
Single Rotor Helicopter Drones
Fixed-wing hybrid VTOL drones
1: Multi-rotor Drones
It is also known as a rotary wing. It is the widely used type of drone. It is used for professional and recreational photography. It is small in size and has excellent control which makes it the best choice for photography.
You can install all types of cameras on this drone which performs different tasks. These types of drones come with great flexibility and they can hover easily.
2: Fixed-wing drones
These are those that can use their aerodynamics to harness air and produce forces that let them stay in the air. They resemble radio-controlled planes in terms of designs, and because of their strong autonomy, they are frequently utilized to map vast areas. They are kept afloat by utilizing their aerodynamics and design, which increase their flight speed and endurance.
Fixed-wing drones have the disadvantage of being more expensive than multirotor drones. Like airplanes, they need a big, open area to take off and land. Moreover, fixed-wing drones are less maneuverable than multi-rotor drones because they can only fly forward.
3: Single Rotor helicopter drones
With only one rotor to supply power and a tail to manage direction and stability, single-rotor drones are strong in both construction and design. They are better equipped to carry heavier payloads and fly more effectively than multi-rotor drones because they combine the advantages of small multi-rotor drones and single-rotor drones.
These drones are typically bigger and more intricate than other kinds of UAVs. As a result, they are more expensive, more challenging to use, and potentially more dangerous because of their larger blades.
4: Fixed-wing hybrid VTOL drones
Fixed-wing hybrid VTOL drones are the most recent drone technology to be developed. These are fixed-wing aircraft that land vertically. They overcome the limitations of fixed-wing UAVs, which necessitate large spaces for takeoff and landing.
They are made for a variety of tasks, including mapping, power line inspection, farming and rescue missions.
Drone types according to their size
Depending on their size, the following are the types of drones.
Very small drones
These drones range in size from 1 to 50 cm and they are tiny as insects and fit comfortably in your hand’s palm. They are also known as nano drones
Small Drones
They range in size from 50 cm to 2 meters which are larger than micro drones. The wings of these drones are fixed and are simple to lift with arms.
Medium Drones
These drones are larger than small drones. They weigh 200 kg and have 2 meters of dimension. There should be two people to lift this drone.
Large Drones
These drones are mainly used for military purposes. They have advanced technology and are replaced with fighting jets.
Drone types according to their load capacity
Following are the types of drones according to their payload capacity.
Featherweight drones
They are commonly known as “nanoscale drones” which can only transport payloads weighing between 4 and 100 grams.
Lightweight drones
Little drones are classified as lightweight. They weigh 200-1000g and have a payload capacity of 150-270g.
Middleweight drones
In this case, we are talking about medium size drones that weigh between 1 and 600 kg. They are separated into two main groups: commercial and military drones.
Heavy-lift drones
These drones are mostly used by the military but occasionally they are used for delivery and highly accurate mapping.
Drone types according to their range
According to a range, the following are some types of drones.
Very close-range drones
Extremely close-range drones have a maximum flight distance of 5km and a maximum flight time of 1 hour. They can be used for leisure purposes.
Close range drones
Short-range drones can go up to 50 kilometres distant from their controller and hover for one to six hours. They are frequently employed in military drones for spying.
Mid-range drones
These drones have a 400-mile flight range. They can spend more than 24 hours in the air.
Long range drones
Long-range drones are more advanced in terms of both design and function. Their estimated range is 400 miles. Experts use them to track weather trends, geology, and geographic mapping.
Drone types according to the power source
These are the drone types according to their power.
Battery powered drones
The battery serves as the majority of the drone’s main power source. LiPo, NiMH and Nickel Cadmium batteries are three popular types of drone batteries.
Gasoline powered drones
For large drones, gasoline is typically utilized as fuel because it is lightweight and affordable.
Hydrogen fuel cell drones
Drones using hydrogen propulsion are more effective in the air than many drones with combustion engines.
CW-25H is a good example of a hydrogen-powered drone.
Solar drones
These drones harness the energy of the Sun to charge their batteries by turning sunlight into electricity. It allows long flights with the availability of Sun.
Drone types according to their ability
If we talk about the abilities of drones, the following are the types.
Toy drones
These drones are available in the toy section of supermarkets. They are available in a variety of sizes and shapes. They can be used indoors and outdoors occasionally. Depending on the model, they can be operated by smartphone or remote control.
Photography/Videography drones
Various drone camera models cancapture images or videos in HD, full HD or 4K. These drones are used for photography and videography at some functions.
Racing Drones
Competitive drone racing also known as FPV racing typically takes place on private property that is subject to strict regulations. It involves piloting a drone at high speeds through obstacle courses while wearing virtual reality goggles.
RTF drones
These are made for users. All the parts of this drone are put in a single kit.
GPS drones
These types of drones are connected to satellites directly. When they are running low on batteries, they return home.
Professional drones
These drones are used for professional videography at events.
Military drones
Military drones are completely different from civilian drones. They are used by the military for different purposes. Like, for they are used for intelligence and fighting.
Delivery drones
These are newly tested types of drones for delivery purposes. In the future, several types of delivery drones may come.
Drone types according to their motors
Brushed drone motors
These motors are available in most recreational drones. They are cheap motors and they require wide maintenance as compared to brushless motors.
Brushless drone motors.
These are the motors which have no brushes. There is a complete absence of brushes that are in contact with rotors.
Drone Apps
Above, we have talked about the definition of a drone and its various types. They can be used for various purposes but the main purpose and main type of drone are that which is used in photography and radiography.
One of the main things that you should know about drones is that they can’t be used automatically. Have you ever thought about how these drones are used??
If you ever thought about it then you should know that there are several mobile apps for drones. The majority of these drones are controlled by this app. Although some of them are remotely controlled, they can be controlled with mobile apps in a better way.
In this article, you will see the best apps for drones. The following are the best drone apps.
Google Earth is a fantastic app. In this app, you will find a place to fly.
B4UFly is an official app of the FAA. In this app, you will see a lot of information.
Airman is an app for airspace authorization.
UAV Forecast is a good best drone app for android.
Sun Surveyor is a photography app that helps with photography.
DroneDeploy is an alternative app to many other apps.
Aloft is used for flight tracking and map
Google OpenSky is a LAANC authorization tool
Following are the best drone apps also they are best drone apps for Android.
You can download these apps from your android mobile and either from your iPhone.
Moreover, Drone pilots can plan, carry out and assess their flights by using software called drone apps. There are many drone apps on the market, and they all have different features and functions. We’ll give an overview of the most well-known drone apps.
DJI GO 4 is a well-known drone application for DJI drones. It enables drone operators to manage their drones, access camera settings, and see drone footage in real-time. Additionally, it has facilities for editing images and videos as well as automated flight modes and intelligent flight planning.
Litchi-Another DJI drone app. It offers sophisticated flight planning features, such as waypoint missions, orbit, and follow modes.
Pix4Dcapture is a drone programme created for mapping purposes. It enables pilots to schedule automated flights to gather aerial imagery, which is transformed into three-dimensional models.
AirMap is an app that gives pilots details about the rules governing airspace, the current weather, and other variables that may affect their flights. It may be used to ask for permission to fly in regulated airspace and has a flight planning function as well.
DroneDeploy is a drone application that offers data analysis and mapping tools for use in commercial drone operations.
B4UFLY is developed by the FAA in the United States. It gives pilots information on airspace limits and other laws.
These are just a few drone apps that are offered on the market. It’s crucial to take into account the features and capabilities that are crucial for your particular use case when selecting a drone app. While some programmes are made for recreational pilots, others are focused on business uses like mapping or inspections. You may enhance the security, efficacy, and efficiency of your drone operations by choosing the appropriate app for your requirements.
Drone controller app
If we talk about the controller apps for drones, there would be plenty of apps available. According to a survey and searches across the web, the following are the best drone controller app.
Drone Deploy Flight app
Drone remote
FreeFlight
FreeFlight Mini
Drone Controller
Hover App
For pilots of quadcopters, and drones Hover is a necessity. This app has several features among them the following are: No-fly zone maps, flight records, weather information, and industry news feed.
This app is very helpful for pilots and drone users. It helps over 20,0000 commercial pilots to fly safely and legally.
What is Hover App?
There are numerous apps with the name Hover. In this article, we will give you full information about what is hover app and we’ll give a comprehensive overview of the phrase and the various circumstances in which it may be used.
Generally, the act of maintaining a cursor or pointing over a particular element without tapping on it is referred to as hovering.
Moreover, in the context of mobile apps, hovering referred to a specific app named hovers. There are numerous apps available on the app store or play store named hover. But the main thing is that the name of the app depends on the category of your questions. First of all, you must know which app you are asking for.
In this article, we are talking about drone apps, so that means we are talking about hover drone app.
Yes, we are talking about hover drone apps in this article. You will see the information and features of this app in the below heading.
Hover Drone App
Hover Drone app is a good and high-leading app that is specially created for drones. This app has some features.
Weather Information: it includes temperature, speed and direction of the wind, and expected weather conditions.
Flight Logs: Individuals and groups may easily monitor, record, and maintain their fleet of drones. Also, control the tools of drones.
Readiness indicator of flight: This straightforward flight status will inform you whether it is safe to operate your drone or unmanned aerial vehicle in particular weather scenarios and geographic locations.
News Feed: Keep informed about what’s happening in the drone industry with live posts from major media outlets, and company blogs.
Hover App Review
Here best hover app review for you
The Hover app is a drone flight planning and management app that helps you plan, fly, and track your drone flights. It is available for both iOS and Android devices and can be used with a wide range of popular drone models.
One of the standout features of the Hover app is its ease of use. The interface is intuitive and user-friendly, making it easy to plan and execute drone flights even if you’re new to drone flying. The app also provides detailed information about the drone’s battery life, flight time, and GPS signal, allowing you to make informed decisions about your flight.
Another great feature of the Hover app is the ability to create custom flight plans. You can select a specific area on a map and set your drone to fly a predetermined route. This is especially useful for photographers and videographers who want to capture specific shots or footage.
The app also provides real-time weather updates, which is essential for safe and successful drone flights. Additionally, it includes a no-fly zone feature that helps you avoid flying your drone in restricted areas, such as near airports or military bases.
Overall, the Hover app is a powerful tool for drone pilots that offers a wide range of features and capabilities. Its ease of use and intuitive interface make it a great option for beginners, while its advanced features make it useful for more experienced drone pilots.
Conclusion
In this era, people use drones for several purposes. There are different types of drones depending on different categories. Every type of drone is different in size, shape and function. But, the main type of drone is that which is used for photography/videography.
All these things are on one side, the main thing is how to use and control these drones.
The answer to this question is; there are several drone apps to use and control these drones. In the above article, you will see the type of drones and best drone apps.
All the things related to drone types and drone control apps are classified in detail. Further, if you have any queries, you can contact us by commenting on this article.
FAQ’s
1: Is the Hover app free?
Ans: Yes, the hover app is free, you can download this app freely from the app store or play store.
2: When was the Hover app created?
Ans: The hover app was created in 2011.
3: Is Hover Drone App useful?
Ans: Yes, the hover drone app shall prove useful for you. It has many features in it.
4: Can drones spy at night?
Ans: Yes, most drones spy at night, but some drones can’t spy at night.
5: Can a Drone Track You?
Ans: The tracking depends on the model and name of a drone. Some drones have tracking technology and they can track you. While, those who didn’t have this technology can’t tracks you.
Content source link – How The Hover Drone App Can Enhance Your Drone Piloting Experience in 2023 ?
0 notes
Link
We can have many reasons related to any drone, for which we need a night vision drone. For example, to monitor a place in the dark of night, or to do any kind of videography or photography in the dark of night, a great night vision drone is also needed. We can make someone's normal drone a night vision drone in three ways. First of all, we can do this by using an infrared (IR) camera with infrared (IR) light in a normal drone, apart from using a thermal camera in a normal drone, we can make a drone a night vision drone. Thermal cameras are used in high-end night vision drones.
0 notes
Text
Night Vision Technology for Drones: A Complete Guide
There can be many different reasons why a drone company may want to have a special feature like a night vision drone. Night Vision is very special for those drone lovers who fly their drones at night. This special feature is also taken advantage of in many businesses. Night vision feature is special for all drone users in some way or the other, due to which people want to get this special feature in a drone.
In a single night vision drone, it can work on three different technologies. Due to which a drone can easily record pictures or videos in low light or dark places. It can do this in three different ways, first by using low light cameras, second by thermal cameras, and third by using IR light with an infrared (IR) camera on a drone.
Now we have to see what kind of night vision feature we need in a drone so that we can do our drone related work easily. We should know that the FAA has exempted flying drones at night for commercial purposes. All these things we as a drone pilot should already know.
What is Night Vision Technology for Drones?
The term night vision used for drones is not exactly a clear term, but we use it to refer to three different technologies in a single drone. Which makes a completely green drone self-sufficient to fly at night, due to which we use a drone for various tasks at night, including to record images in the dark of night. A night vision drone achieves a task in a variety of ways. Let us know all those techniques in detail.
Infrared (IR) Camera
Infrared light is attached to the infrared camera of a drone, which is difficult for a human to see because infrared light has a longer wavelength than visible light. As a drone pilot, we must have seen that a drone with infrared camera has an infrared LED light that emits infrared light to allow a drone camera to take pictures at night. n Captured images are usually taken to be presented in grayscale.
If you also have a drone with night vision technology, it may be that it does not have an infrared camera because we have already been told that it is one of the major technologies of night vision cameras. However, there are some drones available in the market equipped with infrared cameras. Those are advertised for a drone user with a night vision or infrared camera.
thermal camera
The thermal camera in a drone is in the second category of night vision technology, because a drone with a thermal cameras does not require any visible or infrared or light source to take pictures at night. Instead, a thermal camera-less drone uses the thermal emission of objects and a variety of materials to record photography or video. Drones with no thermal cameras are used for most commercial purposes over other night vision drone technology.
There are some drones in the market at the prosumer level that have a thermal camera along with the normal camera which we can use to have an interchangeable payload system that allows us to attach a dedicated flir thermal camera.
low light camera
Such drones use high quality cameras, a large CMOS chip and a large lens so that the camera makes the best possible use of the available light to produce the image. These images are then recorded in RAW to make post-processing easier. By doing this, we can record great pictures even in low light or dark places with a drone.
What drone camera settings can be adjusted as well as shutter speed from Viso to help make the best use of its camera sensor. With the good 4K camera we get from our drones, we can take good video and photography in low light conditions or dark places with the help of some additional specialised equipment.
Do Drones Have Night Vision?
The camera installed in most of the less expensive medium level used drones has good night vision even in low light. Which means we can pick up enough ambient light to capture a picture with their help which can then be post-processed to convert it into a readable picture.
Its level of detail that a standard drone camera can pick up in low light or at night, although we can say that it is much less at night than in the day, and when taking pictures in the dark, there is often a grain in the picture which is often This is due to a drone sensor not getting enough light as it needs to capture an image clearly.
We do not find night vision in most drones in the market in the sense of having thermal cameras or infrared. Thermal cameras and infrared cameras are more specialised than normal cameras that have to be added to another drone later, or we can buy them as part of the entire drone setup.
How far can drones see at night?
To remove the concern of those who work as privacy or a private detective, let me tell you that no normal drone can take a good picture from very far in low light conditions. Even though they may be able to pick up light over a mile, the drones don't see anything very well in the dark at night.
Infrared LED light in any night vision drone, with the help of which we can record a good picture with the power of infrared light up to 5 yards or more. Also, the object we want to take a picture of should be under infrared light, only then we can take a good picture at night.
Thermal cameras for night vision have much better range of vision than infrared cameras, which can easily see objects several hundred feet away due to their amazing technology. And how well we can read an image taken by thermal cameras, rather than any other, depends entirely on thermal emission and not on some kind of light source.
Can I Add Night Vision to My Drone?
We can easily make a drone equipped with night vision technology by adding night vision capabilities to a normal drone. We can easily connect them with any drone. We can do this by adding a special type of light and camera to the gimbal or frame of our drone. All these tools are easily available in the market for us.
If we are doing this especially for such night time photography, then the best way can be made by using lume cube light. Which acts as a spotlight for us in low light photography.
Apart from this, we can use this as an add-on infrared setup by adding a small infrared camera to the frame of our drone. But we can't get these tiny infrared cameras with their own batteries, which requires us to plug them into a port on our drone.
One thing we should be aware of when plugging in an accessory or adding extra weight to our drone is that it will reduce the battery life of the drone due to the high cost of our drone and we will also have less flight time than before.
Thermal
If we want to add a thermal camera instead of an infrared camera in our drone then it completely depends on our drone type as it is a thermal camera is quite a sophisticated piece of equipment as compared to a simple infrared camera, our It is difficult to find a thermal camera for a drone that we can fit on the frame of our drone, but for that it is necessary to be able to connect the thermal camera to our drone's gimbal. If our gimbal setup is predetermined, we cannot pair it with our existing drone.
If we talk about some examples of this, DJI Zenmuse XT2, a visual sensor/a dual thermal which we can buy outside for our drone, but we can find this visual sensor compatible with only a few drone models including DJI's enterprise Contains level matrix drone series.
We can easily find some good thermal cameras for our normal drone which we can easily install on our normal drone which does not already have special features like night vision. But they also have some drawbacks because by using them the weight of our drone increases a lot, as there is no battery in them, they take power from the battery in our drone, due to which the battery life of our drone also decreases.
What we need to know before flying a drone at night
Before using any drone with night vision, we must know some rules about it so that after that we do not have to face any problem related to flying the drone.
If we want to use a night vision drone only for purely recreational purposes. And if you want to use it in the dark of night, then we do not need any kind of drone licence, but for this our drone should have a light so that with its light, a drone can be easily seen even at a distance in the dark of night. So that we can easily tell the direction and orientation of the drone.
Conversely, for any night vision drone to be used at night for commercial purposes, we had to obtain an exemption from the FAA to fly the drone at night. But that's in the process of changing, and we probably won't need a waiver after some time, instead we will have all the potential for operating drones at night for knowledge training and testing on drones flying at night. learning will be required.
What are night vision drones used for?
In today's time, there are many such tasks for which we have to fly a drone at night, for which we need a drone equipped with night vision. We have described some of the main tasks for you below so that we can understand the usefulness of a drone at night. Get to know them well.
Photography - If we talk about the most important use of a night vision drone, then the most important of them is photography, maybe we are interested in doing photography at night or you can do party or wedding photography with the help of a drone at night. If you want, for all these tasks, we are going to need a drone equipped with night vision. With a good and sensitive sensor drone, we can do photography easily at night through low light settings. Also adding an external light source to your drone can be a big help in good photography.
Security - Drones equipped with night vision are also used for perimeter surveillance at night in some places. A low-light drone sensor can't cut it for such tasks, and we can use a good infrared camera to see images in the dark or at night. Even better if we want to monitor without visible light. We have a thermal camera that can help take longer distance images than any other night vision technology. Which on the contrary is better than being illuminated using an infrared camera.
Search and Rescue - Thermal cameras can be used to locate a missing person in an unusually dark place during the night. As we have already said, a thermal drone camera can easily see a greater distance than any other, which covers more ground easily, so that the missing person can be easily traced.
Inspection - As we all know that in many places, industrial inspection and many types of construction are completed in the day as well as at night, in which night vision thermal cameras are used to accomplish this. With the help of a thermal camera, one can see through the fog or dust of a construction site on a hill, which is difficult to do with the help of any other night vision technology. To be honest, the use of a thermal camera for night vision of a drone is wonderful, which does not require any external light source and does all the work well.
Source link - https://www.dronesnuture.com/2022/04/night-vision-technology-for-drones.html
1 note
·
View note
Link
As we all know very well that nowadays the trend of drones is very high, the best drone camera in them has made them even more useful. The use of drones saves us a lot of work, both time and money. We can fly a drone from the ground with a controller with medium to large ease. To know the usefulness of a drone, read an article completely.
0 notes
Text
10 Best Camera Tripods for Photography to Buy in 2022
If we work for a photographer, or drone photography or any Youtube channel, then we will be looking for the best camera tripod for our photography work to do it simple and well, we can use it in photography - So let me tell you that this article is going to be absolutely right for you.
A tripod is a basic and good tool for a YouTuber or photographer which is one of the most essential things for them.
But when we want to buy a camera tripod for ourselves, we see that there are so many options available in front of us in the market, it becomes even more difficult for us to know which camera tripod we should buy from them.
What is the use of a camera tripod?
As a professional photographer you probably know how important it is for a photographer to have a good best camera tripod.
With its help, we can keep the camera stable even in low light and at the same time the camera tripod helps in improving the image quality and sharpness even more.
We can also use the camera timer and tripod for self-portraits
However, we should also know that tripods can be used by photographers as well as streamers and YouTubers tend to create a YouTube vlog for themselves for a high degree of consistency. This is why the tripod is a useful tool.
A good camera tripod is also used in landscape photography for proper framing of a subject as well as for capturing HDR and panoramic images.
Additionally, with the combination of a great camera and a great tripod, we can easily capture impressive video clips and pictures.
So if we are also looking to buy the best camera tripod for ourselves and want to know about the best tripod to pair with your camera right now, then here is my list of the best top 10 tripods of 2022 for you. is included in.
10 Best Camera Tripods for Getting the Best Creative for Us
Manfrotto 190XPro4—Best Overall Tripod
Joby GorillaPod 1K—The Most Affordable Tripod
Vanguard VO 3+263AB—The Most Versatile Tripod
Manfrotto 290 Dual—Most Stable Tripod
Rhino FRHN34CVX30—Best for Pros
Peak Travel Tripod-Best Tripod for a Traveling Photographer
Benro Travel Angel—Most Lightweight Tripod
MeFoto C2350Q2K—The Most Durable Tripod
Benro Mach3—Best Tripod for Photographers
Sirui NT-1005X—The Most Compact Tripod
Things to consider when buying the best tripod for us
Like buying any other equipment or gadget for us, as a good photographer, there are various things to consider while buying a great camera tripod.
Before you go through each of the tripods on my list, I want to tell you about a few key points that you must consider when buying a camera tripod in order to find the best tripod.
Stability
weight support
quick-release system
height and weight
used salmon
We have given a detailed explanation about why it is important for you to check these things first, which we must read:
Stability
We must remember that the stability of a tripod does not depend on its weight.
There are many tripods available in the market for our use which are sturdy and durable too, but we find them lacking in stability when used in different weather conditions.
Whenever a tripod is assembled, at that time a tripod has to face the wind as well as small bumps and big bumps.
During any videography, we should make sure that our camera and lens are balanced properly and not keep tilting in one direction.
Because if our camera and lens are tilted in one direction, then there is a risk of breaking our equipment by falling on the ground, which can be very harmful for you.
weight support
While buying a camera tripod, one must also see that the weight bearing capacity of that tripod should be good.
We should not waste money by buying an AC camera tripod which cannot handle the weight of our camera well because in such a situation our camera or any valuable equipment will fall on the ground due to which we have to damage our valuable equipment and waste money. becomes a threat.
Therefore, before buying any camera tripod, we must check its weight bearing capacity and only then should we buy a tripod.
I advise you that whenever you go to buy a tripod for yourself, then you should take the camera with you and once you have installed the camera properly on the tripod, you must try it.
quick-release system
While buying a camera tripod, we will see that the head of an expensive camera tripod has a stronger plate that is mounted on the camera and lens, but in an affordable camera tripod, we get to see a plastic plate. And in this case, the Arca-Swiss quick release mechanism is used as a good quick-release system.
It is widely used for its simple and fast operation which acts as a standard for most of the manufacturers. Which has proved to be a successful solution in the camera tripod for today's photography.
Talking about the strength of the Arca-Swiss quick release system, it is made of metal many times stronger than the plastic plates attached to a camera tripod. The Arca-Swiss quick release system keeps our lens or camera securely attached to the tripod without moving anything
height and weight
For a good and attractive videography and photography, as a youtuber, I advise you to consider the height and weight of the tripod while buying a tripod for yourself. The height of the tripod we have chosen for ourselves and our height should be somewhat related so that we do not have to bend too much to look at our viewfinder.
We must keep its length at least as close to the level of our eyes. So that we do not have pain in our back due to bending again and again because as a youtuber we have to bend again and again to know what we are trying to catch.
However, now we know about the length of a camera tripod as well as the usefulness of its weight. While choosing a good camera tripod, we should keep in mind that the weight of the tripod we want to buy should not be too much. Because we also have to go out of the house for photography and videography. In such a situation, we have to face a lot of trouble in moving a heavy camera tripod from one place to another. For these reasons, many times we leave our tripod at home.
If we want to make adventure photo shoots or travel blogs for youtube then we should definitely buy a lightweight and compact camera tripod which is very easy to carry from one place to another.
used goods
Most carbon-fibre materials are used to make a lightweight camera tripod.
This material is considered to be the best tripod material due to its stability, durability, and never rust.
The downside, however, is that it is a bit more expensive than any other camera tripod. If we want to buy cheap tripods for ourselves then it can be a bit difficult for us to buy them.
There are also AC tripods in the market, which are made of aluminium metal, even though their weight is a little more than the tripod made of carbon fibre, but we can get them only at a low cost. It is very useful for all those who have less budget.
Also, there are tripod brands in the market that make a very strong tripod made of stainless steel, but not perfect for people who do outdoor photography or travel blogs, as they should be taken with them. It's very difficult.
Now we have to choose a camera tripod for ourselves considering our work and budget
1. Manfrotto 190XPro4
As we know that the manfrotto tripod provides us with good photography related equipment. Talking about its camera tripod, Manfrotto 190XPro4 tripod is counted amongst some of the best tripods for video recording and photo shoots.
The Manfrotto 190XPro4 is considered the best overall tripod for creatives.
The Manfrotto 190XPro4 tripod incorporates a mechanism unique to us that makes us even more flexible when shooting, giving us more shooting options than any other camera tripod.
The Manfrotto 190XPro4 tripod is very easy to set up, which is better suited for the youtuber or photographer who prefers photography featuring adventurous subjects.
For us it also has an unlimited level, which gives us exceptional stability during our video or photo shots.
In the Manfrotto 190XPro4, we also get an LED light along with some other functional accessories that help to enhance the video clips and shots even more.
All these features found in a camera tripod are very useful in making us the perfect set-up for YouTube vlogs or photography.
The Manfrotto 190XPro4 tripod offers flexible legs that are perfect for carrying from one place to another.
Specifications
Max Height: 175cm
Max load: 10/7kg
Folded Height: 57cm
Material: Aluminium
Weight: 2.6kg
Leg Section: 4
Pro
The Manfrotto 190XPro4 is very easy to set up
it is very flexible
Lightweight
Cons
large in size
poor construction
Manfrotto MT190XPRO4 Aluminium 4-Section Tripod, Black
$269.00$298.49
2. Joby GorillaPod 1K
If we have just started our career in photography and are just looking to buy the best tripod to practice our skills properly, then Joby Gorilla Pod 1K will be the perfect tripod for us.
This is the best and affordable tripod for photography enthusiasts.
The Joby Gorilla Pod 1K is touted as one of the best tripods for beginner and hobby photographers who don't need to buy a pricey professional tripod right now.
This tripod is a great low budget camera tripod for anyone starting a creative career.
If we are doing photography just for fun then Joby GorillaPod 1K is perfect for us. The Joby GorillaPod 1K combines many of the same features as high-end tripods that we would find in an expensive camera tripod.
The Joby GorillaPod 1K is a lightweight and portable tripod, which makes it easy to use for outdoor activities and hiking.
Specifications
Weight: 196g
Material: Stainless Steel, Plastic,
Max load: 1kg
Max Height: 25.5cm
Pro
It is cheaper than others
portable tripod
This tripod is perfect for the outdoors
Cons
slightly smaller than others
does not spread
Buy Joby GorillaPod 1K on Amazon
$25.07$34.95
3. Vanguard VO 3+ 263AB
If we are looking for different features in a camera tripod for ourselves that set it apart from a normal camera tripod, then the Veo 3+ 263AB from Vanguard is going to be the right one for us.
This is a great camera tripod for photographers.
We can also use this tripod as an all-in-one tripod as the Veo 3+ 263AB tripod is stylish as well as sturdy, which has become quite popular due to these reasons.
The Veo 3+ 263AB is easy to operate, it is used by beginners as well as professional photographers, it is also very easy to operate.
We as a photographer also get enough flexibility in the Veo 3+ 263AB to do any kind of photography which we don't get in any normal tripod.
Vanguard's Veo 3+ 263AB is known to us for delivering the highest quality and stability to your photos by combining superior computer numerical control engineering technology with high grade materials in the camera tripod and monopod.
For more flexibility in the Veo 3+ 263AB we can easily switch one leg of our tripod to the monopod.
If you are looking for an AC camera tripod for yourself that has multiple uses, then the Veo 3+ 263AB is made for you, then we are definitely the one to go for it.
Specifications
Max Weight: 33 lbs
Material: Aluminium
Leg Section: 3
Max Height: 67.9 inches
Folded Height: 29.9 Inches
Pro
It has excellent max height for you
quick leg locks
with centre column
Cons
too long bent
long bent
Buy Vanguard VO 3+ 263AB on Amazon
4. Manfrotto 290 Dual Tripod
We consider the Manfrotto 290 Dual Tripod Original Rock-Solid as a good camera tripod because of its quality style and unique features that makes it a modern camera tripod.
The Manfrotto 290 is considered the best camera tripod for filming and still photography.
This tripod is built on the 290's rock-solid design, which uses manfrotto travel tripod revolutionary 90° column mechanism with exclusive four-leg angle settings that help us steer our camera to ground-level shooting positions with ease Which is a unique form of videography.
It also uses a new rubber leg warmer and an updated metal disc keeping the grip in mind for any of our tripods, which makes it a better tool than others in some respects and also gives it an updated look.
Additionally, we can get the Manfrotto 290 in three best models – Tripod Kit with Ball Head, Stand-alone Tripod and Tripod Kit with Three-Way Head.
We can choose manfrotto carbon fiber tripod of these camera tripods for ourselves according to our work and requirements
Whatever we choose in a camera tripod as a youtuber, they are all well built for us, but before buying it we must make sure that we can use it for any video clip and photo shoot. can be made in a stable manner.
We also get the option of one leg angle selectors in the Manfrotto 290 tripod, which helps us a lot to reach the lowest angles and positions.
Specifications
Weight: 2.28kg
Material: Aluminium
Max Height: 175cm
Max load: 5/6kg
Folded Height: 69cm
Leg Section: 3
Pro
Manfrotto 290 is very easy to carry
quick to operate
Existing with great height
Cons
poor feet
Slightly more expensive than others
Buy Manfrotto 290 Dual Tripod on Amazon
$250.88
5. Benaro Rhino FRHN34CVX30
The Rhino FRHN34CVX30 Camera Tripod delivers more stability and weight combining strength than others.
This will prove to be the best tripod for a professional photographer.
It is counted among the list of expensive camera tripods but it is very easy for a professional photographer to use it to capture the best possible videos and photos.
The Rhino FRHN34CVX30's unique reverse folding design makes this tripod extremely portable for outdoor photography as well
On the Rhino FRHN34CVX30, we have an automatic leg angle adjustment that makes the process of changing our leg angle very easy.
It has many unique features due to which a professional photographer can work smoothly without any hindrance.
The Rhino FRHN34CVX30 is well designed to provide us with a stable set-up.
We can use the Rhino FRHN34CVX30 for photography or YouTube videos which are a great buy. This is the most suitable option for those people.
Specifications
Max Height: 174.5cm
Max load: 20kg
Material: Carbon Fibre
Weight: 6 pounds
Leg Section: 4
Pro
it's great quality
It is easy to use
expressive height
Cons
it has no pillar axis
it has no centre column
it's a bit expensive
6. Peak Travel Tripod
Peak Travel Tripod has been specially designed for people who travel a lot outdoors and who love to shoot their videos and photos during their travels.
used peak design travel tripod is the best travel blog shoot for those youtube vloggers. And who shoots the event at different places.
We find this tripod with good extended height, pro-level stability and high load capacity would be a first choice for YouTubers or any professional photographers.
The Peak Travel Tripod is easy to assemble and disassemble and its sleek look makes it easy for even a beginner photographer.
If we want to make or have made a travel vlog youtube channel for ourselves, for which we need a camera tripod equipped with good and unique features then we should buy Peak Travel Tripod.
Peak Travel Tripod will go a long way in helping us capture the best moments forever for which we must have Peak Travel Tripod.
It is also a good camera tripod for professional photographers who use DSLR for photography which gives maximum stability to the camera and keeps the camera tight.
Specifications
Max load: 9.1kg
Max Height: 152.4cm
Folded Height: 14cm
Weight: 1.56kg
Material: Aluminium
Leg Section: 3
Pro
This is a portable tripod
phone bag included
low-profile ball head
Cons
It's not long for its price
costly
Buy Peak Travel Tripod on Amazon
$349.95
7. Mephoto Globetrotter C2350Q2K
If durability is our priority when buying a camera tripod, then the MeFoto GlobeTrotter is going to be the best camera tripod for us.
The MeFoto GlobeTrotter is one of the best camera tripods to buy in 2022.
It is a strong and durable camera tripod so that we do not need to buy a camera tripod again and again.
The MeFoto GlobeTrotter is one of the most stylish camera tripods out there while being strong and durable.
We can also get it in different colours as per our choice. Along with this, this tripod is a bit expensive as compared to others, we must make sure before buying it that we can use it to make videos and capture pictures for ourselves.
We can fold the legs back 180° to make the MeFoto GlobeTrotter smaller, making it easier to move from one place to another.
Its special features include all weather use and dust resistance, due to which we can use it in all types of weather with great ease.
Specifications
Max load: 12/12kg
Max Height: 165cm
Folded Height: 41cm
Material: Carbon Fibre
Weight: 2.1kg
Leg Section: 5
Pro
This camera tripod is convenient to carry
cheaper than others
we can use it as monopod
Cons
only for two positions
it's not too long
8. Benroe Travel Angel
This Benro Travel Angel tripod is specially designed to provide great lightweight camera support for vloggers and photographers.
This is one of the lightest tripods for youtube for vloggers.
The Benro Travel Angel Camera Tripod is specially designed for outdoor use as it is a very lightweight camera tripod so it is very easy to carry around for shooting.
Apart from the tripod legs, the Benro Travel Angel has rubber footpads, metal spikes for a unique look, as well as a small centre column in the kit.
Plus, we can easily use one leg of this camera tripod as a monopod.
The Benro Travel Angel won't disappoint us in any way when it comes to the durability of this tripod.
The Benro Travel Angel is a sturdy and long lasting camera tripod if you decide to buy this for yourself as a photographer then it is definitely going to hold you for a long time.
This is a great camera tripods for anyone recording their movements during their travels as it is one of the lightest tripods on my list.
Specifications
Max load: 10/14kg
Max Height: 161cm
Folded Height: 45cm
Material: Aluminium
Weight: 2.42kg
Leg Section: 4
Pro
Convenient to carry Benro Travel Angel
it's great for travel
This is high quality tripod
Cons
Lack of stability compared to others
low operating height
Buy Benro Travel Angel on Amazon
$269.95
9. Benaro Mach3 Series 2
If we are looking for the best camera tripod for blogging a youtube channel or our studio then our search ends here with Benro Mach3 Camera Tripod.
Benro Mach3 One of the best camera tripods for all types of photography.
The Benro Mach3 is highly recommended by all professional photographers who have used it so far because it is designed to provide great stability. All kinds of photographers can use it for themselves.
This tripod's main purpose is to provide a lightweight camera and a compact look. It has three legs for easy setting in any position of our choice.
This makes use of high performance twist lock with magnesium casting in this 9X carbon fibre tripod to make outdoor and indoor photography easy.
The Benro Mach3 Camera Tripod is made from an advanced material with a classic design, thereby enhancing the experience of a photographer.
The Benro Mach3 is lightweight as well, due to which we can carry it wherever we go, anytime.
Specifications
Max load: 8/8kg
Max Height: 167cm
Folded Height: 60cm
Material: Aluminium
Weight: 2.42kg
Leg Section: 4
Pro
cheaper than others
it has great stability
well built
Cons
poor feet compared to others
We can't use it as a monopod
Buy Benro Mach3 Series 2 on Amazon
$164.95
10. Sirui NT-1005X
The photography experience with this sirui nt-1005x review we know is a bit different than others, which helps us to have a comfortable and stable photography.
The Sirui NT-1005X is considered a great compact camera tripod for video and photo artists.
We can use it as a monopod with one leg bent and the Sirui NT-1005X Drone can enhance our photography experience in shots, close-ups, hiking etc.
We can use this tripod to capture panoramic images hassle-free.
We can also use Sirui NT-1005X on resistant rough surfaces as it also has the features like safe operation and efficient locking for doing our photography.
Being very compact, we can easily fit this tripod in our bag pocket.
We can also get it for simple transportation and storage. You can also buy us for use during your travels.
It's also a great camera tripod for photographers using mirrorless cameras, camcorders and DSLR cameras. It comes with a wide range of compatibility.
Specifications
Max load: 10/8kg
Max Height: 150cm
Folded Height: 36cm
Weight: 1.44kg
Material: Aluminium
Leg Section: 5
Pro
it is very small compared to other
easy to adjust
with non-slip feet
Cons
no free sponge in it
small slide
Buy Sirui NT-1005X on Amazon
$149.90
1 note
·
View note
Text
What is a drone camera, and what is a drone camera used in 2022?
Whenever we look at a best drone camera , we tend to think of a breath-taking landscape, historical site, or even a candid aerial view of a movie scene.
Most of us would have a desire in mind to take a bird's eye view of objects. In earlier times, it was very difficult and expensive for people to capture such shots with their cameras, but in today's time, with the help of drone cameras, it is very easy to take good aerial shots. Drone cameras have made it even more accessible. Have given.
Drone cameras are also simply cameras, which are only small and designed to work on a drone. We can do a variety of tasks with drones such as taking pictures, recording videos and transporting various payloads required for any of your tasks from one place to another. All we have to do is choose a good camera drone that is just right for our needs.
Please keep reading to know more about how a drone camera works, other uses of drone cameras, functions and uses of drone cameras in industries, and how camera drones work in the market.
What is a Drone Camera?
A drone camera is also a type of camera which is designed to work on special drones. Drones are designed for various tasks such as only flying toy drones, and drones with cameras for video and photography and have evolved to carry sophisticated payloads for various other tasks. We have to choose a drone suitable for the task for ourselves.what is the best drone with camera to buy
How does a drone camera work?
Any drone camera is made to communicate with the controller on the ground so that we can control our drone from the ground. And that way, we don't have to take off our drone every time we take off the drone to adjust the camera settings and how does drone camera work
If you want to know how both drones and cameras work, then we must understand some important fundamentals about drones.
We have to use a controller to fly any drone. how to use drone camera Any controller communicates with the drone via radio frequency or Wi-Fi signal. Most toy drones use Wi-Fi signals for communication, but advanced drones mostly use radio frequencies for communication.
In this way, through the controller, we send instructions to the drone that how high we want to fly the drone and in whichever direction we want to rotate the drone. What will you do with the camera?
Therefore, in order for us to fly a drone camera effectively, we must already have some drone flying skills as well as some photography skills.
How is the video transmission between the drone and the controller?
Apart from taking pictures from our drone, we can also easily view the live footage viewed by our drone by using VR Goggles, FPV Goggles, Smartphone or controller with an inbuilt screen.
But broadcasting can still be done via Wi-Fi, radio frequency or Bluetooth. And we can also easily use the smartphone or the controller to control our various camera settings for better footage.
What types of cameras are used in drones?
Today's drone cameras have come a long way. Since then, today's cameras have advanced and are perfect for taking high-quality shots especially from some distance from the ground.types of cameras
Whether we just need a simple drone camera for photography or a more sophisticated drone for specific tasks, there is one on the market for us.
They are also available with drone gimbals that help stabilise footage taken when there is turbulence as the drone manoeuvres in the air.
The cameras used in the very best drones like DJI, Unique and Autel are good examples. We can easily shoot 4K footage in most resolutions with its help.
The zooming capability of these cameras makes these drones even more attractive. These drones allow them to take shots from high altitudes without distorting the quality of the images.
The Zenmuse zooming feature in DJI gives this camera the ability to zoom up to 180X which is not available in any regular drone camera. We can use this kind of zooming power when we need to take shots of construction projects, electric stations or turbines from a distance.
what is a drone camera used for
Whenever we think about buying a drone, then one thing definitely comes to our mind what is a drone camera used for. But now with the combination of drone and camera, drone users can now carry out both their hobby and professional tasks with great ease with their drone. Below we have given some applications for your convenience where drone cameras are applicable.
Photography and Filming:
Photography and filming are some of the sectors that have seen the most use of drone cameras. Now relying on helicopters, cranes and other sophisticated filming equipment, shots are now done with the help of drones much more easily and money is also saved.
When it comes to the use of drones in filming, drones have been used in many super hit movies such as James Bond's Skyfall, Jurassic World, The Wolf of Wall Street, and The Expendables 3, among others.
What is a drone camera used for when it comes to So it is not that the drone is used only in filming. It is used a lot in journalism. In places where people or vehicles cannot reach, such as snowy areas, caves or other areas, we film with the help of drones. For example photos of real estate, great aerial selfies or just a photo of nature like a view of the Amazon jungle, all these pictures were taken with the help of a drone.
Some good drones have some special features, with the help of which it is very easy to make cinematic shots, those special features are tracking features, follow-me features and autonomous.
Use of Drones in Research:
Nowadays drone cameras are being installed at all those sensitive archaeological sites, where people want to go or people cannot reach them. With the help of drones, we get to find those artefacts which we could not find earlier.
When it comes to using drones in research, National Geographic conducted a drone expedition to find out what happened to George Mallory and Andrew Irwin, two mountain climbers who disappeared on Mount Everest in the 1920s. Which is a good example.
He used drones to film the aerial view and most of the area. When we have to collect data from other planets, drones are being installed in rockets for this.
A good example of this is NASA's Ingenuity drone that NASA has used to collect data about the existence of life on Mars and relay it to Earth for further study. There are more drones in development for this purpose as well.
Use of Drone Cameras in Disaster Management:
Drones are also widely used in disaster management, especially when a disaster has occurred in an area where pedestrians or vehicles cannot reach. The disaster management team of that place is gray with the help of drones. drones in disaster management
Equipped with some unique thermal cameras and sensors, we can use drones to track wildfires, learn how to deal with fires based on real-time data, and help firefighters collect data.
Doing this using helicopters or other previously used conventional data acquisition systems in US AC situations is costly and quite challenging.
Now the thing to know is, how can a drone camera help in such a situation? Drones use a wide range of sensors, a camera is one of them, it remains aware of its surroundings and recognizes where to land.
Nowadays drones are also useful for reforestation efforts all over the world. We can also keep a watch on deforestation with the help of this. With the help of drones, one can scour the forest floor of forests destroyed by fire and drop seeds loaded with seeds, fertilisers and nutrients on them with the help of ships that will help a tree to rise above the ashes.
We know that about 300 million acres have been deforested since the early 1990s. Now it will take nearly 300 years for humans to reforestation forests, we will accomplish this more efficiently through seed-planting drone technology.
Use of Drone Cameras in delivery:
As we know, from parcel delivery to food and other items, the use of drones is now being used for package delivery all over the world which is growing very fast. For example, Amazon Prime, which is Amazon's delivery service, has been in operation for a while now and has drone-assisted deliveries in the United States and England.
drone for delivery has been of great use even during the coronavirus pandemic. UAV drones are used to transport vaccines, obtain laboratory samples, and even prevent the spread of viruses, as a solution to reduce contact. It was done to provide food.
Drones are also being used nowadays to transport donated organs to patients for transplantation. Recently, history has been made by doing so when a kidney for transplant from a hospital in Maryland was taken by drone in just four days. Was transported to another hospital within minutes. drones can cut into the dangerously slow rate at which donations usually come. As we know, organs for transplantation are typically delivered via chartered or commercial flights.
Use of Drone Cameras in Surveillance:
What is a drone camera used for when it comes to So drone cameras are helpful, especially by law enforcement, in surveillance, crowd surveillance, as well as the use of drone cameras to identify threats.drones in surveillance
We can stop any criminal activities by this kind of surveillance and also drone camera is important in border surveillance to stop alert officers.
Military personnel detect bombs with the help of drones, military personnel can go into their enemy's territory to gather intelligence with the help of drone cameras and even use drones to launch attacks. This is highly possible because the drone pilot has a complete live view of the area that the drone can target.
In addition to law enforcement, drone cameras are also useful in monitoring and monitoring drone constructions, power lines, pipelines, solar panels, and for maintenance, repair, and overall performance. EXO Drones
In another area where drone cameras help in surveillance, we can monitor wildlife with the help of drones. With the help of drones, we can understand how animals survive in their natural habitat.
If we use things like aeroplanes in place of drones then all of them can be very distracting. But drones get closer without making any noise without changing their environment. With the help of drone cameras, the drone animal population can be tracked and they are also very useful in combating poaching.
After all, single-camera drones are making a significant contribution to historic preservation efforts. Drones are being used to map 3D renderings of ancient sites across Europe, including Chernobyl, Turkey, Ephesus and Jewish cemeteries. These historic preservationists use 3D imagery to recreate lost sites.
Best Drone Pilots Job Opportunities
Use of Drone Camera in Weather Forecasting:
Drones with good advanced cameras and sensors are now very useful in collecting all the weather data like wind speed, humidity and temperature, which help us in forecasting the weather. Whose guess is also absolutely correct.
Use of Drone Cameras in Land Surveying and Mapping:
Nowadays drone cameras can be used to take multiple shots from and over a large piece of land. Then later these shots are used to create orthomosaics, 3D models of the terrain or to create maps. What Is AirMap for Drones
Drone cameras like the Ace make it even easier for geologists, land surveyors and other map users to get accurate, up-to-date data of a variety of landscapes with a minimal cost and low risk.
Conclusion:
From film production, disaster management, delivery to personal photography, we can do it all very easily with a drone with a good camera. Better yet, we don't need to spend hundreds or thousands of dollars on this functionality for a very expensive drone. We can buy a good drone under $100 which can do the job with a good camera.
Source link-
https://www.dronesnuture.com/2022/01/what-is-a-drone-camera-used.html
0 notes
Link
As a drone pilot or a fan of drones, we face a lot of trouble in transporting our drone from one place to another, in which case Manfrotto has found a great option of drone transportation solutions for all of us.While the backpack Manfrotto may be especially beneficial for advanced photographers and professional videographers, the Manfrotto will be a dependable, practical drone backpack for you. We will not have any problem in taking our favorite drone equipment from one place to another. The Manfrotto Aviator Drone Backpack for the DJI Phantom is a great drone backpack.
#dronelife#droneofficial#dronebackpack#dronephotography#backpack Manfrotto#DJI Drone Backpack#Manfrotto Aviator Drone Backpack
0 notes
Text
Best Manfrotto Aviator Drone Backpack for DJI Phantom in 2022
As we know today the trend of drone videography is increasing very fast. People are now using drones a lot for videography and in the future, it is going to be even more. A good videography drone is very expensive. Also, the equipment used with it is also very valuable.
When we go from one place to another for doing videography, we also have to take the necessary equipment of its many types of drone-like remote control, laptop and other accessories. For this, we need a good drone bag.
Today Manfrotto is a good choice of drone transportation solutions that is complementing this trend with a dedicated range. Manfrotto is especially beneficial for professional and advanced photographers and videographers who have trouble carrying their drone equipment and are looking for an excellent solution for the same. Then the Manfrotto will be a dependable, practical drone backpack for you. Manfrotto Aviator Drone Backpack for DJI Phantom is ideal for carrying your drone and its necessities with ease.
This bag is made for special adventures and this Manfrotto is perfectly adapted for the day of discovery. This bag has been specially designed for the DJJ Phantom series, which also includes the Phantom 4 Pro. The Manfrotto bag has been designed keeping in mind your needs so that you can easily hold your DLSR even with 1 lens and a tripod. The Manfrotto Backpack keeps all your belongings safe.
The Manfrotto even has separate compartments to securely store your propeller, transmitter and battery, giving you a great portable and handy storage facility. Thanks to those three protective pouches that provide a snug fit around your device.
The Manfrotto is a super-organized drone bag together and you'll feel in control because you can set the drone on the exterior of your bag, we can carry the Manfrotto bag on your shoulder with great ease, and we can use our propeller Can be mounted in a flash by unzipping the front zip. If we need to quickly change our location, we can disassemble our drone's equipment and move quickly.
The Manfrotto bag has a waterproof extra compartment for your 17-inch laptop or tablet that gives you extra space for all those essentials. This flow saves all our equipment from getting damaged in every season. The S-Bag also offers a decent option for attaching your tripod externally.
It is both modular and very easy to use. The built-in divider lets you create the exact sized compartment for your gear so we can custom fit around your gear inside your bag. The batteries fit snugly in this bag.
These compartments keep our laptops safe during transport. Includes a built-in fold-out protector that when installed protects our equipment from wet and dry on the outside of your bag. A special coating is applied to the fabric of this bag which remains resistant to moisture.
As we all know, the DJI Drone Backpack contains our DJI Phantom Drone as well as our DSLR and lens and a tripod. This bag is perfect for travel, this bag allows us to carry the drone in multiple ways. Most users prefer to keep their drones in a backpack for added security.
The best Manfrotto Aviator Drone Backpack for DJI Phantom has enough room to carry a drone, drone accessories, lenses, a full-size DSLR with a controller, camera accessories and much more.
Manfrotto Aviator Drone Backpack for Dji Phantom – First Impressions
From the moment we opened the Manfrotto MB BP-D1 DJI Backpack, the first thing we noticed was that it's much bigger and prettier than we expected.
Even though the drone isn't exactly compact, we never thought the Manfrotto D1 Aviator would be that big.
We think the backpack Manfrotto will be on par with the DJI Backpack. Not a deal-breaker at all, and it's still pretty decent by the carry-on specifications, but it did a little more than we anticipated.
When we picked up the bag, we liked its outer cover which was made of sturdy material. This one was durable and thick - exactly what we've always wanted.
Everything felt comfortable on our backs once inside the S-bag. The weight was evenly distributed and it is also very easy to carry.
This bag will contain the following DJI drones:
Advanced DJI Phantom 3
Vision+ DJI Phantom 3
DJI Phantom 1
DJI Phantom FC40
DJI Phantom 2
Vision DJI Phantom 2
Standard DJI Phantom 3
Professional Technical Specifications of Manfrotto Aviator Drone Backpack for DJI Phantom :
Exterior Dimensions: 22" x 13.4" x 9"
Interior Dimensions: 21.2" x 11.8" x 6.3"
Camera Insert Dimensions : 26 x 15 x 13 cm
Tripod Connection: Yes
Laptop Compartment Dimensions : 30 x 2.5 x 54 cm
Number Of Lenses: 1
Types Of Gear: Drone, DSLR
Storage For Personal Items : Yes
Remote Case Dimensions : 21 x 12 x 11 cm
Drone Compartment Width : 30 x 16 x 41 cm
Weight : 1.904 kg
Material : Nylon, RipStop, Synthetic Fabric
Features of Manfrotto Aviator Drone Backpack for DJI Phantom :
Enhanced protection
The top compartment in the manfrotto nano bag our DSLR and the attached lens safe. While its ultra-protective pouch fits snugly around our drones and kits, keeping our belongings safe.
maximum mobility
Secure our quadcopter with a propeller mounted from outside the Manfrotto pack while an external tripod hook secures our Manfrotto tripod outside the pack.
flexible storage
The side compartment in the S Bag securely holds the iPad and 17-inch laptop, plus the large pouches for batteries, cables, chargers, mounts, etc.
Water-repellant cloth
A special coating has been applied to the fabric used to make this bag, which keeps it resistant to moisture.
Rain protector folds out
Manfrotto backpack also include fold-out protectors that when installed create a barrier between the wet and dry inside our bags.
Here's the list of pros and cons for our Manfrotto D1 Aviator
Pros
In the Manfrotto MB BP-D1 DJIbag, we can comfortably store a DJI Phantom 4, 2 spare batteries, battery station, filter, SD card, charging cable and all kinds of other accessories. If you also have a lightweight drone, then you can travel with it very easily, it is great.
Its separate back panel also has enough room for a 15-inch MacBook Pro.
The backpack also comes with a rainproof wrap-on cover to protect it from water.
The top handle and shoulder strap of this bag is sturdy and we absolutely do not feel that they can fall apart with constant wear and carry.
The bag has a flat bottom and stands perfectly even with even the weight distribution. Doesn't fall easily.
This is perfect for carry-on luggage for all the airlines we've used so far.
Its top pocket is also quite secure and can hold a wide variety of items like a small camera, hard drive and extra cables.
The solid zippers of this bag are also of very good quality which you will always appreciate.
Cons
Our main issue with the Manfrotto Aviator Drone Backpack for DJI Phantom is the slight lack of padding on its bottom.
With a DJI Phantom 4, the inside of the two arms extends to the farthest of the bag.
There's a slight lack of protection or cushioning around both these arms and the motors when we zip up our DJI Phantom.
It doesn't take much room to set up its own padding and is prone to falling off. We have to be very careful in keeping the bag down so that there is no damage to the hand or the motor.
It should be good to have a dedicated SD card organizer. These side pockets aren't great for carrying anything other than thin items.
Conclusion for the Manfrotto Aviator Drone Backpack for the DJI Phantom
Overall the manfrotto camera bag is quite a good product and you are going to be happy after buying it.
The Manfrotto D1 is a decent product for decent padding along with portability and ease of use. Obviously, a hard case would be better for protection, but we'd have a little trouble hiking with the Manfrotto D1.
As far as we know, this is one of the best Manfrotto Aviator Drone Backpack for DJI Phantom. And this is going to be the best drone backpack in the market for you to take your DJI Phantom 4 outside.
Manfrotto has definitely done a great job creating something that covers most of our bases with ease, and we're always ready to use it on our next big adventure.
The Manfrotto D1 Aviator Bag is perfect, but it works great for what it's designed for. and also profitable.
Source link
https://www.dronesnuture.com/2022/01/Best-Manfrotto-Aviator-Drone-Backpack-for-DJI-Phantom.html
1 note
·
View note
Text
FIMI X8 Mini Drone Review: The Most Powerful Budget in 2022

So when we have good and well priced drones like DJI Mini 2, DJI Mini SE, and DJI Mini 3, Fimi released their Fimi X8 Mini directly as their competition.
Let's compare them well, as we know that DJI drones are great and they are also very expensive, so Xiaomi has found a cheap alternative for us. But the thing for us to think about is, can we really compare Xiaomi Fimi X8 Mini with the DJI Mini Drone? I have tried it out as a drone pilot, and I have summarised everything that I felt during that time which is going to be very helpful for you to buy a good and cheap drone.
There are some excellent features we found in Xiaomi's Fimi X8 Mini that we could find in expensive drones like the DJI Mini and Mini 2 at a good price.As we know that Fimi X8 is cheap drone yet we can shoot easily in Fimi X8 4K at 30fps, this is what we get with a decent flight time of 30 minutes, in Fimi X8 we get some excellent flying time. There are also modes which are often seen in expensive drones, we can produce raw pictures from Fimi X8, and Xiaomi's Fimi X8 drone weighs very less, which is around 250 grams. However, the DJI Mini 2 is way ahead of the Fimi X8 in terms of price as well as some aspects.
To know more about Xiaomi's Fimi X8 mini drone, please read our summary till the end to know whether the Fimi X8 Mini is worth your money and how we can do it better.
About The Company: Xiaomi–
Xiaomi is already known as a smartphone company, which is a major electronics manufacturer. However, Xiaomi has made other devices like laptops, tablets, IoT and aerial drones. But these drones are made by a subsidiary of Xiaomi which is known as Fimi.
Founded in 2010, this Xiaomi smartphone company is still trusted by millions of its users. Xiaomi has retained this approach.
However, the Fimi X8 Mini is not Xiaomi's first drone. Other drone models from Xiaomi are also gaining a lot of popularity in the market. We have included some of their exclusive drone models below for you;
Xiaomi Fimi X8 SE
Xiaomi Mi Drone 4K
Xiaomi Fimi A3
Fimi X8 Mini Overview:
As we told you in the beginning, Xiaomi has created the fimi x8 mini vs dji mini 2, which we can also guess from its “Mini” name.
Before knowing well about it, we must know some features which we have given below for you.
Brand: Xiaomi, Fimi
Model: Fimi X8 Mini
Type: Outdoor Quadcopter
Communication Features: WiFi APP Control,Radio Control,Brushless Version,WiFi FPV
Motor Type: Best Brushless Motor Functions: Camera,Precision Landing,Smart-tracking,Livestreaming,Time-lapse,Panorama,Forward/backward,One Key Taking Off,FPV,Hover,High Wind Warning,Flight-plan Shooting,One Key Automatic Return,Tap to Fly, Turn Left/Right, Up/Down, Waypoint, SAR (Search and Rescue Mode
Satellite System: GLONASS,BEIDOU,GPS,
Sensor: Sonar,Optical Flow,
Built-in Gyro: 6 Axis Gyro
Material: Electronic Components, Carbon Fibre, PC
Kit Type: RTF
FPV Distance: 4.5Kms
Model Power: Built-in rechargeable battery
Battery: 15.2V 5100mAh LiPo
Flight time: about 32 minutes
Charging time: approx 3.8
Video Resolution: 30 fps 4K HDR
Drone Weight: 258g
Fimi X8 Mini Package Weight: 1.905 lbs.
Product size: 200 x 145 x 56 mm (open) or 145 x 85 x 56 mm (folded)
Unique Selling Point of fimi X8 :
So, now you must be wondering how it compares with the DJI Mini or Mini 2 and why we should buy it. Well, to know the answer to all these questions, some of the attractive features of this drone are given below.
We like the Fimi X8 with a maximum altitude range of 4000 metres, which is relatively high considering DJI limits its drone to 500 metres. If we like to drone on mountainous areas then this is going to be very perfect for us.
It's cheaper than the Mini 2. While the Fimi X8 can also function like the Mini 2 in most aspects, the Fimi X8 costs up to $100 less than the DJI Mini 2, making it a good drone for those looking to get one at a lower cost. Want to get a good drone?
Since the Fimi X8 weighs less than 2150 grams, we may not even need to register it.
night shooting
Rescue and inbuilt search mode.
What's In Fimi X8 Mini the Box?
Fimi has put a lot of effort into making its Fimi X8 Mini a miniature drone. Even the packaging of the Fimi X8 Mini which weighs around 1 kg, can give us an impression that there is not much that we should have got.
The quadcopter
Remote Controller
USB-C cable
Controller to smartphone cables
Battery
Spare propellers
Instruction Manual
Screw Driver
USB-C cable
Gimbal cover
Screws
Instruction Manual
Camera
As we all know that the camera of the drone is very important in any drone. What I mean to say to you is that any of us like to see pictures taken with a drone camera more than watching it from the ground by flying our drone.
fimi x8 mini camera drone features a 4K HDR camera and is equipped with 12-megapixel still photo resolution, 1/2.6-inch sensor and 80-degree field of view. With the 3-axis gimbal found in it, we can easily take good photos even in the air.
One of the key features of the Fimi X8 drone as a professional photographer is its ability to capture images in RAW and JPEG formats with ease. We can work with RAW with more detail, and then it is made more accessible to us later during the editing process.
This lovely drone also comes with 3 lossless zoom facilities, with the help of which we can capture a good photo even from a distance. However, we may notice some slight loss of image quality while zooming in on a photo.
Featuring an inbuilt night shooting feature that makes this drone a must-have for night photographers, Fimi X8 is built on Hisilicon professional AI algorithm which is perfect for drone pilots looking to shoot night shots in cities |
This drone reduces AI noise to a great extent by capturing finer details from the camera.
Flight Time:
We get an impressive flight time of 30 minutes in the Fimi X8 drone which we have not found in any drone of this price. This also makes the Fimi X8 drone very special. However, when we fly our drone in different conditions, it is also an average of 25 minutes.
Battery:
Right now we can get Xiaomi's The
fimi x8 mini battery
which have two battery
; Which 2200mAh LiPo battery is a light and 2400mAh Li-ion battery is a heavy
If we don't want to register one of our drones somehow, we should use a lighter LiPo battery to fly it. But if we use a li-ion battery in this, even if it drives our drone a little more than 250g, then we will need to register the fimi x8 mini based on the regulations of our region.
Also, LiPo battery offers better performance than Li-ion battery but make sure you follow proper care procedures for charging, discharging and storage.
Flight Modes:
As we know, any quality drone must have a good camera with intelligent flight mode. When it comes to flight modes, the Fimi X8 Mini isn't far behind. We have given below some of the attractive drone modes available in it.
Smart Tracking Mode – This flight mode is a variant of the follow-me mode used in most drones. We always choose the object of interest to us, and in this case a drone will follow us from behind. It's an excellent drone for athletes, vloggers, hikers, or anyone who loves filming themselves while they're outside.As the DJI Mini series lacks the follow-me feature so far, this is a plus point of the Fimi X8 Mini, which makes it the best from DJI in this respect. However before we launch this app to our drone, it must be ensured that there is no obstruction in our drone area. Because as of now this drone only features the anti-collision sensor at the bottom and the Fimi X8 Mini still lacks sensors on the back and front.
One-Tap Shots - If we're passionate about taking quick cinematic shots without any blur or latency, then the Fimi X8 Mini is going to make it quite that convenient for you.
Flight Plan Shooting - This flight mode we know as waypoint flying, this is where we pre-determine the path our drone drone will follow and fly our drone on drone autopilot with our full attention to photography or focus on another task.
Time-lapse - The pictures we take by time-lapse technique are really very good, but before taking these pictures we have to manually set its frequency well in some cases. But to make it very easy for us, there is an inbuilt feature in Fimi X8.
Live Streaming - As a drone pilot we all love to share our footage live with our fans or friends. With Fimi X8 we can easily livestream with our friends via social media channels.
Panorama - This is such a unique feature of this drone that it allows us to take wide-angle pictures with great ease. We can also do night photography and landscape photography very easily using this.
SAR Mode - Excellent transmission and cameras, 3X zoom make the Fimi X8 Drone a perfect drone for rescue missions and search.
Operating Range:
Fimi has made significant improvements in the connection area in Fimi X8 over its previous drones and it currently uses 5.87 GHz WiFi transmission. Which enables our fimi x8 mini range to achieve a maximum operating range of up to 8 KM.
While it's still less than what DJI's OcuSync uses for connections in the Mini 2, it's a bit better than the DJI Mini 1's connection.
Controller:
So if we compare the controller in this, then it is quite solid from the others. There are slides and two antennas to adjust the smartphone size to place our smartphones.
For some equipment to be used, we may even need to remove our cover for a good fit.
For better control of your drone camera, there is a dial button and a record button on the top left side of the joystick. It has comfortable sticks for our hands, which we can remove easily, which also fits snugly under the controller afterwards.
While on the right side of the controller, it's the RTH button and on the left, right near our palm, is the power button.
As I mentioned earlier also OTG cables, with the help of these we can connect our smartphone to our OTG controller. But we have to make sure whether our smartphone supports OTG mode or not.
We can easily control and launch all the functions of our drone with the help of Fimi Navi Mini App. Although its connection completely depends on our smartphone, the better the quality, the better the connection will be available.
Although we can well fly this drone with a controller only.
Fimi X8 Mini Pros and Cons:
Pros:
It has excellent flight times.
We can get it at a lower cost than other drones.
It's easy to fly and install.
This drone remains fairly stable even in moderate winds.
In this drone we get a wide range of flight modes
Cons:
Some Fimi X8 Mini users have experienced connection issues with the drone, often disconnecting itself.
What's It Like to Fly the Fimi X8 Mini?
As I mentioned in the beginning, to get to know this drone better, I have myself tested and understood it in the open field.
And as I mentioned about this drone, it has a flight range of up to 8 kms which is true to some extent even though I did not walk 8 kms with it.
I took some pictures from it to test its camera which was also quite accurate. But the DJI has a little latency compared to the Mini 2, but its camera is good.
Then we will have no problem setting it up if we have used DJI Mini 2 or any other DJI drone before. But if the drone is just a beginner to flying then we should take help from the user manuals that come with it.
Fimi X8 Mini Alternative – DJI Mini 2:
If the DJI Mini 2 didn't exist for us, the Fimi X8 Mini would have been the best entry-level drone for professional photographers and beginner drone pilots alike. However, there is still some downside in the Fimi X8 Mini compared to the DJI Mini 2 which is just right for its price. fimi x8 mini 3 axis 4k foldable drone,
Good and durable material has been used to make the fimi x8 mini price. If you really want to buy a drone and your budget is a bit high then go for the Mini 2. But if we want to buy a good drone on a low budget then the Fimi X8 Mini is still the perfect drone.
Final Thoughts:
So, should we buy this Fimi X8 mini drone after this fimi x8 mini review? Yes, it is worth the hype and money. Because we get an excellent camera, above average build quality, ActiveTrack, extended battery life and some nice and advanced flight modes. We get all these features in the precious Mini 2.
Source link
https://www.dronesnuture.com/2022/03/fimi-x8-mini-drone-review-most-powerful.html
0 notes
Link
As drone pilots we know very well that DJI drones are great and they are also very expensive. To solve this problem, Xiaomi has created the best and cheapest drone for us. But right now a question must have come to mind: can we really compare Xiaomi's Fimi X8 Mini drone with DJI mini drone?As a response to this let me tell you that I have tried the Fimi X8 Mini as a drone pilot, and to go through what I felt during that time and to know about this drone, visit our website Go and read the review of this drone.
0 notes
Link
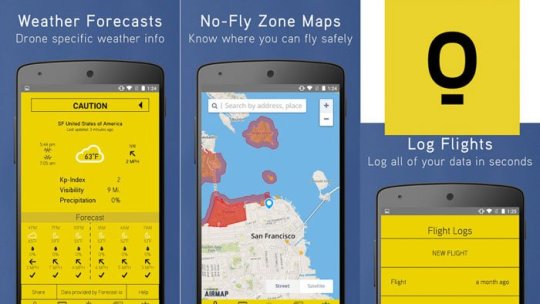
If we are thinking of using a hover app drone for our drone, then we do not need to know about the related information. Because with the help of the hover app drone, we can easily get all the weather data related to our drone flight location.If we talk about the use of hover drone app, then it is very easy to understand and use. The Hover Drone app is perfect for avid drone pilots who are just learning to fly a drone and need to know the weather for a drone.
#dronelife#droneofficial#4k videos 4k video 60fps video 4k relax 4k ultra hd focus nature sounds 4k nature 4k 60fps hd drone film aerial film blue planet simple happ
0 notes
Text
DJI Ocusync 2.0: What We Need To Know About This Great Fpv Transmission System
If you are thinking of buying the best drone for yourself, considering buying the Mavic 2 Zoom or the DJI Mavic 2 Pro, then we have definitely taken a look at the OcuSync 2.0 FPV transmission technology used in these drones. Have heard. But still, the question in your mind will be that what are the benefits of OcuSync and what is it really? So today we are going to tell in detail about OcuSync in this article.
A Little History of Ocusync technology
We first found mavic 2 pro ocusync 2.0 and it is a light bridge technology and which drone is a wireless transmission system that gives us HD wireless control signal and video signal in a very short time and we can do them for a long time with the help of OcuSync technology.
Can be broadcast over long distances easily. In DJI's original Mavic Pro, we were only able to broadcast HD 720p for a total of 4.3 miles. But on OcuSync technology 2.4 GHz we can easily transmit 1080p video along with 720p. This 1080p mode was only for short-range and whenever we select it in auto mode it will automatically drop to 720p then it will degrade the signal one.
One of the other big advantages of the OcuSync technology was its significantly lower latency for digital systems. Yet it was not as short as an analogue, which was between 1590 and 171 milliseconds.
One of its big advantages was that we can easily connect 4 devices to it and we can connect 2 goggles and 2 remote controllers or three remotes to a set of DJI goggles. This is completely new to us which we have never had before as a drone pilot.
DJI released their new Mavic Pro FPV Goggles only after DJI released their OcuSync technology for fast signal receiving and low latency wireless FPVs. They also supported a number of aircraft features, such as aircraft settings and head tracking camera controls.
dji ocusync module for drone pilots giving 720p at 60 frames second live viewing which we can use for lower latency than normal channel mode and with the help of this smooth mode we can improve FPV latency. can be reduced to 110 milliseconds.
However, among the downsides of this new mode was limited recording for us on a plane at 1080p at 60 frames per second. So now we can record for ourselves in 4K if we have used transmission mode, but if we want to get low latency for ourselves even using the specs from DJI Mavic Pro then we must use the new smooth mode Needed.
After some time DJI updated the Mavic Pro to the DJI Mavic Pro Platinum. But we did not see any change in the OcuSync transmission system. It still worked exactly the same way with the DJI specs, the same system.
DJI released the new Goggles Racing Edition with the OcuSync Air system in their Mavic Pro Platinum. It was developed by DJI for DIY use in fixed-wing aircraft, specifically for ocusync fpv , and was a new updated version of an earlier OcuSync system, now dual-band. Which was like the label of OcuSync 1.5 technology. Due to this, it was useful in working on both 2.4 and 5 GHz.
The new version now had even lower latency on the DJI Mavic Pro than the original OcuSync and was specifically designed for FPV flying. If we lowered its resolution to 480p, we got latency as low as 49 milliseconds and its maximum resolution was 1280 x 960.
Another new feature was its ability to automatically switch between bands with ease. Changing between 2.4 and 5 GHz in flight made it a reality for us to get the best possible signal.
OcuSync technology was later used by DJI on the Phantom 4 Pro v2.0 aircraft. Because the original DJI Phantom 4 Pro still had light bridge technology to receive the signal. Which was later but moved to the newer OcuSync. Which was more than a hybrid system: but it just wasn't as good as the Mavic Pro.
Even though the DJI Phantom 4 Pro had dual bands similar to the dji ocusync air system review, it still wasn't able to automatically replace these in flight. So while we can use it 2.4 or 5 GHz, we have to select it manually.
The DJI Phantom 4 Pro had a range of about 4.3 miles and its system was capable of transmitting up to 1080p. The Phantom 4 Pro's latency was still somewhere between 165 and 220 milliseconds and whether that was nice and wide for us depended on our smartphone or whether we were using the Plus RC from DJI for ourselves.
The lowest latency and good signal were achieved when using the DJI Plus RC which was then between 160 and 180 milliseconds and the figure of 220 milliseconds for us were when we used our Android device.
OcuSync 2.0
ocusync vs ocusync 2.0
The newest Mavic 2 Pro drone from DJI uses OcuSync 2.0. As we all know as a drone pilot, DJI has integrated all the previous versions of their OcuSync into one system and DJI has continuously added some improvements to it. OcuSync's new system delivers up to 1080p and 5 miles, OcuSync also features dual-band 2.4 and 5 GHz with automatic band switching in-flight. So it will automatically switch between the two modes to give us the best signal.
This allows low latency up to 130 milliseconds with 130 milliseconds in it as before and the video link frequency can change frequently. We can easily update OcuSync firmware.
We found ocusync 2.0 dji to be a similar system to the DJI Lightbridge, as it is surrounded by FHSS control signals and is also a good OFDM video carrier. If we look at some of the top images obtained from this, we find that we have an OFDM carrier in the centre. Which is present in a very large mass with many small carriers. Which we can easily see between them.
To know the way OFDM works on a drone, whenever we turn it on for the first time it looks for the clear channel and the video to stay there for the whole flight. Will stay on the channel. Only when our video carrier shifts:
if it really interferes or
If we also ask it to change the channel manually.
As long as it's operating in the normal environment for us, it will only choose one channel on its startup and it's going to be there for the entire flight until we shut down our plane.
We will see that there will be an FHSS control signal around it. The way FHSS works for us is that we have constantly changing packets of data in the OcuSync band. This picture represents a spectrum of it and the blue peaks here are basically its historical position where our carrier has been. We can hardly understand through the picture how TT is jumping at such high frequency.
We have to understand what each of these peaks is, here a position with the carrier has jumped continuously and it is still constantly jumping between these positions. It's not doing this because it often does it randomly. So what we have will see us jump from the first one to eighth, third to tenth and so forth.
And when we can see all this easily on a range, then what we can see represents many peaks. Each of those peaks is a position with each of the carriers we see and that will jump back to some other point in the future but it doesn't happen whenever we show it that way.
Lightbridge and OcuSync are the kinds of technology that works to merge these two systems into one. If we look closely at an OcuSync trace we can easily see the OFDM mass at its centre and this is its main video carrier carrying the HD video signal back from our drone camera to our remote controller.
The blue peaks we can see all around are the FHSS signal jumping around for our remote controller link. The light blue colour seen here is the one on which it has been jumped. And the deep blue colour present in it is historical where it has been in the past.
Now our thing to notice and understand is that when we see it good we will see that it jumps continuously on OFDM carrier also. and can see FHSS is constantly switching high rate frequency on it and that it jumps to the main channel still our video is on because it is jumping so fast and still it doesn't matter because It jumps on top of it.
Even if that information is not received, it has already jumped to the next location and that packet will be picked up by our drone or remote controller.
Let's now compare OcuSync to Lightbridge on the spectrum one more time. This is OcuSync:
And this is the light bridge signal:
As we can see they are very similar to each other. We still have the same OFDM mass as before and around which the FHSS control signals are constantly jumping. As we mentioned earlier, on top of the large red mass lies our OFDM with our dark blues and light blues FHSS. The red mass on the light bridge below is OFDM with the FHSS showing the blues and the pink ones still jumping to the current position.
So from the point of view of radio, these two systems are very similar and virtually identical.
So now the thing to be understood is that then what is the real difference between them?
So let's understand their basics which are as follows:
Lightbridge is a combination of software and custom hardware. Which is based on FPGAs making it expensive to make. Then later DJI started doing custom silicone in its manufacture. Its upgrade capability is also limited and is still expensive due to a combination of software and hardware.
That's one of the reasons we move on to the DJI Inspire 2 when things like the Inspire 1 and the original Phantom 3 are compatible and then incompatible. This was because there was a difference in both the hardware and because we could not use one interchangeably.
The second OcuSync technology is more of a software-based system and SDR. Which fully works on generic off-the-shelf hardware, such as Wi-Fi hardware, can use the OcuSync system. Which somehow allows DJI to keep hardware costs down. This suggests they should use more compact packaging and there is no need to build expensive FPGAs or custom hardware.
Because the processes that we use in pretty much all devices these days, like in drones, and smartphones already have onboard radio hardware that is truly designed for Wi-Fi. So DJI is able to take advantage of existing hardware to get the same kind of cool system they originally designed with one of their Lightbridges.
Advantages of OcuSync over Lightbridge
OcuSync having a software base means that DJI may upgrade it further in the future. As we know that a hardware upgrade has its limits. But if we look at the original DJI goggles, by contrast, they'll be updating the nuts to better support the new OcuSync 2.0 that came with the Zoom and Mavic 2 Pro because they're still compatible on the same frequency. can. Since there is no 5 GHz radio, it will work only on 2.4 GHz.
If they had used a hardware base light bridge, then we would not have been able to do this much, because the light bridge is a combination of software and hardware to complete its entire transmission system. Because OcuSync is an SDR it is software, so as long as the processors are powerful enough to support it, we can easily upgrade an existing system to be compatible with the new one.
The thing that both have in common is that they are based on very similar systems. OcuSync technology allows DJI to do what they originally could with Lightbridge on existing off-the-shelf hardware.
This allows us to do it cheaper and better in smaller packaging and that's why for now the LightBridge system is best kept for larger drones with a good price whereas the OcuSync we'll see in lower model drones still don't technical almost anything. Giving similar performance.
Honestly speaking, DJ's techno I would pretty much move on to OcuSync on every system over time. While the DJI Inspire 2 still uses Lightbridge (as there are some small benefits to this transmitting system) I would expect any aircraft to probably move to use OcuSync.
0 notes
Link
Let's start your drone flying journey by knowing how to learn how to fly a drones some common words related to drones. Once we have decided to get a drone pilot license for drone flying, we need to know most of these terms, as knowing how to fly a drone through all is going to help.
#Best Flight control board quadcopter#how do i learn to fly a drone#how hard is it to learn to fly a drone
1 note
·
View note
Text
Learn and Understand How to Fly a Drone
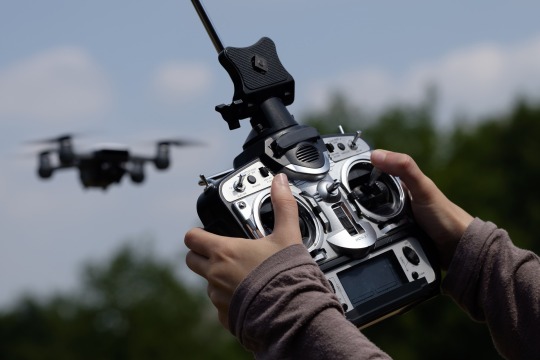
Flight control board
Best Flight control board quadcopter It acts as the "motherboard" of a drone. With its help, we maintain the process of communication between the various components used in a drone.
Electronic Speed Control Circuits (ESCs):
In a drone, the ESC is used to establish a connection between the motor and the battery. With the help of this, we control how fast the drone motor spins and in which direction it spins, so that we can easily rotate our drone.
What about drone control?
Although most drone controllers look different from each other, how do i learn to fly a drone the functions they perform are somewhat similar. Below are the main drone controls for you that we will complete with any controller.
Right stick – Roll and Pitch
Left stick – Yaw and throttle
Roll :
When your drone keeps "rolling" to the left or right. We can then roll our drone by pushing this control to the left or right with the stick on the right. This is a good example as a drone pilot when we have to dodge an obstacle.
Once we push the stick to the right the drone will lean to the left and once we push the stick to the left, the drone will tilt to the left,
Voice fluctuations:
Thanks to this drone speed, any drone can fly back and forth along a y-axis with ease. To fly our drone forward, we have to push the right stick forward, also known as a positive pitch for the drone pilot. Conversely, to fly a drone, pushing the right stick backwards can cause the drone to fly backwards, also known as negative pitch. how hard is it to learn to fly a drone
Truly a drone leans forward to move backwards and forwards to go backwards. If the drone is facing us, then it can be more challenging for a beginner so for such problems we will need to practice more.
Yaw:
We can easily accomplish this drone flight movement by pushing right and left with the left stick. By doing this we can rotate our drone so that we can easily change the direction of the drone during our flight.
Throttle:
With this movement, we can easily change the height of our drone. To increase the drone height by this, we have to push the left stick upwards.
And to lower the drone height or bring the drone closer to the ground, its left stick has to be pushed down. We should not bring the drone too close to the ground because by doing so we can crash our drone.
Trim:
We need trimming to align our drone to throttle, yaw, roll and pitch. With its help, we can make sure that they are working as expected.
Aileron:
Using ailerons is similar to rolling a drone from right to left.
The Rudder:
Rudder also means to turn a drone from right to left as we do in yaw movement.
The Elevator:
The hum of the elevator is to fly the drone back and forth (pitching).
What are the Different Flight Modes for Drones?
Different drones in the market come with different flight modes, and below are some of the main drone modes.
hover:
This is the flight mode of a drone where a drone is continuously hovering in one place without moving back and forth. We adjust and maintain this position with the role feature.
Manual :
This is the flight mode of a drone where we control every aspect of the drone, just like a helicopter. When a drone rolls over, we have to manually move it back to a level position.
auto level:
This is in contrast to the completely manual mode when a drone is calibrated, we as a drone pilots would have noticed that it always adjusts to a level position after the drone is tilted during rolling.
Preflight Checklist:
You must have heard that we can fly a drone very easily outside, so below are some things for you that we must know before flying a drone.
Season:
We can easily get weather details from drone apps or our local weather forecast service. Below are some ideal conditions to make your drone flight a success.
Wind speed for drone flight - at least 15 knots (20mph).
If we want to fly our drone at dawn or dusk, check us at twilight hours in your flight area.
Cloud base (lowest height of the visible part of the cloud) - should be 500 feet.
Visibility for Drone Flight - 3 Law Miles
Precipitation for drone flight - less than 10%
Below are some drone apps for you through which we can get relevant weather information;
Hover drone app - Real-time weather information, flight logs and no-fly zones.
UAV Forecast - UAV provides real-time weather information for us through the drone app.
Tesla Field Recorder - This drone app helps in detecting magnetic interference which can make flight impossible.
Check out Drones:
Make sure that our drone firmware has the latest version.
Check drone for cracks, battery damage, propeller damage.
If our drone came with gimbal protectors, we have to remove them.
Make sure the drone battery is fully charged before a flight.
Install micro SD, propeller, and battery properly in our drone.
Security Check:
Find a suitable area for landing and drone flight.
Before flying a drone, make sure that there are no animals, children playing or pedestrians close to our flight area.
Make sure in the flight area that there are no obstacles like trees, buildings, power lines or towers.
Thoroughly check for potential electromagnetic interference from power lines in our flight area.
We must use the landing pad if we fly in uneven areas, areas with a lot of dust or wet areas after rain.
Test the drone
Power up the transmitter and quadcopter and startup.
Make sure they are connected to each other as different drones have different ways of connecting to the transmitter, we have to connect them by following the instructions of our drone.
The throttle should be at the lowest point when we switch on the transmitter. So that when it is on, connect the battery of the drone to power it on.
Our drone's antenna should be facing the sky.
If you use a camera drone, then we should see some footage from our drone camera.
Calibrate the Drone IMU and Compass.
Press the drone's takeoff button.
Give your drone some time to lock into the GPS properly.
Check for abnormalities in your drone - like shaky flight, strange sounds, etc.
Try all the drone modes at once like yaw, throttle, roll, pitch mode.
If everything still goes well, then we can proceed with our drone flight.
When disembarking our drone, make sure you remove your drone's battery first before we turn off your transmitter.
What are the Drone Regulations?
Here we have told about some of the main rules related to drone flight that we should know before flying a drone.
Get a pilot's license
If we are planning to fly drones commercially or work as a pilot. For example, in film production or real estate photography we will need a remote pilot certificate from the FAA (Federal Aviation Administration) under Rule 107. We must be at least 16 years of age to get this faa drone pilot license.
We can get it for $150 with some training and a series of tests. If we are not able to clear its exam on the first attempt, then we can pass it after two weeks.
But if we want to learn to fly drones for fun, then we don't need any kind of license. But still, we should know how to fly the drone and also get its training
Drone Registration:
Not only is a drone license required to fly a commercial drone, in addition, all drones weighing between 0.55 and 55 pounds are also required to have drone registration stickers. After registering your drone we will get a drone registration number which we can paste on your drone if you want. We can also get it again after losing it, although we must remember our registration number.
Below are more rules;
Drone flying Rules
We cannot fly any drone higher than 400 feet.
A drone should have a maximum top speed of - 100mph.
The UAV must weigh a maximum of 55 pounds.
We should rarely fly the drone at night.
Fly the drone in line of sight.
We should fly our drones in agriculture, firefighting or field at low altitudes because their planes fly at low altitudes.
If we wish to fly at least 5 miles within an airport's closest interval, we must ensure that we contact the control or admin tower.
We should not fly our drones over sensitive property areas or public areas.
We should not fly drones in restricted or "no-fly zones". We can also get information about these areas through the drone app.
Now the most important part ie-
Flying Drones:
So now that we know what is the first thing we need to do before taking a drone in the air, it is time for a beginner drone pilot to learn how to fly a drone.
How do we land our drone?
Before flying a drone, we also know How to land a drone place the drone on a flat surface. It should be placed at a safe distance from us, and the drone should be flying in the direction you're looking, not yours.
Although most drone apps have a takeoff button, we must know how to do it from the controller.
As we have already told you that the left stick of the controller has to be pushed slowly upwards. By doing this our drone will start and its propellers will start rotating.
We have to play the bar with the stick of the controller to get used to the propeller running well. Once we are comfortable with this, we will continue to do this until the quadcopter is well off the ground.
When our drone is completely in the air, take a good look at it for a while. If it makes movements like pitch, roll, or yaw without us doing anything, we can re-adjust it with the trim function.
hover over:
Once the drone is in flight, we have to do our best to keep the drone in one position by balancing it continuously with the stick of the right hand. We may find it a bit challenging at first to do this, but after consistent practice it becomes easy, and that will make the journey of flying a drone easier for us.
Once we learn how to hover the drone, we need to lower our drone from the throttle. Until it's a few inches close to the ground, and then lower the throttle to descend further. Remember all these activities and keep doing it till we master all the drone actions.
Try photographing yourself in a drone:
To make it easier for your drone flight training, try taking a picture of yourself in the cockpit of the drone. Doing this will help us to decide in which direction we are going to take our drone, and how to control it through the drone controller.
Getting a good understanding of the drone's controls will help us "insert ourselves" into the drone's scene.
Try Controls:
We have already mentioned that once we learn to keep our drone stable in a position (hovering), then we should try to rotate our drone.
We use the right stick of the controller to propel our drone some distance while pushing it upwards. And then push the same stick of your controller down to bring your drone back to that position.
We have to use the right stick of the controller to "roll" the drone to the left and to bring the drone back to the original position. This process is to be repeated on the right side.
If our drone starts losing altitude every time we fly in a particular direction, the throttle will have to be used to maintain that fixed altitude.
make a class:
Whatever we have done in the previous step, now let us also do some basic maneuvers to check the practice.
While our drone is hovering in the air, hover the drone by stopping for a few seconds after pitching it forward a few feet with the right stick of the controller.
Then roll it to the right while pushing the right stick of the controller to the right.
Then create a negative pitch by pushing the controller's right stick down.
Then roll your drone to the left to bring it back to where we started.
Make a circle:
Now in making this pattern, we are going to use Roll, Pitch and Throttle together. Give your drone some power and some more power through the throttle. Instead of pushing the controller's right stick up, we push it in a diagonal direction to simultaneously pitch and roll.
After this, after walking a few feet, we push the right stick of the controller to the right to make the drone roll.
After the drone has walked a few feet, roll it while pushing it down diagonally and engage the pitch.
And lastly, rotate the controller stick until our drone returns to its first position. To get a good feel for the controls, we can also change the mid-flight direction to draw a random circle or square as desired.
If the drone loses its orientation while in flight, let us use the left stick to rotate it at an angle of 360 degrees until we learn to face the right direction.
now we can fly our drone
Once we have learned to fly the drone well in different directions, it is time for us to fly proactively. Now take off, fly ahead and keep changing directions because we have to be adept at flying in all directions. If we want to challenge ourselves, now we should try to make a "picture of eight" with a drone which is a bit tricky at first.
Now let us understand our drone:
These are general tips as a beginner drone pilot that apply to all drones. Drones from different companies are made differently, and what may work for one drone for us may not necessarily work for another.
One of the main security features that we need to be careful with is the return-to-home feature and especially obstacle-avoidance sensors.
We need to understand how drone sensors work, how do we avoid obstacles by using them. We fly the drone back to where our drone took off in an emergency with the return-to-home feature of a drone.
The GPS lock we talked about earlier is important as a drone pilot, we can get accurate coordinates for our drone through this. When flying the drone over rough terrain, the GPS is used to ensure that the drone does not crash and takes off safely.
We can also use an emergency power cut-off button for drone flyaways. So, let us check if our drone has an emergency power cut-off button and if it does, it works.
At DJI Drone, we get a simulator app with the help of which we can learn a lot before flying our drone out.
Conclusion:
We have told you a lot about drone flying in this article. However, flying a drone is not that complicated. As drones grow in flight, we can set milestones and learn each and every process of the drone. And in just a few weeks of good practice, we will learn to control our drone well.
As beginner drone pilots, we don't need to go for high-end drones. We can learn all the best drones for beginner drone pilots.
Source link
https://www.dronesnuture.com/2022/02/learn-and-understand-how-to-fly-drone.html
1 note
·
View note
Link
0 notes
Text
How High Can You Fly a Drone in 2022? (Legal and Technical Limits)

Why are drones limited to 400 feet?
According to FAA safety regulations and controlled airspace regulations, we can fly our commercial and recreational drones up to a maximum of 400 feet. In accordance with Drone Regulation Rule 107 issued by the FAA, this law has been enacted to keep manned flights from drones at high altitudes by airspace controllers because recreational drones in such controlled airspaces can prove dangerous for those manned flights.
Most countries around the world, including the United States, have a limited legal limit for recreational and commercial drones being flown above 400 feet above ground level. If we talk about technical limitations, then the height limit of a drone is determined by its range. For example, DJI drones can easily fly 1,640 feet high.
But is there any way to legally fly a drone above 400 feet?
How can we fly our drone above 400 feet it is not an easy task for us to do so. it's not that easy. Through this article, we will try to explain to you everything about the drone flight limit and what we have to take special care of in order for our drone to cross this limit.
We also suggest you some high-quality drones that you can easily use for fun and also those that we can fly above 400 feet.
So, sit back and read this article till the end to know all that.
How high can you fly a drone?
The maximum altitude at any drone can be flown depending on certain possibilities for it. In the US, the laws and regulations regarding recreational and commercial UAS flights are within the jurisdiction of the Federal Aviation Administration.
The US has implemented many rules and regulations on drone flights.
According to Federal Aviation Administration (FAA) Rule 101, the maximum altitude any recreational drone can fly in uncontrolled airspace must be up to 400 feet.
Most all recreational drones are permitted to fly on a Class G surface which only allows them to fly at a maximum altitude of 400 feet.
For a drone to fly high, we need an airspace authorization which can also be issued to us by the FAA itself, in accordance with the AMA's safety code.
In order for us to increase the altitude limit and time of flight, we as a drone pilot will have to obtain a flying license or exemption which will allow us to fly above the range of 400 feet, in which case, by doing so, we will be able to use our drone for us. Even after it would be legal to fly the Co above 400 feet, our flight would still be closely monitored. ( Best Apps for Drones )
What happens if we fly our drone above 400 feet?
Well, for us it all depends on where we are flying our drone. There are also controlled and uncontrolled air spaces and the risk of a collision varies severely for us in both locations.
Let's take a good look at each of them.
Flying above 400 feet in controlled airspace.
Flying above 400 feet in uncontrolled airspace.
Here is the difference-
Flying above 400 feet in controlled airspace:
If we are not authorized to fly in controlled airspace and we cross our drone over the flight limit, we may be made by the FAA in a controlled environment in accordance with the law due to rule-breaks that cause the drone to be tracked by the FAA Because controlled airspace has a higher risk of collision than any other uncontrolled airspace.
Thanks to those drone trackers and other security mechanisms, we can be tracked and then fined a hefty one for breaking the FAA's law.
The fine, which can range from a small amount to a large $12,000 amount, has been paid by a citizen who previously broke the FAA's altitude limit law with controlled airspace with his recreational drone.
Flying above 400 feet in uncontrolled airspace:
Well, if we fly our recreational drone above 400 feet in uncontrolled airspace, chances are we won't have to pay any fines.
Although all airspace regulations advise us to keep our drone below 400 feet due to very little or no air traffic, flying over an altitude limit in such a place will give us little or no legal access. the problem will have to be faced.
But we should not choose to fly above 400 feet for our drone flight in uncontrolled airspace when possible, that is, we may on a rare occasion collide with a manned aircraft or cause an accident that is catastrophic. And anything else can lead to incredibly big results.
How dangerous are drones to an aircraft?
What are the laws regarding flying high altitude drones?
According to the Federal Aviation Administration (FAA), the laws and regulations for all high altitude drones that must be followed at all costs are set out below.
In uncontrolled Class G airspace, we need to make sure our drone stays under 400 feet without authorization.
In all controlled airspace, Classes B, C, D, and E, we will need this authorization waiver to fly without restriction. Authorization can be obtained from LAANC, the Federal Aviation Administration or any written agreement with No DroneZone.
To maintain a safe airspace environment, we do not have to fly our drone near any manned aircraft even after we have received authorization.
Under no circumstances should we fly our drone over groups of people or suspect our commercial or recreational drones to be flying.
We may also take a license test as a drone pilot pursuant to Part 107 for Authorization to Avoid Altitude Limit Restrictions or fines for our drone.
We must register our drone with the FAA before we can fly our drone in any type of uncontrolled or controlled airspace.
We must fully address all these laws, rules and regulations so that we do not face any problems while flying our drone in future.
The FAA encourages you to register a drone pilot license so that you can enjoy recreational drone flying without any restrictions. ( drone pilot jobs )
Can we legally fly a drone above 400 feet?
Well, this is a question that has been asked by a lot of drone piloting enthusiasts across the world. If we give a straight answer to this intriguing question, we may or may not legally fly our drone above 400 feet. This is because it really depends on some factors.
Let's take a look at when we can actually legally fly a drone over 400 feet
Understand and learn how to fly a drone
If you are above the upper limit of a particular structure:
We have to remember that the height of 400 feet above the ground matters here and not the height of 400 feet that we can see as the height of the drone. Therefore, when we are on a building 100 feet above ground level when our drone takes off, the height of our drone will be determined by where we stand and not by the ground level because the height of the drone is the point of takeoff. But starts recording, not how high it is.
As such, we still have to confine our drone to a range of 400 feet above the ground and not the point of our takeoff. This means that if our drone takes off from 100 feet, then it only has a limited altitude of 300 feet.
If we're flying our drone over a mountainous area, we may already be over 400 feet above our takeoff point, as long as we're not maintaining more than 400 feet above ground level because our drone Also climbs hill slopes. As such, it is always necessary to take into account that a manned aircraft may slightly move our drone range and approach the top of a mountain while passing. We should not risk a collision, even if we are within our legal limits. be within.
This is an important thing to know for any photographer who is passionate about taking HD shots of buildings and areas from heights above 400 feet and for drone pilots.
However, if we want to fly over 400 feet without violating any law, we will need special authorization for that. But this authorization is only for the drone pilots working in the field of commerce. Because the only possibility of these drones that can go over 400 feet, for example, they do this when they have to inspect tall buildings using their drone.
So it would be legal for us to fly above 400 feet.
Conclusion:
It is perfectly reasonable for the Federal Aviation Administration (FAA) to impose a drone flight height limit of 400 feet on recreational or commercial drones like this because we know very well the possibility, no matter how rare, of a drone manned in any controlled airspace. There is always the potential to cause problems for aircraft.
Also, we have ways to clear these drone flight-related hurdles through legal authorization and license registration, so if we are looking for an exciting and very fun drone flying adventure then we can eventually fly over 400 feet. ( DJI Mini 2 Review )
If you choose one of these high altitude drones we recommend to you, you are going to have a great drone flying experience that is truly amazing.
We are sure that whatever you want to know through this article, you must have got that information. Thank you very much for reading this article of ours till here, may your coming day bring you happiness.
Source link
https://www.dronesnuture.com/2022/01/How-High-Can-You-Fly-a-Drone.html
0 notes