
Last Seen Blogs

littlenekoo
agere safe space

hopeaterart
Art blog

ninjakitty105
Moss/Token/Ninja

heewyaaa
heat

sezersem-blog
SEZER
Text
Archestra License Manager 2014

Wonderware License Manager
Archestra License Manager 2014 Torrent
Archestra License Manager Missing
Wonderware Archestra License Manager
Archestra License Manager 2014 Download
Wonderware Intouch License Key DOWNLOAD (Mirror #1). The license structure is easy. There is a license manager located at StartWonderwareCommonLicense Utility. This is where you copy license file from the CD to hard disk. You can also just copy of this license disk to a USB drive. You can start the ArchestrA License Manager from any Wonderware product by clicking Help, About, then click View License. You can use the License Information utility to see whether the current local or remote I/O counts exceed the maximum specified by your Wonderware license.
Summary
Instructions provided describe how to reconfigure the ArcGIS License Manager after the license server hostname is changed.
If the name of the computer that ArcGIS License Manager is installed on is changed, the ArcGIS License Manager will need to be reconfigured to use that new computer name. Otherwise, license errors are received.
Procedure
1) Locate a copy of the Esri concurrent use (floating) license file. This file is usually named with the same number as the concurrent use license dongle (hardware key), which always begins with the numbers ‘371’ and has an extension of .EFL9. If the floating license file cannot be found, request a copy by visiting http://service.esri.com, and clicking ‘request a new license file’, or by contacting Esri Customer Service at 888-377-4575.
2) Open that license file using Notepad.
3) Locate the line near the beginning of the license which reads ‘SERVER’. Change the name of the machine listed after ‘SERVER’ to match the PC's new hostname:
4) Save the file.
5) Navigate to Start > Programs > ArcGIS > License Manager (9.x) > Update License and complete the wizard, pointing to the .EFL9 license file that was just edited.
6) Navigate to Start > Programs > ArcGIS > License Manager (9.x) > License Manager Tools. Select the option 'Configuration using services.' Click the Start/Stop/Reread tab. Click Stop Server, Start Server, and Reread License File. It should say that the reread completed successfully.
The reconfiguration is now complete. To use the new computer name as the license server, navigate to Start > Programs > ArcGIS > Desktop Administrator on a computer where ArcGIS Desktop is installed. Click License Manager on the left and the Change button on the right. Type in the license server's new name and click OK.
Related Information
Last Published: 5/5/2016
Article ID: 000009960
INSTALLATION GUIDE
Description
Step by Step Installation of Wonderware's InTouch version 2014 (11.0)
Author
Jimmy McGlaughlin
Publish Date01/14//2014
Applies to Software
InTouch Classic
Applies to Version
11.0
Applies to System/Module
n/a
Article Version
01.01.01
************************************************************************************************************************************************************
Pre-Requisites
Important!
FactorySuite Gateway (FS Gateway) 3.0 SP1 is installed as a hidden feature of InTouch HMI 2014 (v11.0) in an Wonderware System Platform (ASP) 2014 installation.
If you previously installed FS Gateway 2.0 SP1 without any other InTouch products, then installing ASP 2014 will upgrade FSGateway to version 3.0 SP1.
If you previously installed FS Gateway 2.0 SP1 as part of ASP 2012 with InTouch 10.5, you must uninstall FS Gateway before upgrading to ASP 2014.
For more information about FS Gateway installation, upgrade, and uninstall, see the Wonderware System Platform Installation Guide, 'InTouch HMI Requirements and Prerequisites' section, 'Installing FS Gateway and Modifying FS Gateway Installations' topic.
System Requirements
Introduction
This section describes the hardware and software requirements to support Wonderware System Platform 2014 products, including InTouch HMI 2014.
Hardware Requirements
Hardware Requirements by Installation Type
The following table lists the hardware requirements of different types of Wonderware System Platform 2014 installations based on the expected number of I/O operations per node.
Hardware Requirements Notes:
Windows 7 and Windows Server 2008 R2 operating systems and SQL Server versions impose hardware requirements that may exceed the minimum requirements for Wonderware Application Server 2014 (v4.0). If you intend to install Wonderware System Platform 2014 on a computer running Windows Server 2008 R2, Windows 8, Windows Essentials 2012, or SQL Server 2012, see the following Microsoft Web sites for a complete list of hardware requirements:
www.microsoft.com/windowsserver2008/en/us/system-requirements.aspx
www.microsoft.com/windows/windows-8/get/system-requirements.aspx
msdn.microsoft.com/en-us/library/ms143506.aspx#EE32
Auxiliary Hardware Requirements
This section describes any optional hardware requirements beyond the specific hardware requirements discussed earlier in this ReadMe.
Alternative Authentication Using Smart Cards
Smart Card: Raak Technologies C2-40 Mini Driver Smart Card
Smart Card Reader: OK 3021 USB Smart Card Readers
Using Multiple Network Interface Cards
If you are using multiple network interface cards (NICs), you must configure certain settings for the firewall or else a remote node cannot connect to the Galaxy Repository node.
A connection is a term used to define a network interface card (NIC), its settings and the settings of whatever the NIC is connected to. Under certain circumstances, the connection on your computer can change if, for example, the IP address on your network card changes. Your computer's connection can be affected by external factors. During computer startup, and each time a connection changes, the operating system goes through an 'Identifying' process to determine which profile should be assigned to the connection.
A profile is a collection of firewall settings that can be applied to a connection. There are three profiles currently defined in the operating system: Domain, Public, and Private.
The Domain profile is active only when the computer can authenticate with a domain controller on all active interfaces such as LAN, wireless, and VPN. The domain profile may be more or less restrictive than the other two profiles depending on network security policies.
The Private profile is active whenever the network type for all active network connections on the computer are identified as private networks. The private profile typically is used in a more trusted environment and is less restrictive than the public profile to allow for network discovery.
The Public profile is active in all other circumstances. The public profile typically is more restrictive than the private profile because the computer often is connected to the Internet in an insecure location. Network discovery and remote access are disabled rather than explicitly blocking specific traffic. Firewall exceptions and rules can be created on any or all of these profiles.
This is important because the OS Configuration utility and the Firewall utility apply their firewall exceptions to the Domain and Private profiles only.
As previously noted, you can specify which profile you want assigned to a connection as long as that connection is not a Domain connection. This is done through the 'Network and Sharing Center'. Click the Network icon located on the right side of the task bar and then click one of the networks that are shown. You can change a connection from a Public profile to a Private profile. The firewall calls these settings 'Profiles' but the network calls them 'Location types.'
On computers using dual NICs, the first NIC is normally connected to the domain and is assigned the Domain profile automatically. Windows typically assigns the second NIC the Public profile.
The first issue is that your entire computer (all connections) is restricted to the most restrictive of the profiles assigned to any connection. So if the second connection was assigned a profile of Public, none of the firewall exceptions set by the OS Configuration or Firewall utilities will be allowed. The exceptions were set for Domain and Private only, not Public. You must set the second connection to the Private profile for any of the firewall exceptions to work. You want the active profile on the message exchange (MX) NIC to be the profile opened by OS Configuration.
The second issue is that it appears that a restart of your computer, or even a restart of a computer to which you are connected, can change your connection back to the Public profile. Once again the firewall exceptions will not be effective. You'll have to change the connection back to the Private profile after each restart or a restart of the connected computer.
To avoid these NIC issues and prevent the “Identifying” process from taking place on a connection and changing the assigned profile, certain items must be present in the definition of the connection. Follow these rules and procedures:
If you have only one NIC, no action is required. The profiles and firewall rules are automatic.
To configure two NICs, do the following:
1. If the second NIC is not physically connected to anything (that means no wire in it), no action is required. The profiles and firewall rules are automatic. Ahnlab v3 net for windows server.
2. If the second NIC is connected, it MUST be configured. Follow the rules for configuring a normal redundancy setup provided in the Wonderware Application Server User's Guide and the accompanying online help.
Assign the NIC an IP address, subnet mask and gateway address. Typically, these addresses are internal, non-routable addresses. For example, 192.168.1.xx and 10.x.x.x are common addresses of this type.
A NIC acting as Redundancy Message Channel (RMC) does not require a default gateway. Otherwise, the gateway can be the same as the IP address. Vista and Windows Server 2008 will identify this NIC and assign it a Private profile.
If you do not configure the second NIC, Windows 7 and Windows Server 2008 will assign a profile of Public to this NIC and cause all of the Wonderware product firewall exceptions to be deactivated on all NICs.
3. Set a security policy so that Windows 7 and Windows Server 2008 do not re-set the RMC NIC to a Public profile on rebooting the system or changing the IP address. To make the Private profile setting persistent, do the following:
On the Windows Start menu, click Run.
Enter and run this command: SECPOL.MSC. The Local Security Settings menu appears.
Select Network List Manager Policies on the menu tree.
Select Unidentified Network from the Network Names displayed.
Right-click, then select Properties, and then change the Location type from Not configured to Private.
Exit the menu and return to Windows.
4. If you have more than two NICs, make sure all connected NICs are configured with an IP address.
Operating System, .NET Framework, and Virtualization Requirements
Summary of Software Requirements for InTouch HMI Version 11
The following table lists the operating system, .NET Framework, and virtualization requirements for the suite of Wonderware System Platform products, including InTouch HMI Version 11.
Note: Only those Windows and SQL versions and service packs shown in the following tables are supported for Wonderware System Platform 2014 components.
Software Requirement Notes:
The entry for Application Server applies to the ArchestrA IDE (Development Node) and ArchestrA Run time (Application Node).
The Galaxy Repository (GR Node) can run on a client Windows operating system only in a single-node configuration.
Development and application nodes are considered to be clients of the server GR node.
Other .NET Framework versions can coexist except .NET 4.0. But, all scripts in objects run in .NET Framework 4.5. For more information about .NET Framework requirements and compatibility, see .NET Framework Requirements and Compatibility
.NET 3.5 is installed by System Platform only because the supported SQL Server versions require it. No other dependencies to .NET 3.5 must exist.
Operating System Notes Common to Wonderware Products
ActiveX Controls Behavior on Windows 7, Windows 2008 R2, and Windows 8 Operating Systems
Due to the Data Execution Prevention (DEP) feature of Windows 7, Windows 2008 R2, or Windows 8 operating systems, any ActiveX control built with ATL version 7.1 or earlier will fail to host or will have unpredictable behaviors in InTouch HMI 11.0 either in WindowMaker or WindowViewer running on supported versions of Windows. For more information, contact Wonderware Technical Support.
Configuring Remote Alarm Retrieval Queries When Running Windows 7, Windows 8, or Windows Server 2008 R2
The process to configure remote alarm retrieval queries has changed for interactive applications such as InTouch HMI when running on Windows 7, Windows 8, and Windows Server 2008 R2.
When InTouch WindowViewer is started and generates alarms from an interactive Windows desktop session, an AlarmViewer control (running within InTouch HMI) on a remote node must be specially configured to query the alarms. The source alarms will not appear unless the AlarmViewer control's alarm query is configured.
This type of query only works for InTouch HMI as an alarm provider running in a Terminal Services session, not for InTouch HMI running in a console session.
To configure the AlarmViewer's alarm query
1. After starting InTouch WindowViewer (alarm provider) on the Windows 7, Windows 8, or Windows Server 2008 R2 node, open the SMC Logger and look for the most recent string generated by AlarmMgr. For example: 'Registering AlarmMgr with SLSSVC as AlarmMgr 253.127.148.120'. The indicated IP address will be unique to your alarm-providing node. Note the IP address.
2. In the Alarm Query tab of the AlarmViewer control on the remote computer, configure the alarm query as follows, substituting your nodename of the alarm providing InTouch HMI for 'nodename' below and substituting your IP address noted in the previous step:
nodename:ip_addressintouch!$system
where nodename is the name of the node that is providing the InTouch alarm and ip_address is the IP address that you determined in step 1.
3. Test to validate that the alarms generated from the alarm-providing node are shown accurately in the AlarmViewer control.
Wonderware InTouch HMI and Alarm DB Logger
In earlier releases of InTouch HMI that supported Windows Vista, Windows 7, or Windows Server 2008, the Alarm DB Logger could not be enabled to run as a service. The Alarm DB Logger now runs as a Service in Windows Vista and later operating systems primarily to support Galaxy Alarms and InTouch HMI Alarms from Terminal sessions. However, there is a limitation in that the combination of Alarm DB Logger configured as a service and InTouch HMI running locally as a console application is still not supported. If InTouch HMI needs to run in the Console session, the Alarm DB Logger must be configured in the Alarm DB Logger Manager as a 'Normal Application' instead of a 'Windows Service'.
Also, if you are running the Alarm DB Logger as a console application, you cannot run it in the Terminal session until you close the one that is running in as a console application.
Refer to the updated Tech Note 725, 'Running InTouch HMI and AlarmDBLogger Services on Vista and Later Operating Systems,' for full details of the supported scenarios and applicable alarm query syntax.
Terminal Services Behavior in Windows Server 2008 and Later Operating Systems
In a change from Windows Server 2003, Windows Server 2008 and later Windows versions no longer support the /console switch as a means of starting the remote desktop (RDP) client, also known as Session 0 or Terminal Server Console session. In Windows Server 2008 or later, Session 0 is no longer an interactive session, and is reserved only for Windows services. From Windows Server 2008 and later, all remote connections are treated as remote RDP sessions regardless of /console, /admin, or any other switches used to make the connection.
This impacts InTouch HMI functionality such as Alarm Manager that depends on the Terminal Server Console session.
In another aspect of Terminal Services behavior, InTouch HMI functions such as TSEGetClientID() can return a null value when running on Windows 2008 SP2 and Windows 2008 R2 operating systems with InTouch running in a remote desktop (RDP) client session. The cause of this behavior is that the relevant roles are not installed on the Terminal Server. You must install the 'Terminal Server' role for Windows 2008 SP2 or the 'Remote Desktop Host' role for Windows 2008 R2 in order for TSEGetClientId() and other related functions to work properly.
The impact to Wonderware Application Server is minimal as most Wonderware Application Server processes run as services. One impact to Wonderware Application Server is to carry forward the restriction introduced with the Windows Vista operating system which permits only one alarm provider. While both Wonderware Application Server and InTouch HMI can be configured as alarm providers, only one alarm provider can be configured at any one time.
Wonderware Application Server and InTouch HMI detect when the application is running in the console. In Windows Server 2008 R2 and later, it implies that the application was started by a user physically at the machine. However, this behavior requires that you disable Fast User Switching in both Windows 7 and Windows Server 2008 operating systems.
When running Windows Server 2008 or later versions of Windows, you must modify the terminal services behavior for the Wonderware software to operate properly.
Wonderware software detects when an application is running in the console. From Windows Server 2008 and later versions of Windows, all remote connections are treated as a remote RDP session regardless of /console or /admin switches in the mstsc connection.
To disable fast user switching through the Group Policy interface
1. Click Start and then Run. The Run dialog box appears.
2. Enter gpedit.msc and click OK. The Group Policy dialog box appears.
3. Go to the following location: Local Computer Policy > Administrative Templates > System > Logon.
4. Set Hide Entry Points for Fast User Switching to Enabled. Enabling this policy hides the SwitchUser option in the Logon interface, the Start menu, and the TaskManager.
5. On the File menu, click Exit to close the Group Policy dialog box.
By enabling the policy, Administrators hide the Switch User button in Windows logon, in the Start menu, and in the Task Manager.
Certain editions of Windows Vista do not have the Group Policy editor. So, alternatively, you can configure the Switch User settings through the registry.
To disable fast user switching through the Registry Editor
1. Click Start and then Run. The Run dialog box appears.
2. Enter regedit.exe and click OK. The Registry Editor dialog box appears.
3. Go to the following location: HKEY_LOCAL_MACHINE > SOFTWARE > Policies > Microsoft > Windows > CurrentVersion > Policies > System.
4. Right-click and select DWORD (32-bit) Value. Name it HideFastUserSwitching.
5. Set the HideFastUserSwitching data value to 1.
6. On the File menu, click Exit to close the Registry Editor.
In a Terminal Server environment that has a managed application deployed to it, the following behavior applies to references in the InTouch HMI application to the InTouchViewApp object:
ArchestrA Symbols referencing InTouchViewApp_001.Tag1:
Running on the Console - Refers to the tag value of the application running on the console.
Running in a Session - Refers to the tag value of the application running on the console.
Restarting the Window Viewer application running on the console causes references from the terminal session to disconnect and then reconnect.
InTouch Graphic referencing Tag1:
Running on the Console - Refers to the tag value of the application running on the console.
Running in a Session - Refers to the tag value of the application running in the session.
ArchestrA Graphic referencing InTouch:Tag1:
Running on the Console - Refers to the tag value of the application running on the console.
Running in a Session - Refers to the tag value of the application running in the session.
InTouch Graphic referencing Galaxy:InTouchViewApp_001.Tag1:
Running on the Console - Refers to the tag value of the application running on the console.
Running in a Session - Refers to the tag value of the application running on the console.
Wonderware InTouch HMI 2014 (v11.0) Operating System Notes
The following table lists the supported operating systems that can be installed on computers that run InTouch HMI server and client components.
Notes:
The recommended operating system for a Galaxy Repository is Windows Server 2008 R2 SP1.
Microsoft Windows 7 SP1(32-bit or 64-bit) is the recommended operating system to run InTouch HMI client components.
Microsoft Windows Server 2008 R2 SP1 is the recommended operating system to run InTouch HMI server components.
The recommended operating system for InTouch HMI development is Windows Server 2008 R2 SP1 or Windows 7 SP1.
The recommended operating system for run-time nodes is Windows 7 SP1.
Window 7 SP1 Embedded is supported on compact systems only.
Wonderware InTouch HMI 2014 (v11.0) with Windows 7 and Later Versions of Windows
The following InTouch legacy script functions do not operate on 64-bit versions of Windows: WWPoke(), WWExecute(), WWRequest(), ActivateApp() and SendKeys().
If Recipe Manager is started using the path StartProgramWonderwareInTouchRecipe, then select Run as Administrator on Windows 7 or later operating systems.
The InTouch Extensibility Toolkit might need to be started by right-clicking and selecting Run As Administrator on Windows 7 or later operating systems to function properly.
The onscreen keyboard options have changed for the Windows 7 and Windows Server 2008 R2 operating systems.
Hovering to select from the Windows keyboard does not work in the Windows 7 Professional and Windows Server 2008 R2 Standard operating systems.
Wonderware InTouch HMI 2014 (v11.0) View Applications and DDE Support
Windows 7 and Windows Server 2008 do not support NetDDE for InTouchView applications.
By design, an InTouchView application does not serve data to any other source, including InTouch HMI itself. When WindowViewer starts, it verifies if the application is an InTouchView application. When WindowViewer detects an InTouchView application, it does not register to become a DDE server. ArchestrA Symbols make use of the client layer when accessing InTouch tags, and appear as a third-party client trying to access WindowViewer as a data server. As a result, ArchestrA Symbols cannot communicate with InTouch tags when used with an InTouchView license.
Windows Server 2003 and Windows XP Pro still support NetDDE.
In ArchestrA Symbols, InTouch:‹tagname› is still a valid method of referring to an InTouch tag on a local node.
Wonderware InTouch HMI 2014 (v11.0) Support for Windows User Account Control
Wonderware System Platform 2014 with InTouch HMI v11.0 supports User Account Control-enabled operations on run-time nodes. You must disable User Account Control (UAC) before installing Wonderware System Platform 2014 and before performing Configurator operations. UAC also must be disabled on IDE and GR nodes.
.NET Framework Requirements and Compatibility
IMPORTANT: We strongly recommended that prior to upgrading your existing applications to Wonderware System Platform 2014, that you back up your applications, become familiar with the changes introduced by Microsoft in .NET 4.5, and that you review your .NET scripts and .NET controls for any required changes. We also recommend you test the upgrade in a staging system prior to upgrading your production system.
Wonderware System Platform 2014 leverages Microsoft .NET Framework 4.5. The Wonderware System Platform installation program will install .NET 4.5 if it is not already present in your system. If .NET 4.0 is your current .NET version, note that it is possible for .NET 4.0 and .NET 4.5 to coexist in the same machine. In this scenario, ASP 2014 will use .NET 4.5. Other applications you may have on the same machine with dependencies on .NET 4.0 will access .NET 4.5.
Although .NET Framework 4.5 is highly compatible with applications that are built with earlier .NET Framework versions, Microsoft has introduced changes in .NET 4.5 to improve security, standards compliance, correctness, reliability, and performance that may require changes to .NET scripts you may have created with Wonderware System Platform 2012 and earlier versions of Application Server, InTouch HMI, the Historian, Historian Client, and Wonderware Information Server. These changes may also affect .NET controls developed with .NET 4.0.
Virtualization Support
Wonderware System Platform 2014 supports the following virtualization environments:
Microsoft Hyper-V: based on the supported operating system version
VMware 5.0: basic virtualization without High Availability and Disaster Recovery
VMware VSphere 5
SQL Server Requirements for All Wonderware Components
The following table lists the SQL Server requirements for Wonderware System Platform 2014 components, including InTouch HMI 2014. The recommended environment is a 64-bit operating system and SQL Server 2008 R2 SP2, Standard, Enterprise, 32/64-bit.
Note: SQL 2012 SP1 Express is installed automatically if no other version of SQL Server is installed on the computer where InTouch HMI 2014 will be installed.
SQL Server Notes Common to All Wonderware Products
SQL Server Rights Requirements
SQL Server 2008 does not automatically create the BUILTINAdministrators role delivered in SQL Server 2005. Because of this change to SQL Server, the Wonderware Application Server 2014 (v4.0) installation process will create the necessary operating system user group (aaAdministrators) as well as the necessary SQL Server role. This automated process will provide the rights required to allow operations within the Galaxy Repository without the need for blanket BUILTINAdministrator rights. The aaAdministrators group must be present and enabled. If you accidentally delete the aaAdministrators group from the Windows operating system, you can run either of two options to restore it:
Run the Change Network Utility from the Windows Start menu.
Run the aaConfig SQL Utility from the Windows Start menu.
If you accidentally delete the aaAdministrators group from the SQL Server security logins, you must run the aaConfig SQL Utility to restore it. Refer to the Wonderware Application Server User's Guide, About ArchestrA User Accounts, for further information and procedures about restoring the aaAdministrators group.
Alarm Client and Trend Client Prerequisites
The Trend Client is compatible with the following Wonderware products:
Wonderware InTouch HMI 10.1, 10.1 SP2, 10.2, 10.5, 10.6, and 11.0
Wonderware Application Server 3.1, 3.1 SP1, 3.2, 3.5, 3.6, and 4.0
Wonderware Historian 9.0, 10.0, 10.5, and 11.5
Wonderware Historian Client 10.0 SP1/SP2, 10.1, 10.2, and 10.5
ActiveFactory 9.2
QI Analyst 8.0 SP2
InTouch Access Anywhere Requirements
The following sections describe the requirements to run Wonderware InTouch Access Anywhere Server and supported browsers. For detailed information, see the Wonderware InTouch Access Anywhere documentation.
Wonderware License Manager
Requirements
The InTouch Access Anywhere Server can be installed as a Wonderware System Platform installation option. The InTouch Access Anywhere Secure Gateway is an optional component installed on a separate computer within a DMZ.
The following requirements must be met before you install the InTouch Access Anywhere Server or a Secure Gateway.
Wonderware InTouch Access Anywhere must be installed on the same RDP Server computer as Wonderware InTouch HMI 2012 R2 (version 10.6) or later.
Remote Desktop (RDP) must be enabled and properly configured on the host computer. For information and guidance, see Tech Note 782, 'Installing Remote Desktop Services on Windows 2008 Server R2 for Wonderware Products'. You also can refer to http://technet.microsoft.com/en-us/l../dd883253.aspx.
You must install an InTouch 2012 R2 TSE Concurrent License on the same computer as your Wonderware InTouch and InTouch Access Anywhere Server installations.
Supported InTouch Access Anywhere Browsers
Wonderware InTouch Access Anywhere can run on smart phones, tablets, laptop computers, or any other device that supports an HTML5-compliant web browser. Browsers supported by Wonderware InTouch Access Anywhere include the following:
Browsers Tested with InTouch WindowViewer
Archestra License Manager 2014 Torrent
Internet Explorer 11
Internet Explorer 10
Firefox 22
Safari 7
Chrome 28
Opera 15
Functionally Compatible Browsers
Certain versions of the following browsers may be functionally compatible with InTouch Access Anywhere, but have not been tested running InTouch HMI.
Firefox 4-21
Safari 5, 6
Chrome 11-27
Opera 11-14
You are strongly recommended to upgrade to one of the supported browser versions listed in Browsers Tested with WindowViewer. For a complete list of considerations to run an InTouch application with InTouch Access Anywhere on a portable device, see the InTouch Access Anywhere User Guide.
Wonderware InTouch HMI 2014 (v11.0) Component Compatibility
In a single-node environment, if you need to combine multiple components delivered within Wonderware System Platform 2014, all components need to be at the versions delivered in Wonderware System Platform 2014.
In a node-to-node environment, components are compatible between the current licensed version and one licensed version back.
The following table lists Wonderware component products and their compatibility with InTouch HMI 2014 (v11.0).
In some cases, the Wonderware InTouch HMI is supported in newer environments than a compatible product. Wonderware InTouch HMI has been tested for compatibility with a listed product only in the environments that are supported by that particular product.
Detailed Steps
Performing the InTouch HMI Installation
Before you start installing InTouch HMI, you should have a clear idea whether you want to develop, deploy, and publish your own applications, or require only the InTouch run time, to run applications already created and deployed.
The following procedure will guide you through the installation, with information specific to the InTouch HMI.
Archestra License Manager Missing
To install the InTouch HMI
Insert the installation DVD into the computer’s DVD drive.
Using Windows Explorer, manually start the installation by double-clicking setup.exe on the DVD.
Follow the prompts to commence the installation and to install system prerequisites, as necessary.
The installation program prompts you to select an installation type: either product-based selection or installation by computer roles. As you are installing a single product—InTouch HMI—click the product-based selection as your installation type
Choose the components you want to install.
If you choose InTouch Run Time Only, the following will be installed:
InTouch Run Time
InTouch documentation
Alarm DB Logger
FS Gateway (as a silent installation)
Application Server Bootstrap
InTouch Supplemental Components: InTouch Recipe Manager, InTouch SQL Access, and Symbol Factory
Note: The 16 Pen Trend supplementary component is not installed by default. You must select the Customize Installation option and select 16 Pen Trend from the product list to install it as part of the InTouch HMI installation procedure.
If you choose InTouch Development and Run Time, the following will be installed:
All items listed under step a in these instructions.
Application Server Bootstrap, IDE, Galaxy Repository, SQL Server 2012 Express with SSMSE, and Application Server documentation
InTouch sample applications
When the installation prompts you to verify your selection, you have the opportunity to customize your installation.
If you choose InTouch Run Time Only, you can add the following components:
InTouch sample applications
InTouch 16 Pen Trend Supplementary Component:
If you chose InTouch Development and Run Time, you can add the following components:
InTouch 16 pen trend
InTouch Access Anywhere
After you verify and customize your selection, you are prompted to select the language you want to install. English is selected by default, but you can choose another language.
Follow the subsequent installation steps to:
Accept the End User License Agreement.
Create a new ArchestrA user account, or specify an existing account.
Install any prerequisite software components not yet installed on the computer.
The installation proceeds to completion. You must restart the computer after completing the installation.
Installing Your Invensys Product License
Wonderware enforces the use of its products with a software license. After you install a Wonderware product, you must install a single license file, ARCHESTRA.LIC, which contains your customer information, product data, and software features. Until you apply your Wonderware license, you can only run the InTouch HMI in demonstration mode.
You use the Invensys License Manager to install the contents of the ARCHESTRA.LIC file on the computer where InTouch HMI has been installed. The Invensys License Manager is included as an Invensys component when you install the InTouch HMI.
To install your Wonderware product license
Start the Invensys License Manager by doing the following:
Place the installation DVD in the computer's DVD drive.
Click Start from the Windows desktop, and then click All Programs to show the Invensys folder.
Click the Invensys folder, and then click the Invensys License Manager folder.
Click Invensys License Manager.
Click File, and then Install License File. The Choose a License File to Install dialog box appears.
Browse the installation DVD, select the ARCHESTRA.LIC file, and click Open.
The Destination Computer for Installation dialog box appears. Type the domain and computer names.
The Invensys License Manager copies the ARCHESTRA.LIC file to the C:Program FilesCommon FilesArchestrALicense folder on the selected computer.
Antivirus Software Exclusions
After installing Wonderware InTouch HMI Version 11.0, configure your antivirus software to avoid scanning archive files.
Antivirus software should not scan files in the following ArchestrA folders for 32-bit operating systems:
C:Program FilesArchestrA
C:Program FilesCommon filesArchestrA
C:Program FilesFactorySuite (The FactorySuite directory may not exist in newer installations)
C:Program FilesWonderware
C:InSQLData
C:Documents and SettingsAll UsersApplication DataArchestrA
C:HistorianData
For 64-bit operating systems, the exclusion must reflect the (x86) program files directory instead:
C:Program Files (x86)ArchestrA
C:Program Files (x86)Common filesArchestrA
C:Program Files (x86)FactorySuite (The FactorySuite directory may not exist in newer installations)
C:Program Files (x86)Wonderware
From Application Server Platform objects:
History Store Forward directory: (if not default)
From Application Server Engine objects:
Checkpoint directory location (if not default)
<InTouch Application folder path> including:
C:Documents and SettingsAll UsersApplication DataArchestrA
<SMCLoggerStoragefilepath>. The default is:
C:Documents and SettingsAll UsersApplication DataArchestrALogFiles
SQL Server database files of type:
.mdf
.ldf
Note: Ensure that the subfolders of the listed directories are also excluded. Specify folder names accordingly if you are using a 64-bit operating system. For example, the program file's root directory in a 64-bit operating system is C:Program Files (x86).. and the application data root directory in a 32-bit operating system is C:ProgramData..
Modifying, Repairing, or Removing the InTouch HMI
To modify, repair, or remove an installation
Insert the installation DVD into the computer’s DVD drive.
Click the Programs and Features option in Windows Control Panel. The list of software installed on your computer appears.
Select the InTouch component, and then click the Uninstall/Change button. The Modify, Repair or Remove Installation dialog box appears.
Follow the prompts to modify, repair, or remove the installation.
Wintoflash mac os installer. Note: The name of the Uninstall/Change button varies depending on the Windows operating system installed on your computer.
Upgrading to Version 11.0 from an Earlier Version of the InTouch HMI
Upgrading InTouch HMI installs Version 11.0 on a computer that has a previous version currently installed. An upgrade removes or uninstalls the previous version of InTouch HMI and installs Version 11.0.
After the hardware and software requirements are met, including the proper operating system, SQL server and other prerequisites, you can upgrade to Wonderware InTouch HMI Version 11.0 from the following versions of the InTouch HMI:
Version 10.0 SP2
Version 10.1 (All service packs and patches)
10.1
10.1 SP2
10.1 SP2 P01
10.1 SP3
10.1 SP3 P01
Version 10.6
You can only upgrade Wonderware System Platform products that are already installed and you will not be able to install new products within the Wonderware System Platform that have an upgrade process. The installed components that need to be upgraded are selected and disabled. You can neither clear these check boxes nor select more components during the upgrade.
To upgrade from a previous version of the InTouch HMI
Insert the DVD into your DVD-ROM drive. Run setup.exe to start the set-up program.
The upgrade feature dialog box appears.
Follow the prompts to complete the upgrade.
Migrating Applications to Wonderware InTouch HMI Version 11.0
Migration converts applications created with earlier versions of InTouch HMI to the current version. You can migrate applications to version 11.0 that were developed with the following versions of InTouch HMI:
Version 7.11 P07
Version 8.0 SP2 P04
Version 9.0 P03
Version 9.5 SP1
Version 10.0 SP2
Version 10.1 (All service packs and patches)
10.1
10.1 SP2
10.1 SP2 P01
10.1 SP3
10.1 SP3 P01
Version 10.6
Licensing
Wonderware Archestra License Manager
For General System Platform 2014 Licensing click HERE
Archestra License Manager 2014 Download
Related Videos
0 notes
Text
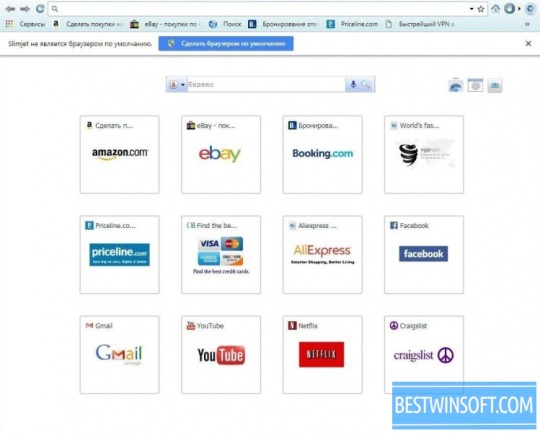
Browser Flashpeak Slimjet

Slimjet Web Browser Slimjet is a fast, smart and powerful web browser based on the Blink engine. It is built on top of the Chromium open source project, on which Google chrome is also based. Slimjet integrates a lot of powerful and convenient features to help users maximize their online productivity. FlashPeak Slimjet. FlashPeak Slimjet is a web browser built upon the open-source Chromium project. But unlike Chrome, FlashPeak does not send any usage data back to the developer. It also has a built-in ad-blocker, which works without any add-ons. Anti-tracking technology is used to protect your identity from websites and hackers.
(German)How can I check and manually update Adobe Flash Player integrated in Google Chrome or in a derivatives like Slimjet browser? In the blog post I’ll give you a short guide.
Advertising

Both the Google Chrome and the Slimjet browser come with integrated Flash Player. If a vulnerability is found in Flash, Adobe usually releases a patch. But how to update Flash in Google Chrome or in the Slimjet browser? There are always browser updates, which include the latest Flash Player.
Chrome browsers has a Flash auto update
You don’t have to wait for browser updates. Google Chrome and its derivatives such as Slimjet have an auto update function. This causes the browser to download the latest Flash Player version as soon as it is available.
A reader of my German blog notified me within this comment at my blog post Slimjet 17.0.6 verfügbar, that his Slimjet browser has been updated (see screenshot above) before Adobe released a patch globally.
How to check your installed flash version?
The question that some users of a Google Chrome and its derivatives like Slimjet might ask: ‘ how can I check which version of Flash is used in the browser and can I trigger the update of the Flash player’`?
Flashpeak Slimjet Download Windows 7
Advertising
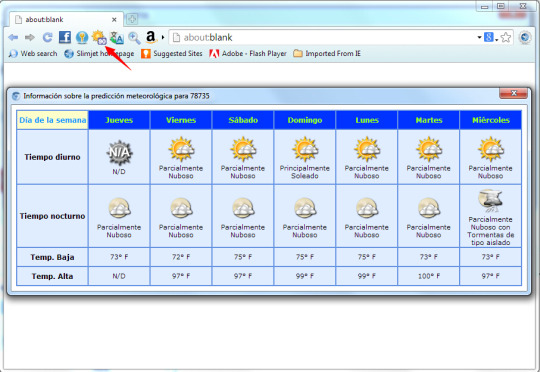
https://loadbud231.tumblr.com/post/665017402767130624/myanmar-mn-font-download-for-mac. The installed Flash version can be tested at this Adobe web page. The browser shold show the Adobe page shown below.
The place marked with an arrow indicates that the Flash Player is missing. The reason is that the player is deactivated by default (for security reasons) in Google Chrome browser and its derivatives. If you click on the symbol of the’ puzzle piece’, the following security prompt appears.
If the user click to Allow Format thumb drive for large files mac os. , the browser enables Adobe Flash Player. Ahnlab v3 net for windows server.
Then you can see if the Flash-Player is supported in your browser. On the Adobe page you can also see which version is available for an update from Adobe (but this information is sometimes lagging behind).
How to update Flash in a browser?
Instead of using the above test page, you can also check the Flash version integrated in your browser directly in Google Chrome/Slimjet. Enter the command chrome://components to show this page.
Flashpeak Slimbrowser
This also works for Slimjet browsers, which then switches to slimjet: //components (otherwise use this instruction). In the component list you will find an entry for the Adobe Flash Player. This not only indicates the current version, but also contains a button to check for updates.
Download Flashpeak Slimjet Browser
Similar articles:
Adobe Flash Player: New Update 28.0.0.161
New Adobe Flash Zero-Day exploit in the wild
How to disable Adobe Flash Player in Windows 8, 8.1, 10 Wintoflash mac os.
Cookies helps to fund this blog: Cookie settings
Advertising
0 notes
Text
Euro Train Simulator Free

Euro Train Simulator Free
Euro Train Simulator Free Download Pc
Feel free to refuse that permission if you do not want Google Play Games leaderboard. Hope you enjoy playing Euro Train Simulator 2. Future updates will add more train operators and routes from UK. Fast Euro Train Driver Sim: Train Games 3D 2020 is new train driving simulator game that’ll give experience of real subway train sim world. Instructions Use mouse to play.
Euro Train Simulator 2 is another realistic train simulation game from Highbrow Interactive, after the success of the Euro Train Simulator.
They made so many Train simulation games like Indian train simulator, Local train simulator, Train Traveller. Ahnlab v3 net for windows server.
Euro Train Simulator 2
Now you can install the High-Quality Euro TrainSimulator 2 game directly from Play-Store. Here we are sharing the latest version of this game which is a BETA version of APK.
If you have already joined in Beta program you will get early access to Beta version 2020.4.2.1 of Euro Train sim. Here you can download directly from the below link.
Euro Train Simulator II Free Download Apk
Euro Train Simulator 2 BETA Apk version 2020.4.2.1 is here, Download now and enjoy the latest features, Watch the above trailer to get an idea about the game.
Wintoflash mac os installer. This Beta version gives you early access to the latest routes, Locos, coaches. Of course, it may contain some bugs also which can be fixed in future updates. Using thumb drive on mac.
SUBSCRIBE to “GamerDesk” YouTube channel for Walk-throughs and Update videos. Related: Euro Train Simulator latest Update
Euro Train Simulator for PC – Windows10/8/7

How to play a Euro train simulator game on PC! Here is the software that helps you to play android games in Windows 10/8/7 laptop.
This software gives you the same experience as you played Indian train/railway games on android. You can play online every game like Euro train sim, Indian train sim, etc.
Whenever we got Euro TrainSimulator 2 Update we will update this article with the latest Beta Apk link, so Bookmark this article
EURO TRAIN Simulator II
Description – Euro Train Sim 2 is the first in a planned series of high-quality, feature-rich railroad simulation games covering every major destination in the world.
Featuring an intuitive, easy to use interface, the game lets users play Career Mode to accomplish varied scenarios and unlock new trains and routes.

Euro Train Sim 2 is the first mobile train simulator to feature officially-licensed real trains from German train operator Deutsche Bahn. The locomotives have been authentically recreated with maximum attention to detail.

Features

Official DB trains: Features stations from Germany and France and official DB licensed trains including the world-famous ICE3, DB142 and a range of freight trains.

Euro Train Simulator Free
Authentic German and French Stations: Munich, Merring, Augsburg, Grobenzell, Olching, Ulm, Strasbourg, Stuttgart, Karsruhe and Paris.
Permit System: Access to every feature, train, and location in the game is through a dedicated Permit System. Purchase newer permits using the in-game Credits and Gems.
Career Mode: Dedicated career mode with Objectives that are required to be completed for maximum reward. Career accomplishments are featured on a leaderboard and etc.
for detailed info please visit Highbrow Interactive Official Page…
Euro Train Simulator Free Download Pc
Share this article and show your love for this game or Subscribe right now using your E-mail ID to get updates…
0 notes
Text
Wintoflash Mac Os

If a user wanted to install the operating system on his computer or create a rescue diskette for it a few years ago, he would burn the operating system to CD / DVD. In order to create a bootable pendrive for installing the operating system on our computer, we have to burn the operating system to CD / DVD. So in this article we are going to talk about the best bootable USB maker.
Mac Os Mojave
Wintoflash Mac Os Installer
Wintoflash Mac Os Mac
Wintoflash Mac Os High Sierra
Wintoflash Mac Os Mac
Mac Os Mojave
Best USB Maker Tools for Windows and Mac
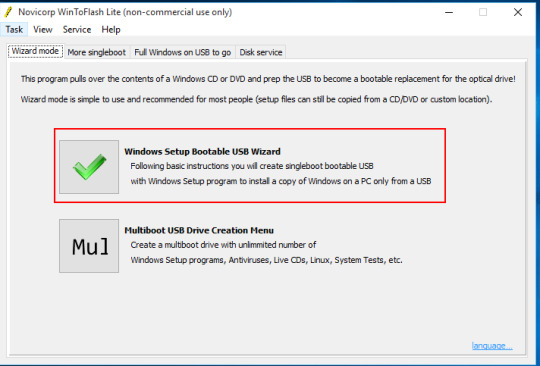
Mac OS: Freeware Download Novicorp Wintoflash Free. Order By: Title Data Added Price File Size Downloads. All Freeware Records 1-10; A free Online Service 1.0. Date: May 01, 2013 Advertisement. Feb 20, 2019 WinToFlash is an extremely useful tool that lets you easily transfer your Windows setup from a CD/ DVD to a removable flash drive in no time! WinToFlash currently supports Windows XP, 2003, Vista, 2008 and 7. Also you can transfer the OS setup to practically any removable drive such as USB sticks, flash cards, external HDDs and others.
1. Rufus
Firstly Rufus is simple and easy to use. It automatically detects your USB flash drive and capacity so that you can easily identify which device you are formatting. A bootable USB drive can be built for new hardware or legacy BIOS supporting UEFI. You only have to select the appropriate options from the list.
2. RMPrep USB
It is all in one tool. Features come with a cluttered interface. If you want a simple bootable USB to install a new operating system, I personally do not recommend it.
RMPrep UBS specialized in creating multiple partitions on a single USB drive. You can install multiple ISOs of different OSs or save user files along the edge of a bootable USB.
The special feature of this USB is that we can create partitions easily so that you can so in hard-drive so that you can make it easily accessible to save the files as well as a separate folder for storing files. Uses the same drive.
It keeps your files separate from operating system files.
For advanced users. difficult to use.
Create ISO from USB drive.
Edit the hard drive grub .
Test speed of USB drive.
Support all OSs.
3. Universal USB Installer
Special tools for creating a bootable live Linux OS. It has a predefined list of most Linux distributions available. Route the ISO image and USB flash drive you want to boot from. Create a live antivirus rescue disk using it. A special option for this is also given for reuse of CDs.
+ Special menu for Linux, also supports Window 7
4. YUMI
Yumi, short for your universal multiboot installer. This software allows you to create a bootable USB drive in a format of more than one operating system in a USB drive.
YUMI has a large collection of free OSs based on Linux and other free OS projects. Just choose what you want and YUMI will give you a direct download link for it. Its appearance is quite more attractive and easily hand able.
5. U-Netbootin
This device is an exact clone of the Universal USB installer or you can also say that the Universal USB installer is a clone of UNetbootin.
Create a bootable USB for any Linux distribution.
Wintoflash Mac Os Installer
The best option is to use UNetbootin if you are not using Windows OS .It is available for Linux, iOS and Windows.

most of the software listed here will not run where U-Netbootin comes in to help. Whenever you are using LINUX Myanmar mn font download for mac.
6. Linux Live USB Creator (LiLi)

LiLi is another software used to create a bootable USB. A special feature called built-in globalization allows users to run the installed Linux operating system without restarting Windows which is a distinctive feature of Lily.If you are only concerned about Linux then you should go for it.
7. Win Setup from USB
It is also a tool for those who want to install multiple operating systems on one USB device. With Win Setup USB you can use any recommended windows windows 7, XP or anyone which you want.it is necessary you will be presented with a list of operating systems installed on the thumb drive whenever you are preparing to install USB drive and then select the preferred operating system to boot. Although the interface is simple, non-specialist users may find it difficult to use.
8. X-Boot
This is more than just a bootable USB manufacturer. You can create a rescue CD or a disk that contains many operating systems or tools such as antivirus rescue CDs.
It combines many tools in the ISO image and is more useful than just USB-making tools. X Boot can create ISO images from files and then write these files to a USB drive for booting or installation.
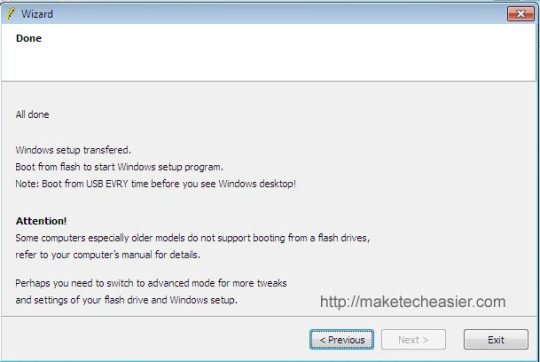
9. Windows Bootable Image Maker
It is a simple and ultra-small device that does its job as you expect. WBIM has a super-simple interface and minimal buttons to avoid confusion for new users. It is a tool of Ask VG.
There are only basic buttons and only one function to do. Simply create a bootable USB drive to install or try out the new operating system. you will be very surprised by the weight and how small this software is. It is just 160KB in size.
Related – Best Rainmeter Skins for Windows 10, 8, 7.
Other Equipment
➤ Novicorp Wintoflash is also a tool that will help you recover a deleted bootloader besides creating a boot flash drive.
➤ Etcher is an excellent tool for Mac OS users

Wintoflash Mac Os Mac
The Windows Official USB Creation Tool is an official tool for creating bootable USB drives to install downloaded Windows 7 and Windows 8 ISO images without burning a traditional disk.
Wintoflash Mac Os High Sierra
MB Flash Boot is a bit tool, which is about 24 MB in download size. It has more options than any other device, but is actually a paid device, but anyone can use it for free.
Wintoflash Mac Os Mac
Ahnlabs v3 windows 10. If you have a related query or any other problem feel free to ask us in the comment section.
0 notes
Text
Format Thumb Drive For Large Files Mac

Format Thumb Drive For Large Files Mac Os
How To Format Hard Drive For Mac
Format Hard Drive For Mac And Pc
Dec 29, 2020 To format the USB drive to FAT32, follow the next steps: Step 1. Connect the USB flash drive to your Mac computer. Step 2.Go to Applications Utilities Double click and open Disk Utility. The file system in which the hard drive is formatted keeps track or record of the state of the clusters present. When a file or a portion of the file is written on any cluster, it is marked as or considered to be occupied. If the size of the clusters is small, the speed with which the hard drive performs becomes slower. Feb 18, 2020 Every newer file system handily whips FAT32 in the file size department, allowing for sometimes ridiculously large files. And when you look at volume size limits, FAT32 still lets you format volumes up to 8 TB, which is more than enough for a USB drive. Other files systems allow volume sizes all the way up into the exobyte and zetabyte range. To format the USB drive to FAT32, follow the next steps: Step 1. Connect the USB flash drive to your Mac computer. Step 2.Go to Applications Utilities Double click and open Disk Utility.
Have you ever formatted a disk on your own?
Or
Myanmar mn font download for mac. Attempting to format a disk for the very first time?
Then, you should definitely read this post as it is going to tell you why it is important to set the right allocation unit size while formatting a drive.
Now, what do you mean by ‘Allocation unit size’?
It is also known as or can be addressed as ‘Cluster size’. The cluster size determines the can be defined as the tiniest chunk of disk space that holds a file.
When you begin to format a partition into one of the file systems such as NTFS, FAT, exFAT etc., Windows makes use of the default values if formatting is done by one of the following methods and they are:
By using the ‘FORMAT’ command from the command line without mentioning the cluster size;
When the Allocation Unit box in the Format dialog box lists Default Allocation Size while formatting a drive from Windows Explorer.
However, it is advisable to keep the allocation size small if lots of small files are present. This will help in saving disk space. But, if the size of the files is large, it is a good idea to keep the allocation size big. This will eventually enhance the system’s performance.
Our Hard drives are divided into clusters and the size of the allocation unit determine the size of a single cluster. The file system in which the hard drive is formatted keeps track or record of the state of the clusters present. When a file or a portion of the file is written on any cluster, it is marked as or considered to be occupied. If the size of the clusters is small, the speed with which the hard drive performs becomes slower. It happens because each file is broken into small pieces and it takes a significant amount of time gather all the broken pieces of the file in one place and access them as one.
And, if the size of the cluster is large, the space on the disk will be wasted.
Hence, there is no absolute benchmark for setting the size of the allocation unit. If the size of the files you wish to store on the drive is large then a large cluster size is recommended. This will also increase the speed with which the drive will perform. If you are planning to store smaller sized files than a small cluster size will do the deed. It will preserve the space on the disk.
Note: Formatting a drive into any file system comes with a catch. If the formatting is done in an improper way or if the process faces some kind of interruption, you may lose the data on your drive.
Read: Here’s how you can retrieve an exFAT partition.
Dec 16, 2020 • Filed to: Solve Mac Problems • Proven solutions
V3 ahnlab free download. USB drives, pen drives, or thumb drives – no matter what you call them, they all perform the same job related to data storage and management. In a matter of a few years, pen drives have drastically replaced CDs and other storage units. Now, we all use USB drives to transfer our data or maintain its backup. Though, there are times when we wish to format a pen drive on Mac. You can do it to erase drive data, troubleshoot a problem, reformat it, and do so much more.
Since Mac gives a one-stop solution to do it all, you won't face any problem like a pen drive not formatting on Mac. To further help you, we have come up with this detailed guide on how to format a pen drive on Mac with other related solutions.
Part 1. What is a Pen Drive or Thumb Drive?
Thumb drives (which are also known as USB or flash drives) are extensively used to store data via USB connectivity. As almost all the computers (be it Windows or Mac) have a universal USB slot, it makes the use of flash drives so effortless. You can just plug it into any system and access the stored content in no time. A pen drive can also be used as an installer at times or to maintain a backup of your data.
You might like to erase all the data present on your pen drive at once.
Formatting can also help you troubleshoot certain connectivity issues with your flash drive.
If the USB drive has been infected by malware, then formatting it can fix the issue at times.
It can also help you reformat the pen drive and change its file system as well.
It will let you defragment the drive and make more free space in it.
Part 2. How to Format Pen Drive on Mac
Just like Windows, Mac also allows a seamless solution to do pen drive format. To do this, you can take the assistance of Disk Utility, which is a dedicated system component in Mac. It can help you manage system partitions, erase an external unit like a thumb drive, and even repair your disk. To learn how to format a pen drive in Mac, you can follow these simple steps:
Firstly, connect your flash drive to the Mac by inserting it to the correct USB slot. Also, go to Mac's Finder > Applications > Utilities and launch 'Disk Utility' from here.
As the Disk Utility window would open, you can view the connected pen drive labeled under the 'External' devices on the left. Simply select your pen drive to view its storage settings on the right.
In order to format the pen drive, you need to click on the 'Erase' button on its toolbar.
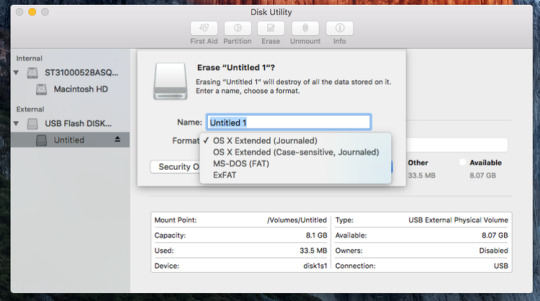
This will open the following pop-up menu. From here, you can change the name of the pen drive, its format, and the scheme. There are different kinds of formats available for thumb drives, which are discussed later in this post.
Lastly, you can change the scheme for the connected pen drive as well. While GUID and Master Boot support both Windows and Mac, the Apple Partition Map would only run on Mac.
After making the appropriate selections, just click on the 'Erase' button, and wait for the pen drive to be formatted entirely.
That's it! In the end, when you are informed that the thumb drive has been successfully formatted, you can unmount it safely from your Mac.
Let's get the ways of formatting USB to FAT32 together.
Video Tutorial on How to Format a USB Flash Drive on Mac
Part 3. How to Check the Pen Drive Format
A lot of users choose to format the pen drive to change its format. If you also have the same requirements, then consider checking the existing pen drive format first. Chances are that it might be of an ideal format beforehand. Here's how you can check the format of thumb drive on Mac.
Simply attach the pen drive to your Mac by inserting it into the USB slot.
Launch Finder once the pen drive is detected by Mac. You can see its dedicated icon on the left panel.
Select your pen drive from here and right-click to get its context menu. Click on the 'Get Info' option to proceed.
This will display a pop-up with crucial details related to the connected pen drive. Here, you can view the format of the selected USB drive.
While formatting a pen drive, users get an option to change its format. Ideally, Mac supports different pen drive formats for a USB drive that you can pick from, as per your convenience.
ExFAT: Extended FAT is one of the most common formats out there. It works smoothly on every major platform like Windows, PlayStation, Xbox, and even Linux.
FAT: While the File Allocation Table format also supports cross-platform compatibility, it is not as reliable as exFAT. For instance, it supports the maximum file size of 4 GB. Ideally, it is best suited for systems with FAT32.
OS X (Journaled): This is the traditional native file format for macOS, which is commonly known as the HFS+ format. Apart from storing data, it can also be used as a Time Machine backup.
OS X (Case-sensitive, Journaled): This is similar to the previous option, with a case-sensitive feature. Although Mac is not case-sensitive, systems like UNIX are.
OS X Extended (Journaled, Encrypted): If you want to protect your thumb drive, then go for this option. It is similar to the OS X Journaled version with encryption. That is, users are required to authenticate (via password) to access it.
OS X Extended (Case-sensitive, Journaled, Encrypted): This is an encrypted and case-sensitive version of OS X Journaled.
Part 4. How to Remove History on Mac Firefox
By now, you must be able to reformat thumb drive on Mac without any trouble. If you are finding it hard to access the pen drive content on Mac, then don't worry. The operating system is pretty user-friendly and will let you access the connected pen drive without any trouble.
Firstly, make sure that the pen drive has been properly inserted on your Mac's USB slot. As soon as the pen drive is detected, you will get its shortcut on the desktop. Just double-click it, or right-click and open it.
Alternatively, you can also access the USB drive content via Finder as well. Go to Mac's desktop and click on Finder > File > New Finder Window. This will open a new Finder Window on your Mac.
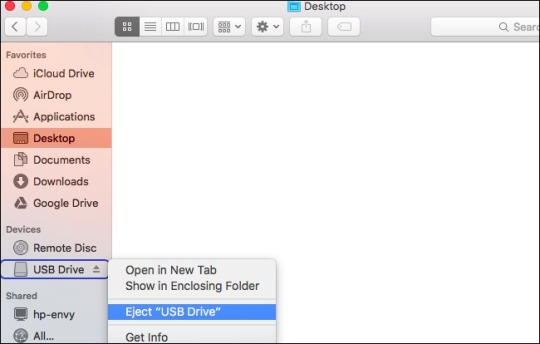
On the left sidebar, you can see all the shortcuts and partitions. Under the 'Devices' or 'External' tab, you can see your pen drive's icon. Just double-click it to open its file system.
In the end, after when you have finished working with the pen drive, you can unmount it. Select the pen drive's icon and right-click it to get its context menu. Click on the Eject option to safely remove it.
Part 5. How to Recover Deleted History on Mac
If you are lucky, then you would be able to format a pen drive on Mac without facing any setback. Though, chances are that you might get the 'Pen Drive Not Formatting' error on Mac as well. Try following these simple yet smart solutions to fix the pen drive not formatting issue on Mac.
• Reinsert the USB drive
If you have not properly inserted the USB drive to Mac, then you might encounter this issue. To fix this, just remove the pen drive and clean the USB slot on your Mac. After a while, insert it once again, and check if it has been detected or not.
• Reinsert the USB drive
If you have not properly inserted the USB drive to Mac, then you might encounter this issue. To fix this, just remove the pen drive and clean the USB slot on your Mac. After a while, insert it once again, and check if it has been detected or not.
• Check the format
Some formats of the pen drive, like NTFS, are not supported by Mac. You can go to the thumb drive's properties to view its format. In case if it has an NTFS format, then you need to use a third-party tool to access it or format the flash drive on Windows instead.
• Fix the USB drive
There might be some problem with the USB drive storage as well. In order to fix this, go to Mac's Applications and launch Disk Utility on it. Select the connected pen drive and click on the 'First Aid' option from its toolbar. This will check the USB storage and would try to fix its file system as well.
• Reset PRAM
The Parameter Random Access Memory on Mac can also lead to the pen drive, not formatting issue. Luckily, it can easily be fixed by restarting Mac. Power it off or simply restart it from the Finder. While Mac is restarting, press the Command + Option + P + R keys at the same time to reset its PRAM.
• Update macOS
If your Mac is running on an outdated version, then it might encounter compatibility issues with the connected pen drive. The easiest way to update its drivers and firmware is by upgrading it to a stable version. Just click on the Apple menu on Finder and select 'Software Update'. This will make your system look for the recent macOS update that is compatible with it.
Format Thumb Drive For Large Files Mac Os
Part 6. How to Perform Pen Drive Data Recovery on Mac
Sometimes, users end up formatting a pen drive by mistake as well. If you also have accidentally deleted data on Mac or have formatted a pen drive, then take the assistance of Recoverit Data Recovery Mac. Developed by Wondershare, it is one of the most advanced and trusted data recovery tools for Mac. The latest update of Recoverit 8.0 has been released that is equipped with tons of high-end features. You can now recover all kinds of data from a Mac or a pen drive with a single click.
Using Recoverit 8.0, you can get back your lost photos, videos, documents, compressed files, and numerous kinds of data easily.
The application is known to produce exceptional results in less time. It also features a user-friendly and intuitive interface that does not require any prior technical knowledge.
It supports data recovery on all types of USB drives. This includes pen drives from brands like Kingston, SanDisk, Sony, HP, Samsung, and more. Also, it supports leading file formats like NTFS, HFS, FAT, exFAT, etc.
The interface will let you preview the extracted data first. Later, users can selectively save their files to a location of their choice.
Recoverit supports data recovery under every possible scenario like formatted drive, accidental deletion, malware attack, and so on.
If you want to perform pen drive data recovery using Wondershare Recoverit 8.0, then simply follow these basic steps:
Step 1: Connect your USB drive and select it
How To Format Hard Drive For Mac
Firstly, connect your pen drive to your Mac and make sure it is detected by it successfully. Subsequently, launch Wondershare Recoverit 8.0 and pick a location to scan. In this case, it will be the connected USB drive. If you want, you can browse to a specific location as well.
Step 2: Scan for any lost content
Format Hard Drive For Mac And Pc
During the data recovery process, you are expected to wait for it to be completed. The interface will let you know the progress on the screen. Kindly don't disconnect the pen drive from Mac as of now to get better results.
Step 3: Recover your data
In the end, when the data recovery process is completed, you will be notified. Now, you can preview your photos, videos, and documents on the interface and select the files of your choice. Click on the 'Recover' button and save them to a trusted location. It is recommended not to save them back to the USB drive.
Conclusion
By following this informative guide, you would certainly be able to format the pen drive on Mac. Apart from that, we have also discussed ways to fix issues like pen drive not formatting as well. Though, if you have accidentally formatted your flash drive, then take the assistance of Recoverit Data Recovery. Being one of the best data recovery tools, it will certainly help you in an unforeseen data loss scenario. You can download its freely available version and keep it handy to do pen drive data recovery during any unwanted situation.
What's Wrong with Mac
Recover Your Mac
Fix Your Mac
Delete Your Mac
Learn Mac Hacks
0 notes
Text
Ahnlab V3 Net For Windows Server
V3 Ahnlab Free Download
Ahnlab V3 Net For Windows Server 9.0
Ahnlab V3 Lite Windows 10
Ahnlab Windows 10
Ahnlab V3 Net For Windows Server 9.0.exe
AhnLab EPP Management
Optimized Platform for
Endpoint Protection
V3 Net for Windows Server 9.0. V3 Net for Unix/Linux Server. Office Security. V3 Desktop for Linux. V3 Mobile Enterprise. AhnLab Policy Center 4.6. AhnLab Policy Center 4.6 for Windows. AhnLab’s Security Center leverages local, global and cloud resources to quickly share and make use of security intelligence. ※ V3 Net for Windows Server 9.0 제품에서만 지원합니다. 환경 설정 네트워크 보안 침입 차단 포트 차단 3. 기능 설명 1) 포트 차단 규칙 - '모든 포트 차단', '사용자 지정 포트만 차단', '사용자 지정 포트만 허용‘ 중 선택이 가능합니다. V3 Endpoint Security 9.0. V3 Net for Windows Server 9.0. V3 Net for Unix/Linux Server. Office Security. V3 Desktop for Linux. V3 Mobile Enterprise. AhnLab Policy Center 4.6. AhnLab Policy Center 4.6 for Windows.
The next-generation endpoint protection, AhnLab EPP, integrates various endpoint security solutions based on a single agent and a single management console.
AhnLab EPP is the endpoint protection platform for optimized interoperation and integrated management of diverse security functions. AhnLab EPP provides a stronger response against threats than point solutions-based responses by providing truly centralized endpoint security management and operation.
Sensitive data of organizations reside in endpoints and as a result, endpoints are continually exposed to security threats. Also, the increasing diversification of operating systems and devices require organizations to widen the object and scope of protection.
In response to today's highly complex security threats, organizations are introducing multiple security solutions; however, limitations in operating and managing such multiple solutions often become a vulnerability in security.
AhnLab EPP, a next-generation endpoint security platform, offers efficient management and strong response to threats with only an agent and a single management console. With AhnLab EPP, security managers can easily operate and manage endpoint products with an at-a-glance convenience.
AhnLab EPP, the next-generation endpoint protection platform, provides diverse and convenient functions for efficient security operations and integrated threat response.
Easy and simple integration of security policy settings
- Integrated rules and responses applicable on all AhnLab security endpoint products, including AhnLab V3 antivirus or AhnLab EDR threat detection and response solution
- Advanced Rule Settings: Interoperating policies easily set on related endpoint solutions
- Integrated Response Settings: Individual or combined response policies set for systems that violate rules (e.g., network isolation, malware remediation, and patching)
- Reports created on set conditions, response commands, exceptions, or designated groups or rules
Automated syslog interoperation
- Seamless integration with various third-party solutions (e.g., SIEM, ESM, and integrated logs)
- Syslog UDP, Syslog TCP, and TCP over SSL supported
- Able to optimize interoperated policy
- Extensive security intelligence on threats via connecting to various solutions
Automated collection of endpoint threat information
- Analysis of suspicious endpoint terminals
- Automated collection of threat information via agent
- Detailed analysis provided by AhnLab’s globally-recognized security researchers upon request
AhnLab EPP helps create a powerful endpoint security system with a tightly integrated operation of various security solutions and threat response.
1. A more powerful threat response
- Implementation of a powerful platform-based endpoint security system by interoperating loads of security solutions
- Threat monitoring and response through interoperated policies between various security solutions
- Establishment of active security policies and measures according to the business environment and security requirements
- Maximization of the security control effect by interoperation with third-party solutions via the automated syslog logs
2. Convenient security operation
- Efficient security management through integrated settings and operations
- Immediate use of various AhnLab security endpoint solutions simply by adding a license
- Operational convenience through a web-based management console and its various management functions
- Enhanced convenience for security administrators through a dynamic UX-based, intuitive dashboard
- Convenient functions for administrators, such as user-defined reports
3. Expandability and reliability
- Easy to deploy and flexible-to-expand software-based solution
- Able to deploy according to business scale and IT environment
- Easy scale-out method to add or expand the server
- Module-based deployment enables flexible and limitless attachment
- Operational stability through load balancers - prevention and distribution of overloads across modules
AhnLab EPP consists of a web-based management console, AhnLab EPP Management and an agent, AhnLab EPP Agent. It can be deployed flexibly to suit your organization’s environment.
V3 Ahnlab Free Download
AhnLab EPP Management
System SupportBrowser
· Internet Explorer 11 and more
· Google Chrome(Windows, Mac)
· Language- Korean, English, Chinese(simplified), Japanese
AhnLab EPP Agent
Ahnlab V3 Net For Windows Server 9.0
System SupportOS
· Windows XP SP3 / Vista / 7 / 8(8.1) / 10
· Windows Server 2003(+SP2, +R2) / 2008(+R2)
/ 2012(+R2) / 2016
* 64-bit is supported for the above OS
· macOS Sierra(10.12) ~ Catalina(10.15)
※ Recommended server specifications vary according to your environment. For more information, please contact us at [email protected]
Overview
An increasing number of businesses are migrating their workloads to cloud environments to accelerate digital transformation. However, cloud environments requires a new security platform for centralized visibility and management of cloud workloads.
AhnLab CPP is a single, centralized cloud workload protection platform that focuses on providing optimized protection, unified management, and flexibility for workloads in hybrid environments.
Optimized Protection for Hybrid ㆍMulti-cloud Environments
- Provides comprehensive visibility and easy management for workloads in on-premise and cloud server (AWS, Azure) environments
- Supports automatic identification for autoscaling cloud server workloads
Ahnlab V3 Lite Windows 10
Unified Operation and Management
- Delivers easy operation and management through a single, web-based management platform
- Supports quick and simple operations with Intrusion Prevention, Firewall, Application Control, and Anti-malware
- Provides integration with 3rd-party solutions via Open API
- Enables SIEM, ESM integration via syslog logging
Ahnlab Windows 10
Flexible and Cost-efficient
- Provides module-based CPP Management, which enables flexible configuration according to the business environment
- Saves cost by allowing selective installation and application of security solutions
Application Control
- Allows execution of trusted applications only
- Ensures system stability by providing various control modes
Anti-malware
- Provides real-time malware scan with minimal impact on resources and performance
- Supports manual and scheduled scan
Firewall
- Enables IP, Port , protocol-based network control
- Supports geo-IP blocking
Intrusion Prevention
Ahnlab V3 Net For Windows Server 9.0.exe
- Detects and blocks network intrusion attacks
- Blocks attacks within internal servers as well as attacks between external and internal servers
- Provides signature recommendation
- Supports IDS mode
0 notes
Text
Myanmar Mn Font Download For Mac
Myanmar Mn Font Download For Mac Os
Download Myanmar Font For Pc
Hi,
Downloads Zawgyi Font (MAC) Category Archives: Zawgyi Font (MAC) 30 Oct. ဖြင့္ပါ။ Library ကို ဖြင့္ပါ။ Fonts Folder ကို ဖြင့္ပါ။ Myanmar MN and Sagnam Font ေတြကို Right Click လုပ္ျပီး Trash လုပ္လိုက္ပါ။ ဒီအျပင္. Font Full Name: Myanmar MN Bold: Font Family: Myanmar MN: Font Style: Bold; Font Version: 12.0d2e2: Designer: Muthu Nedumaran; Foundry: Murasu; Source: Official; License type: Free for MacOS Use; The way of authorization is for reference only. Please contact the copyright party to purchase commercial authorization. Font Embedding Permission.
quick question: I have been asked by a graphic designer -working on Windows- to SEND HIM THE .TFF for the MYANMAR MN, Font that I used to compose the label that he will be printing soon.
Myanmar Mn Font Download For Mac Os
Knowing that Apple Mac has it's Fonts in the User --> System-->Library-->font location, I wa sable to download a .TTC, convert it to .TTF, and send it to my graphic designer. The problem is that the .TTF does NOT include all types of fonts (BOLD, ITALIC, etc), only the REGULAR.
How can I fix this issue? are there MULTIPLE FONT folders that I need to find, in addition to the one I found? Seems that .TTF is not reading the entire family of Fonts on the MYANMAR MN font....
Thanks for a prompt response😕
Mac mini, OS X Yosemite (10.10.2), LG 21.5' Full HD display
Download Myanmar Font For Pc

Posted on Jul 1, 2016 6:01 AM
1 note
·
View note