#I think cotton thread also has uses in quilting but that’s an entirely separate set of skills I do not have
Text
That post about using cotton thread for garment making drives me up the wall. Cotton thread fucking sucks. It’s not durable at all for every day clothing use. The only projects that you should be using cotton thread for 100% of the time is for things that are going to be exposed to high heat (ex. microwave cozies and pot holders) because it’s crucial that you use something that won’t melt. If you’re making clothes or costumes just use polyester. It’s fine. You’ll be fine.
#by all means go forth and make clothes using cotton and linen and wool for fabric!#just don’t be surprised when seams start popping because you were too good for polyester thread!#I think cotton thread also has uses in quilting but that’s an entirely separate set of skills I do not have
13 notes
·
View notes
Text
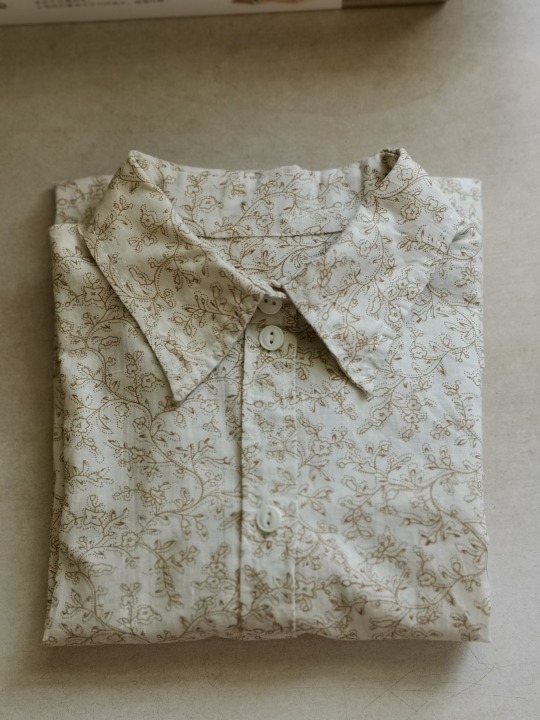
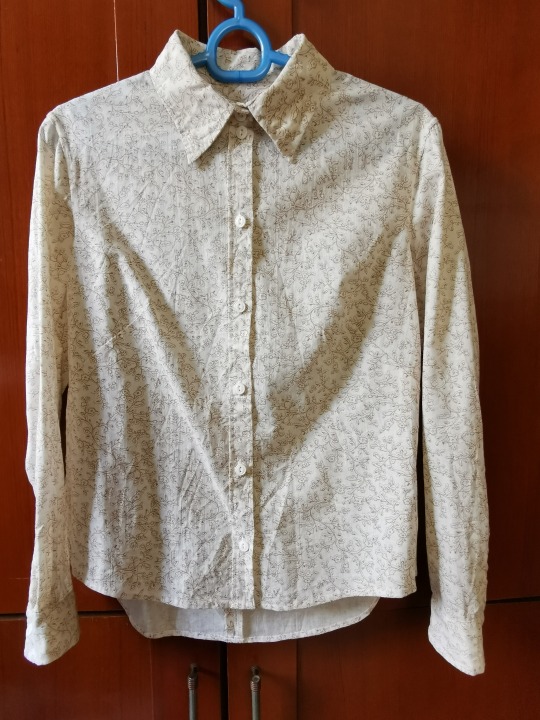
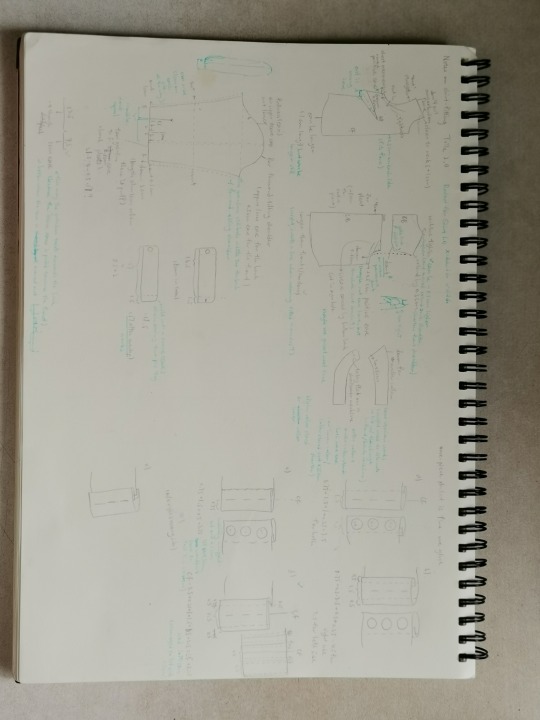
Yellow floral blouse, June 2019
(This post is the longest I’ve written for this blog. No one is obliged to read it except me. Apparently, I am required to read and re-read it and, well, think.)
Guess who just finished her very, very first standard shirt, with cuff plackets and collar stands and all?
I am so happy, and relieved! No matter how badly the first one was made, it is a starting point after all. I am definitely planning to sew more since I enjoy both wearing a proper shirt and trying my best to properly make one.
Shirts are so common and ‘basic’, which makes the quality of patternmaking extra obvious. I prefer my shirt to be sleek and practical, with a touch of femininity. It means that whilst the cut should be smooth and fitted, it must not impair with everyday motions such as doing my hair or reaching for a book across the table. Preferably also taking a nap at the desk. The pattern pieces also need to be designed in such a way that when they are sewn together, the stress seams can actually hold some stress—which I interpret to be the reasonable use of grainline and a good set of stitching techniques.
Since I’m only at the beginning of this quest and there is still much to learn, this post is going to be a reflection, highlighting the adjustments that has worked for me and attempting to offer solutions to the current issues.
But first, let me start with the basic information for my shirt 1.0.
Fabric
Cotton, with a very lovely yellow floral print. I have no idea if it is poplin, or lawn, or quilting cotton, or just the plainest plain weave. My local fabric stores often don’t have such labels, and even if there are, they might not be accurate. My grandma has never cared about the name of a fabric, and yet she made me dresses, trousers, and shoes that I wore one day after another until she decided that the fabric had suffered way too much friction to be mended. Sometimes it’s just an instinct when you roll out the fabric and feel it with your hands.
It feels like a good shirting fabric to me—medium weight, durable, and crisp. It was so badly off-grain when I prepared it for this project, but that was probably because it’d been carelessly thrown into a washing machine twice.
It was reclaimed from the very first piece of clothing I made (well, I cut it, my grandma sewed it), a robe à la française. Yep. That was such a wise choice for a first garment.
Anyways, I really love the fabric. Besides, it has been there so long, it properly smells like me.
I would like to also mention that the thread is cotton-wrapped polyester, in white.
Design
I wanted to have all the usual details of a shirt to make sure that I would get the basics right. At the same time, I also wanted to taper those details to be the most flattering base. Basic but flattering. Strangely, it does make sense.
Here is a list of elements that I decided to include in my shirt:
Loosely fitted waist but not too roomy, especially in the back.
Moderately tight collar with a collar stand (cut in separate pieces).
One-piece button band for the right front piece, rolled edge+invisible stitching for the left front piece.
Six buttons, with the third (from the top) situated on the horizontal line connecting BPs. One extra button on the collar stand.
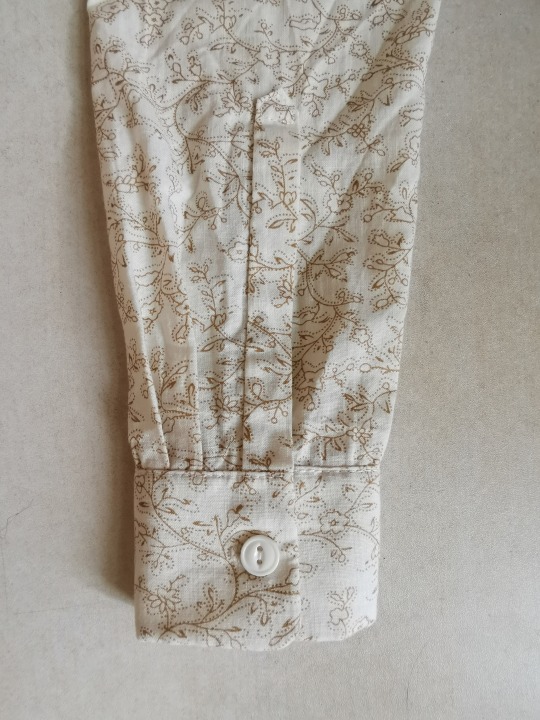
Two pleats per sleeve and a placket. Only one button for the cuff and no button on the placket.
One very slanted bust dart at each side, from the BP to the side seam.
Back yoke with self-fabric facing.
One inverted box pleat at CB.
Back hem ends lower than the front hem, with an overall soft curve.
Only topstitching when it’s absolutely needed, so one line on the back yoke seam and one line on each cuff.
…And here we go. The actual patternmaking details (and adjusting, and adjusting, and adjusting…) I will write in the same order as the sewing process, which is like this:
Bust darts
Back yoke and shoulder seams, using the burrito method
Side seams
Sleeves and cuffs
Sleeve seams
Armscye seams (set-in sleeves)
Button band, both sides
Collar ad collar stand
Hem
Buttonholes and buttons
(I start with a basic bodice block that fitted me okay but not perfect. My use of terms can be inconsistent and I apologise for that.)
Bust darts
My original block has two dust darts per side: one towards the shoulder and one towards the hem. I ignored the one towards the hem for that moderately loose fit at the waist. Then I cut open the dart towards the shoulder, and rotated it to the side. It slanted down instead of hanging almost horizontally. The angled darts were longer and probably less stable, but I liked that it sort of made my lines flow smoother.
I forgot to add an ‘angle’ so the edge of my finish dart did not line up with the side seam. I couldn’t hide the raw edge in the French seam when doing the side seams. Stupid, stupid mistake. Fortunately the edge of the dart was cut on bias so it wouldn’t fray, but it certainly could’ve been more stable.
Back yoke
(I did most alterations of the armscye before separating the back piece into two for the yoke design. My take on armscye fitting is described after the sleeve section below.)
I drew a horizontal line across the back to separate the back for the yoke, and it approximately connected the midpoints of the two armscye depth lines. My shoulder blades still feel somewhat restricted when I move my arms forward, so next time I will move this yoke seam higher up to make sure the protruding areas of the shoulder blades are below the yoke.
For the yoke, there was an inverted box pleat at the centre back. I pleated away 8cm for this. I have noticed that it won’t need to be this much if I widen the bodice (especially at the hem), but I’m not sure if I want to do that.
Shoulder seams
I followed the block and just extended about 1cm towards the CF and the CB, so that the neckline sat closer to my neck. I don’t normally like such tight necklines, but since this shirt has a collar and I don’t have to button it all the way up, it’s okay.
When I tried on the toile things seemed fine, but when I wear the finished shirt, I can see that the seams are placed too far backwards, which partially has to do with my forward-tilting shoulders. I do believe that the first step to solve this problem is to correct my posture, but next time I will bring the seam just a bit forward. Given the tightness in the shoulder area, I may only need to lengthen the back piece and let the front piece stay as it is.
Side seams
As I’ve written, I made the side seam on the front bodice almost vertical. It slanted a tiny bit outwards. Then I made the side seam on the back slant at the same angle. I would’ve preferred to have at least one side on grain, but I did have to accommodate the hip.
Sleeves and cuffs
I can’t believe that it didn’t even come to me that Claire B. Shaeffer wrote about shirt sleeves in her brilliant book Couture Sewing Techniques. As a result, foolish mistakes were made.
I drafted the sleeve myself. That is, I had a vague idea of what a sleeve shirt should look like and read a few tutorials on sleeve drafting, but none of them made enough sense for me to follow entirely.
The first thing is that I don’t understand why the sleeve centre (the grainline) needed to be, well, in the centre. I simply couldn’t get the grainline to divide the bicep line evenly. The forearm section was shorter than the back section because
the entire back half needed to be roomier so that I can bend my arm
the back part of the armscye had a deeper curve and thus was longer
the sleeve had two pleats at the back of the wrist seamline and the centre line should hang straight instead of twisting towards the back
my shoulder tilts forward so the centre line needed to be moved forward too
I think reasons #1, #3, and #4 are pretty solid, so I stand by my unevenly divided bicep line. Reason #2 does have some problem, and together with an exaggerated convex curve on the back of the sleeve curve it resulted in a slight dragline on the back of the sleeve. To solve this problem, I will have to adjust the armscye first and I will write more about it in the next section (armscye).
I made the wrist seamline straight and horizontal to the bicep line, without even a shallow curve. This was so wrong. The sleeve needed extra length where I pleated it, because pleats shortened the sleeve and also more length would allow me to bend my arm more comfortably. Next time, the wrist seamline will have a nice, rounded S-curve. The convex point will be where the back line hits the wrist, and the concave point will be where the forearm line hits the wrist.
I also included 1cm of ease for the entire wrist seamline. I realised that the distribution of this 1cm mattered a lot. In my first trial, I distributed it entirely in the front section of the seam, and as a result, the sleeve seam was pulled forward instead of staying in place on the inside of my wrist. In the second trial, I distributed the ease mainly in the back section with just a little in the front. It worked out much better. The back section ended up a little shorter than the front, which may have contributed to the slight twisting of the centre line (towards the back), though the sleeve seam stayed in place. Next time I will add more width to the back wrist seam to make sure the back and front sections can both have some ease and end up having the same length.
I need to widen the section from the elbow to the wrist in general. Currently I can write or read a book fine, but I must sit upright and I cannot take a nap at the desk at all (my ultimate standard).
If I keep my arm straight, I can raise it to form an approx. 80 degree angle with the side of my body without pulling up the shirt, so the width at bicep line is pretty good. I am not sure if how much extra underarm bulk there will be if I lengthen the bicep line some more.
Armscye
The most evil of all: the armscye. I don’t even know why it is so hard to fit armscye. The front section was fine, but the back section gave me a headache. It was so annoying to fit the back section because my very human body was not built in such a way that I could turn my head like an owl and inspect how everything hanged on my back. Anytime I did it for more than 30 seconds, I got dizzy as if I had had a carsickness.
There were two main problems: the first was that the mid-back section (where the yoke seam ended) had a gaping problem. I think it was partially due to my forward-tilting shoulders as well. I rotated the back shoulder dart to the yoke seam; this resulted in a little curve at either end of the yoke piece. I didn’t want to cut a curve on the back piece too since I preferred to keep the top edge of the back piece on cross grain. I thought my adjustment would be enough, but apparently the ‘dart’ could be a bit larger since the gap didn’t completely go away.
The second problem was that there was some wrinkles in the lower back section of the armscye. This problem remains unsolved and I’m a bit at a loss. It usually means I have made the armscye too snug, but I don’t feel like it’s too snug when I wear the shirt. (But to be honest the weather’s hot and humid, and my underarm area is currently sensitive due to hair removal treatments, so I am confused about whether the armscye is indeed too tight.) I have already made the lower-back curve quite a bit deeper than the original curve which I started with, so this might not be the problem. Maybe it can be solved when I solve problem #1, since the widened dart will pull the back piece upwards and thus eliminate the excess fabric which creates the wrinkles.
I think my back armhole might be curving too deep into the body. I couldn’t see my back so I don’t know the exact situation, but I think the upper part of the curve can be shallower, so it’s more like an L-shape than a C-shape. This way the arm movement is less restricted. I can maybe then make the convex curve on the sleeve less exaggerated and shorten the back curve a bit.
There is no wrinkle at the very bottom of the armscye, though, which means the armscye depth is enough. It’s just the shape that needs some more adjustment. I would like to keep the armscye depth as it is now to maximize the range of movement for the arm.
What I think I will do next time is that I will finish the whole bodice sans sleeves first (I have neither time nor material to bother with yet another toile), and see if my adjustments works out. I will adjust until it does, and add sleeves later.
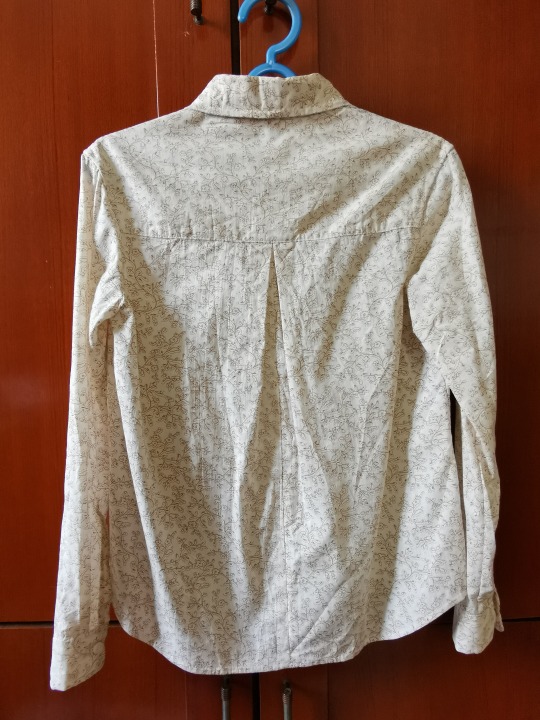
Here is the back view, which illustrates the massive problems on the armscyes and sleeves:
I understand that sleeves can twist when they are hung like this. However, the two sleeves aren’t twisting in the same direction, which means there must be some kind of asymmetry. It might be a tiny error, but the effect is obvious. My assumption is that when the fabric is tauter in the front than in the back, the sleeve twists forwards. If it’s tauter in the back, the sleeve twists backwards. This means there is a difference of ease distribution between the two sleeves.
The back of the armscye cuts into the bodice. I don’t think the curve needs to be this deep.
The shape of the bottom of the armscye and the corresponding part of the sleeve curve can use some adjustment.
Button band
I cut the buttonhole band in one piece with the right front bodice. After some calculation, I pretty much just added a 5.5cm-wide rectangle to the CF of the right front piece.
Because I sewed the shirt by hand, I was able to work with very accurate measurements and narrow allowances. I managed to increase the width of the front bodice by 1cm, by adding 0.5cm towards the CF on either side. It fitted well. I will keep this in mind.
The button side was done like a wider two-time folded edge, as usual.
Collar and collar stand
I read some tutorials and made my own adjustments. It worked out fine. When sewing the two pieces of the collar together, I tried using a tailor’s hem and my left hand to hold the two pieces in such a way that the undercollar was tauter than the uppercollar. This way the finished collar piece would naturally curve without wrinkling on the underside, and the seam wouldn’t be visible because the edge of the collar would be curving towards the body.
It is not enough to just use my hand to manipulate the fabric. I actually do need to cut the undercollar a tiny bit shorter than the uppercollar.
The same thing goes for the collar stand—the facing needs to be cut a little shorter than the outer layer for it to naturally curve around my neck. The problem is illustrated in the first photo of this post.
Hem
I was being tight on fabric, so I had only 1cm of allowance for the hem and did a narrow invisible hem by hand.
I usually tuck my shirt hem into a skirt or a pair of trousers, so a shorter hem is fine as long as it can be secured tucked in. However, I would like to have a slightly longer hem next time
Buttonholes and buttons
I followed the normal way of placing buttons. I had noticed that many shirts did not have a button where it was most likely to gap and result in awkward situations for a lady, so I placed a button there.
Overall, this is far from a perfect shirt worthy of the time spent on hand-sewing. However, I also gained an enormous amount of knowledge of shirt-making by slowly walking myself through this process. I went from having no idea at all to knowing what was considered good. Now I just need to figure out how exactly to achieve that.
13 notes
·
View notes
Last Seen Blogs
beaniebabydaily
Daily TY Friends

52hztrekking
52Hz

cherlloydmex-blog
Cher Lloyd México

theopossumhouse
girl help im trapped in an orb

ineffablyferalarchive
moved to @dilfcryptid