#ProxyUses
Link
What is a Proxy? Learn that, and What to Use a Proxy For!
1 note
·
View note
Link
What is my IP Address Used for & Other FAQS!
0 notes
Text
Nikto Web Scanner
Nikto is an Open Source (GPL) web server scanner which performs comprehensive tests against web servers for multiple items, including over 6700 potentially dangerous files/programs, checks for outdated versions of over 1250 servers, and version specific problems on over 270 servers. It also checks for server configuration items such as the presence of multiple index files, HTTP server options, and will attempt to identify installed web servers and software. Scan items and plugins are frequently updated and can be automatically updated.
Nikto is not designed as a stealthy tool. It will test a web server in the quickest time possible, and is obvious in log files or to an IPS/IDS. However, there is support for LibWhisker's anti-IDS methods in case you want to test your IDS system.
Not every check is a security problem, though most are. There are some items that are "info only" type checks that look for things that may not have a security flaw, but the webmaster or security engineer may not know are present on the server. These items are usually marked appropriately in the information printed. There are also some checks for unknown items which have been seen scanned for in log files.
Nikto can run on any OS which has Perl interpreter installed. It supports SSL,proxies,host authentication,attack encoding, IDS evasion.
Installation of tool:
Installation Of Linux:
Installation of nikto on Ubuntu 18.04 is pretty straight forward as the package is available on the default repositories. Thus, run the commands below to install nikto.
# apt-get install nikto -
Working of Nikto:
The basic nikto command line syntax is: nikto [options...]
-config+ Use this config file
-Display+ Turn on/off display outputs
-dbcheck check database and other key files for syntax errors
-Format+ save file (-o) format
-Help Extended help information
-host+ target host
-id+ Host authentication to use, format is id:pass or id:pass:realm
-list-plugins List all available plugins
-output+ Write output to this file
-nossl Disables using SSL
-no404 Disables 404 checks
-Plugins+ List of plugins to run (default: ALL)
-port+ Port to use (default 80)
-root+ Prepend root value to all requests, format is /directory
-ssl Force ssl mode on port
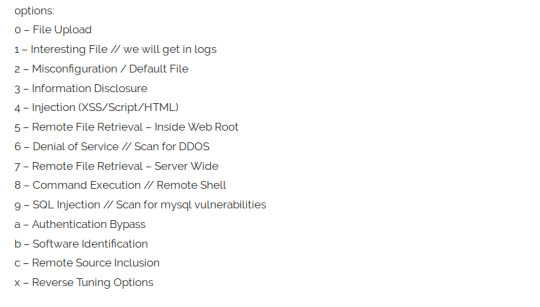
-Tuning+ Scan tuning
-timeout+ Timeout for requests (default 10 seconds)
-update Update databases and plugins from CIRT.net
-Version Print plugin and database versions
-vhost+ Virtual host (for Host header)
+ requires a value
Note: This is the short help output. Use -H for full help text.
Launching Nikto Web Scan
In this section, we are going to see how Nikto is used with various command line options shown above to perform web scanning.
In its basic functionality, Nikto requires just an host an to scan. The target host can be specified with the -h or -host option e.g to scan a web server whose IP address is 192.168.43.154, run Nikto as follows;
As you can see from the output, when the target host is specified without a port, nikto scans port 80 by default. However, if your web server is running on a different port, you have to specify the port using the -p or -port option.
See example below;
# nikto -h 192.168.43.154 -p 8080
Instead of using the IP address to specify the target host, URLs can also be used for example;
# nikto -h mydvwa.example.com
# nikto -h https://mydvwa.example.com
You can also specify the port when you use URL;
# nikto -h mydvwa.example.com -p 8080
# nikto -h https://mydvwa.example.com -p 8443
or
# nikto -h mydvwa.example.com:8080
# nikto -h https://mydvwa.example.com:8443/
As much as target hosts can be specified using the -p option, it is also possible to specify a file containing a list of target hosts one per line. For instance, you file should should contains the targets in the format;
less scan-targets
https://mydvwa.example.com:443/
192.168.43.154:8888
192.168.43.101
To scan these hosts at the same time, run the command below;
# nikto -h scan-targets
It is also possible to scan the hosts in a network listening on web server ports using Nmap and pass the output to nikto. For example to scan for open port 80 in a network, 192.168.43.0/24,
# nmap -p80 192.168.43.0/24 -oG - | nikto -h -
If you are going through a proxy server, you can ask nikto to use proxy by using the -useproxy option. You can set the proxy details on the nikto configuration file, /etc/nikto/config.txt or you can it on the command line as shown below;
To define the proxy server details in the /etc/nikto/config.txt file, use the format;
PROXYHOST=192.168.70.45
PROXYPORT=3128
PROXYUSER=username
PROXYPASS=password
When you have defined the proxy details as shown above, then run nikto as follows;
# nikto -h 192.168.70.128 -useproxy
To specify the proxy connection details on the command line;
# nikto -h 192.168.70.128 -useproxy http://id:[email protected]:3128/
# nikto -h 192.168.70.128 -useproxy http://@192.168.70.23:3128/
Nikto can export scan results in different formats; CSV, HTML, XML, NBE, text. To save the results in a specific output format, you need to specify the -o/-output option as well as the -Format option to define the output format. See examples below to save the scan results in html format.
# nikto -h 192.168.43.154 -o test.html -F html
You can therefore access the report via web browser.
Advantages:
Fast,reliable,versatile tool
Its written in Perl so it can be used in any operating system.
Its open source so it can be modified and extended as per user’s requirement.
Diverse output formats easy to integrate with other penetration testing tools.
Disadvantages:
It doesn’t have any particular GUI and it runs on command lines.
1 note
·
View note
Link
Encoding::Shift-JIS
$user = "" $password = "" $proxyhost = ":" $proxyaddress = "http://$($proxyhost)/" $env:http_proxy = "http://$($user):$($password)@$($proxyhost)" $env:https_proxy = "http://$($user):$($password)@$($proxyhost)" $env:ftp_proxy = "http://$($user):$($password)@$($proxyhost)" $password_secure = ConvertTo-SecureString $password -AsPlainText -Force $creds = New-Object System.Management.Automation.PSCredential $user, $password_secure $proxy = New-Object System.Net.WebProxy $proxyaddress $proxy.Credentials = $creds [System.Net.WebRequest]::DefaultWebProxy = $proxy $env:chocolateyProxyUser = $user $env:chocolateyProxyPassword = $password $env:chocolateyProxyLocation = $proxyaddress
choco config set proxy $proxyhost
choco config set proxyUser $user
choco config set proxyPassword $password
0 notes
Text
Confluence 6.0.4 Release Notes
The Atlassian Confluence team is pleased to announce the release of Confluence 6.0.4, which is a bug-fix release.
Issues in Release
Fixed: Update seraph.version to 3.0.3
Fixed: Update analytics.version to 5.2.20
Suggestion: Ability to modify the Synchrony heartbeat URL for Server
Fixed: fix class cast exception on MailEventServerListener
Fixed: Support both "synchrony." and the "reza." system properties for overriding the Synchrony configuration
Fixed: The Collaborative Editing Plugin may fail to start due to JS dependencies
Fixed: Confluence cannot connect to Synchrony configured with non-standard -Dsynchrony.bind or -Dreza.bind
Fixed: Setting proxyUser and proxyPassword in the catalina.properties file breaks web proxy configuration
Fixed: Adding hundreds of page restrictions causes error to appear in the UI when one more is added
Fixed: Against SQL Server, the subtreeCount REST endpoint can fail, causing the delete page dialog to get stuck on checking permissions
Source
0 notes
Link
What is a Proxy? Learn that, and What to Use a Proxy For!
0 notes
Last Seen Blogs

songlintcmhealthcare
Untitled

ninolovers
I Actually Kind Of Like You


inyourdreamscowboy
lexi

capofteareview
Чай и кино