#btw the white is so dark in my posts bc i have dark mode on sry for that
Text


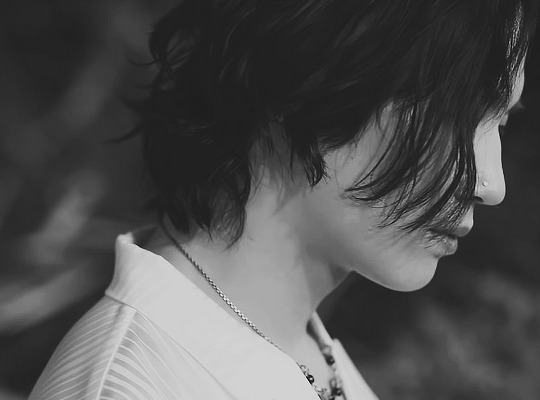
this might be the prettiest Eunyung Baek panel out there.
#i truly do believe so#might be bc this is one of those rare REAL smiles#he's so sweet#no home#no home wanan#eunyung baek#집이 없어#webtoon#btw the white is so dark in my posts bc i have dark mode on sry for that#IM AWAKE
56 notes
·
View notes
Text
#showyourprocess
From planning to posting, share your process for making creative content!
To continue supporting content makers, this tag game is meant to show the entire process of making creative content: this can be for any creation.
RULES — When your work is tagged, show the process of its creation from planning to posting, then tag 5 people with a specific link to one of their creative works you’d like to see the process of. Use the tag #showyourprocess so we can find yours!
thank you csenge @imdefs for tagging me to show how i made this set ✨
buckle up folks this is gonna be long bc min. character limit uni papers thought me a lot of things but def not how to be concise
01. planning
this was a long time ago but i do remember wanting to make something with overlays bc quite honestly i started working on this way too late and it seemed the fastest lmao. jokes on me i had 2 failed attempts and this also went through some changes along the way. initially i wanted to combine dye, bol and present:you... them being my fave eras for this lovable dumb man. so it would’ve been one pair for each gif.
02. creating
picking footage
so onto creating,, first things first the concept had to be changed bc present:you only had light shots so that had to be removed rip, here you can see a failed attempt at me trying to include it. this was before i started making proof on concepts for gifsets which later on saved me so much time... but not this time
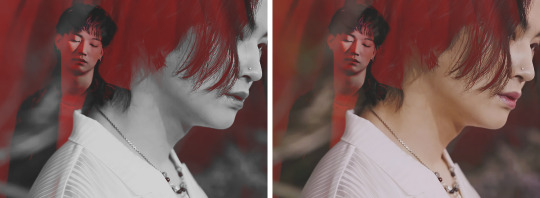
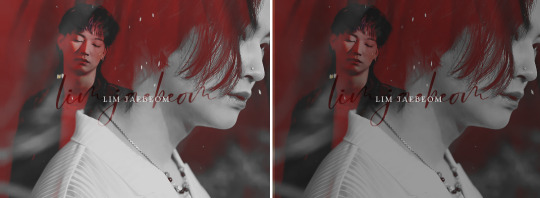
once i accepted defeat i had to reshuffle the shots and add some new ones but it was all good i was not losing braincells at all. so onto the real gifs, gonna show you the red one bc that’s my fave of the three.
making the base
btw i’m always working with timelines and smart objects bc it feels way easier than frames. so here we started with this jaebeom, and since the background and his hair it’s pretty dark those will be the parts which will be covered with the next gif. i made it black and white and also adjusted the levels a bit to make it a bit softer (lowered the whites and lightened the blacks)
for aesthetic purposes i always go for one close shot and one wider shot, then literally all i did was add the other gif on top, and set it to lighten. okay this is it that’s the whole process bye. oh we need the rest too? okay okay. so btw for a while i was considering making both of them coloured but then bw looked better when having all three gifs under each other, felt more like a ‘set’
now for this gif in particular i did not need to mask anything, shocking, but for the others i had to either blend the edges or make the bottom layer darker at some places to let the top layer show up a bit more e.g. for the second gif i needed a tiny blending like so (it’s the layer 1 copy 3 lmao)
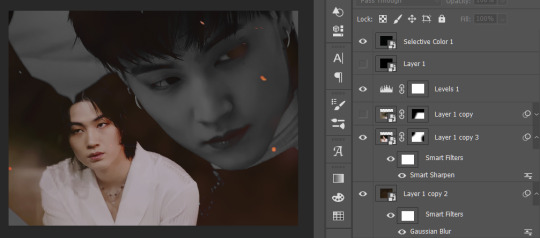
making the overlay bits
then we are basically done with the main part of the gifs, obviously i applied colouring to each inside the smart object. but i always like to add something extra on top which are usually two things: 1.) full overlay gif something blurred (literally any kind of footage.. i used leaves, water, space renders etc. so far), or a light leak, oooor a bokeh effect whatever and just keep it subtle. and 2.) some smaller moving bits which are usually sparkles, dust, stars, galaxy stuff etc. u get the idea. for the above gif this happens to be Layer 1 copy 2 rip. also in this case this overlay is actually this jaebeom footage blurred and with some colouring added on top of it to have this redish brassy tone (not me forgetting about this completely lmao) obviously it’s zoomed in and i’m using the top left part of the video blurred. look at me explaining my chosen gif with another gifs gahd i’m bad at this. anyways it just goes to show i use practially anything i can think of and just blur it.
for the full overlay footage i either go black and white and set it to overlay or soft light, whatever works best, or go coloured and set it to lighten again.... whatever blending mode works best. for this specific 2nd gif i went with lighten. for the smaller moving bits same tbh i just adjust the levels/curves to only show the bits i need when it’s set to lighten, i.e. i make its background more black so it won’t make the gif hazy.
adding the text
so anyways i add those on top so it’s not boring anymore,, practically just concealing the fact that all i‘ve really done was adding a gif on top of another and set it to lighten rip. oh yeah we have the text layers, nothing fancy here: for the script i used Challenge and the serif is FogtwoNo5. For the script i sampled some red from the background and just set it to overlay, and for the serif i just went with full caps adding some extra kerning bc one: for full caps you always need that, not this much lol, and two: it just looks better okay.
last touches
then i added a levels adjustment layer because i felt the gifs were a bit brighter than i wanted, so we ended up with this
saviiiiiing
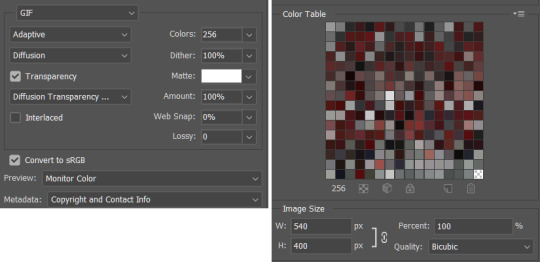
oh my gahd we are almost theeeere, for saving gifs here are my settings, i did not have to tell photoshop which colours to use luckily so it was an easy process.
03. posting
eeehmmm posting... yeah nothing exciting? i just save it in my drafts check it on mobile, and if something is really messed up i’ll change some colouring and saving settings, but this was a fairly ‘easy’ gif for tumblr to compress decently so none of that.
if you read this far bruh.... i don’t think i’ve made sense anyways thank yooouuu 💕
and the five amazing CCs i’m tagging are
🎬 dear wifey, rosie @se-jun for these victon posters which i definitely did not make her choose and we ended up with the same i would’ve chosen
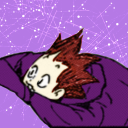
🌈 vivi @yeekies for making a rainbow from the mostly yellow blob that is the fireworks mv
💙 yv @woodzm for this beauty where the blues are colourmatched so well it makes me mad
🌸 lotta @halahala for this miracle of a gifset which made me not despise pink
🌈 bridget @lilacwoo for this 12/10 rainbow right here because apparently i like rainbows. shocking.
feel free to ignore and all them usual stuff
#tag game#showyourprocess#gif tutorial#i guess#ps*#hahahahah also let's all ignore the fact i told csenge i'd show her how i make these things and then i completely forgot about it#sooorryyyy im so dumb
38 notes
·
View notes
Text
show your process
To continue supporting content makers, this tag game is meant to show the entire process of making creative content: this can be for any creation.
RULES - When your work is tagged, show the process of its creation from planning to posting, then tag up to 5 people with a specific link to one of their creative works you’d like to see the process of. Use the tag #showyourprocess so we can find yours.
I rarely keep my psds or keep record of my process but luckily I saved the ones for these edits. Depending on how lazy I am it takes me between 2 hours and a week to finish a full set.
I don’t exactly remember each step but here are layer by layer breakdowns of the final product of the first gif i made for each set.
Explanation down below
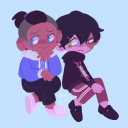
@essercipertuttienonperse tagged me for this Miss You edit

and @letsbealone-together tagged me for this Defenceless edit

I chose not to question the difference in quality between these two btw.
Planning
i rarely plan tbh i just go with where the editing takes me with the first gif. bc once i have the first gif down it’s just a matter of making the others match to have a cohesive set.
Choosing the clips to gif + lyrics
Since these two gifsets are song based it was relatively easy to choose the clips because I’ve identified specific shots before that would fit a certain lyric.
For Miss You I used clips from the mv, the royal variety performance and the x factor performance. + maybe i miss you
For Defenceless I used clips from wmi mv, miss you mv and walls mv. + 1st verse.
Making the gifs
I don’t want to turn this into a giffing tutorial rip, but i basically follow a very basic gifmaking routine and use 2 actions for loading and sharpening. (most of the giffing guides i based mine on can be found here.
But it goes: loading > cropping > sharpening > base colouring.
For refence, I either use PS CS5 or PS CS6.
For Miss You: 540x300 px | For Defenceless: 540x400px
Sharpening settings: smart sharpen twice (500/0.4 + 10/10) + gaussian blur (blending 30% opacity)
The base colouring is mostly there to brighten and colour correct the gif. For that I mainly use curves, levels, colour balance, selective color and vibrance.
For particularly dark shots I use a trick I learned from @stardustony using white color fills and b&w gradient map.
Colouring-Colouring
This is where the fun begins.
Sometimes before even beginning I have a dominant and accent colour in mind, but more often than not the final result is very different from the first round lmao.
I use multiple layers of selective colours to get everything to match and get what I want + different blending modes.
For Miss You i knew I wanted blue and red/orange, so it was a matter of bringing out the cyans and reds of the scenes without making it too grainy.
For Defenceless, the colour choices were based on the colours Nyx associated with the song, in this case pastels, blue, pink and yellow/beige.
+ Additional step for this gif because it was an experiment: i added an empty layer at some point, painted on it with big brushes of blue and peach, then set it to substract to get that rainbow-ish effect on the water.
Adding text
I choose the fonts:
For Miss You --> Gobold Bold (regular) 18pt/36pt
For Defenceless --> Kiona 7pt, Boiling Demo 18pt, Amalia 36pt
Then I add inner + outer shadows to the text.
Then for colours I usually just add two layers with random colour gradients as clipping marks on each text box OR change the font colour and play around with blending modes
Then placement, depends on the vibes lbr
The boxes
Shape > Rectangle Tool (make the box, choose size, stroke, fill)
For Miss You : we have a dashed box thingie going on + the b&w/colour separation
For Defenceless: the box lines are lyrics hehe, i actually forgot how to do it, but it involves making the text follow the path of the lines of the box using the direction selection tool.
Exporting
Save for Web (Alt + Ctrl + Shift + S)
Selective or Adaptative, Pattern, Bicubic
Drafting
To check if the gifs are cohesive, arrange placements and check if the colouring is ok on different devices. I also send the links to friends to see if it’s ok.To add caption (html + edit fiddle)
To add tags: generic tags for louis edits + user tags + tag i use for my edits (usually louis tomlinson, louisupdates, tracksintheam, belletracks, *mine)
It’s also a hack to avoid no showing up in the tags.
Posting
I either let the gifset rot for weeks before I post it, or post it right away because I can. Some people schedule for specific hours for maximum engagement. I only schedule self-reblogs for after posting, 12 hours after, then 9pm my time, then 3am.
Bonus: camping in the notes of my own gifsets for the two first days.
Tagging people some oldish edits I really liked, don’t feel obligated to:
@stanwalls for this pink gifset
@stormyhale for this edit
@tomthenetherlands for this edit
11 notes
·
View notes
Last Seen Blogs
rinandyukiookumura15
Sokka and Zuko2098

leiasfanaccount648
you only live once

nhonhoinewcitybinhdinh
Nhơn Hội New City 2021 Bình Định
billshargrove
lavender haze
warriorteam1924
bassists do it deeper