#from the very realistic and detailed to the quick messy-in-a-great-way sketches
Text
I will not resubscribe I will not resubscribe I will not resubscribe I will not
#käärijä#khaarija onlyfans#unless he wears a bra or something... then I might crack lol#or if he got Tommy to participate.. I'd be curious about that#or if he finally kisses Hä#also thank you so much to everyone providing descriptions it's lovely#so the rest of us don't have to be as frustrated hahah#and thank you to the amazing artists in this fandom drawing the pics so we can see the essence of the posts#you guys are fast as fuck and super talented and I appreciate you#love all your interpretations#from the very realistic and detailed to the quick messy-in-a-great-way sketches
18 notes
·
View notes
Text
The Demon Brothers: Creative Outlets Headcanons
they are all immortals and when you've lived longer than you can remember, you're bound to find a creative outlet to destress, alleviate boredom, or you know, to just have fun!
Lucifer
He’s a busy demon. If he’s not working, he's sleeping, or cleaning up one of his brother’s messes, so he doesn't have that much time to just relax and explore his creative sides.
That said though, it doesn’t mean he has no hobbies at all.
He plays the piano. He used to play it every morning, back when he’s still in the Celestial Realm, when he’d taught Lilith how to play the piano every morning and she’d sat besides him as his fingers moved across the keys slower so she could copy him.
Nowadays, playing the piano feels very nostalgic and bittersweet, but you’ll hear soft, bittersweet melodies drift from the music room once in a while.
He also composes his own music, but that's an even rarer occurrence. The last time he created a new music piece was centuries ago.
(Ever since MC came to Devildom though, he's been itching to write music for them.)
Practices calligraphy for fun. He has a whole set of brushes and ink and lettering pens. His handwriting is already beautiful but his calligraphy is even more amazing.
Another thing he does is gardening. He's got a great eye for landscape architecture, he's the reason why the house's backyard is pretty.
He plants decorative plants and likes to cross breed flowers so the House of Lamentation's backyard is full of pretty shrubs and unfamiliar flowers.
He is usually joined by Beel as he is the other brother that finds gardening very relaxing.
Mammon
He definitely shows his creativity by coming up with the most absurdly brilliant, out-of-the-box, original schemes to make money.
Mammon can draw, like really good. His drawings are very realistic. He prefers to use traditional media: charcoal pencils, graphite sticks, blenders, erasers, drawing pens, brushes, and maybe some watercolors.
He usually does architecture sketches.
But if you check his drawers, you’ll find several sketchbooks of his brothers in different candid poses. MC alone has taken up three whole sketchbooks. Mammon makes sure MC doesn’t see those sketches though.
Crashes Asmo’s Art Day regularly, claiming that if Levi’s invited then the Great Mammon should be too. Asmo and Levi always complains but they let him stay anyway.
Mammon also has a natural talent on jewelry making and metalwork. He makes jewelry from buttons, beads, pearls, diamonds, and crystals. From small pendants to elaborate neckpieces, simple anklets to ornate hairpins.
Mammon has made metal bookmarks for Satan because the book lover always misplaces his bookmarks or destroys them in fits of rage when he doesn't like a book's ending.
He sculpts wood. It takes him months to finish one small piece because he only does it when he's really, really bored, he prefers to make his much more profitable jewelry.
He keeps all of his sculptures in his room, small and detailed pieces of wood engraving of Devildom native animals lining up on one of the shelves.
Leviathan
This is canon but he draws! He doesn't think he's very good at it, but he really enjoys it.
Unlike Mammon who likes to draw with his charcoal pencils and drawing pens, Levi prefers to draw digitally. He still switch to traditional media now and then though.
Has a monthly scheduled “Art Day” where he and Asmo hang out together, Levi draws with his sketchbook or his drawing tablet and Asmo paints. They basically just gossip and hype each other’s art.
Dabbles in making short animations but feels like it’s just not something for him. He makes short comics though.
He wants to be able to make his own video game someday though. Maybe after he learns programming.
He makes the most detailed cosplay outfits for his own cosplays. He sews really good and patches his brothers clothes when they ask. Where do you think Asmo learns how to sew his own clothes from?
Really good at dancing and he really likes it too. He's a natural at it. From the most intricate traditional Devildom dances to freestyle dancing. He can make new moves on the spot and can copy any moves from one look.
He’s a shy baby though, you’ll rarely see him dance when he’s sober.
Except when he’s playing DDR (Demons Dance Revolution). Then, it’s like he’s the most confident demon in Devildom.
Satan
Satan writes poetry when inspiration strikes him. He has also written short stories but he always comes back to creating beautiful poems. He’s got a way with words.
Photography is something he has only recently taken interest in but he has a great eye for taking breathtaking shots.
Has become the family’s go-to photographer.
“Satan, take a picture of me and Mammon!” “Satan, take our picture, quick!” “Satan, help me get a picture for my Devilgram!”
He’s the reason Asmo’s Devilgram pictures always look like they’re taken professionally in a photo studio or something.
Satan loves art, likes to stroll through museums and stare at paintings for hours, but has little talent in creating them. Even so, he still likes to paint even if he's not good at it.
Sometimes he just wants to slap paint on a canvas and make a colorful mess. It's fun.
He joins Art Day every other month.
Another thing he does is knitting! It relaxes him. It gives him something to focus at when he's angry (um, angrier than usual), just to give his hands something to do that doesn't involve breaking anything. The simple patterns he makes are easy enough that they don't frustrate him.
Rarely ever finishes his knitting though, you'll just find this 5 meters long knitted fabric in one corner of his room with the ends coming undone because he calms himself down enough to stop knitting.
Asmodeus
Regularly designs, cut, and sew his own clothes.
Has a lot of sketchbooks full of drawings of flowy dresses and stylish coats and many aesthetically pleasing shirts.
He has started his own clothing line and sometimes collaborate with Majolish.
But for the most part, he designs clothes for himself and himself only, he doesn't want anyone else to wear clothes as fabolous as his.
Nail art? Nail art.
Asmo paints all of the brothers nails and sometimes he'll persuade one of them to let him do a complete manicure, with glitter polish and shiny studs and all.
Yes, even Lucifer. You just never see the results because Lucifer wears his gloves almost all the time.
Asmo creates beautiful makeup art. He doesn't really like a lot of makeup on his own face though, so his brothers' faces are his canvases.
He also has a great eye for interior decorating and flower arranging. He restyles his room every month.
Not many people know it but he paints. And he's very good at it. He has done a painting of each brother, the paintings can be seen on the walls of the House of Lamentation's hallways.
Art Day with Levi (and sometimes Satan or Belphie) is spent with him in front of canvases, chatting with his brothers, paint splatters on his hands. It's the only day that he doesn't mind looking a little messy.
Beelzebub
He cooks, of course! And bakes too!
It's one of the times he’s willing to wait to eat because cooking the ingredients first rather than just straight up eating them will make the foods taste better.
Half of the food in the kitchen are his creations. Anything he can make on his own from scratch, he will; jams, ice cream, sauces, juices, bread, chips, etc.
Likes to experiment and always do something different than the original recipes.
He garnishes his cooking like it’s something you order from a five star restaurant.
Beel is another demon who has a green thumb. He likes taking care of plants and doesn't mind getting a bit dirty doing it so gardening is another hobby of his.
If Lucifer plants ornamental plants, Beel grows useful plants like herbs and vegetables and small fruits. He's also good at topiary.
Always has an idea for a DIY project.
His creations is scattered all over the House of Lamentation. Belphie's drawer divider is made out of yogurt cups. Broken drawer knobs recycled into Asmo's jewelry organizer. The coat rack. The bathroom towel holder.
Even Lucifer's hanging Demonus rack is handmade by Beel when he's bored one weekend, with Mammon's help for the engraving decorations along the sides of the rack. Beel's got a bit of Bob the Builder in him.
He is very good at singing. His voice is clear and he has a broad vocal range. Has been caught unconsciously humming in class many times.
Has definitely sang Belphie to sleep.
Belphegor
Does his pranks counts as a creative outlet though?😂 Between him and Satan, Belphie's ideas are the most creative and out of the box, resulting on some of the best pranks they did.
Belphie does origami. It's relaxing, easy enough to learn, and doesn't take much effort and energy to do it.
Has stacks of origami papers in his room: standard origami paper, foil paper, traditional Washi ones, the leather-like Momigami paper, all kinds of paper.
He especially loves to make little origami stars and keeps them in glass jars in his room.
Belphie also has adult coloring books.
And kids coloring books.
Coloring is relaxing to him. It's very calming to just lay down and fills a page with pretty colors for a while. It's not a tiring way to destress, he can color without moving from his bed, and it feels satisfying when he finishes a whole page.
He sometimes joins Art Day if he's not too lazy to move. Still prefers to color alone where it's quiet though.
He also journals. It's another thing he can do that is inexpensive and not energy consuming. He writes about anything that comes to his mind, his thoughts, his ideas, memories.
Definitely keeps a dream journal.
Also I headcanon that as the Avatar of Sloth, sleep and dreams are some of the things he can manipulate. He enjoys creating dreams; the worldbuilding, the story, the details. He can be really creative when it comes to making them, spinning the most vivid and imaginative dreams.
They’re not necessarily good dreams though. After all, he is still a demon, his dreams will most likely mess up your mind than make you smile in your sleep.
#obey me#obey me swd#obey me shall we date#obey me headcanons#obey me lucifer#obey me mammon#obey me leviathan#obey me satan#obey me asmodeus#obey me beelzebub#obey me belphegor#rol writes
430 notes
·
View notes
Text
How Stefano Turconi uses details to enrich a universe
I have mentioned in previous posts that I am a huge fan of comic artist Stefano Turconi’s work. His work includes stories for the Italian Topolino (”Pippo reporter”, “Pride and Prejudice”) but also independent projects (e.x “Il porto proibito”, “Tosca dei boschi” and many others) go read them they are amazing
As an artist I was really curious to understand what was this element that drew me so much to his work
So, I did a little bit of a study and came to a conclusion:
Apart from all the technical parts that made his work appealing (e.x smooth lines, cartoony style, great panelling) it was his use of details that captured my interest
Especially, the way he uses details to enrich the universe in which the story takes place or to reveal more about the characters. His work embodies the “show not tell” philosophy perfectly
It’s true that many artists do this (with Don Rosa being the first one to pop into my mind) and they are all great but Turconi was the first one (not the only one though) that I noticed doing this in disney stories and I personally think that his details have a different charm
So let’s examine this case!
I will take as an example the comic series “Pippo reporter” (Goofy reporter) written by Teresa Radice and drawn by Stefano Turconi because it’s a series I love and also the first one I noticed this phenomenon in
Quick recap: It’s kind of a prequel to existing lore with Goofy being a reporter in the ‘30s before he meets Mickey with many known disney characters making appearences (I plan to write a review soon)
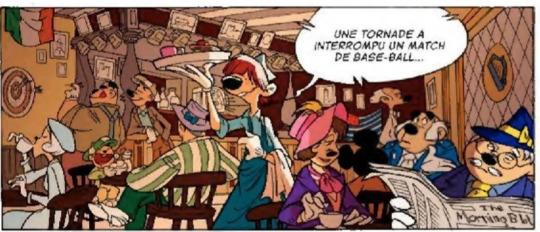
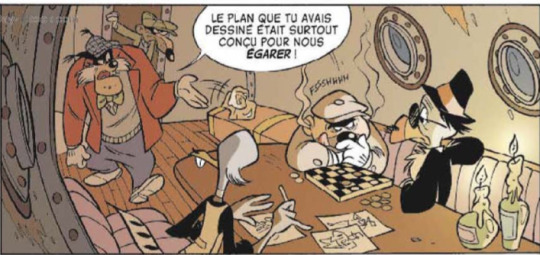
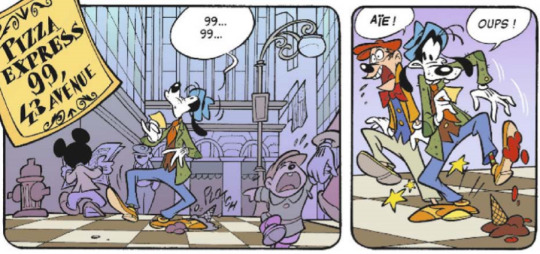
♦ Turconi makes sure to establish the context of the story via background.
There are multiple little stories taking place at once making things more realistic and helping the reader realise that there’s always a bigger picture
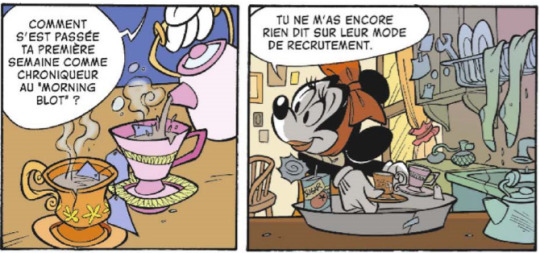
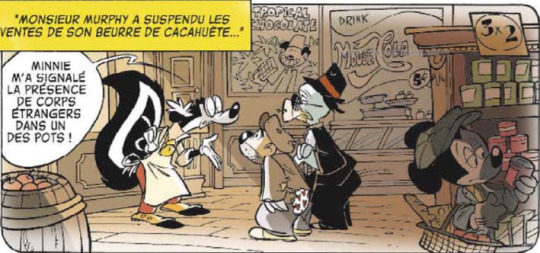
♦ He uses details to reveal more about the characters
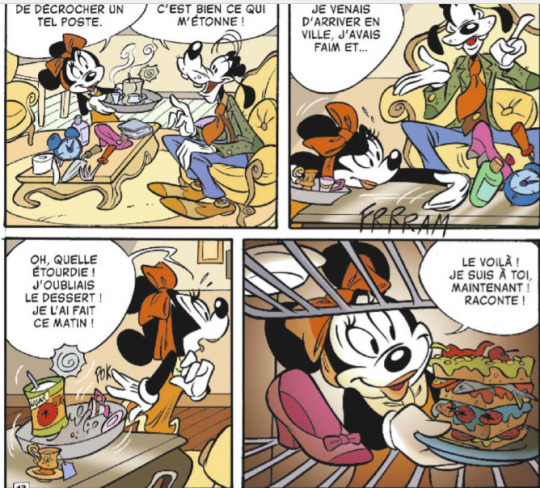
For example, Minnie is supposed to be messy and disorganised. Take a look at the table. There are gardening tools and even a shoe (with the other one being in the fridge!). Also, notice how she keeps sugar in a tomato soup can.
She puts flowers in a watering pot. But in this series Minnie is also inventive and smart so despite the mess the way she puts her things is functional
Sugar in a can? Weird but functional!
Flowers in a watering pot? A paradox but functional!
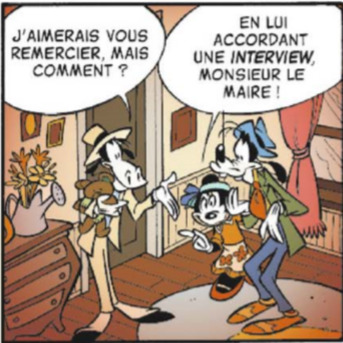
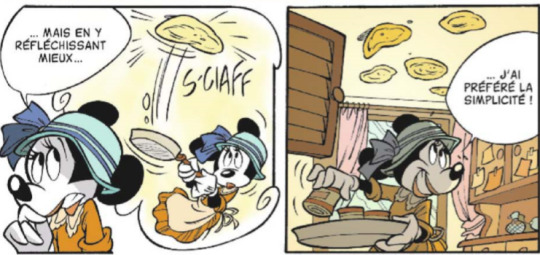
Another example:
Rick Chick, the fashion designer, keeps working and sketching outfits when the gang is not on a mission
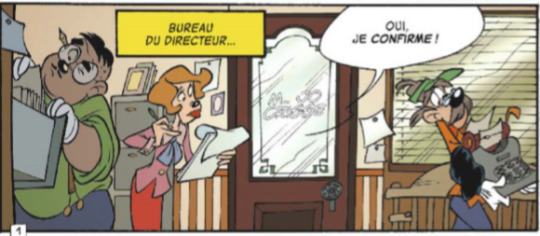
♦ Things stay consistent with a sense of continuity
Notice the garter holding the curtain (weird but functional)? The perfume near the sink?
Five pages later, they are STILL there!
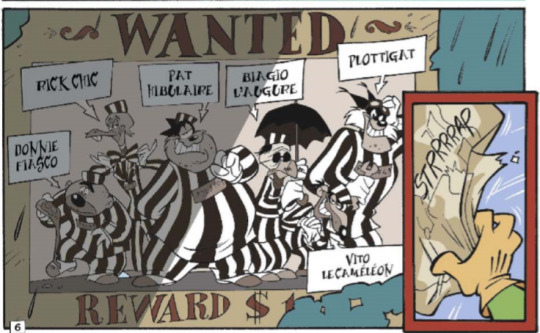
The wanted poster that gets ripped?
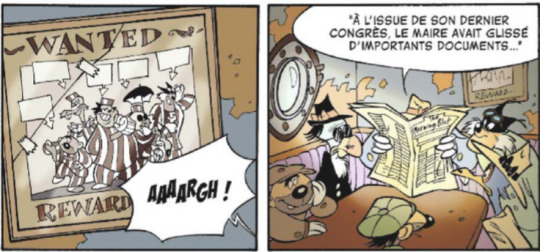
Ends up framed in the villains lair!
These are element that add to the story even if they don’t have a critical role to the plot. They help build a universe and specify characters’ traits (e.x through the poster situation we understand that the bad guys are very proud of themselves)
Another example:
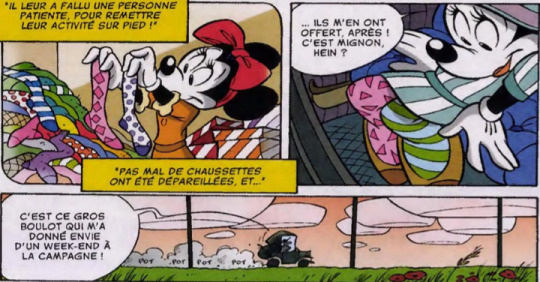
Minnie mentions getting all the mismatched socks from her work
She keeps wearing them until the very end of the story, there’s no “the artist forgot about it minutes later”
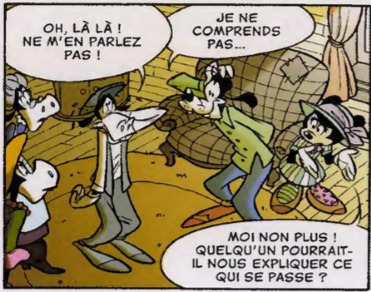
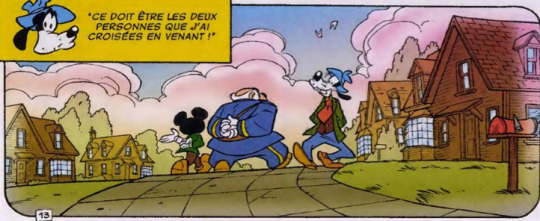
♣ The irony
One of the series reccuring gags is the fact that Goofy and Mickey always fail to meet despite Minnie’s fair attempts
So Turconi sneaks Mickey around all the time even though he is not a main character
These are some of the details I noticed and deemed worth sharing (I’m sure more will follow along with a review of the series)
More about Stefano Turconi and Teresa Radice’s work here: http://stefanoturconi.blogspot.com/
#not duckverse#stefano turconi#teresa radice#mickey mouse#pippo reporter#topolino#analysis#mouseverse
64 notes
·
View notes
Photo
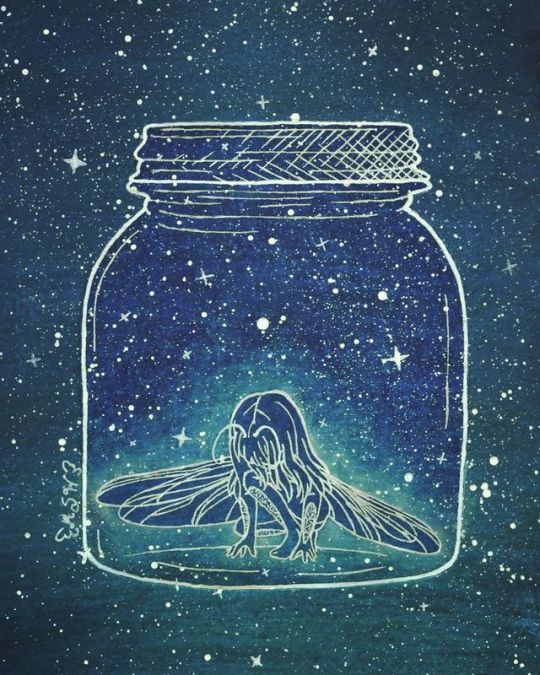
Bug Girl
My WIP Wednesday! piece is all finished!
(Warning: LOOOOOOONG description about the art process ahead! )
I don't think it's terribly obvious for a number of reasons (at least not at first), but this piece is actually a bit of fan art/inspired by How to make Friends with the Dark by Kathleen Glasgow, which I finished reading Monday night--Though I actually started this piece a couple of days before
There's a concept that gets brought up a few different times in the book of the main character Tiger imagining a "bug-girl" in a jar, usually to help visualize her emotions to us, the audience. This concept really resonates and stuck with me even before I finished the book, and thus I was compelled to draw it.
Technically the way I see that concept in my head looks different from what I've done here, so sometime in the future I may take another stab at it, but for this time I wanted to strengthen the connection between the bug-girl concept and the book, so visually I modeled the overall aesthetic largely off of the book's cover; white lines and white dots on a dark blue background that has a slight gradient at the bottom. The gradient on the cover is more subtle and is more on the lines than the background itself, but I took artistic liberty on that to make my life a little easier.
My original plan was to do the background with watercolor, do the lines digitally and print them out (since I had some kinks in the sketch I wanted to experiment with digitally instead of doing a lot of additional drawing and erasing) and then use my lightbox and a white gel pen to trace directly on top of the watercolor, then splatter away with some white ink. But of course, things can never be that simple.
The way I see it in my head, the bug-girl has, well, bug eyes, but for this piece, I didn't want to lean too heavily into the "creepy" factor, given it doesn't really fit with the content of the book (which is a great read if you like realistically heavy YA novels, by the way) so I angled her head down and her hair covering her face to keep from having to make the decision on whether or not I wanted to go with that look. And additionally to do proper bug eyes (at least the kind I was imagining) would've involved a lot of tiny circle/cell shapes, and I imagine that would've made things feel too crowded or would have blended into the splatters/background in an uncomfortable way.
Additionally, I was going to have her wings raised behind her, but after playing around with a few different references and positions in Photoshop (knowing full well I was not happy with the original wings from the sketch that I completely free-handed), I felt like this more asymmetrical, lowered position and dragonfly-type structure just looked better and fits better with some of the movements of the wings described in the book (using them to cover her eyes, etc.) which in most cases aren't technically plausible with normal bug wings.
My first real problem was with the jar. Realistically, it needed to be tall enough for the girl to stand at full height at least. And in theory, probably a little bit higher so it would be more comfortable overall and so that in theory she wouldn't just stand up and be able to push the lid off. But I was having issues with the sizing because the jar could only be so big so that A. it would fit comfortably on my paper and B. if it was too tall, the empty space between the top of the jar and the girl would noticeably awkward. So I fiddled with that for way too long and ultimately, it's probably too short, but the size balanced is more comfortable to the eyes, I think. (I also added the cross-hatching to the lid to make it more obvious there was a lid since originally it just kind of looked like the jar had a very wide lip.)
I also gave her a set of antennae, and after trying the concept of segmenting her whole body to be more bug-like (which was way too many lines everywhere) I decided to add some plates on the front of her forearms and calves. It's not much at all, but I didn't want to stick solely to traditionally "fairy" imagery since she's a bug-girl, not a fairy, but in this lines-only format, there was only so much I could do and still get the proper impact I was looking for.
Speaking of which...
I did a lot of swatching and testing of my various watercolors that I have on hand to A. get the colors I wanted right, B. practice my blending of two colors with more paint than water since I wanted very dark, opaque colors, and C. test if my lightbox would even work under the thick watercolor paper and the actual watercolor. However, I made two errors in judgment during the testing:
1. The areas I swatched to test were considerably smaller than the actual size of the area I wanted to cover and even with my biggest brush when I went to do a practice go I very quickly realized that was going to take an absurd amount of paint, time, effort, and I was very likely to run into some blending problems with the gradient. (So, in summary, half-pan-sized watercolors and mostly small brushes are not great for very large areas)
2. Once I realized the above, (and I had already done two very quick tests with alcohol markers and that idea almost immediately went out the window for the same issue) I had to switch course and ended up using some water-soluble pencils (one Arteza Woodless Watercolor Pencil for the dark blue and one Derwent Inktense pencil for the dark teal at the bottom) to lay down the color for the background and then wet them down to smooth out the color. Which turned out pretty nicely, especially once they dried. (I was a little worried at first since while still wet it was looking kind of patchy and weird )
The problem with number 2 is that after it had fully dried (aside from the paper curling pretty badly since it was in a sketchbook and I didn't think to tape the edges of the page down before taking water to it, which was mostly fixed pretty easily by wetting down the back of the page and sitting a very heavy box on it while it dried overnight) when I went to use the lightbox, the pigment from the water-soluble pencils was noticeably more opaque than the straight watercolor tests/swatched I had looked at previously. It wasn't so opaque that I couldn't see my lines underneath at all but it was opaque enough that a lot of the smaller details wear really hard to see. And thus I had a pretty big problem on my hands.
What I should have done was trace the lines in black on the blank paper first so they would be more likely to show through the pigment in the first place and there's a good chance that would've fixed the problem, even if I still needed the lightbox to see those lines perfectly. But hindsight is always 20/20 so that knowledge didn't really fix the matter at hand.
I knew pretty instantly that I didn't want to try tracing the lines onto another piece of watercolor paper and trying to color matter since I seem to always have majorly noticeable issues with that, especially when there's a gradient involved, and also because I knew when I scanned it in it would be fairly obviously there were two layers of paper instead of one because of how thick watercolor paper is. I also knew alcohol markers were out because, again, color matching issues with the selection available to me, and also from some of my much earlier testing with trying to get the specific gradient that I wanted.
That left me with colored pencils.
And thus I went through the five different sets I use enough to keep where I can easily access them (I have others I don't like as much that would've just been a waste of time) and started swatching colors on a piece of the same paper I had the lines on and then held them up to the background to color match as closely as possible. I ended up picking one dark blue and one dark teal each from both my Prismacolor and Polychromos sets since the blue from the Prismacolor was closer but the teal from the Polychromos was closer but they were both slightly off, so to keep the texture consistent I mixed both together for both colors. This ended up being a very good idea in hindsight because I finished off with a final layer of the Polychromos and that kept my white gel pen from having the problems it would normally have over straight-Prismacolor pigment. (Since Prismacolors are wax-based the wax usually clogs the pen tip very easily; the Polychromos are oil-based, so the oil created a slicker layer between the wax and the pen).
And all I did was use my lightbox to see the black printed lines through the colored pencil as easily as possible and went back over them with my white Sakura Gelly Roll, then I went back and outlined the jar and the lid specifically with my white Uni-Ball Signo, since the ink is slightly brighter and the nib is larger.
Once that was all done to my satisfaction, I cut out the girl in her jar and placed it on the watercolor background with some double-sided tape I picked up the day before from DollarTree, clipping a few edges so they'd be as flush with the edges of the paper as possible. And I figured that would be a better idea than glue because the glue had a very good potential of being very messy and leaving notable marks. The tape was just a safer bet. And fortunately, the paper laid pretty flat, save for a couple of spots I either missed because I applied the tape by lifting up the edges so I wouldn't totally lose my placement or up by some of the nooks and crannies that make up the ridges at the top of the jar that were just too small to do individually. And there is one spot where that tape wrinkled on me, but it's fortunately not terribly noticeable in the final product.
Then I made a paper mask for the girl inside the jar and got to move on to the slightly more fun part; I dipped a paintbrush in some white ink (white ink as opposed to white watercolor because I was concerned the water part might cause some reaction to the existing watercolor background that I didn't want and I was a little concerned it would make the non-watercolor paper that the girl and the jar were drawn on warp) and started tapped it against another paint brush to get splatters everywhere. I masked the girl since I was pretty sure she'd blend in too much if she got splattered too.
After the ink was dry, I removed the mask and went in with the white Gelly Roll again to make some stars here and there; mostly just because I wanted to since the original book cover only has dots.
I left it at that for the night since it was almost 3 and I was tired, but I came back to it the next day and racked my brain for a bit since it felt like it was missing something.
I ultimately ended up putting the mask back on the girl and used my pastel blue PanPastel to create a glow effect around her.
After that, I scanned it and did make some minor adjustments in Photoshop (mostly color correction, but there were a couple of black lines of shadow around the edge of the jar since it was still a separate piece of paper on top of the other one at the end of the day. And here we are.
It's still not perfection, but I am ultimately happy with it since I think I got the look I was after in the end. Plus, I think I capture the spirit of the original book cover's style pretty well
____
Artwork (c) me, MysticSparkleWings
I do not own How to make Friends with the Dark or the cover art
____
Where to find me & my artwork:
My Website | Commission Info + Prices | Ko-Fi | dA Print Shop | RedBubble | Twitter | Tumblr | Instagram
1 note
·
View note
Text
9 ways to organize successful creative projects
Getting your project organized and easily manageable is always a challenge when working as a part of a team. The problem reaches a whole new level when it concerns a creative project. Creativity blossoms the most when it’s unlimited while collaborative projects crumble without rules.
So what to do with a creative agency project that requires teamwork and collaboration? Organization and leadership, if executed correctly, doesn’t have to affect the creative process. Here are nine practical tips to keep your designer team organized no matter the task at hand!
1. The Art of Prioritization
Some projects are more complex than others. To keep yourself from being overwhelmed, identify the most important tasks (your MITs) that need to be worked on before the project can go to the next level. The secret is to determine a limited (realistic) number of crucial tasks that need to be done and try to complete them first. Giving your team a realistic deadline will give each day a structure and a particular purpose. It’s a great way to slay a particularly big beast of a project, or finally, complete those little tasks that have been passed around the office like a hot potato and eventually forgotten.
Defining MITs will allow the designer team take charge of the day rather than just react to whatever is thrown at them.
2. Take Advantage of a Project Management Tool
The phrase ‘project management tool’ sounds like a drag but, in fact, can come in quite handy. There is no bigger time eater out there than using multiple communication tools, leaving little messages here and there and subsequently keeping some of the members of the team in the dark about the progress. Save your team time and hassle trying to figure out what needs to be done next, or where the project is headed. Actually, using a project management tools will give the green light to creativity through efficiency.
The trick lies in choosing a tool that works the best for you. Today, there are a plethora of software tools to choose from. Do a little bit of market research, try and experiment to find which project management tool is the right fit for your team.
3. Keep Everybody in the Loop
When it comes to achieving customer satisfaction in terms of design, information is the key. The common ‘less is more’ saying doesn’t work in this case. If you want the project to be done right and on time, give your team all the information you possibly can. This way your designers will not have to waste time verifying dates and demanding details.
Most importantly, give all the team members the same information! You will avoid a lot of conflicts and confusion. Put all the requirements, needs, rules and deadlines out there (by using an awesome management tool maybe) and the designer team will love you for it.
4. Allow for a Realistic Timeline
The customer is the king, and we are often drawn to do anything to please him or her. However, setting ridiculous, unrealistic deadlines for creative projects is not a way to go. Do not expect a great log or a mind-blowing website to be created in 24 hours. Simply put, creative teams need time to be creative, to brainstorm, sketch and design, to deliver their best. Rather than forcing your team work in crazy stressful conditions, teach your clients the value of time in creative projects.
5. Feedback is Key
Constructive feedback is key to design masterpieces. For feedback to take place, all members of your team must feel safe to express their opinions.
A leader of the project needs to be very clear and open about what they like and dislike about the proposed designs. On the other hand, the team members should feel free to offer their input and feel like they are being listened to. Successful feedback is all about respect and logical justification of your opinions. It’s an excellent way to avoid frustration within the team and keep the spirits and productivity up.
6. Standardize!
Standardization doesn’t sound creativity-friendly, but when imagination needs to be productive, it is the holy grail of effectiveness. Messy interactions, inconsistent work styles and team members working from remote locations can wrap the creative work and project advancement!
Standardizing file names and process chains will enable quick and frictionless interactions and creative exploration. Adhering to a particular naming convention and workflow will help every member of the team locate the files easily and complete its part of the job without giving in to the chaos.
7. Bundle Related Tasks
Bundling similar or related tasks together is guaranteed recipe for efficiency, especially so if it comes to critical yet very tedious routine tasks that can disturb creative workflow. Whether it’s taking care of social media or getting down to the recruiting tasks, allocate 20-30 minutes, get it off your mind and tackle all these tasks together. You will be left free to concentrate on the more important design tasks at hand, free of distractions.
8. Let designers maximize high-energy time
Each creative person works differently. Some prefer to work late, well into the night, other are at their best in those fleeting moments of clarity early in the morning. The best creative work rarely happens on the “beloved” nine to five schedule. If you can afford it, let the members of your team profit from their personal high-energy and high-creativity times. Encourage them to take notes of their rhythm, observe how they work and schedule the most challenging tasks when they are at their peak. Although a bit less structured, this approach is likely to improve the quality of work.
9. Use Shortcuts
To be more precise, use graphic software shortcuts. The trick lies in customizing the software workspace to reflect and enable the type of design work your team does on a regular basis. One of the greatest time-savers is creating reusable templates for reoccurring types of projects and building a library of files for most used graphic resources such as icons, fonts or textures.
To wrap things up
When a team works smoothly, it reflects on the final results. Thus, keeping your designer team happy yet structured is imperative to the success of any creative agency. Get yourself a project management tool and apply any of the tips above that caught your attention. Nonetheless, the best way to improve your workflow is to ask your team members about the most upsetting issues and ask for them for ideas!
225+ Authentic Hand Drawn Logos from TSV Creative – only $14!
Source
from Webdesigner Depot http://ift.tt/2mop1UZ
from Blogger http://ift.tt/2lXElfJ
0 notes
Last Seen Blogs
futuristicbearthingtoad
Untitled

success-those-add
Untitled

reze-bld
Be one with freedom

cosmiis-blog
MOVED

sleep-nurse
oag