#haproxy configuration
Text
HA Proxy Multiple Sockets
HA Proxy Multiple Sockets
Problem
You are leveraging HA Proxy and need to monitor it closely to ensure good performance for your site or service. In most cases, this will mean monitoring. In my case, I leveraged telegraf and sensu for monitoring the socket.
However I ran into permission problems trying to have both sensu and telegraf use the same user/group to read the stats. I got the below error.
This file contains…

View On WordPress
#haproxy#haproxy cfg#haproxy configuration#haproxy stats#http#sensu#sensu check#socket#stat#stats enable#telegraf
0 notes
Text
currently experimenting with using a vps as a reverse proxy for services i'm running off a home server.
dns records for services point to static vps ip, haproxy proxy routes it from the vps through a wireguard tunnel. i can even route tls traffic (based on hostname!) to terminate on the home server, which i wasn't aware i could do before i configured this. and since i can configure wireguard to persist the connection from my home server to the vps, i don't need to concern myself with dynamic dns at home, or opening home ports. ofc ping increases.. round trip.
3 notes
·
View notes
Text
You can learn NodeJS easily, Here's all you need:
1.Introduction to Node.js
• JavaScript Runtime for Server-Side Development
• Non-Blocking I/0
2.Setting Up Node.js
• Installing Node.js and NPM
• Package.json Configuration
• Node Version Manager (NVM)
3.Node.js Modules
• CommonJS Modules (require, module.exports)
• ES6 Modules (import, export)
• Built-in Modules (e.g., fs, http, events)
4.Core Concepts
• Event Loop
• Callbacks and Asynchronous Programming
• Streams and Buffers
5.Core Modules
• fs (File Svstem)
• http and https (HTTP Modules)
• events (Event Emitter)
• util (Utilities)
• os (Operating System)
• path (Path Module)
6.NPM (Node Package Manager)
• Installing Packages
• Creating and Managing package.json
• Semantic Versioning
• NPM Scripts
7.Asynchronous Programming in Node.js
• Callbacks
• Promises
• Async/Await
• Error-First Callbacks
8.Express.js Framework
• Routing
• Middleware
• Templating Engines (Pug, EJS)
• RESTful APIs
• Error Handling Middleware
9.Working with Databases
• Connecting to Databases (MongoDB, MySQL)
• Mongoose (for MongoDB)
• Sequelize (for MySQL)
• Database Migrations and Seeders
10.Authentication and Authorization
• JSON Web Tokens (JWT)
• Passport.js Middleware
• OAuth and OAuth2
11.Security
• Helmet.js (Security Middleware)
• Input Validation and Sanitization
• Secure Headers
• Cross-Origin Resource Sharing (CORS)
12.Testing and Debugging
• Unit Testing (Mocha, Chai)
• Debugging Tools (Node Inspector)
• Load Testing (Artillery, Apache Bench)
13.API Documentation
• Swagger
• API Blueprint
• Postman Documentation
14.Real-Time Applications
• WebSockets (Socket.io)
• Server-Sent Events (SSE)
• WebRTC for Video Calls
15.Performance Optimization
• Caching Strategies (in-memory, Redis)
• Load Balancing (Nginx, HAProxy)
• Profiling and Optimization Tools (Node Clinic, New Relic)
16.Deployment and Hosting
• Deploying Node.js Apps (PM2, Forever)
• Hosting Platforms (AWS, Heroku, DigitalOcean)
• Continuous Integration and Deployment-(Jenkins, Travis CI)
17.RESTful API Design
• Best Practices
• API Versioning
• HATEOAS (Hypermedia as the Engine-of Application State)
18.Middleware and Custom Modules
• Creating Custom Middleware
• Organizing Code into Modules
• Publish and Use Private NPM Packages
19.Logging
• Winston Logger
• Morgan Middleware
• Log Rotation Strategies
20.Streaming and Buffers
• Readable and Writable Streams
• Buffers
• Transform Streams
21.Error Handling and Monitoring
• Sentry and Error Tracking
• Health Checks and Monitoring Endpoints
22.Microservices Architecture
• Principles of Microservices
• Communication Patterns (REST, gRPC)
• Service Discovery and Load Balancing in Microservices
2 notes
·
View notes
Text
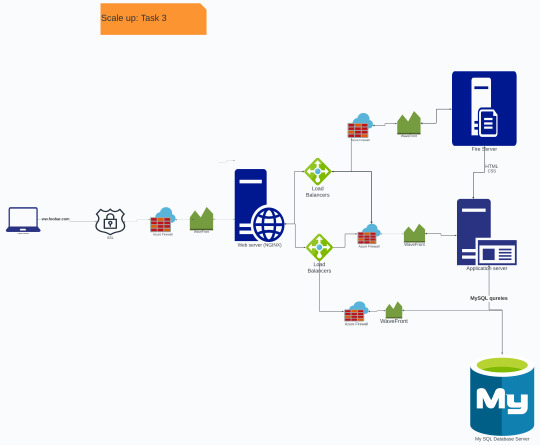
You must add:
1 server
1 load-balancer (HAproxy) configured as cluster with the other one
Split components (web server, application server, database) with their own server
Diagram will prevent single point of failure with the use of two load balancers
0 notes
Text
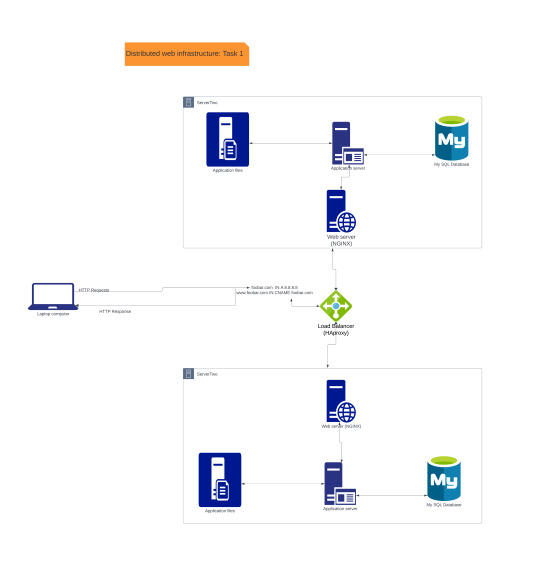
On a whiteboard, design a three server web infrastructure that hosts the website www.foobar.com.
Requirements:
You must add:
2 servers
1 web server (Nginx)
1 application server
1 load-balancer (HAproxy)
1 set of application files (your code base)
1 database (MySQL)
You must be able to explain some specifics about this infrastructure:
For every additional element, why you are adding it
What distribution algorithm your load balancer is configured with and how it works
Is your load-balancer enabling an Active-Active or Active-Passive setup, explain the difference between both
How a database Primary-Replica (Master-Slave) cluster works
What is the difference between the Primary node and the Replica node in regard to the application
You must be able to explain what the issues are with this infrastructure:
Where are SPOF
Security issues (no firewall, no HTTPS)
No monitoring
0 notes
Text
HAproxy Configuration to AD Active Directory Servers
Quick configuration to proxy AD requests through another server. Set the following on the proxy server. Note the frontend server is on port 443 whereas the backend server is on port 389:
# vi /etc/haproxy18/haproxy.cfg
global
log 127.0.0.1 local0 debug
stats socket /var/run/haproxy.sock mode 0600 level admin
# stats socket /var/lib/haproxy/stats
maxconn 4000
user haproxy
group…
View On WordPress
0 notes
Text
Linux Performance Tuning and Optimization
Red Hat Certification, Linux performance tuning and optimization are essential for maximizing the efficiency and responsiveness of a Linux system. Here are key strategies and considerations:
Monitoring Tools: Use performance monitoring tools like top, htop, and vmstat to identify bottlenecks and resource utilization. Tools like sar and Prometheus can provide historical data for analysis.
Kernel Parameters: Adjust kernel parameters via the /proc file system or configuration files in /etc/sysctl.d to optimize system behavior. Parameters like vm.swappiness, fs.file-max, and net.core.somaxconn can impact performance.
File System Optimization: Choose the right file system for your workload (e.g., ext4, XFS, or ZFS). Tune file system options like block sizes, journaling, and mount options for your specific use case.
I/O Optimization: Use hdparm or fio to test and optimize disk I/O. Implement techniques like RAID and SSDs for improved disk performance. Set read-ahead and I/O scheduler options appropriately.
Memory Management: Adjust memory settings, such as swappiness and transparent huge pages, to optimize RAM usage. Use vmstat to monitor swap activity.
CPU Tuning: Configure CPU governors to manage CPU frequency and power usage. Tools like cpufrequtils and tuned help optimize CPU performance.
Network Optimization: Tune network settings like TCP congestion control algorithms and buffer sizes. Tools like ifconfig and ethtool can help manage network interfaces.
Service Optimization: Review and optimize services running on your system. Disable unnecessary services, and configure service parameters for efficiency.
Security Measures: Implement security best practices to protect against resource-intensive attacks, such as denial-of-service (DoS) attacks.
Load Balancing: Use load balancing tools like HAProxy to distribute workloads across multiple servers for better performance and redundancy.
Web Server Optimization: For web servers like Apache or Nginx, adjust settings, such as worker processes and connections, to handle varying loads efficiently.
Database Tuning: Optimize database performance by configuring indexes, query caching, and buffer pool sizes. Tools like mysqltuner can assist in database tuning.
Regular Maintenance: Schedule routine maintenance tasks like disk defragmentation, log rotation, and software updates to prevent performance degradation over time.
Benchmarking: Periodically run benchmarks and performance tests to evaluate the impact of changes and improvements.
Documentation: Maintain documentation of changes and configurations to track the impact of optimizations and facilitate troubleshooting.
Performance tuning and optimization in Linux are ongoing processes that require monitoring, analysis, and adaptation to meet the specific requirements of your system and workloads. Regularly review and adjust configurations to ensure optimal performance.
0 notes
Text
Scaling Up: Strategies for Managing High-Traffic Minecraft Servers
Minecraft Download Pc
Running a high-traffic Minecraft server can be an exhilarating experience. It means that your server is attracting a large number of players, creating a vibrant and bustling community. However, managing such a server comes with its own set of challenges. From ensuring smooth gameplay to maintaining server performance, scalability is key. In this article, we'll explore strategies for effectively managing high-traffic Minecraft servers and providing a seamless experience for your players.
Invest in Powerful Hardware:
As your server attracts more players, the demand on your hardware increases. It's crucial to invest in powerful hardware that can handle the increased traffic. Consider upgrading your server's CPU, RAM, and storage capacity to ensure optimal performance. Additionally, using solid-state drives (SSDs) instead of traditional hard drives can significantly improve loading times and overall server responsiveness.
Optimize Server Configuration:
Optimizing your server's configuration is essential for handling high traffic. Here are a few tips:
- Allocate Sufficient RAM: Minecraft is a resource-intensive game, especially when dealing with a large number of players. Allocate sufficient RAM to your server to ensure smooth gameplay and prevent lag. Consider using server management tools to help you optimize RAM usage and allocate resources effectively.
- Use Multithreaded Server Software: Opt for server software that supports multithreading, such as Spigot or Paper. Multithreaded servers can distribute the workload across multiple cores, improving overall performance and responsiveness.
- Implement Caching: Utilize caching techniques to reduce the load on your server. Plugins like Varnish or Redis can cache frequently accessed data, reducing the need for repetitive database queries and speeding up response times.
Implement Load Balancing:
Load balancing is crucial for distributing incoming traffic across multiple servers, ensuring optimal performance and preventing server overload. Here are two common load balancing strategies:
- Horizontal Scaling: This involves adding more physical or virtual servers to your infrastructure and distributing the player load evenly among them. Load balancers such as Nginx or HAProxy can be used to direct incoming connections to the available servers.
- Cloud-based Solutions: Cloud platforms like Amazon Web Services (AWS) or Google Cloud Platform (GCP) provide scalable infrastructure options. By leveraging their auto-scaling features, you can dynamically adjust server capacity based on demand, ensuring a seamless player experience.
Optimize Network Connectivity:
To handle high traffic, it's essential to optimize your server's network connectivity:
- Bandwidth Management: Monitor your server's bandwidth usage and ensure you have sufficient bandwidth to handle the increased player load. Work with your hosting provider to upgrade your plan if needed.
- DDoS Protection: Distributed Denial of Service (DDoS) attacks can cripple your server's performance. Implement DDoS protection measures, such as using a reliable hosting provider that offers DDoS mitigation services or utilizing dedicated DDoS protection solutions.
- Content Delivery Networks (CDNs): Consider using CDNs to cache and serve static content, such as texture packs or resource files. CDNs distribute content across multiple servers globally, reducing latency and improving download speeds for players.
Monitoring and Optimization:
Regularly monitor your server's performance and player experience to identify bottlenecks and areas for improvement. Utilize monitoring tools to track server metrics like CPU usage, RAM usage, network latency, and player activity. This data will help you identify performance issues and optimize your server configuration accordingly.
Regularly update server software, plugins, and mods to benefit from bug fixes, performance improvements, and new features. Additionally, remove any unnecessary plugins or mods that may negatively impact server performance.
Community Engagement:
Engaging with your community is vital for maintaining a high-traffic server. Encourage player feedback and actively address concerns or issues raised by your community members. Regularly communicate server updates, events, and maintenance schedules to keep players informed and engaged.
Managing a high-traffic Minecraft server requires careful planning, optimization, and scalability. By investing in powerful hardware, optimizing server configuration, implementing load balancing, optimizing network connectivity, monitoring server performance, and actively engaging with your community, you can provide a seamless and enjoyable experience for all players. Embrace the challenge of scaling up your server and watch it thrive as a vibrant hub for Minecraft enthusiasts.
#Freddy#Html5#Frehtml5.co#Minecraft Installer#New minecraft servers#Minecraft server files#Minecraft java edition download#Minecraft Mac
1 note
·
View note
Text
Fluree node setup for load balancing
Load balancing is a critical aspect of managing Fluree nodes in a high traffic environment. Load balancing enables businesses to distribute traffic across multiple Fluree nodes, improving performance and ensuring that the database remains available and responsive to user requests. In this article, we will explore the key considerations for setting up Fluree nodes for load balancing.
Understanding Load Balancing
Load balancing is the process of distributing network traffic across multiple servers to ensure that no single server becomes overwhelmed by traffic. Load balancing can be performed at the network level or at the application level, depending on the specific requirements of the Fluree node. Load balancing can improve performance, reduce downtime, and ensure that user requests are processed efficiently.
Choosing a Load Balancer
When setting up Fluree nodes for load balancing, the first step is to choose a load balancer. Businesses can choose between hardware and software load balancers. Hardware load balancers are physical devices that sit between the Fluree nodes and the network, while software load balancers are applications that run on servers or in the cloud. Some popular load balancers include NGINX, HAProxy, and Amazon Elastic Load Balancer (ELB).
Configuring Fluree Nodes for Load Balancing
Once a load balancer has been chosen, businesses must configure their Fluree nodes for load balancing. This includes setting up multiple Fluree nodes and ensuring that they are configured for high availability. Businesses should also configure their Fluree nodes for data replication to ensure that data is consistent across all nodes.

Establishing Connectivity
After configuring the Fluree nodes, businesses must establish connectivity between the load balancer and the Fluree nodes. This can be done using virtual IP addresses or DNS names. The load balancer must be configured to route traffic to the appropriate Fluree node based on the load balancing algorithm being used.
Load Balancing Algorithms
Load balancing algorithms determine how traffic is distributed across the Fluree nodes. Some common load balancing algorithms include round-robin, least connections, and IP hash. Round-robin distributes traffic evenly across all Fluree nodes, while least connections routes traffic to the Fluree node with the fewest active connections. IP hash distributes traffic based on the client IP address.
Monitoring and Optimization
Finally, businesses must monitor and optimize their Fluree nodes for load balancing. This includes monitoring performance metrics, identifying and resolving bottlenecks, and optimizing the Fluree nodes for maximum efficiency. Businesses should also consider implementing real-time monitoring and alerts to quickly identify and resolve any issues that arise.
In conclusion, load balancing is a critical aspect of managing Fluree nodes in a high traffic environment. Businesses must choose the right load balancer, configure their Fluree nodes for high availability and data replication, establish connectivity between the load balancer and the Fluree nodes, and monitor and optimize the Fluree nodes for maximum efficiency. By following best practices and working with experienced professionals, businesses can leverage the benefits of load balancing and maximize the performance and availability of their Fluree nodes.
1 note
·
View note
Text
Using load balancing for Fantom node deployment and management.
Using load balancing for Fantom node deployment and management is a critical component of maintaining a high-performance, reliable network. Load balancing can help distribute incoming network traffic across multiple nodes, ensuring that no single node is overwhelmed with traffic and that all nodes are being used efficiently.
Load balancing is especially important for blockchain networks like Fantom, where high transaction volumes can lead to network congestion and slow transaction processing times. By using load balancing, you can improve the overall performance and speed of the network, leading to a better user experience and increased adoption of the platform.
Here are some tips for using load balancing for Fantom node deployment and management:
Choose the Right Load Balancing Tool
There are several load balancing tools available, and choosing the right tool for your network is critical. Consider factors such as ease of use, scalability, and compatibility with your existing infrastructure. Some popular load balancing tools for Fantom node deployment and management include NGINX, HAProxy, and F5.
Deploy Multiple Nodes in Different Geographic Locations
To ensure maximum performance and reliability, it's essential to deploy multiple nodes in different geographic locations. By doing so, you can improve fault tolerance and ensure that your network is always available, even in the event of a failure or outage in one location.
Use Session Persistence
Session persistence ensures that a user's session remains tied to a specific node throughout the session, preventing data loss or inconsistency. Using session persistence can be especially useful for applications that rely on persistent user sessions, such as online marketplaces or social media platforms.
Monitor Load Balancer Performance
Monitoring load balancer performance is critical to ensuring that your network is operating at its best. Regularly monitor key performance indicators, such as CPU usage, memory usage, and network activity, to identify any issues and address them promptly.
Automate Load Balancer Configuration
Automating load balancer configuration can help streamline the deployment and management of your network. Use tools such as Ansible, Puppet, or Chef to automate load balancer configuration and deployment, reducing the risk of errors and increasing efficiency.
Consider Load Balancing as a Service
If managing your own load balancer infrastructure is too complex or resource-intensive, consider using a load balancing as a service (LBaaS) provider. LBaaS providers offer load balancing as a cloud-based service, allowing you to offload the management and maintenance of load balancers to a third party.

Conclusion
Using load balancing for Fantom node deployment and management is critical to maintaining a high-performance, reliable network. By following the tips outlined above, you can improve the overall performance and speed of your network, leading to a better user experience and increased adoption of the platform. Remember to regularly monitor load balancer performance and address any issues promptly to keep your network running smoothly.
1 note
·
View note
Text
In this guide we will perform an installation of Red Hat OpenShift Container Platform 4.11 on KVM Virtual Machines. OpenShift is a powerful, platform agnostic, enterprise-grade Kubernetes distribution focused on developer experience and application security. The project is developed and owned by Red Hat Software company. OpenShift Container Platform is built around containers orchestrated and managed by Kubernetes on a foundation of Red Hat Enterprise Linux.
The OpenShift platform offers automated installation, upgrades, and lifecycle management throughout the container stack – from the operating system, Kubernetes and cluster services, to deployed applications. Operating system that will be used on both the Control plan and Worker machines is Red Hat CoreOS (RHCOS). The RHCOS OS includes the kubelet, which is the Kubernetes node agent, and the CRI-O container runtime optimized for Kubernetes workloads.
In my installation the deployment is performed on a single node KVM compute server. This is not a production setup with high availability and should only be used for proof-of-concept and demo related purposes.
Red Hat’s recommendation on each cluster virtual machine minimum hardware requirements is as shown in the table below:
Virtual Machine
Operating System
vCPU
Virtual RAM
Storage
Bootstrap
RHCOS
4
16 GB
120 GB
Control plane
RHCOS
4
16 GB
120 GB
Compute
RHCOS
2
8 GB
120 GB
But the preferred requirements for each cluster virtual machine are:
Virtual Machine
Operating System
vCPU
Virtual RAM
Storage
Bootstrap
RHCOS
4
16 GB
120 GB
Control plane
RHCOS
8
16 GB
120 GB
Compute
RHCOS
6
8 GB
120 GB
The shared hardware requirements information for the virtual machines is not accurate since it depends on the workloads and desired cluster size when running in Production. Sizing can be done as deemed fit.
My Lab environment variables
OpenShift 4 Cluster base domain: example.com ( to be substituted accordingly)
OpenShift 4 Cluster name: ocp4 ( to be substituted accordingly)
OpenShift KVM network bridge: openshift4
OpenShift Network Block: 192.168.100.0/24
OpenShift Network gateway address: 192.168.100.1
Bastion / Helper node IP Address (Runs DHCP, Apache httpd, HAProxy, PXE, DNS) – 192.168.100.254
NTP server used: time.google.com
Used Mac Addresses and IP Addresses:
Machine Name
Mac Address (Generate yours and use)
DHCP Reserved IP Address
bootstrap.ocp4.example.com
52:54:00:a4:db:5f
192.168.100.10
master01.ocp4.example.com
52:54:00:8b:a1:17
192.168.100.11
master02.ocp4.example.com
52:54:00:ea:8b:9d
192.168.100.12
master03.ocp4.example.com
52:54:00:f8:87:c7
192.168.100.13
worker01.ocp4.example.com
52:54:00:31:4a:39
192.168.100.21
worker02.ocp4.example.com
52:54:00:6a:37:32
192.168.100.22
worker03.ocp4.example.com
52:54:00:95:d4:ed
192.168.100.23
Step 1: Setup KVM Infrastructure (On Hypervisor Node)
Install KVM in your hypervisor node using any of the guides in below links:
Install KVM Hypervisor on Ubuntu
How To Install KVM Hypervisor on Debian
Install KVM on RHEL 8 / CentOS 8 / Rocky Linux
After installation verify your server CPU has support for Intel VT or AMD-V Virtualization extensions:
cat /proc/cpuinfo | egrep "vmx|svm"
Creating Virtual Network (optional, you can use existing network)
Create a new virtual network configuration file
vim virt-net.xml
File contents:
openshift4
Create a virtual network using this file file created; modify if need be:
$ sudo virsh net-define --file virt-net.xml
Network openshift4 defined from virt-net.xml
Set the network to autostart on boot
$ sudo virsh net-autostart openshift4
Network openshift4 marked as autostarted
$ sudo virsh net-start openshift4
Network openshift4 started
Confirm that the bridge is available and active:
$ brctl show
bridge name bridge id STP enabled interfaces
openshift4 8000.5254002b479a yes
virbr0 8000.525400ad641d yes
Step 2: Create Bastion / Helper Virtual Machine
Create a Virtual Machine that will host some key services from officially provided virt-builder images. The virtual machine will be used to run the following services:
DNS Server (Bind)
Apache httpd web server
HAProxy Load balancer
DHCP & PXE/TFTP services
It will also be our bastion server for deploying and managing OpenShift platform (oc, openshift-install, kubectl, ansible)
Let’s first display available OS templates with command below:
$ virt-builder -l
I’ll create a VM image from fedora-36 template; you can also choose a CentOS template(8 or 7):
sudo virt-builder fedora-36 --format qcow2 \
--size 20G -o /var/lib/libvirt/images/ocp-bastion-server.qcow2 \
--root-password password:StrongRootPassw0rd
Where:
fedora-36 is the template used to create a new virtual machine
/var/lib/libvirt/images/ocp-bastion-server.qcow2 is the path to VM qcow2 image
StrongRootPassw0rd is the root user password
VM image creation progress will be visible in your screen
[ 1.0] Downloading: http://builder.libguestfs.org/fedora-36.xz
########################################################################################################################################################### 100.0%
[ 15.3] Planning how to build this image
[ 15.3] Uncompressing
[ 18.2] Resizing (using virt-resize) to expand the disk to 20.0G
[ 39.7] Opening the new disk
[ 44.1] Setting a random seed
[ 44.1] Setting passwords
[ 45.1] Finishing off
Output file: /var/lib/libvirt/images/ocp-bastion-server.qcow2
Output size: 20.0G
Output format: qcow2
Total usable space: 20.0G
Free space: 19.0G (94%)
Now create a Virtual Machine to be used as DNS and DHCP server with virt-install
Using Linux bridge:
sudo virt-install \
--name ocp-bastion-server \
--ram 4096 \
--vcpus 2 \
--disk path=/var/lib/libvirt/images/ocp-bastion-server.qcow2 \
--os-type linux \
--os-variant rhel8.0 \
--network bridge=openshift4 \
--graphics none \
--serial pty \
--console pty \
--boot hd \
--import
Using openVSwitch bridge: Ref How To Use Open vSwitch Bridge on KVM Virtual Machines
sudo virt-install \
--name ocp-bastion-server \
--ram 4096 \
--disk path=/var/lib/libvirt/images/ocp-bastion-server.qcow2 \
--vcpus 2 \
--os-type linux \
--os-variant rhel8.0 \
--network=bridge:openshift4,model=virtio,virtualport_type=openvswitch \
--graphics none \
--serial pty \
--console pty \
--boot hd \
--import
When your VM is created and running login as root user and password set initially:
Fedora 36 (Thirty Six)
Kernel 5.xx.fc36.x86_64 on an x86_64 (ttyS0)
fedora login: root
Password: StrongRootPassw0rd
You can reset root password after installation if that’s your desired action:
[root@fedora ~]# passwd
Changing password for user root.
New password:
Retype new password:
passwd: all authentication tokens updated successfully.
If the server didn’t get IP address from DHCP server you can set static IP manually on the primary interface:
# ip link show
1: lo: mtu 65536 qdisc noqueue state UNKNOWN mode DEFAULT group default qlen 1000
link/loopback 00:00:00:00:00:00 brd 00:00:00:00:00:00
2: enp1s0: mtu 1500 qdisc fq_codel state UP mode DEFAULT group default qlen 1000
link/ether 52:54:00:21:fb:33 brd ff:ff:ff:ff:ff:ff
# vi /etc/sysconfig/network-scripts/ifcfg-enp1s0
NAME="enp1s0" # Set network name, usually same as device name
DEVICE="enp1s0" # Set your interface name as shown while running ip link show command
ONBOOT="yes"
NETBOOT="yes"
BOOTPROTO="none"
TYPE="Ethernet"
PROXY_METHOD="none"
BROWSER_ONLY="no"
DEFROUTE="yes"
IPADDR=192.168.100.254 # Set your VM IP address
PREFIX=27 # Set Netmask Prefix
GATEWAY=192.168.100.1 # Set network gateway IP address
DNS1=8.8.8.8 # Set first DNS server to be used
DNS2=8.8.4.4 # Set secondary DNS server to be used
# Once configured bring up the interface using ifup command
# ifup enp1s0
Connection successfully activated (D-Bus active path: /org/freedesktop/NetworkManager/ActiveConnection/7)
Test external connectivity from the VM:
# ping -c 2 8.8.8.8
PING 8.8.8.8 (8.8.8.8) 56(84) bytes of data.
64 bytes from 8.8.8.8: icmp_seq=1 ttl=117 time=4.98 ms
64 bytes from 8.8.8.8: icmp_seq=2 ttl=117 time=5.14 ms
--- 8.8.8.8 ping statistics ---
2 packets transmitted, 2 received, 0% packet loss, time 1001ms
rtt min/avg/max/mdev = 4.981/5.061/5.142/0.080 ms
# ping -c 2 google.com
PING google.com (172.217.18.110) 56(84) bytes of data.
64 bytes from zrh04s05-in-f110.1e100.net (172.217.18.110): icmp_seq=1 ttl=118 time=4.97 ms
64 bytes from fra16s42-in-f14.1e100.net (172.217.18.110): icmp_seq=2 ttl=118 time=5.05 ms
--- google.com ping statistics ---
2 packets transmitted, 2 received, 0% packet loss, time 1002ms
rtt min/avg/max/mdev = 4.971/5.008/5.045/0.037 ms
Perform OS upgrade before deploying other services.
sudo dnf -y upgrade
sudo dnf -y install git vim wget curl bash-completion tree tar libselinux-python3 firewalld
Reboot the server after the upgrade is done.
sudo reboot
Confirm you can access the VM through virsh console or ssh
$ sudo virsh list
Id Name State
-------------------------------------
1 ocp-bastion-server running
$ sudo virsh console ocp-bastion-server
Connected to domain 'ocp-bastion-server'
Escape character is ^] (Ctrl + ])
fedora login:
Enable domain autostart:
sudo virsh autostart ocp-bastion-server
Step 3: Install Ansible and Configure variables on Bastion / Helper node
Install Ansible configuration management tool on the Bastion machine
# Fedora
sudo dnf -y install git ansible vim wget curl bash-completion tree tar libselinux-python3
# CentOS 8 / Rocky Linux 8
sudo yum -y install epel-release
sudo yum -y install git ansible vim wget curl bash-completion tree tar libselinux-python3
# CentOS 7
sudo yum -y install epel-release
sudo yum -y install git ansible vim wget curl bash-completion tree tar libselinux-python
We have a Github repository with all the tasks and templates used in this guide. Clone the project to ~/ocp4_ansible directory.
cd ~/
git clone https://github.com/jmutai/ocp4_ansible.git
cd ~/ocp4_ansible
You can view the directory structure using tree command:
$ tree
.
├── ansible.cfg
├── files
│ └── set-dns-serial.sh
├── handlers
│ └── main.yml
├── inventory
├── LICENSE
├── README.md
├── tasks
│ ├── configure_bind_dns.yml
│ ├── configure_dhcpd.yml
│ ├── configure_haproxy_lb.yml
│ └── configure_tftp_pxe.yml
├── templates
│ ├── default.j2
│ ├── dhcpd.conf.j2
│ ├── dhcpd-uefi.conf.j2
│ ├── haproxy.cfg.j2
│ ├── named.conf.j2
│ ├── pxe-bootstrap.j2
│ ├── pxe-master.j2
│ ├── pxe-worker.j2
│ ├── reverse.j2
│ └── zonefile.j2
└── vars
└── main.yml
5 directories, 21 files
Edit ansible configuration file and modify to suit your use.
$ vim ansible.cfg
[defaults]
inventory = inventory
command_warnings = False
filter_plugins = filter_plugins
host_key_checking = False
deprecation_warnings=False
retry_files = false
When not executing ansible as root user you can addprivilege_escalation section.
[privilege_escalation]
become = true
become_method = sudo
become_user = root
become_ask_pass = false
If running on the localhost the inventory can be set as below:
$ vim inventory
[vmhost]
localhost ansible_connection=local
These are service handlers created and will be referenced in bastion setup process tasks.
$ vim handlers/main.yml
---
- name: restart tftp
service:
name: tftp
state: restarted
- name: restart bind
service:
name: named
state: restarted
- name: restart haproxy
service:
name: haproxy
state: restarted
- name: restart dhcpd
service:
name: dhcpd
state: restarted
- name: restart httpd
service:
name: httpd
state: restarted
Modify the default variables file inside vars folder:
vim vars/main.yml
Define all the variables required correctly. Be careful not to have wrong values which will cause issues at the time of OpenShift installation.
---
ppc64le: false
uefi: false
disk: vda #disk where you are installing RHCOS on the masters/workers
helper:
name: "bastion" #hostname for your helper node
ipaddr: "192.168.100.254" #current IP address of the helper
networkifacename: "ens3" #interface of the helper node,ACTUAL name of the interface, NOT the NetworkManager name
dns:
domain: "example.com" #DNS server domain. Should match baseDomain inside the install-config.yaml file.
clusterid: "ocp4" #needs to match what you will for metadata.name inside the install-config.yaml file
forwarder1: "8.8.8.8" #DNS forwarder
forwarder2: "1.1.1.1" #second DNS forwarder
lb_ipaddr: " helper.ipaddr " #Load balancer IP, it is optional, the default value is helper.ipaddr
dhcp:
router: "192.168.100.1" #default gateway of the network assigned to the masters/workers
bcast: "192.168.100.255" #broadcast address for your network
netmask: "255.255.255.0" #netmask that gets assigned to your masters/workers
poolstart: "192.168.100.10" #First address in your dhcp address pool
poolend: "192.168.100.50" #Last address in your dhcp address pool
ipid: "192.168.100.0" #ip network id for the range
netmaskid: "255.255.255.0" #networkmask id for the range.
ntp: "time.google.com" #ntp server address
dns: "" #domain name server, it is optional, the default value is set to helper.ipaddr
bootstrap:
name: "bootstrap" #hostname (WITHOUT the fqdn) of the bootstrap node
ipaddr: "192.168.100.10" #IP address that you want set for bootstrap node
macaddr: "52:54:00:a4:db:5f" #The mac address for dhcp reservation
masters:
- name: "master01" #hostname (WITHOUT the fqdn) of the master node (x of 3)
ipaddr: "192.168.100.11" #The IP address (x of 3) that you want set
macaddr: "52:54:00:8b:a1:17" #The mac address for dhcp reservation
- name: "master02"
ipaddr: "192.168.100.12"
macaddr: "52:54:00:ea:8b:9d"
- name: "master03"
ipaddr: "192.168.100.13"
macaddr: "52:54:00:f8:87:c7"
workers:
- name: "worker01" #hostname (WITHOUT the fqdn) of the worker node you want to set
ipaddr: "192.168.100.21" #The IP address that you want set (1st node)
macaddr: "52:54:00:31:4a:39" #The mac address for dhcp reservation (1st node)
- name: "worker02"
ipaddr: "192.168.100.22"
macaddr: "52:54:00:6a:37:32"
- name: "worker03"
ipaddr: "192.168.100.23"
macaddr: "52:54:00:95:d4:ed"
Generating unique mac addresses for bootstrap, worker and master nodes
You can generate all required mac addresses using the command below:
date +%s | md5sum | head -c 6 | sed -e 's/\([0-9A-Fa-f]\2\\)/\1:/g' -e 's/\(.*\):$/\1/' | sed -e 's/^/52:54:00:/'
Step 4: Install and Configure DHCP serveron Bastion / Helper node
Install dhcp-server rpm package using dnf or yum package manager.
sudo yum -y install dhcp-server
Enable dhcpd service to start on system boot
$ sudo systemctl enable dhcpd
Created symlink /etc/systemd/system/multi-user.target.wants/dhcpd.service → /usr/lib/systemd/system/dhcpd.service.
Backup current dhcpd configuration file. If the server is not new you can modify existing configuration
sudo mv /etc/dhcp/dhcpd.conf /etc/dhcp/dhcpd.conf.bak
Task to configure dhcp server on the bastion server:
$ vim tasks/configure_dhcpd.yml
---
# Setup OCP4 DHCP Server on Helper Node
- hosts: all
vars_files:
- ../vars/main.yml
handlers:
- import_tasks: ../handlers/main.yml
tasks:
- name: Write out dhcp file
template:
src: ../templates/dhcpd.conf.j2
dest: /etc/dhcp/dhcpd.conf
notify:
- restart dhcpd
when: not uefi
- name: Write out dhcp file (UEFI)
template:
src: ../templates/dhcpd-uefi.conf.j2
dest: /etc/dhcp/dhcpd.conf
notify:
- restart dhcpd
when: uefi
Configure DHCP server using ansible, defined variables and templates shared.
$ ansible-playbook tasks/configure_dhcpd.yml
PLAY [all] *******************************************************************************************************************************************************
TASK [Gathering Facts] *******************************************************************************************************************************************
ok: [localhost]
TASK [Write out dhcp file] ***************************************************************************************************************************************
changed: [localhost]
TASK [Write out dhcp file (UEFI)] ********************************************************************************************************************************
skipping: [localhost]
RUNNING HANDLER [restart dhcpd] **********************************************************************************************************************************
changed: [localhost]
PLAY RECAP *******************************************************************************************************************************************************
localhost : ok=3 changed=2 unreachable=0 failed=0 skipped=1 rescued=0 ignored=0
Confirm that dhcpd service is in running state:
$ systemctl status dhcpd
● dhcpd.service - DHCPv4 Server Daemon
Loaded: loaded (/usr/lib/systemd/system/dhcpd.service; enabled; vendor preset: disabled)
Active: active (running) since Tue 2021-08-17 19:35:06 EDT; 2min 42s ago
Docs: man:dhcpd(8)
man:dhcpd.conf(5)
Main PID: 24958 (dhcpd)
Status: "Dispatching packets..."
Tasks: 1 (limit: 4668)
Memory: 9.7M
CPU: 17ms
CGroup: /system.slice/dhcpd.service
└─24958 /usr/sbin/dhcpd -f -cf /etc/dhcp/dhcpd.conf -user dhcpd -group dhcpd --no-pid
...
You can as well check generated configuration file:
$ cat /etc/dhcp/dhcpd.conf
Step 4: Configure OCP Zone on Bind DNS Serveron Bastion / Helper node
We can now begin the installation of DNS and DHCP server packages required to run OpenShift Container Platform on KVM.
sudo yum -y install bind bind-utils
Enable the service to start at system boot up
sudo systemctl enable named
Install DNS Serialnumber generator script:
$ sudo vim /usr/local/bin/set-dns-serial.sh
#!/bin/bash
dnsserialfile=/usr/local/src/dnsserial-DO_NOT_DELETE_BEFORE_ASKING_CHRISTIAN.txt
zonefile=/var/named/zonefile.db
if [ -f zonefile ] ; then
echo $[ $(grep serial $zonefile | tr -d "\t"" ""\n" | cut -d';' -f 1) + 1 ] | tee $dnsserialfile
else
if [ ! -f $dnsserialfile ] || [ ! -s $dnsserialfile ]; then
echo $(date +%Y%m%d00) | tee $dnsserialfile
else
echo $[ $(< $dnsserialfile) + 1 ] | tee $dnsserialfile
fi
fi
##
##-30-
Make the script executable:
sudo chmod a+x /usr/local/bin/set-dns-serial.sh
This is the DNS Configuration task to be used:
$ vim tasks/configure_bind_dns.yml
---
# Configure OCP4 DNS Server on Helper Node
- hosts: all
vars_files:
- ../vars/main.yml
handlers:
- import_tasks: ../handlers/main.yml
tasks:
- name: Setup named configuration files
block:
- name: Write out named file
template:
src: ../templates/named.conf.j2
dest: /etc/named.conf
notify:
- restart bind
- name: Set zone serial number
shell: "/usr/local/bin/set-dns-serial.sh"
register: dymanicserialnumber
- name: Setting serial number as a fact
set_fact:
serialnumber: " dymanicserialnumber.stdout "
- name: Write out " lower " zone file
template:
src: ../templates/zonefile.j2
dest: /var/named/zonefile.db
mode: '0644'
notify:
- restart bind
- name: Write out reverse zone file
template:
src: ../templates/reverse.j2
dest: /var/named/reverse.db
mode: '0644'
notify:
- restart bind
Run ansible playbook to configure bind dns server for OpenShift deployment.
$ ansible-playbook tasks/configure_bind_dns.yml
ansible-playbook tasks/configure_bind_dns.yml
PLAY [all] *******************************************************************************************************************************************************
TASK [Gathering Facts] *******************************************************************************************************************************************
ok: [localhost]
TASK [Write out named file] **************************************************************************************************************************************
changed: [localhost]
TASK [Set zone serial number] ************************************************************************************************************************************
changed: [localhost]
TASK [Setting serial number as a fact] ***************************************************************************************************************************
changed: [localhost]
TASK [Write out "example.com" zone file] **********************************************************************************************************************
changed: [localhost]
TASK [Write out reverse zone file] *******************************************************************************************************************************
changed: [localhost]
RUNNING HANDLER [restart bind] ***********************************************************************************************************************************
changed: [localhost]
PLAY RECAP *******************************************************************************************************************************************************
localhost : ok=7 changed=6 unreachable=0 failed=0 skipped=0 rescued=0 ignored=0
Forward DNS zone file is created under /var/named/zonefile.db and reverse DNS lookup file is /var/named/reverse.db
Check if the service is in running status:
$ systemctl status named
● named.service - Berkeley Internet Name Domain (DNS)
Loaded: loaded (/usr/lib/systemd/system/named.service; disabled; vendor preset: disabled)
Active: active (running) since Wed 2021-08-11 16:19:38 EDT; 4s ago
Process: 1340 ExecStartPre=/bin/bash -c if [ ! "$DISABLE_ZONE_CHECKING" == "yes" ]; then /usr/sbin/named-checkconf -z "$NAMEDCONF"; else echo "Checking of zo>
Process: 1342 ExecStart=/usr/sbin/named -u named -c $NAMEDCONF $OPTIONS (code=exited, status=0/SUCCESS)
Main PID: 1344 (named)
Tasks: 6 (limit: 4668)
Memory: 26.3M
CPU: 53ms
CGroup: /system.slice/named.service
└─1344 /usr/sbin/named -u named -c /etc/named.conf
Aug 11 16:19:38 fedora named[1344]: network unreachable resolving './NS/IN': 2001:500:1::53#53
Aug 11 16:19:38 fedora named[1344]: network unreachable resolving './NS/IN': 2001:500:200::b#53
Aug 11 16:19:38 fedora named[1344]: network unreachable resolving './NS/IN': 2001:500:9f::42#53
Aug 11 16:19:38 fedora named[1344]: network unreachable resolving './NS/IN': 2001:7fe::53#53
Aug 11 16:19:38 fedora named[1344]: network unreachable resolving './NS/IN': 2001:503:c27::2:30#53
Aug 11 16:19:38 fedora named[1344]: zone 1.0.0.0.0.0.0.0.0.0.0.0.0.0.0.0.0.0.0.0.0.0.0.0.0.0.0.0.0.0.0.0.ip6.arpa/IN: loaded serial 0
Aug 11 16:19:38 fedora named[1344]: all zones loaded
Aug 11 16:19:38 fedora named[1344]: managed-keys-zone: Initializing automatic trust anchor management for zone '.'; DNSKEY ID 20326 is now trusted, waiving the n>
Aug 11 16:19:38 fedora named[1344]: running
Aug 11 16:19:38 fedora systemd[1]: Started Berkeley Internet Name Domain (DNS).
To test our DNS server we just execute:
$ dig @127.0.0.1 -t srv _etcd-server-ssl._tcp.ocp4.example.com
; DiG 9.16.19-RH @127.0.0.1 -t srv _etcd-server-ssl._tcp.ocp4.example.com
; (1 server found)
;; global options: +cmd
;; Got answer:
;; ->>HEADER (item='name': 'master01', 'ipaddr': '192.168.100.11', 'macaddr': '52:54:00:8b:a1:17')
changed: [localhost] => (item='name': 'master02', 'ipaddr': '192.168.100.12', 'macaddr': '52:54:00:ea:8b:9d')
changed: [localhost] => (item='name': 'master03', 'ipaddr': '192.168.100.13', 'macaddr': '52:54:00:f8:87:c7')
TASK [Set the worker specific tftp files] ************************************************************************************************************************
changed: [localhost] => (item='name': 'worker01', 'ipaddr': '192.168.100.21', 'macaddr': '52:54:00:31:4a:39')
changed: [localhost] => (item='name': 'worker02', 'ipaddr': '192.168.100.22', 'macaddr': '52:54:00:6a:37:32')
changed: [localhost] => (item='name': 'worker03', 'ipaddr': '192.168.100.23', 'macaddr': '52:54:00:95:d4:ed')
RUNNING HANDLER [restart tftp] ***********************************************************************************************************************************
changed: [localhost]
PLAY RECAP *******************************************************************************************************************************************************
localhost : ok=5 changed=4 unreachable=0 failed=0 skipped=0 rescued=0 ignored=0
Headless environment considerations
With the consideration of the fact that we’re working in a headless environment, minimal setup of KVM without graphical interface. We need to ensure CoreOS booted VM will automatically choose the correct image and ignition file for the OS installation.
PXE Boot files are created inside the directory /var/lib/tftpboot/pxelinux.cfg
NOTE: Each of the file created should have a 01- before the MAC Address. See below example of bootstrap node.
Bootstrap node
Mac Address:
52:54:00:a4:db:5f
The file created will be
cat /var/lib/tftpboot/pxelinux.cfg/01-52-54-00-a4-db-5f
With contents:
default menu.c32
prompt 1
timeout 9
ONTIMEOUT 1
menu title ######## PXE Boot Menu ########
label 1
menu label ^1) Install Bootstrap Node
menu default
kernel rhcos/kernel
append initrd=rhcos/initramfs.img nomodeset rd.neednet=1 console=tty0 console=ttyS0 ip=dhcp coreos.inst=yes coreos.inst.install_dev=vda coreos.live.rootfs_url=http://192.168.100.254:8080/rhcos/rootfs.img coreos.inst.ignition_url=http://192.168.100.254:8080/ignition/bootstrap.ign
Master nodes
The file for each master has contents similar to this:
default menu.c32
prompt 1
timeout 9
ONTIMEOUT 1
menu title ######## PXE Boot Menu ########
label 1
menu label ^1) Install Master Node
menu default
kernel rhcos/kernel
append initrd=rhcos/initramfs.img nomodeset rd.neednet=1 console=tty0 console=ttyS0 ip=dhcp coreos.inst=yes coreos.inst.install_dev=vda coreos.live.rootfs_url=http://192.168.100.254:8080/rhcos/rootfs.img coreos.inst.ignition_url=http://192.168.100.254:8080/ignition/master.ign
Worker nodes
The file for each worker node will looks similar to this:
default menu.c32
prompt 1
timeout 9
ONTIMEOUT 1
menu title ######## PXE Boot Menu ########
label 1
menu label ^1) Install Worker Node
menu default
kernel rhcos/kernel
append initrd=rhcos/initramfs.img nomodeset rd.neednet=1 console=tty0 console=ttyS0 ip=dhcp coreos.inst=yes coreos.inst.install_dev=vda coreos.live.rootfs_url=http://192.168.100.254:8080/rhcos/rootfs.img coreos.inst.ignition_url=http://192.168.100.254:8080/ignition/worker.ign
You can list all the files created using the following command:
$ ls -1 /var/lib/tftpboot/pxelinux.cfg
01-52:54:00:31:4a:39
01-52:54:00:6a:37:32
01-52:54:00:8b:a1:17
01-52:54:00:95:d4:ed
01-52:54:00:a4:db:5f
01-52:54:00:ea:8b:9d
01-52:54:00:f8:87:c7
Step 6: Configure HAProxy as Load balanceron Bastion / Helper node
In this setup we’re using a software load balancer solution – HAProxy. In a Production setup of OpenShift Container Platform a hardware or highly available load balancer solution is required.
Install the package
sudo yum install -y haproxy
Set SEBool to allow haproxy connect any port:
sudo setsebool -P haproxy_connect_any 1
Backup the default HAProxy configuration
sudo mv /etc/haproxy/haproxy.cfg /etc/haproxy/haproxy.cfg.default
Here is HAProxy configuration ansible task:
$ vim tasks/configure_haproxy_lb.yml
---
# Configure OCP4 HAProxy Load balancer on Helper Node
- hosts: all
vars_files:
- ../vars/main.yml
tasks:
- name: Write out haproxy config file
template:
src: ../templates/haproxy.cfg.j2
dest: /etc/haproxy/haproxy.cfg
notify:
- restart haproxy
handlers:
- name: restart haproxy
ansible.builtin.service:
name: haproxy
state: restarted
Run ansible-playbook using created task to configure HAProxy Load balancer for OpenShift
$ ansible-playbook tasks/configure_haproxy_lb.yml
PLAY [all] *******************************************************************************************************************************************************
TASK [Gathering Facts] *******************************************************************************************************************************************
ok: [localhost]
TASK [Write out haproxy config file] *****************************************************************************************************************************
changed: [localhost]
RUNNING HANDLER [restart haproxy] ********************************************************************************************************************************
changed: [localhost]
PLAY RECAP *******************************************************************************************************************************************************
localhost : ok=3 changed=2 unreachable=0 failed=0 skipped=0 rescued=0 ignored=0
Open the file for editing
sudo vim /etc/haproxy/haproxy.cfg
Configuration file is place in the file /etc/haproxy/haproxy.cfg
Configure SElinux for HAProxy to use the custom ports configured.
sudo semanage port -a 6443 -t http_port_t -p tcp
sudo semanage port -a 22623 -t http_port_t -p tcp
sudo semanage port -a 32700 -t http_port_t -p tcp
Open ports on the firewall
sudo firewall-cmd --add-service=http,https --permanent
sudo firewall-cmd --add-port=6443,22623/tcp --permanent
sudo firewall-cmd --reload
Step 7: Install OpenShift installer and CLI binaryon Bastion / Helper node
Download and install the OpenShift installer and client
OpenShift Client binary:
# Linux
wget https://mirror.openshift.com/pub/openshift-v4/clients/ocp/latest/openshift-client-linux.tar.gz
tar xvf openshift-client-linux.tar.gz
sudo mv oc kubectl /usr/local/bin
rm -f README.md LICENSE openshift-client-linux.tar.gz
# macOS
wget https://mirror.openshift.com/pub/openshift-v4/clients/ocp/latest/openshift-client-mac.tar.gz
tar xvf openshift-client-mac.tar.gz
sudo mv oc kubectl /usr/local/bin
rm -f README.md LICENSE openshift-client-mac.tar.gz
OpenShift installer binary:
# Linux
wget https://mirror.openshift.com/pub/openshift-v4/clients/ocp/latest/openshift-install-linux.tar.gz
tar xvf openshift-install-linux.tar.gz
sudo mv openshift-install /usr/local/bin
rm -f README.md LICENSE openshift-install-linux.tar.gz
# macOS
wget https://mirror.openshift.com/pub/openshift-v4/clients/ocp/latest/openshift-install-mac.tar.gz
tar xvf openshift-install-mac.tar.gz
sudo mv openshift-install /usr/local/bin
rm -f README.md LICENSE openshift-install-mac.tar.gz
Check if you can run binaries:
$ openshift-install version
openshift-install 4.10.18
built from commit 25b4d09c94dc4bdc0c79d8668369aeb4026b52a4
release image quay.io/openshift-release-dev/ocp-release@sha256:195de2a5ef3af1083620a62a45ea61ac1233ffa27bbce7b30609a69775aeca19
release architecture amd64
$ oc version
Client Version: 4.10.18
$ kubectl version --client
Client Version: version.InfoMajor:"1", Minor:"23", GitVersion:"v1.23.0", GitCommit:"878f5a8fe0d04ea70c5e5de11fa9cc7a49afb86e", GitTreeState:"clean", BuildDate:"2022-06-01T00:19:52Z", GoVersion:"go1.17.5", Compiler:"gc", Platform:"linux/amd64"
Create SSH Key Pairs
Now we need to create a SSH key pair to access to use later to access the CoreOS nodes
ssh-keygen -t rsa -N "" -f ~/.ssh/id_rsa
Step 8: Generate ignition fileson Bastion / Helper node
We need to create the ignition files used for the installation of CoreOS machines
Download Pull Secret
We can store our pull secret in ~/.openshift directory:
mkdir ~/.openshift
Visit cloud.redhat.com and download your pull secret and save it under ~/.openshift/pull-secret
$ vim ~/.openshift/pull-secret
Create ocp4 directory
mkdir -p ~/ocp4
cd ~/
We can now create OpenShift installation yaml file install-config-base.yaml:
cat
0 notes
Text
site reliability engineer

Immediate Hiring || sr. SRE (SITE RELIABILITY ENGINEER) (EXP: 9+ MUST) || 1 Month remote Alpharetta, GA / St Louis, MO (HYBRID)|| c2c
NOTE: It is a direct client requirement no layer in-between
Hai,
I was trying to reach you regarding the role of sr. SRE (SITE RELIABILITY ENGINEER) (||c2c
Please find the job description and let me know your interest on it
Job Title: sr. SRE (SITE RELIABILITY ENGINEER)
EXP: 9+
Location: 1 Month remote Alpharetta, GA / St Louis, MO (HYBRID)
Job Description:
- Experience with configuring, customizing, and extending monitoring tools (Appdynamics, Apica, Sensu, Grafana, Prometheus, Graphite, Splunk, Zabbix, Nagios etc.)
- 5 years of experience building JavaEE applications using, build tools like Maven/ANT, Subversion, JIRA Jenkins, Bitbucket and Chef
- 8+ years’ experience in continuous integration tools (Jenkins, SonarQube, JIRA, Nexus, Confluence, GIT-BitBucket, Maven, Gradle, RunDeck, is a plus)
- 3+ years’ experience with configuration management and automation (Ansible, Puppet, Chef, Salt)
- 3+ years’ experience deploying and managing infrastructure on public clouds (AWS, GCP, or Azure or Pivotal)
- 3+ years’ experience working on Kubernetes and other related applications.
- Experience working with Nginx, Tomcat, HAProxy, Redis, Elastic Search, MongoDB, and RabbitMQ, Kafka, Zookeeper.
- 3+ years’ experience in Linux environments (CentOS).
- Knowledge of TCP/IP networking, load balancers, high availability architecture, zero downtime production deployments. Comfortable with network troubleshooting (tcpdump, routing, proxies, firewalls, load balancers, etc.)
- Demonstrated ability to script around repeatable tasks (Go, Ruby, Python, Bash)
- Experience with large scale cluster management systems (Mesos, Kubernetes)
- Experience with Docker-based containers is a plus
Thanks & Regards
Karthikeyan .V| Technical Recruiter
http://www.krelixir.com/

: (770)881-7039 |

: [email protected]
Read the full article
0 notes
Text
Guide to Adapting HAProxy to openGauss
1. Introduction to HAProxy
HAProxy is an open-source project and its code is hosted on GitHub.
Code link: https://github.com/haproxy/haproxy
HAProxy is a free, quick and reliable proxy, which provides HA, load balancing, and TCP- and HTTP-based proxy services. It supports virtual hosts.
HAProxy implements an event-driven, single-process model that supports a large number of concurrent connections.
2. Read/Write Isolation and Load Balancing Based on HAProxy
HAProxy implements read/write isolation and load balancing for the openGauss cluster. The prerequisite is that Patroni manages the openGauss database cluster. The key is the configuration file.
The HAProxy configuration consists of five parts:
global: sets global configuration parameters, which are related to processes and the operating system.
defaults: sets default parameters. These parameters can be used by the frontend, backend, and listen components.
frontend: frontend virtual node that receives requests. The frontend can specify the backend to be used based on the ACL rule.
backend: backend service cluster, which is a real server. One backend corresponds to one or more entity servers.
listen: combination of the frontend and backend.
In the HAProxy configuration file, two listen modules are defined: opengauss and opengauss_balance, which correspond to the write operations on the primary node and the read operations and load balancing on the standby node, respectively. In the listen modules, you can use the server keyword to set the backend server, that is, set the IP address and port number of each database node in the openGauss cluster managed by Patroni. Then, the database node information can be added to the HAProxy management.

0 notes
Text
https://www.haproxy.com/documentation/dataplaneapi/enterprise/#get-/services/haproxy/configuration/http_response_rules
https://apps.db.ripe.net/db-web-ui/query?bflag=true&dflag=false&rflag=true&searchtext=Individual&source=GRS
0 notes
Text
How to set Max Connection Limit and timeout in HA Proxy ?
How to set Max Connection Limit and timeout in HA Proxy ?
HA Proxy is a powerful and reliable load balancing software. I am using HA Proxy for more than five years.

I have three API servers each can handle 100 requests at a time. I have used HA Proxy to load balance the requests between these three. Recently I have faced an issue due to large number of requests. The request rate came in the range of 1000 and it was equally splitted by the HA Proxy and…
View On WordPress
#configure#connection limit#HA Proxy#haproxy#limit connections#linux#max connection limit#maximum connections#queue timeout#set max connections#timeout
0 notes
Text
502 Bad Gateway The server returned an invalid or incomplete response.
502 Bad Gateway The server returned an invalid or incomplete response.
Running into this error?
502 Bad Gateway
The server returned an invalid or incomplete response.
This error only popped up when keepalived was started. Otherwise just with HAproxy, a timeout was seen. It appeared as if it was a keepalived config error. In this case, it was due to a faulty HAproxy configuration:
[root@jenkins01 jenkins]# diff /etc/haproxy/haproxy.cfg-diff01…
View On WordPress
0 notes
Last Seen Blogs

ex-seyong-mnet-blog
Hiatus Kim Seyong


hermithomebase
collision

thriftism
Thriftism

taylorspoems
Brenda