#if this has typos i'm sorry...i'm just sleepy 😂
Note
So 👀 you have inspired me to think about making gifs and/or edits 👀 and I don’t know shit about either. Care to throw some tips at ya girl? 👀 I ain’t even know what the first gah damn step is
I’m really flattered that I’ve inspired you 🥺 I’d be happy to help you get started!
HOW I MAKE A GIF 101:

1. The first step is acquiring the software needed to create gifs—which means you need Photoshop. I use Photoshop CC and it costs $10 a month with the plan I have. There’s also cracked versions available, but from what I hear they might not be as reliable at times and can be buggier. It’s up to you if you want the cracked or legitimate version. Either way I’m not judging you 😂
2. Gifs are made from video footage, so to begin the process you’ll need footage on your computer. The higher the quality the better. Since I make gaming edits, I record from my PS4 using the share button. I privately upload onto youtube and download them onto my computer. I can also plug a flashdrive into my PS4, but I don’t have a decent one. If the footage is captured on my computer then I don’t have to go through the hassle. You might a screen recording software. I have a PC and with windows 10 I can record by pressing the windows key, alt, and R.
When you have those two things, you’re ready to make a gif! Here are the actual steps to my process. (please note, this is just a tutorial on how to make a basic gif. I’m not going in-depth on my coloring processes and what filters I use and such.)
(I apologize for my screenshots being the best 😖)
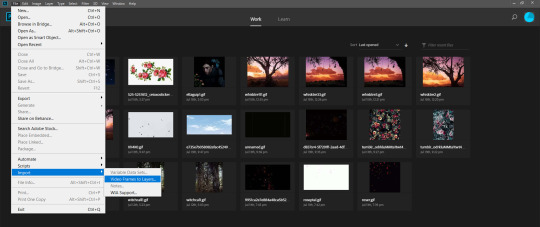
The first thing you do once you open PS is to go to File, and then from the drop-down menu click Import, and from there Video Frames to Layers. So what we’re doing here is opening up the footage in PS and loading it into frames. Next, a file explorer window will pop up.
(Yes laugh. I have a folder for heart memes and Arthur. Mind your own business 😂)
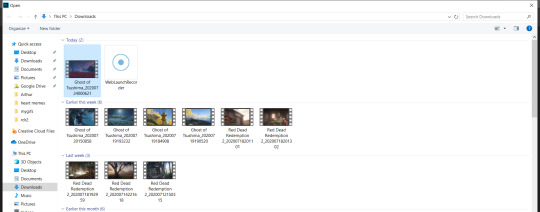
So since I download my uploads off of youtube, they are stored in my downloads folder, so I go there to find them and select the clip I want. For today’s example I’ll do a clip from Ghost of Tsushima. Click open.
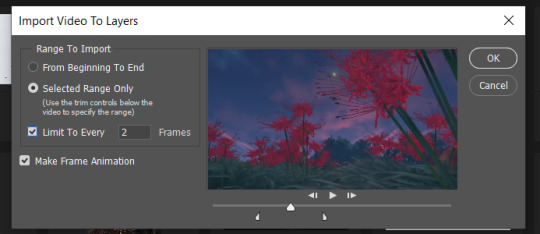
This will be your next screen. Here it’s asking to select a range from which to make layers. You’ll notice two beginning and ending slider bars you can use to crop between what part of the video you want to gif. Also note the setting I have of limiting to every 2 frames. Click OK.

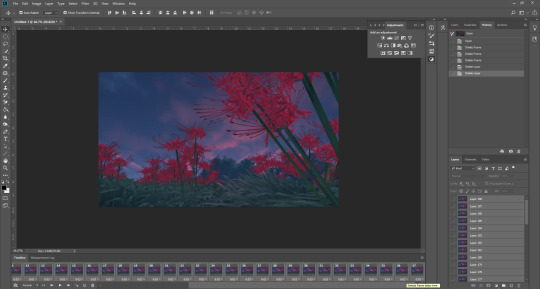
Once that loads, your screen should look like this. If it doesn’t, go to the Window tab in the header bar above and make sure Adjustments, History, Layers, and Timeline are checked off. You can customize your workspace layout however you wish.
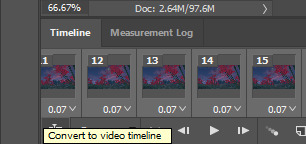
So now you have a timeline bar that let’s you play through the frames. Make sure on the bottom left you change Once to Forever. This controls how much the timeline will loop. During my process I play through it and look for where I actually want my gif to start and end, so I do delete frames as needed. When I’m satisfied with the range, I select all of my frames (there’s a short cut in the hamburger menu ≡ up to the right of the timeline bar, click it and find select all frames) and I select all of my layers in the layers window on the right (click first frame and hold the shift key until you select the last frame).
With everything selected, I now change the frame delay. If you notice on the bottom on each individual frame there’s a decimal number and a downwards arrow. This is the time that elapses before the next frame plays and so on and so forth. I click that arrow and a menu will pop up. Typically, most gifs have a frame delay of 0.05, but I personally find that too fast for game gifs so I set mine to 0.07. Again, everyone is different, you use what works for you. Anyways if you want to set the delay to 0.05 click Other... from that menu.


Then just type in the amount you want and click OK.
Now it’s time for the real work to begin. On the bottom left of your timeline panel, click square with the icon of a stack of bars with a slider. This will convert the gif into a video timeline.

Shit’s gonna look like this now ^
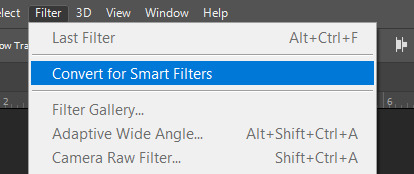
Next, go to the Filter menu from the header bar and select Covert to Smart Filters
Once it’s converted, go back to the Filter menu and go to Sharpen.

Select Smart Sharpen.
A new window will pop up.

Everyone uses different settings, but I typically go with Amount at 500% and Radius at 0.3. This is something you can experiment with, each gif may require different levels of sharpening. I know 150% is another popular option for the amount. Choose whatever you think looks best and makes the image clearer. Sharpening is a very important step.
Now, you’re free to experiment with coloring using the adjustments panel. I’ll typically tinker around with Brightness/Contrast, Levels, Curves, Vibrance, Color Balance, Photo Filter, and Selective Color. I do all of my colorings from scratch and just go by what I think looks good, trusting my eye. Once you’re satisfied with how everything turned out, here’s the next step:
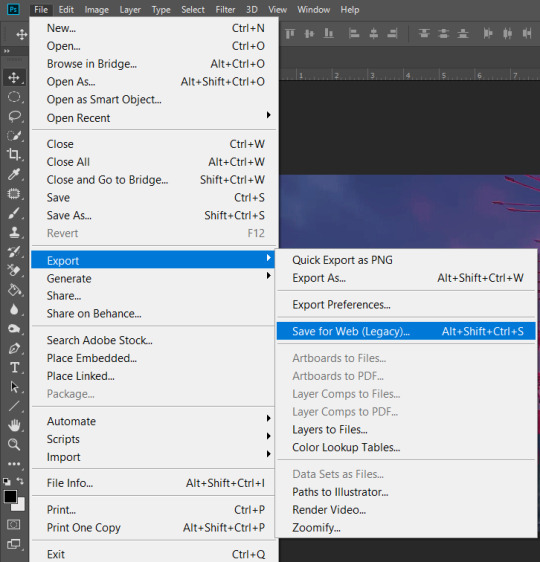
Go to the File menu, choose Export, and then Save for Web (Legacy).
Now comes the waiting. You can resize the gif before this step by going to the Image menu on top, and then Image size, and type in the dimensions you want. I personally don’t do this because it creates a transparent border around the gif? and it fucks with the specific filters I frequently use and makes it turn out ugly? So that’s why this step takes time for it load.
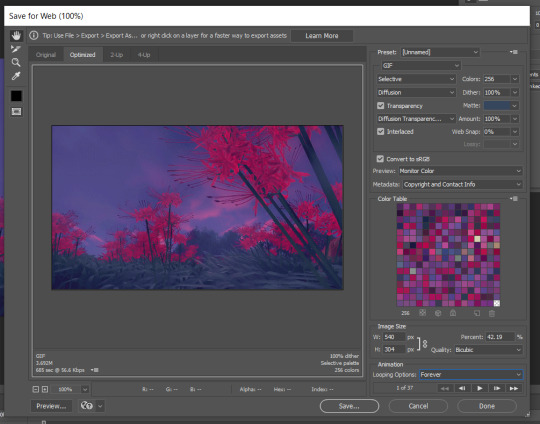
In the Image Size box here I type in the dimensions I want. Usually I always do a width of 540, your typical rectangular gif. Hit enter and it will start to resize again. Please note that the Animation box I have the Looping Option set to Forever. That’s very important. Again, everyone is gonna use different settings here based on what they think looks best. I use Quality: Bicubic, Selective coloring and Diffusion dithering. Some people using Pattern dithering and Adaptive coloring.
Once your gif is all ready you can click save. This window will also tell you the size of the gif in that left corner. And that’s it. That’s how you make a gif.
It’s a trial and error process and it takes so much practice. You’re gonna get frustrated, it’s gonna take awhile to learn your way around photoshop, and you’re gonna have to look things up sometimes. There’s many great resource blogs on tumblr for this as well, but for the most part I learned by doing and experimenting.
I know this was long but I hope I explained the process well? Feel free to shoot me more questions if not, I’m always down to help out with this.
Good luck! ♥
24 notes
·
View notes
Last Seen Blogs

panajans
Panajans Reklam Ajansı

hirotoshihamakawa
Hirotoshi Hamakawa


doodleduds
Personification of Nonsense

canvasinternationalpre-school
Canvas International Pre-School