#it's all thick rope and cotton cord in varying shades of tan
Text
Day 1-2: Cord length and types
Before you can make a project you need to select a cord and cut it to the length needed. There's many types of cord to choose from, each with their own properties. :
A. Limp cord, usually made out of twisted cotton, can be tough to use. It unravels and sometimes doesn't hold it's diameter- a tight knot can compress the cord. However, limp cord is the only type that doesn't hold it's past shape. It can be good for wall hangings where you don't want the hanging cords curly from being sold in a bundle. Since I'm not really into wall hangings I personally avoid this type.
B. Flexible cord like waxed braided cord is my favorite- the cord is strong and brightly colored, the ends don't unravel enough to be an issue, and the texture is smooth and nice on the hands. Sometimes sold in bundles, sometimes wrapped around a piece of cardboard.
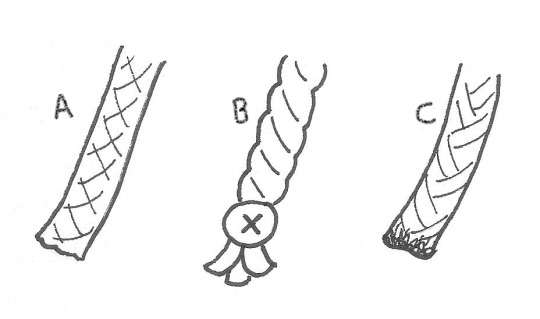
C. Stiff cord is usually natural hemp fibers, which are sold in round bundles. This type is really good for trying out new designs without worrying about wasting fancy colored cord, plus the ends don't unravel. Be careful though- this cord is very hairy and can be lumpy and uneven. Natural fiber cord can also come in different colors and stiffness, but even limp natural fibers don't compress in a knot like cotton.
Try not to mix these cord types- limp cord is flattened in a knot with other types, making the knot uneven. Mixing natural fibers with braided cord is fine in certain projects but for the most part the mix of smooth versus hairy+lumpy is awkward.
Other types of cord include synthetic cord, which is limp and can unravel like cotton but can come in vivid colors and weird shapes like flat. I don't have much experience with these. Avoid elastic cords for macrame.
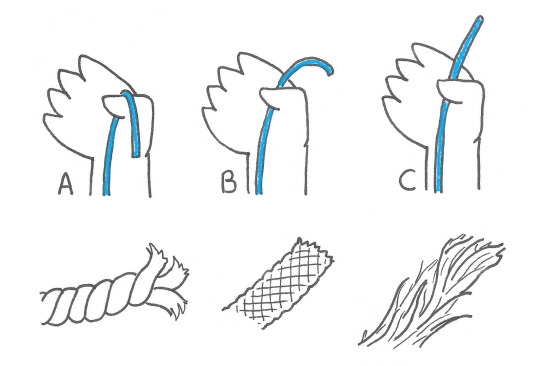
/\/\/\/\/\
^ Some cords don't unravel much and you can A) not worry about it. For cords that unravel you can B) tie the end in a knot, or for some synthetic cords C) singe/melt the endings with a lighter.
/\/\/\/\/\
One other thing to keep in mind is thickness- the width of the cord is usually given in millimeters (mm) but between you and me, tumblr, I don't think they know what a millimeter is. Who said that.
"1mm" is thin, good for smaller projects like jewelry. This is my default thickness. I've also seen 1mm be called "0.5mm." It doesn't matter much as long as it's thin macrame cord.
"2mm" is thick cord for smaller projects. I don't use thicker cord much because the thicker the cord the (slightly) easier it is for knots to unravel. 3mm and thicker starts getting unwieldy for my style of projects, but is common in stores because wall hangings got trendy.
/\/\/\/\/\
When it comes to the length of the cord many tutorials will just give you a length to cut. They give either the length for one specific project or there's a chart for bracelet/necklace/whatever. But people come in different sizes and having a 'one size fits all' measurement leads to wasted cord or a piece that's too small to wear. It can be a bit of a hassle. And I don't like having to dig out a ruler.
So I have my own method.

To measure by feel, use your chosen cord to figure out the length of the project (A). If it is a bracelet, wrap the cord around the wrist. You can make a necklace tight or loose. Whatever you like. Then, add like 3 or 4 inches, 15 to 20cm of bonus cord (B).
(The bonus cord is for you to hold onto when making the knots, and on longer strings it gives much needed wiggle room in case your knots eat up string.)
A and B together is the Project Length, or PL.
Next look at your project. Plan out what each string is doing- if it is used as a base string that goes the length of the project with no turns, it's length is 1 PL. Another string that is used in knots and has lots of turns can be 3 PL. The more PL, the more convoluted the path of the string.
For example, a series of square knots has two base strings and two strings that wrap around them. This project could be one cord, 2 PL, folded in half for the two base strings and a second, 6 PL, folded in half for the two wrapping strings.
So once you measure your project and decide on a PL, fold it back and forth until the cord is the desired length, and use that cord to measure the others in the project.
Another example with pics:
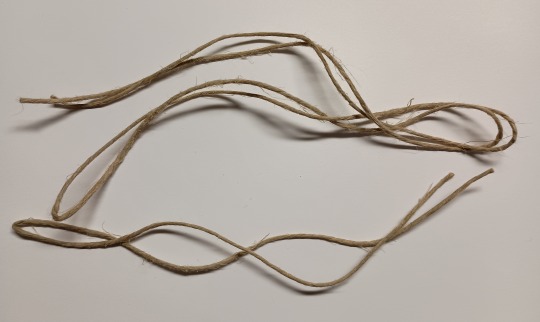
Two strings, natural hemp fiber, as straight as I could get them without taping them down lol. One is 2 PL and the other is 4PL, each folded in half. This makes two 1 PL strings and two 2 PL strings.
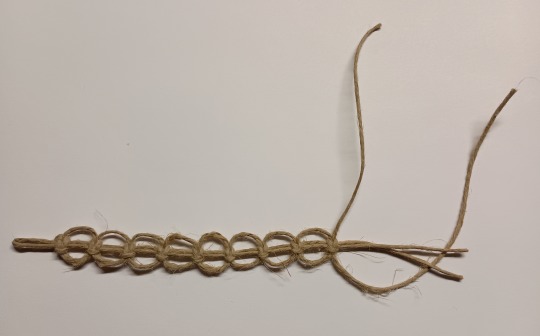
The long cords were used to make knots around the base cords, which are straight. (the wrapping cords ended up having more leftovers, but I chose a knot that's really light on the string. And I used string-saving techniques, oops)
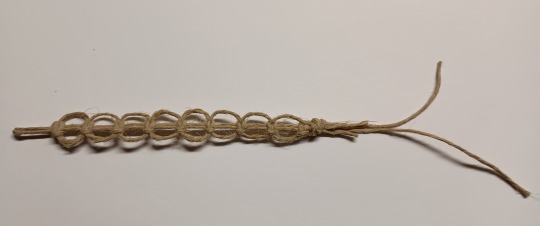
(I didn't give myself that much room for the finishing knot, oops x2)
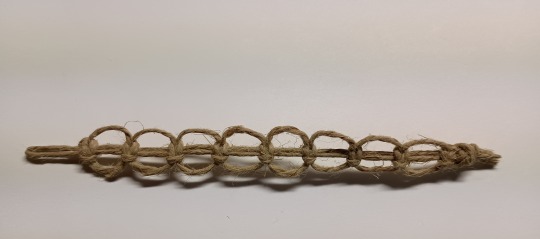
Final product with the strings trimmed! Don't worry about leftovers, the longer ones can be used in other projects or small samples for testing designs. It's better to overestimate the needed cord then to go through the circus of ending up short.
Anyway this way I can give you a design, say the Project Length of each string, and you can use that to build sweeping necklaces to child bracelets.
btw you can always look around at other tutorials of similar designs if you just want a solid number to work with.
(Macre-May Prompt list)
#Macre-May#Macre-May 2024#macrame#art challenge#not me throwing subtle shade at the wall hanging community#after wall hangings became a trend braided cord slowly stopped being sold in art stores#or at least there's less variety each year#it's all thick rope and cotton cord in varying shades of tan#boo#also#how did this become a mile long#I put two concepts in one post because this wasn't supposed to be wild#it got wild#also also#sorry for going back and forth with the words cord and string#there's a difference..... I can feel it but I can't explain it
3 notes
·
View notes
Last Seen Blogs

tawnysoup
TawnySoup

myroommateisdracula
My Roommate Is Dracula!?

otterlylostthesequel
Otterly Lost in a Fantasy