#msp430
Photo
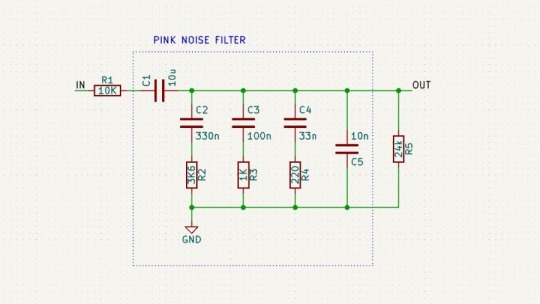
Stefan Antoszko's Pink Noise Generator Packs a TI MSP430 and "a Handful of Resistors and Capacitors"
0 notes
Text
Top Electronic Components Brands: A Distributor's Guide
As a distributor navigating the vast landscape of electronic components, aligning with reputable and reliable brands is paramount. This guide aims to highlight some of the top electronic component brands renowned for their quality, innovation, and industry impact. Whether you're procuring components for a specific project or expanding your inventory, these brands offer a solid foundation for sourcing high-quality electronic components.
Texas Instruments (TI):
Overview:
Texas Instruments is a global semiconductor and electronics company.
Renowned for analog and embedded processing solutions.
Key Offerings:
Analog ICs: Amplifiers, power management, data converters.
Microcontrollers: MSP430 and Tiva-C series.
Digital Signal Processors (DSP): Widely used in audio and signal processing.
Applications:
Industrial automation, automotive systems, consumer electronics.
Analog Devices, Inc.:
Overview:
Analog Devices is a leading global high-performance analog technology company.
Specializes in signal processing, power management, and data conversion.
Key Offerings:
Signal Conditioning ICs: Amplifiers, filters, analog switches.
Converters: ADCs (Analog-to-Digital Converters) and DACs (Digital-to-Analog Converters).
Power Management: Voltage regulators, power monitoring.
Applications:
Healthcare, automotive, communication systems.
STMicroelectronics:
Overview:
STMicroelectronics is a global semiconductor company delivering innovative solutions.
Offers a wide range of semiconductor products.
Key Offerings:
Microcontrollers: STM32 series.
Sensors: Accelerometers, gyroscopes, magnetometers.
Power Management ICs: Voltage regulators, motor drivers.
Applications:
Automotive electronics, industrial systems, consumer devices.
NXP Semiconductors:
Overview:
NXP Semiconductors focuses on secure connections and infrastructure.
Offers a diverse portfolio of semiconductor solutions.
Key Offerings:
Microcontrollers: LPC and Kinetis series.
Automotive ICs: In-vehicle networking, security solutions.
RFID Solutions: NFC (Near Field Communication) and UHF RFID.
Applications:
Automotive electronics, IoT solutions, secure identification.
Vishay Intertechnology:
Overview:
Vishay is a leading global manufacturer of discrete semiconductors and passive components.
Known for its extensive range of electronic components.
Key Offerings:
Diodes and Rectifiers: Schottky diodes, rectifiers.
Capacitors and Resistors: Ceramic capacitors, thin film resistors.
Optoelectronics: LEDs, displays, sensors.
Applications:
Power supplies, telecommunications, lighting.
Murata Manufacturing Co., Ltd.:
Overview:
Murata is a global leader in the design and manufacture of electronic components.
Specializes in ceramic capacitors, sensors, and wireless communication modules.
Key Offerings:
Ceramic Capacitors: Multilayer ceramic capacitors (MLCC).
Sensors: Accelerometers, gyroscopes, environmental sensors.
RF Modules: Wi-Fi, Bluetooth, LPWA (Low Power Wide Area) modules.
Applications:
Mobile devices, IoT devices, automotive electronics.
Infineon Technologies AG:
Overview:
Infineon is a German semiconductor manufacturer known for its power semiconductor solutions.
Focuses on power management, security, and automotive applications.
Key Offerings:
Power Semiconductors: MOSFETs, IGBTs, power modules.
Security Solutions: Microcontrollers with integrated security features.
Automotive ICs: Microcontrollers, power management.
Applications:
Power electronics, automotive systems, industrial automation.
ON Semiconductor:
Overview:
ON Semiconductor is a leading supplier of power management and sensor solutions.
Offers a broad portfolio of energy-efficient products.
Key Offerings:
Power Management ICs: Voltage regulators, power switches.
Sensors: Image sensors, proximity sensors.
Discrete Semiconductors: Diodes, transistors.
Applications:
Automotive electronics, imaging applications, industrial systems.
Xecor:
Overview:
A global electronic components trading company based in Japan, dedicated to providing exceptional services to enterprise clients.
1+ Million Users Rely on Xecor Leading Electronic Components Search Engin.
Key Offerings:
Discrete Semiconductor Devices: Diodes, transistors, IBGT modules, field-effect transistors, etc.
Integrated Circuits (ICs) and Memory Chips: Offering diverse integrated circuit solutions, from microprocessors to memory chips.
Sensors and Converters: Supplying various sensors and signal converters to meet diverse application needs.
Applications:
Automotive electronics, I to T device , industrial systems
Conclusion:
Navigating the electronic components market requires partnering with reliable and innovative brands. The featured brands in this guide, including Texas Instruments, Analog Devices, STMicroelectronics, NXP Semiconductors, Vishay, Murata, Infineon, and ON Semiconductor, represent a diverse range of offerings. Whether you're sourcing components for specific applications or aiming to broaden your inventory, these reputable brands ensure you have access to high-quality electronic components for your distribution needs.
0 notes
Text
Essential Embedded Software Development Tools for a Smooth Development Process
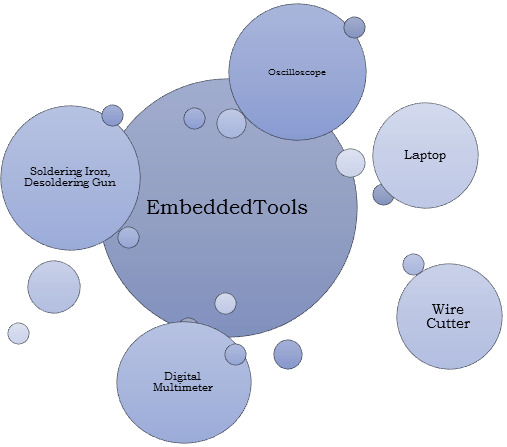
Embedded software development is a specialized field that requires a unique set of tools to ensure the smooth creation of software that runs on embedded systems, such as microcontrollers and microprocessors. These tools are essential for debugging, testing, and optimizing code for these resource-constrained environments. In this blog post, we’ll explore some of the key embedded software development tools that every developer should have in their toolbox.
Integrated Development Environments (IDEs)
IDEs are the central hub for embedded software development. They provide a comprehensive platform for writing, editing, compiling, and debugging code. Some popular IDEs for embedded development include:
Eclipse: An open-source IDE with a vast ecosystem of plugins, including many tailored for embedded development.
Keil MDK: A dedicated IDE for ARM-based microcontrollers.
IAR Embedded Workbench: A powerful toolchain for ARM, MSP430, and RISC-V processors.
PlatformIO: An open-source IDE that supports multiple platforms, including Arduino, ESP8266, and STM32.
Cross-Compilers
Cross-compilers are essential tools that allow you to write and compile code on a host machine while targeting a different architecture, like an ARM-based microcontroller. These compilers help optimize code for the target hardware. Popular cross-compilers include GCC (GNU Compiler Collection), ARM Keil, and IAR Embedded Workbench.
Debugging Tools
Debugging is a crucial aspect of embedded software development. Without the right tools, finding and fixing bugs can be a daunting task. Some of the tools used for debugging embedded systems are:
JTAG Debuggers: These hardware tools connect to your embedded system and enable you to halt program execution, inspect variables, and trace program flow.
Serial Debuggers: These are essential for debugging when using serial communication with your embedded system.
GDB (GNU Debugger): GDB is a popular open-source debugger that can be used with various IDEs and hardware debuggers.
Real-Time Operating Systems (RTOS)
Many embedded systems require real-time capabilities, and an RTOS is often the best way to achieve this. Popular RTOS options include FreeRTOS, Micrium uC/OS, and VxWorks. These operating systems help manage tasks, priorities, and resources in an embedded system.
Code Analysis and Profiling Tools
Code analysis and profiling tools are essential for optimizing code and identifying potential issues. Tools like Lint, Cppcheck, and Static Analysis Tools can help find code quality and security issues, while profiling tools like Gprof and Percepio Tracealyzer can help identify performance bottlenecks.
Version Control Systems
Effective version control is crucial for collaboration and code management. Tools like Git and SVN help keep track of code changes, facilitate collaboration, and provide a backup for your work.
Simulation Tools
Simulation tools allow you to test your embedded code on a host machine before deploying it to the target hardware. Tools like QEMU and Simulink can help you validate your code without the need for physical hardware.
Documentation and Collaboration Tools
Proper documentation is essential for understanding and maintaining embedded software. Tools like Doxygen can automatically generate documentation from code comments. Collaboration tools like Slack, Microsoft Teams, or even a simple Wiki can help teams work together efficiently.
Conclusion
Embedded software development can be a challenging but rewarding field. Having the right tools at your disposal can make the process much more manageable. Whether you are a beginner or an experienced developer, these tools can help streamline your development process, improve code quality, and ensure the reliability of your embedded systems. Make sure to choose the tools that best suit your project requirements and hardware platform for a successful embedded software development journey.
0 notes
Text
Custom LCD Display
Our vision is to become one of the world's top display manufacturers in the industrial intelligent field. And providing top-quality products and professional technical services to customers all over the world.
We provide affordable, powerful, and easy to develop HMI display solutions for industrial and civil equipment. Custom lcd display
Our core TFT LCD display modules integrate a CPU, flash memory, and touch screen in the hardware unit. Paired with an easy-to-use free GUI design software and complete instruction set, customers can avoid time-consuming accessories selection and system integration tasks. These units greatly reduce the workload in HMI development and make the entire process faster and easier.
The modules come with a UART TFT serial interface that can be controlled by any MCU through simple but powerful instruction set like the 8051 series, AVR series, MSP430 Series, STM32 series, MC9S12, and Arduino series, among others. 7 inch display
Each TFT display LCD module has a wide range of applications, such as automated system control, vending machine functionality, intelligent lockers, electricity equipment (oiling machine, EV charger), elevators, smart home and office, precision instruments, and much more.
To date, we have delivered custom display solutions to over 3000 customers around the world. Our TFT LCD modules have been widely praised for their quality and performance and that is in large part thanks to our partners, including NI, Siemens, ThyssenKrupp, and many others. These long-term cooperative relationships have been mutually beneficial and we hope to continue a long history of success.
0 notes
Text
Nucleo f401re clion

#NUCLEO F401RE CLION CODE#
#NUCLEO F401RE CLION SERIES#
#NUCLEO F401RE CLION FREE#
PC0, PC1, PC2, PC3, PC10, PC11, PC12, PC13, PC14, PC15Ĭan be used to power them module from battery They are also categorized with the table below: The name of the pins can be found in the image above. They comprise of GPIO pins, Analog Pins, Timer Pins, and Power pins. These pins are classified into CN7 and CN10 with each having 38 Pins. These pins can also be used for I2C Communication A4 is SDA and A5 is SCLĬan be used to provide analog reference voltageĪcts as SCK, MISO, MOSI and CS pins respectively for SPI communicationĪcts as Rx and Tx pins respectively for USART communicationĪpart from the Arduino pins, the board also has 76 (38+38) GPIO pins as male headers on either side of the board as shown above. Provides 3.3V as output can also be used to power the MCU Each category pin can be tabulated as follows: The Arduino pins are split into category CN5, CN6, CN8, and CN9. The arduino like pins are female connector pins which exactly match the order and position of Arduino UNO pins and hence any Arduino shield can be used with these development boards. The pin one resembles the Arduino UNO and the blue one is the STM32 style ( Morpho). As you can see, there are two sets of pins. The STM32 Nucleo board pinout is shown above. The Board operates with 3.3V supply but a wide voltage range of 7-12V can be provided to the VIN pin since it has an on-board voltage regulator. Similarly, there are two push buttons where one is user programmable, and the other is to reset the Microcontroller. This board also comes with an integrated ST-LINK/V2-1 programmer and debugger hence it is very easy to get started with this board.Īs shown in the image above, there are three LEDs, where LD1 is for indicating USB communication, LD2 is programmable LED, and LD3 indicates power. The Boards pinout is similar to Arduino UNO and has many other additional pins to expand performance. It features the ARM Cortex M4 32-bit STM32F401RET6 microcontroller which is in LQFP64 package. Errors and Warnings List: The left pane shows the list of errors and warnings and some hints are provided inside the code.The STM32 Nucleo boards are the official Development Boards from STMicroelectronics.
#NUCLEO F401RE CLION CODE#
The code is checked as you type, with suggestions, help and error checking. Check-as-You-Type Code Control: This is really amazing.
#NUCLEO F401RE CLION SERIES#
ATmega-based Trinket boards from Adafruit, - Atmel ATmega- and Cortex-M3 SAM-based boards from Arduino, - Microchip PIC32-based chipKIT boards from Diligent, - Atmel ATmega328 with BLE BLuno board from DFRobot, - Atmel ATtiny85-based board from Digistump, - Intel Quark SoC X1000-based Galileo boards from Intel, - LaunchPad MSP430 and LaunchPad Cortex-M4 Tiva C series boards from Texas Instrument, - ARM Cortex-M3 STM32 F103RB-based board from Maple, - ATmel ATmega328 and ATmega644-based boards from Microduino, - ARM Cortex-M4 Freescale MK20-based Teensy 3.0 and 3.1 from PJRC, - Atmel ATmega644p-based board from Wiring, - Nordic nRF51822 SoC-based boards from RedBearLab, - Nucleo F401RE on mbed from STMicroelectronics, - Freedom KL25Z on mbed from FreescaleĬode Presentation: Syntax colouring, line numbering and function highlighting ease code reading.
#NUCLEO F401RE CLION FREE#
It eases development for the most popular embedded computing boards.Īfter having played with embedded computing platforms for a while, I was looking for one single IDE and a better one.īecause I'm a Mac user, I designed embedXcode, a template for Xcode, the free and standard IDE on Mac.ĮmbedXcode supports the most popular boards based on the Wiring / Arduino framework and on the mbed framework.
1 note
·
View note
Text
Hacking tools

GoodFET: this is an open-source JTAG adapter, based on the TI MSP430 FET UIF and EZ430U boards and is a USB interface.
The best starter antenna that you can use is ANT500. For you to use it, you will need an antenna since one is not provided by default.
HackRF One: the HackRF One is a software-defined radio that can transmit or receive radio signals from 1MHz to 6GHz.
You would need to connect it to any USB ports of the target computer and connect a LAN cable through to it. It can also be used to intercept traffic inbound to a target computer. It can be connected to the LAN and administered remotely.
LAN turtle: the USB LAN turtle works perfectly on Kali Linux.
The most interesting and amazing part of it all is that this device is incredibly cheap, costing only around $1.50. Just like the Arduino board above, this device can be programmed to function just like a USB rubber ducky.
DigiSpark: the DigiSpark is a low-powered microcontroller that can be programmed using the Arduino IDE found in Kali Linux.
You can also access its web server from a browser on Kali Linux. This can function better than the USB rubber ducky seen above. It is internet capable and you can use it as a human interface device like a USB mouse or keyboard, so it can perform like a USB rubber ducky.
Arduino MKR1000: you can program this device in Kali Linux, allowing it to perform various functions.
You can then operate this as a remote administration tool if you can have it installed in a network. These devices are cheap, readily available and can be hidden in places that cannot be easily discovered.
Raspberry pi: this is a small computer that you can install Kali Linux on and is quite small and portable.
This adapter is mostly preferred due to its packet injection capabilities and works well with most Kali Linux versions. It is supported by a huge number of Kali Linux kernels and uses the Atheros chipset that allows you to operate within all six Wi-Fi modes.
Alfa AWUS036NHA USB Wi-Fi adapter: the Alfa is the primary tool for attacking wireless networks using Kali Linux.
The captured traffic can be examined for sensitive content using software such as Wireshark in Kali Linux that we shall see in the next section. You can use it with Kali Linux to capture Wi-Fi traffic. You can operate it within the 2.4 GHz frequency and for Bluetooth traffic monitoring with Kali Linux.
UberTooth One: this is a very good tool for Bluetooth hacking.
These scripts can gather credentials from various locations, perform brute force attacks against password prompts, automatically copying files and directories to their internal memory. Since it is plug-and-play, it simulates a HUD device such as a keyboard and using scripts that you can write in Kali Linux, you can instruct it to run the scripts immediately when connected to the target USB device.
USB rubber ducky: the USB rubber ducky is a thumb drive-like device.
You can also collect credentials of connected victims by creating phishing pages and serving them to the unsuspecting victims, this is a much better way than relying on the Social Engineering Toolkit in Kali Linux.
Wi-Fi pineapple: the Wi-Fi pineapple is a device that allows you to clone and mimic existing Wi-Fi hotspots and create rogue access points that you can control.
You can use this device to test hardware and determine which ones are more resilient. This effectively disables any device that is not protected against such attacks. It works by taking in power from the connected device via USB, then multiplies it and discharges it into the data lines of the device.
USBKill: USBKill is a device that you can use to perform stress tests on hardware that is USB capable.
You can use these tools with your Kali Linux installation to modify the normal functionality of certain hardware devices that you have or can access. The following sections discuss some of the commonly used tools for hardware hacking. Hackers are therefore able to use tools together with Kali Linux to extract data and information out of such hardware in environments. Normally, these actions are not expected by the manufacturer of the hardware equipment. Hardware hacking enables hackers to be able to exploit the normal functionality of common hardware into their desires.
0 notes
Text
Register indirect addressing mode pdf file
REGISTER INDIRECT ADDRESSING MODE PDF FILE >>Download (Telecharger)
vk.cc/c7jKeU
REGISTER INDIRECT ADDRESSING MODE PDF FILE >> Lire en ligne
bit.do/fSmfG
Addressing modes of 8085 by Er. Swapnil V. Kaware. Oct. 28, 2019. • 2 likes • 1,136 views. 26 Summary: use of memory addressing modes M emory indirect 1% 1% 6% Scaled 0% 6% 16% GCC Spice Register Defered 3% 11% 24% Tex Immediate 17% 39% 43% Register $v0 has to contain the service number, i.e. what we want syscall to $a0 = address of string Prints every character until the terminating '\0'. Intel 8085 uses the following addressing modes: 1.Direct Addressing Mode 2.Register Addressing Mode 3.Register Indirect Addressing Mode If the processing of an instruction can be interrupted Add new instructions to manipulate index registers Evolution of Addressing Modes. The number of EMIF address pins (EA[21:2]) limits the maximum addressable memory (SDRAM) to BK1 du registre de contrôle AMR Address Mode Register. Private written deed bearing the written signatures of the parties. Action. Titre de propriété négociable émis par une société de.MSP430.pdf est le manuel générique de la famille MSP430. 3 de ce document. The constants are selected with the source-register addressing modes. sous Linux et dont on trouvera la description complète dans le document Using as avant dans ce document. Indirect register addressing mode */.
https://www.tumblr.com/tavucuwad/697517783200743424/icone-pdf-gratuito, https://www.tumblr.com/tavucuwad/697517783200743424/icone-pdf-gratuito, https://www.tumblr.com/tavucuwad/697517783200743424/icone-pdf-gratuito, https://www.tumblr.com/tavucuwad/697517783200743424/icone-pdf-gratuito, https://www.tumblr.com/tavucuwad/697517783200743424/icone-pdf-gratuito.
0 notes
Text
Nucleo f401re clion

#Nucleo f401re clion pro#
#Nucleo f401re clion download#
GPIO_InitStructure. HAL_GPIO_Init(GPIOA, &GPIO_InitStructure) GPIO_InitStructure.Speed = GPIO_SPEED_HIGH GPIO_InitStructure.Mode = GPIO_MODE_OUTPUT_PP I made this program in order to turn on and off the green led when I press the user's button (the blue one), #include "stm32f4xx.h" The STM32 MCUs are commonly used in many industrial and commercial products these days.I am trying to run a simple program on my new Nucleo board,
#Nucleo f401re clion download#
It is beginner friendly and on top of that, it is free to use, just download the IDE and its respective drive from link below. Out of these, the Keil MDK is the most used one. The Board can be programmed with many Development tool chains which are listed below: The Nucleo Development Board is relatively easy to get started and learn since it has an in-built programmer and debugger.
#Nucleo f401re clion pro#
Note: More technical information can be found in the STM32 Nucleo-F401RE Datasheet, linked at the bottom of this page.Īrduino UNO, Arduino Pro Mini, Arduino Mega, Arduino Due, Arduino Leonardo, Raspberry Pi, PIC Development Board, AVR Development Board, MSP430 Launchpad, Intel Edison, ESP32 PC0, PC1, PC2, PC3, PC10, PC11, PC12, PC13, PC14, PC15Ĭan be used to power them module from battery They are also categorized with the table below: The name of the pins can be found in the image above. They comprise of GPIO pins, Analog Pins, Timer Pins, and Power pins. These pins are classified into CN7 and CN10 with each having 38 Pins. These pins can also be used for I2C Communication A4 is SDA and A5 is SCLĬan be used to provide analog reference voltageĪcts as SCK, MISO, MOSI and CS pins respectively for SPI communicationĪcts as Rx and Tx pins respectively for USART communicationĪpart from the Arduino pins, the board also has 76 (38+38) GPIO pins as male headers on either side of the board as shown above. Provides 3.3V as output can also be used to power the MCU Each category pin can be tabulated as follows: The Arduino pins are split into category CN5, CN6, CN8, and CN9. The arduino like pins are female connector pins which exactly match the order and position of Arduino UNO pins and hence any Arduino shield can be used with these development boards. The pin one resembles the Arduino UNO and the blue one is the STM32 style ( Morpho). As you can see, there are two sets of pins. The STM32 Nucleo board pinout is shown above. The Board operates with 3.3V supply but a wide voltage range of 7-12V can be provided to the VIN pin since it has an on-board voltage regulator. Similarly, there are two push buttons where one is user programmable, and the other is to reset the Microcontroller. This board also comes with an integrated ST-LINK/V2-1 programmer and debugger hence it is very easy to get started with this board.Īs shown in the image above, there are three LEDs, where LD1 is for indicating USB communication, LD2 is programmable LED, and LD3 indicates power. STM32Cube HAL and Nucleo-F401RE: debugging and unit testing. Octopart is the world's source for NUCLEO-F401RE availability, pricing, and technical specs and other electronic parts. of clion2021 and STM32 lighting LED based on clion In our last tutorial. The Boards pinout is similar to Arduino UNO and has many other additional pins to expand performance. Kurs STM32 F4 1 Czas View and Download ST STM32H7 Nucleo-144 user manual. Find the best pricing for STMicroelectronics NUCLEO-F401RE by comparing bulk discounts from 8 distributors. upload, and debug STM32Cube-based application on the STM32 Nucleo-F401RE. It features the ARM Cortex M4 32-bit STM32F401RET6 microcontroller which is in LQFP64 package. The STM32 Nucleo boards are the official Development Boards from STMicroelectronics.
0 notes
Text
Character purble place

CHARACTER PURBLE PLACE FULL VERSION
CHARACTER PURBLE PLACE DOWNLOAD FOR WINDOWS
CHARACTER PURBLE PLACE DOWNLOAD FOR WINDOWS
Electronic Workbench freeload For Windows 7 64 Bit.Electronic Workbench For Windows 7 64 Bit Download.Electronic Workbench For Windows 7 64 Bits.However, this USB driver is incompatible with IAR Embedded Workbench for MSP430 version 4.21 and older. This driver is included in IAR Embedded Workbench for MSP430 version 5.10 and newer. On Windows 7 (or any 64-bit Windows) the FET debugger needs the ‘Windows driver package’ (umpusbvista) USB driver. The traces on the screen instruments are the same as you get on real equipment.
CHARACTER PURBLE PLACE FULL VERSION
Free electronic workbench 5.12 full version download software at UpdateStar - Electronics Workbench is a powerful software tool that enables you to easily build and test simulated analog and digital circuits. As the integrated design software for your Micro Control system, Connected Components Workbench software provides device configuration, controller programming, and integration with Human Machine Interface (HMI) editor. Simplify standalone machine development for multiple industries with the Connected Components Workbench™ software. We think that this software very popular in electronic student because many electronic university or collage using Electronic. When you are electronic student, maybe you will not foreign again with Electronic Workbench software or called EWB software. One of the popular electronic simulation software that wanted by electronic student and hobbyist is Electronic Workbench or called with EWB. Get classic windows 7 games in windows 8 and 10 for free. Download microsoft purble place game for windows (xp, 7, 8, 8. Download purble place game free vista download software. The that it is reasonable microsoft expects windows 10 users to. IPhone Upgrade Program If you’re a Verizon, AT&T, Sprint, or T-Mobile customer looking for a quick and easy. Purble Place direttamente sul tuo iPhone, iPad e iPod touch. Purble Place is a puzzle mini-game collection developed by Oberon Games and released by Microsoft for the PC in 2006, bundled with all Windows Vista and Windows 7 installations. We spend countless hours researching various file formats and software that can open, convert, create or otherwise work with those files. Purble Place Ipad App aims to be the go-to resource for file type- and related software information. And now, updated to the latest version at This month. This free app was developed by Oberon Games Inc. Purble Place for PC – Purble Place is a Games apps that you can running into your Windows PC.
0 notes
Text
Little professor texas instruments bedienungsanleitung target
LITTLE PROFESSOR TEXAS INSTRUMENTS BEDIENUNGSANLEITUNG TARGET >> DOWNLOAD LINK
vk.cc/c7jKeU
LITTLE PROFESSOR TEXAS INSTRUMENTS BEDIENUNGSANLEITUNG TARGET >> READ ONLINE
bit.do/fSmfG
mikrocontrollermikroprozessortechnik tu berlin
mikroprozessoren
mikroprozessortechnik pdf
mikroprozessortechnik studium
mikroprozessor aufbau
cpu
Für das Praktikum gibt es eine eigene Anleitung. Wir 2.2 Kurzeinführung: Der MSP430 von Texas Instruments . JTAG das Target übertragen werden. Es ist zwar schwer vorstellbar, doch LabVIEW von National Instruments war ur- der University of Texas, wo er nicht abgelenkt wurde und besser nachdenken Yokogawa mv2000 handbuch maschinenbau · 204 · Little professor texas instruments bedienungsanleitung polar · Scheppach hf 3000 bedienungsanleitung deutsch2 Bosch, Analog Devices, Texas Instruments, Sensirion, and other small and medium enterprises have built colleagues under the guidance of the professor.powered by powered by Target Video Kein DS, dafür aber TEXAS INSTRUMENTS Schulrechner Little Professor Solar Habe wie nach Anleitung gemacht!!! mich auch bei Professor Gunter Winkler vom Insitut für Elektronik der TU Graz für seine TI. Texas Instruments. TTL. Transistor-Transistor-Logik.
https://wojaqitoxuvu.tumblr.com/post/694380966796492800/einhell-airtech-1500-1-bedienungsanleitung-target, https://lamudajuxu.tumblr.com/post/694381214209081344/honeywell-cm67z-bedienungsanleitung-huawei, https://wojaqitoxuvu.tumblr.com/post/694381145280921600/metz-64-af-1-bedienungsanleitung, https://nexofesuhobe.tumblr.com/post/694381645868023808/odys-boox-ereader-bedienungsanleitung-medion, https://lamudajuxu.tumblr.com/post/694381589540601856/bauknecht-fssm6-bedienungsanleitung-pdf-writer.
0 notes
Text
Arduino PSA: Genuine vs. Knock-off and How to Spot Them
I think this particular topic has been talked to death, but just a refresher in case you come across one of these...
About a month or so ago, I signed up in a contest to get some free stuff. I’ve seen ads for a website called inventr.io and, after some research, determined it was reputable (at least to an extent) and signed up for the contest. Didn’t win, but apparently you got a free Arduino Uno just for participating. You only payed for the shipping and handling, which was about $10 USD.
Alright, easy enough. $10 USD isn’t bad. What’s the harm there?
Last week, it finally came in. My first suspicion that it wasn’t going to be a genuine Arduino was when I saw all the labeling on the box: It came from China. For those of you new to electronics as a hobby, Chinese companies are notorious for producing clones and counterfeits of popular electronic devices, such as Arduino. These clones/counterfeits are typically subpar in quality and performance but otherwise operate similarly to the product they are imitating. (It’s here I should note that there are a few Chinese electronic products that are of a similar quality to those products with which they are competing and are sometimes even better. However, Arduino isn’t one of them.) I opened my box and found the contents below inside.
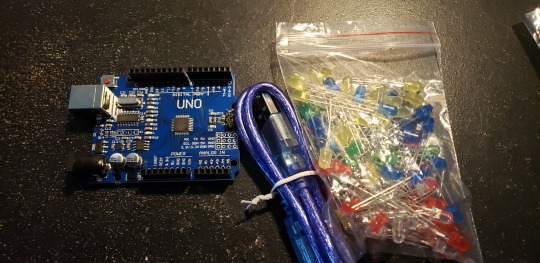
A “fake” Arduino, a data cable, and a sh*tload of LEDs. I was going to be mad about it, but honestly, I’m not entirely sure what I expected. I was actually happy about getting the data cable and LEDs since my current data cable is a bit wonky and my LED supply is running low.
So let’s break this down: How am I sure that I have an Arduino clone? The very first thing to notice is the color of the PCB. It’s a dark, Navy blue. A genuine Arduino is assembled on a teal-colored PCB. Additionally, and rather obviously, is “Arduino” and the respective logo aren’t anywhere to be found on the board. And, if you check the back, the nice “Made in Italy” with the outline of the country is also missing. In fact, the country of origin isn’t printed anywhere on the board as far as I can tell. Whether it actually works or not remains to be seen.
How was I duped, you ask? The advert they had for this contest was using pictures of a genuine Arduino. And...yeah, the price seemed pretty good.
So, to all you electronics enthusiasts and hobbyists out there, beware of Arduino clones. I’ve been in this game for a few years now (5 years if I’m remembering correctly) and I still managed to get duped. If you are looking to purchase and Arduino, do so from the Arduino site. There are also a list of official distributors here if you are in the United States. And if you think you have a counterfeit or Arduino clone, you can check here.
These guys who produce Arduino clones don’t deserve your business. The Arduino guys already do so much for the community by providing an open-source platform for us to use and make stuff with. Always, always be sure to purchase a genuine Arduino if you are wanting or needing one; a single Arduino Uno is literally only $22 USD. Hell, donate to them if you can. That money goes to developing the Arduino platform and providing services for us and many others to use.
Now, I’m gonna go back to seeing if I can get my Arduino Mega and TI MSP430 to talk to each other while I let my newly acquired Arduino clone gather dust in a box somewhere.
-J
1 note
·
View note
Photo
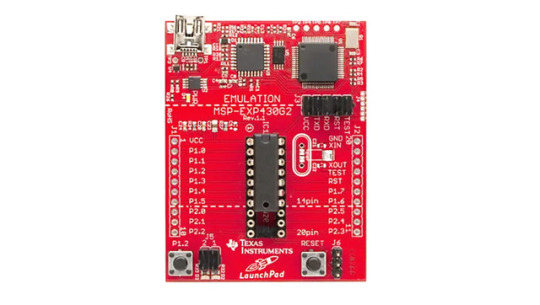
MSP430 Launchpad
MSP430 Launchpad is a hardware development tool for MSP430 Value Line series of microcontrollers and is popular among hobbyist for its low cost and features. It is an easy way to start developing on the MSP430 MCUs, with on-board emulation for programming and debugging as well as buttons and LEDs for a simple user interface.
Learn more about MPS430 launchpad
12 notes
·
View notes
Text
Microcontroller MSP430-Launchpad von Texas Instruments
Von der Firma WinSource Electronics habe ich den Microcontroller MSP430-Launchpad von Texas Instruments für dieses Review erhalten.
Bezug
Diesen kleinen Microcontroller kann man wie bereits in der Einleitung erwähnt im Onlineshop von WinSource Electronics bezogen werden.
Lieferumfang
Zum Lieferumfang gehört
1x Microcontroller MSP430-Launchpad,
1x Microchip M430G2553 (vormontiert)
1x Microchip M430G2452
1x USB Kabel (ca. 50cm lang),
2x 10 polige Buchsenleisten, sowie
1x Micro Crystal, MS3V-T1R 32,768 kHz
Die zusätzlichen Microchips enthalten "nur" den Speicher, die Recheneinheit ist auf der Platine verbaut.
Technische Daten des MSP430-Launchpad von Texas Instruments
Beim Microcontrollerboard MSP430 sind die Logikeinheit (M430F1612) und der Speicher getrennt.
Die Logikeinheit hat folgende Technische Daten:
16Bit RISC Architektur,
Prozessortakt
bei 1,8V > 4,15MHz
bei 3,6V > 8MHz
12Bit Analog zu Digital Wandler
dual 12Bit digital zu Analog Wandler
Weitere Technische Daten zum Chip M430F1612 findest du in der offiziellen Dokumentation vom Hersteller unter https://ti.com.
Dem Microcontroller liegen zwei Microchips bei, welche jeweils unterschiedlichen Speicher und Leistungen haben.
M430G2452
M430G2553
Flash Speicher
8kB
16 kB
RAM
256 Byte
512 Byte
digitale I/O Pins
16
16-bit Timer
1x
2x
Schnittstellen
WDT, BOR, 1x USI (I2C/SPI)
WDT, BOR, 1x USCI (I2C/SPI/UART)
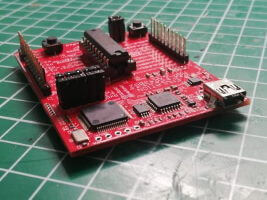
Aufbau des Microcontrollers
Der Microcontroller hat die Abmaße 66mm x 51mm und eine Höhe von ca. 13mm. Neben der Micro - USB Buchse für die Verbindung zum Computer bzw. zur Stromversorgung über eine Powerbank oder ähnlichem verfügt dieser kleine Microcontroller über 2 Taster (einmal für Reset und einmal frei Programmierbar).
Was ich besonders gut finde ist dass, das Board auf kleinen, rutschfesten Gummifüßen steht. Somit hat dieser einen festen Stand auf dem Schreibtisch und "fliegt" nicht so durch die Gegend wie ein Arduino UNO.
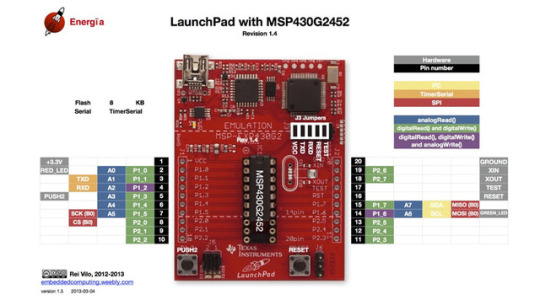
Pinout
Der Microcontroller verfügt über digitale sowie analoge Pins welche wir später mit einigen kleinen Beispielen programmieren möchten.
Hier also zunächst eine kleine Übersicht.
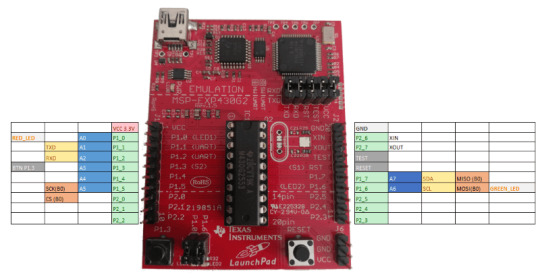
Pinout des Texas Instruments MSP430 Launchpad
Programmieren
In den nachfolgenden Beispielen zeige ich dir wie du einige Aktoren / Sensoren an dem Texas Instruments MSP430 Launchpad anschließt und ausließt bze. steuerst.
Wenn wir das Board mit dem Computer verbinden so wird bereits ein kleines Programm ausgeführt welches die LEDs (rot & grün) abwechselnd blinken läßt.
einrichten der Entwicklungsumgebung Code Composer Studio
Für den Microcontroller gibt es die kostenfreie Entwicklungsumgebung "Code Composer Studio" welche auf der Seite von Texas Instruments heruntergeladen werden kann. Es gibt jeweils eine Version für die verschiedenen Betriebssysteme (Linux, MacOS, Windows). Im nachfolgenden gehe ich darauf ein wie man die Software auf ein Microsoft Windows 10 PC installiert.
Die neue Version ist leider nicht mit einem 32bit System kompatibel hier müsste man eine Version vor CCSv8.3.1 wählen. (Da ich ein 64bit System habe kann ich die neue Version CCSv9 (stand 08.02.2020) installieren.)
Nachdem die ca. 1GB Datei heruntergeladen wurde, muss diese zunächst in ein beliebiges Verzeichnis entpackt werden. In dem nun neuen Verzeichnis befindet sich die Datei "ccs_setup_9.3.0.00012.exe" welche mit einem Doppelklick gestartet wird.
Nachfolgende zeige ich die Dialoge mit den jeweiligen, getroffenen Einstellungen für die Installation von Code Composer Studio v9 für das MSP430 Board.
Während der Installation wird gefragt ob man eine vollständige oder eine angepasste Installation möchte. Die vollständige Installation benötigt 4GB Festplattenplatz die angepasste mit dem Treiber für das Board MSP430 ca. 2.2 GB.
Wenn die Software wie in den Bildern angegeben installiert wurde, so sollte sich auf dem Desktop nun ein Icon für die Software "Code Composer Studio v9" befinden.
Icon der Anwendung Code Composer Studio v9
Mit einem Doppelklick auf dieses Icon startet nun die Software und man wird aufgefordert ein Workspace anzulegen.
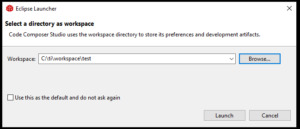
anlegen eines Workspaces für die Software "Code Composer Studio"
Ich habe in dem Installationsordner der Software einen Unterordner mit "Workspaces" angelegt, in diesem werde ich dann die Verschiedenen Workspaces anlegen um die Projekte sauber zu trennen. Es kann natürlich der Standardwert belassen werden, dann wird der Workspace in dem Benutzerordner angelegt.
Mit einem klick auf die Schaltfläche "Launch" wird dieser Vorgang abgeschlossen.
Beim ersten start werden einige Berechtigungen gesetzt hier wird ggf. ein Virenscanner oder ähnliches Alarm geben, in meinem Fall hat der Windows Defender etwas zum meckern gefunden was zusätzlich bestätigt werden musste.
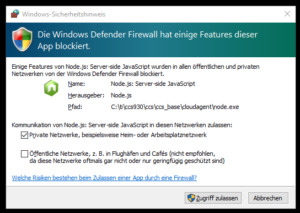
bestätigen des Zugriffs von Node.js auf das Netzwerk
Diese Tools / Plugins sind meist sehr wichtig und ein verhindern des Zugriffs kann zu Fehlfunktionen führen.
Wenn die Software nun fertig gestartet ist wird der Startbildschirm / die View "Getting Started" angezeigt. Hier kann man nun wählen ob man in den bestehenden Ressourcen sich umschauen (Resource Explorer), ein neues Projekt anlegen (New Project) oder ein bestehendes Projekt importieren (Import Project) möchte.
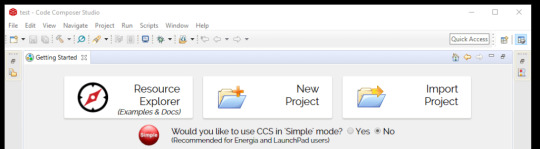
Schaltflächen zum erzeugen eines neuen Projektes in CCS
Zunächst möchten wir ein neues Projekt anlegen, dazu klicken wir auf die Schaltfläche "New Project". In dem neuen Dialog müssen wir nun die Einstellungen zum Microcontroller treffen.
Ich habe das Modell MSP-EXP430G2 und wähle die Einstellungen:
Target MSP430Gx Family (MSP430G2001)
Project name "HelloWorld"
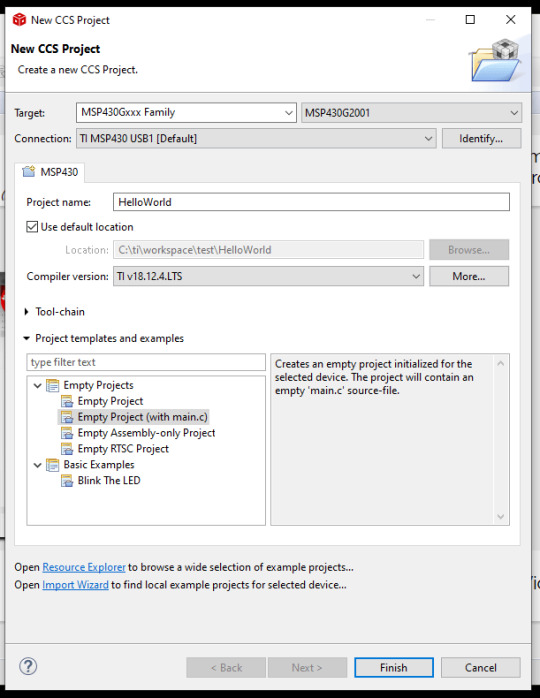
CCS - neues Projekt für MSP430G2x erstellen
Beispiele
Nachdem die Entwicklungsumgebung eingerichtet ist und wir ein Projekt erstellt haben, wollen wir nun ein erstes kleines Programm schreiben.
Das Board verfügt über 2 LEDs (rot, grün) welche wir relativ einfach ansteuern können.
rote LED aktivieren
#include
/**
* main.c
*/
int main(void)
{
WDTCTL = WDTPW | WDTHOLD; // stop watchdog timer
P1DIR = BIT0; // als Ausgang definieren
P1OUT = BIT0; // die LED1 (rot) aktivieren
// Endlosschleife
// Wenn diese schleife nicht wäre dann würde das Programm sofort beenden und die LED wäre wieder aus.
while(1) { }
return 0;
}
rote LED blinken lassen
#include
/**
* main.c
*/
int main(void)
{
WDTCTL = WDTPW | WDTHOLD; // stop watchdog timer
P1DIR |= 0x01;
while(1){
P1OUT ^= 0x01; // Togglen des Pins P1.0 mit exclusives OR Statement
volatile unsigned int i; // volatile um die Optimierung zu nutzen
i = 25000; // Softwareseitige Pause
do i--;
while(i != 0);
}
return 0; //Dieser Code wird nicht erreicht.
}
Wechselblinken der roten sowie grünen LED
#include
void main(void) {
WDTCTL = WDTPW | WDTHOLD; //Stop watchdog timer
//P1.0 (rote LED) & P1.6 (gruene LED) als Ausgang definieren
P1DIR |= BIT0+BIT6;
P1OUT |= BIT0; //rote LED, aktivieren
P1OUT &= ~BIT6; //gruene LED, deaktivieren
while(1)
{
P1OUT ^= (BIT0+BIT6); //umkehren / toggeln der LED Status (AN > AUS, AUS > AN)
volatile unsigned long i;
for(i = 0; i }
}
Weitere Beispiele zum programmieren findest du auch auf dem GitHub Repository https://github.com/ticepd/msp430-examples.
alternative Entwicklungsumgebung - Energia IDE
Zum einfacheren programmieren des Microcontrollers MSP430 habe ich die Entwicklungsumgebung Energia IDE gefunden.
Diese wirbt damit mit dem Chip MSP430G2452 kompatibel zu sein.
Leider hat die neue Version einen bekannten Bug und man muss für den genannten Chip die IDE in der Version E17 nutzen.
"Info über Dialog" - Energia IDE
Du kannst die ca. 200MB große Entwicklungsumgebung auf der Seite http://energia.nu/downloads/downloadv3.php?file=energia-0101E0017-windows.zip kostenfrei herunterladen.
Wenn du diese Datei heruntergeladen hast wird diese einfach in einen beliebigen Ordner entpackt und du kannst die Anwendung mit der Datei energia.exe starten.
Vergleich Arduino IDE & Energia IDE
Im "Info über..." Dialog steht geschrieben "Modified version of the Wiring/Arduino IDE" dieses merkt man an so ziemlich jeder Ecke der Software.
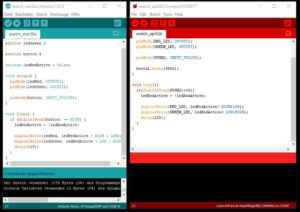
Fenster, Arduino IDE und Energia IDE
Die LEDs (rot & grün) und der Button auf dem MSP430 sind frei programmierbar.
Man kann diese über die Pins ansteuern oder aber über die internen Konstanten.
Pin
Konstante
rote LED
P1_0
RED_LED
grüne LED
P1_6
GREEN_LED
Push Button (S2)
P1_3
PUSH2
In der Energia IDE fehlen unter anderem
der serielle Plotter,
der Bibliotheksmanager, und
der Boardmanager
Diese IDE ist also speziell auf die MSP Reihe von Texas Instruments ausgelegt.
Beispiele
rote LED blinken lassen
void setup(){
pinMode(RED_LED, OUTPUT);
}
void loop(){
digitalWrite(RED_LED, HIGH);
delay(750);
digitalWrite(RED_LED, LOW);
delay(750);
}
Wechselblinken der roten & grünen LED
void setup(){
pinMode(RED_LED, OUTPUT);
pinMode(GREEN_LED, OUTPUT);
}
void loop(){
digitalWrite(RED_LED, HIGH);
digitalWrite(GREEN_LED, LOW);
delay(750);
digitalWrite(RED_LED, LOW);
digitalWrite(GREEN_LED, HIGH);
delay(750);
}
Button (S2) zum steuern der LEDs
boolean ledRedActive = false;
void setup(){
pinMode(RED_LED, OUTPUT);
pinMode(GREEN_LED, OUTPUT);
pinMode(PUSH2, INPUT_PULLUP);
Serial.begin(9600);
}
void loop(){
if(digitalRead(PUSH2)==0){
ledRedActive = !ledRedActive;
digitalWrite(RED_LED, ledRedActive? HIGH:LOW);
digitalWrite(GREEN_LED, ledRedActive? LOW:HIGH);
delay(125);
}
}
Fazit
Der Microcontroller MSP430 von Texas Instruments ist ein sehr guter aber auch teurer Microcontroller. Diesen jedoch mit einem Arduino UNO (oder ähnlichem) vergleichen zu wollen wäre nicht fair. Der MSP430 kommt mit einem zusätzlichen Chip daher welcher mehr Speicher bietet und einem Quarz welcher bei Echtzeitanwendungen seinen Einsatz findet.
Die Programmierung des Microcontrollers ist in der Anwendung Code Composer Studio recht gewöhnungsbedürftig aber möglich. Die Entwicklungsumgebung Energia IDE liegt mir persönlich mehr, das liegt vielmehr daran das der geschriebene Code lesbarer und übersichtlicher ist. Jedoch bezweifle ich das sich "echte" IoT Entwickler dieser Meinung anschließen werden.
Obwohl ich leichte Startschwierigkeiten mit dem Microcontroller hatte möchte ich nachfolgend gerne einige Beispiele in separaten Beiträgen herausbringen. Es wird jedoch kein 100%iger Ersatz für einen Arduino werden.
Read the full article
0 notes
Photo
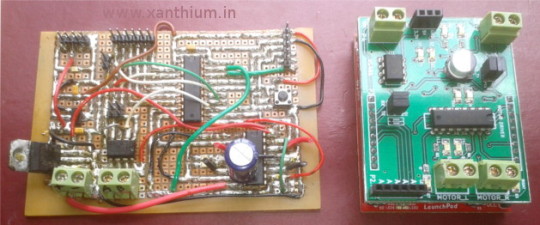
MSP430 Launchpad Booster Packs for learning by xanthium enterprises.
Learn Embedded systems using MSP430 microcontroller by building robots.
#MSP430#msp430g2553#msp430 projects#msp430 clocks#MSP430 Booster Pack#texas instruments#embedded#Embedded System#DIY Projects#diy ideas#robotics
4 notes
·
View notes
Photo

Appreciation is the one thing which always thrives us to move forward and guide us that our choosen ways is right for our future. - Follow for new Updates@visionworldtech 🎯 - #award #awards #engineering #workinprogress #jaipur #robotics #maker #mentor #engineering #engineeringproject #arduino #msp430 #raspberrypi #raspberrypi3 #poornimauniversity #jecrc #rcew #electronics #industrialization #embeddedworld #researchdevelopment #love❤ (at Vision World Tech Pvt. Ltd.) https://www.instagram.com/p/Bu5Ufxbnc08/?utm_source=ig_tumblr_share&igshid=wa6a62s7celi
#award#awards#engineering#workinprogress#jaipur#robotics#maker#mentor#engineeringproject#arduino#msp430#raspberrypi#raspberrypi3#poornimauniversity#jecrc#rcew#electronics#industrialization#embeddedworld#researchdevelopment#love❤
0 notes
Photo
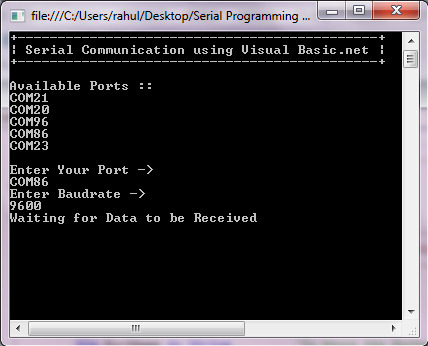
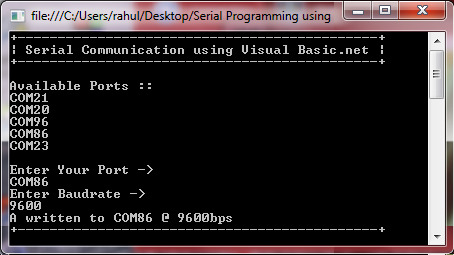
Serial Port programming using Visual Basic for Embedded Developers.Learn how to interface your microcontroller with PC using Visual Basic .net
#serialport#embedded#programming#visualbasic#dotnet#usbtors485#.net development#msp430#avr#atmel#8051#at89s51#microcontroller
3 notes
·
View notes
Last Seen Blogs

kimgouen
home.

tentabrella
this is so sad marina play shark bytes

junglecatfan
JungleCatFan

jayyyykayyyyyy
too many fandoms to count

davidleestone
David Lee Stone