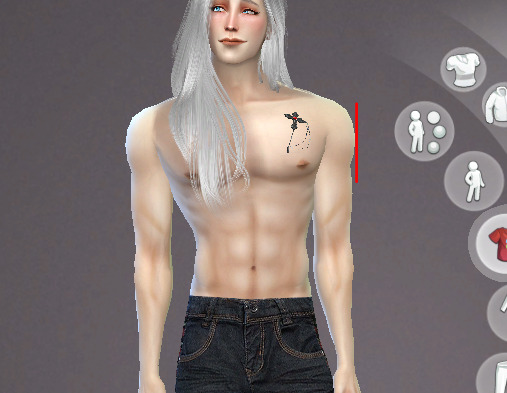
#the first pic is when i did the body uv map for the texture paint lol
Text

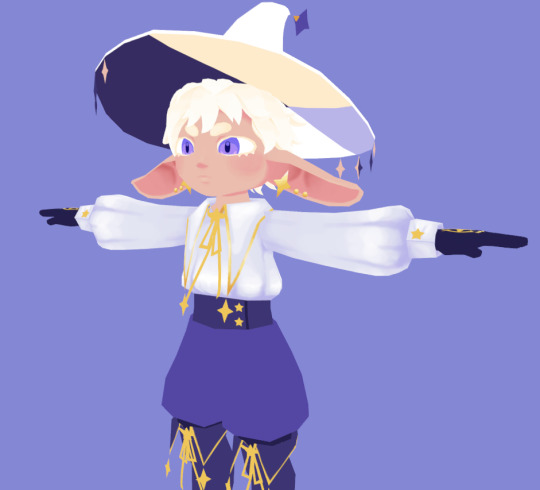
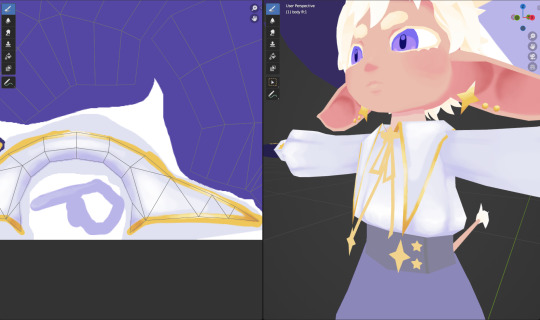
im in texture paint hell
#3d#wip#the first pic is when i did the body uv map for the texture paint lol#since i used flat colors as placeholders before and just used project from view to assign colors#idk what im doing wrong but my shoulder always gets so sore from drawing on the computer#maybe i should just take more stretch breaks#i like the look of these soft painterly textures but man is it a lot of work#also i never do soft shading when im drawing because i cant be bothered#so im kinda in foreign territory also lmao
121 notes
·
View notes
Text
BG3 Modding Tutorial - Tattoos
Part II Body Tattoos
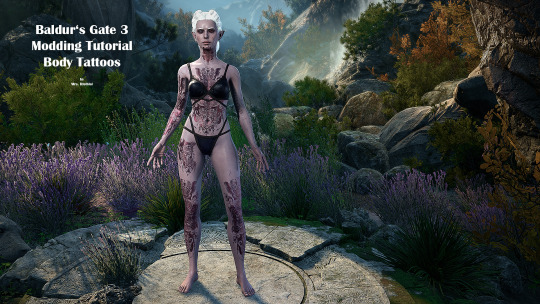
Reworked Tutorial...because people still like it and reblog my crap :D
Now you can have your unique tattoo file and you don't have to paint on the body texture as I did when I made the old tutorials.
PART I - Face Tattoos -> here
You need:
A photo editor as PS or gimp etc.
Body uv-map
Body textures
The file from the unique tav_mod by kartoffels as a template. Grab it on the Nexus or make your own.
Phantasy, brushes, time...
Or download my file here
Load your necessary files in Gimp or PS etc. The body texture will not be exported- it's just a help/ orientation where the tattoo is placed.
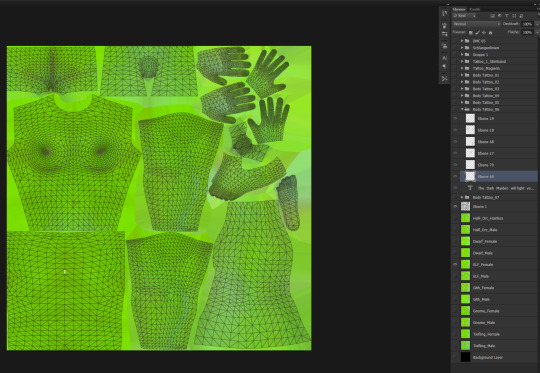
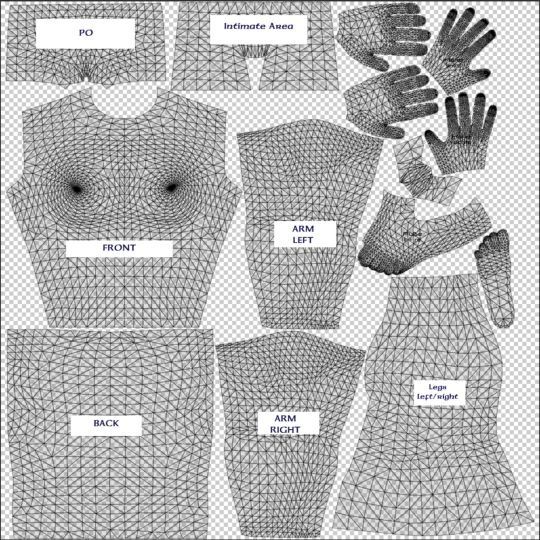
The next pic above shows the uv-map with the different body parts. Watch out when you make tattoos for the arms or legs. The left side of the uv map body part represents the back of the arm or leg. Hm, writing this I'm not sure anymore-- try it out :D
Then create your stuff on different layers:
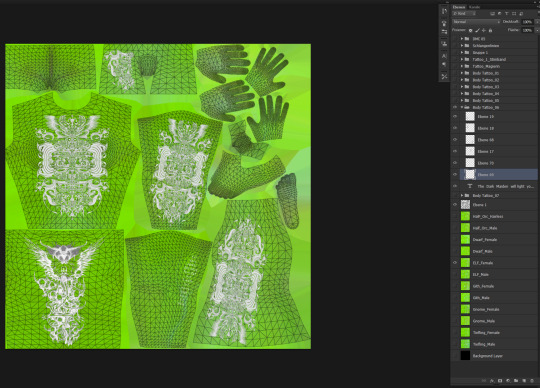
and merge your levels together when you are finished. The same prodcedure as for the face tattoos.
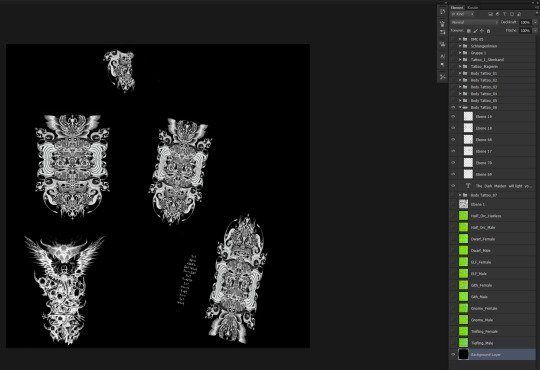
Don't forget to deselect the uv-map and the body texture!
Your merged file should look like this:
Now load the tattoo file from Kartoffels mod in your editor or create your own.
Your own should look like this.

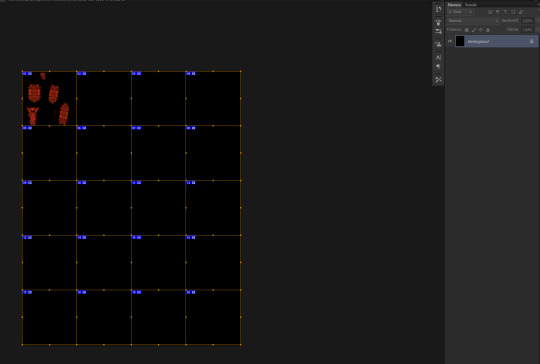
You have to use the slice tool to subdivide the file.
Then copy paste your tattoo in your new tattoo file in the red channel

Then drag/ move it in the left corner..

and scale it that it fits in the first square of your tattoo file

Select all channels before you export. Your file should look like this:
Export your file:

Name of the file is: Skin_Atlas_Body_UNI_Tattoo_A_MSK.dds
And your new creation goes here:
Games\Baldurs Gate 3\Data\Generated\Public\Shared\Assets\unique_tav\BODY\TATTOO
Happy Modding!
#bg3 mod tutorial#bg3#baldur's gate 3#bg3modding#if something changed or is wrong please let me know#full release
68 notes
·
View notes
Photo

CC Making Journal day 7- Collars, tailoring, transparent patterns, LODs.
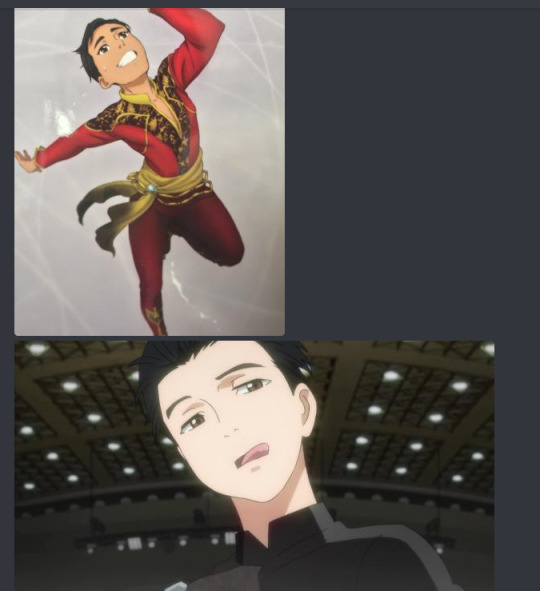
Aka what started as a night full of hope and excitement over nipple lace button downs turns into bowling alley manager uniforms, tiramisu, irl shirt theft, screaming about paint buckets, and disappointment. Yuuri making his cute face is all I can stand. I didnt even go in game for this shirt I was so disappointed.
First realization- when the mesh is ugly as fuck there is no saving the piece. Just start over.
Second realization- half sleeve will never be flattering
No matter how these jazzy looking boy pose:
BUt I started off realizing this piece was not a simple 4 piece suit. No- it had many moving parts. So I made my first button down. The original piece had these hideous buttons:

I was pretty happy here.I had, after all, created my first button down with the two pieces n the back, the trim, collar, the whole 9 yards! A certain tofu loving dragon helped me find a collar pattern guide after they caught me blindly making the worst collar known to man on stream. Thank you for your guidance. (I also wasnt sure if the collar was 1,2,or 3 pieces so I stole a shirt from my dads closet. Its still on my bed. I may keep it. He doesnt need it anyway. Its so soft) We were still so naive though. Dofu tried to warn me about the weird sleeve length and frumpy sleeve holes. But I didnt listen. I was too busy screaming:

Yes I did a little peak at the stammi vicino possibilities. I felt so close.But then...
Then...
It came to open it in S4s...
(at least the white swatch is clean)
And I was met with a huge disappointment. The shoulders are rounded hideously. and the collar stands up weird. And I cant for the love of me figure out where the sim waist pant line is on the Sims 4 male rig for MD.
Basically I achieved the silhouette “Boy stuffs himself into a button down that is much to small for him” DX I mean if we wanna play chubby Yuuri it works.
The waist UV didnt copy over from the sim so he has a different body shape. This keeps happening on tops I have partial transparency on so I think this is related to that issue. As I learn more I realize the issues on my cc are all fixable at their various step. Yuuris waist is supposed to be SNATCHED
Okay some may think the shirt doesnt look bad on Yuuri, right? But I knew something was wrong....when I put it on Victor and his shoulder SUNK INTO HIS BODY:
THIS IS WHAT HE IS SUPPOSED TO LOOK LIKE.
Oh the disappointment I was met with. Victors beautiful broad shoulders. Decimated.
(Oh speaking of decimate i managed to get this mesh to be under 12k and then I imported it into s4s it JUMPED TO 20K AND I WAS SHOOK LIKE WTF SO OF COURSE MY OTHER 3 LOD DECIMATES WERE ALL HUGE POLY COUNTS. NONE OF THEM NEAR 500 FOR LOD 3). I was annoyed but had bigger monsters with this piece.
Already deterred by some much disappointment, I almost didnt want to continue on. But I roped my friend in again and we went at the Lace texture. BC AS UGLY ASTHE MESH WAS, THE TRANSPARENCY WORKED. SO I failed the war but won the mission. We shared a few pic me up photos of our good boys and powered on.
And then I found out in PS version 20 there is NO PAINT BUCKET TOOL.
After screaming over no paint buckets (silently bc my discord audio broke) we tried like 10 different methods. I tried to follow along but boyyyy I had no idea what mask laters or rasterize was. I dont even know how to rotate and combine photos in PS. I was in pain. Perhaps I am still traumatized. But not enough to not keep trying.
By then it was 3am and I had inhaled a piece of tirimisu cake to fend off sadness. I ate my late dinner from a paper plate like the sad bachelorette I am and watched again and again as my friend tried to explain how to make the transparency work.
Eventually they got it to work. I did but I had the pattern too small. So it was useless.
Anyway, I had to show SOMETHING so I tried Archive actions weird pants that I cant put on literally any outfit bc its clips awfully on the sim and BAM

CANT YOU JUST SEE HIM IN A BOWLING ALLEY?!?!? UGH
Anyway credits to StinkyDofu here on tumblr and the victuuri birb server, Otaku Sim server, random twitter followers who will not see this image or else my follower count will continue to drop, and NO THANK YOU TO HALF SLEEVED SHIRTS.
Also heads up usually im not a negative person and wont be as harsh on cc to others as I am to myself. But this particular piece was started with such high expectations and the downfall really hurt. But, like I said, this is all for learning so I will keep going. I love this process fully.
It was calming, the boring parts of cc making. Lowering poly with edge loop deleting, extruding edges, uv mapping, texturing. I love the process no one wants to show in their time skips.
I’ve already linked the tutorials I used in my last journal. So today i’ll advise yall to watch Grafity-cc on youtube for their great speed meshing blender. I would tag but I am but a measly peasant.
Also of course follow StinkyDofu, DroSims, and Poeticfalls for my sim inspo, teachers, and friend groups.
10 notes
·
View notes
Note
hey so your fjord model completely blew me away; do you have any process pics? If not, can you explain a little of your process, for both fjord and beau? absolutely stunning.
Hey !
Thank you, that’s super nice ! I usually post my progress on Twitter but I can make a recap here ;D
1 - First thing first I make a base model in 3Dsmax. I know a lot of people start in ZBrush directly but A) I am not comfortable enough when it comes to creating from scratch in ZBrush and B) I don’t have to do retopology when I’m done he he. I also think it’s easier to manage a shape with a few points rather than sculpt in it but that’s a personal preference so if you’re more at ease with sculpting, go for it ! For this model I tried to stay relatively low poly (and then people from Ubi told me their models were up to 50K and I realized I could have put more edges).
The ropes are still splines at that point and are not transferred to ZBrush. I later used this tutorial to make a high poly version that was then baked on the low poly:https://www.youtube.com/watch?v=OxAYvMs117I&t=120s
I put a placeholder for the hair so I could see what the silhouette would look like eventually.

When I’m done I send the model over to ZBrush !
2 - I import each asset in .obj one by one, starting with the body. To avoid ZBrush making mush out of my shapes when subdividing them, I add one level of subdivision, then come back to the now slightly different first level of subdiv and reimport my original asset. That way it regains its original form and I keep my levels of subdivisions. This method can create some artefact on squared shapes but it’s the only one I found that worked.
When working in ZBrush I try to apply some tips I’ve learned from watching FlippedNormals’ tutorials and work by levels of details: low, middle and high-frequency. Here is the video that explains it the best but I really recommend most of their channel, you learn a ton of important principles when it comes to sculpting ! https://www.youtube.com/watch?v=VKstQNoI2w0
Second important tip: never work with the default orange material, it lies to you.
ZBrush is also a good moment to check my overall proportions and anatomy. I use the Transpose Master in ZPlugin to make my different subtools one, I move and resize everything that feels off and then I reconvert them into separate objects. You don’t loose any subdivision information and it’s completely undoable so it’s very handy !Another thing when working with ZBrush: step back and look at the whole thing from time to time. Remember where your area of focus should be and check that you didn’t overdo it in areas that shouldn’t draw the focus away. For exemple at the beginning I had spent a lot of time on the folds of the boots at the ankles. Turns out the hard shadows they created were catching the eye too much and drawing the attention away from the face. So I smoothed them down a bit.
When I’m done with the sculpt it’s time to do some UVs !
3 - For that part I come back to 3dsmax. I use the ZPlugin “FBX Import/Export” to transfer everything at the lowest subdivision level. And then it’s UVs, yay ! I’m not going to explain how to make UVs, I’ll just say I used two UDIMs, one for the whole body and one for the face. Looking back three would have been nice since the hood is too low definition for being so close to the face. I used a checker to make sure all the UVs have the same size.

Beautiful, I know.
When the UVs are done I export each asset one by one in .OBJ to update the ZBrush model. There again I go back to the first level of subdivision and I reimport, it keeps my higher levels of subdiv.
Ok now we have a low poly version and a high poly it is time for texturing and… baking. Oh dear I hate that part.
4 - So, I’m gonna be honest, when it comes to baking normal maps ZBrush has always been the death of me, and since Substance Painter was involved in my process I decided to do everything in Substance. It was my first time using it so I lost a whole day trying to understand how to make it work :)
Basically you start your project by importing your low poly in .fbx, with every asset named NameOfAsset_low. You then can bake your maps by importing your high poly as a fbx, with every asset in it named NameOfAsset_high. And then ask Substance to “match by name”.
And then time to work ! I can’t really give tips on Substance to be honest, I’m very new at it, but there are tons of very good tutorials out there ! I worked using PBR Metallic Roughness. I made the opacity map for the edges of the cloth by simply taking the smallest brush size I could and painting threads. There’s one thing a recruiter told me once about Substance, that vaguely sounded like “With Substance kids these days don’t know how to paint textures, it’s all automatic”. So I think using the materials available in substance is nice, but you need to work over them after that. FlippedNormals’ channel has videos on Substance and how to think while texturing so I recommend checking those !

Then I just exported all my maps and put them on my model ! For Substance to Arnold there is a good video explaining in which slot goes which map: https://www.youtube.com/watch?v=kgiZ-ZOEPNg&t=2103s
5 - And now… the hair. The hair was a first too, and it was quite difficult.
I learned the principle of the method from this video (it’s a very interesting interview with the guy who made the hair for Horizon Zero Dawn):https://www.youtube.com/watch?v=Z58OQ9x0E68
And I found another tutorial that used the method but with tools I knew how to use (I have never touched xgen in maya and the fibermesh in ZBrush seemed more approachable): https://www.artstation.com/artwork/GW9JB
For baking I used 3dsmax (you really need to up the global supersampler to get something not horrible) and xNormals.
When I had all my hair strands all pretty and baked I started placing them. I think I put way too many of them and I would certainly do things a little differently but the method itself is good, I think you just need practice to get better results. For the eyebrows and lashes I couldn’t get something satisfying on ZBrush so I painted the maps by hand. The normal map is a combination of xNormals’ HeightToNormal baking and handpainted normal.

And we’re not done yet ! Because that’s a three weeks of work model.
6 - The rig and skin. I’ll just say I used a CAT from 3dsmax. Those are extremely easy to learn and use with tutorials on youtube and they can really bring a character to life. I merged most of the objects together and then skinned them to the CAT. Here you need to know anatomy but if you want references you can check out Hippydrome, a handy website for modelers and riggers showing where articulations should be and how they work. It can also help with good topology ! https://hippydrome.com/
7 - Lighting and rendering. I used Arnold on 3dsmax for rendering everything. It’s very simple to use once you’ve learned the basics:
A) for the light settings you use intensity first, exposure second, and you change the color using temperature (Kelvin)B) for rendering settings you start low, you check where the noise is and you up the corresponding samples
For lighting I used 4 lights. From left to right: a rim light, a key light, a secondary and a fill light. The fill light is a skydome. I used this article to get a good base: https://3dtotal.com/news/inspiration/10-top-tips-for-lighting-and-presenting-your-sculpts-by-james-w-cain-zbrush-hair
And I think that’s all !
As you can see I spent a lot of time researching tutorials, but in parallel I also asked for a lot of feedback from friends who work in the industry.
For Beauregard I only did modeling on 3dsmax, UVs, handpainted textures in photoshop, rig/skin and rendering in Arnold. She took me a week. For Fjord I introduced new elements and methods: I decided to use ZBrush and Substance, and I wanted to make hair cards. He took me three weeks.I think starting simple with Beauregard helped me figure out a lot of stuff and made it much easier to work on Fjord after. Struggling every step of the way can be overwhelming and make me loose interest in a personal project, so I really recommend starting small and introducing difficulty and new methods when you’re at ease with the basics. Finished is better than perfect !
I hope this will help you in some way. Don’t hesitate if you have specific questions I’ll be happy to answer as best as I can !
37 notes
·
View notes
Last Seen Blogs
detective-timelord-sorceress
Good day to you

lehungnim
궁서체

yonkise
Sin título
the-ravening
Borrowed Bones
thehumblemom
Mom Life is the Best Life