
currentlywriting
I should probably be writing right now
She/her | main blog is @selinenuli | this blog is where I will post my work, writing and paintings. fantasy / sci-fi / romance / and anything else, really, depending on my mood and inspiration
241 posts
Don't wanna be here? Send us removal request.
Last Seen Blogs

mangaandanimerecommendation-blog
漫画 と アニメ


calico-arctique
"Two hearts." "And both of them yours."
ashwido
hewwo? ashwido???

dersaisonkoch-blog
Unbetitelt
Text
Manual Wheelchair Tutorial by Fade31415
So... I technically drew this 3 years ago but forgot to post it. I think I was going to clean up the end and make a nice recap, but I ran out of steam and then just left it as a wip for years. I got reminded of it because I was talking to a friend about how to draw wheelchairs today.
This covers most of what I view as the most common errors when it comes to drawing characters who use manual wheelchairs. I hope it helps you a lot.
Image description is in alt text, but there is a back up image description under the cut in case that does not work for some reason
[image description: a 4 picture long wheelchair tutorial. the background is white and the text, when it appears, is black and in calibri. each step will be labeled with "Step #" and a description of the drawing next to it, and "text" and then the text that is written to explain it to follow.
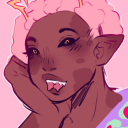
Step one text: So, you want to draw a character who uses a manual wheelchair? Awesome! I can't approve more. Drawing characters who use wheelchairs is a bit different than drawing standing characters, because of obvious posing differences. But to start, you need to know what parts of a wheelchair you will draw. So, without further ado, here are 3 wheelchairs!
Step one image: a simplified drawing of a chubby woman sitting in a quickie GPV manual wheelchair and resting her hand on the handrim of one of the wheels. this is labeled "the artist"
step two: next there is a lineart drawing of three wheelchairs. one is a tilite TR series 3. this is an ultralight wheelchair with a bucket seat (the back is lower than the front), a big cushion and a short backrest that kind of contours to the back of the person who would sit in it. the caster wheels (front wheels) are very small and the footrest is just two little metal bars. next image is a quickie GPV. this is also an ultralight wheelchair with a low back, but its caster wheels are slightly larger, the back has regular upholstery (it does not look like it was made to conform to the back of the person who sits there) and the frame is boxier -- there is no bar underneath the seat where the wheels would attach, rather each wheel is attached to the side of the chair. the next wheelchair is an invacare tracer. it is how most people imagine wheelchairs when they hear 'wheelchair'. it has no cushion and it has a high backrest with handles. it has high armrests that would be comfortable to rest your elbows on if you were just sitting. the wheels are not bicycle wheels like the previous two but are rather plastic. it has big footrests and big caster wheels.
text: the wheelchairs on the left are the ultralight, sporty kind. I have one of them (the quickie). the one on the right is a more standard one you might find in hospitals or as the public wheelchair in grocery stores or the mall.
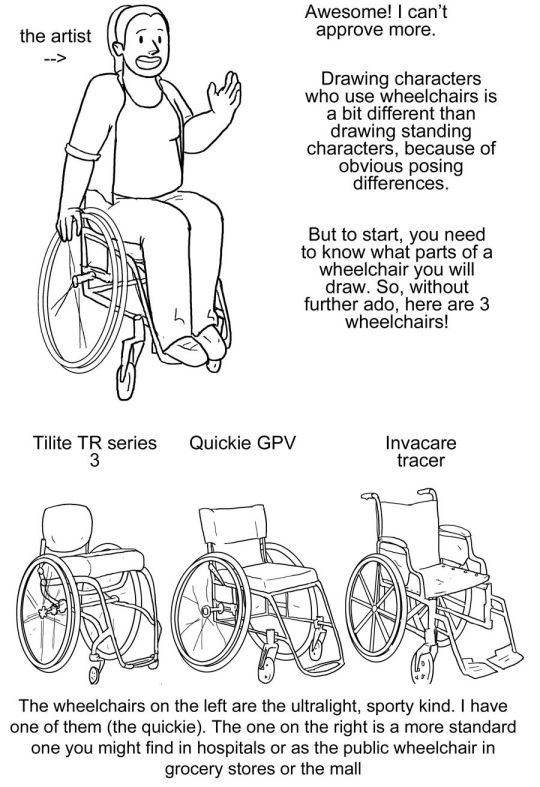
step three: first is text to accompany the tilite. "This wheelchair has a really thick cushion - it's pressure relieving, which you need if you use your chair ufll tiem and especially if you have a spinal cord injury. This wc has the smallest caster (front) wheels. They are hte most handy for turning in small circles." next there is text to accompany the quickie gpv: "This one has the one I use -- it isn't pressure relieving, but is still useful." next is text to accompany the invacare: "this wheelchair has no cushion - you do not want to sit on it for long. This one has the biggest caster wheels - they are useful for not 'tripping' when your front wheel gets caught on an obstacle.”
step four text: like with all complex drawings, you want to break it into simple shapes first. I normally have a box underneath the seat, a rectangle for the backrest, and a trapezoidal thing for hte area from the box to the footrest. these are the most important shapes, because your character will rest on them and they will move with your character.
step four image: the lineart of each wheelchair has been put on reduced opacity, so we can see the square representing the backrest of each seat (the square is the smallest for the tilite and biggest for the invacare), the box for each seat and area underneath it, and the trapezoid for the footrests. the next step labels the images of these simplified shapes as the lineart is removed. "Note the proportions of each set of shapes is not the same - just like how you wouldn't draw all your characters with the same proportions on their faces!"
step 5: we see the same shapes to form the wheelchair, but now with blue circles drawn where the back wheels would be.
text: next shape is the wheels - two circles
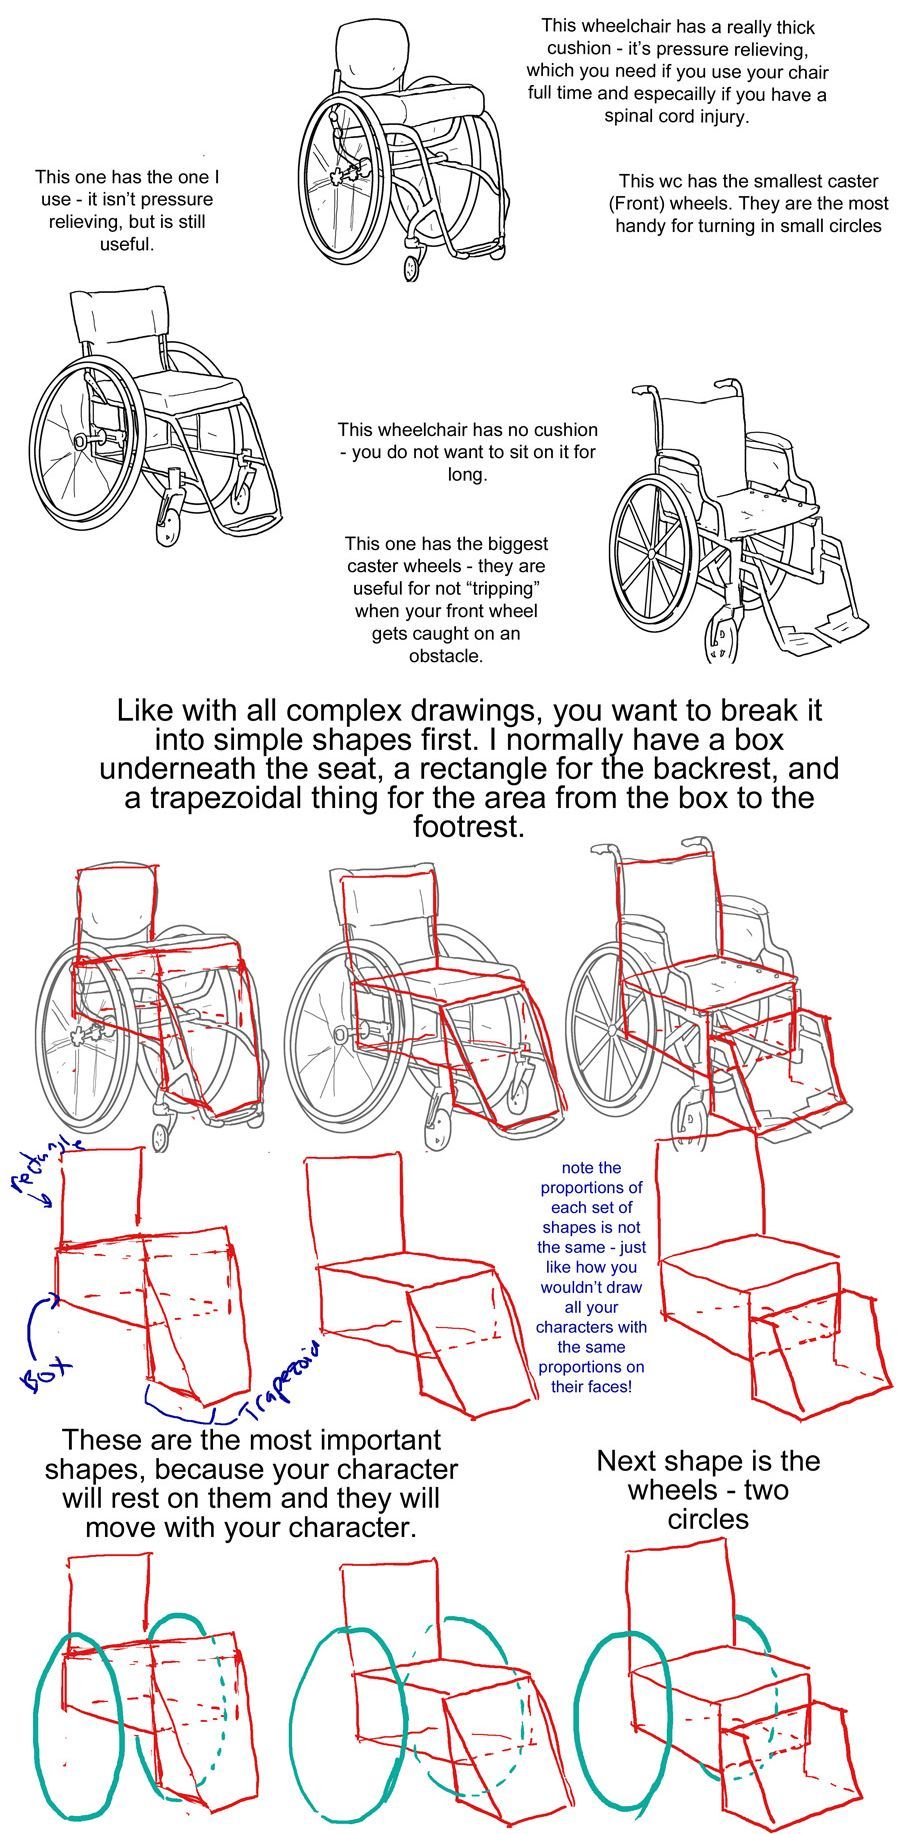
step six: next we see the wheels and shapes have been reduced in opacity and the basic structure of everything about each wheelchair: footrests, caster wheels, upholstery details, axles has been drawn on in orange.
text: the next stage is everything else that's structure - front wheels, handlebars, cushions, footrests.
Step seven: we see the lineart on top of the lowered opacity sketch.
text: you can then do detailing like axles, spokes, upholstery, etc and lines
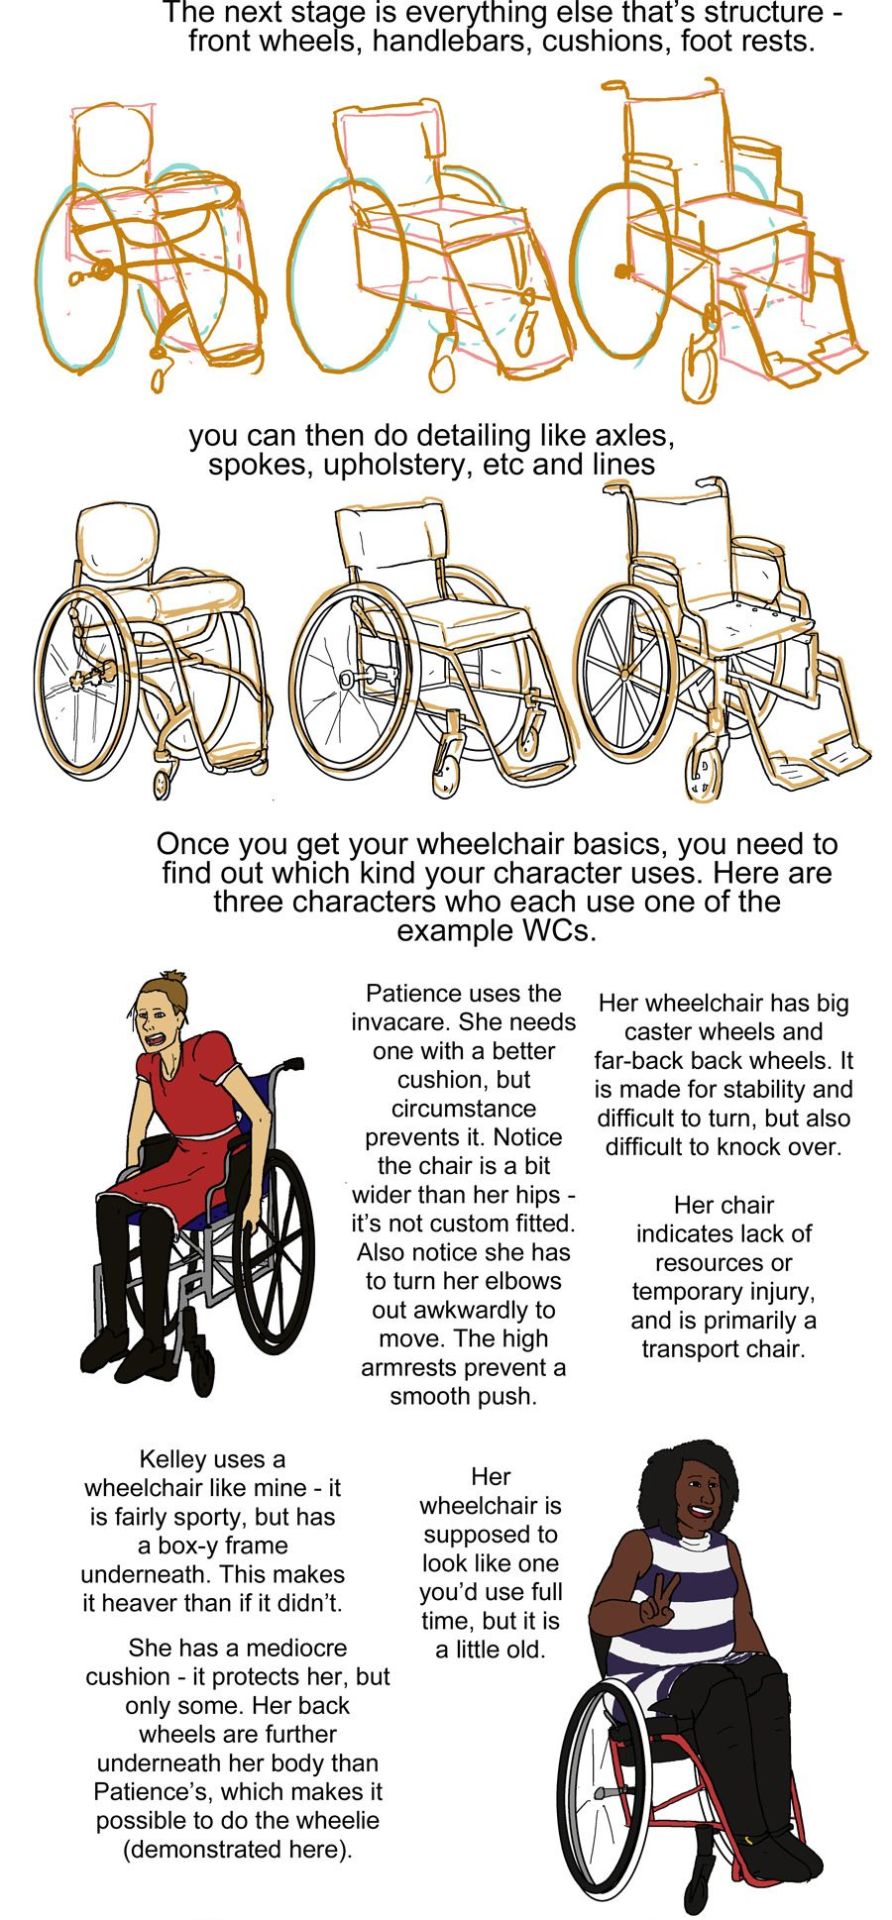
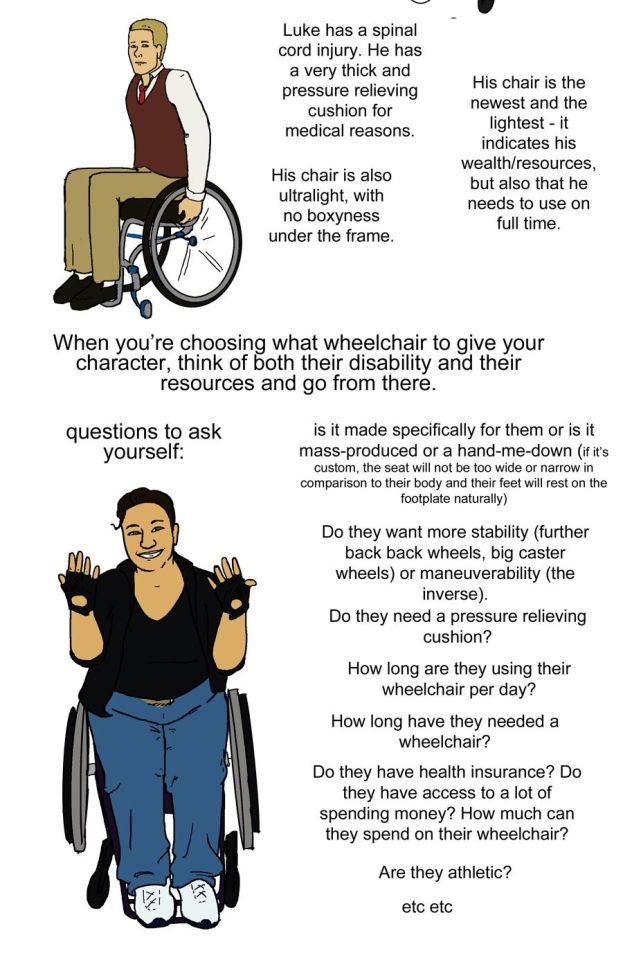
step eight: next we see three drawings of different characters. there is patience, a skinny white woman sitting in a blue invacare wheelchair. kelley, a slightly chubby black woman wearing a stripey dress sitting in a red quickie gpv wheelchair and doing a wheelie while smiling. then luke, a white man with short blond hair wearing khaki pants. he is sitting in a tilite chair.
text: once you get your wheelchair basics, you need to find out which kind your character uses. here are three characters who each use one of the example WCs. patience uses the invacare. she needs one with a better cushion, but circumstance prevents it. Notice the chair is a bit wider than her hips - it's not custom fitted. Also notice she has to turn her elbows out awkwardly to move. the high armrests prevent a smooth push. her wheelchair has big caster wheels and far-back back wheels. it is made for stability and difficult to turn,but also difficult to knock over. Her chair indicates a lack of resources or temporary injury, and is primarily a transport chair
kelley uses a wheelchair like mine - it is fairly sporty, but has a box-y frame underneath. this makes it heaver than if it didn't.she has a mediocre cushion - it protects her, but only some. her back wheels are further underneath her body than Patience's, which makes it possible to do the wheelie (demonstrated here). her wheelchair is supposed to look line one you'd use full time, but it is a little old.
luke has a spinal cord injury. he has a very thick pressure relieving cushion for medical reasons. his chair is also ultralight, with no boxyness under the frame. his chair is the newest and lightest - it indicates his wealth/resources, but also that he needs to use on full time.
step nine: just a drawing of me sitting in my wheelchair holding my hands up to show fingerless wheelchair gloves. we're looking at me from above.
text: when you're choosing what wheelchair to give your character, think of both their disability and their resources and go from there. questions to ask yourself: is it made specifically for them or is it mass-produced or a hand-me-down (if it's custom, the seat will not be too wide or narrow in comparison to their body and their feet will rest on the footplate naturally). do they want more stability (further back back wheels, big caster wheels) or maneuverability (the inverse). do they need a pressure relieving cushion? how long are they using their wheelchair per day? how long have they needed a wheelchair? Do they have health insurance? do they have access to a lot of spending money? How much can they spend on their wheelchair? are they athletic etc etc
posing steps:
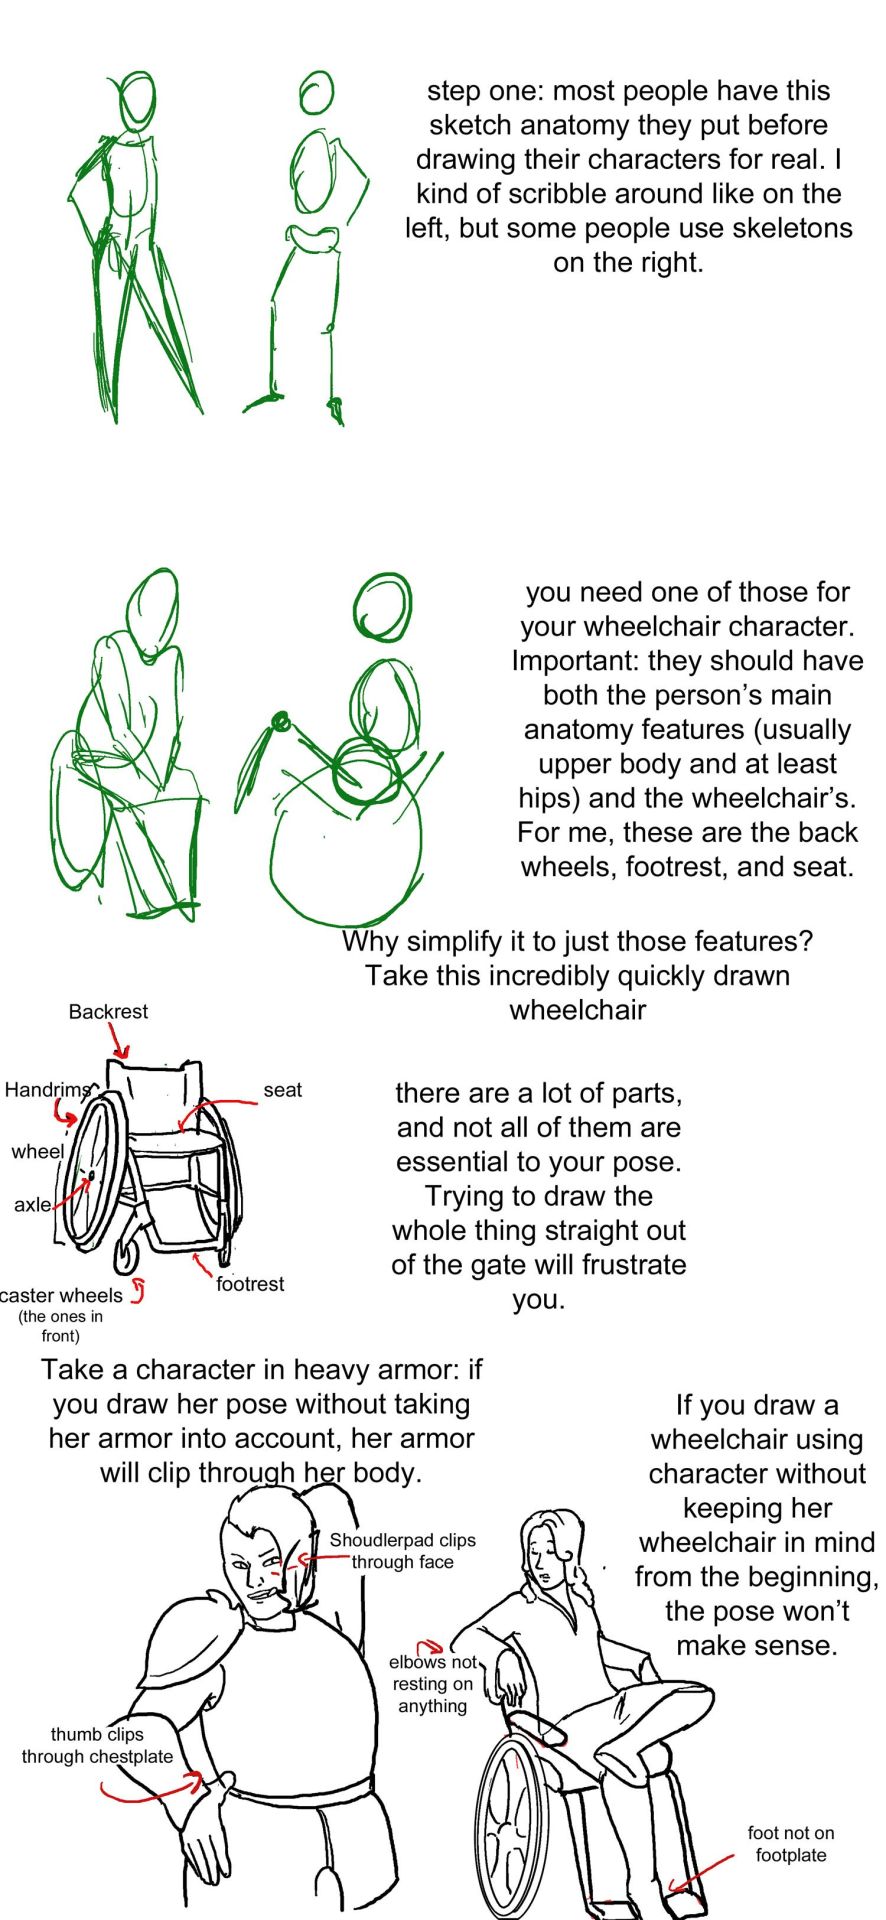
step one: a sketch of two people standing up. one just shows the outline of a person's body, with legs that are ind of triangle shaped, the other shows a sketched pelvis and rib cage to go along with the bones of the legs and arm. text: step one: Most people have this sketch anatomy they put before drawing their characters for real. I kind of scribble around like on the left, but some people use skeletons on the right.
step two: there are now too sketched pictures of people in wheelchairs. one shows lightly traced human form (arms articulated, curve for a stomach, legs that are kind of triangle shaped and pointing down) sitting in a wheelchair that is just the sketch of footrests and wheels. the other sketch shows the sketch of a body with a circle for hips and an oval for a rib cage and the person doing a wheelie (lifting the front end of the wheelchair off the ground and leaning back). their wheelchair is also sketched out and defined by a circle for their wheels and 2 lines, 1 of the seat and 1 for the backrest. text: you need one of those for your wheelchair character. important: they should have both the person's main anatomy features (Usually upper body and at least hips) and the wheelchair's. for me, these are the back wheels, footrest, and seat. why simplify to just those features? Take a look at this incredibly quickly drawn wheelchair.
step three: there is a lineart drawing of a manual wheelchair with slightly cambered (angled towards the seat) wheels, a backrest, and a footrest. the frame is light and there are no handlebars. there are labels pointing to different parts of the wheelchair: Backrest, handrims, wheel, axle, seat, footrest, and caster wheels (the ones in front). text: there are a lot of parts, and not all of them are essential to your pose. trying to draw the whole thing straight out of the gate will frustrate you.'
step four text: take a character in heavy armor: if you draw her pose without taking her armor into account, her armor will clip through her body. if you draw a wheelchair using character without keeping her wheelchair in mind from the beginning, the pose won't make sense.
step four image: next we see two lineart drawings of different characters. one is a bulky woman wearing plate armor. her hand is on her hip and she is trying to scratch her back with the other hand. there is the label "shoudlerpad clips through face" and "thumb clips through chestplate." the next drawing shows a woman in a wheelchair with one foot rested on her knee and her arms rested back, such that they would be rested on the back of a regular chair, but the back of her wheelchair is not wide enough for them to actually be resting on anything. the text here reads "elbows not resting on anything" and "foot not on footplate"
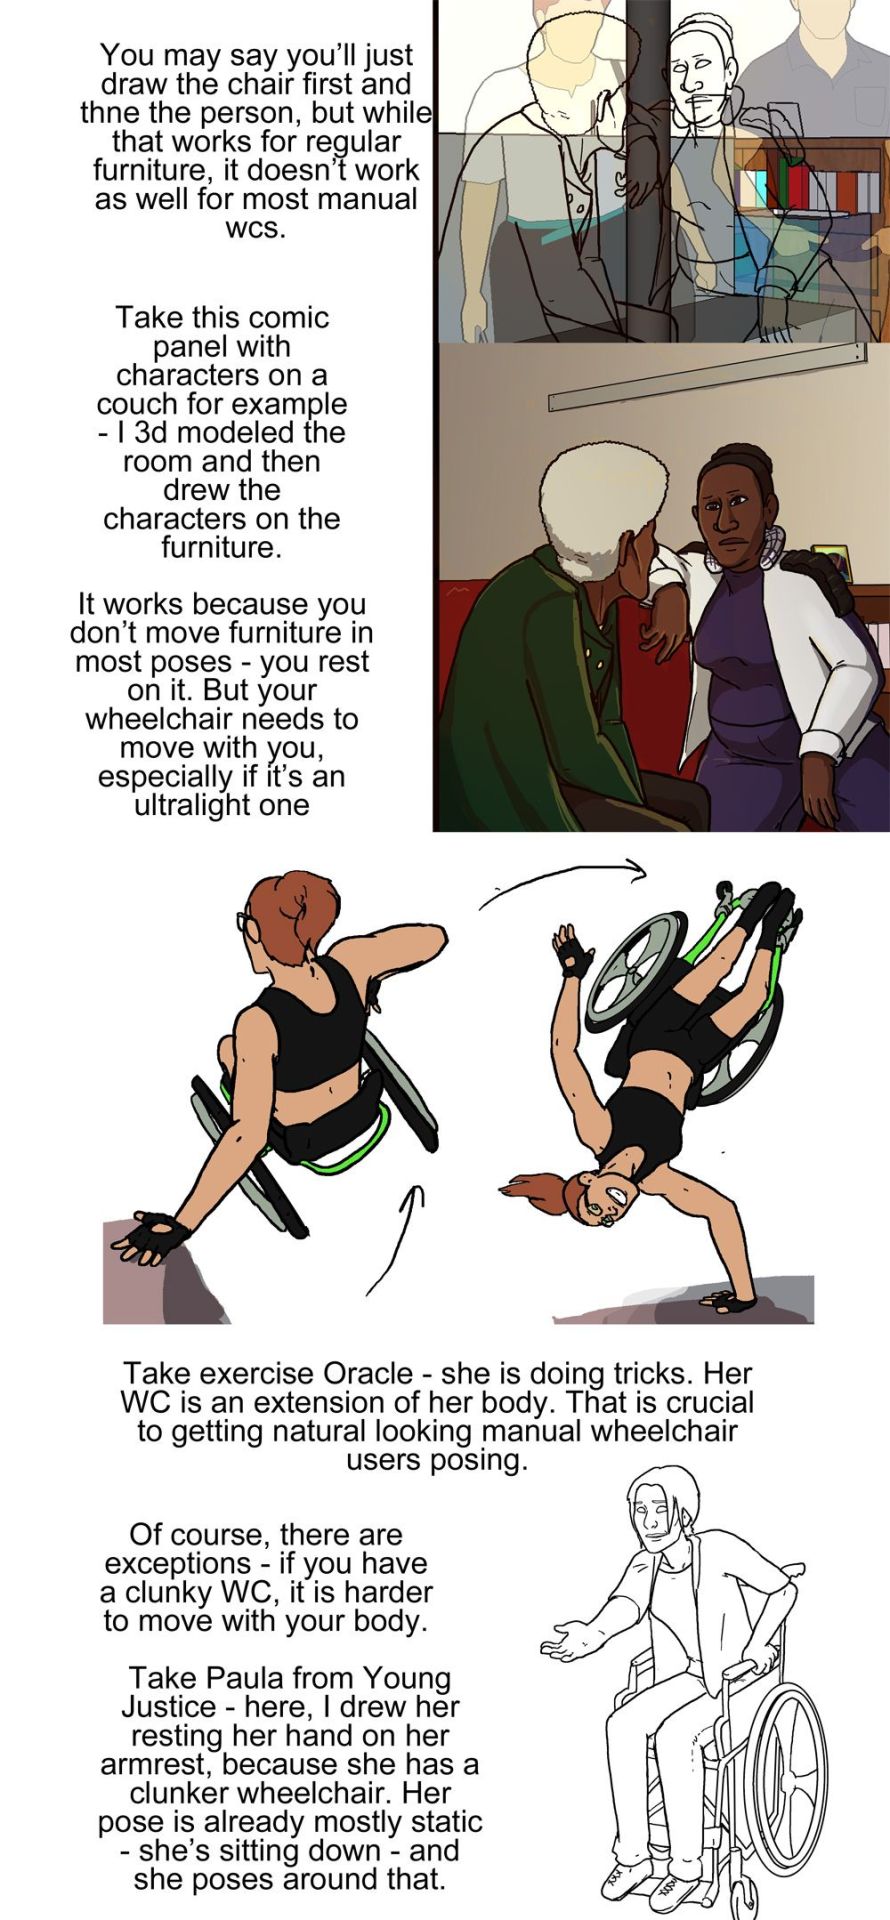
step five: there are two images, one is lineart on top of a 3d modelled apartment with sketchup, the other is a colored in version of that lineart with the background also colored in and no longer a 3d modelled screencap two characters, one old woman wearing a green jacket and one younger woman wearing a white shirt and blue undershirt, are sitting on a couch. the old woman is leaning forward and the young woman is resting her arm on the couch. behind the young woman is a bookshelf.
step five text: you may say you'll just draw the chair first and then the person, but while that works for regular furniture, it doesn't work as well for most manual wcs. take this comic panel with characters on a couch for example - I 3d modeled the room and then drew the characters on the furniture. it works because you don't move furniture in most poses - you rest on it. but your wheelchair needs to move with you, especially if it's an ultralight one.
step six image: there is a flat color drawing of barbara gordon in her wheelchair. she is wearing a black sportsbra and black shorts. in the first image we see she is doing tricks in her chair, zooming through the air (as if she has just launched herself off the ground in a skater park or somethign) while her left hand is resting on a structure and her right hand is heading towards the right handrim. the next image shows her right hand planted on the ground and her chair and body above her, such that she is briefly doing a one-handed handstand, but the motion line indicates that she is moving and this will not last. her left arm is near the handrim of her left wheel.
text: take exercise Oracle - she is doing tricks. Her WC is an extension of her body. That is crucial to getting natural looking manual wheelchair users after posing.
step seven: we see a lineart drawing of paula from young justice. she is sitting in a standard manual wheelchair with high armrests (goes up to the bottom of her ribs probably) and a high backrest (goes up to just below her shoulderblades). she is setting her hand on the armrest, leaning forward, and holding her other hand out.
text: of course, there are exceptions - if you have a clunky WC, it is harder to move with your body. Take Paula from young Justice - here, i drew her resting her hand on her armrest, because she has a clunker wheelchair. her pose is already mostly static - she's sitting down - and she poses around that.
49K notes
·
View notes
Text
some people think writers are so eloquent and good with words, but the reality is that we can sit there with our fingers on the keyboard going, “what’s the word for non-sunlight lighting? Like, fake lighting?” and for ten minutes, all our brain will supply is “unofficial”, and we know that’s not the right word, but it’s the only word we can come up with…until finally it’s like our face got smashed into a brick wall and we remember the word we want is “artificial”.
188K notes
·
View notes
Text
A Flirting Guide For Writers (And Real World Usage)
I reblogged a post a day or so ago, and the result (which made me sad) was mostly people saying that they feel they cannot flirt (and therefore cannot write it effectively).
So I thought I’d share my own, admittedly limited, knowledge (under the guise of writing advice) so that you can all write kick-ass romance and show your feelings like the boss-ass-bitches you are!
The Basics; Eye-Contact, Personal Space, Body Language
The thing about flirting is that most of it is non-verbal, and the world is split between those writers who find this part the easiest, and those who find it the most incomprehensible.
The problem is that it’s all dependent on a fine, mostly unspoken, line which makes the interaction creepy if crossed. When writing a character who is trying to flirt with someone, or when trying to flirt with someone yourself, you need to keep three main things in mind; personal space, body language, and potential restriction. This is especially important for men. The problem is that this is mostly instinctual, and so it can be hard to write if you haven’t had time to develop the right skills yourself.
Personal space
When trying to show that your character is flirting you need to make a note of them moving into the other person’s personal space but not too much. Consider this; someone leaning into your space just a little to speak to you versus someone being practically nose to nose with you. One catches your attention, the other is uncomfortable at best and intimidating at worst. The idea is to lean in enough to show interest and create a sense of intimacy, without becoming overbearing or threatening. As a rule, I find that I begin to feel uncomfortable if a man I’m not sure of gets closer than the distance it would take to perform a ballroom Waltz.
To get an idea of how that looks, hold up your hand at arms length as if pushing someone away or pressing against a wall. Now slowly bend your elbow until the point sits just under your breast or pectoral muscle.
That’s the maximum personal space invasion I allow from people I don’t know well. In my experience, this is common to many women, though others prefer more space. Likewise, in my experience, men I have met seemed perfectly comfortable with me being closer than even that, but I am small, relatively unthreatening, and we have to allow for the fact that we were in the position of viewing each other as romantic interests. Men may prefer more space from other men, or from individuals that they do not see in a romantic light already. This changes from person to person, and noting your characters preference is a good way to show what kind of person they are.
Eye-Contact
Another fundamental which relies on instinct subtlety; conventional wisdom says that you should make eye-contact in order to show interest. Actual wisdom will also tell you that too much becomes intense and a little creepy. If your character holds someone’s eye for too long its becomes fixative rather than flirtatious; it becomes staring. Depending on your character and their interest this can either read as obsessive, creepy, or aggressive.
Flirtatious eye contact can take a few forms;
1 - the “getting caught” method where a person looks at someone and quickly looks away again. When caught have your character (or yourself) look away quickly and then back, hold eye contact for a few moments and then acknowledge the other person. A smile, wink, or nod will suffice for this.
2 - the “lash” method where someone, usually a woman, catches their crushes eye, looks down, and then back up from under the lashes. Also very effective when done by men with big eyelashes.
3 - the “full cheese” method by which someone winks, grins, or wiggles their eyebrows. This is effective when used sparingly.
If your character also touches the person they are flirting with lightly, this will build tension. The touch should be gentle, but obviously deliberate. Avoid possessive gestures like gripping or pulling, however.
Body Language
When flirting, the body language of both people is important; your character should watch their crush for signs of interest and/or discomfort.
Positive signs; leaning in, touching, playing with hair, smiling, licking or biting lips, tilting their head slightly, mirroring.
Negative signs; leaning away, crossing arms, pursing lips, refusing to make eye-contact, raising their shoulders, crossing their legs away from the other person, frowning, clenching jaw, balling fists.
This body language can apply to both characters in the scene.
Advanced Techniques; Verbal Cues, Suggestions, And Other Senses
This is the shit I thrive on, as a writer you will probably feel the same way; I notice the sounds, smells, and textures of another person as well as what they say (in fact, when you read my work you’ll notice that the smell of any romantic lead is noted upon more than once).
Verbal Cues
This is the thing that most people focus upon when it comes to discussions or attempts at flirtation. The verbal sparring that comes with flirting is what really gets our stomachs churning and our hearts pulsing… but why are some people so naturally good at it, while others are… less so?
And why does some of the most vapid and run-of-the-mill stuff seem to work between the right people?
Well, the sad news for your unlovely characters is that physical attraction makes us more likely to respond to even the most poorly constructed of verbal flirtation. Then again, beauty is in the eye of the beholder so even the least pretty of characters could find themselves flirting up a storm with the right person.
Verbal cues include;
- Gentle teasing
- Compliments
- Inside jokes
- Using someone’s name (yes, really)
- Asking questions and responding in a thoughtful way
- Sexual innuendo (when used tastefully and sparingly)
Suggestion
This is the easiest to miss or overshoot because it’s a combination of everything else we’ve already covered. For example, your character saying to a friend,
“I’m just going to hop into the shower, talk soon.”
Is not a suggestive statement. Now imagine your character flirting with someone on the phone before sighing and saying,
“I’m going to take a shower… I’ll speak to you soon, ok?”
The difference is subtle but important; the second suggests that they don’t want to stop talking to the other person, that they definitely want to speak to them again as soon as possible, and subtly encourages the other person to consider them in the shower. You see?
Easy to miss, easy to fudge. Suggestion is hard to pull off, and hard to write, but think of it this way - suggestion;
1) Encourages the other person to think of you/your character in an intimate way
2) Implies enjoyment in and desire for their presence
3) Is open-ended and encourages reciprocation
The Other Senses
This is not so much flirting, but the act of making your character/yourself as appealing as possible to another. Personal hygiene, a good fashion sense, and good manners are a part of this.
But -
When writing about this you should not discuss it directly unless your character is making a conscious choice. Instead, focus on the character that yours is focussed upon.
- How do they smell?
- What are the textures of their clothes?
- What manners do they affect?
- Does their voice have a texture?
- Do they touch your character a lot?
- Do they note upon your characters smell or noticeably try to take in their smell?
- Do they react noticeably to your character’s voice or mannerisms?
This is just a basic guide, of course, but if you get this down you’re in a good position to build romantic tension in every walk of life!
If you found this post useful and you want to help keep me writing, you can support me through Kofi!
11K notes
·
View notes
Text
So the other day, my friend, realizing she had accidentally written a 26k word long fanfiction, pulled up our DMs and went, “How do you edit long things?”
“Do you like spreadsheets?”
This, of course, lead to some confusion…spreadsheets? For editing fiction?
Yes. Spreadsheets.
Consider The Story Grid.

But your columns don’t have to look like that, depending on what you’re worried about. My friend was worried specifically about making sure everything made sense, so things like the turning point, polarity shift, POV, didn’t necessarily matter. And was specifically worried that the character’s emotional journey was cohesive.
What I suggested was making a column of what happened in each scene, and what the character’s emotional reaction was. Like this:

And you can see that putting scene three before scene one and two wouldn’t flow as well–while Bob could walk the dog to have a moment to think before getting into a fight with Jason, and the fight might still prove the point, it flows much better that Bob had time to think after experiencing after the prior two scenes are right next to each other to realize. If these scenes were in a different order, having them neatly written out in columns in a spreadsheet really helps clarify what’s happening in the story.
You can also had a word count to each scene, and a POV, or whatever, and then you can see you spend 75% of the story in Jason’s head worrying about taxes and not about Bob, which means if you were trying to tell a story about Bob’s emotional state, you might want to change that, because what you actually have is a story about Jason’s taxes.
And if later Jason refers to his taxes as “a piece of cake” you can see that maybe you want to change the pie to cake or Jason’s line to “easy as pie” for like. Thematic resonance or whatever. It’s easier to see through-threads like that when you’ve boiled the details of a scene down into a chart like this.
Depending on what columns you use, you can track whatever details you’re most concerned about–giving readers mood whiplash can be helped if you chart the mood of each scene shift it more gradually. You can chart which chapters things are in to organize them. You can–etc, etc, etc.
Spreadsheets.
420 notes
·
View notes
Text
When writing always remember… a character flaw is only a flaw until becomes useful.
Is your protagonist manipulative? Well that’s awful… until they manipulate the antagonist into making a decision that saves the lives of their friends.
Is your protagonist a skeptic? Well that’s not good… until someone tries to lie to them.
Is your protagonist overprotective? That sucks… until someone they love is in danger.
Is your protagonist remorseless? Well that makes them pretty unlikeable… until a hard decision has to be made.
141K notes
·
View notes
Text
Actually, can we talk about how Garbage a lot of ubiquitous writing advice in the late 2000's was?
Like "you have to begin in the middle of the action! your first line has to be a 'hook' that draws the reader further into the story!"
This is the bullshit responsible for the amount of books that begin in the middle of some sort of pointless fucking action scene that I care nothing about because I just got here.
Like I guess this makes books easier to "sell" or whatever on some level of the process, but it's garbage storytelling advice because setup and establishment of the Way Things Are is almost always necessary.
On some level I don't think it's actually possible to begin a story right on top of the "inciting incident" because...you don't have the raw materials to "incite" anything with. If you have to set up basic things about the characters and world after the "inciting incident," it's not really the inciting incident anymore, is it?
The event that "launches" a character into their plot line is something that follows from the character's established situation, desires, traits etc. It's a follow-up to a situation that makes a Story of some kind inevitable.
It is, by definition, an event that makes no sense and does not matter to the reader at all unless the "setup" already exists.
If you try to begin right in the middle of the event that "sparks" the plot, you're going to end up including a second, "real" event that actually does the job, because you can't do the job if the character, the stakes, the rules, etc. are not there yet.
Now the action scene you stuck to the beginning of your story is probably dead weight that is getting in the way of the setup.
10K notes
·
View notes
Text
Why coax the story out of your head
You can't keep all that detailed info in your head all the time.
You owe it to yourself to have it recorded. In scenes. So you can read it and enjoy it for yourself for comfort in rainy days.
Cause wordcount goals and writing updates are so cool. They feel all professional.
Brag about having actually written.
Ticking off wordcounts, chapters, scenes and arcs feels very fulfilling. Like scratching things off from the to-do list. So good.
You will never learn what your writing weaknesses are. Then you can't join those cool sympathetic discussions with other writers about "yeah I always do that and I forget that stuff..."
You will also never get nice tips from the field how to manage that.
You can know all the theory you want, but you will never improve on those weaker things, if you don't know what they are.
You can give meta behind-the-scenes-info. Writing this made me feel xxx. Working on that chapter made my heart go all xxx.
Posting cool quotes and snippets out of your writing. VALIDATION
People can read and fall in love in the story with you. <3
Fans of the worlds and people inside your head!
Connection. Understanding. People who like your writing will likely have many common interests and tastes.
Finishing stuff is HUGE confidence boost.
No word is ever wasted, cause you are learning.
Rereading your story when you forget the details. Serisouly, worth millions.
Focus on the content, not on the style. Focus on what and not on the how. We are all natural storytellers with excellent practice in our heads. Use that. Be proud of that.
You probably won't notice the imperfections first. Enjoy it! It's perfect little baby. Once you notice them, celebrate! You have grown! You are a better writer now who can do it better!
Experience. That pesky little thing you need with skills by, y'know, actually doing them.
Stories are the best way for the brain to transmit information. The most natural, enjoyable, easiest way. Human brains are wired for it. So the greatest way to explain your awesome world/characters/plot/themes? Show them through the story. In scenes.
391 notes
·
View notes
Text
How to draw: Not white characters
How to draw a Black person
How to colour Black people skin tones
How to draw dreadlocks
How to draw African hair
How to draw curly hair
How to draw braids
How to draw braids part 2
How to draw cornrows
How to draw Bantu knots
How to draw two strand twists
How to draw an Asian person
How to colour darker skin tones with alcohol markers
How to draw hijabs/traditional Muslim hair coverings
How to draw a hijabi girl
All links and art provided by @ itsajart on TikTok
Before you go “mY aRt sTyLe iS dIfFrEnT tHoUgH” you can moderate it and play around with your style to get it to fit.
55K notes
·
View notes
Text
Be gentle with your WIP. It is growing. It is expanding. It is contracting. It is transforming. Sometimes it will take a shape that doesn’t look or feel right to you but it’s only one of many shifts as it gradually takes on the form it’s supposed to be.
5K notes
·
View notes
Text
WEBSITES FOR WRITERS {masterpost}
E.A. Deverell - FREE worksheets (characters, world building, narrator, etc.) and paid courses;
Hiveword - Helps to research any topic to write about (has other resources, too);
BetaBooks - Share your draft with your beta reader (can be more than one), and see where they stopped reading, their comments, etc.;
Charlotte Dillon - Research links;
Writing realistic injuries - The title is pretty self-explanatory: while writing about an injury, take a look at this useful website;
One Stop for Writers - You guys... this website has literally everything we need: a) Description thesaurus collection, b) Character builder, c) Story maps, d) Scene maps & timelines, e) World building surveys, f) Worksheets, f) Tutorials, and much more! Although it has a paid plan ($90/year | $50/6 months | $9/month), you can still get a 2-week FREE trial;
One Stop for Writers Roadmap - It has many tips for you, divided into three different topics: a) How to plan a story, b) How to write a story, c) How to revise a story. The best thing about this? It's FREE!
Story Structure Database - The Story Structure Database is an archive of books and movies, recording all their major plot points;
National Centre for Writing - FREE worksheets and writing courses. Has also paid courses;
Penguin Random House - Has some writing contests and great opportunities;
Crime Reads - Get inspired before writing a crime scene;
The Creative Academy for Writers - "Writers helping writers along every step of the path to publication." It's FREE and has ZOOM writing rooms;
Reedsy - "A trusted place to learn how to successfully publish your book" It has many tips, and tools (generators), contests, prompts lists, etc. FREE;
QueryTracker - Find agents for your books (personally, I've never used this before, but I thought I should feature it here);
Pacemaker - Track your goals (example: Write 50K words - then, everytime you write, you track the number of the words, and it will make a graphic for you with your progress). It's FREE but has a paid plan;
Save the Cat! - The blog of the most known storytelling method. You can find posts, sheets, a software (student discount - 70%), and other things;
I hope this is helpful for you!
(Also, check my blog if you want to!)
72K notes
·
View notes
Text
that whole "make your characters want things" does so much work for you in a story, even if what your characters want is stupid and irrelevant, because how people go about pursuing their desires tells you about them as a person.
do they actually move toward what they desire? how far are they willing to go for it? do they pursue their desires directly or indirectly? do they acquire what they desire through force, trickery, or negotiation? do they tell themselves they aren't supposed to feel desire and suppress it? does the suppressed desire wither away and die, or does it mutate and grow even stronger? is the initially expressed desire actually an inadequate and poorly translated different desire that they lack language for? does the desire change once the language has been updated, or when new experiences outline the desire more clearly? do they want something else once they have better words for it, or once they know that they definitely don't want something they thought they wanted before?
how does the world accommodate those desires? what does the world present to your character and in what order to update and clarify their desires? how does your magic system or sci-fi device correspond to those desires and the pursuit of them?
there's so much good story meat on those bones; you just have to be brave and decisive enough to let characters want specific things instead of letting them float in the current of the plot.
21K notes
·
View notes
Photo
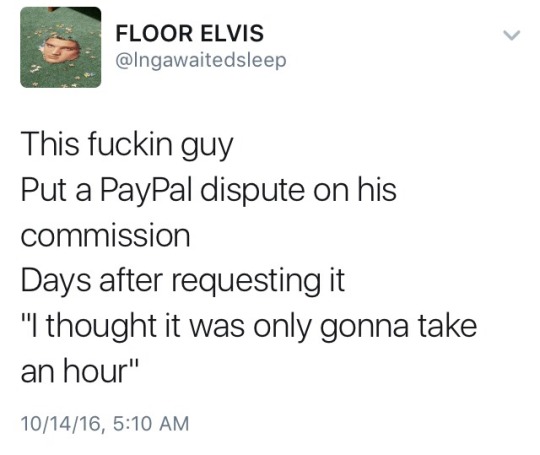
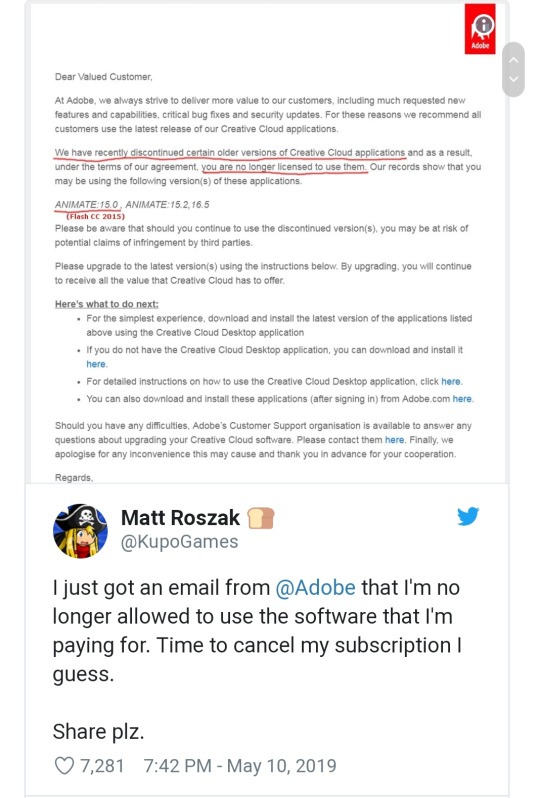
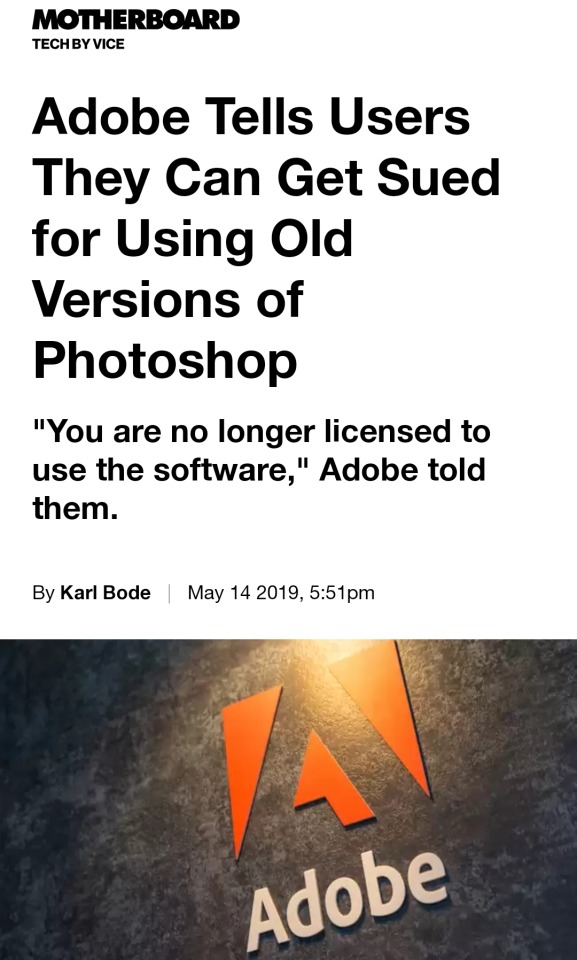
Attention non-artists who commission artists: don’t fuckin do this???
333K notes
·
View notes
Text
I dont understand this so common obsession with “finding one’s own art style” and seeing inconsistent art style as a bad thing. When I see an artist whose art style varies from piece to piece I feel impressed, it’s really cool, I don’t understand why having One art style is seen as the only one true path of a Good Artist
30K notes
·
View notes

Text
psa for artists
make a redbubble. im serious make a redbubble. you can just upload your stuff on there and theyll make merch for you and give you a cut. you get money and the knowledge someone is wearing ur art on a tshirt. or other item. they have so many items. Even if youre not an artist they dont really give a shit if you use official art as long as no one reports it so if u have any design ideas u can make with editing official art or ur own art or just. cool text with colors. you can do that. make a redbubble im shaking you and crying Make a redbubble make a
9K notes
·
View notes
Text
someone, reading my writing: wow great story!
me, sticking my hands in the plotholes: thanks it has pockets :)
100K notes
·
View notes