
Last Seen Blogs

r0pe-kitten
Kitten 🐾

famousplaidrascalweasel
Untitled

valberryventi
unintentional pyro main

anaulizia
___assim sou eu___
saatmans
Saatman's Life
Text
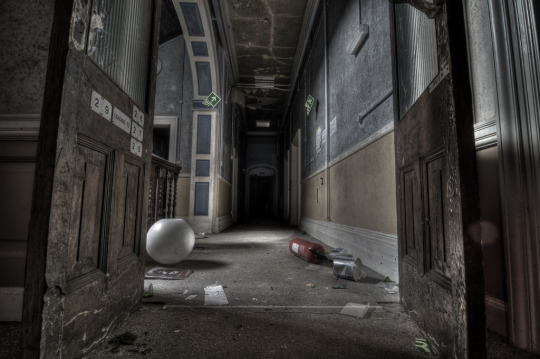
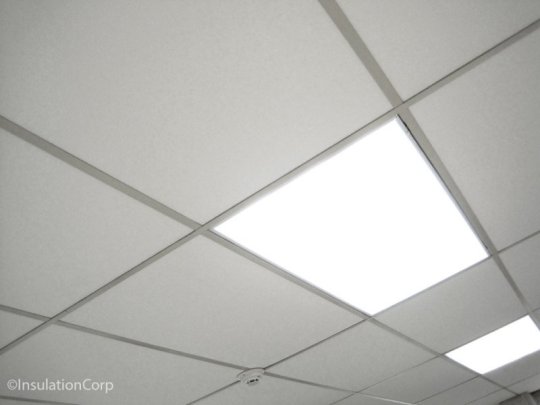
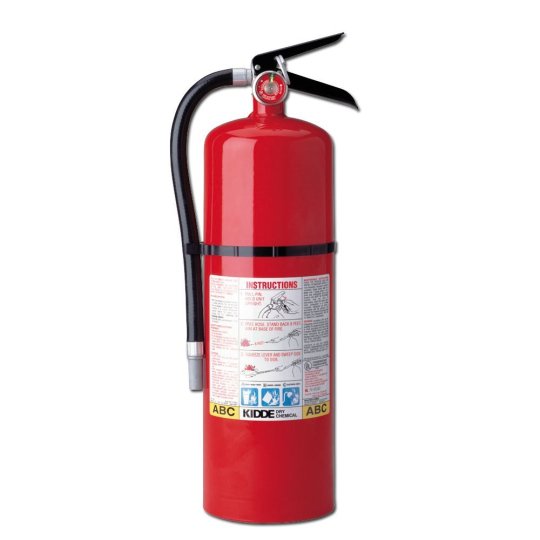
3Ds Max Personal Project: Reference Images
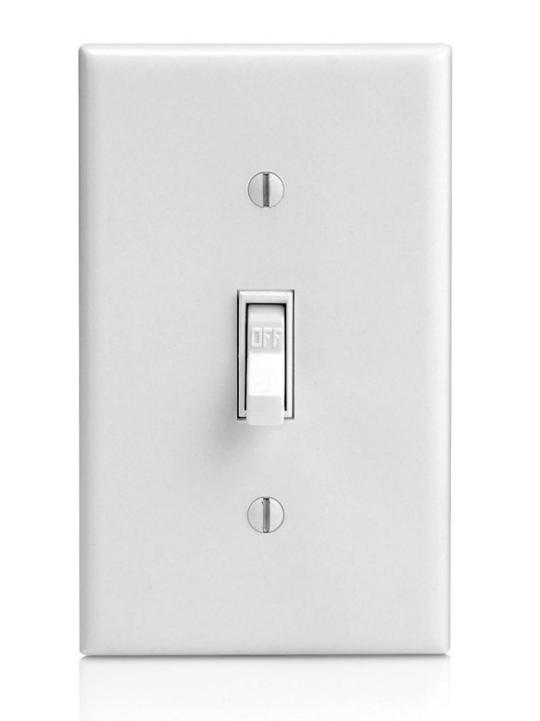
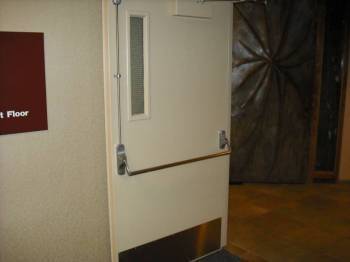
These are the images I used as reference throughout the making of my project as a whole and it’s assets.


0 notes
Text
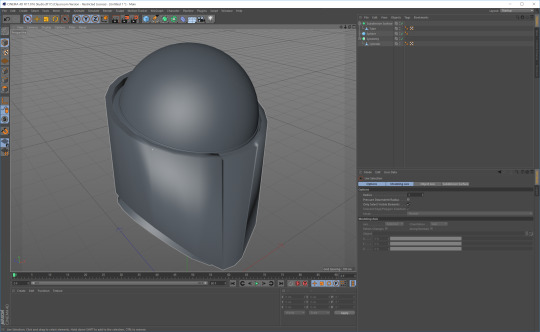
3Ds Max Personal Project: Model and Details
133I really like Cinema 4D. Thisprogram is pretty intuitive to me, maybe its just because its my 3rd program I’ve learned, but I think the object list is easier to understand. My only quarrel is the awkward navigation of the viewport, and there are some settings that C4D doesn’t has that Max does. Or maybe I just haven’t found them yet. I am satisfied with the way this model came out. Unfortunately I didn’t have time to texture anything, but given the time restraints, I think this came out quite well. I think C4D will be my preferred program over the summer.
This is my model rendered with shadows, and the model with a flat grey and wireframe.
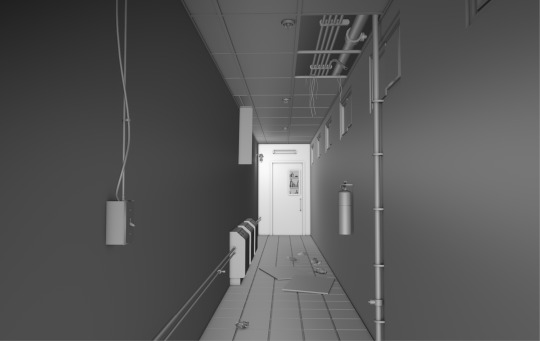

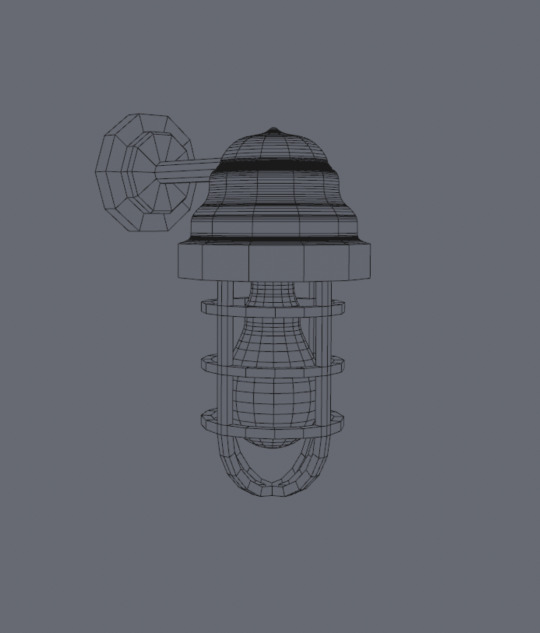
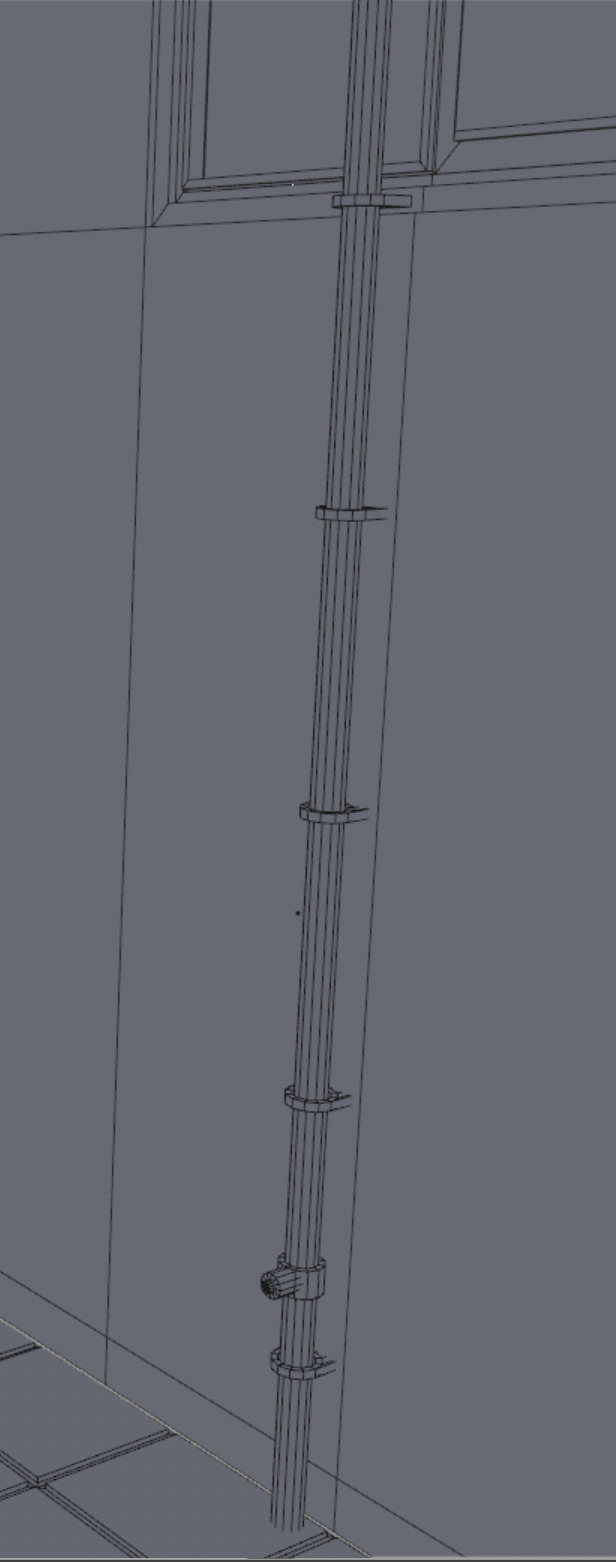
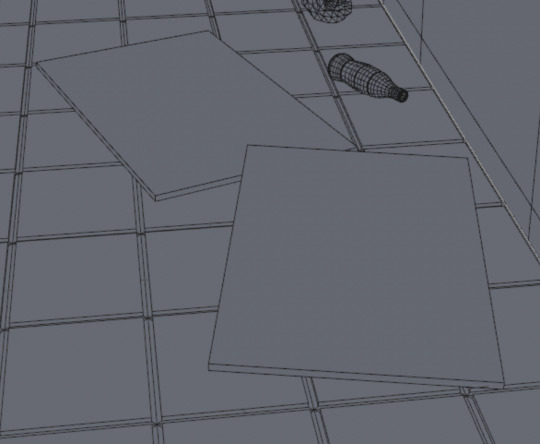
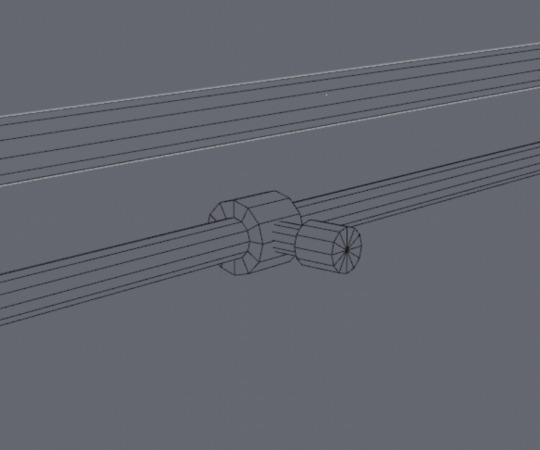
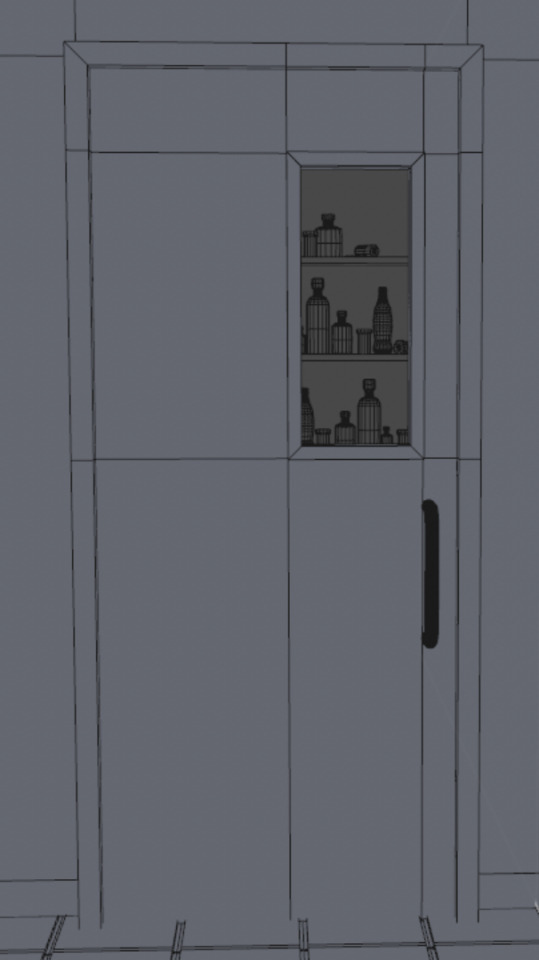
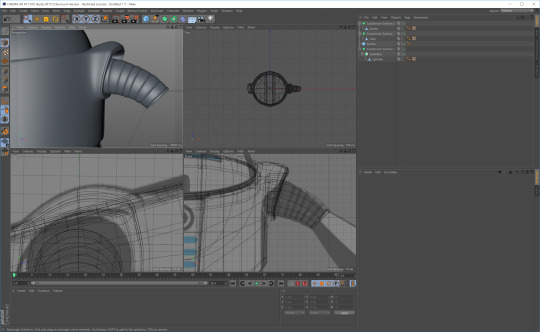
In addition to the whole scenes I have included detail shots of the scene, to emphasize the attention to detail. These are all done in a flat grey with wireframe to show the geometry.
Light switch with wires and stability pipe: Created with box modeling, a cylinder for the stability pipe, manipulated cylinder for the attachment piece, and a swept spline for the wire.

Miscellaneous garbage: Consists of a bottle and four pieces of paper, crumpled with moving mesh spheres and triangulated plane faces. The bottle was created using lofted circles.

Radiators: Created from a spline, fillet and then extruded. The vents were every other section of a knifed face, and then extruded and pushed back into the surface.

Cage light: The cage was made with a capsule, stretched and edited points., and deleted faces. It was a bit tricky to figure out, but satisfying in the end. The top was made from a lathe, but created a huge amount of geometry, so in the light bulb, I used lofted circles. The wall stand was extruded cylinders.
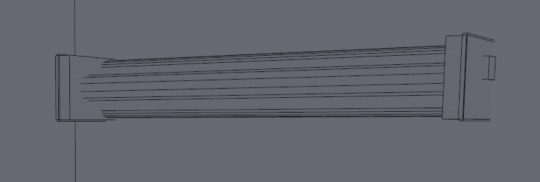
Fluorescent light: Just boxes and cylinders, one of the easier assets. I explored chamfer in this asset.
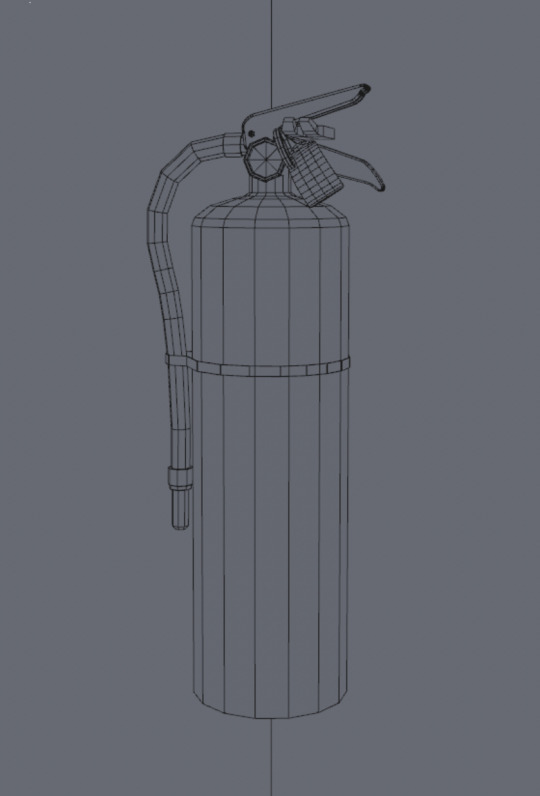
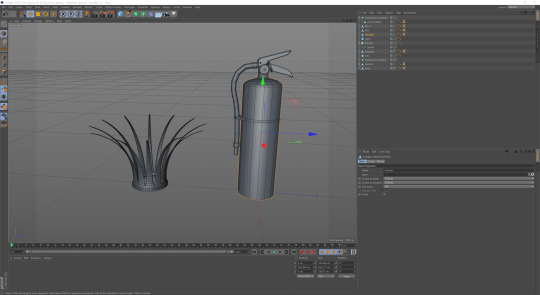
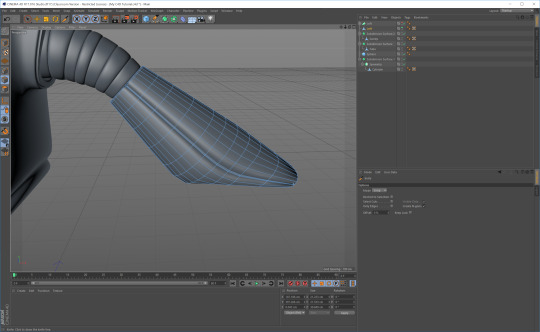
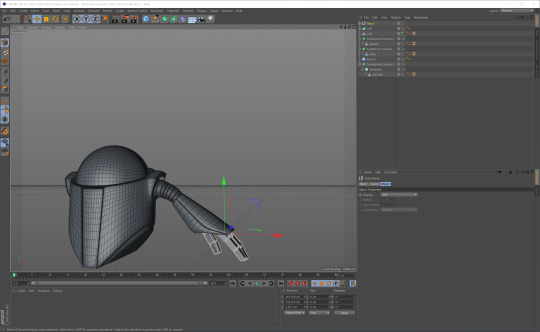
Fire extinguisher: The body was a simple cylinder. The nozzle was made from a swept spline. The handles and the tag was made from extruded splines. The strap and wall stand were box modeled from cubes and discs, respectively, while the pressure gage was a cylinder.
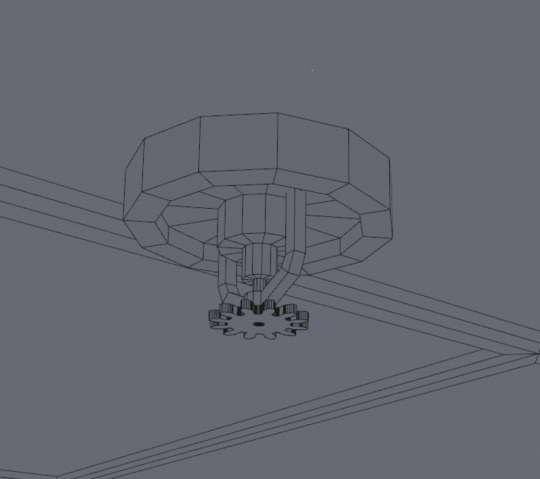
Sprinkler: Box modeled from cylinders and cubes. The gear was made from an extruded spline.
Pipes and wires: Pipes were made from cylinders, and the wires were extruded splines. Each wire was copied and the points were manipulated to make a different flow, while cloners were used for pipes. The knobs are extruded faces.

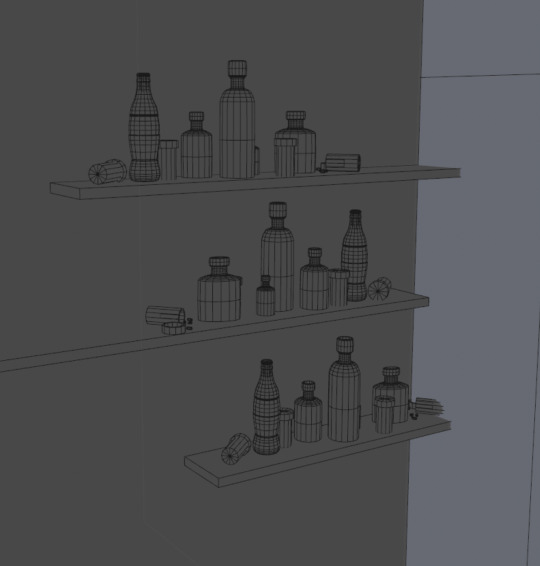
Shelves. These were created to only be seen through the window of the door, so there is little detail. only 3 different bottles were actually modeled, and the bottle was copied from the garbage. The prescription bottles are just cylinders, the medicine bottles are all lofted circles with stretched points to make them different. The pills are capsule shapes.
Miscellaneous details: (vertical pipe, strewn ceiling tiles, pipe cap, hanging ceiling tile, corridor door, basement window)


0 notes
Text
I don’t know what I’m doing yet for my final project. Either some sort of fire-fighting robot or an abandoned hallway. Good thing this fire extinguisher fits with both. Also I accidentally made that weird joker cap out of discs and extrusions? I don’t know. It looks really cool though so I thought I would keep it for future use just in case.
0 notes
Text
Introduction to Modeling in CINEMA 4D R16 (Continued/Finished)
Adding Simple Materials (7m): So this material tutorial was by far the easiest so far. So yeah it was really just smooth materials pasted on. no biggie, same functionality as the past programs.

Organization and Cleanup (7m): Alright. Everything is mirrored and named in the task manager. And the whole make editable thing is a little clearer in my head now in terms of turning objects with weird modifiers into exactly what you see in terms of geometry. I also like that you can copy an object easily and work with the copy in case the baking process turned out to not work. But yeah overall this program is just like the others, with a few differences of course but I think I’m ready to at least crudely model a hallway for this final project.
0 notes
Text
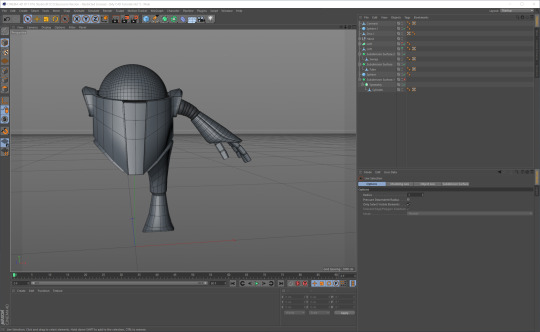
Introduction to Modeling in CINEMA 4D R16 (Continued...)
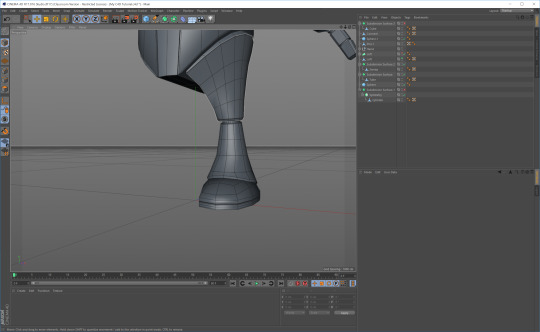
Building the Foot (6m): It was cool how he baked a sub division into the geometry of the foot. The foot kind of looks like a potato.
Extruding the Eye and Mouth (6m): Simple face selection and extrude. Easy stuff.

Adding Mouth Detail with Cloners (7m): Well that’s new. The effectors wasn't something I’ve seen before. I bet there’s all sorts of cool things you can do with that. I’m impressed. Good stuff C4D.
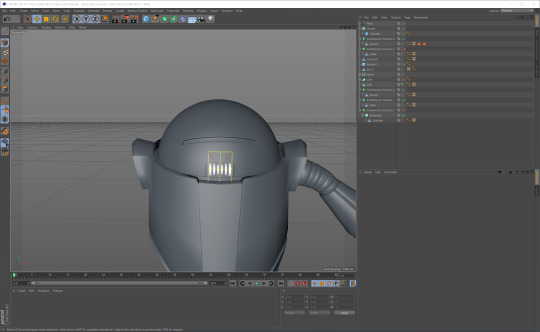
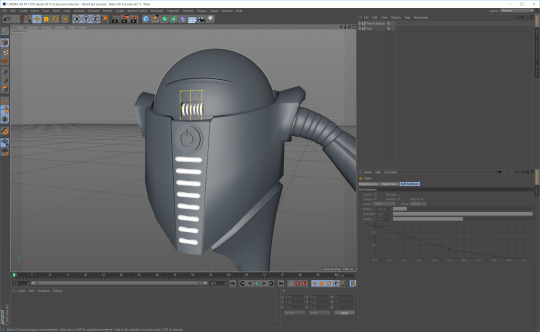
Modeling the front Lights with Cloners (4m): More cloner magic. I love it.

Creating the Power Button with Splines (8m): That was an interesting use of splines. I liked it, good for making clean pieces. It was also my first time using booleans. These types of spline objects confuse me though, because don’t they create all sorts of N-Gons? Weird.
0 notes
Text
Introduction to Modeling in CINEMA 4D R16 (...)
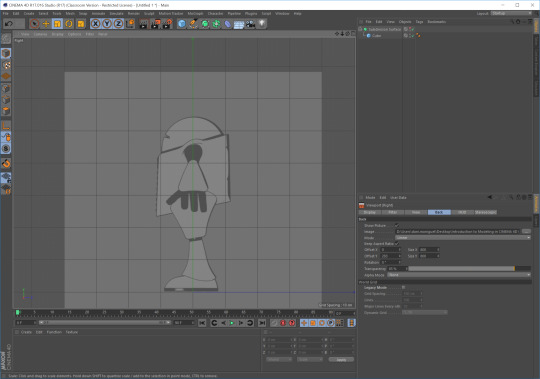
Setting Up Reference Images (4m): This was the least painful version of this yet. For some reason in the past I’ve just always had issues with setting up the reference images. We didn’t set a project in this case, which is quite confusing to me. Cinema 4D did not automatically create a bunch of folders for me, which I actually find nice. I will be very pleased if that is not something I have to do at all. Cinema 4D is in my good graces right now.
Modeling the Body Base (8m): Well everything was going smoothly until the extrude function started wacking out, and then C4D froze. Why does this happen to me
Adding Detail to the Polygon Body (8m): The extrude tool is confusing, which is bad, because the extrude tool is very important. I’ll probably get a hold of it soon, but until then, UGH. Also all the different options are hard to remember.
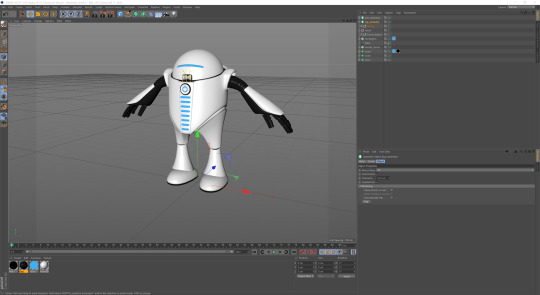
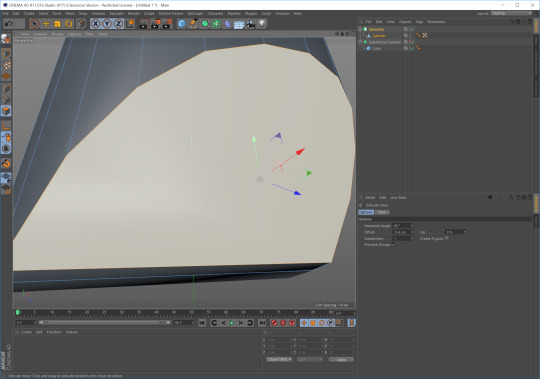
Building the Head and Seal (7m): Making the head was really easy, making the seal was sooo much harder than it had to be haha. Also it finally connected in my brain because of the hierarchy that smoothing mechanisms are sub division modes. Also I like that the hierarchy kind of includes layers in the way we can hide some objects without isolating our selections.
Extruding the Shoulders (9m): So I couldn't figure out the problem at the bottom of the robot, so for the time being, I’ve ignored it. The shoulders are nice and smooth now, though!

Creating the Arms with Splines (8m): My little biceps are much more uneven than his and I don’t know why.
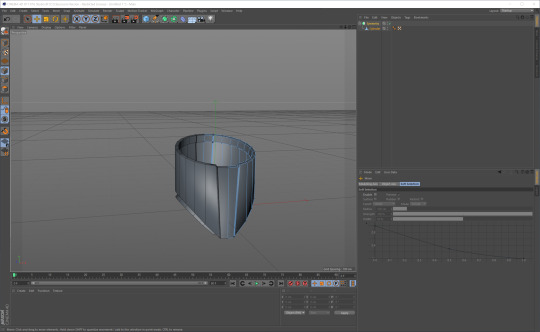
Modeling the Forearm in a Loft (9m): So splines weren't as bad as I expected it to be. It was actually kind of fun. There is no obvious way to select and edit the bezziar handles though.

Finishing the Forearm (7m): This is always more difficult than it seems. My number of polygons didn’t match his for some reason and so the knifing was different. I had to improvise and figure out my own way to get the seam in. It took two attempts but I think I got what he was going for.
Building the Hands (10m): This was a pretty simple shape to make. And a fun little lesson in parenting objects.
Modeling the Upper Leg (7m): Leg went well! I added a taper of my own in the middle of the leg to closer match the blueprints!

Adding the Lower Leg (7m): Shin was easy vertices manipulation. I’m satisfied.
0 notes
Text
Introduction to Modeling in CINEMA 4D R16: Introduction and Project Overview
Introduction and Project Overview: (1m): Looks like the other programs so far. The course looks very interesting! I think it will be fun to learn this program, because most of my peers use this program to work in. I wonder how this program fits into the industry standard, though.
Working with Primitives and Polygons (7m): Straight off the bat i see tools and settings that seem to simplify the modeling process. There are default shapes like the capsule, landscape, and figure that the other programs simply don’t have, and are a hassle to make. I like what I’m seeing so far, but Maya trumps all in terms of a slick interface.
Hierarchy and Workflow Concepts (7m): The hierarchy system is new to me, Maya had a little bit of a hierarchy and max had a lot more of that type of system, but this one seems easier to understand and more intuitive overall. Its a bit confusing because its new to me, but I think I’ll get the hang of it soon. I like the feel of this program so far. We will see how the actual model goes! Also. this dude isn't showing me how to navigate the view port AT ALL.
Project Overview (3m): This project seems pretty simple compared to the other ones. And considering the last Max project, its pretty much the same process. I don’t think the modeling itself will be too hard, but I need to pay attention to everything he says in order to get the controls down, because this tutorial is so short. I’m ready!
0 notes
Text
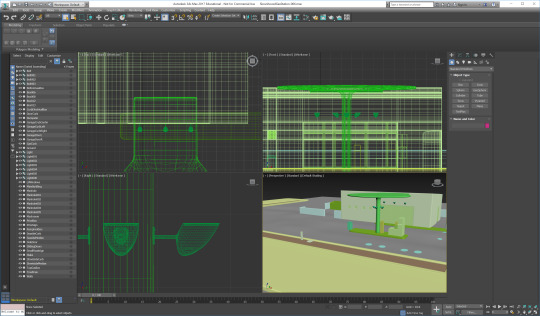
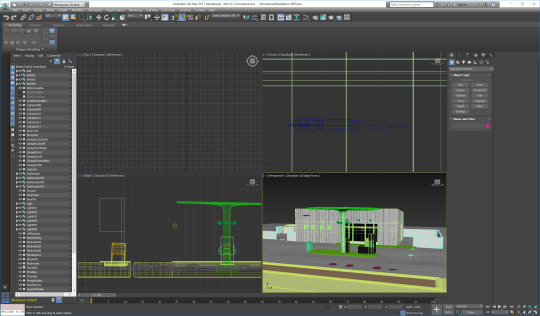
3Ds Max Personal Project: Process
001: The greybox is in! not everything is grey, but you know, the boxes are there. I have just begun with the simple topology to get my proportions right. The mushroom dome is a very tricky shape already.

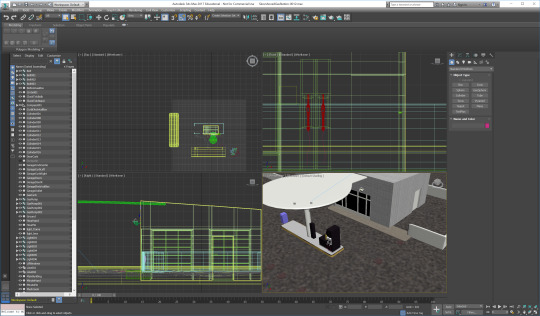
002: Some smoothness has been introduced to the major building and walls, however the smoothing did not want to cooperate with my edge loop defining the top of the sliding doors, I’m going to have to solve that somehow. Oh yeah! There are doors now! on the side and the front, as well as garage doors on the other side.

003: The mushroom is now smoothed, and a bridge has been added to connect it to the main building. Here we can also see the wireframe of the model. The tiny windows have also been added.

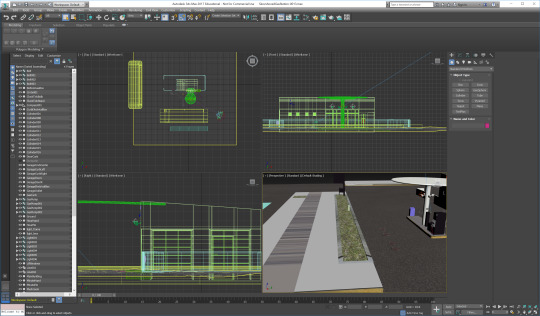
004: A curb surrounding the model has been added! Also greyboxes of the signs and a trashcan. Additionally, detail was added to the gas pumps’ topology.

005: The curb is smoothed and duplicated to the other side adjacent to this curb. The small sign out front has also received some smoothing, and minor topology details have been added to the gas pumps and trashcan. Also, bumps and divots have been added to the floor plane.
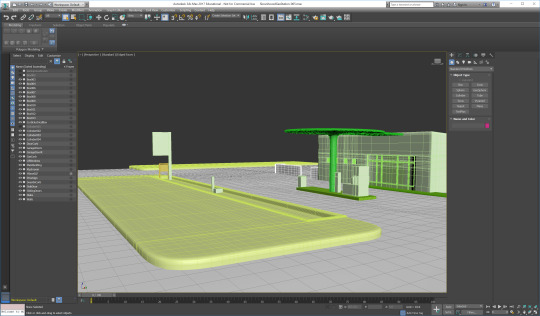
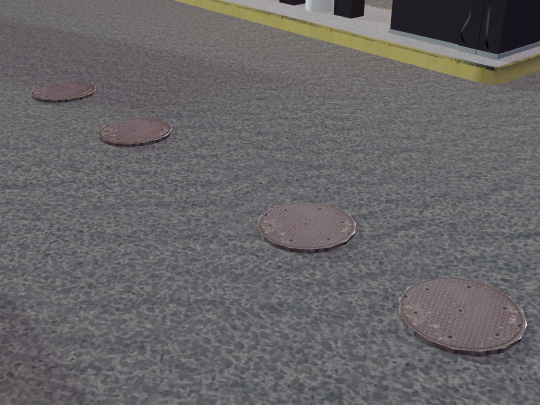
006: Manholes, medians, electrical boxes, stakes, lights, and a dumpster have been added at this point. A lot of time was put into correctly shaping the lights on the building and mushroom stalk. Also, unfortunately, the dumpster was abandoned later on because it was too much to model. (also I made everything different shades of green and teal)
007: At this point I begin to model the actual gas pumps. They are pretty detailed objects, and this probably wasn't a rational use of polygons, but detail is very important.
008: Texturing has begun! Materials are assigned to the simple objects, like the white accents in the building, and black pumps outside. Also, the brick had been added but nowhere near where the UVs need to be.

009: Texturing continues as the glass is made and the manholes are copied. An attempt at lighting has also been included.
010: At this point progress begins to slow down as I encounter errors with UVs. I also made half my building black by accident. But Sunlight was successfully integrated!

011: The main building has been successfully UVed (for the first time). Additionally, asphalt was added to the floor plane, however the resolution was far too small, and I had to go back in and change that somehow later. Also, the trashcan received a spicy wood texture, an I have begun to integrate yellow curb sides into my work. Omni light have been added to the lights, and metal has been introduced on the gas pump and side door handle.

012: Additional curb textures. A spikey death material appeared. I dont know why.
013: Textures on the main objects have been completed, but surrounding areas are still being figured out. UVs are also still a problem.
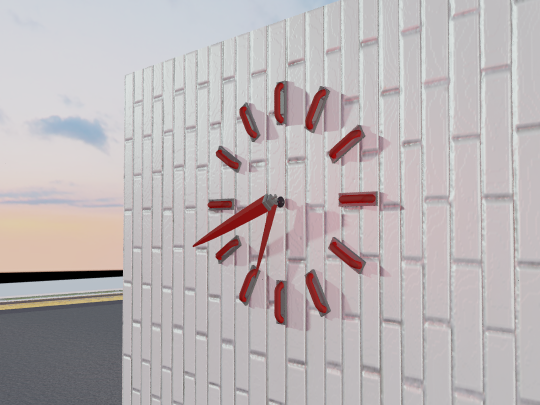
014: The grass and clocks have been sorted, at this point the model is basically complete, qwith some minor UV changes and duplicating the only [processes left to complete.

015: The model is complete! Now just to render the final images out. In the final processes I adjusted the lighting effects, and finalized the UVs on certain objects as well as duplicate and extrude the gas pumps. Unfortunately the signs in the surrounding area didn't make it into the final renders because the UVs would not cooperate. Ready to ship off!

0 notes
Text
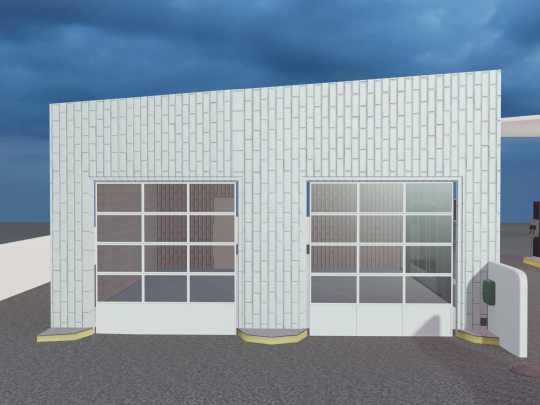
3Ds Max Personal Project: Remake of Arnie Jacobsen’s Petrol Station in Copenhagen (1983) - FINAL RENDERS
Overall I feel like this second project was much more successful than my first. I would attribute this to the more extensive use of texturing and materials. I used a multitude of textures to complete this project which I believe attributed greatly to the realism of this model.
Ironically enough, I feel like my textures were a weaker part of this project as well. The 3Ds Max UV editor was quite a hassle to deal with. Sometimes my edits would erase themselves when I clicked off an object, and more often than not I had to turn off any turbosmooths to get the texture to stretch minimally. Cutting seams was a mystery to me throughout this project, and for some reason unwrapping objects in the editor would flatten the largest faces into 2D lines, disallowing any detailed Photoshop texture maps to be added. However, I worked around it for the most part, and the stretching is only noticeable in some areas, and even less noticeable in the angles of the renders I chose. But besides that I created my own bump maps in Photoshop and assigned them to nearly every texture. I tried to add a displacement map and ended up with a spikey-death texture, so I eliminated that.
The model itself is relatively simple in shape, and therefore allowed a lot of time for detailing what I had. If I have one regret in the model, it was to put more detail into the gas pumps. If I had even more time, I think I would've added a car nearby and maybe a dumpster near the garages. But given the constraints, I am satisfied with my work.
After rendering I went into Photoshop and edited the renders to add detail and vibrance. These edited renders are below.


These are the unedited final renders:


After rendering the high quality images I went back in and rendered some of the parts of the model to showcase the attention to detail. These renders are unedited and included below.
Shape of the clock ticks, handles and stand.
Manholes.
Textures of the ground (Grass, curb, asphalt 1, and asphalt 2)

Shape of the lights.

Side door and handle.

Square texture (modeled) of the small glass windows.

Gas pumps and side curb texture.

Thus concludes my second personal project in 3D Modeling 1! Arnie Jacobsen, I hope you would be proud!
0 notes
Text
Self-evaluation of Baldwin Train Project in Comparison to References.
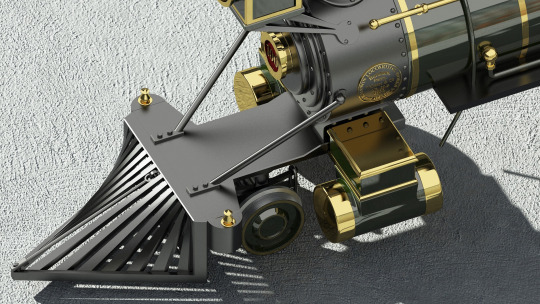
Since my first model I have had more experience with modeling and I will now go back to my first solo model, the baldwin train created in Maya, and I will critically examine the piece for how I would've done it differently after considering my slightly increased experience as well as examining actual baldwin train references in more detail. One of my greatest errors in this model was only/primarily using the blueprint for my creation. Until the materials I relied on the blueprint only, and it is very easy to misinterpret parts of the blueprints. In some places it works out without noticeable deviation from realistic trains, but in some places it seems to create unrealistic floating objects, lack of detail, and strange shapes. Below I have the finished model with wireframe, as well as the final render.


Right away, it doesn’t seem too bad. The most glaring thing the eye is drawn to is the texture seems to be made of a too-smooth, clay-like material rather than actual metal. After further examination, it becomes very noticeable that the cow-catcher completely lacks detail and is really nothing more than a greybox. Also, the cabin in the back’s windows are not windows (at the time I planned to create a glass texture, but if I had examined references more I could have seen punching out the faces completely would have worked just as well). The cabin overall lacks detail. Most references have more pipes as well. There is also more detail overall about the undercarriage and wheels. The light at the top ought to be solid, but has a hole punched through the center, which was another feature lost in translation of the blueprint. Although the features vary from train to train these errors are typically the same across each reference. I would like to take another crack at this project if I had the time to. Perhaps over the summer I will have the chance.


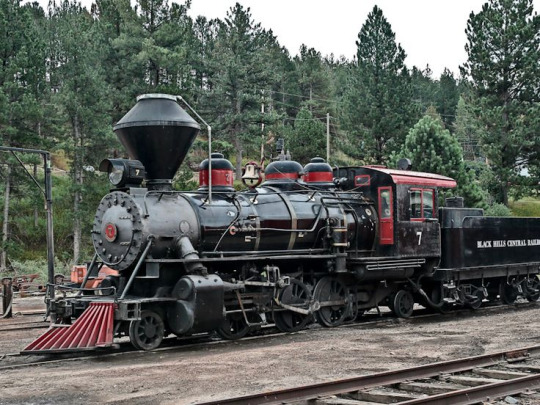
This toy train seems like the closest thing to my actual model, I would like to say that my model looks like a real train, and not just a toy.

Nice model, the gold looks good on this one, as well as the seal on the side.
The worn/western texture here has a nice effect as well.
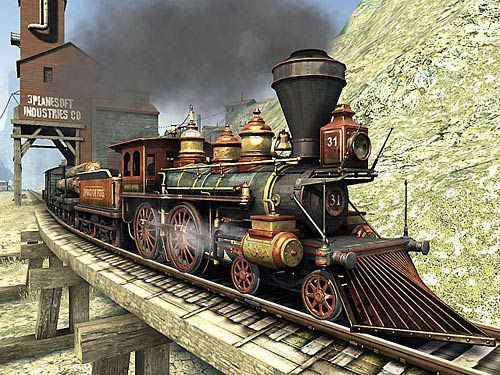
I like this vibrant color scheme a lot.
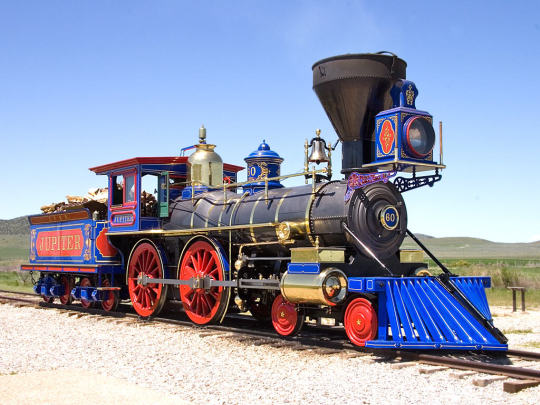
The pipeage here seems to add a lot of detail. There is also a lot going on around the undercarriage here.
If I were to remake the project I would focus more on the detail, and the texturing, being sure to have multiple colors to highlight the details. I particularly like the bright blue, gold, and red model. I think making a ground would help with the realism as well!
0 notes


Text
Introduction to 3DS Max 2015: Materials Editor in 3Ds Max (Continued/Finished)
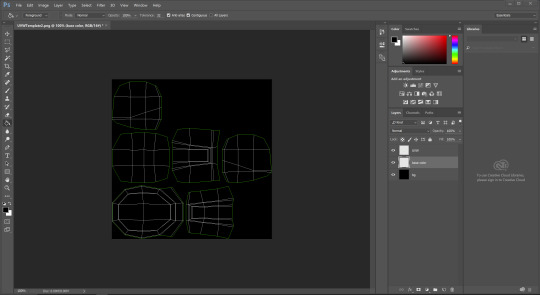
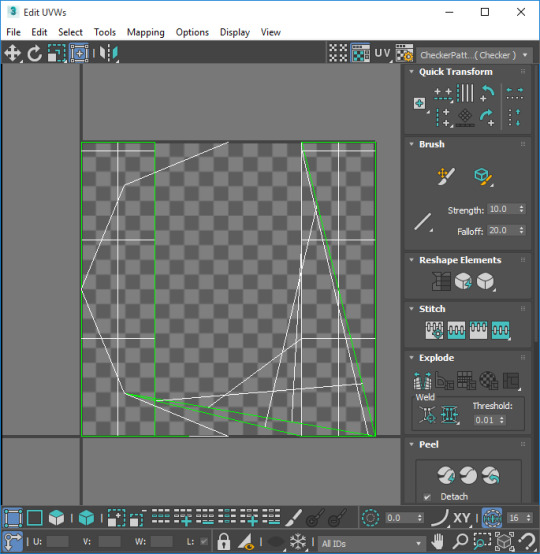
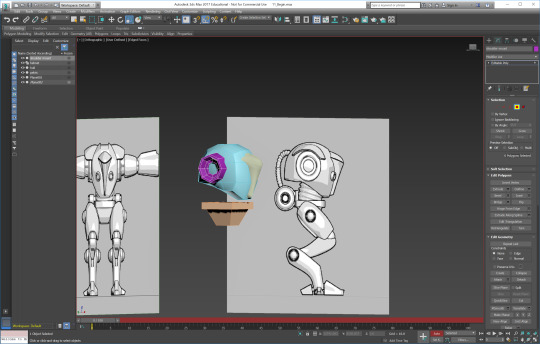
ddiputting a UVW Template (4m): What does the W stand for? Also, my hull UV’s are different from his? I dont understand why especially since I began from the exercise files this time. I’m not too sure what to do at this point if I should do my template from his file or from mine. I think I will do it from his just to keep it easy to follow, even if it doesnt fit my mech.
Adding File Textures (8m): My material isnt assigning to the object and I dont know why!! the proper things are selected, the btmap was assigne, the texture was assigned to the bitmap. I asked for help from some others, and they didnt know what to do either.
Adding a Bump Map (8m) Adding the bump map really helped out with the way it looked. I actually thought it looked very subpar until now. now its pretty ok! I’m intewrested in how normal maps work and what the quality is between the grayscale and the purple/pinkish one.Previously i messed with effects in photoshop and never understood what those kind of functions were for, i thought they were just styles, but now i know theyre for modelling!. Thats also cool because you can pretty much turn any image into a normal map pretty much instantly. Like I have said I wish there was more time for in depth tutorials on materials and textures, because even after Maya and Max the whole concept is still a bit fuzzy to me.
0 notes
Text
Introduction to 3DS Max 2015: Materials Editor in 3Ds Max (...)
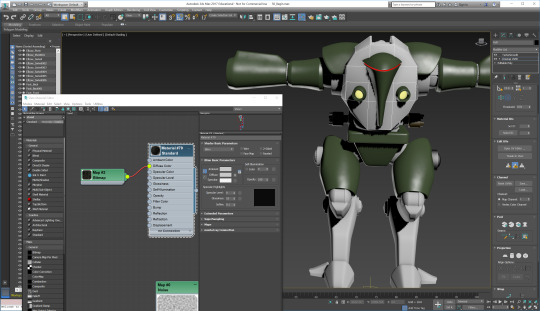
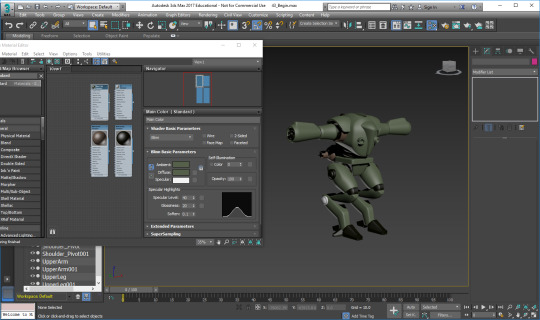
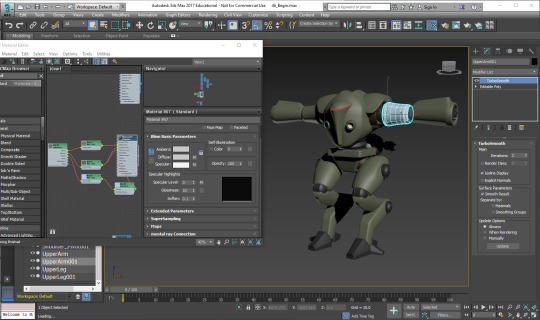
Material Editor Overview (8m): Looks just about the same as Maya, thank goodness.

Modifying the Basic Parameters of a Material (9m): As of Right now I kind of just have a standing tank haha. I wish there was a shader ball to preview the material.
Adding Multiple Object Materials to a Single Object (8m): I like how he showed multiple ways to assign the materials. The Maya guy missed that. I can see how it would be useful as well.
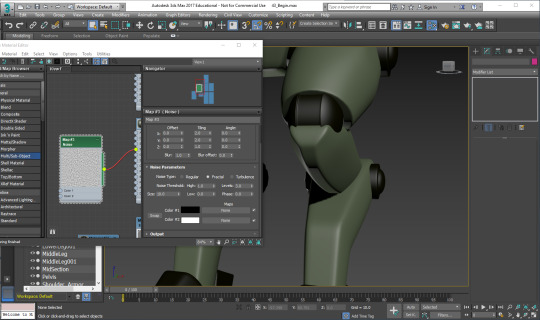
Using Procedural Maps(5m): Mapping is the most obscure concept to me right now. I’m kind of just trying my best to work out in my mind how to actually make a textured model look good. It doesnt seem easy.
Unwrapping UV Basics (7m): Classic UV’s. Love em. Thank goodness this model isnt very organic.

Exploring the Unwrapping Tools (10m): I couldn't get the Flatten Mapping tool to work unfortunately. But I followed along while he unwrapped.
Using Substance Materials (11m): My materials arent appearing for some reason. I’m going crazy so I’m gonna take a break. I feel like there is so much ground to cover with materials that it could take up just as much of the tutorial time as the actual model. I will be interested in that lighting rendering and texturing class for sure.
0 notes
Text
Introduction to 3DS Max 2015: Modeling in 3Ds Max (Continued/Finished)
Modeling the Back Foot Piece (8m): I found the exercise files! Not all is lost! My patience has returned along with my perseverance. I can do this.

Modeling the Mid-Sections (7m): I accidentally duplicated my object sometime along the way, so I had to delete it and start again which was lamee, but I got it.
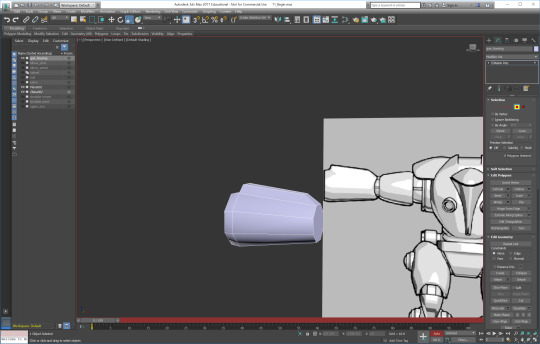
Modeling the Jet Pack Tank (9m): No hiccups.
Modeling the Jet Pack Exhaust (8m): Easily done. Sometimes I get confused with the grouping and forget to rename things as I make them, but other than that I am progressing without much error.
Modifying the Hip to Function (8m): I like the functionality rule. It has always bothered me when I have seen models that dont make sense functionally.
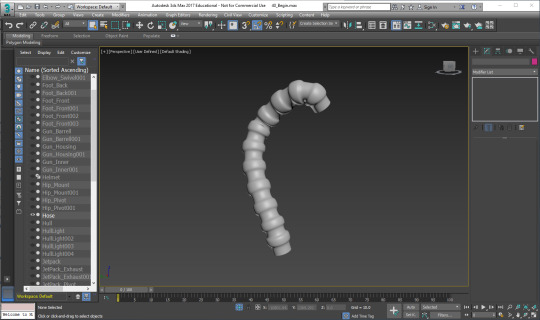
Modeling a Hose (7m): It took some time to figure out. For some reason the Path Deform tool just wasnt working.. I figured it out eventually but I had to remake the hose into a more boring path shape.

Adding the Final Elements: Interesting how he didnt want us to add any spheres for lightbulbs.
Using Smoothing Methods (8m): Smooth and shiny!

Smoothing the Shoulder Pieces (8m): I wish we added the edge loops to the pieces as we went so that we didnt have to do them multiple times for copied pieces of geometry. Oh Well. I find adding edge loops to be very satisfying.

Smoothing the Arm Pieces (9m): This is pretty mich all of the same thing. Same as Maya as well.

Smoothing the Accessory Pieces (8m): I like the way the hose looks when smooth. It really has that latexy feel. I would've put a taper on each of the rings if I had time. that would've been a cool design too.
Smoothing the Lower Body of the Mech (9m): More of the same.
Adding the Final Details of the Helmet (8m): Its done!! Glad its over, but glad that I could finally understand the 3Ds Max interface. I do feel much more adept then when I began Max with the arcade. Looking forward to the materials and texturing!
0 notes
Text
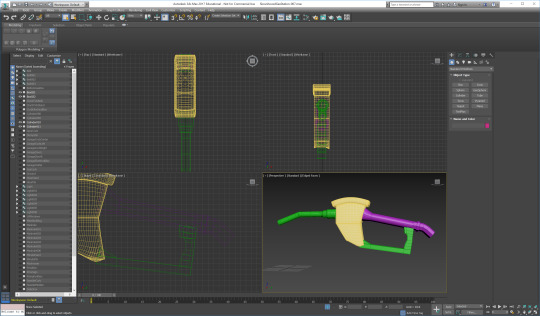
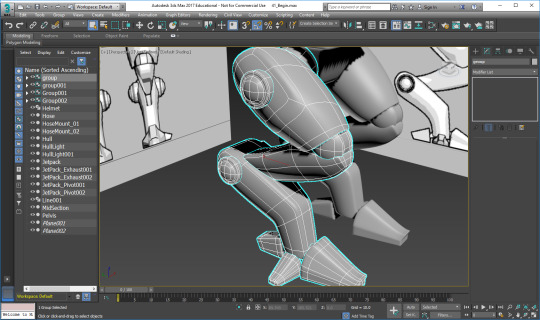
Introduction to 3DS Max 2015: Modeling in 3Ds Max (...)
fModeling Overview (1m): Awesome I’m gonna build a transformer / boba fet crossover.
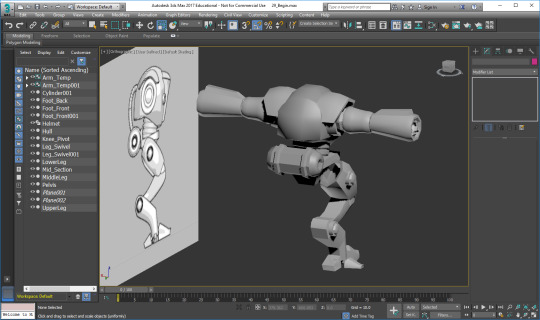
Setting up Reference Images (8m): I already ran into annoying problems trying to set the project folder and make the image planes. Same annoying crap from Maya. Finally got it done though! now on to the modeling!

Modeling the Hull (8m): I would rather be doing it on my own, but I cant deny that modeling is pretty peaceful. Its like a fun little puzzle, and you see your results pretty quickly, especially in the blocking process.

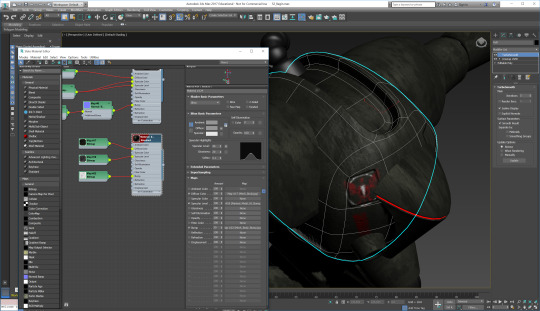
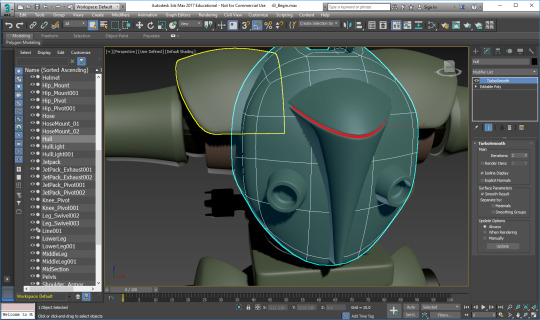
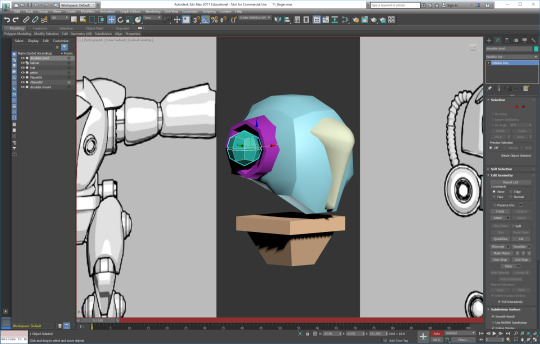
Beginning the Helmet (7m): Was going great until the splines randomly curve now when I move them. Awesome. It looks like theres some invisible anchors like this is illustrator or something... great.
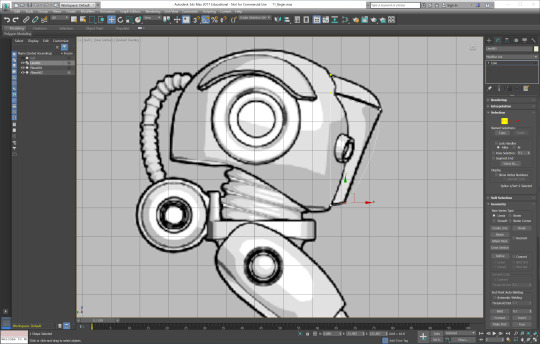
Smoothing the Splines (8m): Im more familiar with box modeling but I was actually digging the splines too. Splines are hard because theyre not shaded and its easy to jack up proportions in 3D space. But those smooth curves are SLEEK.

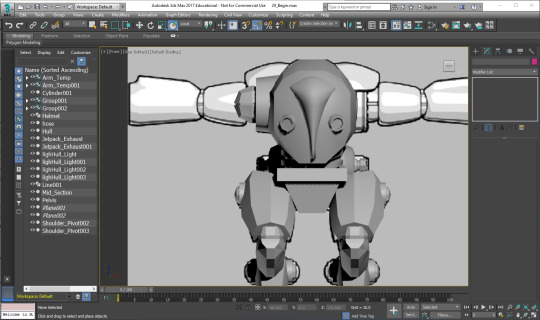
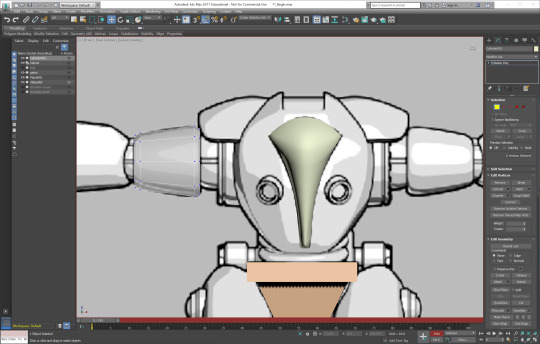
Finishing the Helmet (6m): I have a random red outline now apparently. Classic

Modeling the Pelvis (7m): Boba Fett is looking good!

Modeling the Shoulder Mount (7m): I cant really tell the difference between bevel and extrude. The interface is still weird, butI’im starting to warm up to it. Also I like the new colors that come in with every newly spawned object. It keeps things exciting.
Modeling the Shoulder Socket (7m): That spherify tool is pretty cool. I can think of a few times it would’ve been useful in Maya.
Modeling the Upper Arm (8m): Taper is cool for sure. It was kind of hard to understand where to put the pivot poit or how to move it though, so I just did the easy method.
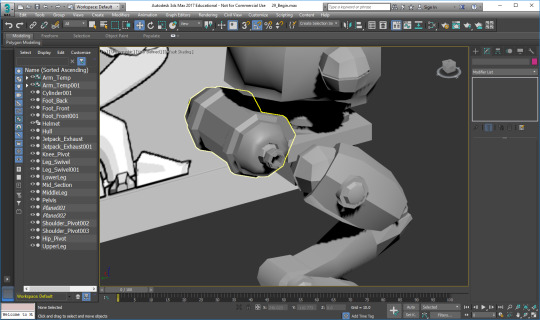
Modeling the Elbow Joint (8m): I hate doing that cut thing and adding a point to make a tip.

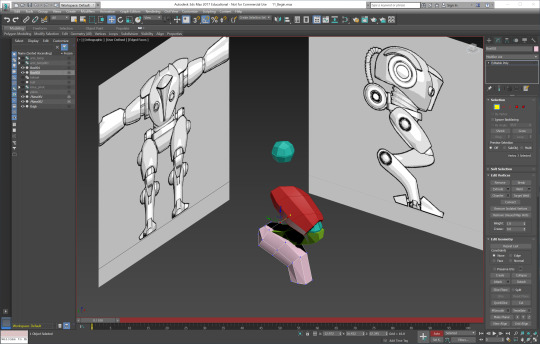
Modeling the Arm Cannon Housing (7m): Yaay
Modeling the Arm Cannon Interior (7m):

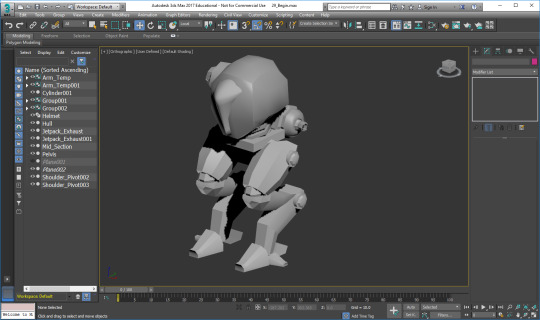
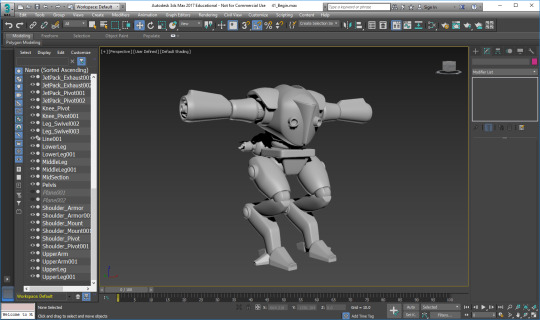
Mirroring the Arm (9m): Upper body complete!!

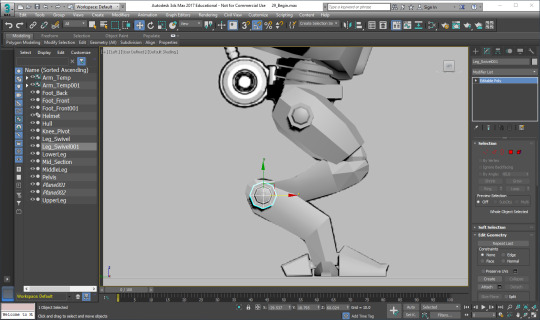
Modeling the Upper Leg (10m): Yeah my leg just didn't turn out as well as his did at all I would've just box modeled it though this guy is crazy with all his cylinders.

Finishing the Upper Leg (7m): The geometry was really bad but it got better!!

Modeling the Middle Leg Link (10m): Okay it went bad again. Nothing was working out in this video, my knee cap’s pivot wouldn't center, it turned itself into an uneditable shape and wouldn't let me convert to editable poly. The leg shape was ugly and I don’t know what he did with the tops of the shin. I’m rapidly losing patience. I have been here for so many hours.

Modeling the Lower Leg (8m): Not even sure if I’m doing this correctly at all but its cool. It’s pretty much the same model.
Modeling the Front Foot Piece (7m): We are staring to do things differently. Sometimes I get impatient and just do it the way I already know how to. I think It is becoming sloppy so I’m gonna turn in for the night. But overall Max is staring to warm up to me. Its not so bad. I will start from the exercise files tomorrow, because of the deviations.

0 notes
Text
Introduction to 3DS Max 2015: Introduction to Interface (Completed)
Interface Overview: I’m happy that he broke down everything into their basic functions. It made everything seems at least slightly less complicated. Especially when he explained the animation things at the bottom. Also the different window layouts was a useful bit of info. Something that caught my eye that he really didn’t expand on was the “populate button”. That seems like a pretty complex function so to just have one button for it is pretty weird. I don’t think well get to that button in this program though, so it will remain a mystery.
Viewport Navigation (8m): I like how he went over the bottom right controls. Even though I will be using the hotkeys its nice to know what those buttons do so that I know they're less complicated than they look. Easy stuff. I like Maya’s pan system much better though.
Creating a 3Ds Max Project Folder (6m): Customize > Configure User Paths. Gotta remember that. I don’t know what the difference is between Save As and Save a Copy As. Oh well haha
Selecting and Viewing Objects (8m): Cool stuff. I like all of the different shading options. And I’m willing to admit those different selection options have an upper hand on Maya. Good move, Max.
Creating and Manipulating Geometry (8m): The incremental creation tools are interesting. I think it works just as well to bring an object in and scale it from there, but that’s just me.
Accessing Sub-Object Modes (9m):Border and Ring are some Max exclusive functions that could prove to be useful in the future. Ok Max, you’re not all that bad. BUT why do I have to convert that object into an editable poly or whatever? Annoying. Just kidding Max, you’re back to square one.
Grouping and Parenting (6m) I see how this would be important in animation but knowing that I’m not learning that it’s hard to concentrate on what he is saying. OK model time!

0 notes
Text
Introduction to 3DS Max 2015: Introduction and Project Overveiw
Looking at the mech we will be building It doesn’t look too complicated! If only we were doing it in Maya. It’s a shame we have to relearn everything. Since I was given this new knowledge all I have wanted to do was create my own projects! Maybe If I can get through this quick I can make that a reality!
0 notes