
Last Seen Blogs

sad-boy-215
...
majonezniysomelye
Олежа

promoteonlyfans2
Untitled

1d--louhaz
For Your Eyes Only...

digitalsdfasdgasdff
Untitled
Text
How to Setup AC1900 MU-MIMO Gigabit Wi-Fi router (DIR-1950-US)?
How to Setup AC1900 MU-MIMO Gigabit Wi-Fi router (DIR-1950-US)? - The D-Link wireless router lets you access your network using a wireless connection from virtually anywhere within the operating range of your wireless network. Keep in mind that the number, thickness and location of walls, ceilings, or other objects that the wireless signals must pass through may limit the range. Typical ranges vary depending on the types of materials and background RF (radio frequency) noise in your home or business.
The D-Link Wi-Fi app allows you to install and configure your AC1900 MU-MIMO Gigabit Wi-Fi Router (DIR-1950-US) from your compatible Android or IOS device.
Note:-The screenshots may be different depending on your mobile device’s OS version. The following steps show the IOS interface of the D-Link Wi-Fi app. If you are using an Android device, the appearance may be different from that of the screenshots, but the process is the same.
Step 1:- Search and install the free D-Link Wi-Fi app available on the App Store or on Google Play. You can also scan the QR code on the right, which will take you to the respective D-Link Wi-Fi app store page.
Step 2:- Launch the D-Link Wi-Fi app from the home screen of your device.
Step 3:- Tap on the Install New Device button at the middle of the screen.
Step 4:- Tap Scan the QR code to scan the setup QR code located in the Quick Installation Card and proceed to step 6. Alternatively, you can tap Continue without scanning to proceed to step 5.
Step 5:- Select Router and select AC1900 MU-MIMO Gigabit Wi-Fi Router (DIR-1950-US) from the list of available devices. Tap Next to continue.
Step 6:- You will now be guided through a step-by-step process for setting up your router. Simply follow the on-screen instructions to continue the installation and the configuration process.
Hardware Setup AC1900 MU-MIMO Gigabit Wi-Fi router (DIR-1950-US)
Step 1:- Position your AC1900 MU-MIMO Gigabit Wi-Fi router (DIR-1950-US) near your Internet-connected modem. Place it in an open area for better wireless coverage
Step 2:-Turn off and unplug the power to your cable or DSL broadband modem. This is required. In some cases, you may need to turn it off for up to five minutes.
Step 3:- Use the Ethernet cable to connect your modem to the port labeled INTERNET on the router.
Step 4:- Plug in and turn your modem back on and wait approximately one minute before proceeding.
Step 5:- Connect the supplied power adapter to the router and a power outlet, press the power button, and wait approximately one minute until the LED indicator on the front of the device changes from orange to solid white.
Step 6:- If you are configuring the router wirelessly from a PC, connect to the Wi-Fi network printed on the label attached to the bottom of your router or in the Quick Installation Card. If you are configuring the router from a PC with a wired Ethernet connection, plug one end of an Ethernet cable into the port labeled 1 on the back of the dlinkrouter.local , and the other end into the Ethernet port on your computer.
#dlinkrouter.local#AC1900 MU-MIMO Gigabit Wi-Fi router (DIR-1950-US)#Setup AC1900 MU-MIMO Gigabit Wi-Fi router (DIR-1950-US)#dlink router login#dlink router setup#www.dlinkrouter.local
1 note
·
View note
Text
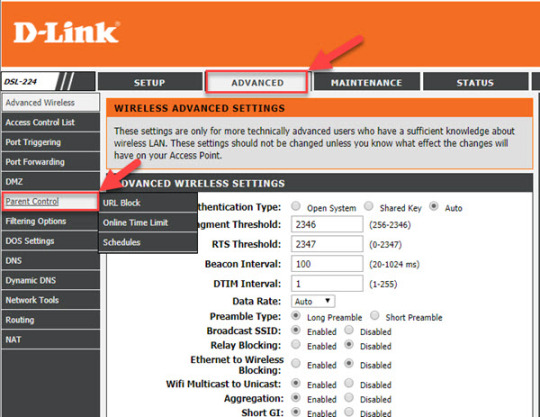
How to Set Up Parental Control on your D-Link Router?
How to Set Up Parental Control on your D-Link Router? - Parental control features basically help the parents to control internet access of their child by blocking any website access or granting access to the approved websites. Also, it allows setting up limits to use the internet for a particular time period applying certain time limits and dates. This feature could be used under access control on Dlink wifi router.
Things required:
A computer or mobile device to access the D-link router's web interface.
Dlink router login via dlinkrouter.local to access the web GUI.
Dlink router login is the initial step to allow parental control on your D-link router from the web GUI through dlinkrouter.local login as explained here:
D-link router login steps to access GUI for parental control setup:
Launch the browser window that you often use on your computer or mobile device.
From the desktop browser’s address bar navigate to http://dlinkrouter.local as dlink router login default web address.
Any login errors with dlinkrouter.login , use the default IP address 192.168.0.1 to login.
The D-link router admin login window appears on screen.
It would allow dlink router login with the administrator username and password.
Enter the default D-link router login username as well as password in the fields.
The default login username should be Admin.
The default login password field should be left blank.
Click on the Login button.
It directs the web GUI interface of D-link router.
Note: Make sure that the dlink router administration login password is different from the dlink router’s Wi-Fi connection password.
To setup parental control access on D-link router:
Access d-link router login steps via dlinkrouter.local as explained above.
Use the default dlink router login details in the username and password fields to access the web GUI.
Click on the Login button.
Open the web graphical user interface GUI of dlink router.
Click on the advanced tab/link on the top of the web GUI.
Select the Website Filter option on the left of the web screen.
Opt to deny access by selecting “deny computers access to ONLY these sites” option.
It is mentioned on the field below configure the website filter.
Key in the website address or URLs that you want to block on D-link router.
Click on the save settings button when done.
To enable access control feature or parental control setup on D-link router:
Following above steps, locate the access control option
just above the website filter on GUI.
Tick the checkbox to enable the access control feature.
Note: This access control feature grants controlled access to approved websites as well as limits web access depending on set time or dates.
By enabling access control features you would need to set up a policy on the dlink router for the website filter for parental control.
Select the Add policy tab just below the enable access control checkbox.
Follow the dlink router setup wizard through rest.
Click on the Next link.
The dlink router wizard screen shows that guides through steps to add a new policy for Access control setup on dlink router.
In the first step, you will be required to name the policy.
Input the policy name and Click on Next.
Then, select a schedule for access control and name it as well.
Click on Next.
Specify the machine to which this access control policy has to be applied.
Add IP address or MAC address.
Click Next.
Also, select the method for filtering – either log web access or block access.
Enable or disable the web access logging.
Click on save.
The policy would be displayed on the screen under the policy table.
Click on save settings for parental control setup.
#Set Up Parental Control on your D-Link Router#Parental Control on your D-Link Router#How to Set Up Parental Control on your D-Link Router?
1 note
·
View note
Text
How to Setup D-Link DCS-930L
Zero Configuration Setup:- As well as the Zero Configuration Setup will only work with a registered Cloud Router and an active mydlink account. Hence your Cloud Router will automatically assign your camera’s network settings (both wired and wireless), and add the camera to your mydlink account. This means you'll find out your camera by simply plugging it in and connecting it to your router.
Connect the Power Cable and Ethernet Cable:-
Step 1:- The facility supply to the facility receptor located on the rear of the DCS-930L and connect it to a wall outlet or power strip. Power is confirmed when the facility LED is lit.
Step 2:- If using an Ethernet connection, connect the included Ethernet cable to the Ethernet port located on the back of your camera. Plug the opposite end into an available port on your D-link Cloud Router.
Note: As well as you later decide to use your camera wirelessly, you will be able to remove the cable after Zero Configuration Setup is complete.
Add Your Camera to Your mydlink Account:-
Step 3:- From a computer connected to the Internet, open a web browser (e.g., Internet Explorer, Chrome, Firefox, or Safari) and go to http://www.mydlink.com. Sign in to your mydlink account.
Step 4:- As well as the mydlink page will automatically check for new devices. Hence once mydlink detects your camera, a notice will appear that says , Zero Configuration (at rock bottom of the screen). Click the notification to continue.
Step 5:- As well as confirmation request will appear with a summary of the configuration details. Make a note of the small print and click on Yes to feature the camera to your account. Your setup is complete! Note:- If you experience issues registering this device together with your mydlink account, perform a tough reset by pressing and holding the push button on the device for 10 seconds while the device is powered on.
Step 6:- Hence you will see the mydlink Live View for your camera. As well as the screen will look similar to the screenshot on the right.
Note:- You used an Ethernet connection and now want to connect your camera to your router wirelessly, you can simply disconnect the Ethernet cable and move the camera to the preferred location. As well as the router’s wireless settings were automatically transferred to the camera during Zero Configuration Setup, so no further configuration is required.
D-Link DCS-930L Manual Installation:-
Hence if you prefer to set up your camera without using the Camera Setup Wizard, follow the steps below.
Connect the Power Cable and Ethernet Cable
Step 1:- The facility supply to the facility receptor located on the rear of the DCS-930L and connect it to a wall outlet or power strip. Power is confirmed when the facility LED is lit.
Step 2:- If using an Ethernet connection, connect the included Ethernet cable to the Ethernet port on the back of the camera. Plug the opposite end into an available port on your router
WPS - Push Button Setup and installation Create a WPS Connection:-
Step 1:- As well as with the camera powered on, press and hold the WPS button for about three seconds. Hence the blue WPS status LED above the button will blink.
Step 2:- As well as press the WPS button on your router within 60 seconds. The WPS button is probably on the back of your router. Hence if you are not sure where the WPS button is located on your router, refer to your router’s User Manual. On some routers, you'll have to log in to the online interface and click on an on-screen button to activate the WPS feature.
Step 3:- Allow up to at least one minute to configure. As well as the DCS-930L will automatically create a wireless connection to your router. Hence while connecting, the green LED will flash and your camera will reboot. WPS Button If your router supports Wi-Fi Protected Setup (WPS), the easiest way to create a secure wireless connection is by using the WPS Button on the back of the camera. In general, WPS setup only establishes the connection, so you continue to run the Setup Wizard to configure your camera. As well as the exception is Zero Configuration setup with a D-Link Cloud Router. You can use WPS to attach the DCS-930L to your router, then register your camera with mydlink.
#Setup D-Link DCS-930L#How to Setup D-Link DCS-930L#D-Link DCS-930L#dlinkrouter.local#dlink router login#dlink login#dlink router setup#www.dlinkrouter.local
1 note
·
View note
Text
How to Setup D-Link Router
To begin D-link router setup and installing it for the first time, then smart setup Wizard helps you get through quick setting up of the router. It requires accessing the setup wizard through D-link router login involving dlinkrouter.local web address for login. This internet connection setup wizard is designed to guide the D-link router users through a step-by-step onscreen process to configure your new D-Link router and connect to the Internet.
1 note
·
View note
Photo

D-Link Router can be configured in just a few minutes and once you have configured the router and set it up, your Wi-Fi connection will set up and you will be able to connect to the internet through your D-Link router local.
#dlinkrouter.local#mydlink login#www.dlinkrouter.local#dlink router setup#dlink login#dlink router login
1 note
·
View note