fenlr
fenlr
hi i'm fennella, 25 and living in uk this is my learning log for the oca
109 posts
Don't wanna be here? Send us removal request.
Last Seen Blogs
moativational
MoAtivational

gabrielsbubblegumbitch
Trust us with your daily shitpost
chatarinadinafizzy-blog
I'm a Proud Fizzy Family Member
senyorspock
viaje a las estrellas
seoz-seoz
Oya Oya?
Text
Final ATV Written Reflection
One thing I think went especially well was my presentation for the end assignment of each part. Particularly those from assignment 3 and assignment 4. These presentations are minimalistic yet contain exactly what is needed to demonstrate my work as needed for each assignment. Presenting work digitally this way is something I am extremely confident in, having a lot of experience with working digitally within my own art.
Looking back through the work I’ve created throughout this course, I am drawn to a few exercises in particular such as the gouache studies from exercise 3.1. I also find that the work produced for the re-interpret re-invent project from exercise 4.3 particularly interesting to look at. I am fairly confident in my painting and observational drawing skills on the whole, so I would consider these strengths of mine. Creating basic and simple yarn designs was something I seemed to fall into the habit of throughout the course and I am happy with these experiments but in future I think it would be good for me to try and expand on these and make them more unique.
I would like to address my ability to create samples and exploring ideas. I have mentioned this in previous reflections but I would definitely like to work on this in my future work - I struggle to look beyond an original concept, often creating one sample to explore an idea and then finding it difficult to create anything beyond that. In future I need to work on this, perhaps giving myself time restraints might work. For example, giving myself only 5 minutes or less to create a sample. This way I would need to worry less about the outcome and it may push me to create more than one if I felt I did not get to explore an idea enough within those few minutes.
I am still unsure as to where I will go from here in my own textiles practise, I feel that I still have a lot to learn when it comes to textiles but I would really like to incorporate my digital skills more within my practise. I feel that I could come up with some really great and exciting concepts if I were to combine more traditional textile processes and techniques with some sort of digital process.
0 notes
Text
Assignment 5: Final Collection
After receiving my feedback from my tutor for the final assignment, I decided to revisit the assignment and rework it to try and create some final samples that fit the criteria and my own development research better. I decided to keep 3 of the previous final samples I had submitted, and then recreated an extra 3 samples - a fabric scrap patchwork quilt sample and two mixed-media collage samples. I felt that these reflected my developments from the assignment far more than what I had previously submitted. I was far more pleased with the outcome of these samples and when looking back at my original arrangement of objects that was used as a reference point for the entire assignment, it is clear that these new 3 samples reflected that arrangement way better too.

Fig 1 Original arrangement of objects and materials

Fig 2 Piece 1 crochet patchwork sample
Fig 3 Piece 1 close up

Fig 4 Piece 1 close up
My research into patchwork and crochet has been a clear source of inspiration for this first sample and I tried to just focus on both the processes and the overall colour palette for the project with this piece. Unfortunately I was unable to gain access to the exact colours I needed when looking for wool to work with so I had to try and match the colours as close as I could. I used the bright pink to represent the flamingos on the picture frame within the arrangement but it is certainly far brighter than it should have been. The use of crochet was to incorporate the following observational drawing (see fig 5, below) which was in response to the material I used at the base of my arrangement.
Fig 5 Observational drawing

Fig 6 Piece 2 crochet patchwork version 2 sample
Fig 7 Piece 2 close up

Fig 8 Piece 2 close up
I decided to keep this second version of a crochet patchwork as it was a development of the previous one, but with the addition of some more mixed-media aspects to the design such as the beading and the coils made from pipe cleaners. The beading was in response to the observations of the decorative frame from fig 9 as seen below which I had already explored within one of my samples (see fig 10 below). The coils were of course in response to the metal coils included in my original arrangement which I recorded in a few of my observational drawings. Unlike the coils from the original arrangement and my development sample (see fig 11), I decided to experiment with the colour choice by using a purple shade which is sourced from the floral fabric within the arrangement. Much like the bright pink wool used which doesn’t quite reflect that of the colour in my arrangement, the purple shade isn’t an exact replica of the colour taken from the fabric, I tried to match the colours as much as I could with the materials I had available to me.
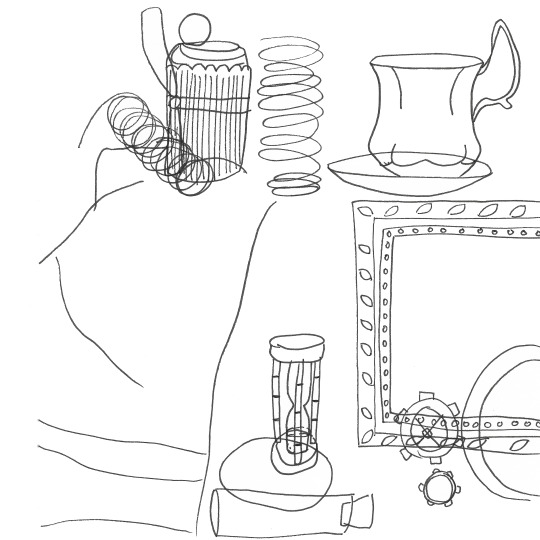
Fig 9 Observational drawing

Fig 10 Sample of crochet and beading combination

Fig 11 Sample of crochet and coils combination
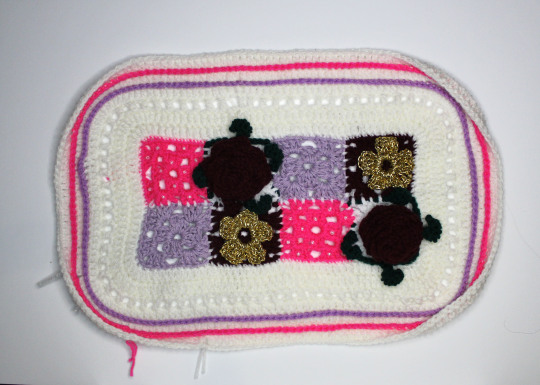
Fig 12 Piece 3 crochet patchwork version 3 sample

Fig 13 Piece 3 close up

Fig 14 Piece 3 close up
Although this particular sample is quite a jump from the previous two, I decided to keep this in my final collection rather than the other designs as I felt that there were aspects to this design that really represented my original arrangement as well as my own observations and research compared to the others samples. For example, the use of the 3D crochet flowers and the vine-like yarn which I have included on 2 of the patches and the gold elasticated yarn which was used to create the flatter-looking, less 3D crochet flowers on 2 of the other patches from this crochet patchwork sample. I took a lot of inspiration from one of my observational drawings for the white section surrounding the patchwork within this piece, if you look at fig 5 I think it is clear where I have taken inspiration when you look at the crochet section with holes as part of the design. The pink and purple raised stripes near the outer edge of the design were definitely inspired by the decorative frame in the arrangement as well as my observation of the frame as seen in fig 9. Below are some of the developments throughout this project that I used to inspire this particular sample (see fig 15-18)
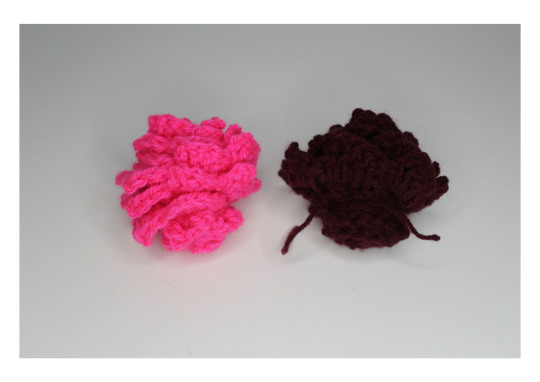
Fig 15 Samples of 3D crochet roses
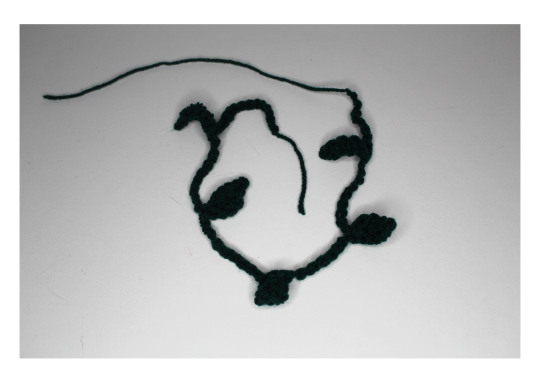
Fig 16 Sample of vine-like crochet yarn

Fig 17 Sample of combination of crochet patch, 3D crochet flower and vine-like crochet yarn

Fig 18 Sample of gold elasticated crochet flowers

Fig 19 Piece 4 fabric scrap patchwork quilt sample

Fig 20 Piece 4 close up
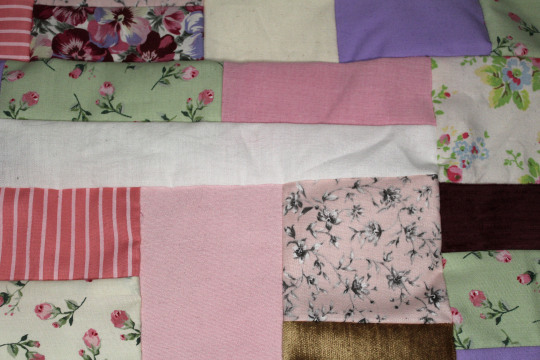
Fig 21 Piece 4 close up
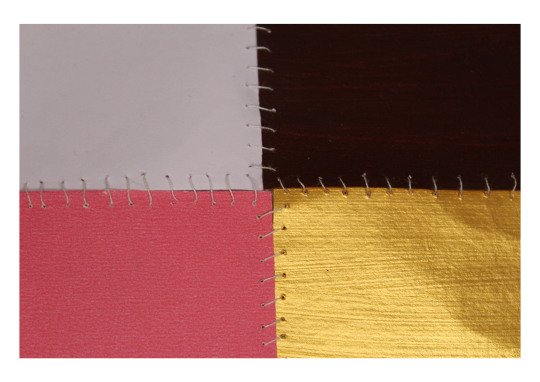
Fig 22 Paper patchwork sample from project 2
I decided to create a fairly simple sample for the first “new” design for the final assignment, using this paper patchwork sample from project 2 as a starting point. I selected various fabrics that I felt represented my colour scheme and object arrangement and used a variety of sized pieces to create a free-hand patchwork. By free-hand I mean that I did not iron anything nor pin anything. The edges were un-even and weren’t visually appealing as a result of this and considering there was no fabric to represent the knitted/crochet samples I have been working with, I decided to incorporate some lace. The lace added another texture to the piece without taking away too much attention from the rest of the patchwork. I think compared to the crochet pieces I have created for this assignment, this patchwork represents my colour scheme far better but lacks much texture or depth.

Fig 23 Piece 5 mixed-media collage sample

Fig 24 Piece 5 close up

Fig 25 Piece 5 close up

Fig 26 Piece 5 close up
I decided to look at my collage and material observations from project 2 (see fig 27 and 28) when approaching the next two samples. For this 5th piece, I used the photograph of my original arrangement as well as my observational drawings to pick out elements to represent within the multi-media collage. I went for an abstract interpretation, similar to how I approached some of the collage work from part 3 earlier on in the course. I did not worry about accurately representing each element, instead focussing on the materials I chose and how they sat together compositionally. I wanted to add in some more “3D” elements to the collage to add some depth and texture to the piece that the previous design (piece 4) simply did not have. I think visually this piece is okay but I think I may have left too much “white space”. This is something I tried to address in the next and final sample for this assignment, as well as incorporating some added texture inspired by previously made samples. I also included a sample of crochet on this piece, with metal coils sewn to it. This was my way of bringing in a fully 3D element to the piece that featured in my original object arrangement as well as trying to experiment with using a different colour from my colour scheme - purple coils rather than the original copper coils used.
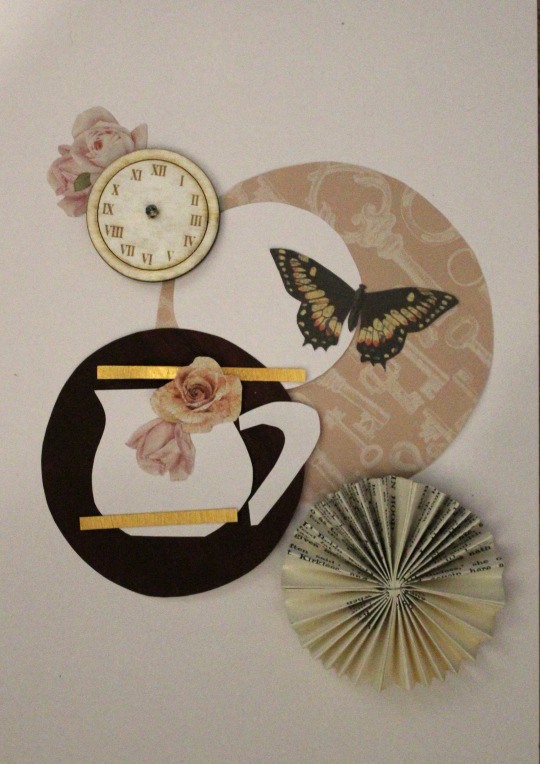
Fig 27 Collage observation from project 2

Fig 28 Material observation from project 2
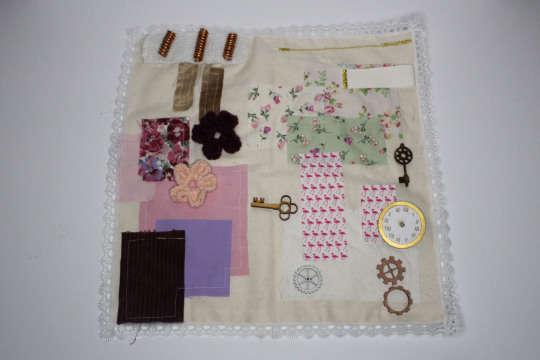
Fig 29 Piece 6 mixed-media collage 2 sample
Out of all the designs I have created for this final assignment I would say that this is probably my favourite and one of the more successful samples I have created throughout the course. I kept this design fairly similar to the previous, a multi-media collage, but this time I tried to focus on the overall composition more as well as adding additional texture to the piece. The new textures come from the addition of both the lace trim and the beading added to some of the floral fabric. Concerning the composition of this piece, I tried to represent the arrangement from my observational drawings and how the objects were placed. I still kept with the abstract style as this is a style I am really drawn to, I feel that creating abstract representations is far more freeing and allows me to be more creative with my work. Although there is still a fair amount of “white space” to be seen within this piece, I feel that the placement of the various elements works better and the “white space” simply allows the viewer to take in those various elements. As well as providing texture, the lace trim has provided covering for the raw edges of the fabrics used but it proved a little difficult to attach when sewing it next to the crochet and metal coils. I used copper coil for this piece rather than the purple to try and bring in the actual metallic colour from the original arrangement. I also added some machine stitching using gold metallic thread which I tried to represent in on of my original observational drawings (see fig 34).
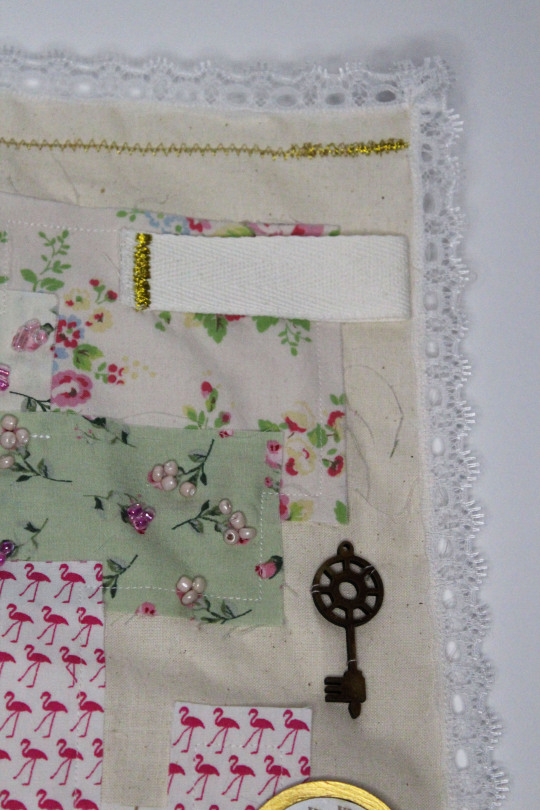
Fig 30 Piece 6 close up

Fig 31 Piece 6 close up
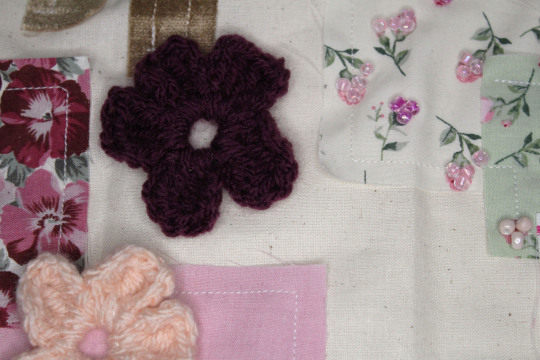
Fig 32 Piece 6 close up

Fig 33 Piece 6 close up
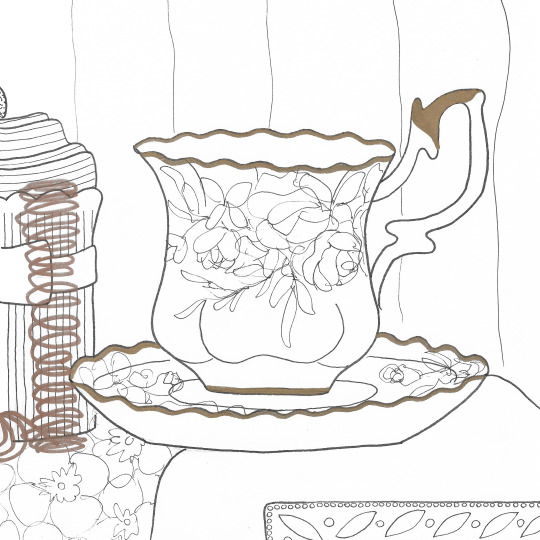
Fig 34 Observational drawing
On reflection, I limited myself by keeping materials exactly as is when creating these samples. Particularly in the first 3 final samples. Thinking back, I could have tried to add paint or dye to my materials to try and achieve the correct colours I was after as using paint obviously gives you the ability to mix colours to the exact colour you’d like. If I were to go back and look at this project again, this is definitely something I would look at and it would have provided me with further development and research too. I will definitely keep this in mind for further projects as it should enable me to explore colour and materials more.
0 notes
Text
Part Five Feedback
Demonstration of technical and visual skills, quality of outcome, demonstration of creativity
Throughout this assignment you have explored composition, still life and a mixed media approach. Your initial observational drawings are intriguing and explore composition and scale. However this earlier exploration is not evident in the final outcomes. Whilst having technically mastered the crochet technique the final outcomes do not particularly reflect the initial inspiration. Some of the more experimental processes such as embedding metal coils or springs into the crochet have been successful. The ruffled surface samples are also interesting but this idea has not been developed further or explored within the final outcomes. You have explored colour taken from your initial still life however, again, this does not seem to translate into the final piece. Overall you have produced a series of interesting textile samples which explore a range of processes and demonstrate technical ability. You have chosen to focus only on the crochet process for your final outcome but could have been more experimental with the technique used, choice of materials and application.
Context, reflective thinking, critical thinking, analysis
You have clearly organised your work and present a coherent and logically presented body of work which links your contextual research to your creative outcomes. On balance, greater breadth and depth of research and a broader range of sources may help you to push the boundaries of the craft you are exploring, research of more unusual applications of crochet and exploration of different contexts may help to push your ideas further.
Your reflection is consistent and explains your process and justification of the choices you have made within your research and creative work. However you have scope to demonstrate further critical reflection and analysis by avoiding descriptions of process and focussing on what you ‘like’, and instead exploring why things are successful, how you might develop ideas further and evaluating the successes and areas for improvement.
0 notes
Text
Written Reflection
Although I am really pleased with the outcome of my work and the progression of my crochet skills, I think that I neglected to experiment with much else once I had gotten into the crochet. I originally planned to try working with materials a lot more than I ended up doing, only my initial samples really used fabric as a material. Much of the later samples have at least a crochet element. If I were to go back and work into this project I would certainly create more samples experimenting with fabric more as well as pushing the samples further by combining fabric with crochet as I think I could have created some really interesting designs had I done so.
I think I have definitely started to understand the importance of working through the different stages such as creating observations, choosing colour palettes, finding inspirations, etc. Following these steps allowed me to find areas to focus on and artists to take inspiration from which really helped when creating my samples. I think you can see a clear link to my samples and my chosen artist for inspiration, Ellen Deckers, but it is still obvious that they are my own designs with my own style.
I found the research aspect of this assignment much easier and found more enjoyment when actually completing the research part. I think this may be a result of my being able to choose my own area of research rather than being directed in a specific direction like in previous assignments. Having this research helped when creating my own samples I felt as I had more informed ideas.
0 notes
Text
Assignment 5: Final Collection

Fig 1 Piece 1 crochet patchwork
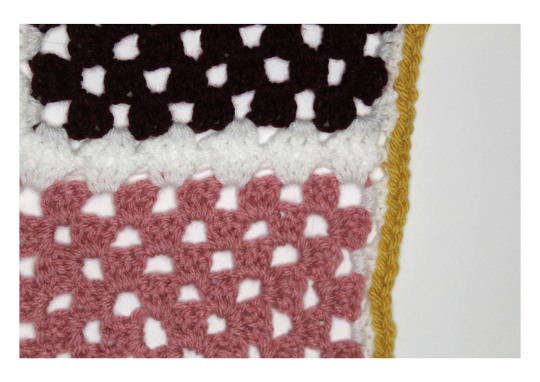
Fig 2 Piece 1 close up

Fig 3 Piece 1 close up
Whilst doing my research for this project I was particularly drawn to crochet as well as the style of patchwork too and I wanted to try and combine these for my first sample piece for my final collection. Taking the pink and purple tones from my colour palette to use for the patches and then a plain white to create the borders I feel I represented my colour scheme well with this first sample. By stitching each patch to the next I created a chain on the back which raises from the surface of the crochet patchwork. I find this aspect is what I like most about the piece actually, I like the added depth it adds to the piece.
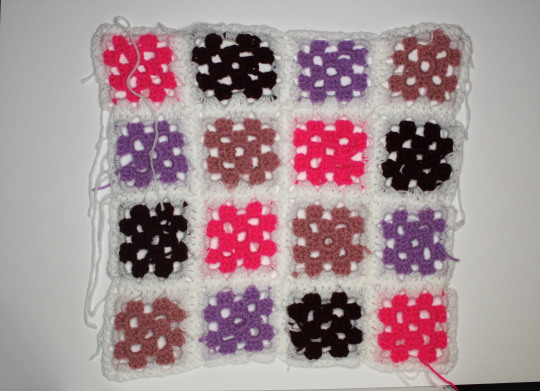
Fig 4 Piece 2 crochet patchwork version 2

Fig 5 Piece 2 close up
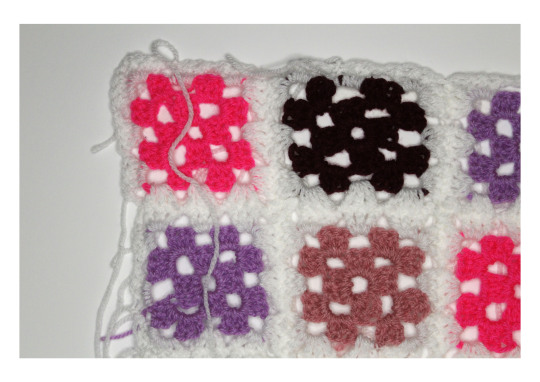
Fig 6 Piece 2 close up
I wasn’t very keen on the size of each of the patches in the previous sample so for this next piece I decided to create patches much smaller this time. I’m unsure if it is because it is only a small sample overall so using the smaller patches helps to show the actual look of patchwork or not but I think they definitely look far more visually appealing than those from the first sample from this collection. I created patches using the same colour palette as the previous sample.

Fig 7 Piece 3 crochet x beads x coils

Fig 8 Piece 3 close up

Fig 9 Piece 3 close up
I was much happier with the size of the smaller patches in the second piece so I decided to stick with that sizing for this third design. The border around each patch in the second design takes away from the “patchwork” appearance of the design so I took this element out for this piece, opting to show the stitching that was used to attach the patches to each other. I wanted to bring some materials to the design other than yarn so I referred back to some of my experimental samples. I loved the combination of the crochet squares with the beads so I included this in the design as well as using coils to add a 3D aspect to the piece. Rather than using wire I used pipe cleaners to match the colour of the yarn I used.

Fig 10 Piece 4 crochet patchwork x vine x 3D flowers
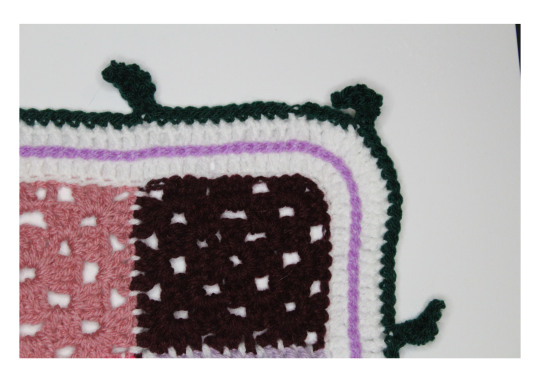
Fig 11 Piece 4 close up

Fig 12 Piece 4 close up

Fig 13 Piece 4 close up
I was fairly pleased with the outcome of the previous sample so I tried to think of ways I could improve it further when creating this design. I kept the stitching to connect the patches visible as I think this helps to really mimic the patchwork style. When creating the border I tried to bring in a stripe of colour, much like the teacup within my observational drawings has a stripe of gold within its design. When creating my experimental samples in project 3 I was really pleased with the outcome of same of the samples, particularly the sample that combined the crochet vine with the 3D crochet rose, so I tried to incorporate both of these elements within the design. I think that using the crochet vine as a style of edging brings a different look to the piece than that of the previous three, this along with the 3D rose is a very interesting combination alongside the brightly coloured patchwork pieces.
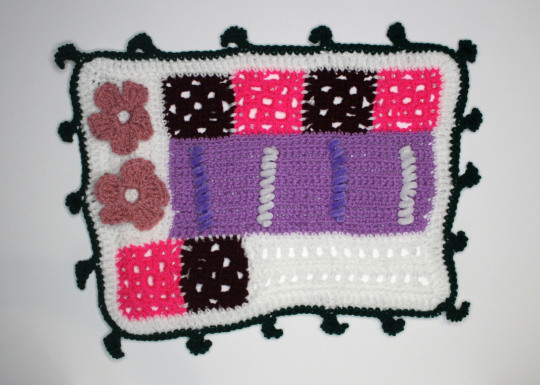
Fig 14 Piece 5
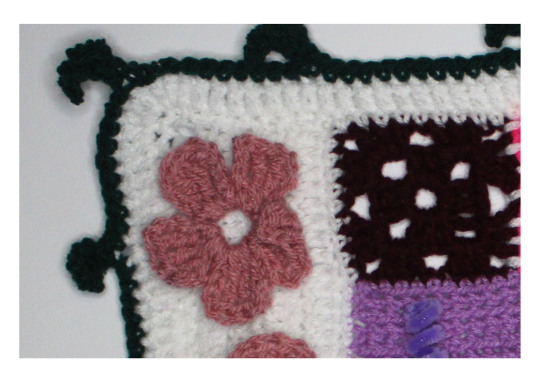
Fig 15 Piece 5 close up

Fig 16 Piece 5 close up
For this next piece I wanted to try and incorporate patches of different shape and size. Unfortunately I think the fact that I used white for two of the sections has kind of ruined the design, although those sections look okay on their own the white border placed directly next to them doesn’t look very good in my opinion. I tried to include a wide range of the different components I have used in previous designs - stitched on flowers, pipe cleaner coils, beads and the crochet vine. I like the combination of all the elements, it introduces a lot of different textures to the design and helps to add more depth.

Fig 17 Piece 6

Fig 18 Piece 6 close up

Fig 19 Piece 6 close up
When designing this sixth and final piece I tried to look back on my previous designs and include the elements that I thought worked well. For the patches I kept them on the smaller side, adding beads to the pink and using a different kind of purple yarn compared to the rest of the piece. I felt that the 3D rose I added to one of the previous designs worked really well to incorporate the floral aspect so I created patches inspired by one of my experimental samples from earlier on. Adding this part as a patch was a little more difficult than usual but I think it works well regardless. I liked the idea of using a mixture of flowers so I used the flatter style crochet flower also but using the metallic elastic cord which also worked well helping to bring in the gold into the design. I included a section where you can see a repeat of holes, this is to represent the crochet/knitting garment used within my “frozen in time” arrangement.
0 notes
Text
Project 3: Experimenting and Taking Risks 2
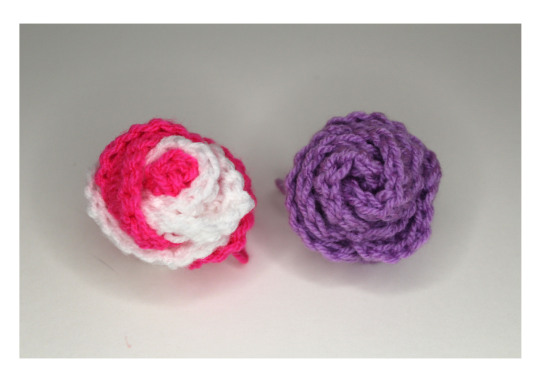
Fig 1 Experiment 5.4.8 3D crochet rose made from rings

Fig 2 Experiment 5.4.8 Side view

Fig 3 Experiment 5.4.8 View of bottom
I wanted to try out creating a different style of 3D flower and I found a tutorial on how to create these crochet roses from several hoops linked together. Although I thought that the process of creating these was really interesting I don’t particularly like to actual result. I think I will stick to using the previous style of crochet rose to add to my future designs.
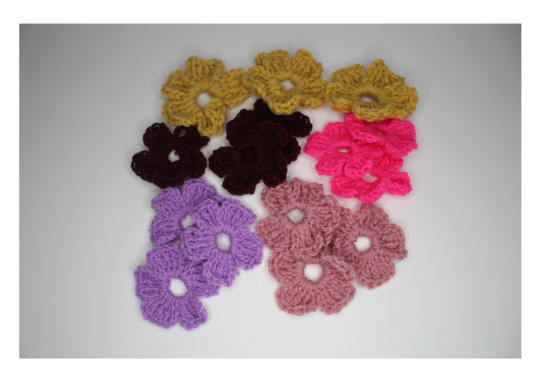
Fig 4 Experiment 5.4.9 Crochet flowers

Fig 5 Experiment 5.4.9 Close up
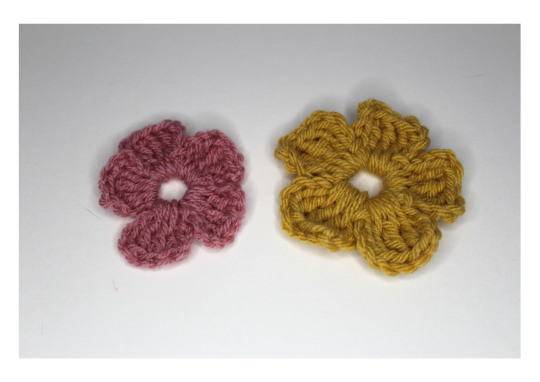
Fig 6 Experiment 5.4.9 Material/size comparison
These crochet flowers are much flatter than the previous designs I have looked at but I think they look really effective regardless. I decided to create a number of these flowers in the various colours from my palette to add to my future designs. I also used a chunky yarn and used a larger hook to demonstrate the difference the sizing can make. I think that the chunky yarn was better at keeping the flower quite rigid compared to the other flowers but it is a bit too big for what I would like to use these for in future designs.
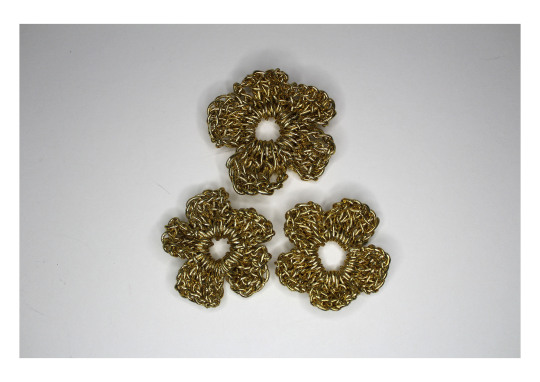
Fig 7 Experiment 5.4.10 Crochet flowers using metallic elastic cord
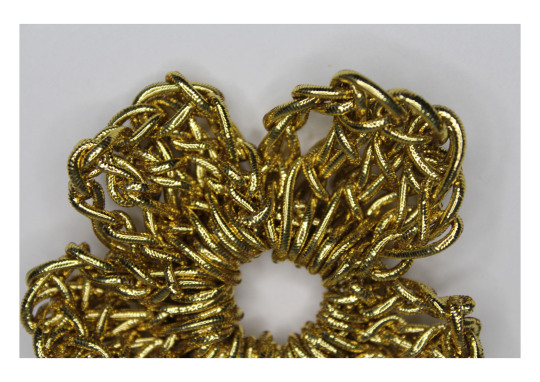
Fig 8 Experiment 5.4.10 Close up

Fig 9 Experiment 5.4.10 Side view
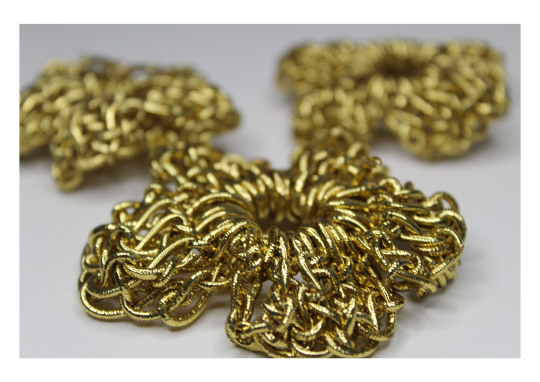
Fig 10 Experiment 5.4.10 View of bottom
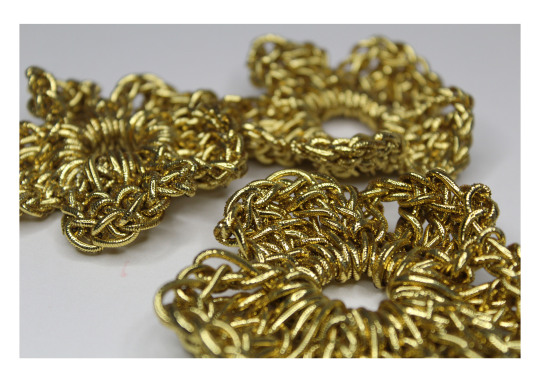
Fig 11 Experiment 5.4.10
I liked the outcome of the crochet flowers when working with the normal acrylic yarn but I absolutely love these that I used the metallic elastic cord for. I think the cord makes the flowers look less like crochet as it is not made from the typical yarn and I think that the cord gives them a really elegant look. I would even say they look kind of expensive? I ran out of this material after creating these three flowers but I may use these three in some future designs so they do not go to waste. I way the cord shines is very reminiscent of how the gold detailing on the teacup and saucer shines from the original arrangement of objects and my observational drawings.
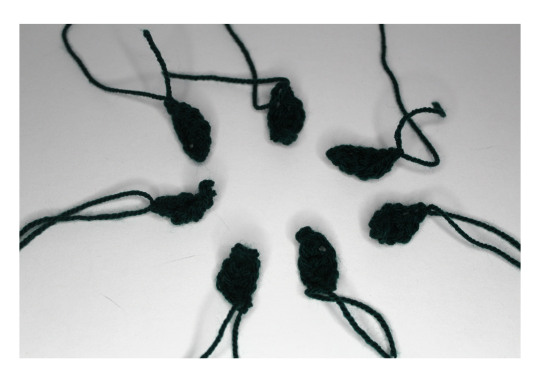
Fig 12 Experiment 5.4.11 Crochet leaves

Fig 13 Experiment 5.4.11 Close up
After creating the crochet “vine” yarn before, I wanted to create some of the leaves separately so I could possibly add them to some later designs. I also wanted to look at how the leaves looked when they weren’t attached to a chain. I think they would possibly look a little better on their own if they weren’t made with such a dark green coloured yarn.
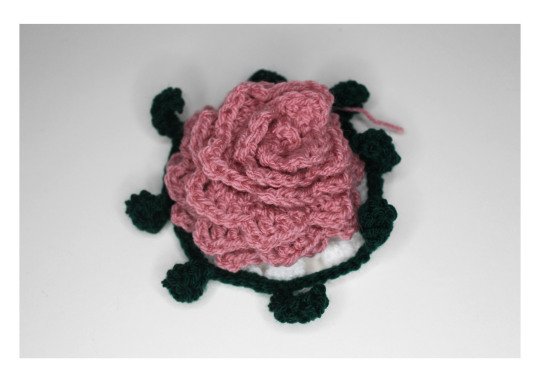
Fig 14 Experiment 5.4.12 Granny square x 3D rose x crochet “vine” combination

Fig 15 Experiment 5.4.12 Showing how the rose can be lifted slightly
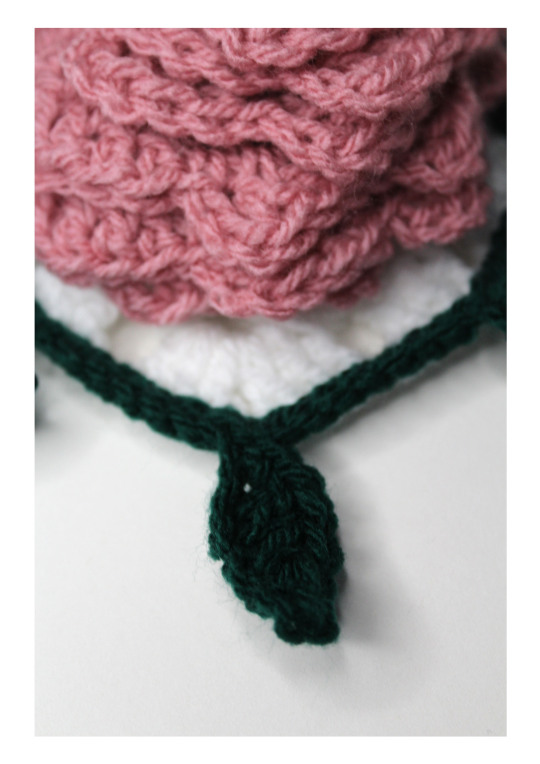
Fig 16 Experiment 5.4.12 Close up
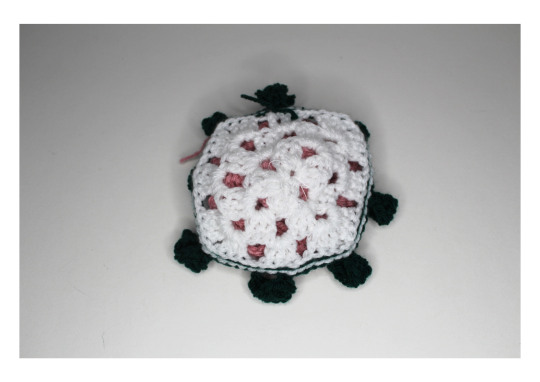
Fig 17 Experiment 5.4.12 View of underneath
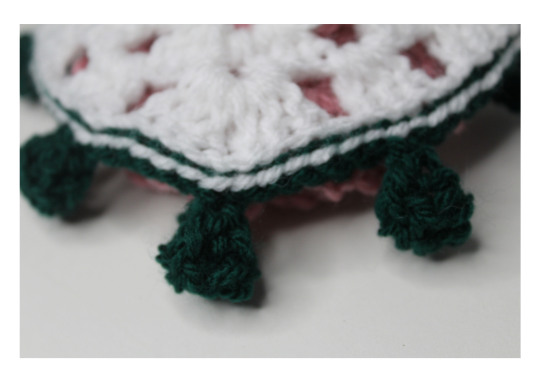
Fig 18 Experiment 5.4.12 Close up
I am super pleased with the outcome of this experiment. I think that the combination of my previous explorations really compliment each other - the white granny square with the pink 3D rose alongside the green vine edging I added to the base. I feel that this is a great example of how you can incorporate unusual yarn designs alongside a simplistic base as well as including a 3D element. This is definitely the sort of direction I want to head in with my designs for my final collection.

Fig 19 Experiment 5.4.13 Granny square using cotton yarn

Fig 20 Experiment 5.4.13 View of bottom
Previously I have only really looked at creating the crochet granny squares using acrylic yarns but for this experiment I wanted to look at using a slightly different material - cotton yarn. This is extremely similar to using an embroidery thread though it is much thicker than that, but the qualities are similar in that the yarn seems to separate frequently when you are trying to work with it. I also found that it was harder to keep my work neat when using this material. I am unsure as to whether I will use this again or not.
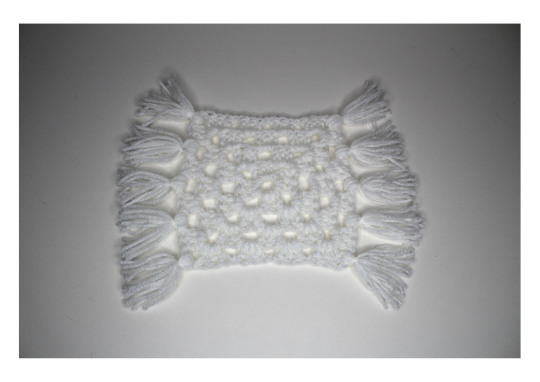
Fig 21 Experiment 5.4.14 Tassel edging
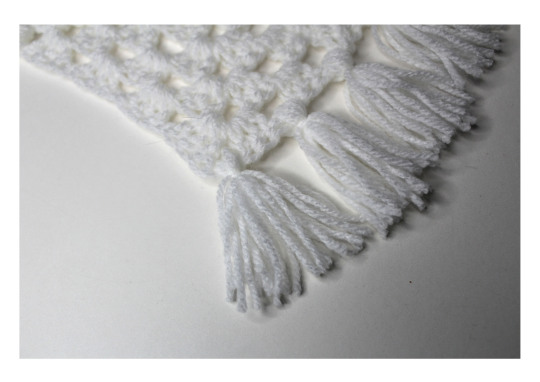
Fig 22 Experiment 5.4.14 Close up
I wanted to look at including some different edging within my experiments so I looked at adding tassels to this design. I found that it is simple yet effective, even when only working with plain white yarn. The way that the tassels flow down reminds me of how the floral fabric was sitting within my still life arrangement and how I tried to depict this within my observational drawings.
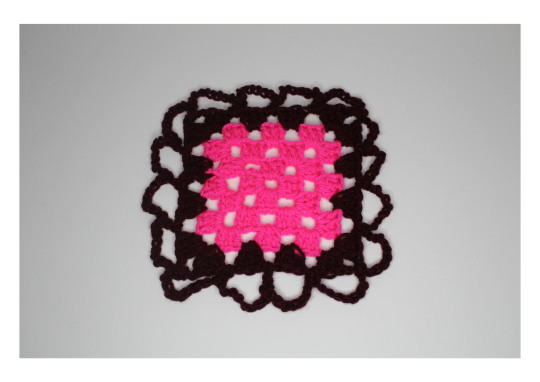
Fig 23 Experiment 5.4.15 Looped edging
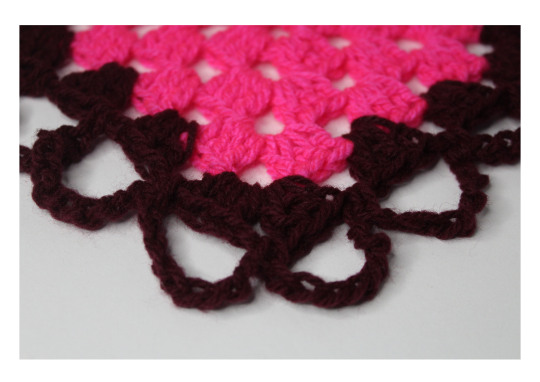
Fig 24 Experiment 5.4.15 Close up
When creating this sample I had the work of Ellen Deckers in mind - the way she often adds a lovely decorative edging to her designs. I find that this just brings another interesting factor to her designs and I wanted to try this out myself. I do not think I have quite got the hang of this particular technique but I still think that it looks okay. I think it is likely I will try to include this in my final collection of samples.
#textiles 1 a textiles vocabulary#part five building a collection#project 3 experimenting and taking risks
0 notes
Text
Project 3: Experimenting and Taking Risks
I wanted to look at using materials that aren't usually used in typical textiles designs. I thought that using some more interesting materials such as wire or pipe cleaners would be a good way to incorporate 3D elements to my work. I thought I could also try looking at combining various methods together and experiment with which techniques to mix into a design.
Within my original “frozen in time” set up included a frame with flamingos. So far, the only way I have really included this within my designs is by using fabric with a flamingo repeat pattern on it so I wanted to try think of a more interesting way to do so. Trying to come up with different materials I thought of feathers - I sourced some pink feathers to use but I could also look into creating yarn feathers. Using other feathers would also be interesting, but I must make sure that colours fit into my colour scheme.
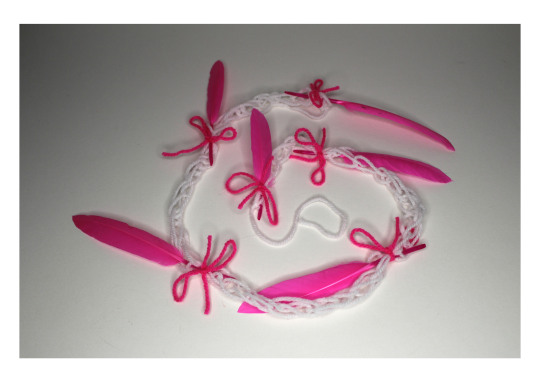
Fig 1 Experiment 5.4.1 Finger knit yarn base with pink feathers and pink acrylic yarn bows

Fig 2 Experiment 5.4.1 Close up
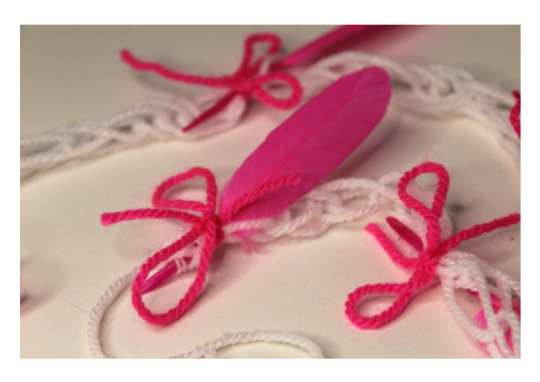
Fig 3 Experiment 5.4.1 Close up
I started by creating a yarn sample with the pink feathers. I combined the striking bright pink feathers with a plain white finger knitted length, tying on with some acrylic yarn to match the colour of the feathers. I quite like the contrast of textures between the feathers and knitted yarn but I am unsure as to how I would actually use the yarn design within a design, the feathers make it quite hard to work with and you can’t bend the feathers without breaking them. Perhaps this particular yarn design could be used in a purely decorative sense.
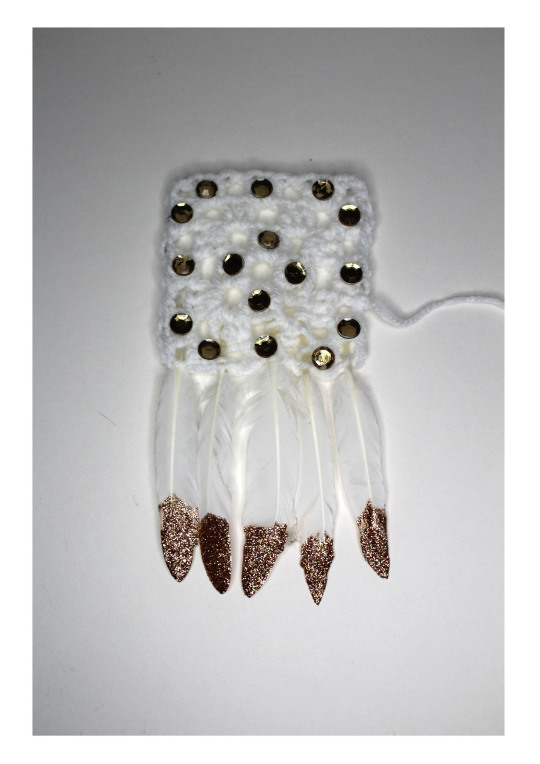
Fig 4 Experiment 5.4.2 Crochet x Feathers x Gems
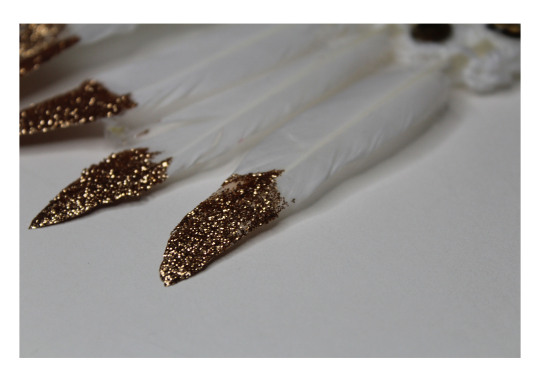
Fig 5 Experiment 5.4.2 Close up
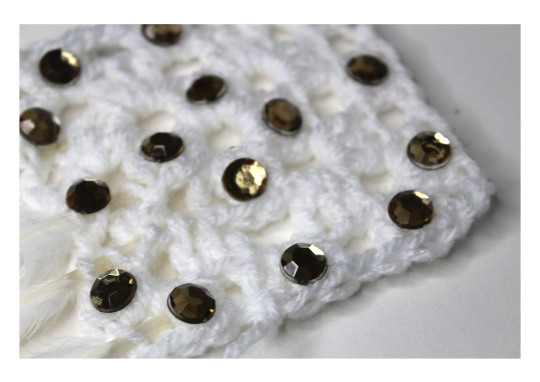
Fig 6 Experiment 5.4.2 Close up
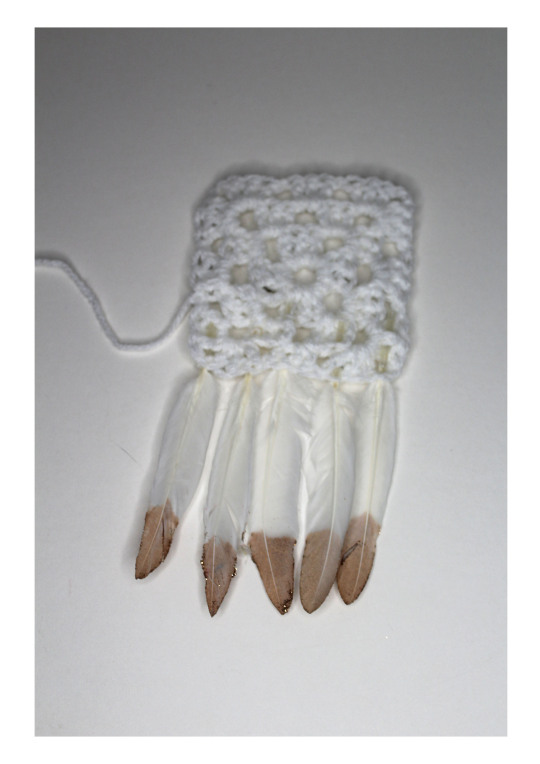
Fig 7 Experiment 5.4.2 View of back
Moving on from the first experimental material sample, I thought about how I could move from a yarn sample to a surface sample. Going from the finger knitted yarn base to a crochet granny square base and then from the bright pink feathers to the white feathers with some gold detailing. This sample reminded me very much of a dreamcatcher, although that was definitely not my intention when creating it. My aim for this sample was to experiment with how you could attach the feathers to the yarn base. Thinking back to my original arrangement, I decided to add some gold coloured gems to the crochet to resemble to bumps of texture on the decorative frame. I had noticed that you don’t really see things added to crochet garments and such so I wanted to look at adding different materials to crochet.
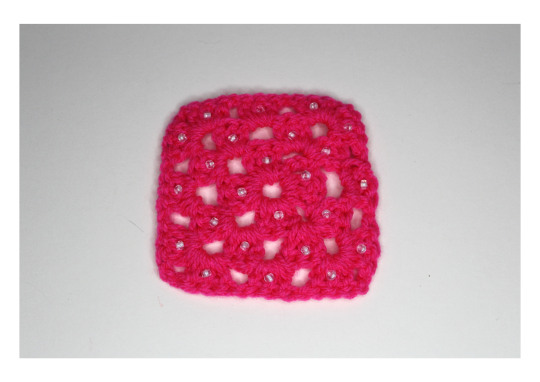
Fig 8 Experiment 5.4.3 Crochet x Beading
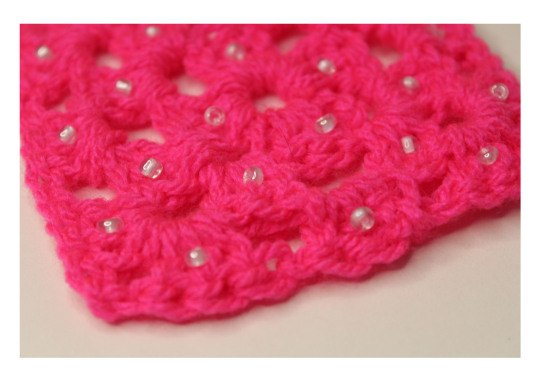
Fig 9 Experiment 5.4.3 Close up

Fig 10 Experiment 5.4.3 View of back

Fig 11 Experiment 5.4.3 Close up
Staying with the idea of adding materials to crochet, for this next sample I looked at adding beading to a crochet granny square. The crochet base is to replicate the crochet/knitted material within the still life arrangement and the beading is to represent the bumpy texture on the frame. In terms of colour, I decided to use the bright pink that I sampled from the flamingos on the frame in the arrangement and then I used white beads to compliment this. I think that this particular exploration really enhances the crochet base, making it look more elegant even by using fairly cheap materials to do so. I will definitely try using this in my final collection as I think it is really effective.
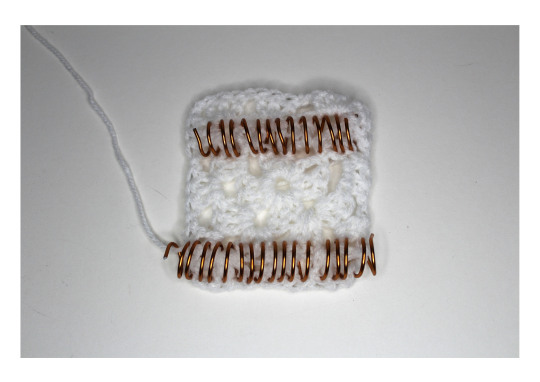
Fig 12 Experiment 5.4.4 Crochet x Wire coils

Fig 13 Experiment 5.4.4 Close up

Fig 14 Experiment 5.4.4 View of back
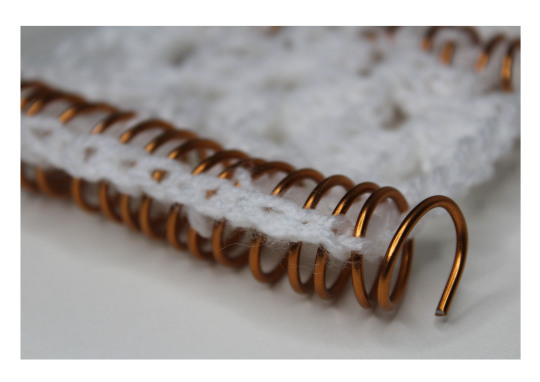
Fig 15 Experiment 5.4.4 Close up
Next I looked at the wire coils I included within my object arrangement representing the theme of “frozen in time”. I felt that using these coils in some way would be a great way to include a 3D element to some of my samples. I decided to use the copper wire to create some coils for my first exploration with this material, choosing to pair the two coils I made with a white granny square I had crocheted. I thought that the combination of white knitted yarn against the smooth, copper wire would make for an interesting sample.

Fig 16 Experiment 5.4.5 3D crochet yarn sample

Fig 17 Experiment 5.4.5 Close up
I wanted to explore some more possibilities when it came to yarn designs so for this exploration I decided to look at creating a crochet yarn with a 3D element. I am really happy with the result. I noticed I had not yet incorporated the leaves from the teacup and saucer within my still life arrangement even though I had looked at including the floral element a number of times throughout the project so far so I wanted to try focus on the leaves for this sample. What I like about this sample is that although it does not look like it would be particularly easy to incorporate it into a design, the way the chain is created would allow me to add this to a design as decorative edging whilst still retaining the 3d element of the leaves. You could even keep the edging fairly loose with gaps if that was the desired look - I may try this in a sample.
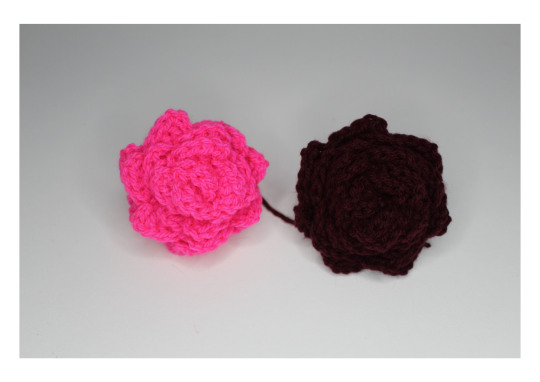
Fig 18 Experiment 5.4.6 3D crochet roses

Fig 19 Experiment 5.4.6 View of bottom

Fig 20 Experiment 5.4.6 Side view
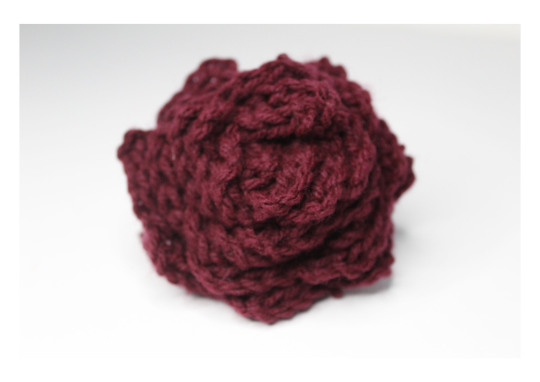
Fig 21 Experiment 5.4.6 Close up

Fig 22 Experiment 5.4.6 Close up
After creating the yarn sample with the 3D element of leaves, I wanted to look at how else I could use crochet to create 3D elements to include within my designs. I found the pattern to create these 3D roses and I think that they are really effective. If I were to add these to my future designs I think they would add some depth and extra pops of colour that could be what makes my designs more visually appealing.
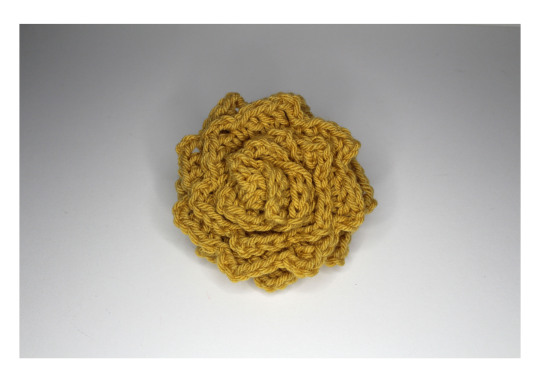
Fig 23 Experiment 5.4.7 3D crochet rose using chunky yarn and larger crochet hook

Fig 24 Experiment 5.4.7 Side view
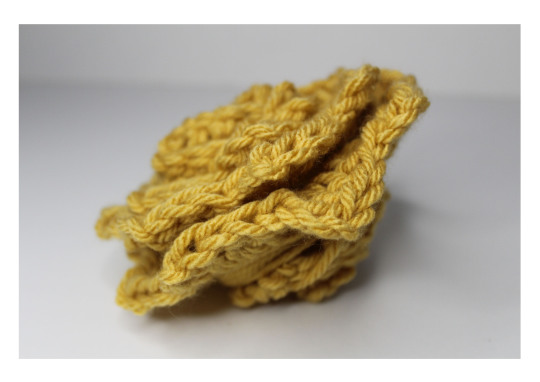
Fig 25 Experiment 5.4.7 Close up
For this sample I wanted to look at creating the 3D crochet rose again but using a chunky yarn and larger hook to see the difference in sizing and whether it was easier to create. I think it was definitely easier to crochet but it used a lot of yarn for an end result that is a little too large to really be able to work with properly so I think if I use this again I will stick to using the standard size yarn compared to chunky as well as using a smaller hook size to match.
#textiles 1 a textiles vocabulary#part five building a collection#project 3 experimenting and taking risks
0 notes
Text
Project 2: Surface Concepts

Fig # Surface concept 5.4.2 strip of ruffles front view

Fig # Surface concept 5.4.2 back view
From observing the floral fabric within my arrangement of objects, particularly the overlapping petals within the design, I was inspired to create this surface sample. I created a ruffled surface by overlapping and stitching lots of folded circles onto a strip of fabric and I think that it reflects the overlapping petals well and creates a really interesting textured surface.

Fig # Surface concept 5.4.2 close up of front
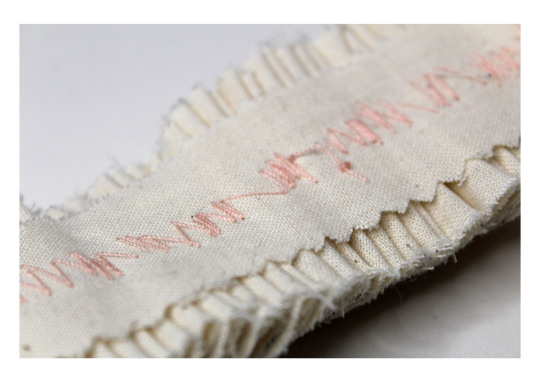
Fig # Surface concept 5.4.2 close up of back

Fig # Surface concept 5.4.3 beaded floral fabric front view

Fig # Surface concept 5.4.3 beaded floral fabric back view
When observing the decorative frame within my arrangement, I was particularly drawn to the textured surface of the frame - the way the pattern is raised from the base. I wanted to explore this within my own samples so I decided to try out adding beads to some of the floral fabric I had sourced. I enjoyed working with beads in previous projects and I found that I really liked the final outcome when using them to add to a fabric design in this way.

Fig # Surface concept 5.4.3 close up

Fig # Surface concept 5.4.3 close up
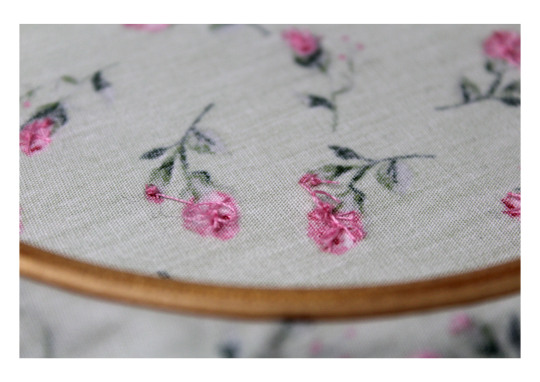
Fig # Surface concept 5.4.3 back view close up
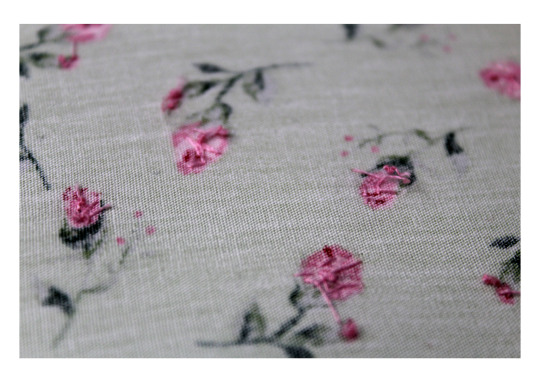
Fig # Surface concept 5.4.3 back view close up
#textiles 1 a textiles vocabulary#part five building a collection#project 2 building a response#develop textile concepts
0 notes
Text
Project 2: Stitched Concepts

Fig 1 Stitched concept 5.3.1 front view

Fig 2 Stitched concept 5.3.1 back view
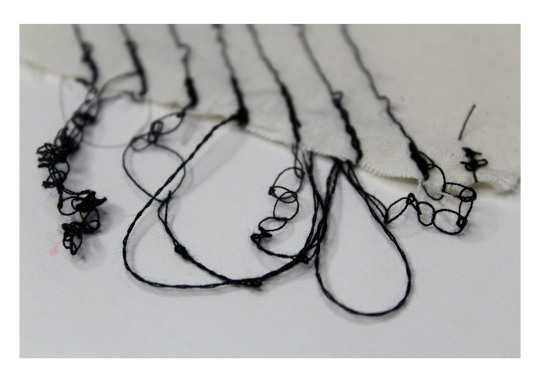
Fig 3 Stitched concept 5.3.1 close up
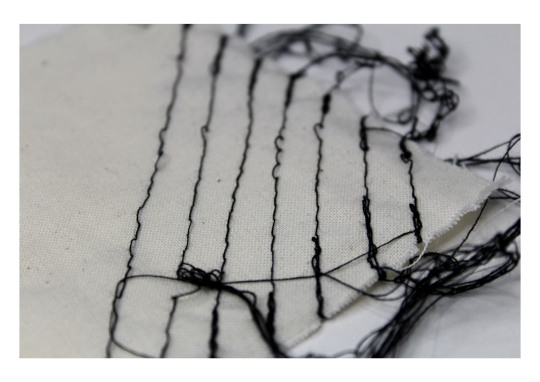
Fig 4 Stitched concept 5.3.1 close up
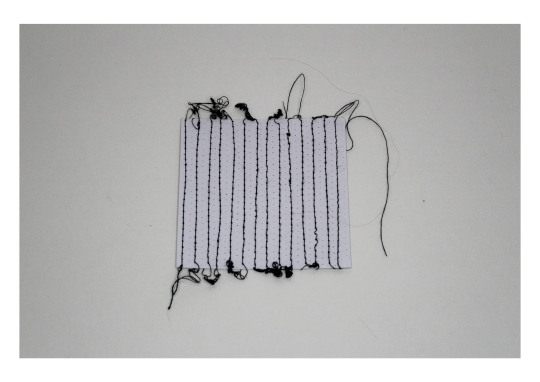
Fig 5 Stitched concept 5.3.2 front view
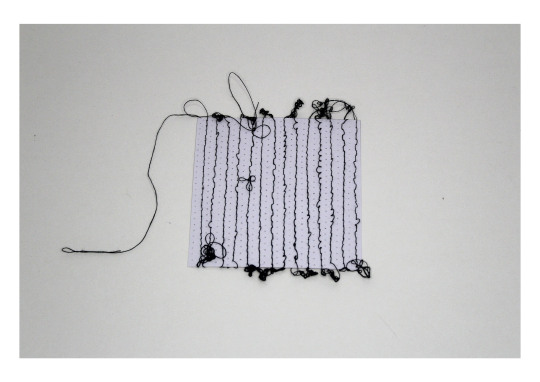
Fig 6 Stitched concept 5.3.2 back view
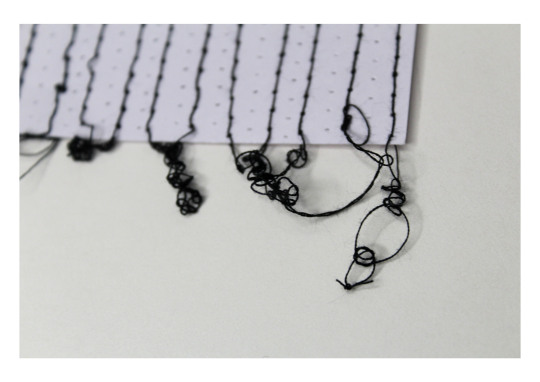
Fig 7 Stitched concept 5.3.2 close up

Fig 8 Stitched concept 5.3.2 close up
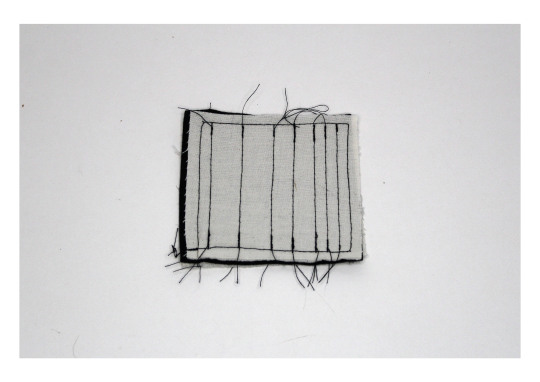
Fig 9 Stitched concept 5.3.3 front view

Fig 10 Stitched concept 5.3.3 back view
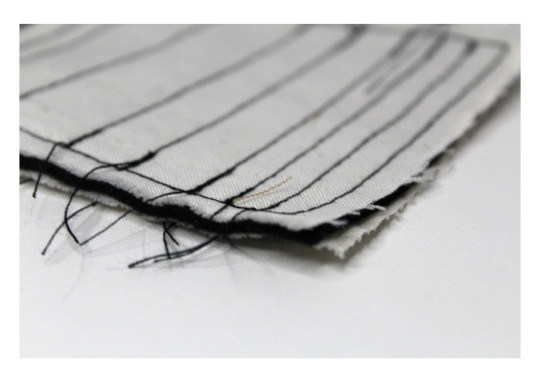
Fig 11 Stitched concept 5.3.3 close up
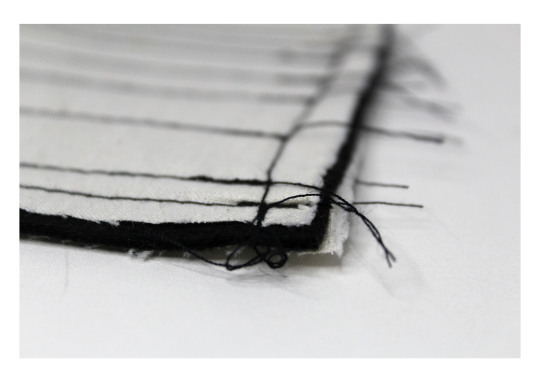
Fig 12 Stitched concept 5.3.3 close up

Fig 13 Stitched concept 5.3.4 front view
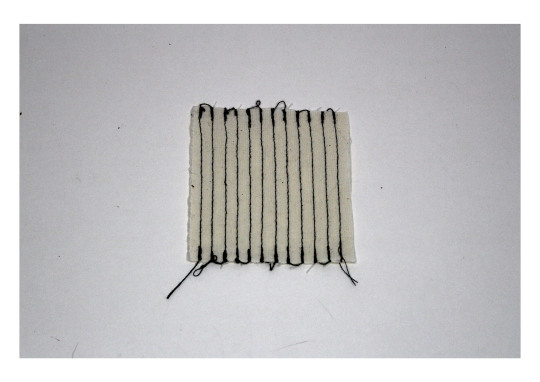
Fig 14 Stitched concept 5.3.4 back view

Fig 15 Stitched concept 5.3.4 close up
#textiles 1 a textiles vocabulary#part five building a collection#project 2 building a response#develop textile concepts
0 notes
Text
Project 2: Material Selection
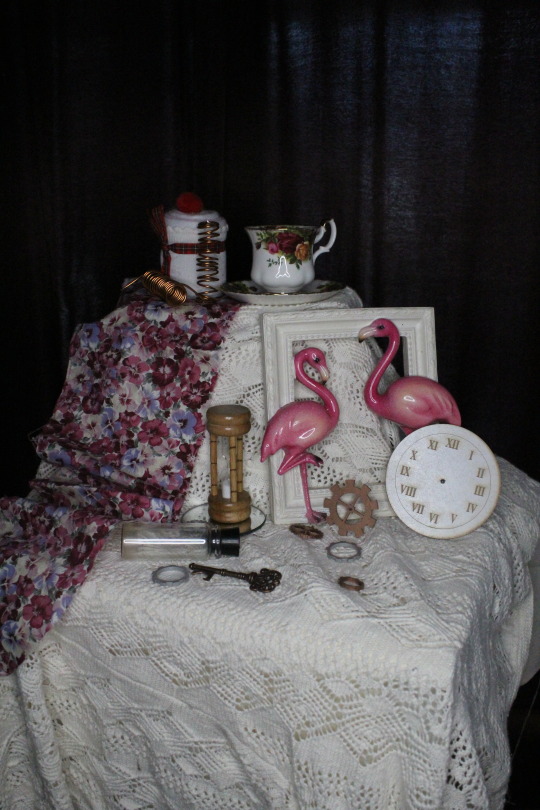
Fig 1 “Frozen in Time” still life arrangement
Before making any decisions on the materials I would use for this project, I looked again at the set up I created to represent the “frozen in time” theme. I paid close attention to the colour palette within the arrangement as well as the shapes and materials.
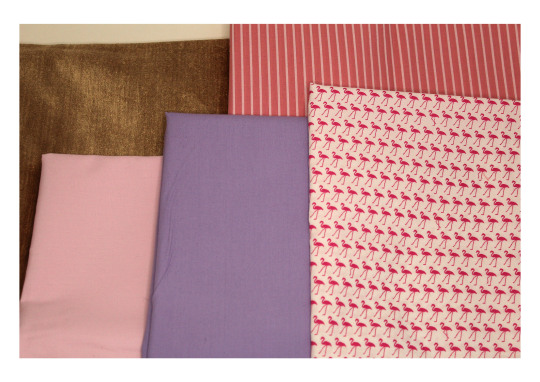
Fig 2 Selection of fabrics

Fig 3 Selection of floral fabrics
Firstly I put together a couple selections of different fabrics that I could use within my work - a selection of plain and patterned fabric and a selection of floral fabrics. I tried to stick to my colour palette as close as I could when selecting my fabrics.

Fig 3 Laser cut flower and leaf shapes
I enjoy using materials such as wood and incorporating them into my designs and I felt that these would be a great addition the materials I could use within this project. Not only do these laser cut shapes represent the floral fabric in a different way, they are also easily customisable when it comes to colour. Meaning it does not matter that the colours may not necessarily fit into my colour palette, I can just paint them to fit it instead. Also they will be easy to attach to designs as they can be attached by some simple stitching or just a knot.
0 notes
Text
Project 2: Crochet Research
Although I have already briefly looked at crochet in previous parts, I wanted to explore crochet further for part five. I have mostly looked at using crochet to create yarn in previous samples but for this project I wanted to look at how I could use crochet on a larger scale. Maybe explore combining crochet with fabric in some way. I think this combination would tie in nicely with my research on patchwork as well as my samples.

Fig 1 Hand Crocheted 60s Style Granny Square Skirt Size S/M
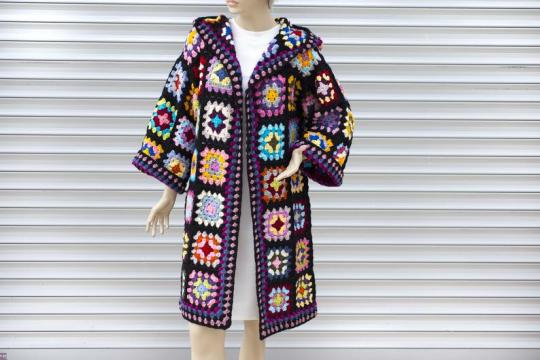
Fig 2 Hooded Granny Square Crochet Cardigan Festival Cardigan, Bohemian Cardigan, Black
‘Granny squares’ are mostly used to create blankets and similar objects, much like patchwork. But these granny squares can also be used to create garments such as cardigans, hats and tops. I found this use of a simple crochet square to be really interesting - to think so many different designs can be created just from combining squares together!
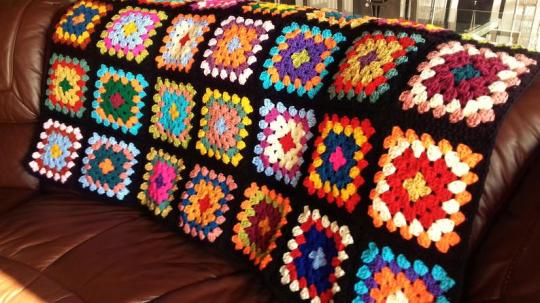
Fig 3 Granny Squares Blanket / Granny Square Afghan / Baby Afghan
Within the granny square design that I started to look at within my responses, I noticed that the shape formed within the design resembled the petals from the floral fabric designs I had observed earlier. With this in mind, I think that the granny square fits quite well within my project theme and I may continue to include these within my designs.
Fig 1 https://www.etsy.com/uk/listing/863298668/hand-crocheted-60s-style-granny-square
Fig 2 https://www.etsy.com/uk/listing/641723350/hooded-granny-square-crochet-cardigan
Fig 3 https://www.etsy.com/uk/listing/785938701/granny-squares-blanket-granny-square
#textiles 1 a textiles vocabulary#part five building a collection#project 2 building a response#research point 5
0 notes
Text
Project 2: Colour Exploration
I decided to explore my colour palette further by playing around with some abstract shapes cut from papers in my chosen colour palette. I looked at using the colours in various proportions to each other within each mini collage.

Fig 1 Mini collage 1
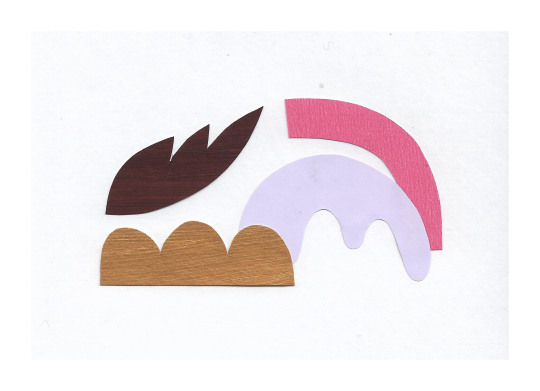
Fig 2 Mini collage 2
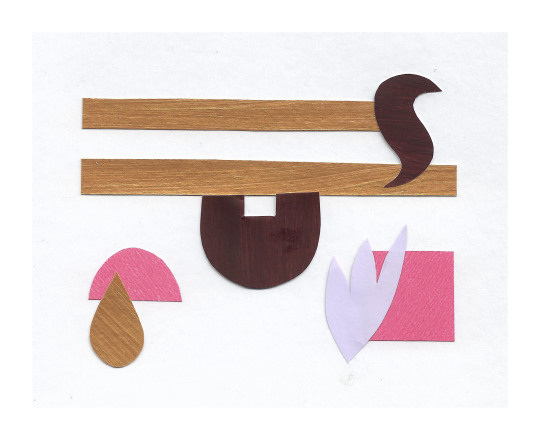
Fig 3 Mini collage 3

Fig 4 Mini collage 4

Fig 5 Mini collage 5
0 notes
Text
Project 2: Quilting Research
Victorian Era and Quilting
- Used as a way to use unused or otherwise wasted materials. Resulted in a wide range of materials being used for one quilt.
- Not just something “poor” people would do but actually a hobby also done by women from high society. This resulted in silks and velvets being used as well as to make their quilts, either by the lady herself or scraps of higher quality fabric may have been given to women from poorer backgrounds.
*can be traced back to medieval times
Colour palettes were not necessarily a key area of focus when quilts were being made. When looking at a finished piece a wide range of colours, patterns and textures can be seen. It seems to me that the main concern regarding colour when a patchwork quilt is being made is whether colours work together when directly next to each other. This means a design can include colours that do not really work together but as the fabric surrounding them work, it still results in a nice-looking quilt without the overall colour palette clashing too much.
Intarsia patchwork
I came across this particular technique of patchwork whilst researching standard patchwork in the Victorian era. It is my understanding that intarsia patchwork is a lot more demanding compared to a normal patchwork, involving wool cloth motif cutting, stitching these motives without seam allowances, or backing fabric. Different techniques that are used for intarsia are very time consuming, even compared to standard patchwork quilts, which is not a particularly quick technique itself.
Also known as: cloth intarsia, mosaic needlework, inlaid patchwork, inlay patchwork and stitched inlay.
- Can only be created with felted wool fabric as it will not fray.
Challenging what many people assume to be a purely feminine pastime, intarsia panels are often created by male professionals. Tailors could use the technique to show off their sewing skills as well as their ability to use unused fabric scraps.
Patchwork research 2 and quilting
Quilting is the method of serving layers of fabric together. The most common example being a quilt cover which is wedding between two layers of fabric.
Quilts can be traced back to medieval times, in England the first use of the term ”quilt” seems to date back to the 13th century. The earliest examples of quilting were bed covers. Some designs were considered heirlooms, being passed down through the family. These quilts would have been of a finer quality, demonstrating skill and most probably use of high-quality materials. During the medieval period quilting was often used to produce clothing, allowing for clothes to be warm yet still lightweight.
When stitching quilting, it is vital that each stitch is caught by all the layers of the quilt. It is a very time-consuming technique and it is common for people to share the task, allowing a faster turnover time.
The 17th century is when quilting is thought to have been at its most popular in Britain. Doublets and breeches were often made using the method, creating quality silk designs worn by the wealthy.
Patchwork is often linked to quilting, but patchwork is a method of its own the method of serving pieces of material together to make a larger, flat surface/design. Patchwork is a good method to use for the practicality of being able to use up old scraps of fabric. Whereas quilting has often been something done in a more professional or high-quality manner the method of patchwork is generally far more domestic. Using scraps of fabric as a necessity, rather than using the method as a hobby. There are examples of patchwork quilts that have been made more specifically, showing specially brought, higher quality fabrics. These would have been created by more middle-class women.
During the 20th century there was an evident decline in the use of patchwork but was sort of resurrected in the 1960s thanks to the fashion industry. Now quilting and patchwork is used more commonly, being featured in designs in a number of ways.
https://mrvictorian.co.uk/2018/10/23/victorian-patchwork/
http://www.womenfolk.com/quilting_history/victorian.htm
http://www.vam.ac.uk/content/journals/research-journal/issue-03/a-patchwork-panel-shown-at-the-great-exhibition/
https://www.vam.ac.uk/articles/an-introduction-to-quilting-and-patchwork
#textiles 1 a textiles vocabulary#part five building a collection#project 2 building a response#research point 5
0 notes
Text
Project 2: Response Ideas
After creating a number of yarn concepts/responses, I wanted to try and jot down some ideas on paper before moving forward onto my textile samples and responses. I started off with a few simple ideas, just basic ideas to get me started within my developments.

Fig 1 Simplistic idea 1
Fig 2 Simplistic idea 2
Fig 3 Simplistic idea 3

Fig 4 Simplistic idea 4
These simplistic ideas helped me to start thinking of some more complicated designs/responses and how I could combine different techniques and materials. I referenced the work of Ellen Deckers when drawing these next few responses and I think that you can see that fairly clearly but I think you can tell I simply took inspiration from her designs rather than outright copied them. I particularly liked her use of additional 3D elements, scalloped edges, multiple materials.

Fig 5 More complicated idea/response 1

Fig 6 More complicated idea/response 2
Fig 7 More complicated idea/response 3
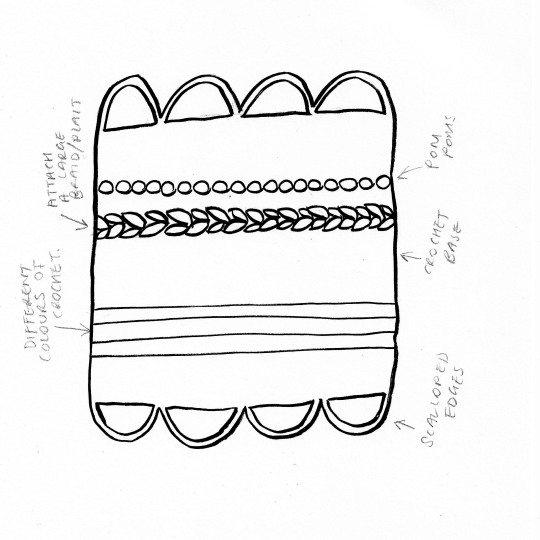
Fig 8 More complicated idea/response 4
Although I have added notes around these sketches, some stating specific materials I had in mind when drawing these out, I have tried not to draw in too many details as I wanted to keep these ideas quite open and easy to make changes to. Writing down specific material ideas helps me to visual the sort of direction I could go in but I will gather a number of other materials before making any final decisions.
I actually really liked these sketches and think they look great as is so I thought I would display them together as a little “collection”

Fig 9 All four complicated designs/ideas together
Fig 10 Design/idea 1 and 2
Fig 11 Design/idea 3 and 4
0 notes
Text
Project 2: Yarn concepts 2
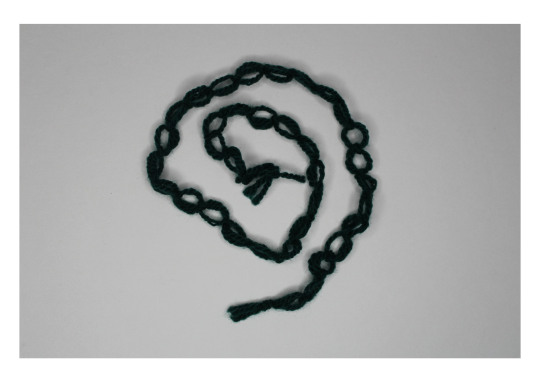
Fig 1 Yarn 5.2.7 Hoop yarn using bottle green DK yarn

Fig 2 Yarn 5.2.7 Close up
I really liked the look of yarns 5.2.4 and 5.2.5 so I wanted to see what the concept would look like with a change in colour scheme. Rather than using a combination of pink and purple tones like the previous versions, I decided to try out using a much darker colour from my palette - bottle green. I feel that this worked quite well with the shapes created from tying all the knots within this concept, the hoops are sort of oval shaped and kind of look like leaves so the green is a great choice with this in mind.I still decided to use more strands on one side of the hoop as I think that the different in weight as you look down the yarn length gives it a more interesting look.
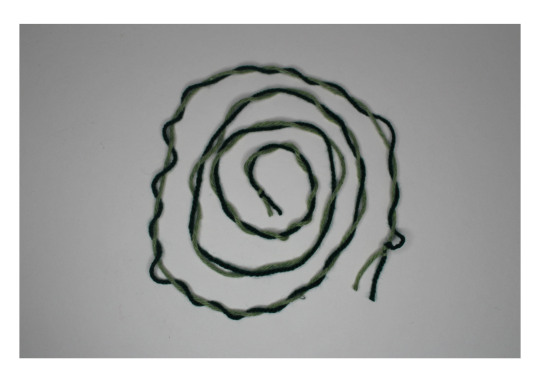
Fig 3 Yarn 5.2.8 Twisted green shades using different yarn types
Yarns used: “Sirdar Hayfield Bonus DK yarn 839 Bottle Green” and “Himalaya Home Cotton yarn 122-15″
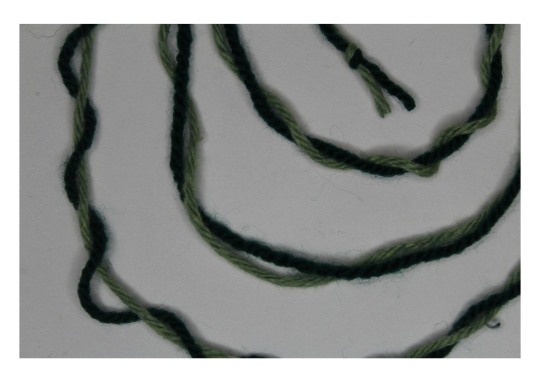
Fig 4 Yarn 5.2.8 Close up
I can’t quite seem to get this technique right, the twirl/twist is really inconsistent - going from too tight to too loose. I find that the two yarns want to untwist from each other also which isn’t very helpful. Still, I feel that this is a better attempt than others I did for the previous assignment.
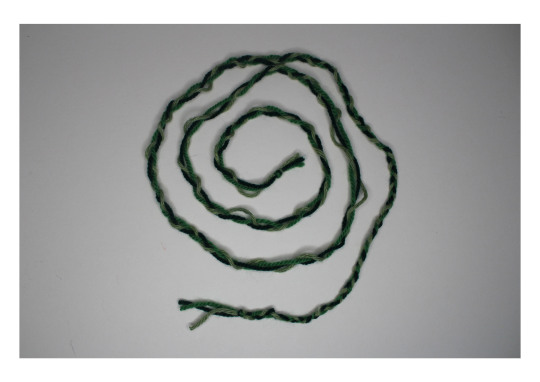
Fig 5 Yarn 5.2.9 Braid using 3 different types of green yarn
Yarns used: “Sirdar Hayfield Bonus DK yarn 839 Bottle Green”, “Himalaya Home Cotton yarn 122-15″ and unknown brand/shade of acrylic yarn

Fig 6 Yarn 5.2.9 Close up
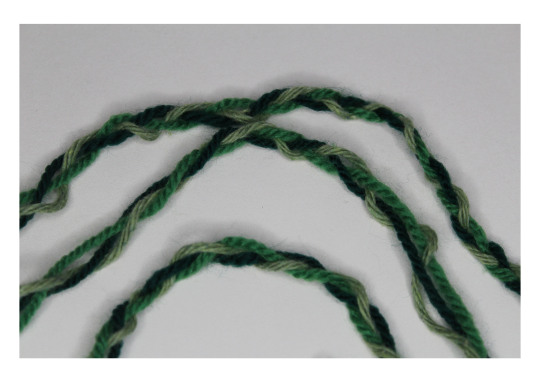
Fig 7 Yarn 5.2.9 Close up
I had a similar problem with 5.2.9 as I did with the previous yarn concept, I found it difficult to maintain an even consistency to my plait. Some areas look really good, each of the colours of yarn are showing an equal amount and then in other areas the plait is extremely uneven and the yarns are too loose. This could have possibly been down to the three yarns all being different types, but I am not sure.
#textiles 1 a textiles vocabulary#part five building a collection#project 2 building a response#develop yarn and linear concepts
0 notes
Text
Project 2: Yarn concepts
To start I decided to try working with some gold elastic cord, which I picked after looking at the thin stripes of gold added to the teacup and saucer within my arrangement of objects. I felt that the cord represented this gold detailing nicely.

Fig 1 Yarn 5.2.1 Knotted metallic elastic cord
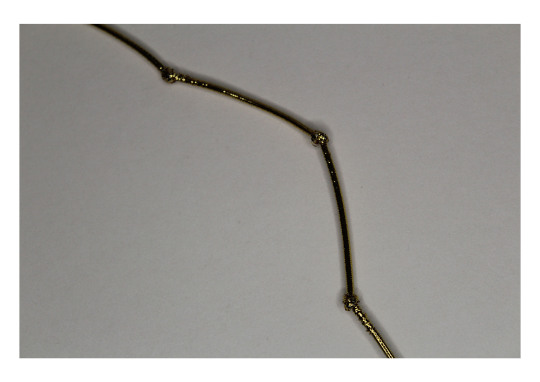
Fig 2 Yarn 5.2.1 Close up
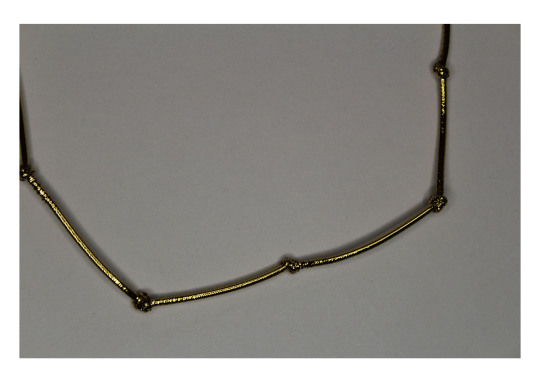
Fig 3 Yarn 5.2.1 Close up
To start I went with a super simple concept, just knotting some cord over and over along the entire length. There are lots of small dots of texture throughout the still life arrangement based on my theme, so I felt that this would be a nice simple starting point for my yarn concepts. I decided to use a metallic elastic cord as I wanted to see how knotting the cord would effect the metallic covering. If you observe up close you can see this sort of cracked, almost broken look to the surface close to the knots and I think this looks really interesting.

Fig 4 Yarn 5.2.2 Crochet chain using metallic elastic cord

Fig 5 Yarn 5.2.2 Close up
I enjoyed working with the elastic cord in the previous concept so I wanted to explore it further. This time I tried creating a crochet chain with it. Making the chain was as simple as using a standard wool yarn to crochet but as soon as I made a link with my hook, I could instantly tell there was a difference between working with the more standard wool yarn compared to some elastic cord. I think it was a combination of the elasticity and the weight, but the chain didn’t sit like it usually would and it started to spring back up. It also starts to curl in on itself making it harder to work with.
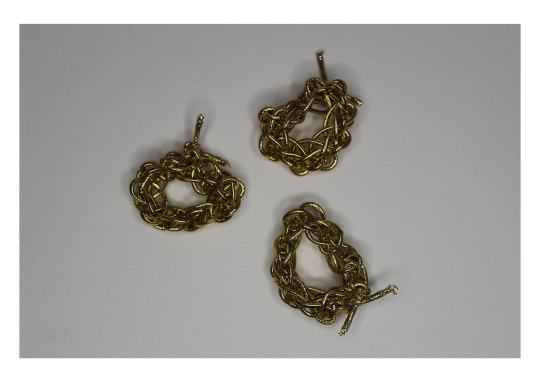
Fig 6 Yarn 5.2.3 Crochet chain hoops using metallic elastic cord
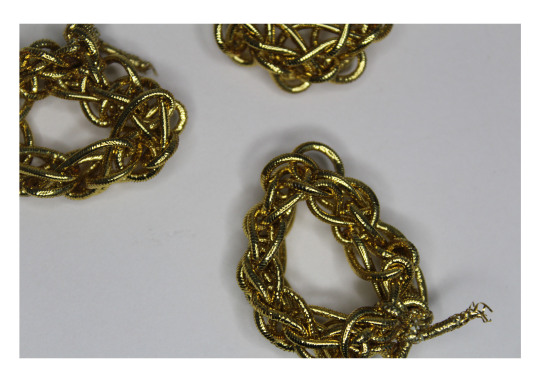
Fig 7 Yarn 5.2.3 Close up
I wanted to see how I could take 5.2.2 and make it into a more successful concept so I tried out joining the two ends of the elastic crochet chain and then following the created ring round with another row of crochet chain, making these bulky rings. I think these look pretty good, doubling up the chain has really helped to show the actual shape and pattern of a crochet chain compared to 5.2.2.

Fig 8 Yarn 5.2.4 Hoop yarn using 3 colours of acrylic yarn
Yarns used: “Robin Bonny Babe DK yarn 1368 Lavender”, unknown pink shade of yarn (either from QD or Stitches), “Happy Sheep DK yarn 1012 Burgundy”
Much like my first yarn concept I wanted to create a yarn design that reflects the dots/circles of texture within my arrangement of objects. Though rather than using knots to demonstrate these dots of texture in the same way, I used the knots to create hoops along the length of the yarn. Although I have still used knots to create this yarn, the hoops are very much the main focus and the knots almost blend into the combined three yarns. As far as colour is concerned, I took inspiration from the colour of the various flowers within the floral fabrics I had chosen. I felt that these colours worked fairly well beside each other without clashing or blending in with eachother too much.
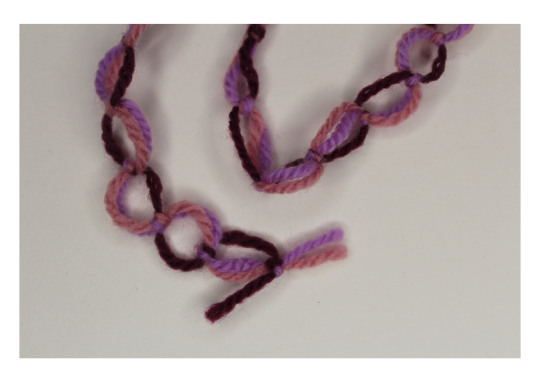
Fig 9 Yarn 5.2.4 Close up
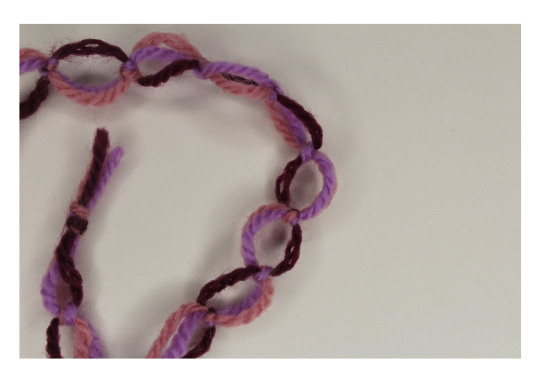
Fig 10 Yarn 5.2.4 Close up

Fig 11 Yarn 5.2.5 Hoop yarn using 3 colours of acrylic yarn (version 2)

Fig 12 Yarn 5.2.5 Close up
Fig 13 Yarn 5.2.6
Fig 14 Yarn 5.2.6 Close up
#textiles 1 a textiles vocabulary#part five building a collection#project 2 building a response#develop yarn and linear concepts
0 notes
Text
Project 2: Material Exploration
Before moving on to create my actual textile samples, I wanted to look at the materials and colours I would potentially be working with. The following material explorations were to see how the different colours and materials interacted with each other, whether they would work together or not. I worked with cotton fabric, polycotton fabric, pre-shrunk calico, felt sheets and webbing for these explorations. As well as looking at how the colours and patterns worked with each other, I also looked at how easy the materials were to work with. For example, looking at how difficult it is to sew through multiple layers of the different fabrics or how I could attach hoops of webbing or felt to the samples.
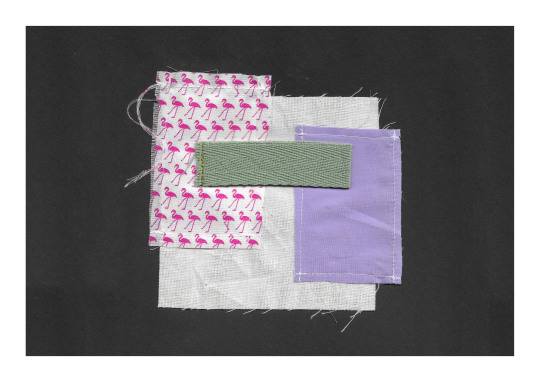
Fig 1 Material exploration 1

Fig 2 Material exploration 2
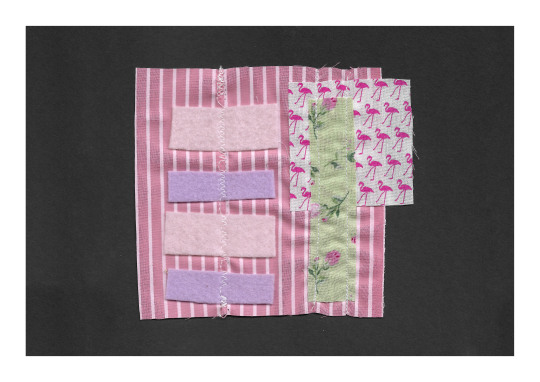
Fig 3 Material exploration 3
I had broken my bobbin so that is why the zig zag stitch has come out strangely in this third sample, once I had finished the line of stitch I fixed the error.
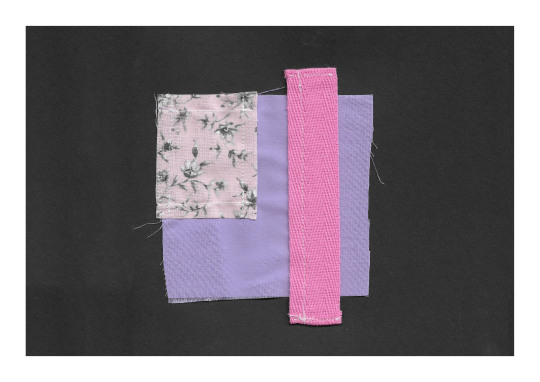
Fig 4 Material exploration 4
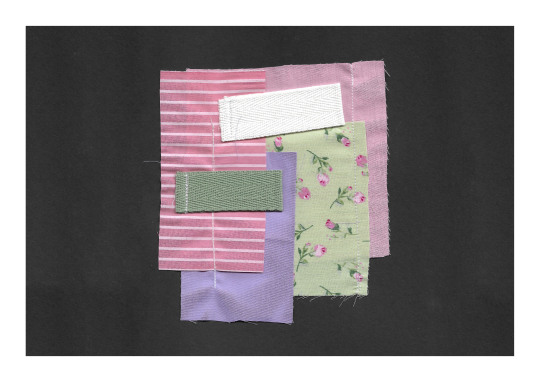
Fig 5 Material exploration 5

Fig 6 Material exploration 6

Fig 7 Material exploration 7
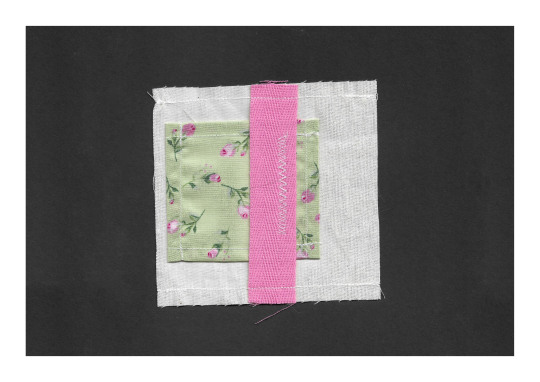
Fig 8 Material exploration 8

Fig 9 Material exploration 9
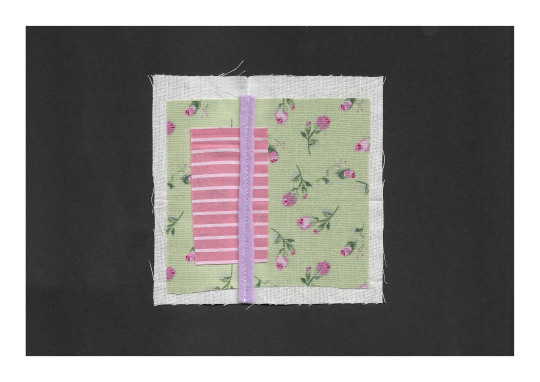
Fig 10 Material exploration 10

Fig 11 Material exploration 11

Fig 12 Material exploration 12

Fig 13 Material exploration 13
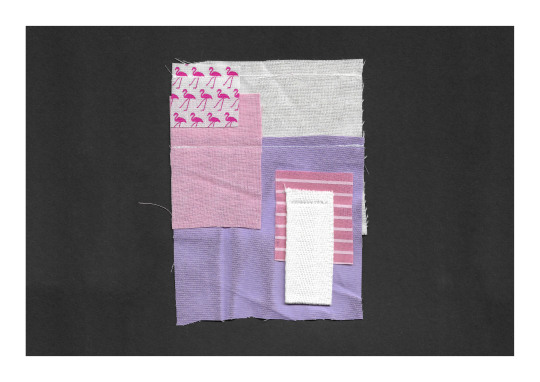
Fig 14 Material exploration 14
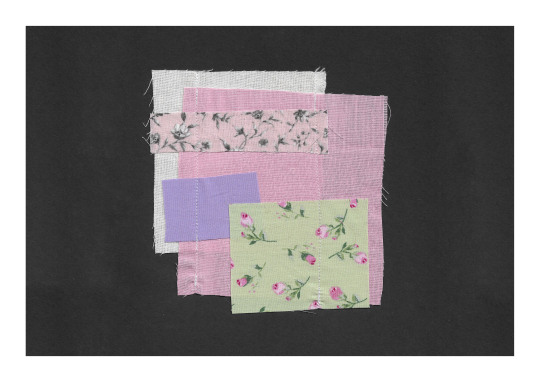
Fig 15 Material exploration 15
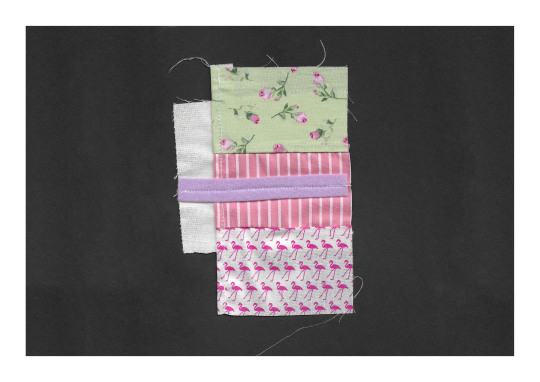
Fig 16 Material exploration 16

Fig 17 Material exploration 17
0 notes