
Last Seen Blogs

gradjournaljaz
Graduation Journal

transparentprincestarfish
Untitled

axia-chan
✥axia_chan

gargcomputer-blog
Garg Computers

soprecori
Soporte Prehospitalario de Costa Rica SOPRECORI
Text
hello NUA this is my Final project Year 1 blog in case you wanted to see it
this blog corresponds with the ‘windfall’ portfolio <<<
0 notes
Text
Website
https://lunarscape8.wixsite.com/windfall
This has all the character/world information on it - none of it is here!
0 notes
Text
0 notes

Text
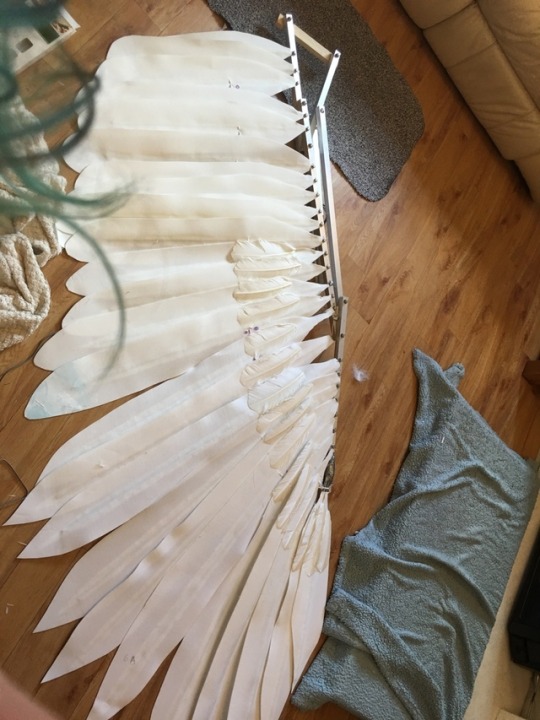
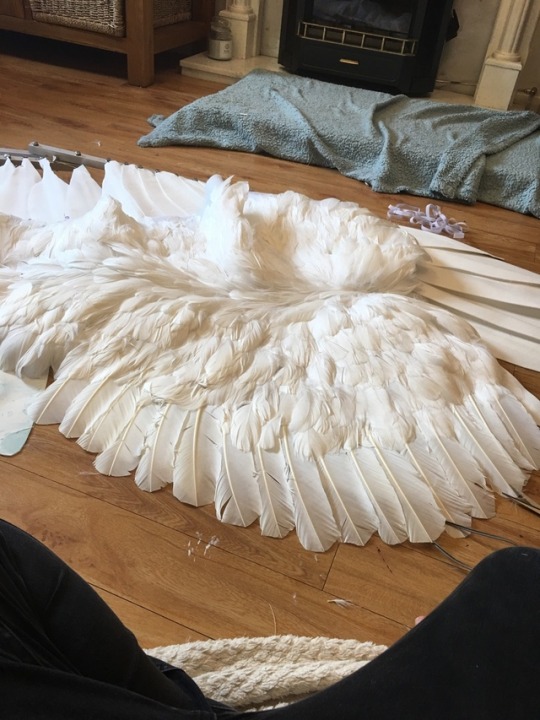
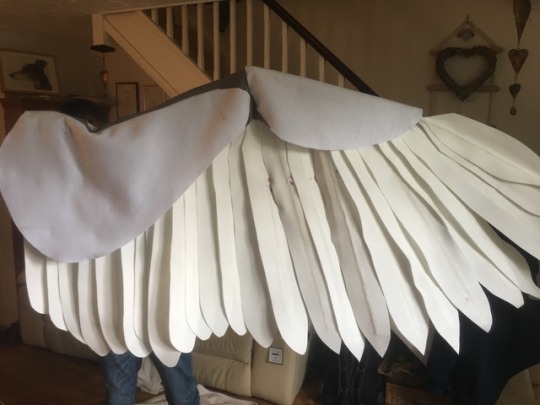
Wing Photos
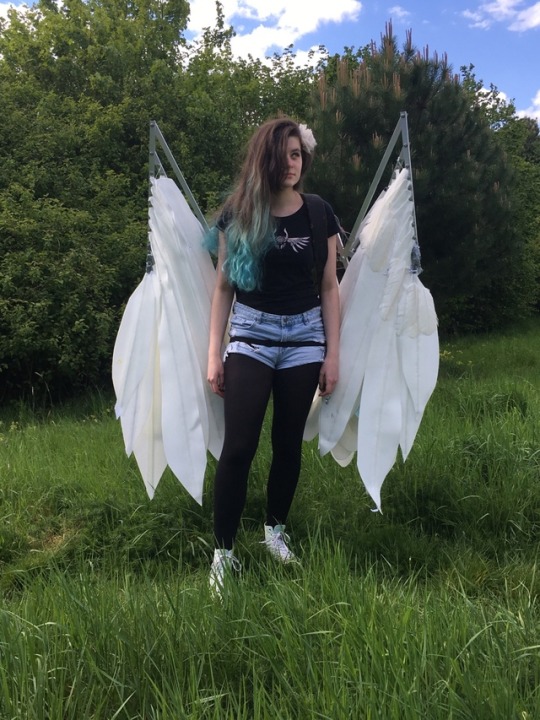


I am super happy with how the wings have turned out - although if I had more time I would have liked to have painted them to reflect the actual wings of my character - I may do this once the project is over!
1 note
·
View note
Text
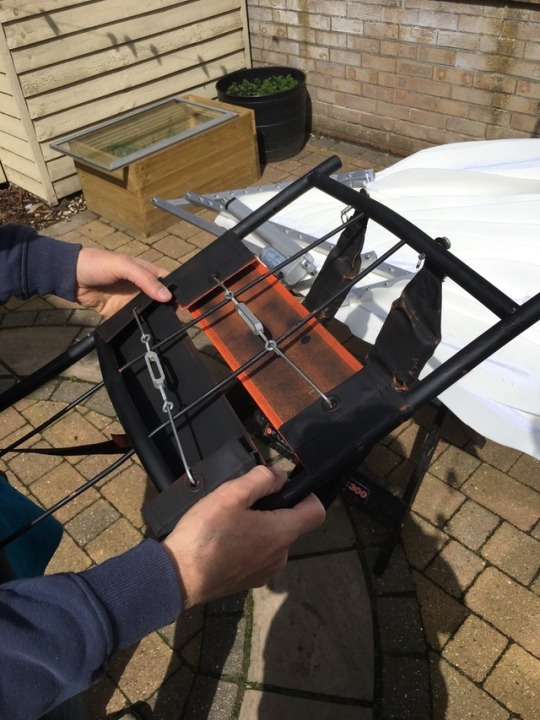
Wing Electrics 2
This is a continuation from the previous post. After the crimp plugs were attached to the wire, the other end was stripped using wire strippers and each part was wound together so that it could be soldered to the switch.

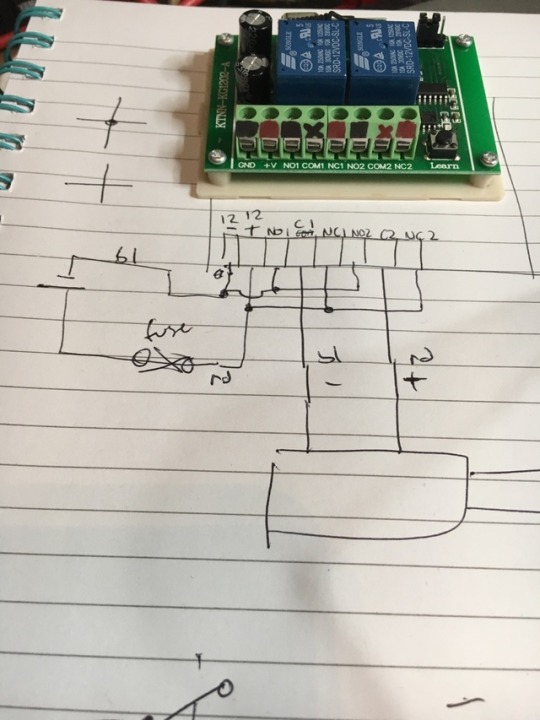
The control board for the remote controller was marked using red and black to show which connections were common (i.e. all the black squares connect together and all the red squares connect together). The red and black x’s connect to the actuators, as can be seen by the diagram.
The actuators had two wires coming out of them that were black and red. These wires were stripped and tinned. Both of the red wires (one from each actuator) went to the terminal block with the red x - it had to be unscrewed from the top - then screwed back in place to hold the wires. Both of the black wires went into the terminal with the black x.
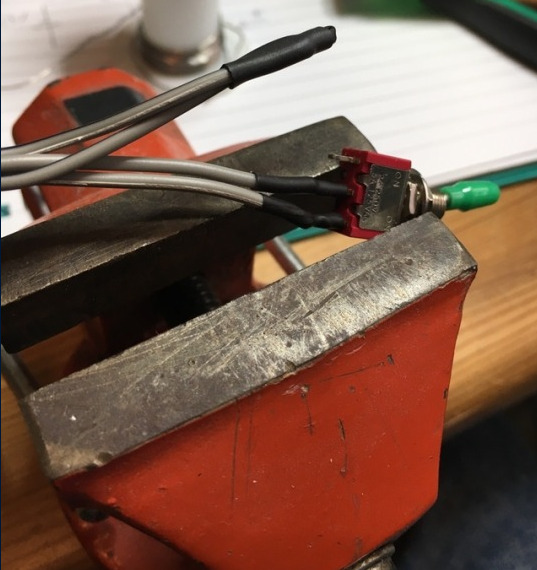
I held the switch using a vice in order to solder it.

The ends of the wires (that would attach to the switch) had to be tinned (they had solder melted onto them) before they could be properly attached.

The black strips on the wires (above) is heat shrink. This was pushed over the soldered joint after it was complete and then heated with a heat gun. This made is shrink so it was fixed in place, stopping anything from touching the exposed contact.

This is what the strips looked like once they had been soldered and heated. The switch was marked with On and Off on each side so I would know which way to flip it when moving the wings.
0 notes
Text
Wing Extras 2
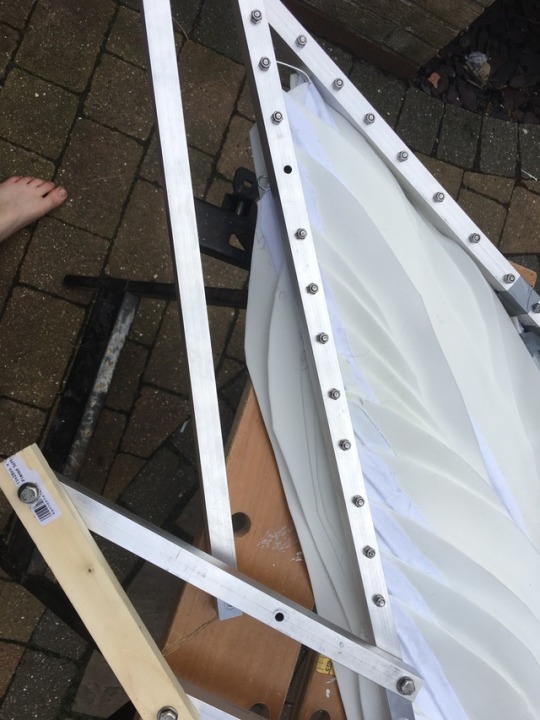
Once the actuators had been attached and I had the back frame, I unscrewed the frame from the wooden strips.
The holes were meant to be exactly 7 inches apart so I used the holes i’d drilled in the wood as a reference. I marked lines on the frame in pencil so that I knew where to drill the holes.
The holes were punched before being drilled. I tried to get the punched hole as central as I could on the curved surface. Once the holes were punched, the distance between them was measured, which was still 7 inches.
As with the aluminium bars, a smaller hole had to be drilled before the larger hole. I used a 3mm diameter drill-bit.
After the smaller hole was drilled I used a 6mm drill-bit to widen the hole enough to fit the 6mm bolt.

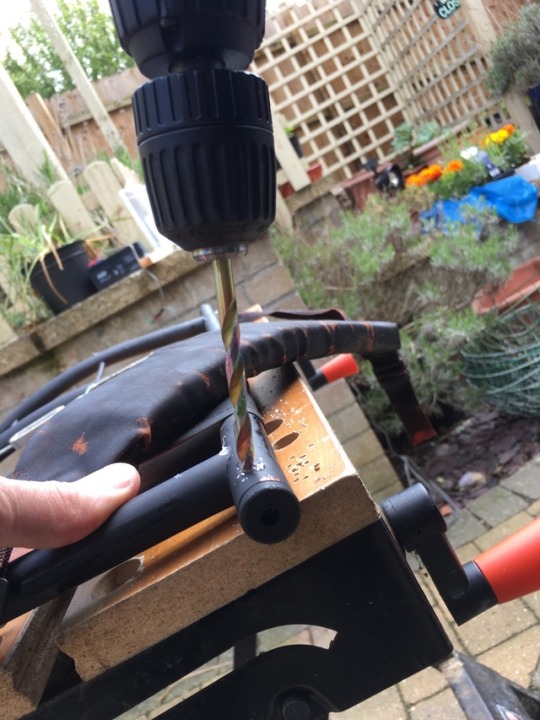
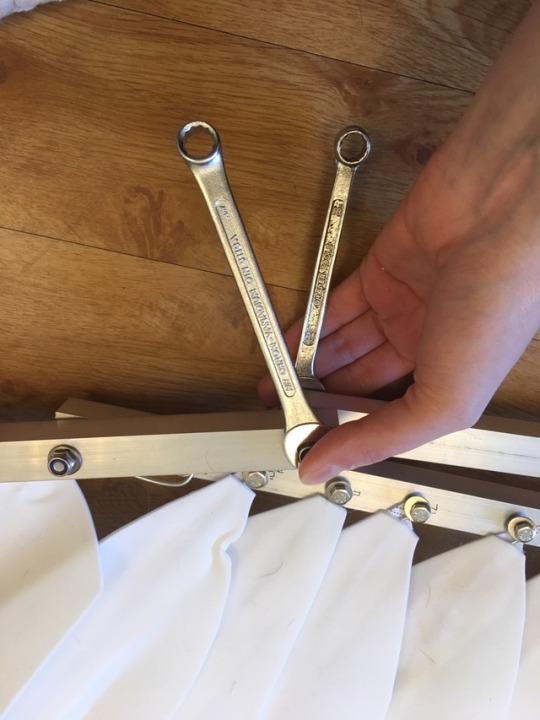
The bolts, washers and locknuts were then screwed back into place and tightened with the spanners.
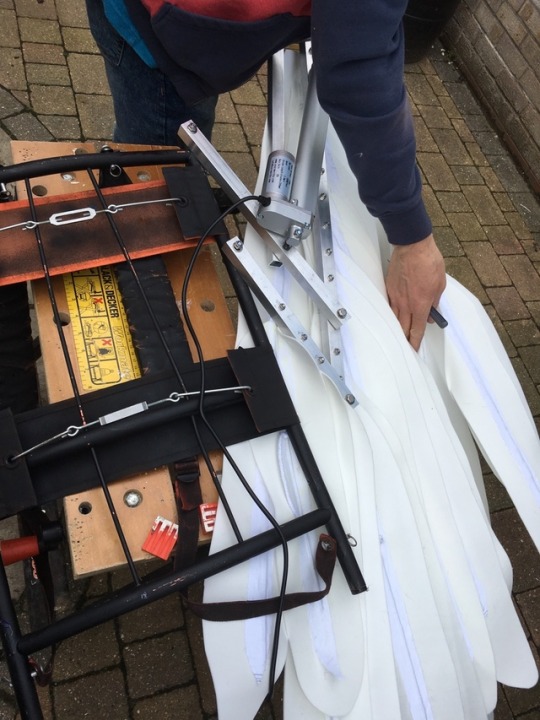
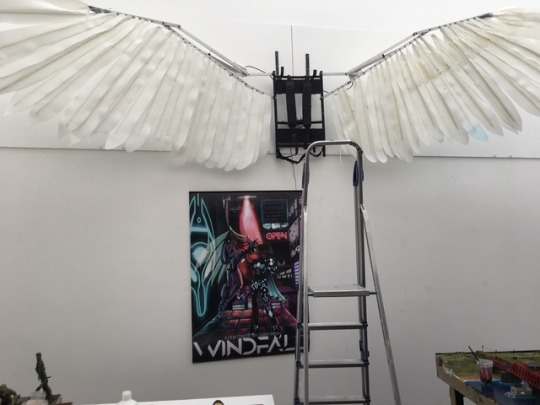
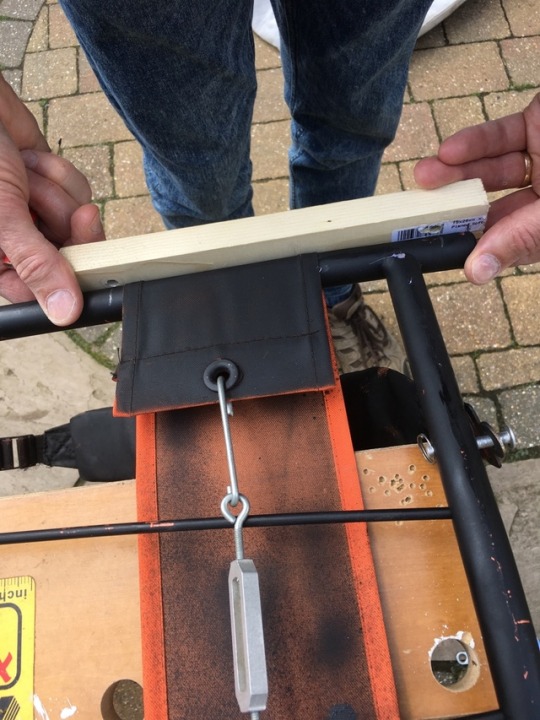
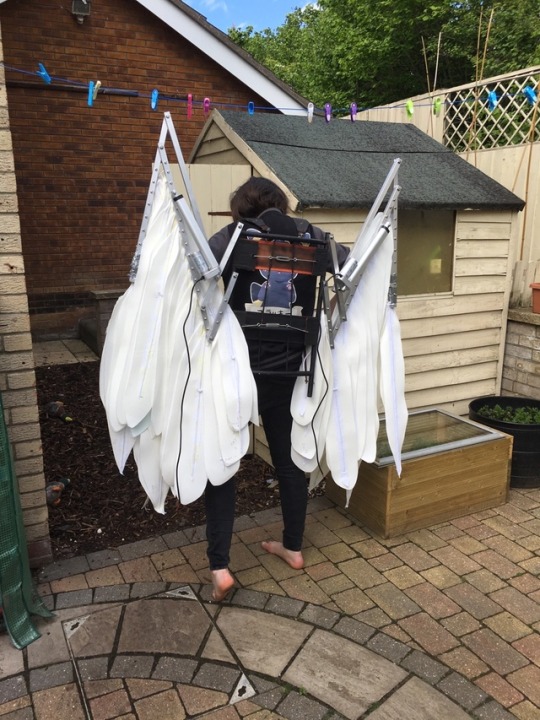
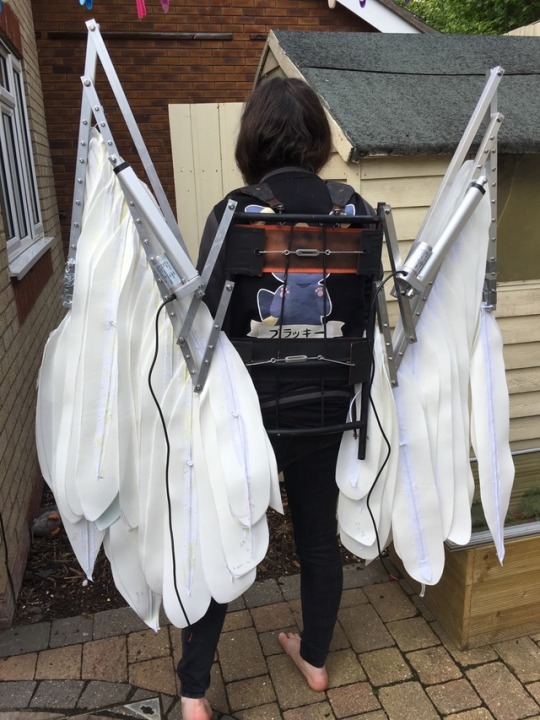
the control board was cable tied to the frame - the battery was left on the floor. This was the first time I ever wore the finished set. Upon wearing them for the first time I noticed that whenever I leaned slightly forwards the wings would lean majorly and the frame would start to come off my back. This was fixed by attaching a strap to the bottom of the frame (as seen above) this clipped on to the loops that were already on there to attach the backpack straps. This went across my waist and held the bottom of the frame to my back.
0 notes
Text
Wings - Extras 1
I thought it would be a good idea to paint the wing so I tested it out using one feather. It didn’t look as good as the white so I tried to paint over it with white again.

These are the turkey quills which I glued onto the larger feathers.
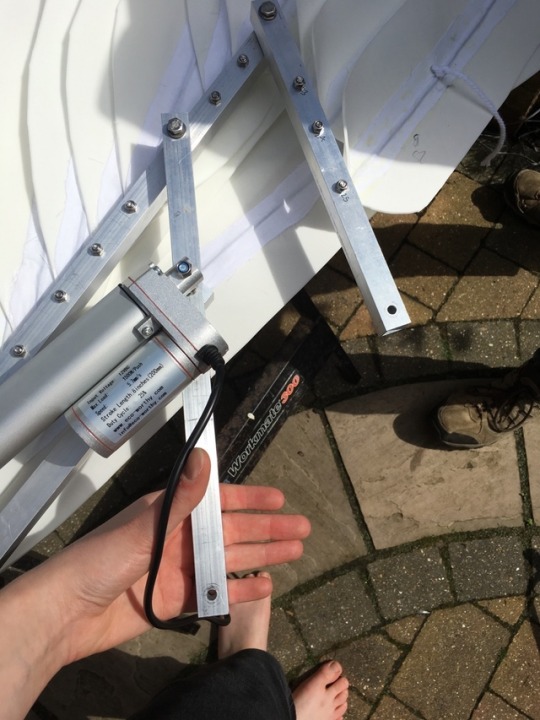
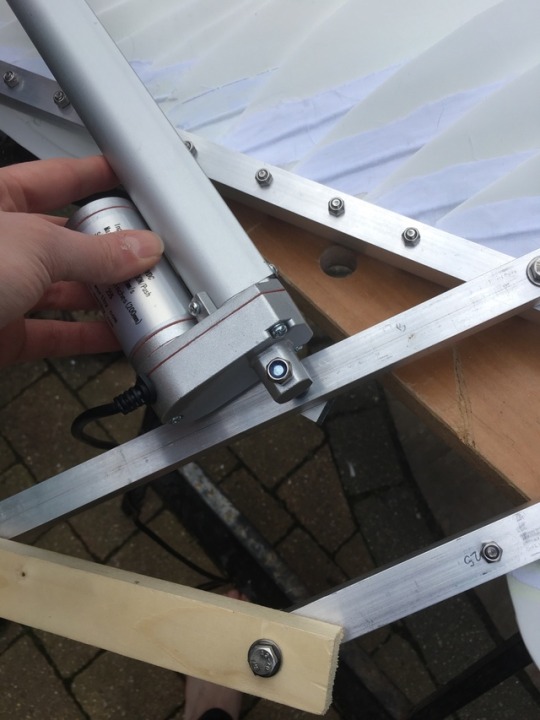
To attach the actuator, the wings were taken outside.

Due to the size of the wings, the actuator had to be attached to the bolt that created the elbow joint. This required a much longer bolt. I was careful to make sure the actuator was attached to the back of the wing rather than the front where it would be annoyingly visible. This tutorial was a big help in this process.
When the actuator was positioned at the joint, we had to try and line the stroke (the part of the actuator that extends outwards) up with one of the preexisting holes drilled for the feathers. Luckily it fit almost perfectly in line with the hole I had drilled (the one missing the bolt in the picture above). I made sure to attach both actuators to the same hole on each wing.

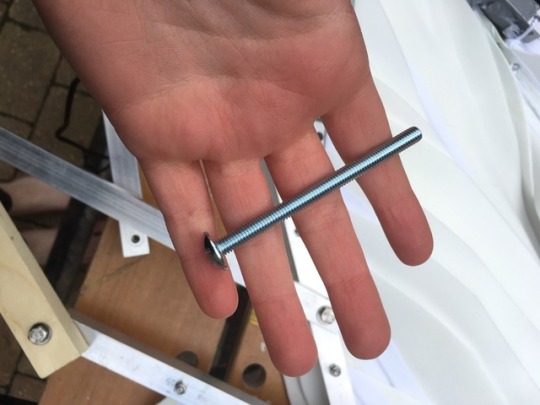
The bolt that I had to use was far too long so it was cut down with a hacksaw after I tested out how long it needed to be.
The bolt was put through the whole with a washer on the underside, as well as between the two bars. On top of the second bar I put two collets on the bolt before the actuator. These were added for two reasons - to keep the actuator away from the metal so it wouldn’t collide when opening/closing, and to make the height of the actuator the same at both points.
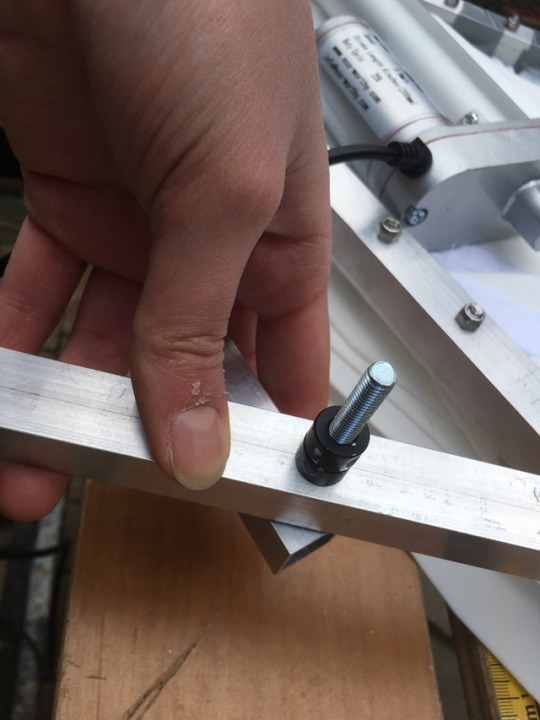
Once the bolt was hacksawed down I screwed on the locknut and tightened it with both spanners. This was done so that the actuator was attached in both places to the bars.
This was done to the other actuator as well. After this, We decided to add it to the frame which i’d previously used for a different set of wings.
0 notes
Text
Making the Other Wing
I thought that I would only have time to create one wing when I started them again. As we were looking at the solitary wing, I asked my dad if it would be wearable by itself - it would not due to the unbalanced moments - it would have to have another weight on the other side to counteract it.
After a long thought, I decided to try and quickly make the other wing - since most aspects had already been completed - the only thing I needed to make was the other feathers and string them before they would both be at the same stage.
I started this in the evening after making the wing cover at around 6pm - and finished it at 2am.
I started making the feathers the same way I had done so for the previous wing, but it got too dark and cold outside to continue using contact cement. I had a brief thought to try out hot glue instead, as long as I was careful and only glued down small portions of the fabric at a time.
This method turned out to be much quicker than the contact cement. In hindsight I should have tested both ways out before starting the project as I could have saved a lot of time. There was also the added benefit of hot glue not giving off fumes so that was nice.
I had to create around 25 feathers for this wing by cutting out a piece of thin cotton fabric from a sheet and sandwiching the piece of wire between that and the foam.
Once all of them had been finished I would estimate it was around midnight.

I got out the other frame which I had previously created and attached all of the feathers to the frame using the locknuts, washers and bolts.
After attaching all of them I compared it to the completed wing and realised that the entire thing was the wrong way around - the locknuts were on the wrong side of the metal. This meant that I had to take everything out and redo it.
I also had to cut a lot of foam off the tops of the feathers since they were overlapping each other way too much and wouldn’t fold properly as a result.
I duct taped the first two feathers to the frams as instructed by the tutorial, making sure to leave a gap for the holes (which I did not the first time around, which caused a lot of frustration later on)

I had to string the feathers again, which was far easier this time as i’d done it before for the other wing. Above is the knot I used to attach the string to the framework. I had to attach a piece of tape to the end of the thread to stop it from coming undone.
The other end of the thread also had tape to flatten it, this way I could thread it through a really large plastic needle. This sped up the process a lot as it meant that I could easily get the cord through the holes that I cut in an X shape with a craft knife.

The next morning I tightened all the bolts in the feathers and the framework. The top two spanners were used to tighten the framework. One was used to hold the bolt in place and the other was used to turn the locknut until it was almost tight. it couldn’t be tightened fully as then the framework wouldn’t open and close. It was a trial and error process.
The framework bolts were tightened using a smaller spanner and wrench as there was not one of a correct size for the smaller locknut.

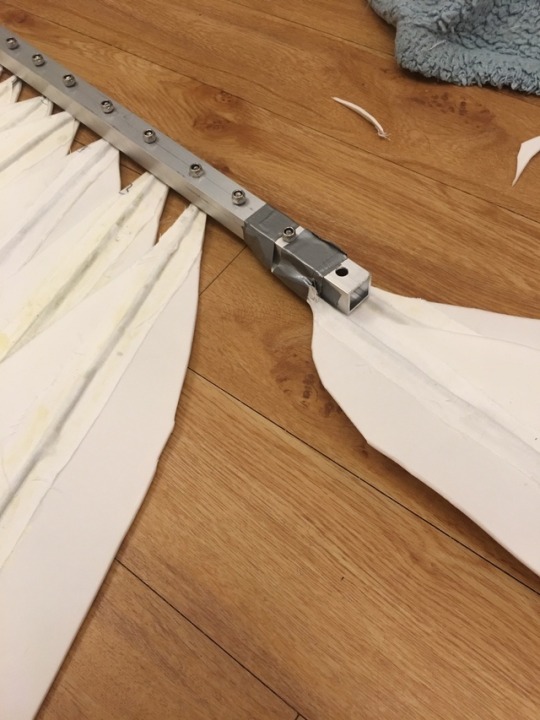
This is where the actuator would attach.
0 notes
Text
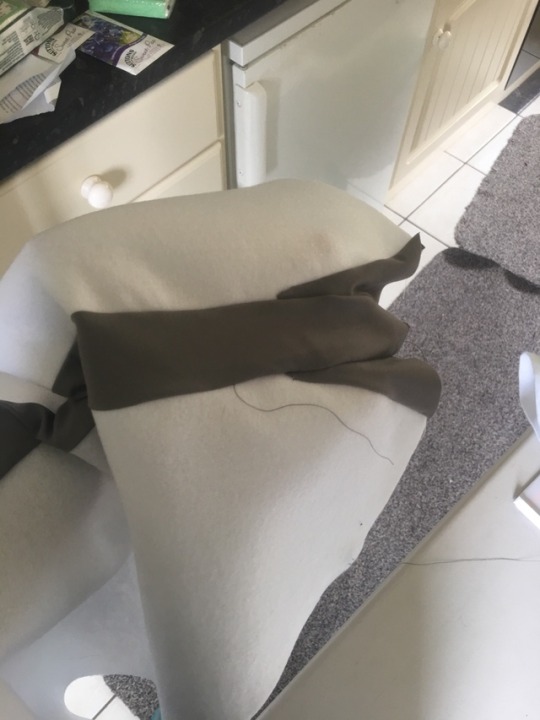
Finishing the Feather Cover
I repeated the sewing process on the other side of the wing for the first few rows. However, when sewing the larger portion I made sure to start much further down to avoid having to add more feathers underneath to get the correct shape again. I frequently referenced the other side to make sure the shape matched on both halves.

This was the cover once it had all the feathers except those covering the midde section.

It was allegedly possible to add the top row of feathers by fanning them out then sewing them in place, but I couldn’t actually get it into the sewing machine due to the width of the fabric. I instead chose to glue them on in the fan shape. This is what the wing looked like once I had glued half of the remaining feathers on.

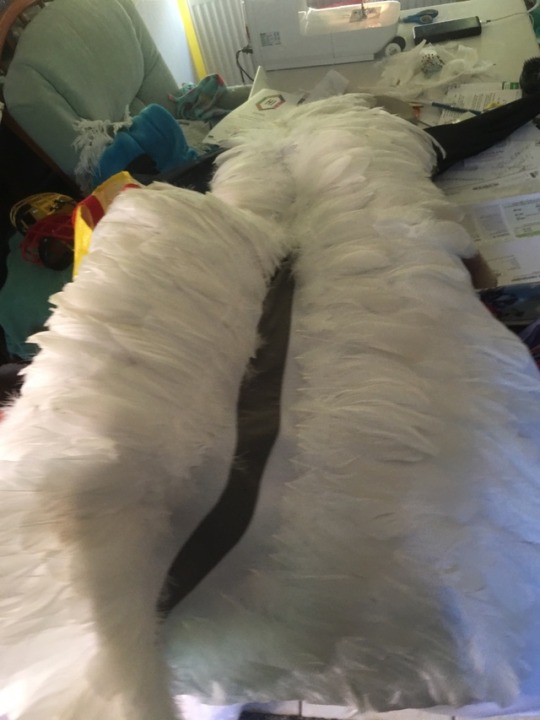
At the base, the feathers created a small circle. This was the cover once all of the goose plumage feathers were added.
When cutting them, I tried to only use the ones that were not broken and had the much rounder teardrop shape to get as much coverage as possible.
This was the cover from underneath.

Next, I cut the quills off a large portion of turkey quill feathers and sorted them into two piles depending on which way they were pointing. All the feathers that were pointing to the right were added to the left side of the cover and vice versa. I tried to cut them to a varierty of different sizes so that I could create the organic shape as shown below.
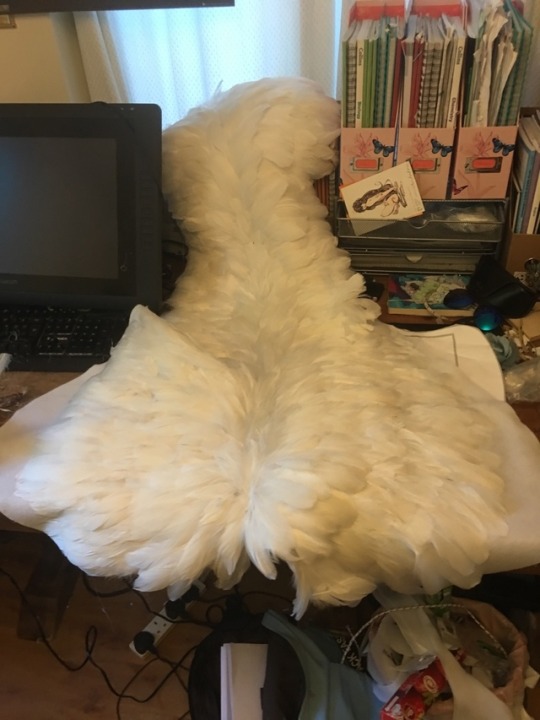
This was the fully completed cover.
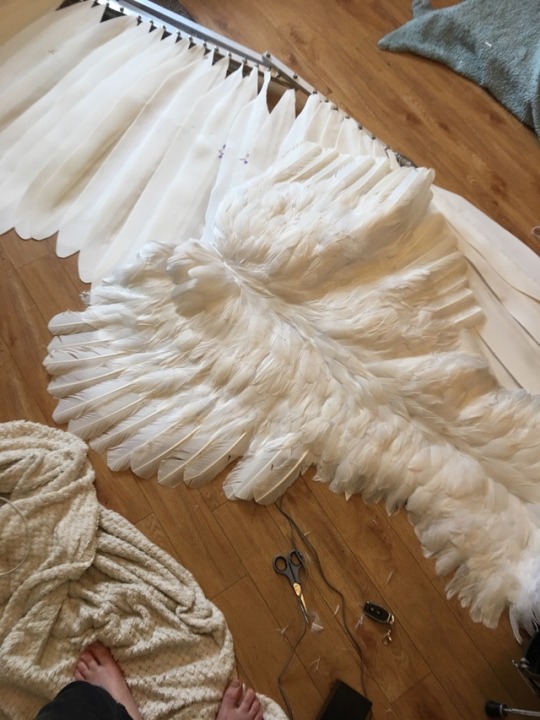
Before I glued some of the quills to the large fake feathers, I laid the cover on top of the wing and drew around the shape. This way i would be able to attach the remaining quills in the right place.

0 notes
Text
Sewing the Feathers
To make the cover more realistic I purchased 0.25kg bags of goose plumage feathers. These all had to have the sharp quills cut off which took a long time and had to be done outside. To create the entire wing I would estimate that just cutting off the quills of all the feathers took maybe and hour and a half.

I put one side of the cover in the sewing machine and placed a couple feathers at the edge of the fabric so that the overlap was a couple of inches. I sewed them maybe one and a half inches from the edge of the feather. This is what it looked like when i’d half finished the first row (ft. Posy).

When sewing the bottom row of the feathers along the main piece, I had to create a line which I would sew them along. I could not simply sew them along the bottom edge of the fabric as I had to put the larger turkey quills along there (to mimic the greater coverts and help the cover blend with the rest of the wings). However I ended up drawing the line w ay too far up which made the feathers look really strange.

This was the cover once I had added several rows of feathers on top of each other. I made sure to space them so that the row above would cover up the seams from the row below.

At this stage, i decided that it would be easier to glue the extra row of feathers underneath (to try and fix the mistake) rather than trying to sew them under the original layer.
This was what it looked like once I had finished most of one side and added the glued feathers underneath.

We closed the wing as a test to make sure the fabric would lay on top with the feathers as we had intended.

0 notes


Text
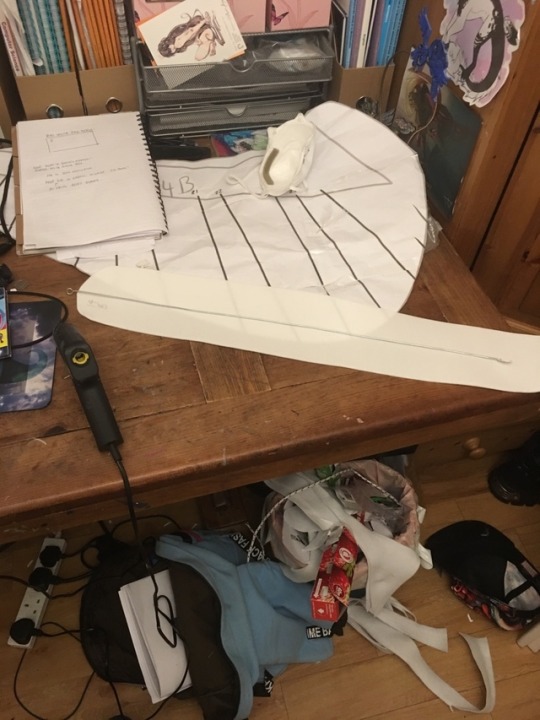
Making the Feather Cover
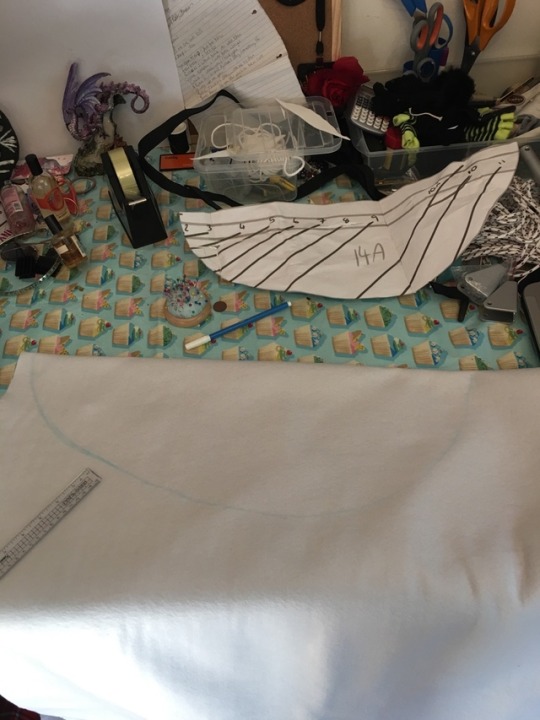
Having never done anything like this before, I used the pattern and this tutorial which I downloaded from TheCrookedFeather.com.
I bought 2m of white felt (which I guessed based on the pattern size). The hardest thing to find though was the spandex (or elstane/lycra) fabric that I needed to allow parts of the cover to stretch over the frame when it was closed. I looked all over town and couldn’t really find anything online either that would have arrived soon enough. I measured the length of spandex I needed on the pattern before I left, and knew that I would need around 68cm long.
I ended up finding an elstane shirt in sports direct that was on sale - and although it was grey there was really no other alternative. Upon getting home, I drew on the strip I would need (6.25cm wide and 68cm long) and it fit almost perfectly which was a relief. I would have ordered the fabric a lot earlier but I didn’t think I would end up finishing the wings so didn’t bother initially.

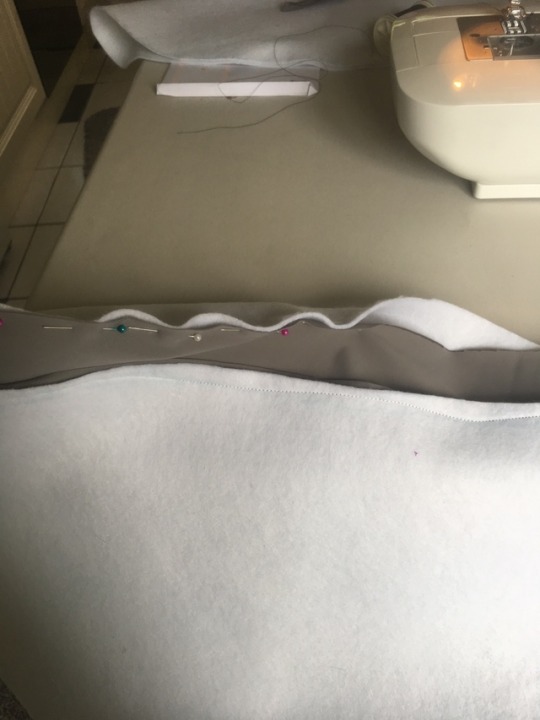
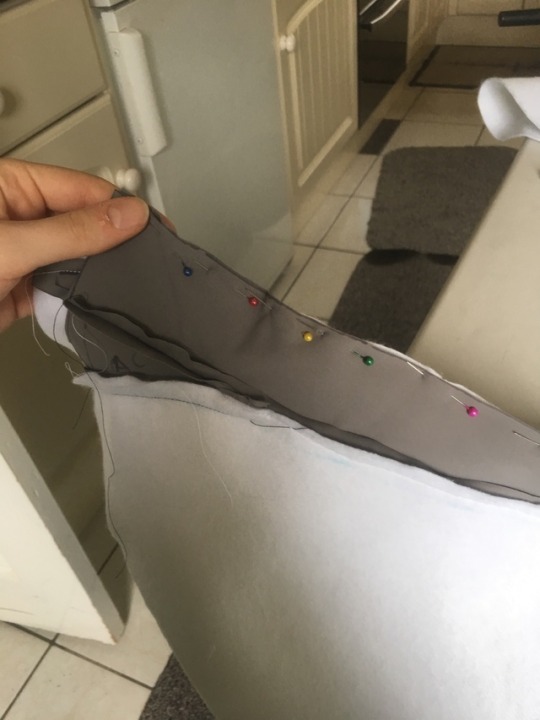
The semi-circular piece had to be drawn on the folded edge of the felt fabric with around 2-3cm extra space between the edge of the pattern and the fold. This was so it would accomodate for the extra space added by the elastane strip, which is sewn between the two larger pieces.
Before drawing it onto the felt I put the entire pattern piece up to the opened wing, and noticed that it didn’t quite cover the finger piece of the metal. For this reason, I extended the shape outwards about 7cm when drawing it. I was so preoccupied with doing this that I actually forgot to add a seam allowance to the other end. This, thankfully, didn’t make much of a difference overall but it could have - I had not used a sewing machine in a while and was used to working with not adding one on foam.
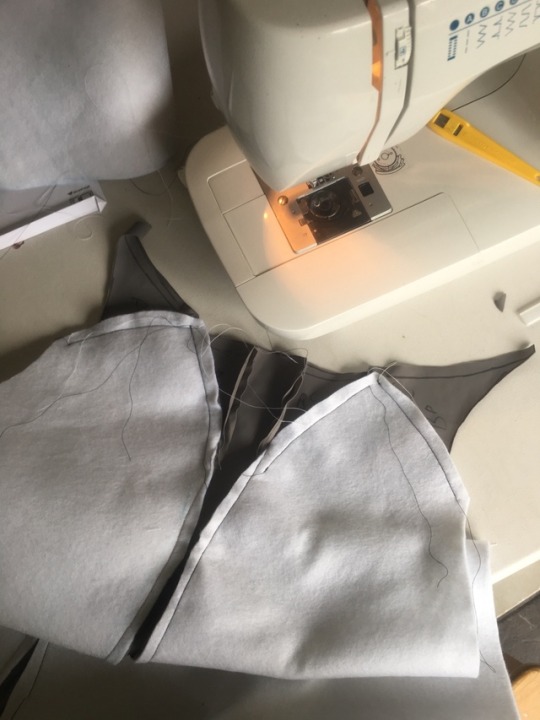
The larger pieces were pinned to the felt and drawn around using a fabric pen in a light colour. After the previous piece mistake, I did add the correct seam allowance to this but the size of it varied from point to point, which ended up being awkward to sew since the seam allowance of the elastane was different (it was at this point when I realised that people usually use set sizes for seam allowances, Noriega had recommended a quarter inch in her tutorial video).

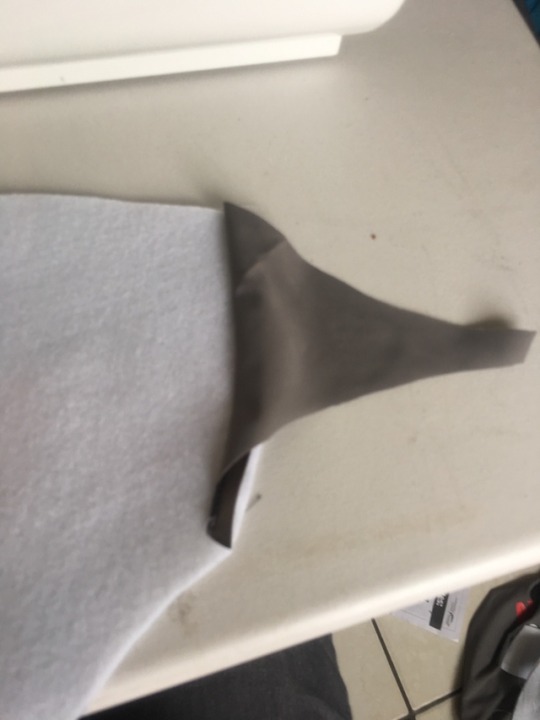
I also had these two different triangle shapes that had to be made out of the elastane. I made two of these with the right seam allowance then flipped them over and made another two. They were labelled to ensure I sewed them in the correct orientation.

I started by pinning these two pieces together and sewing them.

Once I had sewed them together, I turned the fabric over and noticed that the seam allowance was visible underneath (in hindsight I just needed to trim it off) but this really threw me off and for about 20 minutes I forgot everything i’d ever learned about sewing. Convinced that i’d done it wrong I hastily unpicked it and decided that i’d leave that part till last.
I sewed on the other triangular piece and then realised that all of them would look this way due to the shape of the pieces, so I just trimmed off the seam allowance a bit and it looked better.

I continued sewing all of the pieces together.

This was the finished cover when it was laid over the wing.
0 notes
Text
Wing Electrics 1
I used crimp plugs to connect the battery to the remote control unit I picked a few different crimp plugs to test them beforehand to see if they would attach to the wire. Once I was confident that the crimps could be successfully attached by crushing them with pliers, I attached the two that were picked out - the red would attach to the red (positive) side of the battery and the blue would attach to the black (negative) side.

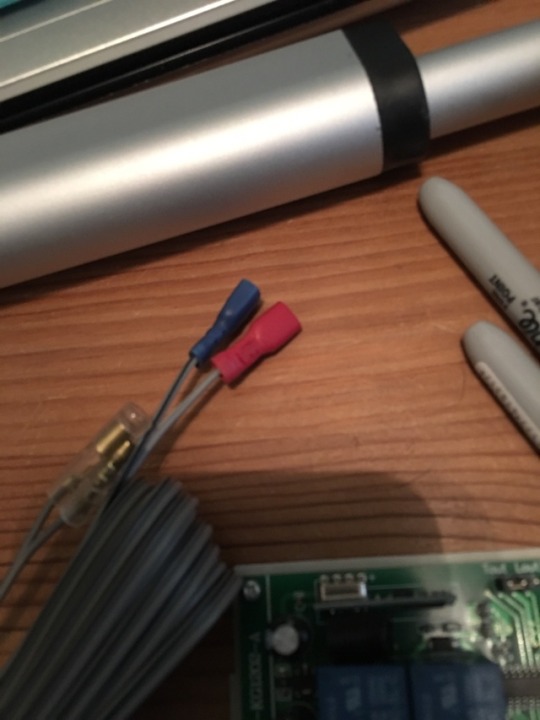
Before attaching anything together a plan for the circuit had to be drawn. The top diagram shows how the battery would attach to the actuator with the circuit board in the middle; the bottom shows the switch which would be placed after the battery to turn the power on and off.

0 notes

Text
THE WINGS!!!! WOOO
After a lot of thought and consideration I knew that I couldn’t just leave the wing I had started unfinished. I had already made the frames for both, purchased all the materials and half finished one wing. I was asked to present the half finished wing at the show and knew that I wouldn’t be happy showing it in the state that it was left in. I thought that perhaps it wouldn’t take too long to at least have one to present.
The tipping point for me was when I had to string the wings together previously. There was a tutorial available which I rushed through and consequently missed all of the important details about how to do correctly. This time I was determined to get it right.

I started with regular string, even though in the video she had used cord. I didn’t that this would make a huge difference, but it did. The knots themselves were very tricky to learn how to do and I frequently made mistakes when tying rhe feathers together - mistakes that I could not undo because of the thickness of the string. It was too thin and knotted too tightly, and would move whenever I had finished a knot.

I knew that I wouldn’t be able to use this string so I ordered some cord from amazon. Upon arriving the next day it turned out to be extremely synthetic and smooth as well as heavy. Once again I followed the tutorials and tried to string the first few feathers, but not only were the knots too large, they also didn’t stay together since the material was so smooth that it came undone far too easily.
Regretfully I had to get another type of cord - but decided to go into a shop instead and test it out before buying.
The cord I managed to get was decorative piping cord in 3.5 mm (I think) from a sewing shop. The seller kindly let me test the knot below out in the shop, which worked the best out of all three kinds I had used. I bought 15m of it to be safe (luckily it was only 20p a meter).

Before starting to actually thread the string through, I had to mark the point on each feather that I wanted to create the holes in. As you can see I messed itup the first time and put the holes too far down (this meant that they would be easier to see, which wasn’t great.) I should have used a lighter coloured pen or even tape to make these markings, as they were visible afterwards (I assumed the real feathers would cover them up but they did not).
It was important to string the feathers on the back side of the wings (the side that would not be visible in a picture where I was wearing them) so that the knots would not be visible as they were a considerable size.


The knots I had to do were as follows:

This one was to attach the cord to the aluminium bar at the ‘finger’ of the wing.

This knot was painstaking to try and do 26 times per wing but I eventually got the hang of it, although I often had to undo at least one part every couple of knots.
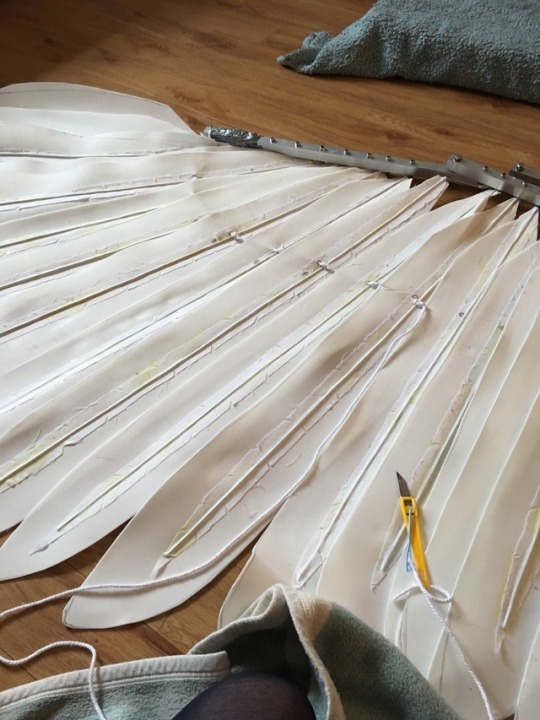
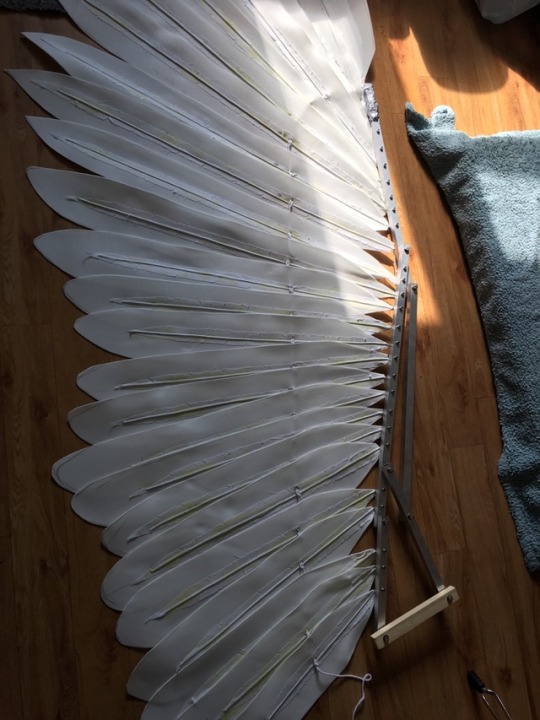
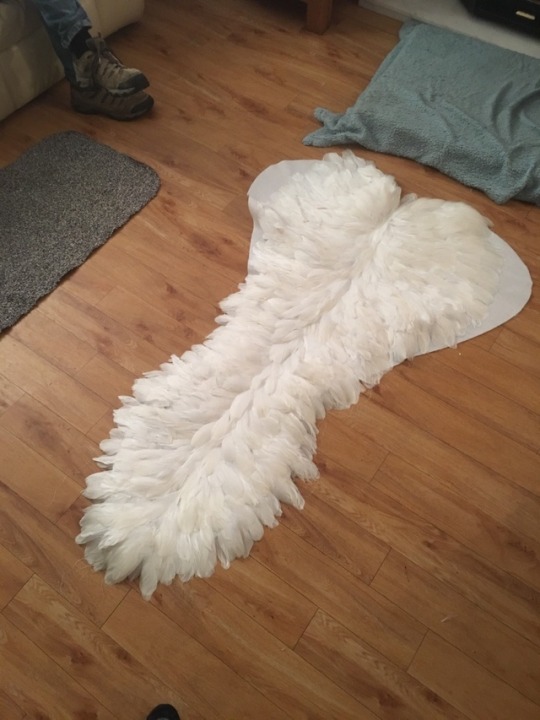
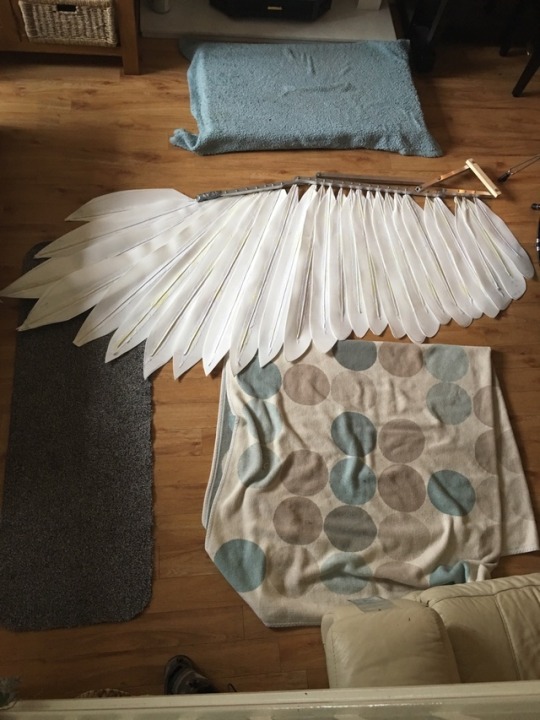
This was what the wing looked like once it had been strung. I had to make sure to keep all the feathers in the place that I wanted them while tying the knots - they all had to be laid out on the floor in the right positions.

Opening the wing once the feathers were attached this way was such a satisfying moment.
0 notes
Text
Fireball Charming - Drossel
Fireball Charming is a Japanese series of CG shorts produced by Disney. The main character Drossel is a humanoid android robot. It is the design of this character which really appeals to me.
She is extremely stylised yet also has enough mechanical hardware parts showing that she looks convincing - I wouldn’t be surprised to see a robot that actually looks like this in our world. She is designed with both functionality and aesthetic appeal in mind - you can see a lot of her joints and how her panelling is missing in certain parts to allow her limbs to bend and move around without being restricted.
I really like her black and white colour scheme and simplistic body plate design which is very smooth and shiny, almost streamlined. I also really like the additional cosmetic detail on her head plate - the flower decoration, as well as her eyelashes and general ‘female’ shaped body. Her ‘hairstyle’ is also changeable to differently shaped plates, as seen below, which I think is a really unique touch. I found this character when creating a pinterest board for the appearance of my robots for my project and she has been a huge influence to their design as she looks almost exactly how I envisioned them.


She looks very simple yet almost cute due to the designs of her ‘hair’ and large eyes. Overall I just really like her design and have been very inspired by it when I was creating my own.
0 notes