
Last Seen Blogs

rely-with-obsess
Drag ME Devil

yuki-knight
Imperfection Is Beauty

ayansukkhaphisit
Untitled

generaliumptranger
Tint On Wheels

newsradiogifs
NewsRadio GIFs
Text
Format Flash Drive With Mac

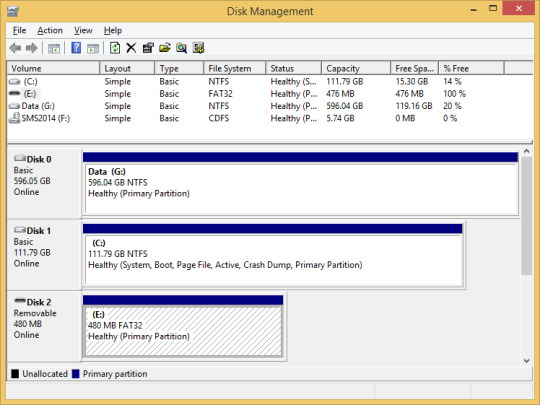
This article explains how to format a USB drive on Mac using the command-line. Even though using the Disk Utility tool to format your USB drive on Mac is a straightforward procedure, sometimes you might want to use the Terminal. Its use allows you to execute commands that provide the same result without having to rely on software applications. Step 2: Enter the following command to view the USB flash drive you want to format: Get-Volume Format-Volume -DriveLetter F -FileSystem exFAT (Replace F to the exact drive letter of your USB flash drive).
So, whether you wish to format the internal hard drive, external drive, or a USB flash drive, the procedure is the same for all. Here is the step by step guide you need to follow to format the hard disk on Mac.
Part 1: How to Format a USB Flash Drive on Mac. Connect the USB drive; Switch on your Mac and connect the USB drive using one of the USB ports. Ensure that the USB is connected correctly. Choose Utilities; Now launch the application program and click on the Utility option on the right side window.
Not every USB drive can be used on Mac out of the box -- you need to format the drive to make sure it's compatible with the MacOS extended file system. And here in this article, we'll offer you a full guide on how to format a USB Drive on Mac. Besides, in case you lose important data due to formatting, we have a professional data recovery tool to help you recover data from a formatted USB drive on Mac.
Bonus: How to Recover Lost Data After Formatting USB Drive
Part 1. What You Should Do First Before Formatting USB Drive on Mac
Make sure that уоu know clearly whаt уоu are doing whеn you begin the whole formatting process, which will еrаѕе your еntirе hаrd drivе.
To avoid formatting the wrong disk, firstly remove the USB drive from Mac, check the title of other storage disks, then insert the USB disk again and note the name of the disk. Next, drag the USB data to a safe location for backup/recovery measures before formatting it. Then you are set to get it done!
Part 2. What Is the Best Format for USB Drive on Mac?
You'll be given several format options when you try to format a USB drive on Mac, including Mac OS X Extended (Journaled), Mac OS X Extended (Case-sensitive, Journaled), Mac OS X Extended (Journaled, Encrypted), Mac OS X Extended (Case-sensitive, Journaled, Encrypted), MS-DOS (FAT) and ExFAT. If you are using macOS 10.13 or later, you'll also see an option named APFS, which is the default file system of macOS 10.13 and later.
1APFS (Apple File System)
APFS is a new file system for macOS. It's the most appropriate format for SSD. However, you need the latest macOS to write to this file system. If you're sure that you don't need to use it on a Mac running old version in the future, then you can format your USB drive to APFS.
2Mac OS X Extended (Journaled) & Mac OS X Extended (Case-sensitive, Journaled)
Mac OS X Extended, aka HFS+, is the default file system before APFS for macOS 10.12 and earlier. It doesn't put a limit on the size of files you can save on the drive, which is the greatest advantage. Windows-running computers can read the files formatted to Mac OS X Extended but can't write to them. And this file system is necessary if you plan on using the drive for Time Machine backups.
The biggest difference between Mac OS X Extended (Journaled) and Mac OS X Extended (Case-sensitive, Journaled) is the latter one is case-sensitive to folder names. For example, 'file' is different from 'File'. Therefore, if you do not have special needs, just ignore this option.
3Mac OS X Extended (Journaled, Encrypted) & Mac OS X Extended (Case-sensitive, Journaled, Encrypted)
These two are basically the same with the previous two but with encryption, which means you have to provide the password whenever you connect the drive to your Mac.
4MS-DOS (FAT)
This is Disk Utility's name for FAT32 file system. As the most widely compatible file system, it suits both Windows operating system and macOS. Therefore one can easily transfer data between PC and Mac using a USB drive formatted this way. However, a USB drive formatted to FAT32 doesn't support long file names and an individual file cannot be larger than 4GB.
5ExFAT
Format Flash Drive With Macbook
ExFAT is the improved version of the older FAT32, which offers larger storage space and supports files larger than 4GB. Of course it also supports transferring files between PC and Mac as a cross-platform file system.
To arrive at a conclusion, if you need to transfer smaller files between operating systems, choose MS-DOS (FAT) or FAT32. And with no doubt, ExFAT will be the best format for USB drive on Mac for larger files.
Part 3. How to Format USB to FAT32/ExFAT on Mac
As earlier stated, you need to first back up your USB drive before formatting it as the formatting operation will wipe all the data. Now, you can follow the steps highlighted below to get the USB successfully formatted.
Format Flash Drive Mac Ntfs
Method 1: Format a USB Drive on Mac OS with Disk Utility
Step 1: Insert the USB waiting to be formatted to a Mac computer.
Step 2: Navigate to Applications > Utilities, and click it twice to open it.
Step 3: Select the drive you want to format and click on Erase.
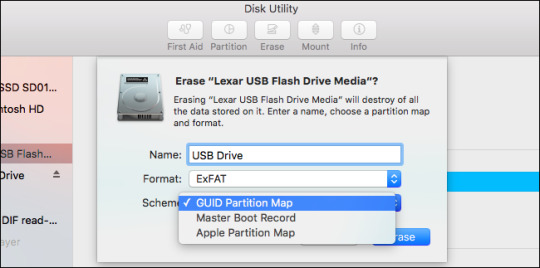
Step 4: Rename the USB drive (optional), and choose one file system from the options.
Step 5: Then select Master Boot Record for scheme, hit Erase.
Step 6: Once the process is done, you are ready to use the drive with new file system to store data again.
Method 2: Convert/Format USB Drive to FAT32/ExFAT
Step 1: Connect the USB drive to your Mac computer.
Step 2: Click on cmd + space to run Spotlight, input terminal then tap Enter key.
Step 3: Type diskutil list to find the location of your USB drive (eg: dev/disk2 is the USB drive in the below picture).
Step 4: Type sudo diskutil eraseDisk FAT32 MBRFormat /dev/disk2.
sudo gives you user right.
Diskutil calls disk utility program.
eraseDisk commands the formatting.
FAT32 sets the file system.
MBRFormat tells disk utility to format with a Master Boot Record.
/dev/disk2 is the location of the USB drive.
Note: You can replace FAT32 with ExFAT in the command, and your USB drive will be formatted in that way.
After the process completes, type diskutil list in command once more to check if the USB drive has been formatted successfully.
Bonus: How to Recover Lost Data After Formatting USB Drive
Formatting a USB drive is never an easy task and problems tend to arise from time to time, among which data loss is perhaps the most common one. Users format a USB drive by mistake or directly format it without doing any backup job and both mistakes will cause data loss disaster. This issue will worry us even more when there are important files we cannot offord to lose. If this is the case, you'll need a professional data recovery software to help you get back lost files, and AnyRecover is what you need exactly. With this software, anyone can recover all kinds of data from formatted USB drive on Mac with only 3 simple steps.
As a comprehensive Mac data recovery solution, it handles all data loss scenarios, including formatting USB drive, hard drive failure, and Mac crash.
All-round and deep scan ensures high recovery rate, and sophisticated algorithms contribute to quick scanning speed.
Supports data recovery on all types of USB drives in various file formats like NTFS, HFS+, FAT32, and ExFAT.
Brings back the lost photos, videos, documents, compressed files, etc. - numerous kinds of data from formatted USB drive easily.
Provides preview before recovery and enables selective recovery.
Note
Format External Hard Drive Mac
AnyRecover offers free trial for every user, with which one can scan, preview and recover 3 files for free. Just download and have a try! The more time for hesitation, the less possibility for your lost data to get back!
Follow the simple steps below to recover data after formatting USB drive on mac:
Step 1: Make sure you have connected your USB drive to your Mac successfully. Download, install and launch AnyRecover. Then select the formatted USB drive you are trying to recover data from as the location to find data. Press the 'Start' button to initiate the scanning.
Step 2: The software will immediately begin the scanning process. You can pause the process at any time and resume from that point later.
Step 3: Immediately after the scanning process is complete, all the files will be listed in their respective file formats and folders. Freely preview and choose what to recover by clicking on 'Recover' button.
Final Words
Formatting is a complicated process indeed but by clearing your mind and then follow the steps as listed out in the article, you can successfully format a USB drive on Mac without much difficulty or errors. Loss of data may come as a nightmare but AnyRecover is powerful enough to help you out. In fact, not just after you format a USB drive, it can work wonders whenever you lose data. Try it and you won't be disappointed.
Dec 16, 2020 • Filed to: Solve Mac Problems • Proven solutions
'I just bought a new USB flash drive and a hard drive for extra storage, but they are not compatible with my Mac. The only solution I can find is to format the drives but I don’t know how to perform it. Can someone tell me how do I format a new hard drive for Mac?'
There are lots of people who mistakenly think that the USB drives and hard drives format don’t really matter. But the reality is quite different. Whether it is a hard drive or USB or internal drive, Mac uses different format support. So, you can’t simply use the same drive with both Windows and Mac. As a result, you will need to format the hard drive for Mac. Using the Mac preferred file system is important otherwise the files will be of no use to you.
In this article, we are going to discuss how to format a hard drive for Mac and some related terms too.
Part 1. Situations When Formatting a Hard Drive on Mac:
Before you get deep, you must understand what is the drive formatting. Some people confuse the term with reformatting. Basically, formatting is the process of preparing the storage devices such as hard disk drive, solid-state drive, USB flash drive, or any other for initial use.
The basic operation is termed as low-level formatting which means erasing the existing data on the disk. But it leaves the track to recover the data using the recovery tool.
There is another term related to disk formatting and it is called reformatting. It is called high-level formatting as it is used to prepare the disk for different file system formats. It is usually done during the OS installation or adding a new disk. Reformatting is done to free the storage space from the previous content stored in it.
You can consider disk formatting in macOS in various circumstances. Whether your system has corrupted data, damaged software, impending system upgrade, storage is full, or it is running slow, formatting will fix a lot of issues. Take a look at the scenarios given below and you will be sure that disk formatting will help you.
If you want to quickly erase all content from the drive permanently without leaving a trace of data on it.
If you want to change the format of the disk such as PC format like FAT or exFAT to Mac format.
If you see the message that the disk is not readable by Mac.
If you want to resolve a disk issue that can’t be fixed by the Repair feature of Disk Utility.
If the macOS installer can’t see the disk or unable to install it.
In case the macOS installer says that the drive can’t be installed because it is a part of Apple RAID.
Under all these situations, formatting is most likely to fix your problems and you will be able to use the drive on Mac.
Part 2. How to Format a Hard Drive on Mac:
Formatting is a very simple procedure that is operated in a similar way for all sorts of storage media. So, whether you wish to format the internal hard drive, external drive, or a USB flash drive, the procedure is the same for all. Here is the step by step guide you need to follow to format the hard disk on Mac. Before you erase a disk, make sure that you have a backup of the files you want to keep.
Format Flash Drive Mac Scheme
Step 1: Connect the USB drive or external drive to Mac and launch the Disk Utility from Applications.
Step 2: From the left side panel, pick the volume or the drive that you want to format and switch to the Erase tab.
Step 3: As you click on the Erase button, you will see several fields in the section. Enter the given information-
Name- Enter a name for the disk such as Macintosh HD/SSD/USB Drive or anything else you want.
Format- You have to choose a Mac supported format from the list. The most recommended format is APFS or Mac OS Extended (Journaled). There are numerous other formats too which will be displayed in the drop-down menu. You can select any format as per your requirement.
The scheme- If this option is available, then you should choose the GUID Partition Map from the option.
Step 4: After specifying the fields, click on the Erase button at the bottom of the window and Disk Utility will format the drive.
Once the formatting is complete, you can use the disk for a backup drive, sharing, time machine backup, or any other requirement. In case if the drive doesn’t appear in the Disk Utility interface, you will have to disconnect all the extra and non-essential devices connected to Mac. Make sure that the External drive is on and connected properly. Restart your Mac and then carry out the task.
Part 3. How to Perform Mac Data Recovery After Format:
There are situations when Mac users don’t get the chance to create a backup of their data and forced to format the hard drive. But you don’t need to panic. You can get your hands on Recoverit data recovery for Mac. If you have mistakenly formatted the data that you still need, Recoverit is the best chance you have to get the files back. Apowersoft screen recorder for windows 10. It is a complete data recovery solution that is capable of recovering all kinds of files with wide format support of 1000+.
You can download the software from the official website and install it immediately on Mac. Once the setup is complete, follow the steps below to recover formatted drive files.
Step 1: Specify Location:
Run the program and specify a location from the main drive. If data is lost from an external drive or USB flash drive, then you’ll have to connect the drive with the system and then specify the location.
Click on the Start button to initiate the scanning process.
Step 2: Scan Results:
Depending on the data that is lost or deleted, scanning will take some time. As the process finishes, the files will be displayed on the screen according to their respective format.

Format Flash Drive With Macbook Pro
You can decide whether you want to look for files according to file type or file path. You can also stop the scanning process in between if the results are displayed before the scanning finishes.
Step 3: Preview and Recover Formatted Data:
Format Flash Drive Mac Exfat
As soon as the data is displayed on the screen, you can have a preview of the files. Select as many files as you want and have a preview of the files. Tap on the Recover button to save the files on your system.
As you are retrieving the files, keep in mind not to save the files in the previous location. Depending on the amount of recovery, it will take a while and ultimately you’ll have your files back. If the normal scan doesn’t work for you, Recoverit also has a deep scan mode to look deeper for the deleted and lost files.
Part 4. Different Formats of Hard Drive for Mac:
Mac Hard drives have wide support for formats but there are two major formats that are preferably used by the Mac users. It also depends on the macOS version you are using. The key point to consider is that the drives formatted with the newer versions won’t be recognized by the older devices. So, when you are formatting a USB drive, it will be ideal to choose the right format which is Mac OS Extended.
The supported Mac formats for the drive are explained below: Office 2016 mac gratis.
APFS:
The APFS format is optimal for Solid State Drive such as flash drives. Hence, if you are formatting a flash drive, you should definitely choose the APFS format. Along with the flash drives, this format is also faster and more reliable for Mac hard drives.
Mac OS Extended:
Talking about Mac OS Extended, it is perfectly suitable if you want to use a drive for backup. The Time Machine feature of Mac still doesn’t have support for APFS disk. In case you select this format, Time Machine will prompt you to reformat the drive.
When you are formatting disk on Mac, keep some things in mind. Never ever change the inbuilt format of a Mac drive.
Part 5. Tips for Formatting a Hard Drive on Mac:
Even though formatting doesn’t seem like a big deal, still it can be very helpful. So, you must stay active and keep all things in mind. Here are some tips that might help you when you are about to format a Mac hard drive.
Disk Utility in macOS Sierra and later chooses a compatible format for you automatically. But you should know the default format for your drive. It is advised not to change the default format of a Mac hard drive under any circumstances.
You can check the format of a drive inside the Disk Utility Menu bar. Just click on the Get Info option and you’ll know the current format a drive is using to store files. Open the System information and select the storage. In the right-side panel, you will see the respective format for each volume on your Mac.
If you want to erase your disk before you install the latest High Sierra on your Mac for the first time, then opt-out for the Mac OS Extended format. During the installation of OS, the macOS installer will automatically decide whether to use APFS or Mac OS Extended for the disk.
You can also use the FAT32 format on Mac for USB drives if you wish to use it on both Mac and Windows. The FAT32 format can be read and written on both OS and hence it is the most versatile format for use.
If you wish to transfer big files from Windows to Mac, you’ll still have an alternative, i.e. exFAT. This format doesn’t have a file limit but it can only be read on Mac OS X Snow Leopard or later.
So, before you pick out the format, look out for the advantages and the disadvantages of the formats to choose the optimal format for Mac. The Windows supported format is usually listed as an MS-DOS format in the list of formats.
Wrapping It Up:
As you can see, now you know how to format hard drive/ USB flash drive/ internal drive/external drive on Mac. So, from now on whenever someone is in need, you can help them. And formatting doesn’t always finish without complications. So, if you lost some important files while formatting the drive, you can use Recoverit data recovery software for Mac to restore them in the original condition. Recommend the software to your friends and family and let them know that there is a master tool for recovery for both Mac and Windows OS in the market.
What's Wrong with Mac
Recover Your Mac
Fix Your Mac
Delete Your Mac
Learn Mac Hacks
0 notes
Text
Torrent App For Windows 7 64 Bit
We all can be part of the solution. Digital downloads are the 'green' answer to demanding fewer resources for your computer's needs. What you get is software with an environmental footprint of zero while still staying up-to-date.
Digital downloads are one part of the larger trend in making our lives - both professional and personal - cleaner, more efficient, and better. Continue reading to see what else you can do to improve your green computing.
Limit screen-saver use. A screen saver does not save energy. In fact, more often than not, a screen saver not only will draw power for the monitor, but also will keep the CPU from shutting down. Instead, set your computer to turn off the monitor first, then go into standby mode after a longer period of inactivity.
Disconnect your Virtual Private Network (VPN) when not actively using your corporate network. Being connected may limit your system's ability to enter standby mode.
Many popular computer games and other third party software packages that run in the background will not allow the computer to go to sleep - even if they are paused or the active window is minimized.
Some web sites or pages that have active banners and or animated advertisements will not allow the computer to sleep on its own and must be closed, or the computer put manually into a sleep state.
Enabled power management to place your monitor, hard drives and computer into a low-power 'sleep' mode after a period of inactivity.
Monitor/display sleep: Turn off after 15 minutes or less
Turn off hard drives/hard disk sleep: 15 minutes or less
System standby/sleep: After 30 minutes or less
Advanced users may wish to establish multiple power schemes to address different usage models. For example, you can create a power scheme for playing music CDs that shuts off your hard drive and monitor immediately, but never puts your system into standby mode.
To further reduce power consumption, turn off computing and peripheral devices that are not being used or being used for an extended period of time such as overnight.
Plug all your electronics into one surge protector, so you can easily switch them all off when you leave the room or go to sleep. Most power supplies (such as your cell phone charger) continue to draw power and generate heat even when not attached to a device.
Utorrent 64 Bit free download - Bit Che, Adobe Captivate (32-bit), uTorrent - Torrent Downloader, and many more programs. Minitool partition wizard the specified disk is too small.
We all can be part of the solution. Digital downloads are the 'green' answer to demanding fewer resources for your computer's needs. What you get is software with an environmental footprint of zero while still staying up-to-date.
Digital downloads are one part of the larger trend in making our lives - both professional and personal - cleaner, more efficient, and better. Continue reading to see what else you can do to improve your green computing.
Limit screen-saver use. A screen saver does not save energy. In fact, more often than not, a screen saver not only will draw power for the monitor, but also will keep the CPU from shutting down. Instead, set your computer to turn off the monitor first, then go into standby mode after a longer period of inactivity.
Disconnect your Virtual Private Network (VPN) when not actively using your corporate network. Being connected may limit your system's ability to enter standby mode.
Many popular computer games and other third party software packages that run in the background will not allow the computer to go to sleep - even if they are paused or the active window is minimized.
Some web sites or pages that have active banners and or animated advertisements will not allow the computer to sleep on its own and must be closed, or the computer put manually into a sleep state.
Enabled power management to place your monitor, hard drives and computer into a low-power 'sleep' mode after a period of inactivity.
Monitor/display sleep: Turn off after 15 minutes or less
Turn off hard drives/hard disk sleep: 15 minutes or less
System standby/sleep: After 30 minutes or less
Advanced users may wish to establish multiple power schemes to address different usage models. For example, you can create a power scheme for playing music CDs that shuts off your hard drive and monitor immediately, but never puts your system into standby mode.
To further reduce power consumption, turn off computing and peripheral devices that are not being used or being used for an extended period of time such as overnight.
Plug all your electronics into one surge protector, so you can easily switch them all off when you leave the room or go to sleep. Most power supplies (such as your cell phone charger) continue to draw power and generate heat even when not attached to a device.

Torrent App For Windows 7 64 Bit 64
Windows 7 Download 64 Bit
Installing of windows. Since everybody likes and Using the latest windows 7 ultimate, We have almost noticed and plan that we should upload the file of iso for windows 7 ultimate free, some enthusiasts still favour Windows 7 Ultimate 64 bit on its successor release Windows 8, due to its flexibility in operations regarding an older version of windows including XP Programs. Deluge is a lightweight, Free Software, cross-platform BitTorrent client.
0 notes
Text
Blackweb Gaming Mouse Bwa15ho121

Blackweb Grim Gaming Mouse Drivers Bwa15ho121
Blackweb Grim Gaming Mouse Bwa15ho121 Software
Blackweb Grim Gaming Mouse Bwa15ho121 Driver
Blackweb Gaming Mouse Bwa15ho121
The blackweb gaming mouse software is developing at a frantic pace. New versions of the software should be released several times a quarter and even several times a month. Minitool partition wizard the specified disk is too smaller.

Update for blackweb gaming mouse software.
Bought it to replace my logitech gaming mouse which was comfortable, and worked great other than the battery. The black web mouse works great but it feels clunky, awkward and uncomfortable in the hand compared to the others I have had, actually a massive downside to the device. My logitech is plugged back up and the other is about to go in the.

Blackweb Grim Gaming Mouse Drivers Bwa15ho121
This product is currently Out of stock. SKU: VIP75LN Blackweb BWA15HO121 Gaming Mouse Take your gaming to the next level with the Blackweb Gaming Mouse.
Want to get one of these?RGB Programmable Gaming Mouse 6400 DPI (7 PROGRAMMABLE buttons) a WALMART product XD Thanks fo.

Blackweb Grim Gaming Mouse Bwa15ho121 Software
Office 2016 mac gratis. There are several reasons for this dynamic:
First, new technologies are emerging, as a result, the equipment is being improved and that, in turn, requires software changes.
Secondly, the needs of users are growing, requirements are increasing and the needs are changing for blackweb gaming mouse software.
Therefore, it is necessary to monitor changes in the blackweb gaming mouse software and to update it in a timely manner. Mass gmail account creator free.
Blackweb Grim Gaming Mouse Bwa15ho121 Driver
/ If you do not update Blackweb Gaming Mouse Bwa15ho121
Software:
0 notes
Text
Apowersoft Free Screen Recorder 3 0 8 Crack
Download MASS Gmail Account Creator - Create several mail accounts on Google's Gmail service with just a few clicks with the help of this handy and intuitive application. MASS Gmail Account Creator 2.1.77 serial numbers, cracks and keygens are presented here. No registration. The download is free, enjoy. Mass Gmail Account Creator 2.1.77 Cracked By Omega. 6/25/2019 0 Comments It might be time to change some of your passwords — again. Mx150 vs gtx 1050. But if you've used a Gmail password that's unique from other accounts, you might not have to worry. GET Mass Yahoo Account Creator 1.0.70 GET Free Hotmail Account Creator GET Free Hotmail Account Creator GET Free Hotmail Account Creator GET Tube Smasher – Set Up and Raked in $10,619 in the Last 12 Months (Autopilot) GET WebHarvy 5.4.0.161 Cracked Visual Web Scraper – Intelligent Web Scraper GET YouLikeHits Digg Followers Bot. https://foxog833.tumblr.com/post/665012210559582208/mass-gmail-account-creator-2-1-77-crack. MASS Gmail Account Creator 2.1.93.0 + crack serial keygen. January 12, 2020. Copy Download Link (paste this to your browser) Comments. Name. Email. Website.

C: Program Files (x86) Apowersoft Apowersoft Free Screen Recorder unins000.exe is the full command line if you want to uninstall Apowersoft Free Screen Recorder version 3.0.8. Apowersoft Free Screen Recorder version 3.0.8's main file takes about 2.65 MB (2777752 bytes) and is called Apowersoft Free Screen Recorder.exe. Apowersoft Screen Capture Pro Free Download Final Full Patch Key Activation + Crack Latest Full Version Free PC Windows. Free Download Apowersoft Screen Capture Pro Crack Final Full Version + Keygen Full Crack. Apowersoft Screen Recorder Crack is an easy-to-use and professional desktop tool for recording screen and audio activity at the same time. It also allows you to save your videos as standard WMV files. By using its built-in converter, you can convert those WMVs into AVI, MP4, FLV, and SWF, and many other formats with no quality loss.
Apowersoft Screen Recorder is an easy-to-use and professional desktop tool for recording screen and audio activity at the same time. It also allows you to save your videos as standard WMV files. By using its built-in converter, you can convert those WMVs into AVI, MP4, FLV, and SWF, and many other formats with no quality loss. Download Apowersoft Free Screen Recorder Full Version on all Windows like Win 7, Win 8 and also Win 10. If you want to download Apowersoft Screen Recorder Crack then click on the links. Thank you to download Apowersoft Screen Recorder Pro Crack Plus Serial Key Free from the Nest. Best And Latest Features.
Apowersoft Streaming Audio Recorder 4 Keygen incl Full Version
Apowersoft Streaming Audio Recorder 4.3.5.0 Crack allows you to record any sound or audio from your PC using both soundcard and microphone. You can also record any audio from the video source. It is an easy way to download the audio from various online radio stations for offline music listening. It is complete music entertainment software with a built-in recorder, converter, downloader, editor, ripper, burner, and audio manager. You can download and record audio and sounds from various playlists, radio stations, websites, video sources, and many more sources for audio extraction using the crack. It can be then converted into a variety of popular formats that are supported by various devices.
Apowersoft Screen Recorder Free Online
Apowersoft Streaming Audio Recorder 4.3.5.0 provides a user-friendly interface that lets you find and record the perfect sound without any effort. It let you record your audio conversation while you can edit your audio, music, and sounds with the built-in editor. The registration code can edit your music to your liking, edit ID3 tags, burn your music collection to a CD, and let you transfer your music to iTunes as well. It supports all the popular audio formats including MP3, AAC, WMA, OGG, FLAC, and much more. It allows you to search, stream and download your favorite music from the internet and have endless fun with this fantastic software. Office 2016 mac gratis.
Apowersoft Streaming Audio Recorder with registration codeis the all-in-one program for recording the streaming audio, downloading your favorite music, editing audio files, and audio conversation while burning them into CDs. The built-in editor lets you edit and convert files in batch while it can convert your audio into the popular formats that are compatible with any device using the serial key. There are tons of options and tools for customizing. It provides the facility of creating schedules for the recording, while you can even pause and restart your recording as well as the automatic skip silence while recording. Multiple tools and functionalities with an easy yet intuitive interface let you use the application without any effort.
Apowersoft Streaming Audio Recorder 4.3.5.0 serial key allows you to record online streaming audio and radio stations while converting them into popular formats. The full version is available for free download. You can also download the torrent file with a serial. You can record every sound that passes through your sound card on the computer. The recording of various audios and music files just required a single click, and the amazing tool will download and record multiple files in one go. You can record your voice through the microphone if you are making the music. You can even create a schedule for your recording tasks. It is an excellent tool for recording and editing your audios with the keygen.
Streaming Audio Recorder 2021 Features:
Can record audio in high quality.
Auto adds ID3 tags.
Convert your audios.
Can record online radio.
Can easily edit audio.
Can transfer audio to iTunes.
A simple interface and easy in use.
System Requirements:
OS: Window XP, Window Vista, Window 7, 8, 8.1 and 10 and Mac.
Intel or AMD CPU with a faster processor.
786 GB of RAM or above.
125 MB of free space for installation.
Intel graphic card.
How to Install?
Download the ASA Recorder from the below links.
After download, unzip the file and run the “video-converter-studio” setup.
Select the language and click “Ok”.
Click “Next” to continue.
Accept the agreement by clicking “Next”.
Select the destination location then click “Next”.
Select the additional tasks and click “Next”.
Click “Install” to start the installation process.
Wait until the installation is complete then click “Finish” to close the setup.
Apowersoft Streaming Audio Recorder Crack v4.3.5.0 Method:
Open the given Crack ASAR folder.
And copy the “Apowersoft.CommUtilities.dll” file from the Crack folder and paste it into the program directory which is >>>C: Program Files>Apowersoft Streaming Audio Recorder.
Minitool partition wizard the specified disk is too small. All Done! Enjoy registered Streaming Audio Recorder.
Click below to download the working and tested version of Streaming Audio Recorder Cracked.
Apowersoft Streaming Audio Recorder 4.3.5.0 Crack Free Download
Setup + Crack
Download Link 1
+
Download Link 2
Apowersoft Screen Recorder is an easy-to-use and professional desktop tool for recording screen and audio activity at the same time. It also allows you to save your videos as standard WMV files. By using its built-in converter, you can convert those WMVs into AVI, MP4, FLV, and SWF, and many other formats with no quality loss.
Apowersoft Screen Recorder Pro Free
Features :
Record your PC screen activity with audio
Capture webcam videos with high quality
Record video from external devices
Capture video games on PC screen
Record live streaming video from any web browser
Make video demos as needed
Apowersoft Screen Recorder Key
How To Install :
Apowersoft Screen Recorder Pro Crack
Install program.
Copy crack files from crack directory.
Use any name and serial number.
mirror link
Related
0 notes
Text
Mass Gmail Account Creator 2 1 77 Crack

Version 2.1 is a bug fixing release. We have fixed a few minor bugs in captcha and proxy features. Also, you can now easily make accounts look real and not like spam with our new feature! Mass Gmail Account Creator 2.1.77 Cracked By Omega. 6/25/2019 0 Comments It might be time to change some of your passwords — again. Mx150 vs gtx 1050. But if you've used a Gmail password that's unique from other accounts, you might not have to worry. Download pvacreator here:. More tool,skype:whitehatbox, PVACreator permits you to.
Mass Gmail Account Creator 2 1 77 Crack Torrent
Mass Gmail Account Creator 2 1 77 Crack Key
Mass Gmail Account Creator 2 1 77 Crack Download
Mass Gmail Account Creator 2 1 77 Crack Windows 7
Mass Gmail Account Creator 2 1 77 Crack Download
Gmail Account Creator Software
MASS Gmail Account Creator 2.1.77 serial numbers, cracks and keygens are presented here. No registration. The download is free, enjoy.
Mar 30, 2014 - 2011 film 'Dolphin Tale,' which told a fictionalized account of Winter the dolphin's story. The aquarium's story is. A funeral Mass will be at 10 a.m. Davis isn't the. Veterans organizations: Creator of. ALPHA/OMEGA HOME. CARl MANiJi -52.1)2.1 77 SJ.
Price $27.00 USD
Create phone verified account automatically.
Auto phone verification feature.
Auto proxy ip to create unlimited accounts.
Auto Enables POP/IMAP Access
Custom Username/Password Option
Installation Online Support
Compatible : XP, Vista, Win7, 8, 9, 10
License Type: Lifetime (Updates Free)
Mass Gmail Account Creator 2 1 77 Crack Torrent
This mass Gmail accounts creator software is a must have tool!... Now we've all been in that position where we really need some Gmail accounts for various marketing activities, But the problem is you either have to sit there manually filling out account details and verifying each account which becomes very tedious after a while...
Or option two is you buy them from account sellers, and the problem with this is many of the accounts stop working or get blocked after a while!
Which leave you looking for another reliable source for high quality Gmail accounts?
Well now there’s a solution!
Mass Gmail account creator is a top quality software created by a marketer named John Andy, the software allows you to create high quality Gmail accounts fully on autopilot the awesome thing is this badass software even phone verifies the accounts for you!
All you need to do is tweak the settings to your liking and click a few buttons, then the Gmail account creation software will go about cranking out as many Gmail accounts as you want all day long!
So that means...
✓ No more wasting money paying for pva Gmail accounts that go dead it a few days.
✓ No more waiting days before you receive your Gmail accounts after purchase.
✓ No more having to hunt for reliable sellers that can provide accounts when you need them.
✓ No more paying through the ears for Gmail accounts as it can get expensive when you need a lot.
✓ No paying for expensive software.
All of the above is taken care of with this auto software!
Let’s take a look at some of the amazing features of the Gmail account creator...
Inbuilt smart delays - the software has random delays throughout actions to seem human like to google.
Inbuilt sms feature - software integrates directly with a high quality sms verification service to verify and create accounts on autopilot.
Auto Captcha Solve - Software can solve captcha automatically when registering accounts.
Lightning fast - software creates Gmail accounts super-fast on the fly your only limited by your internet speed and quality of your proxies.
Highly customizable - can create randomly datas like first name, last name, sex and age etc... to create your accounts, you can also import yourself data to create your accounts.
Auto Proxy Ip System - it’s always a good idea to use proxies when creating a lot of accounts to avoid getting your ip banned and this software takes care of that.
Lifetime Free Update - Some sites update often, the software need keep to update for work, we provide all update freely and we update our software very fast once there is any site updated.
This tool is absolutely awesome and every marketer needs this in their toolbox!
So how exactly will this software benefit you?
Well let’s see!
Create an unlimited amount of phone verified Gmail accounts whenever you want!
Each account will only cost you pennies to create which is a huge difference from paying expensive prices from third party sellers.
create your own fully verified Gmail accounts that you can trust to work as needed whenever needed.
These accounts have multiple uses, from using them for your marketing projects to make money, selling them for serious bank, etc.
Fire up the software whenever you need quality pva Gmail accounts and let it work its magic on fully auto.
You can tell that a lot of work has been put into this amazing software and John and his team always keep the it updated and provide top-notch support to customers, And this Mass Gmail account creator is just another one of the many powerful tools to hit the internet marketing community from an honest Developer&Marketer who has a Solid reputation for releasing very helpful informational guides and software.
So whether you’re looking for a Mass Gmail account creator, Gmail account generator, Gmail maker, google account maker, etc. Whatever you may call it! You need this so hurry up and grab your license while you still can and start cranking out high quality Gmail PVA Accounts whenever you want!!!
>>> Get your license to this explosive software by clicking Here Before you miss the opportunity!!!
PVA Creator Deluxe v2.5.0 Cracked – Best PVA Account Creator – Gmail – Instagram – Facebook – Twitter – Reddit – Facebook – Pinterest – Tumblr – YouTube – Outlook – Hotmail – Soundcloud – Slickdeals – Amazon – LinkedIn & more!
PVACreator is super accounts bulk creating machine that can creating phone and email verified accounts for different sites. It can also solve captcha automatically and allow you to import proxies to register accounts.
Name : PVA Creator Deluxe Cracked
Version : v2.5.0
OS : Windows
Type : 12 in 1 Marketing Tools
Mass Gmail Account Creator 2 1 77 Crack Key
Features:
Smart Task Manager
PVACreator allows you to create/manage/run/pause/resume multi-accounts creating tasks at the same time. Every task has full stats of account creating, you can manage and check everything easily.
Auto/Custom Data Settings
PVACreator can create randomly datas like first name, last name, sex and age etc… to create your accounts, you can also import yourself data to create your accounts.
Customized Save Settings
You can custom the register information to save, like you can only save username and password, or you can also set to save username, password, register proxy, register phone number, first name, last name and others. All information can be saved with created accounts if you want.
Captcha Auto-Solving and Proxy Support.
PVACreator can solve captcha automatically when register accounts, and you can import proxies to use in PVACreator for creating many accounts.
Phone Verify Automatically
PVACreator can get phone numbers and receive sms to verify your accounts automatically.
Auto-Confirm Email
When some sites need email confirmation, PVACreator can do this for you automatically too.
Multi-Threads Support
You can set PVACreator to run with multi-threads to speed up the registration and create accounts for different sites at the same time.
Lifetime Free Update
Some sites update often, the software need keep to update for work, we provide all update freely and we update our software very fast once there is any site updated.
Deluxe Version Contains all current sites and future sites in update.
$918 one time fee
Instagram Version Only for Instagram
$113 one time fee
Youtube Version Only for YouTube
$113 one time fee
Gmail Version Only for Gmail
$113 one time fee
Twitter Version Only for Twitter
$113 one time fee
Outlook Version Only for Outlook
$113 one time fee
LinkedIn Version Only for LinkedIn
$113 one time fee
Facebook Version Only for Facebook
$79 one time fee
Pinterest Version Only for Pinterest
$79 one time fee
Reddit Version Only for Reddit
$79 one time fee
SoundCloud Version Only for SoundCloud
$79 one time fee
Slickdeals Version Only for Slickdeals
$79 one time fee’
Amazon Version Only for Amazon
$56 one time fee
(GET) PVA Creator Deluxe v2.5.0 Cracked – Best PVA Account Creator – Gmail – Instagram
Mass Gmail Account Creator 2 1 77 Crack Download
This content is locked
Login To Unlock The Content!
Mass Gmail Account Creator 2 1 77 Crack Windows 7

PVA Creator Deluxe v2.5.0 Cracked,PVA Account Creator – Gmail – Instagram – Facebook – Twitter – Reddit – Facebook – Pinterest – Tumblr – YouTube – Outlook – Hotmail – Soundcloud – Slickdeals – Amazon – LinkedIn,PREMIUM SEO TOOLS, SEO TUTORIALS, E-COMMERCE FORUM, BEST CPA NICHES, MAKING MONEY ONLINE METHODS, BACKLINKS, AFFILIATE MARKETING, DROPSHIPPING & ELITE PROXIES,Autland, AUTLAND CRACK, email marketing, Extrator, facebook, Instagram, LinkedIn, micro-social 19.1 CRACKED, MicroSocial,Micro Social, OLX Extrator, seo, SMS envios em Massa, Software, Twitter, WebMotors, Whatsapp, Youtube Marketing
Mass Gmail Account Creator 2 1 77 Crack Download
Related posts:
0 notes
Text
Office 2016 Mac Gratis
-->
Sorry this link in this video not working anymore therfore made new video with new links which working 100% be pacient and follow this video link:https://www. 8/10 (105 votes) - Download Microsoft Excel Mac Free. Microsoft Excel 2016 for Mac is the tool belonging to Microsoft Office to deal with large volumes of numerical data with great comfort and flexibility. If we talk about spreadsheets, we definitely need to mention the program par excellence. Office 2016 include applications such as Word, Excel, PowerPoint, and Outlook. They’re available as a one-time purchase for use on a single PC. Microsoft 365 plans include premium versions of these applications plus other services that are enabled over the Internet, including online storage with OneDrive and Skype minutes for home use.
Note
Office 365 ProPlus is being renamed to Microsoft 365 Apps for enterprise. For more information about this change, read this blog post.
Summary
Existing Office 2016 for Mac customers will be seamlessly upgraded to 64-bit versions of Word, Excel, PowerPoint, Outlook, and OneNote as part of the August product release (version 15.25). This affects customers of all license types: Retail, Office 365 Consumer, Office 365 Commercial, and Volume License installations.
Deployment options for the 64-bit update
AutoUpdate (MAU)
Customers who use Microsoft AutoUpdate (MAU) to keep their Office applications up-to-date will see a 'regular' monthly update notification when their selected channel is upgraded to 64-bit builds. Depending on which version is installed on the local computer, MAU will offer either a delta or full update. The update package size does not change between 32-bit and 64-bit versions. Also, MAU can deliver a delta update when applicable to update a user from 32-bit to 64-bit applications. Therefore, customers won't experience a sharp increase in download activity. For the release to the Production channel, customers will see '(64-bit)' in the update title to make them aware that this is a 64-bit update.
For information about how to use the MAU, see Check for Office for Mac updates automatically.
Manual updates
The August release of Office for Mac is available for manual download. The following file provides a 64-bit package to replace existing 32-bit applications with 64-bit variants during installation:
Download the Microsoft Office 2016 for Mac August update package now.
Virus-scan claim
Microsoft scanned this file for viruses, using the most current virus-detection software that was available on the date that the file was posted. The file is stored on security-enhanced servers that help prevent any unauthorized changes to it.
Volume License Service Center
Download Office 2016 Gratis

Volume License customers typically get their Office 2016 software from the Volume License Service Center (VLSC). These builds are refreshed infrequently and are typically aligned with new language editions. The VLSC will continue to offer 32-bit installers (15.23) until November 2016. However, all updater packages that are released after August will be based on 64-bit builds. Therefore, a VLSC customer who updates either manually or through AutoUpdate will be transitioned to 64-bit builds.
More Information
64-bit only
The Mac operating system has been 64-bit for several years. Unlike for Windows, there's no choice between running a 32-bit or 64-bit version of the Mac operating system. Similarly, we won't offer a choice between 32-bit and 64-bit versions of Office 2016 for Mac. After each 'channel' is transitioned per the rollout schedule, only 64-bit builds will be available.

Effect on third-party applications and add-ins
The transition to 64-bit Office for Mac was announced in April 2016. IT Pros will want to understand which compiled add-ins are deployed to the users whom they manage so that they can assess the effect of the upgrade. The following Microsoft Office website summarizes the issues that affect the more common add-ins that are used together with Office 2016 for Mac:
Tools for inspecting product architecture
To verify the architecture of an Office application (that is, to understand whether you have a 32-bit or 64-bit build), start the application, open the Activity Monitor, and then enable the Kind column.
You can also use the file command in a terminal session to inspect the binary. For this use, type file -N <path of binary>.This method can be used with for any binary file, including third-party add-ins.
The file command returns one of three values.
Return valueMeaningMach-O 64-bit executable x86_6464-bit binaryMach-O executable i38632-bit binaryMach-O 64-bit executable x86_64FAT binary (compatible with both 32-bit and 64-bit processes)Mach-O executable i386FAT binary (compatible with both 32-bit and 64-bit processes)
Options for reverting to 32-bit installations
There may be situations in which the customer has to change code that's not 64-bit ready. If customers can't immediately move forward to 64-bit builds, we will make available a one-time 32-bit update for the 15.25 release in addition to the default 64-bit updates. The 32-bit updates will be available only for manual download from the Office CDN.
The latest 32-bit release of Office 2016 for Mac (15.25.160818) can be downloaded from https://go.microsoft.com/fwlink/?LinkId=823192.

Customers who manually install the 32-bit release won't be offered the 64-bit version of 15.25 through MAU. However, MAU will offer the 64-bit version of 15.26 in September 2016. Therefore, customers have a limited time to remain on 32-bit builds.
If a customer has already upgraded to the 64-bit update of Office for Mac 15.25 and wants to revert to the 32-bit version, follow these steps:
Exit all open Office 2016 applications.
Start Safari, and then browse to https://go.microsoft.com/fwlink/?LinkId=823192 to start the download of the 32-bit installer.
Double-click the downloaded package, and then follow the instructions.
Office 2016 Mac Free Activation
The 64-bit installation has a build date of 160817. The 32-bit version has a build date of 160818.
0 notes
Text
Minitool Partition Wizard The Specified Disk Is Too Small

Summary :
You would have said, what is the size of the current system partition (which You are trying to migrate) and how it really is employed. Have you been offered to reduce the size of the partition, but if You have there information, more than 120 gigs, first seek that from there you can transfer to another drive / partition.
I have tried formatting the SD card using the disk management, and the MiniTool Partition wizard, and the disk management method gives me a 'Could not complete format' error, and the MiniTool tells me it has changed, yet when I go on disk management it hasn't. Once installed, Open Partition Wizard and Shrink your system volume, C: in my case, by 101MB at the beginning of the partition. (I had to put 101MB as when I tried 100 it said that the space was too small when doing the next step) To do this, Right Click the C: Drive, select, Move/Resize, and the put 101 in box named 'Unallocated Space Before. MiniTool Partition Wizard offers lots of useful disk and partitioning functions that Windows Disk Management can’t give. For example, Disk Management doesn’t allow users to revert a dynamic disk to basic disk while MiniTool Partition Wizard can achieve this easily via the function “Convert Dynamic Disk to Basic“. And its powerful.
Are you using a traditional hard drive but find the computer runs slowly? Are you about to clone a hard drive to an SSD but the SSD is smaller? Here, hard drive cloning software - MiniTool ShadowMaker or MiniTool Partition Wizard will help you to clone HDD to smaller SSD easily and successfully.
Quick Navigation :
Can I Clone Hard Drive to Smaller SSD
Disk cloning has become a good way to transfer all contents including system, settings, programs, and data from a hard drive to another disk. In today’s era, disk cloning is public demand and you are required to do disk cloning in many cases, for example, upgrade your disk, make a backup and more.
In general, many users decide to clone a hard drive to SSD or migrate OS from HDD to SSD because of the fast read-write speed of SSD so that Windows can boot up in a few seconds.
Then, a question comes up: what if the disk capacity of an SSD is smaller than a traditional HDD? This is bothering the majority. Let’s see a true case:
“I am attempting to upgrade several computers from HDD to SSD and would like to use a stand-alone cloner to do so. The problem is that all of the SSD's are of smaller capacity than the HDD's and the cloners that I have found do not allow for this. Does anyone know of a stand-alone cloner that would allow me to do this?” tomshardware
Download Minitool Partition Wizard 9.1
Are you facing the same situation? Is it possible to finish the disk cloning from a large HDD to smaller SDD? Actually, it can be done with ease. Here, let’s focus on the effective methods now.
How to Clone Hard Drive to Smaller SSD
Based on user feedback, it is not easy to clone a large disk to a smaller one. In the software market, you will find there are many types of hard drive cloning software, however, most software only supports cloning a small disk to a larger one. Well then, is there any available tool for this job?
Of course, MiniTool Solution Ltd. has released two programs including MiniTool ShadowMaker and MiniTool Partition Wizard. Right now, let’s see some detailed information.
Note: Prepare an SSD in advance. Note that MiniTool Programs can work only if the used space on your HDD is equal to or less than the capacity of the SSD. For example, HDD is 1TB and its used space is 200GB, then, it is OK to prepare a 500GB SSD.
Clone HDD to Smaller SSD Using MiniTool ShadowMaker
Minitool Partition Wizard Free 10.3
Is MiniTool ShadowMaker suitable for you to clone a disk from large to smaller? Maybe this is the thing you want to know.
At first glance, you can find it is a good piece of Windows backup software mainly for important files, Windows OS, partition or disk on your computer.
As a matter of fact, it also offers you a powerful feature called Clone Disk, enabling you to transfer the entire system disk or data disk to HDD or SSD although the hard drive is smaller than the original disk in Windows 10/8/7.
Right now, download the Trial Edition of this SSD cloning software from the following button to start to clone HDD to smaller HDD or directly use its Professional Edition for cloning.
How to clone a hard drive to SSD free in Windows 10/8/7? MiniTool software offers the best way to clone a hard drive from HDD to SSD or a new one.
Step 1: Connect the SSD that has enough disk space to your computer. Then, double-click on the program icon and then enter the main interface.
Tip: MiniTool ShadowMaker only allows you to control a PC on the same LAN. If you have a need, type a correct IP in the textbox and click Connect to continue.
Step 2: Then, perhaps you will ask where the cloning feature is. Please navigate to Tools tab located in the toolbar, and then click Clone Disk module to start to clone large HDD to smaller SSD.
Step 3: After that, for a hard drive cloning, it is necessary to choose the large source disk and the smaller target disk.
Tip:
1. MiniTool ShadowMaker allows cloning a system disk or a data disk to another hard drive. Relatively speaking, it is common to choose a system disk as the source disk.
2. Select the SSD you have connected to your PC as the target disk to save the copy.
After the selections, Click OK to continue. A warning will appear, saying all target disk contents will be deleted. Well then, ensure that no important files are saved on the SSD or use MiniTool ShadowMaker to make a backup at once.
Step 4: In the process page, all the information about the cloning will be listed including the source disk, destination disk, cloning elapsed time and remaining time.
If you can't wait for the cloning to complete, click the button Shut down the computer when the operation is completed in advance. Conversely, please wait patiently.
Tip: After some time, the copy operation will be finished. Then, you will receive some information as shown below: please remember to disconnect either the original hard drive or the target hard drive. Once both the original and target disks are connected to the computer, Windows will mark one disk as offline.
There are some details that you should know:
To replace large HDD with smaller SSD, for a laptop, you can shut down it, remove the source disk, and then put the smaller SSD containing system disk copy to the original location. Then, boot your laptop to enjoy the good performance of SSD.
If you use a desktop and want to use both the large HDD and small SSD, just enter BIOS to change the boot order so as to boot your computer from the SSD.
Are you searching for a way to clone HDD to smaller SSD? Just get MiniTool ShadowMaker Trial Edition and install it on Windows 10/8/7. Besides, you can also share this professional cloning software to Twitter so that it can help your friends out.
Clone Large HDD to Smaller SSD via MiniTool Partition Wizard
In addition, MiniTool is also the developer of MiniTool Partition Wizard which is specially designed to cope with many disk issues, for instance, low disk space warning, the Format did not complete successfully issue, can't read from the source file or disk error and so forth.
Besides, it can also be a piece of hard drive cloning software. With its powerful features, you are able to perform a cloning operation in the most user-friendly way. What's more, it supports mainstream operating systems including Windows 10/8/7, etc.
To clone HDD to smaller SSD, get its Free Edition from the following button first and foremost, install it on your PC and have a try. If you want to clone your system disk, use its Pro Edition due to the edition limitation.
Step 1: Run MiniTool Partition Wizard to its main interface, you can see many useful functions displayed. To clone to smaller SSD, here use its Copy Disk function and the following interface shows you how to get it:
Step 2: Select a target disk and here it should be the smaller SSD connected to your PC. Then, click Next to proceed. A warning will appear and tell you the process will destroy all data on the SSD. For a successful cloning operation, click the Yes button. Please make sure no important data is put in this SSD.
Step 3: Then, there are two copy options listed in the following interface. But you are only allowed to choose Fit partitions to entire disk when you choose to clone to smaller SSD. This is the thing you should pay attention to.
Besides, for the target disk SSD, we suggest checking Align partitions to 1MB to improve performance. Moreover, if you attempt to clone system disk to the SSD with GPT partition style, Use GUID Partition Table for the target disk is helpful.
Step 4: The following page will show you how to boot from the destination disk. If you are cloning the system disk, pay more attention to this notice.
Step 5: MiniTool Partition Wizard will return to its main interface. Here, you can preview all the changes you are going to make to the smaller SSD. Just make a confirmation, then, press Apply to bring all operations into effect.
To clone HDD to smaller SSD, in addition to the Copy Disk feature of MiniTool Partition Wizard, Migrate OS to SSD/HD Wizard is still available. After clicking it in the toolbar, you are required to choose one migration way:
If you want to replace your system disk with another hard disk, A can help to copy all the partitions on the system disk.
If you decide to only move operating system from HDD to smaller SSD, choose B.
Then, begin the migration according to its instructions. This post - How Can You Migrate Windows 10 to SSD without Reinstalling OS gives you more information.
MiniTool ShadowMaker VS Partition Wizard
In the second part, we have walked you through how to clone HDD to smaller SSD by means of MiniTool programs. In all probability, you feel curious about which one you should use. Let’s see some details.
MiniTool ShadowMaker enables you to clone a hard drive which can be system disk and data disk to smaller SSD. This feature is powerful to transfer all disk data to another hard drive. Note that, this PC clone software only allows cloning the entire disk.
MiniTool Partition Wizard has two helpful functions: Copy Disk is suitable for the entire disk cloning including system disk and data disk. This is the same as MiniTool ShadowMaker. Besides, this tool offers you an additional feature to only move system required partitions from HDD to SSD. But you need to pay for the Pro Edition for these features.
Both of them support booting your computer from the target disk after disk cloning. Which one do you prefer? Just get the appropriate tool based on your needs to begin the cloning and then enjoy the fast read-write speed.
Buy the Right SSD
Knowing the way to clone HDD to smaller SSD, it is necessary for you to choose the right SSD for disk cloning. Here are the top sellers on Amazon for you to choose from:
Product NameIntel 660p Series (1TB) SSDCorsair MP500 (480GB) SSDSamsung 860 EVO (250G) SSDSamsung 970 EVO NVMe (500GB) SSDAdata SU800 SATA (1TB) SSDBrandIntelCorsairSamsungSamsungAdataCapacity1TB480GB250GB500GB1TBI/O SpeedUp to 1,800MB/sUp to 3,000MB/sUp to 550MB/sUp to 3500MB/sUp to 560MB/sProsVery good NVMe performance most of the time.
Extremely affordable.
5-year warranty.
Black printed circuit board.
Copper strip technology.
High-Performance.
NVMe-Enabled.
Good overall performance.
Outstanding endurance rating.
Samsung Magician software.
Hardware-Based encryption.
Package with DRAM cache and cloning.
5-year warranty.
Affordable (relatively) NVMe drive.
Excellent sequential reads
Available in up to 2TB capacity.
Almost 50% shorter file transfer times.
5-year warranty.
Adata SSD Toolbox.
Acronis Data Migration.
Fair pricing.
ConsSlows to 100MBps writing during very long transfers.
High initial pricing.
Low warranty terms.
Lack of progress for the E7 controller.
Expensive.
Slows to just over 600MBps after cache is exceeded.
Occasionally trails 960 Pro.
Lower capacities could be cheaper.
Micron 384Gbit 3D TLC NAND.
Low throughput.
High latency.
Low notebook battery life.
Rating StarBuyBuy on AmazonBuy on AmazonBuy on AmazonBuy on AmazonBuy on Amazon
Bottom Line
Above is all the information about the cloning from large HDD to smaller SDD, including the reason for cloning to SSD, ways to clone HDD to smaller SSD and the difference between two great hard drive cloning tools developed by MiniTool Team. Hope you can benefit from this article.
If you have any problems during the process of using our software, please let us know by writing your issues in the following comment section. Or, you can contact our support team via (email protected). Besides, all suggestions are welcome. We will reply to you as soon as possible.
Clone HDD to Smaller SSD FAQ

Of course, you can clone a larger HDD to a smaller SSD, provided that the target SSD has enough space to hold the original content of the HDD.
How do I clone my hard drive to a smaller SSD for free?
You can use MiniTool ShadowMaker to easily clone your hard drive to a smaller SSD for free. Just get it, use the Clone Disk feature, choose the source & target disk, and start the cloning.
If your 500GB SSD has enough disk space to hold the content of the 1TB HDD, you can perform the cloning operation.
MiniTool ShadowMaker is a professional hard drive cloning software that allows you to easily clone HDD to SSD.
1 note
·
View note