
Last Seen Blogs

jimmersutherland
Untitled
jimmersutherland
Untitled

wings-dings-and-iggyfings
Even the Noblest Soul can be Broken

yirangkimart
YIRANG'S ART BLOG

digitalmarketng21
Untitled
Link
Humbuger soup. This is the perfect dish to make when it's cold outside. I made this glorious hamburger soup yesterday for three very important reasons: One, it was so ding dang cold outside. This hearty hamburger soup is loaded with potatoes and vegetables, all in a savory broth.

This Hamburger Soup recipe is make ahead friendly, reheats beautifully and wonderfully versatile. Hamburger Soup - loaded with flavorful lean ground beef, hearty vegetables like potatoes and carrots, and full of rich flavor. It's easy to throw together and a perfectly comforting soup!
Hello everybody, it's Jim, welcome to my recipe page. Today, I will show you a way to prepare a distinctive dish, humbuger soup. One of my favorites. This time, I'm gonna make it a bit tasty. This will be really delicious.
This is the perfect dish to make when it's cold outside. I made this glorious hamburger soup yesterday for three very important reasons: One, it was so ding dang cold outside. This hearty hamburger soup is loaded with potatoes and vegetables, all in a savory broth.
Humbuger soup is one of the most popular of recent trending meals on earth. It is appreciated by millions every day. It's simple, it is fast, it tastes delicious. Humbuger soup is something that I have loved my entire life. They're fine and they look fantastic.
To begin with this recipe, we have to first prepare a few components. You can have humbuger soup using 10 ingredients and 7 steps. Here is how you can achieve that.
The ingredients needed to make Humbuger soup:
{Get 2 tablespoons of cooking oil.
{Prepare 1 of large onion chopped.
{Take 2 of large tomatoes chopped.
{Get 3 cloves of garlic crashed.
{Get 1/4 of red meat cubed.
{Get 2 of large potatoes ficed.
{Make ready 1 glass of corn.
{Prepare 1 glass of green peas.
{Prepare 1/2 of couriflower.
{Make ready 1 teaspoon of salt.
This hamburger soup recipe is a simple and hearty meal made with ground beef, potatoes, and a delicious tomato broth. It's sure to become a family favorite! Thank you guys for clicking on this video and sharing this moment with us. You could have been anywhere in the work but you chose to be with us and we thank.
Instructions to make Humbuger soup:
Pour the oil into the pan and let it catch medium heat. Add onions and stirr for a 30sec..
Add the meat and cover. Let it cook till it's tender..
Add the tomatoes and garlic. Stirr and cover for a min..
Add the potatoes. Stirr and cover for 3min..
Add the corn and green peas and stirr. Add water and some salt to taste..
Add the couriflower and the water..
Cook for 4 mins. Serve while hot..
What's really nice about Hamburger Soup is that you can subtract or add any ingredient that you wish. I use cubed potato and add the liquid from the canned veggies use low-salt beef broth make a. Hamburger Soup from Delish.com has everything but the buns. It's an easy ground beef tomato-based soup that will warm you up all winter long. This Cozy Hamburger Soup = Comfort Food To The Max.
So that is going to wrap it up with this special food humbuger soup recipe. Thank you very much for your time. I am sure that you will make this at home. There's gonna be interesting food at home recipes coming up. Don't forget to save this page on your browser, and share it to your family, friends and colleague. Thank you for reading. Go on get cooking!
0 notes
Link
Su-Buta (Sweet and Sour Pork).
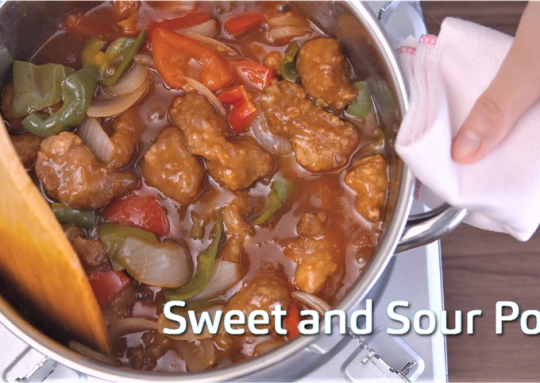
Hello everybody, it is Jim, welcome to our recipe page. Today, we're going to make a distinctive dish, su-buta (sweet and sour pork). One of my favorites food recipes. This time, I am going to make it a bit unique. This will be really delicious.
Su-Buta (Sweet and Sour Pork) is one of the most favored of recent trending foods in the world. It's easy, it's quick, it tastes delicious. It is enjoyed by millions every day. Su-Buta (Sweet and Sour Pork) is something which I have loved my whole life. They're fine and they look fantastic.
To get started with this particular recipe, we have to first prepare a few components. You can have su-buta (sweet and sour pork) using 23 ingredients and 10 steps. Here is how you cook that.
The ingredients needed to make Su-Buta (Sweet and Sour Pork):
{Make ready 420 g (14.8 oz) of pork loin.
{Take 1 of onion (medium size).
{Make ready 4-5 of green japanese bell peppers (or 2 green bell peppers).
{Make ready 1 of red bell pepper.
{Take of oil for frying : adjust to suit your needs.
{Make ready of about 8-10 Tbsp potato starch (for marinated pork).
{Take 1 Tbsp of potato starch and 1 Tbsp water (for sweet and sour sauce).
{Prepare 1/2 Tbsp of sesame oil.
{Make ready of ■Marinade for pork.
{Make ready 1 Tbsp of cooking sake.
{Get 1 Tbsp of soy sauce.
{Prepare 1 tsp of cane sugar.
{Get 1 tsp of sesame oil.
{Get 1 of thumb-size piece of ginger (1 Tbsp grated ginger).
{Make ready of ■Sweet and sour sauce.
{Make ready 170 ml (5.8 fl oz) of water.
{Get 50 ml (1.7 fl oz) of cooking sake.
{Prepare 65 ml (2.2 fl oz) of apple cider vinegar.
{Get 65 ml (2.2 fl oz) of black rice vinegar.
{Take 60 g of (2.1 oz, 5 Tbsp) cane sugar.
{Take 1.5 Tbsp of soy sauce.
{Make ready 75 g of (2.6 oz, 5 Tbsp) ketchup.
{Prepare of ※You can use cornstarch instead of potato starch.
Instructions to make Su-Buta (Sweet and Sour Pork):
★Recipe video★ (my You Tube channel)→https://youtu.be/Ih5WVHw3YTw.
Combine all sweet and sour sauce ingredients ; water, cooking sake, apple cider vinegar, black rice vinegar, cane sugar, soy sauce and ketchup. Stir well until the sugar is dissolved. Leave it until you use..
Cut green bell pepper and red bell pepper in half and get rid of the seeds. Cut them into bite-size pieces. Cut a onion into bite-size pieces. Put the green bell pepper in a bowl and red bell pepper and onion in the another bowl. Set aside..
Combine all marinade ingredients, grated ginger, soy sauce, cooking sake, cane sugar, sesame oil. Set aside. Pat the pork dry with paper towel. Pare away excess fat from the pork..
Cut the pork into thick slices. Poke holes into each slice with fork. Pound each slice lightly with the back of the knife..
Cut the pork into bite-size chunks. Mix the pork with the marinade..
Heat the oil for frying in a frying pan over medium high heat. Toss the pork in the potato starch to coat. Deep fry the pork over medium heat (170℃, 338F) for 4-5 mins until evenly browned or crisp. Drain excess oil..
Deep fry the green bell pepper over medium heat for 30 sec. Deep fry red bell pepper and onion over medium heat for a min. Drain the oil on paper towels..
Mix 1 Tbsp potato starch and 1 Tbsp water ; set aside. Pour the sweet and sour sauce in a large pot and heat it. When the sauce boils, stir the potato starch and water mixture until smooth. Turn off the heat and add the mixture to the sauce while stirring the sauce. Stir it well until smooth..
Put the fried vegetables and pork in and mix roughly. Heat it over medium heat for 3 mins and bring to a boil while mixing the bottom sometimes to prevent scorching. Turn off the heat and add 1/2 Tbsp sesame oil and mix roughly (in the video of youtube, it completely slipped my mind). It's all done!.
So that's going to wrap it up with this exceptional food su-buta (sweet and sour pork) recipe. Thanks so much for your time. I'm sure you can make this at home. There is gonna be more interesting food in home recipes coming up. Remember to bookmark this page on your browser, and share it to your family, friends and colleague. Thank you for reading. Go on get cooking!
0 notes
Link
Egg bhajji. Please subscribe our channel and press bell iconLike share and comment. Here comes the all time favorite irresistible snack Egg Bhajji / Mutta Bhajji recipe. It is really quick, tasty and simple to prepare at home.

It is sometimes compared with the Parsi dish akuri. The difference lies in its preparation and addition of sautéed chopped onions, chilies and optional spices. Egg bhajji - Bhajji made of rice powder and maida - It is something different.
Hey everyone, I hope you're having an amazing day today. Today, I will show you a way to prepare a distinctive dish, egg bhajji. It is one of my favorites food recipes. This time, I will make it a little bit tasty. This will be really delicious.
Egg bhajji is one of the most well liked of recent trending meals on earth. It is appreciated by millions daily. It's easy, it is quick, it tastes delicious. They're fine and they look wonderful. Egg bhajji is something that I have loved my whole life.
Please subscribe our channel and press bell iconLike share and comment. Here comes the all time favorite irresistible snack Egg Bhajji / Mutta Bhajji recipe. It is really quick, tasty and simple to prepare at home.
To begin with this particular recipe, we must prepare a few components. You can have egg bhajji using 13 ingredients and 4 steps. Here is how you can achieve it.
The ingredients needed to make Egg bhajji:
{Take 6 of Eggs.
{Make ready 1 cup of Besan flour.
{Take 1/2 cup of Rice flour.
{Take 2 tsp of Corn flour.
{Make ready 1/2 tsp of Cooking soda.
{Prepare 1/4 tsp of Hing.
{Make ready 1 tsp of Ajwain.
{Prepare 2 tsp of Mild Chilli powder.
{Make ready As needed of Water.
{Make ready As needed of Salt.
{Make ready 2 tsp of Ghee.
{Get As needed of Oil.
{Take 2 tbsp of Hot oil.
Then make a batter of rice powder and maida. Egg bhurji recipe - Indian style spiced scrambled eggs popularly known as Anda bhurji. Anda is a Hindi word that translates to eggs and bhurji refers to scramble. Egg bhurji is the easiest you can make.
Steps to make Egg bhajji:
Hard boil the eggs, peel and keep aside. Let it get cool..
In a mixing bowl, mix gram flour, rice flour, red chilli powder, cooking sods, hing, salt, corn flour, hot oil and ghee. Ghee gives extra flavour to the recipe. It's completely optional. Add water little by little and prepare the batter. Batter should not be too thick or too runny. Keep this aside for 10 min..
Now take the eggs if it is not dried use tissue to remove the moisture. Slice the egg thinly. I used egg slicer to get perfect shape..
Heat oil in wide kadai which is little deep. When it's hot carefully dip every single slices in batter and deep fry in the oil, until crispy on both sides. Once done, dry he excess oil in tissue and serve hot with ketchup or any chutney. You can sprinkle some chat masala if you want..
Egg Bajji is one of my all time favourite. Traditionally it is made with gram flour batter, but i like to play around and made using all purpose flour and it turns out so tasty and the taste was very different. Egg Biryani Recipe - How to make Egg Biryani. Lets see how to prepare an easy quick snack with left over hard boiled eggs. It is one of my favorite egg snack after egg kabab.
So that's going to wrap it up for this exceptional food egg bhajji recipe. Thanks so much for reading. I'm confident that you will make this at home. There's gonna be interesting food in home recipes coming up. Remember to bookmark this page in your browser, and share it to your family, colleague and friends. Thank you for reading. Go on get cooking!
0 notes
Link
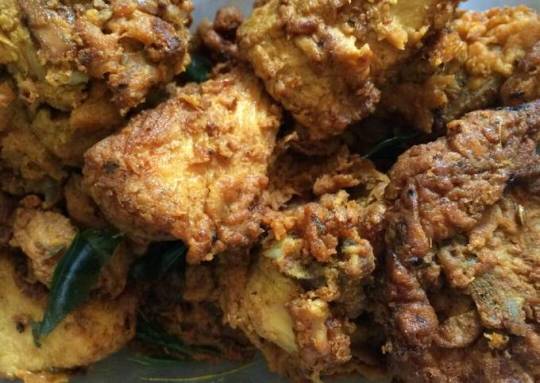
Fish Fry.

Hey everyone, hope you're having an incredible day today. Today, I will show you a way to prepare a special dish, fish fry. It is one of my favorites food recipes. This time, I am going to make it a little bit tasty. This is gonna smell and look delicious.
Fish Fry is one of the most well liked of current trending foods in the world. It's enjoyed by millions every day. It's simple, it is quick, it tastes delicious. Fish Fry is something that I have loved my entire life. They're nice and they look wonderful.
To begin with this particular recipe, we must first prepare a few components. You can have fish fry using 13 ingredients and 5 steps. Here is how you cook it.
The ingredients needed to make Fish Fry:
{Take of Fish.
{Prepare of Cooking Oil.
{Take of Rice Flour.
{Get of Yellow Colour.
{Get of Maida Flour.
{Prepare of Corn Flour.
{Take of Salt as per taste.
{Take of Red Chilli Crushed.
{Prepare of Ajwain.
{Get of Whole Cumin.
{Get of Black Pepper Crushed.
{Get of Cumin Powder ½ tsp Lemon Juice 2 tbsp.
{Get of Ginger & Garlic Paste.
Instructions to make Fish Fry:
1-Sab se pehle fish main namak laga kar rakh dain 15 se 20 minute ke liye..
2-Ek bowl main lasan lal mirch namak ko mix kar lain..
3-Machli ko dho kar us par sara masala achi tarhan se laga kar ek ghantay kai lye rakh dain..
4-Deep fry kejeay yahan take kai golden brown colour ajaye..
Now fish is ready to serve..
So that's going to wrap it up with this exceptional food fish fry recipe. Thank you very much for your time. I am sure that you will make this at home. There is gonna be interesting food in home recipes coming up. Don't forget to bookmark this page on your browser, and share it to your family, colleague and friends. Thank you for reading. Go on get cooking!
0 notes
Link
Mike's Crispy Orange Chicken. Easy Orange Chicken Recipe This crispy Orange Chicken Recipe is better than taking out with a sweet and slightly spicy orange or a heavy bottomed pot, add a few tablespoons of canola oil to a skillet with high edges and cook the chicken on all sides until browned and crispy. Crispy orange chicken in a sweet, sticky sauce made with ginger, garlic and fresh orange juice is the better-than-takeout dinner your family will love. The corn starch adds extra crispiness once fried.

Orange Chicken is a Chinese-inspired dish made with breaded fried chicken in orange sauce. With this easy recipe, make your own restaurant-quality version! #orangechicken #chickenrecipes #chinesefoodrecipes #sweetandsavorymeals #recipevideo. Crispy fried chicken with a sweet and tangy orange sauce.
Hello everybody, I hope you are having an amazing day today. Today, I'm gonna show you how to make a special dish, mike's crispy orange chicken. It is one of my favorites food recipes. For mine, I am going to make it a little bit unique. This will be really delicious.
Mike's Crispy Orange Chicken is one of the most well liked of current trending foods on earth. It's appreciated by millions daily. It is simple, it is fast, it tastes yummy. Mike's Crispy Orange Chicken is something which I've loved my whole life. They are fine and they look wonderful.
Easy Orange Chicken Recipe This crispy Orange Chicken Recipe is better than taking out with a sweet and slightly spicy orange or a heavy bottomed pot, add a few tablespoons of canola oil to a skillet with high edges and cook the chicken on all sides until browned and crispy. Crispy orange chicken in a sweet, sticky sauce made with ginger, garlic and fresh orange juice is the better-than-takeout dinner your family will love. The corn starch adds extra crispiness once fried.
To begin with this recipe, we must first prepare a few ingredients. You can have mike's crispy orange chicken using 27 ingredients and 9 steps. Here is how you can achieve that.
The ingredients needed to make Mike's Crispy Orange Chicken:
{Take of Crispy Chicken Coating [mix everything together except for eggs & oil. eggs beaten separately. oil for frying].
{Make ready 1 cup of Plain Panko Bread Crumbs.
{Take 1/2 cup of All Purpose Flour.
{Take 1 cup of Corn Starch.
{Get of Salt.
{Take 2 large of Eggs [beaten].
{Make ready 2 cup of Cooking Oil [high heat oil].
{Make ready of Chicken.
{Get 2 large of Boneless Chicken Breasts [rinsed - fat trimmed - cut into 1" cubes].
{Prepare of Sweet Orange Marinade & Sauce [mix everything together well].
{Make ready 1 cup of Chicken Broth.
{Prepare 1/2 cup of Fresh Squeezed Orange Juice [with pulp].
{Prepare 1/3 cup of White Distilled Vinager.
{Take 1/2 cup of Granulated Sugar.
{Take 1/4 cup of Soy Sauce.
{Get 1 tbsp of Fine Minced Garlic.
{Take 1 tbsp of Orange Zest.
{Take 1 tbsp of Siracha Garlic Chili Sauce.
{Make ready 1/2 tsp of Fine Minced Ginger.
{Take 1/4 tsp of White Pepper.
{Make ready 1/2 tsp of Red Pepper Flakes [optional].
{Prepare of Sweet Orange Marinade & Sauce Thickener [mix well].
{Make ready 2 tbsp of Corn Starch [+ 2 tablespoon water].
{Get of Garnishments.
{Prepare of Toasted Sesame Seeds.
{Prepare of Orange Wedges.
{Take of Chives.
They are obsessed with orange chicken but I am never really sure what's in it….especially if they get it from a drive-thru. I wanted to create a version at home, made from scratch, with all-natural ingredients. Crispy orange chicken is made from tender chunks of chicken thighs, coated in crispy panko breadcrumbs and oven baked for extra crunch. Team with a bowl of chinese fried rice, smother in tangy orange sauce, and you have a quick and easy Chinese inspired meal that you'll want to make again.
Instructions to make Mike's Crispy Orange Chicken:
Rinse chicken. Trim any fat. Cut into 1" cubes. Place in a Ziplock bag or, sealed bowl..
Mix everything in the Sweet Orange Marinade & Sauce section well. Add 1/2 to 2/3 cup of your marinade to your chicken cubes in your Ziplock bag. Refrigerate for 1 hour minimum. Longer if possible. Massage chilled bag intermittently. Refrigerate your remaining marinade as well. I allow my chicken to marinate for up to 4 hours..
Tip: To get the most juice out of your oranges, microwave them for 1 minute, roll them hard with your palm of your hand, then squeeze juices out. This method works well with most any citrus fruit. Watch out for any seeds!.
Drain your chicken pieces. Discard juices. Dab chicken dry with a clean paper towel..
Mix everything in the Crispy Chicken Coating section. Except for eggs and oil. Beat eggs in a seperate bowl. I'll usually add the zest of another orange to my flour mixture for that extra kick but, it's not necessary..
Dip your [dabbed dry] chicken pieces in your egg mixture then, press chicken firmly in your flour / panko / corn starch mixture. Fully coat..
Fry coated chicken pieces on high heat in a wok or frying pan for about 3 minutes. Flip pieces once during frying time. Drain cooked pieces on clean, absorbant paper towels..
Heat up your marinade sauce in a pan. Bring it to a steady simmer. Then, slowly add your thickener [2 tbs corn starch + 2 tbs water] and stir until your sauce reaches your desired thickness or consistency..
Drizzle your sweet orange sauce over your crispy chicken or, just lightly toss them all up in a larger bowl. Either way, serve immediately on a bed of fluffy rice or, chow mein. Serve soy sauce to the side! Enjoy!.
Crispy chicken is coated in a sweet orange soy glaze to create one of our favorite new meals, Crispy Orange Chicken. It's cheaper and healthier than the takeout version and tastes way We generally try to avoid frying things but this chicken is shallow fried so it's not crazy excessive in the oil department. This Crispy Orange Chicken is my stay-in version of the well-known Chinese take-out dish. The chicken gets its fabulous crunch from a coating of egg whites and cornstarch. Note: The above video will explain the entire recipe for Crispy Orange Chicken.
So that's going to wrap it up with this special food mike's crispy orange chicken recipe. Thank you very much for reading. I am sure that you can make this at home. There's gonna be more interesting food at home recipes coming up. Remember to save this page in your browser, and share it to your family, friends and colleague. Thank you for reading. Go on get cooking!
0 notes
Link
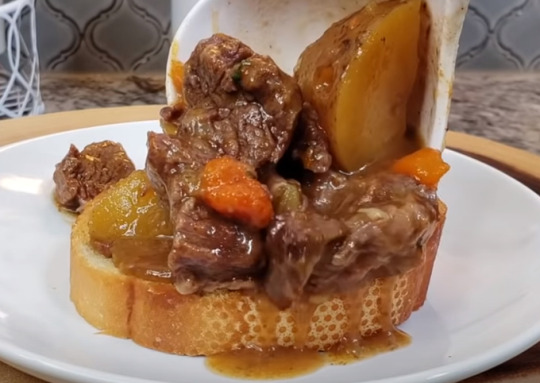
Pressure Cooker Beef Stew. This beef stew was made for us when we were just infants. Beef, carrots and potatoes taste like they simmered all day, but this is ready in about half an hour. This Pressure Cooker Beef Stew is a classic, old-fashioned recipe, based on a stovetop version my mom cooked for me growing up.
Pressure Cook Beef Stew: Add the beef briskets chunks and make sure the briskets are spread out, so each piece can soak the stock mixture. Serve Pressure Cooker Beef Stew: Add salt and pepper to taste. Serve immediately with pasta, rice, or just eat it as is.
Hey everyone, I hope you are having an incredible day today. Today, I will show you a way to prepare a distinctive dish, pressure cooker beef stew. One of my favorites. This time, I'm gonna make it a bit tasty. This will be really delicious.
This beef stew was made for us when we were just infants. Beef, carrots and potatoes taste like they simmered all day, but this is ready in about half an hour. This Pressure Cooker Beef Stew is a classic, old-fashioned recipe, based on a stovetop version my mom cooked for me growing up.
Pressure Cooker Beef Stew is one of the most favored of current trending foods on earth. It is simple, it is fast, it tastes delicious. It's appreciated by millions daily. Pressure Cooker Beef Stew is something which I have loved my entire life. They are nice and they look fantastic.
To begin with this particular recipe, we have to first prepare a few components. You can cook pressure cooker beef stew using 19 ingredients and 9 steps. Here is how you can achieve that.
The ingredients needed to make Pressure Cooker Beef Stew:
{Prepare 2 LBs of beef stew meet.
{Prepare 1/4 cup of all purpose flour.
{Make ready 1 tsp of salt.
{Make ready 1/2 tsp of black pepper.
{Take 1/4 cup of cooking oil.
{Take 1 of medium celery stick.
{Take 1 of large onion.
{Take 3 cloves of fresh garlic.
{Prepare 1 Tbsp of tomato paste.
{Make ready 3 1/2 cup of cups water (or beef broth).
{Take 2 1/2 Tbsp of beef bouillon.
{Make ready 2 tsp of Worcestershire sauce.
{Make ready 1 lb of potatoes (cut into large chunks).
{Take 2 of large carrots.
{Get 2 of dried bay leaves.
{Make ready 1 1/2 Tbsp of corn starch.
{Take 1 1/2 Tbsp of cold water.
{Make ready Can of peas.
{Make ready pack of Beef stew seasoning.
Optional step: For more texture, add. Pressure Cooker American Beef Stew Recipe. Unraveling the mysteries of home cooking through science. With the aid of a countertop or stovetop pressure cooker, you can make incredibly satisfying and tasty beef stew, with tender beef and rich, browned flavors, in just about an.
Steps to make Pressure Cooker Beef Stew:
Combine 1 tsp salt, 1/2 tsp pepper, and 1/4 cup flour and coat beef with mixture..
Saute beef in oil until browned (no need to cook all the way through) once browned set aside..
In pan that browned meat cook celery, onion, tomato paste, garlic..
Turn off saute setting, add 3 1/2 cups beef broth or water and 2 tsp Worcestershire sauce.
Add browned meat back into instant pot, along with carrots and potatoes and bay leaves. combine well.
Close lid, close vent, set to pressure cook on high for 35 minutes then let naturally release for 10 minutes then quick release.
Remove lid and set to saute.
Make corn starch slurry out of 1.5 Tbsp corn starch and 1.5 Tbsp cold water combine well then add into simmering beef stew.
Stir well to thicken, turn off heat and serve.
This savory and delicious pressure cooker beef stew has been adapted as an easy and super fast pressure cooker recipe that's hard to beat. Pressure Cooker Beef Stew - a hearty beef stew with potatoes, carrots, green beans, and tomatoes can be on the table in minutes when you use a pressure cooker. I'm just going to say it - I love my pressure cooker. Pressure cooker beef stew is a delicious and easy recipe that cooks in minutes but tastes like it has simmered for hours. You can buy meat marked "beef for stew", but that is usually of lower quality.
So that's going to wrap it up for this special food pressure cooker beef stew recipe. Thank you very much for reading. I'm confident that you will make this at home. There is gonna be more interesting food in home recipes coming up. Remember to save this page on your browser, and share it to your loved ones, friends and colleague. Thank you for reading. Go on get cooking!
0 notes
Link
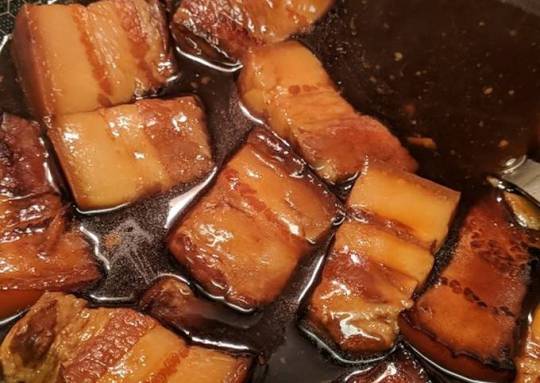
Red braised pork. Red braised pork belly is a very classic, famous dish in China. When choosing the pork belly, it should have even layers of fat and meat. Rock sugar is commonly used for this dish.
I've even seen gorgeous cuts of pork belly at Costco. Personally, I always pick the leanest. Variations on Braised Pork Belly in China.
Hey everyone, it's Brad, welcome to our recipe site. Today, we're going to make a distinctive dish, red braised pork. One of my favorites. For mine, I will make it a bit tasty. This will be really delicious.
Red braised pork belly is a very classic, famous dish in China. When choosing the pork belly, it should have even layers of fat and meat. Rock sugar is commonly used for this dish.
Red braised pork is one of the most well liked of recent trending meals in the world. It is enjoyed by millions daily. It's simple, it is quick, it tastes yummy. They are fine and they look fantastic. Red braised pork is something which I've loved my entire life.
To get started with this recipe, we have to prepare a few ingredients. You can cook red braised pork using 14 ingredients and 10 steps. Here is how you can achieve it.
The ingredients needed to make Red braised pork:
{Take 1-2 lbs of Skin on Pork belly.
{Get of Shaoxing wine (cooking wine).
{Prepare of Ginger.
{Get of Green onion.
{Take of Sugar.
{Prepare of Salt.
{Take of Oyster sauce.
{Get of Fish sauce.
{Prepare of Sichuan peppercorn.
{Take of Star Anise.
{Make ready stick of Cinnamon.
{Get leaf of Bay.
{Take of Ground white pepper.
{Make ready of Corn starch slurry for thickening if needed.
Overall though, Chinese people love their braised pork belly. This traditional braised pork belly dish is a crowd-pleaser for any special occasion. This is a part of our Chinese New Year menu with chef Simone Tong. Tender, gelatinous and aromatic, Chinese red braised pork belly is scrumptious and comforting.
Steps to make Red braised pork:
Torch the skin until it's blackened to make sure all the hair is removed, and then scrub off the charred part. The skin will have a yellow / red tinge afterwards..
Add cold water to a pot, enough to cover pork. Cut pork into preferred size (1.5 in cube) Add shaoxing wine (about 1/2 cup), ginger (about 1 inch knob and sliced), green onion (1 stalk). Boil and skim off foam. Remove pork and discard water..
Wash pork in hot /warm water to remove any foam..
Make caramel (can use caramel coloring soy sauce to replace this step) Add small amount of oil to work, add sugar (about 3 tbsp). Keep stirring while heating up, until sugar melts and the will turn into caramel fairly quickly. Add pork to coat the caramel on pork. (Watch for oil splatter).
Add one star anise, 1 in piece of cinnamon, about 1-2 tsp Sichuan peppercorn, 1 bay leaf, 2 in knob of ginger (sliced), 2-3 stalks of green onion and white pepper. Stir until fragrant, then add soy sauce, oyster sauce, fish sauce, and shaoxing wine, and enough water to cover pork..
Bring the wok to a boil, skim off any foam that is still there, and then keep it at rolling boil for another 15 minutes. This step will make sure the pork will absorb the coloring and turn red..
Put everything in pressure cooker and cook on high for 35 minutes. Quick release pressure..
Remove all pork and sieve through the braising liquid to remove all spices and ginger/green onions..
Put pork and braising liquid to wok, high heat to reduce the liquid to a thicker sauce. Adjust seasoning to taste (mostly needs more sugar. There should be plenty of salt in fish sauce and soy sauce).
Once the liquid is thickened, time to eat..
Apart from the desired taste and texture, braised pork belly also stands out for its red-brownish shine. Red-colored meats are eaten for good luck because red is the color of fire, a symbol of good fortune and Perhaps the most famous revolutionary dish from the Hunan province, this red-braised pork is. The recipe teaches how to cook the Red Braised Pork, Hong Shao Rou in Chinese, in the way of stewing, which is a representative of Chinese meat dishes. The famous red-braised pork belly, or hong shao rou, is one of the classic pork dishes that In Chinese, hong means red, shao means braised, and rou means meat. In this case, it refers to pork.
So that's going to wrap this up with this exceptional food red braised pork recipe. Thank you very much for reading. I am sure that you can make this at home. There is gonna be more interesting food at home recipes coming up. Remember to bookmark this page in your browser, and share it to your loved ones, colleague and friends. Thanks again for reading. Go on get cooking!
0 notes
Link
Creamy Beef Sauce.
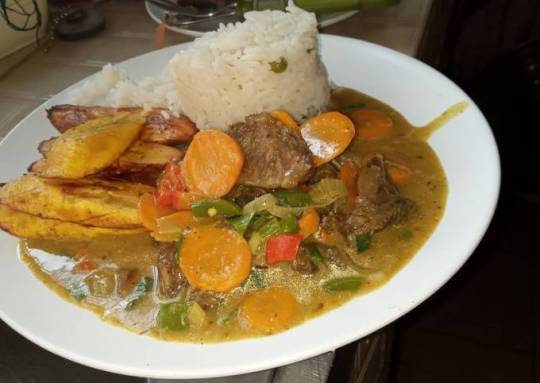
Hey everyone, I hope you are having an amazing day today. Today, I'm gonna show you how to make a special dish, creamy beef sauce. It is one of my favorites. This time, I am going to make it a bit unique. This is gonna smell and look delicious.
Creamy Beef Sauce is one of the most popular of current trending meals on earth. It is easy, it is quick, it tastes yummy. It is enjoyed by millions every day. Creamy Beef Sauce is something that I've loved my whole life. They're fine and they look wonderful.
To begin with this particular recipe, we must first prepare a few ingredients. You can have creamy beef sauce using 17 ingredients and 3 steps. Here is how you cook that.
The ingredients needed to make Creamy Beef Sauce:
{Get 1/2 of kilo of non fat pan grilled beef.
{Prepare 1 cup of Dano Cream milk.
{Prepare 1/3 cup of rich beef stock.
{Prepare 4 of fresh pepper sliced.
{Take 1 1/2 tablespoon of corn flour to thickner.
{Get 1 of medium sized green.pepper sliced.
{Take of I medium sized yellow pepper sljced.
{Take of I medium onion sliced.
{Get of I medium size red pepper sliced.
{Make ready 3 of gloved garlic chopped.
{Get 4 of carrot sliced.
{Take 1 handful of spring onion sliced.
{Prepare of I tablespoon black pepper.
{Get 3 tablespoon of olive/ cooking oil.
{Get of Fresh herbs, curry, thyme, rosemary./ curry masala.
{Take 1 of Stock cubes.
{Take of Salt.
Instructions to make Creamy Beef Sauce:
Shred into equal sizes the grilled beef. Place non stick pan on fire, add the olive oil, allow to heat up...add the onions and garlic, sliced fresh pepper sautee, next add the Dano milk/cream, add in the grilled beef, herbs, curry, thyme, rosemary., curry masala and a little bit of salt...allow to cook...till water evaporates... pour in the beef stock..stir and allow to cook again..
Next, dissolve corn flour, stir it in properly, allow to simmer. Add all the peppers, the carrot, black pepper and spring onions, crumbled the stock cube over it... reduced the fire or heat...and after 3 mins...remove from heat....
Enjoy with rice, yam, plantain or potatoes..
So that's going to wrap this up for this exceptional food creamy beef sauce recipe. Thanks so much for reading. I am confident you can make this at home. There's gonna be more interesting food in home recipes coming up. Don't forget to bookmark this page on your browser, and share it to your family, colleague and friends. Thanks again for reading. Go on get cooking!
0 notes
Link
Maggie's Magnificent Meatball Minestrone Soup. Before you jump to Maggie's Magnificent Meatball Minestrone Soup recipe, you may want to read this short interesting healthy tips about Apples Could Certainly Have Enormous Benefits To Improve Your Health. I am certain you have heard that you ought to be eating an apple a day but did you ever. This is absolutely delicious on a cold winter day & one of my favourite soups!

Minestrone means "big soup," and Allrecipes has plenty of top-rated recipes for this Italian-inspired classic! This meatball minestrone is a friend and family favorite. It's even better the next day, if there's any left over!
Hey everyone, it's Drew, welcome to my recipe site. Today, we're going to prepare a distinctive dish, maggie's magnificent meatball minestrone soup. One of my favorites food recipes. For mine, I'm gonna make it a little bit tasty. This is gonna smell and look delicious.
Maggie's Magnificent Meatball Minestrone Soup is one of the most popular of current trending foods in the world. It is appreciated by millions daily. It's easy, it is quick, it tastes delicious. They're fine and they look fantastic. Maggie's Magnificent Meatball Minestrone Soup is something which I've loved my whole life.
Before you jump to Maggie's Magnificent Meatball Minestrone Soup recipe, you may want to read this short interesting healthy tips about Apples Could Certainly Have Enormous Benefits To Improve Your Health. I am certain you have heard that you ought to be eating an apple a day but did you ever. This is absolutely delicious on a cold winter day & one of my favourite soups!
To begin with this recipe, we must first prepare a few ingredients. You can have maggie's magnificent meatball minestrone soup using 26 ingredients and 3 steps. Here is how you can achieve that.
The ingredients needed to make Maggie's Magnificent Meatball Minestrone Soup:
{Take of meatballs.
{Prepare 4 lb of ground beef.
{Get 3 medium of eggs.
{Take 2 tsp of garlic powder.
{Take 2 of envelopes Lipton onion soup mix.
{Take 1/2 cup of breadcrumbs.
{Get of soup base.
{Make ready 3 box of beef broth (32 oz. each).
{Take 2 box of chicken broth (32 oz. each).
{Take 46 oz of spicy vegetable juice (V8).
{Get 1/2 cup of red wine vinegar.
{Take 1/2 cup of port wine.
{Take of other ingredients.
{Prepare 1 box of (11 oz.) barley (quick-cooking barley works).
{Prepare 2 packages of (5 each) sweet Italian sausage links, cut into bite-size pieces.
{Get 2 cup of sliced mushrooms.
{Get 3 large of onions, chopped.
{Get 1 1/2 cup of baby carrots, cut into thirds.
{Take 1 of red bell pepper, seeded and chopped.
{Make ready 1 of yellow bell pepper, seeded and chopped.
{Prepare 2 can of (16 oz.) green beans.
{Make ready 2 can of (16 oz.) kidney beans.
{Take 2 cup of fresh or frozen corn.
{Take of garnish.
{Prepare 1 of Crutons.
{Take 1 of Fresh grated parmesan cheese.
Serve with crusty bread and Parmesan cheese to top the soup. It has been an unusually cool and rainy January here in Florida this year, and although I feel sorry for all the tourists visiting Between the meat, beans, and pasta, this soup becomes a complete meal in a bowl. Just serve with some crusty Italian bread and perhaps a crisp. Minestrone Soup Hearty vegetable soup with carrots, broccoli, tomatoes, potatoes, beans and pasta.
Instructions to make Maggie's Magnificent Meatball Minestrone Soup:
In large bowl, mix together the meatball ingredients. Shape into bite-sized meatballs (I use a small cookie dough scoop) and place in baking dish. Bake at 350°F for 20 minutes. Drain excess fat..
Pour soup base ingredients into HUGE (7.5 quart) stockpot. Bring to a boil. Reduce heat to medium. Add the barley, carrots, bell peppers, beans, and corn. Stir then cover..
In large electric skillet, heat 2 T. vegetable oil. Add onions and fry for about 15 minutes, then add the sausage and fry another 15 minutes. Add the mushrooms, stir, and cook 10 minutes more. Add this mixture to your pot of soup, add the prepared meatballs, stir, cover and simmer several hours until carrots are tender..
This soup will thicken in the refrigerator as the residual heat of the broth continues to cook the vegetables and they release their starches, so stir in another splash of broth when you reheat leftovers. If you're meal prepping this soup or making it ahead of time, cool the soup, then. Minestrone soup with meatballs is my hearty and warming take on traditional minestrone soup. Brimming with juicy and tender beef meatballs, lots of flavorful vegetables, creamy white beans and an array of fresh Italian herbs, it's a terrifically soothing one-pot meal! I e tried a couple other minestrone recipes and this one is by far the tastiest.
So that is going to wrap it up with this special food maggie's magnificent meatball minestrone soup recipe. Thanks so much for your time. I'm confident that you can make this at home. There is gonna be more interesting food in home recipes coming up. Don't forget to bookmark this page in your browser, and share it to your loved ones, friends and colleague. Thank you for reading. Go on get cooking!
0 notes
Link
Plate Vegetables Idli and Rasam Chutney 😋.

Hello everybody, it's John, welcome to our recipe page. Today, we're going to make a distinctive dish, plate vegetables idli and rasam chutney 😋. It is one of my favorites. For mine, I'm gonna make it a little bit tasty. This is gonna smell and look delicious.
Plate Vegetables Idli and Rasam Chutney 😋 is one of the most well liked of recent trending foods in the world. It is simple, it is quick, it tastes delicious. It is enjoyed by millions every day. They are nice and they look wonderful. Plate Vegetables Idli and Rasam Chutney 😋 is something that I have loved my whole life.
To get started with this particular recipe, we have to first prepare a few components. You can cook plate vegetables idli and rasam chutney 😋 using 25 ingredients and 5 steps. Here is how you cook it.
The ingredients needed to make Plate Vegetables Idli and Rasam Chutney 😋:
{Get For of Rasam Chutney:.
{Make ready As required of Chopped Coconut.
{Prepare 1/2 cup of Lemon juice.
{Prepare 2 spoons of Red chilli powder.
{Prepare 2 spoons of Rasam powder.
{Take As per taste of Salt.
{Take 1 cup of Roasted Chickpea/Roasted Bengal gram flour.
{Make ready As required of Oil for cooking.
{Make ready 3-4 of Dry Red chilli.
{Prepare Handful of Curry leaves.
{Take 1 spoon of Mustard Seeds.
{Get Handful of Green Freshly chopped coriander.
{Make ready For of Vegetables Idli:.
{Get 1 packet of Semolina/Suji.
{Get 1 packet of Curd.
{Take 1 packet of Eno fruit salt.
{Take 200 gms of Chopped Carrot.
{Make ready 200 gm of Chopped Capcicum.
{Take 200 gms of Sweet Corn.
{Get 100 gm of Paneer.
{Take 100 gm of Cabbage.
{Take As per taste of Salt.
{Prepare Handful of Chopped fresh Coriander.
{Take As required of Oil for Greasing Plate.
{Take As required of Chopped Coconut.
Instructions to make Plate Vegetables Idli and Rasam Chutney 😋:
For Rasam Chutney: Take a jar add roasted chickpea flour, chopped coconut, curry leaves, rasam powder, salt to taste and blend it and make a smooth paste after that take a kadhai or pan add oil curry leaves, mustard seeds, dry red chilli heat it for 1 min..
Then add paste into it and boil it for 5 min after 5 to 10 min boiling add green fresh Coriander. Your Rasam Chutney is ready to serve hot..
Now take a thali put all the chopped vegetables after that take a container add semolina, salt curd, mix well and rest for 15 min. After that mix all the vegetables mix well and again. Rest for 15 min. Lastly add eno fruit salt..
For Plate Idli: Now grease all the plates with oil add suji paste into it and steam it in a kadhai or cooker for 15 min. After 15 min cool the cooked Idli Plates..
Now take a Plate Serve Hot Rasam Chutney and Plate Vegetables Idli into it. Garnish with Green fresh Coriander..
So that is going to wrap it up for this exceptional food plate vegetables idli and rasam chutney 😋 recipe. Thanks so much for reading. I'm confident you can make this at home. There is gonna be more interesting food at home recipes coming up. Remember to bookmark this page on your browser, and share it to your loved ones, colleague and friends. Thanks again for reading. Go on get cooking!
0 notes
Link
Kathiawari Cholay.

Hey everyone, it's Drew, welcome to my recipe page. Today, I'm gonna show you how to prepare a special dish, kathiawari cholay. It is one of my favorites food recipes. This time, I will make it a bit unique. This is gonna smell and look delicious.
Kathiawari Cholay is one of the most favored of recent trending foods on earth. It's simple, it's quick, it tastes yummy. It's appreciated by millions every day. They're nice and they look wonderful. Kathiawari Cholay is something that I've loved my whole life.
To get started with this recipe, we have to prepare a few components. You can cook kathiawari cholay using 16 ingredients and 2 steps. Here is how you cook that.
The ingredients needed to make Kathiawari Cholay:
{Take 1 of Tomatoes chopped.
{Make ready 1 of Onion chopped.
{Make ready 2 of Green Chillies chopped.
{Get leaves of Fresh Coriander.
{Take 1/4 cup of chopped.
{Prepare 1/4 cup of Oil.
{Get 1-2 tablespoon of Tamarind paste.
{Make ready 2-3 teaspoon of Corn Starch.
{Prepare to taste of Salt.
{Get 1-2 teaspoon of Red Chilli cutter/flakes dry roasted.
{Prepare 1 teaspoon of Coriander whole dry roasted.
{Make ready 1/4 teaspoon of Turmeric powder.
{Get 1/2 teaspoon of Baking soda for cooking.
{Make ready 2 teaspoon of Baking soda for soaking.
{Make ready of Chat Masala for serving Karak Bun/Pao Bun for serving.
{Prepare of Papri for serving.
Steps to make Kathiawari Cholay:
Method Soak Kabuli Chanain enough water for 6-8 hours with 2 teaspoon added baking soda. Now wash and drain the soaked Kabuli channa. Boil soaked Kabuli Chanain enough water, add 1 teaspoon salt during boiling. Retain boiled chanaand boiling water. Now in another pan saute onion till soft. Then add tomatoes, spices and soda. Fry for 2-3 minutes, then add boiled Kabuli Chana and boiling water. Continue to cook for 10 minutes..
Now dissolve corn starch in 1/2 cup water and add to the cooking Kabuli channa. Cook for 3-5 minutes on medium flame. Then add Tamarind pulp mixed with little water, again cook for 3-5 minutes. At last garnish with green chillies and fresh coriander leaves. Simmer for 5 minutes. Delicious Kathiawari Cholay are ready. Serve hot with Karak Bun, Papri and Chat Masala..
So that's going to wrap it up with this special food kathiawari cholay recipe. Thank you very much for your time. I am confident that you can make this at home. There's gonna be more interesting food at home recipes coming up. Don't forget to bookmark this page on your browser, and share it to your loved ones, colleague and friends. Thanks again for reading. Go on get cooking!
0 notes
Link
Ayam Goreng Rempah.
Hey everyone, hope you are having an incredible day today. Today, I will show you a way to make a distinctive dish, ayam goreng rempah. One of my favorites. This time, I am going to make it a little bit unique. This is gonna smell and look delicious.
Ayam Goreng Rempah is one of the most favored of recent trending meals on earth. It is enjoyed by millions every day. It's easy, it is quick, it tastes yummy. They're nice and they look wonderful. Ayam Goreng Rempah is something which I've loved my entire life.
To begin with this recipe, we must prepare a few components. You can have ayam goreng rempah using 14 ingredients and 4 steps. Here is how you can achieve that.
The ingredients needed to make Ayam Goreng Rempah:
{Take of chicken (wash and cut into small pieces).
{Prepare of onions (blended).
{Prepare of garlic (blended).
{Make ready of ginger (blended).
{Make ready of galangal (blended).
{Take of lemongrass (blended).
{Get of aniseed (marinade).
{Take of cumin (marinade).
{Prepare of chilli powder (marinade).
{Prepare of curry powder (marinade).
{Make ready of corn flour (marinade).
{Get of turmeric powder (marinade).
{Make ready of salt.
{Take of cooking oil.
Steps to make Ayam Goreng Rempah:
Mix the chicken with the marinade ingredients except oil.
Then add the blended ingredients and mix well.
Marinate for an hour.
Fried the marinated chicken over low heat.
So that's going to wrap it up for this special food ayam goreng rempah recipe. Thank you very much for reading. I'm sure you can make this at home. There is gonna be interesting food in home recipes coming up. Remember to save this page on your browser, and share it to your loved ones, colleague and friends. Thanks again for reading. Go on get cooking!
0 notes
Link
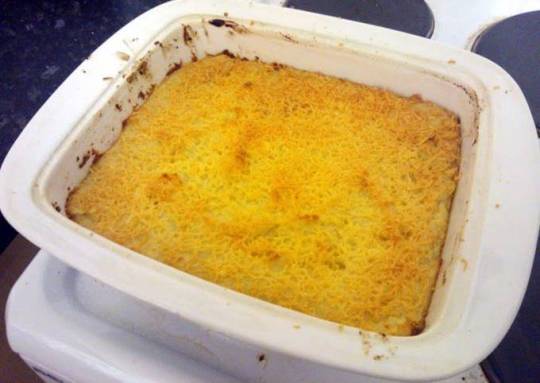
Corned Beef Hash.
Hey everyone, it is Brad, welcome to our recipe site. Today, I'm gonna show you how to prepare a special dish, corned beef hash. One of my favorites food recipes. This time, I will make it a little bit unique. This is gonna smell and look delicious.
Corned Beef Hash is one of the most popular of current trending foods in the world. It's simple, it's quick, it tastes yummy. It is appreciated by millions daily. They are fine and they look wonderful. Corned Beef Hash is something which I've loved my entire life.
To begin with this recipe, we have to first prepare a few ingredients. You can cook corned beef hash using 6 ingredients and 10 steps. Here is how you can achieve it.
The ingredients needed to make Corned Beef Hash:
{Prepare 1 medium of Onion.
{Get 1 can of Corned Beef.
{Prepare 1 can of Baked Beans.
{Prepare 5 medium of Potatoes.
{Take 4 tsp of Horseraddish Sauce.
{Get 100 grams of Your favourite Hard Cheese, I used Lancashire in the photo.
Instructions to make Corned Beef Hash:
Pre heat the oven to 180°C.
Peel the potatoes and dice them small then put them onto boil till they are ready to be mashed.
Finely chop the onion and fry in a frying pan with a bit of butter/oil till golden and soft.
Take the corned beef out of the can and cut into cubes as best as you can and then place into a deep oven proof dish.
Open the can of baked beans and pour over the corned beef.
When the onions are ready tip them into the dish and mix with the corned beef and baked beans.
When the potatoes are ready mash them and then add the horseradish sauce and mix well.
spoon the mash potatoes onto the corned beef and smooth down.
Sprinkle with the grated cheese.
Put the dish into the oven for about 30 mins or till the cheese has melted and gone golden.
So that's going to wrap it up for this special food corned beef hash recipe. Thank you very much for reading. I am confident you can make this at home. There's gonna be more interesting food at home recipes coming up. Don't forget to save this page on your browser, and share it to your family, colleague and friends. Thank you for reading. Go on get cooking!
0 notes
Link
Simple Korean Army Stew or Budae Jjigae. Budae Jjigae (Korean Army Base Stew) Recipe Allrecipes This spicy budae jjigae stew is a traditional Korean army base dish made with sausage, ramen noodles, and kimchi that will please a crowd. This spicy budae jjigae stew is a traditional Korean army base dish made with sausage, ramen noodles, and kimchi that will please a crowd.

Korean Army Stew (Budae Jjigae) transforms simple everyday ingredients like spam, noodles, mushroom and veggies into a mouth-watering spicy stew. Budae Jjigae is perfect for sharing and entertaining too - if you have a table top cooker, why not cook it all together with friends! My budae jjigae features SPAM, sausage, tofu and mushrooms, but the beauty of this dish is that you can honestly throw in whatever else you would like!
Hello everybody, hope you're having an amazing day today. Today, we're going to prepare a special dish, simple korean army stew or budae jjigae. It is one of my favorites food recipes. This time, I will make it a little bit tasty. This will be really delicious.
Budae Jjigae (Korean Army Base Stew) Recipe Allrecipes This spicy budae jjigae stew is a traditional Korean army base dish made with sausage, ramen noodles, and kimchi that will please a crowd. This spicy budae jjigae stew is a traditional Korean army base dish made with sausage, ramen noodles, and kimchi that will please a crowd.
Simple Korean Army Stew or Budae Jjigae is one of the most favored of current trending meals on earth. It's enjoyed by millions every day. It's simple, it is quick, it tastes yummy. They are fine and they look fantastic. Simple Korean Army Stew or Budae Jjigae is something that I've loved my whole life.
To get started with this particular recipe, we must prepare a few ingredients. You can cook simple korean army stew or budae jjigae using 22 ingredients and 4 steps. Here is how you cook it.
The ingredients needed to make Simple Korean Army Stew or Budae Jjigae:
{Get 6 cups of chicken stock.
{Get 200 g of SPAM cut into cubes.
{Prepare 200 g of mushroom (enoki and or oyster mushrooms).
{Take 200 g of shitake mushrooms.
{Take 6 of cocktail sausages cut thinly.
{Get 3 of instant ramen noodles.
{Prepare Half of a cup of cheese(cubed or 2 slices).
{Prepare 1 cup of kimchi (bite-sized).
{Prepare 1 of Napa cabbage (cut and sliced).
{Prepare 100 g of Rice cakes (Tteokbokki) or replace with kikiam.
{Take 100 g of tofu (sliced or cubed).
{Take 4 of cobs cooked corn or 1 can of sweet corn kernels.
{Get 2 tablespoons of Korean chili paste (Gochujang).
{Take 1/2 tablespoon of sugar.
{Get 1 tablespoon of Korean chili flakes.
{Prepare 1 tablespoon of garlic (minced).
{Take 1 tablespoon of soy sauce.
{Make ready 1 tablespoon of fish sauce.
{Get of Green onions.
{Take 1 teaspoon of cooking oil.
{Make ready of I added corn instead of baked beans.
{Get of I also removed kelp and anchovies because I don't like them.
A lot of people like to add canned beans to their budae jjigae, but I personally chose not to add them to my stew. This dish, budae jjigae, or Korean army stew, is no different. After the cease-fire of the Korean war, food was extremely scarce. But there was a huge surplus of processed meats and cheese on US military bases.
Instructions to make Simple Korean Army Stew or Budae Jjigae:
Cook garlic in oil until golden brown. Set aside so it doesn't burn..
Assemble the ingredients (except for the ramen noodles, rice cakes, green onions, napa cabbage, corn and cheese) in a pot. Mix the Korean paste with soy sauce, chili flakes, sugar, and fish sauce and add the mixture to the pot. Pour the stock and bring to boil on medium heat (about 10 mins). Reduce heat and let simmer for another 10 minutes..
Add the remaining ingredients – garlic, instant ramen noodles, rice cakes, green onions, napa cabbage (I like my napa cabbage crunchy), corn and add cheese on top of the pot and boil uncovered until the noodles are cooked (about 2 to 3 mins)..
Serve with steamed rice (& with other Korean side dishes). Or if doing hot pot, reduce the heat to low (using a portable burner) and share the food at the dinning table..
Thus, this dish was born, and is now enjoyed all over Korea, and frequents our campsites very often. Budae jjigae (부대찌개) is a fusion dish that incorporates American processed meats such as Spam, ham, bacon, and hot dogs into a Korean stew with kimchi. Budae is a general term for a military base in Korean, but budae jjigae is translated into "Army stew" or "Army base stew" because of its origin. This is our second take on Budae Jjigae! The word Budae means Army Base in Korean and by now you know Jjigae means stew.
So that is going to wrap this up for this exceptional food simple korean army stew or budae jjigae recipe. Thanks so much for your time. I'm sure that you will make this at home. There's gonna be more interesting food at home recipes coming up. Don't forget to bookmark this page in your browser, and share it to your loved ones, friends and colleague. Thank you for reading. Go on get cooking!
0 notes
Link
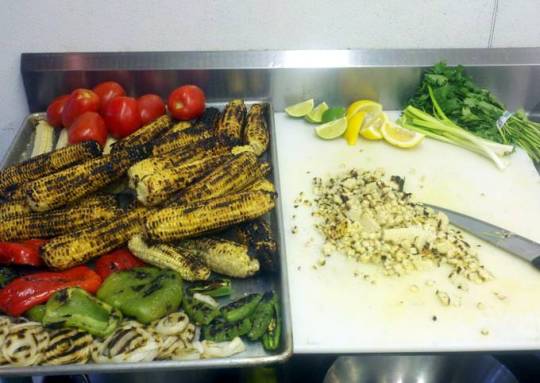
grilled corn salsa.
Hey everyone, it's Drew, welcome to my recipe site. Today, I'm gonna show you how to prepare a special dish, grilled corn salsa. It is one of my favorites food recipes. For mine, I will make it a bit tasty. This will be really delicious.
grilled corn salsa is one of the most well liked of recent trending foods in the world. It's appreciated by millions every day. It is easy, it's fast, it tastes delicious. They're nice and they look fantastic. grilled corn salsa is something which I have loved my entire life.
To begin with this particular recipe, we must first prepare a few components. You can have grilled corn salsa using 11 ingredients and 5 steps. Here is how you can achieve that.
The ingredients needed to make grilled corn salsa:
{Make ready 24 each of ears or fresh corn(white is preferred).
{Get 3 each of red, green bell pepper.
{Make ready 1 each of spanish or white onion.
{Get 4 each of jalepeno pepper.
{Make ready 10 each of plum tomato.
{Prepare 1 bunch of cilanto.
{Prepare 2 bunch of scallion.
{Make ready 3 each of chipotle pepper with adobo sauce.
{Prepare 1/4 cup of lemon and lime juice each( fresh squeezed preferred).
{Make ready 1/4 cup of olive oil.
{Get 1 of salt and pepper to taste.
Instructions to make grilled corn salsa:
on a preheated grill or grill pan, lightly oil corn, bell peppers, jalepenos and sliced onion, place on hot grill to char.
take all grilled veg, cut corn from cob, finely dice peppers and onions(reserve all prepped veg in mixing bowl).
finely chop cilantro and scallion, small dice plum tomatoes (place in mixing bowl with grilled veg).
finally add finely chopped chipotles with adobe sauce, lime and lemon juice, salt and pepper to taste.
mix and serve with tortillas, mixed greens or any protein or favorite fish. don't forget the Corona beer!!.
So that is going to wrap it up for this special food grilled corn salsa recipe. Thank you very much for reading. I'm confident that you will make this at home. There is gonna be interesting food in home recipes coming up. Don't forget to save this page in your browser, and share it to your family, friends and colleague. Thanks again for reading. Go on get cooking!
0 notes
Link
Grilled Summer Corn Salsa.

Hello everybody, hope you're having an amazing day today. Today, I'm gonna show you how to prepare a distinctive dish, grilled summer corn salsa. It is one of my favorites food recipes. This time, I will make it a little bit unique. This is gonna smell and look delicious.
Grilled Summer Corn Salsa is one of the most favored of current trending foods in the world. It's easy, it's quick, it tastes delicious. It's enjoyed by millions every day. They're nice and they look wonderful. Grilled Summer Corn Salsa is something which I've loved my entire life.
To begin with this particular recipe, we have to prepare a few ingredients. You can have grilled summer corn salsa using 8 ingredients and 5 steps. Here is how you cook that.
The ingredients needed to make Grilled Summer Corn Salsa:
{Make ready 3 of corn on the cobb, grilled on bbq.
{Make ready 1/2 of jalepeno, minced.
{Get 1 of green onion, diced.
{Take 1 tbsp of butter.
{Get 1 of tomato (or 2 handfuls cherry tomato), diced.
{Get 2 tbsp of crumbled queso fresco.
{Take of Salt and pepper (to taste).
{Make ready Half of lime.
Instructions to make Grilled Summer Corn Salsa:
Grill your corn on bbq (about 5-8 min).
Cut the corn off the cob while still warm and toss together with tbsp butter (try to do this while its warm so the butter melts).
Add all the other diced ingredients and stir to combine.
Stir in the cheese and squeeze of lime juice.
Serve as a side or with tortilla chips. FREAKIN YUM!!!.
So that's going to wrap it up for this special food grilled summer corn salsa recipe. Thank you very much for reading. I am confident you can make this at home. There is gonna be more interesting food at home recipes coming up. Remember to save this page in your browser, and share it to your loved ones, friends and colleague. Thank you for reading. Go on get cooking!
0 notes
Link
Medium thick base pizza.

Hey everyone, hope you're having an amazing day today. Today, we're going to make a distinctive dish, medium thick base pizza. It is one of my favorites food recipes. For mine, I will make it a bit unique. This will be really delicious.
Medium thick base pizza is one of the most well liked of current trending meals on earth. It's simple, it's fast, it tastes yummy. It's appreciated by millions every day. Medium thick base pizza is something which I've loved my whole life. They are fine and they look fantastic.
To get started with this recipe, we must first prepare a few components. You can have medium thick base pizza using 19 ingredients and 11 steps. Here is how you can achieve it.
The ingredients needed to make Medium thick base pizza:
{Prepare of For the dough:.
{Make ready of Quater cup(regular mug) wholemeal flour(used bread flour here).
{Take of and 3/4 plain white flour.
{Make ready of tablespoonsfull butter(about 30 grams).
{Make ready of tablespoonsfull cooking oil(For kneading at the end).
{Get of Quater cup warm milk.
{Prepare of Quater cup warm water.
{Prepare of dry good yeast.
{Get of About 3 tablespoons warm water (for the yeast proofing).
{Take of brown suger @ yeast proofing.
{Take of salt.
{Get of For sauce:1 tomato can, plain paprika powder time,tomoto puree,.
{Prepare of For sauce:salt to taste,zaatar or some dried herbs,garlic.
{Get of tspn :Tumeric powder,Crushed black pepper, black seeds.
{Make ready of For end sprinkles: half tsp black seeds, zaatar dried herb.
{Make ready of For toppings:mild grated cheese,grilled sausage, bell pepper,.
{Prepare of (Optional)Another cheese type such as dairylea triangles.
{Prepare of Small handfull Sweet corn,fresh green chilli (optional).
{Prepare of oil for brushing on the tray.
Instructions to make Medium thick base pizza:
Prep the dough: in a medium large dish,proof the yeast using only little warm water and yeast and 2 tbspn brown suger.let rise then add in semi melted butter, warm milk and water,salt.
Then mix all together.then add the flours and mix until form a soft dough.at this point will be slightly sticky so add tablespoon of the cooking oil.then tidy up the dough ball by tucking into the centre.
Now can cover with cling film and set aside to rise...if room temp is good for it then it will rise very qwick...after about 20 mins or so,of proofing you can mix again,add the remaining cooking oil esp if getting sticky and make ball again.let rise until well risen,you will tell when ready it forms the holes at the base and it is smoothly sticky on surface...can try tilting your dish and it is visible while moving slightly as needs to be a soft dough.
Meanwhile make the sauce:put all ingredients in a medium size saucepan.and then heat up on cooker until tomatoes are cooked..do not add any water as the tomato can gas some enof liquids in it. Break down the tomatoes with wooden spoon,and remove any uncooked tomato piece.alternatively, sieve thru a metal wired sieve to get smoother sauce if prefer but this is unnecessary step if you don't mind bit textured sauce,(as this will not be very issue once added other toppings later etc).
Now prep the clean metal trays, for the dough spreading,using a bit of oil brushed over all around.Divide dough into equal halves and start the spreading..Here make sure that the dough is evenly rolled out and about 4 mm thick.here is where the thickness of end result can be determined so take heed InshaAllah....
Then now it's the patting and pulling gently the dough for rounding it..the chef @ work!!so that you can involve the children it's very fun insh aAllah.then bake without filling until half cooked and rhe base is about half way cooked.you can checknusing a flat cooking spatula if not sticking at bottom.it shudnt be soggy as well.take the tray out onto a surface and make some holes such way that you put it back briefly til surface is JUST more firm.
.Because you are using half thevdiugh (you divided it after proofing),You USE HALF THE SAUCE.IF you are making 2 pizzas, you can use different toppings on each one,example you can make ONE VEGGY AND ONE VEGG AND SAUSAGE.
Then now spread the prepared tomato spread,over the semi cooked pizza surface!again children's works here!!.esp the toppings when choosing theirs and they'd like doing it too..here used sweet corn bell peppers(paprikas),grilled sausage...
Arrange the toppings that need arranging nicely,then can sprinkle on e.g. diced bell peppers,sweet corn or olives or chillies even spring onions if you like...also you can sprinkle black seed and more dried herbs of choice!.
Now after this additions onto the pizza, add generous sprinkle of grated cheese.here also added some other cheeses combinations and options to make healthier such as calcium anf vitamin d...you can definatly do your researches here, and try use combinations that will work and produce results much as possible inshaAllah.....
Now bake in oven high heat or maybe the top grill may work for this stage...then brown the cheese.once that is achieved you can check,inshaAllah.make sure base of pizza is NOT soggy other wise leave abit more just to attain good base as well as good surface!!!Alhamdulillah you have done it!.
So that is going to wrap it up for this special food medium thick base pizza recipe. Thank you very much for reading. I am confident that you will make this at home. There is gonna be interesting food in home recipes coming up. Don't forget to bookmark this page on your browser, and share it to your family, friends and colleague. Thank you for reading. Go on get cooking!
0 notes