
george5259999
IDES1262 - Comm 2 -Sketch Modelling
11 posts
Don't wanna be here? Send us removal request.
Last Seen Blogs

shugar-27
Switch back

depasenpa
alex

juliebooboobear
Tiny Awesome Juju

willowtree-888
Willow

doctor-squish-blog
Sans titre
Text
Week 10 - Completing the Loop
Week 10 Activities - Short Reflection
For the final tutorial, we were tasked with cleaning up a 3D scanned object, and slicing it in Cura.

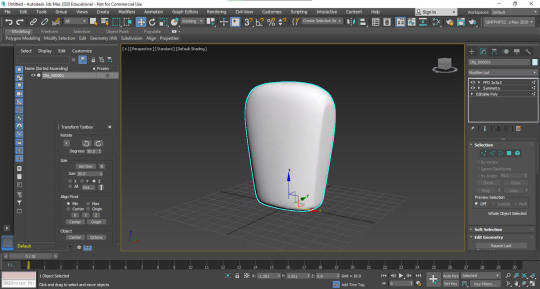
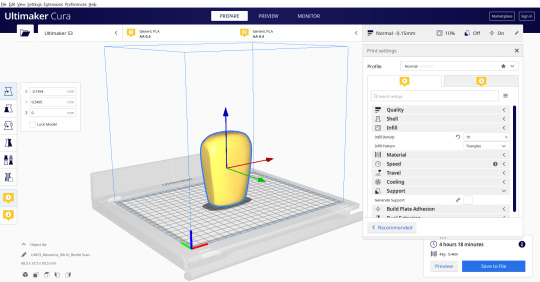
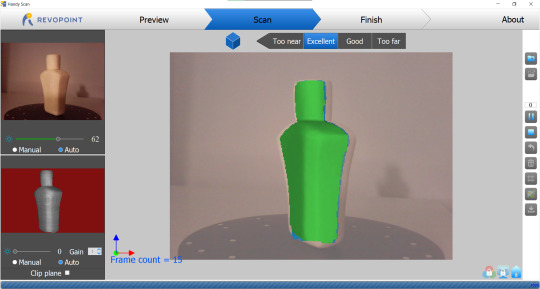
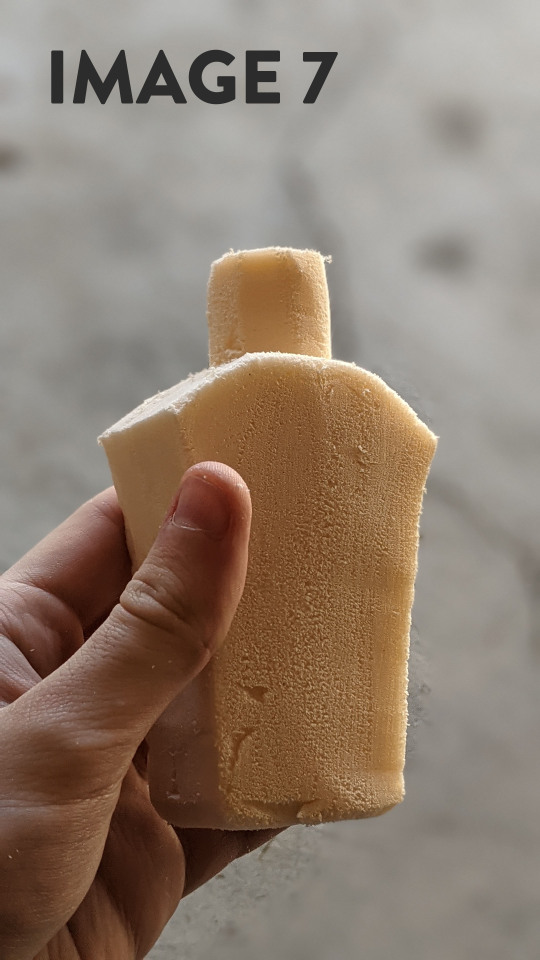
As well as manipulating and slicing the example model that Rob Provided (Images) , I was actually lucky enough to ask my friend to scan my foam model, and I was then able to print my own bottle out on my Prusa Mini FDM Printer. For the scanning, they used a RevoPoint Pop scanner, which worked in a similar way to UNSW's Einscanners - just on a budget. After converting the point cloud to a mesh, I sent it to Cura and sliced it at a 0.15mm layer height and 10% infill. After a few hours, this is what I ended up with.


Unfortunately I wasn't able to finish my model, as I had no fine sandpaper or any primer to coat it, however I was really fortunate to have my 3d printed model.
I really wanted to end this term right, and figured if I had the tools on hand, I might as well use them to the fullest. Besides getting the materials to properly finish my model, I don't think I would change much from this week if I could do it again. Although I wouldn't consider my product perfect by any means, it was the first time I could say that I completed a conceptual design to my fullest capabilities. It felt very satisfying knowing that I was involved in the product from its inception, to the physical models on my desk.
Overall Course Reflection
When I first enrolled in this course, I was worried that I would be behind from the first day. I think its normal to feel a bit of imposter syndrome when entering unfamiliar territory. I really wanted to go into this course with determination and enthusiasm to learn, and I gained a lot of confidence when the classes started. Everyone in the Industrial Design faculty was really welcoming and supportive, and I definitely felt included and involved in the course content.
When comparing my progress to the learning objectives and the marking rubric, I can honestly say that I felt like I achieved these set goals. Model making and sketch modelling have been such rewarding skills to learn, and they are so multifaceted in their use. From developing skills with my hands like drawing and carving, to communication of these designs through posts like this, IDES1262 has encapsulated the importance of perception in design, and overall presentation.
Even beyond the rubric, I have definitely gained a lot of creative inspiration and confidence, and this course has definitely put design thinking into the forefront of my mind. I find myself thinking about applying these skills and methods into my course work and into personal projects at home.
It was nice to come into this course with a base level of knowledge in many of these topics. In the first few weeks of sketch modelling and engineering drawing, I definitely felt at home when sticking to the rules and guidelines of technical drawing. When it came to sketching and freeform drawing, it took me a bit more time to get into the nuances of it all. Eventually, I realised I needed to stop being so strict and uptight in my drawing. I think this was one of the most valuable lessons this course has taught me. I usually get very attached to concepts and drawings, but by taking a step back, this course made me realise that concepts can be improved and iterated much faster when you fail faster. From traditional drawing techniques, foam model making, and digital design, I definitely gained a lot of useful information which I feel elevates my current understanding of these techniques, and I look forward to utilising them in the near future.
The middle third of the course definitely felt like my weakest section, as it was the area I had the least experience in; but it was also my favourite as a result. Being challenged in a particular area can always be rewarding, because it is where I saw the most improvement over the weeks. To further develop my skills, I have set the goal of practising freeform sketching and using markers to accentuate my pieces. I want to set up a place to store these images, to later reflect on them; similar to this blog format, as I have found it greatly rewarding. Creativity is definitely like a muscle that needs stimulation and use. I find that my other coursework can lead to this skill lying dormant, so it is my responsibility to find ways to use it for personal projects; especially if I want to peruse a career in Engineering Design.
As an aspiring Engineer, I believe that Industrial Design and Engineering should have a more collaborative and symbiotic relationship; and I really hope that I get to work with more creative minds like yourselves in a professional environment; and even interact with the Faculty of Built Environment more during the rest of my studies.
Thank you Rob, Gonz and Tom for taking me in as one of your own for the term, and for the informative advice and feedback. And thanks to everyone in class who asked questions, left feedback on my blog posts, and also in person for the first few weeks. Overall, I am stoked that I got to take this subject as my free elective, because it was informative, insightful, and a great creative outlet. Hope to see you all around on campus when things get less grim and Uni opens again. Maybe I'll catch some of you at the makerspace. Stay safe, and best of luck with the rest of your time at UNSW.
14 notes
·
View notes
Text
Week 9 - Prototyping
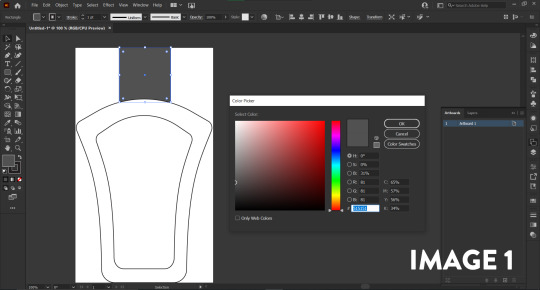
I was really keen to get into this week's content, as it felt as though the product was approaching its finished state. I had a pretty strong idea of the bottle concept I wanted to go with, so I used Rob's advice in the initial stages of the tutorial to make a template of the bottle on its top, front and side views (Image 1). I think that really paid its dividends as it allowed me to have a reference of the bottle's volume and size, but still allowed for a bit of creative freedom when creating the forms in Max.
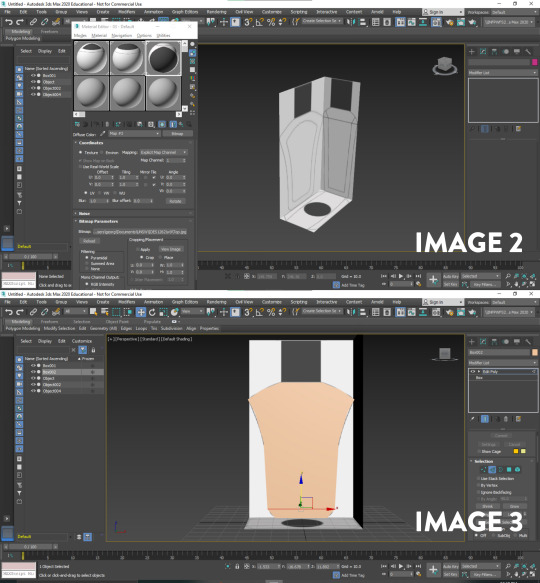
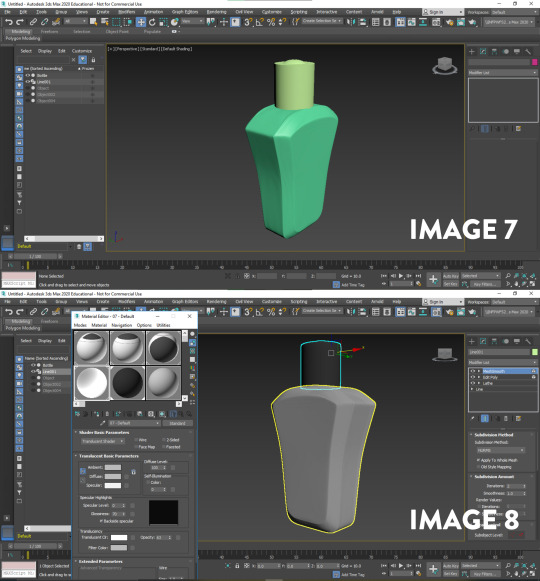
After aligning my views and importing the reference images onto the planes of the box (Image 2), I started with the modelling of the front view. I found that working in one view at a time was the way to go, because it meant I didn't have to split my time between the three sides at once. I started with a plane and blocked out the outer edges of the form (Image 3), adding in the swift loops I learned from last week's tutorial, as well as the general navigation of the UI. I liked the amount of control I was starting to develop with 3ds Max, and I think that from last week, my skills have improved with more exposure to the program.
After the initial plane, I used the extrude tool to give it depth. When modelling, I decided to only focus on one half, and then mirror it over to the other side. I think its important to try and get concepts done as fast as possible, and I didn't want to overinvest on something that is meant to be experimental. I was having a lot of difficulty trying to connect the mirrored halves together into one solid mesh, so it took me a bit of time to find the answer on the Autodesk forums. I ended up finding a useful video on YouTube which instructed me to use the 'attach' tool when selecting both bodies to join them, and then bridging the edge loops together in the poly modelling tools. Although it was an arduous process, I think it was well worth the learning experience, and something which can be implemented into my workflow in the future to speed up my time modelling.
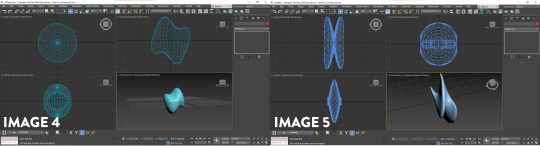
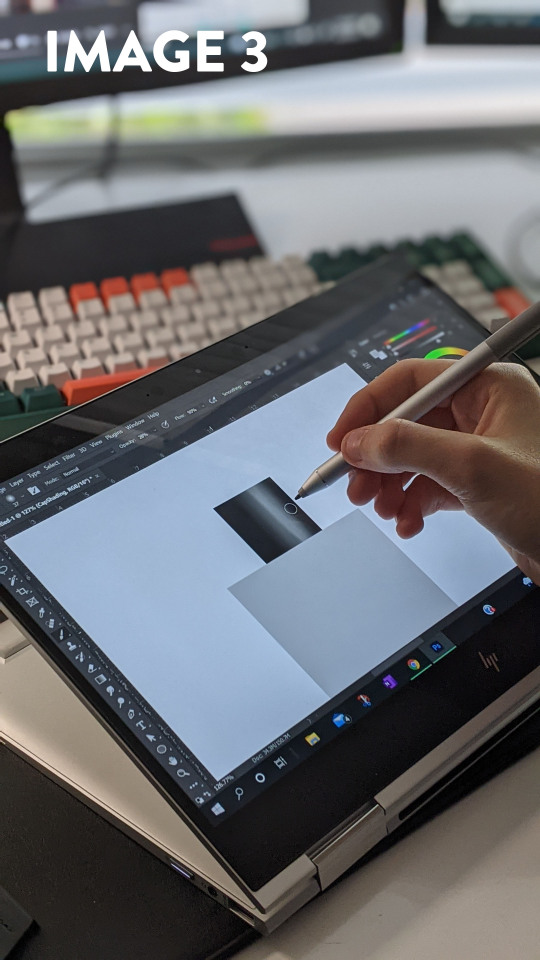
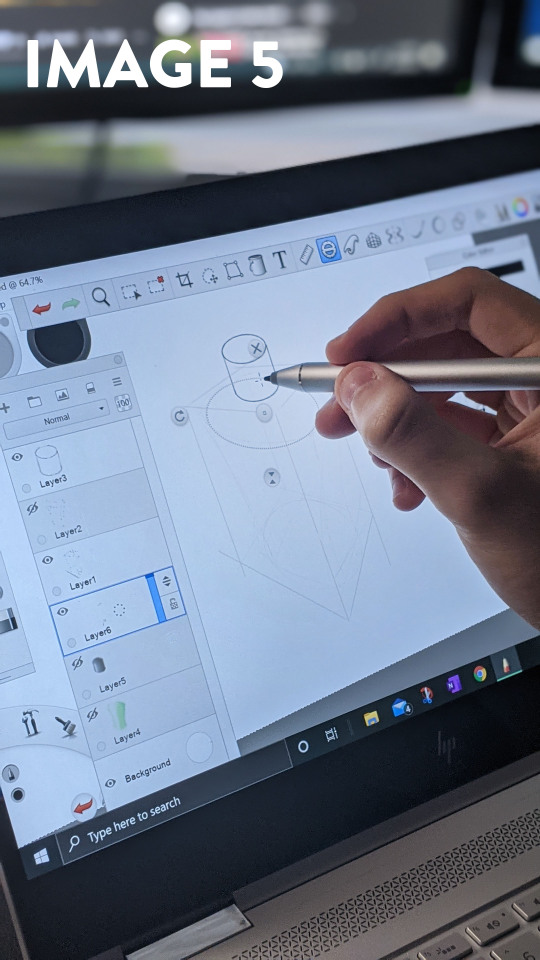
To create the taper on the side view, I used my discovery of the 'soft select' tool from last week to scale in the bottom section of the bottle (Image 4). I truly believe that the week 8 tutorial was pivotal in my understanding of the program, and it was really rewarding to use all of my experimentation practically. I then used the spline and lathe (Image 5 + 6) features to make the cap, tracing the reference image from the front view. I realised I forgot the bump at the top of the cap in the reference, so I added it into the lathe operation.


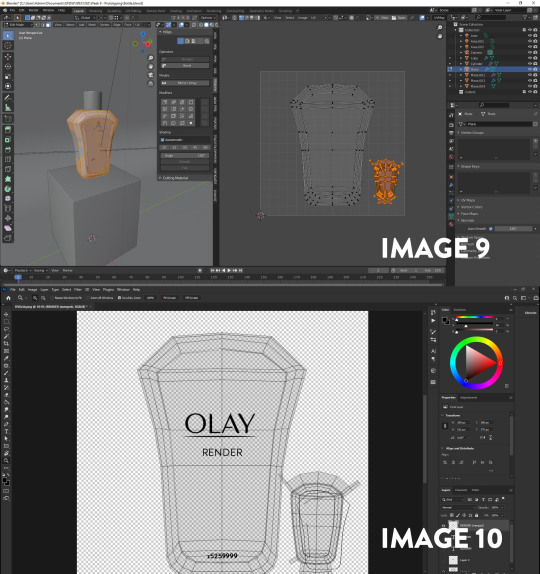
After the model was finished, I hid the reference layers (Image 7), and decided I wanted to work on rendering out my bottle design. I started by playing with the material editor in the Arnold rendering engine (Image 8). Before trying to play around with lighting and angles, I just wanted a base render of the bottle to see what the translucent material looked like. It was at this point that I ran into a sizeable issue. Using the MyAccess suite, 3ds Max was refusing to render anything out, and crashed multiple times before I gave up. Instead of trying to get the virtual machine to work, I switched to Blender on my PC. I was disappointed that I couldn't render anything through MyAccess, but I was comfortable with blender, and knew that I could make something which I was happy with.
I made a small pedestal out of a cube, and placed a bevel modifier in the exact same way I would in 3ds Max. Since I had made the jump to Blender, I decided that I wanted to add some branding decals to the surface of the bottle to make it look realistic. After, I UV unwrapped the model, and designed the branding in Photoshop Images 9 + 10).
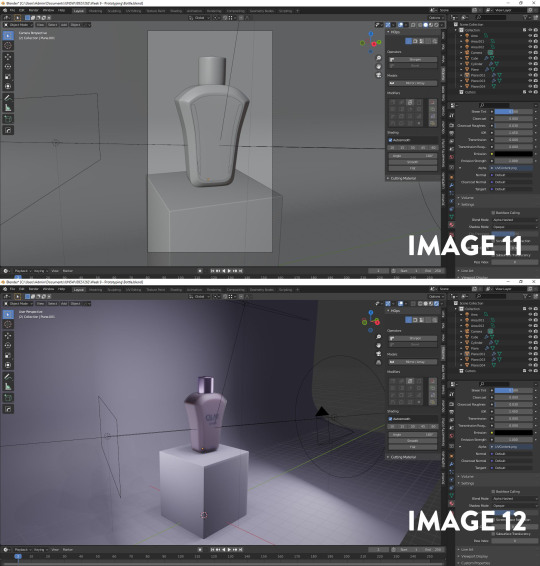
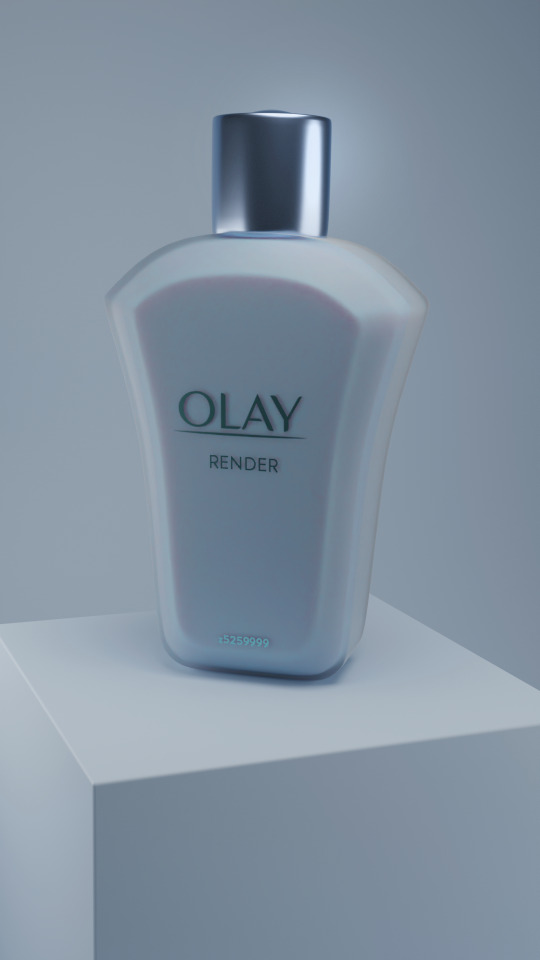
I applied some textures and shaders to the bottle after preparing the decals and UV's. Browsing on Pinterest for inspiration, I found a frosted plastic which I really liked, so I modified the default Principled shader (Like Blinn or Lambert in Arnold) to pass light through; duplicating and scaling the bottle's body to create the moisturiser inside. I set up the three point lighting and camera angles for rendering in Cycles (Image 11 + 12).
Overall I was extremely happy with how these turned out, but at the same time I was disappointed that I wasn't able to improve my rendering skills with 3ds Max. Despite not using Arnold/Max as the renderer, I still learned a lot about product rendering and staging; as it is something I haven't had to do often. If I could redo these exercises, I would definitely get 3ds Max up and running on a stable platform so that I could render it out. I would also try a few more bottle concepts, and utilise the mirror feature more efficiently now that I know how to use it.


Pre-Class Activity: Andrew Simpson Cup Case Study
I found it extremely insightful when Andrew spoke about the continual and ongoing nature of designing prototypes. Digital and Physical model making both provide the opportunity for rapid iteration and 'tweaking' of ideas. What resonated with me most was when he discussed the importance of weight, and how the object "sits in your hand". Like his cup model, I believe that the physical foam model was influenced by how the form felt in my hand when carving it out of the block.
One stark comparison between Andrew's workflow and my own in this instance was the materiality of his concepts. Obviously, his concepts had a greater range of physical materials and product concepts, but I did my best to simulate that in 3ds max and Blender. Being in lockdown, it is quite difficult to source different tools and methods of production; so I think digital modelling really shines in this instance. Being able to try different materials, colours, finishes with the click of a button really works well with Andrew's mindset of low fidelity and rapid changes. In design, nothing is a static feature; everything plays a role in the perception of the final product.
Watching this video before working on my models was valuable, because it taught me that it was ok to deviate from the initial concept, and to go back and changes to try and enhance the product. It is a goal of mine to become more proficient and confident in every stage of design, and I found it really interesting to gain wisdom from someone who has been in the industry for a lot longer than I have.
31 notes
·
View notes
Text
Week 8 - Digital Iteration
This week's tutorial was really interesting and entertaining. One of my personal hobbies is digital rendering (mainly in Blender), but it was really nice to go out of my comfort zone to a program I have only ever used once before. When I opened 3ds Max for the first time, I noticed how similar the interface looked to Maya. Being Autodesk programs natively, it made sense, but it was nice to have some element of familiarity.
During my year 10 and 11 high school holidays I completed a Cert IV in digital design for games and film. That coursed used Maya and Unreal Engine 4, so I had a bit of experience with the interface and principles of polygon modelling. However, 3ds max was probably one of the popular programs which I had the least experience with; so it was still a hugely informative and insightful process trying to adapt my knowledge between programs.
I started with the primitives menu, and imported a sphere into the workspace. I initially found myself struggling with the interface. There are a lot of options and features which are not necessary when learning the basics of a program. When starting to learn any 3d program, I often find myself spoiled for choice, and perhaps even too overwhelmed. I was very glad when the tutorial suggested hiding some superfluous menus from view, as I felt that it really cleared up the screen. After aligning the views (Image 1), I experimented with the modifiers tab.
The modifiers in 3ds max were really interesting to play around with. Working with meshes can sometimes be a tedious and particular process, but it was really enjoyable creating something with no end goal in mind. I liked how using a squeeze modifier (Image 2) could generate an egg shape with the sphere primitive, and how the melt, twist and wave modifiers (Images 3, 4 and 5) could be pushed to the mesh extremes. When working with a mesh, the topology is important to the quality of the final form. As the entire object is constructed of tris and quads, the way they are situated on the model, and their resolution play an important role in what you see. For example, the more I increased the twist modifier, the more I could see the vertices sticking out of the shape. It goes to show that unless the resolution is increased, there are limitations to the modifiers usage, as they can 'break' your model.
The modifiers in 3ds Max are very different to the ones in blender, I definitely feel like in any 3D program, anything you can create in one is attainable in the other; however 3ds max has a lot of mesh deformation modifiers out of the box. Although I thought these created really interesting and abstract shapes which I certainly enjoyed, I realised that I couldn't think of many instances where I would use some of the modifiers on a real project, but I think they are really valuable for niche tasks.
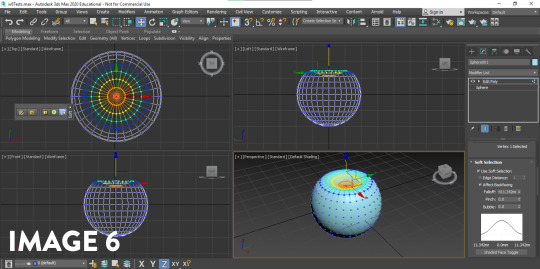
My favourite part about the exercise was learning poly modelling in 3ds Max. Poly modelling is a core part of most 3d modelling programs; and the skills are usually transferrable between. There are some really fantastic modelling tools in 3ds max which make the process of modelling enjoyable. I had a look around my desk for some quick and interesting forms I could make, and started with a really simple apple using the sphere I had in the viewport. I utilised the 'soft select' (Image 6) feature to move many verts at once, to create the top and bottom crease in the apple where the stem travels. To create the stem, I used the cylinder primitive and used the taper/bend modifier to create a curved and natural form (Image 7).

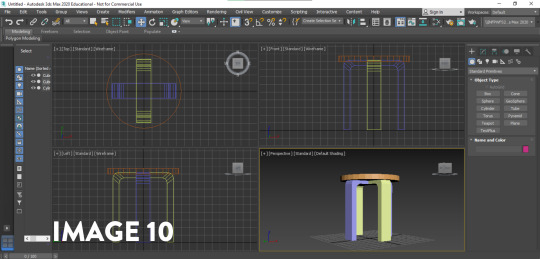
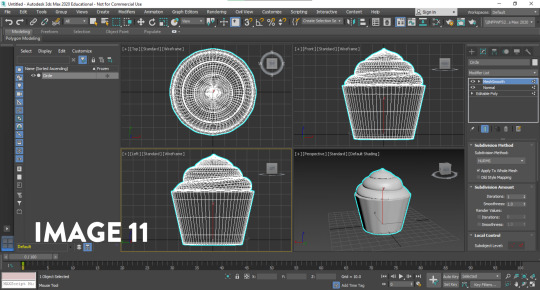
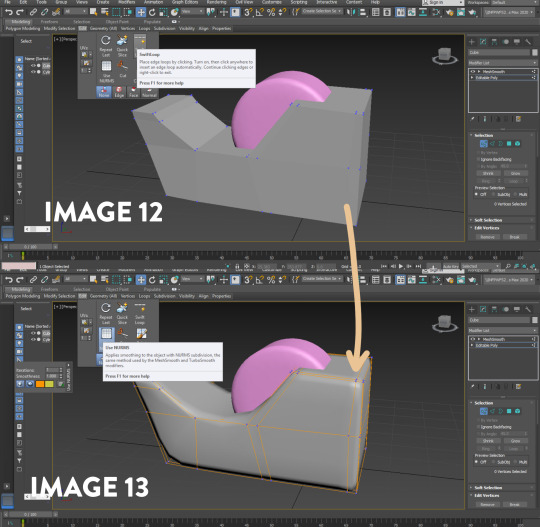
Next, I used the cylinder primitive and used the scale and extrusion feature to get the barrel of a pen. To create the tip of the pen I target welded the vertices together to get the point. I created a new cube primitive to create the clip on the pen, and extruded it (Image 8); also creating a bevelled edge to round it out slightly. Using the same techniques, I also made a stool from my room (Image 9). I really wanted to experiment with as many features as I could in these exercises, so with each 'sketch' I tried to focus on a tool I hadn't used before - as it felt like the best way to improve (Image 10). Still getting comfortable with the Poly Modelling in 3ds max, I also made a cupcake (Image 11) from the basic cylinder primitive to try and improve my modelling quality and speed; making simple extrusions, scaling the rings in, rotating them to get the icing layers. I played around with NURMS subdivision on the mesh to smooth it out, and was really happy with the results.

Finally, I wanted to use all the skills in conjunction, as well as using a tool which really sped up the workflow. I knew from Blender and Maya that loop cuts sped up the process, but I could not find them in 3ds max. After researching the issue on different forums, I found that it went under a different name; Swift loop Though it was very basic problem solving, it goes to show that these skills and programs have transferrable knowledge; and doing a simple search of your problem can lead to new ways of solving them. Swift loop was really useful in creating a loop cut between two parallel edges; adding more geometry for manipulation. When creating the tape dispenser, I noticed that the subdivision was rounding the model out too much, to the point where it no longer registered as a tape dispenser. So I used the swift loop feature to create loop cuts close to the bordering edges to reduce the interpolation between the curve (Images 12 and 13). This taught me that the subdivision modifiers aren't just something that can be added to a model to instantly make it look better; they require some manipulation and editing to get the desired effect.
I found 3ds max challenging but really interesting and insightful. As I am familiar with other programs of similar nature, it took me a while to get out of my own head; using shortcuts and hotkeys from the other programs and wondering why it wouldn't work. Overall, I think that its really rewarding to pick up another program, as it expands my skills and approach to modelling. If I were to redo this activity, I think I would try and make some more complex forms now that I have gotten more comfortable with 3ds Max; perhaps moving onto a product or more complex object. I am really looking forward to creating the bottle concepts in 3ds max next week, as I believe it will be another chance to improve my skills.
Thoughts on the Pre-Class activity - Andrew Simpson case Study
I believe that digital modelling and physical models have a closer relationship than people think. Form and Materials are an important part of perception, but there are qualities of both physical and digital modelling provide when compared to one another. Digital models allow for material iteration, simulation and rendering. Physical models allow for the physical contact, and interaction with the end user. When Andrew discusses the importance of materiality, it drives home the necessity of experimentation and versatility in design. The idea of new materials informed new processes in his decision making process, and it lead to different material types being explored.
I found Andrew's discussion on model fidelity really insightful. I perceive high and low fidelity models to represent how close the model is to a refined product. Whilst a high fidelity model would be fantastic to show clients or to use in renders, low fidelity models are required to quickly iterate on concepts and ideas to test the boundaries of the product e.g. material, form, colour. High fidelity models are more refined, and have more time put into them, to explore how the end product will feel for the user.
High fidelity and low fidelity models are both important, and when Andrew talks about the non-uniform relationship of the two in his process, it shows that design is not a linear process; rather a circular one driven by prototyping and feedback. If a high fidelity model still doesn't feel right, faster, low fidelity models can be made testing a range of new ideas; to be taken through the process of design once again.
9 notes
·
View notes
Text
Week 7 - Physical Model Making (Foam)
For the exercises this week, I decided to move downstairs to my garage upon recommendation of the demonstrators (Image 1). As I live in a small apartment block, the garage is not designed for much other than a car; so I was definitely working with limited space.

I was really excited to complete this week's exercises. For the first exercise, I created a sketch of the bottle, and used a ruler to scale it to match the size of the original bottle. I decided to cut out the positive templates for the carving (Image 2), as I found that looking at the profiles was important to my understanding of the form, as well as the detail lines on the surface of the bottle which I wanted to include.

I decided to not spend too much time on this stage, both because I was excited to go straight into the modelling, but also because I was in a garage without a proper table, so I found it frustrating to do any drawing on a malleable box.
When it came to materials, I managed to find a decent size block of yellow hobbyist foam in my garage. I made sure it was safe to carve and sand, and cut it into three equal boxes. The foam was 50mm thick, and whilst that was less than ideal, it gave me a constraint to work with. I decided to try and maximise the amount of bottles I could make out of the piece; in case I damaged or ruined any of the pieces when carving them out. Since the foam was torn and damaged around the sides, I made sure that there was more than enough padding around the border of the box. I cut the baseline first and rested it on the table to ensure it was flat, before moving to the roughing stage.
I decided to make markings on the foam block itself to act as guidelines for the cutting operations (Image 3). I wanted to transfer the lines from the front view directly over to the top view to keep it aligned. When it came to copying the information onto the foam block, I used the drawing and the sketch to shave down to the initial outlines. I found it difficult to use the retractable snap-off blade to cut down the initial form because it kept getting stuck, and forcing the blade through the foam only produced tearing in the foam, as well as small bits of foam crumbling off.


I found it easier to cut it in smaller passes, as there was much less resistance on the blade. I decided to create the silhouette from the front view first, as it defines any hidden detail which is not visible in the top view. Despite its rough surface appearance, at this stage I was happy with how it looked (Image 5). After blocking out the front extrusion I could really see it taking form. I carved the cap and the sides in that respective order (Image 6). I cut a bit too deep when making the lid, and got a cut into the bottle slightly. As the blade was thin I could get away with it, as it didn't affect the surface very much. At this stage the model was looking extremely roughed out, but I made sure there was still room to subtract foam; making sure to take my time so I did not cut into the bottle again.

Unfortunately I did not have access to a rasp so I had to compromise time for material by using coarse sandpaper. I started with 40 grit, and used that in a similar to a rasp. I found that it probably would not have given me the same level of control as a rasp, but managed to work for all intents, albeit taking a longer time. It was at this stage that I was really starting to see the model take proper shape, so it felt worth the time put in. I gradually moved up the grits until the front silhouette was smoothed out, ending at 120 (Image 7).
At the detail stage, I used the blade to freehand cut the chamfers on the front faces of the bottle, as well as to create the rounded corners on the base. Because I was removing such little material at a time, I had more control than I thought I would. When the bottle was adequately blocked out, I gave it an overall pass at 240 grit.
I was really happy with the model, but there were a few large dents which appeared from the blocking stage. Since I was in my garage and I really wanted a clean finish, I used some filler on the shelf to cover up the noticeable ones. I moved up to 360 grit for the final pass (Image 8 + 9).

I decided that I was having too much fun to stop carving, so I decided to use the other two blanks to do some 3D 'sketches' without any drawing as reference. I made the middle bottle from week 6's digital sketching exercise (Image 10 + 11), and I decided to challenge myself by including a turning form like a spiral (Image 12). Even though it was really impractical for the Olay moisturiser bottle I wanted to have some fun with the foam carving exercise. For these two extra bottles I repeated the same finishing steps as the first one.


Overall I was really proud of the foam models I made (Image 13). Though the spiral one wasn't perfect, I was content with the turning form I carved without reference. I am glad I made three models because it definitely made it easier to create complex cuts. If I were to do this exercise again I wouldn't change much regarding the process or approach, but I would definitely try new forms and bottle concepts, and spend a bit more time sanding the last two models. I would definitely also put more attention toward the first exercise. Since I was in a garage without a proper table, I definitely took liberties when it came to the orthogonal views. I would also love to try new ways of working with foam, like the hot wire cutters at the BE Makerspace. I believe that they could really speed up my workflow.
9 notes
·
View notes
Text
Week 6 - Digital Sketching
During the non-teaching week, we were tasked with creating digital sketches, developing the skills taught during week 5's content.
Before any sketching and drawing took place, we were tasked with gathering reference for our pieces on Pinterest. I found that Pinterest managed to curate images much better than google images, Flickr and other image search engines I have used before. I really wasn't aware how powerful it was at creating themed moodboards (Image 1). I am absolutely certain that I will use it for future projects, because I gained lots of insight into different styles and design trends; and it even linked me to some really interesting tutorials.
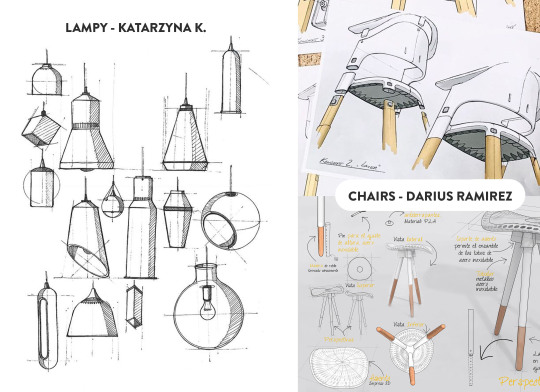
I selected a few images that I really liked and appreciated; the first being LAMPY by Katarzyna K. I really liked the clean linework and hatching in this piece. Even though it was hand drawn, the shapes and forms are legible, clean and convey the necessary information in as few lines as possible. The linework skill is something I definitely aspire to achieve with more practise.
The next set of images I gained insight from were the chair drawings by Darius Ramirez. This image set really resonated with me because of the clean marker renderings, and the composition of the pieces. I enjoyed that there were overlapping features and lines, but the overall composition remained clean and not too overwhelming. The marker renderings were colourful and sharp, and the minimal palette really worked well with the simple forms. Both these artists produced wonderful works; and I would love to emulate the skills and techniques required to make them. I will definitely continue to look for inspiring designers and skills that will improve my own works.
For the tutorial itself, I started with the online video tutorials from Rob. Even though I feel like I have a lot of experience with Photoshop, it was really interesting to see the workflow of someone with more experience than myself. I found that it was less the technical information like the use of layer masks and clipping masks, but more the process, and artistic design choices where I gained the most insight from these tutorials. Using a digital medium like photoshop, there are many ways to speed up or improve workflow compared to traditional sketching. One of the most important methods from the tutorial was the use of masking and copying (Image 3). Using the initial block-out as the boundaries, applying shadows and highlights is a much faster process as it reduces the clean-up at the end. Another method I used during the blocking out stage was the symmetry tool in Photoshop to create even and symmetrical sides. I found that this allowed me to see the form faster, and iterate through ideas at a quicker rate.
I really liked Rob's use of the Gaussian Blur filter to soften the edges. It allowed me to block in the hard edges and shapes. I found that it was much easier to be conscious of the shadow shapes and highlights when they had hard edges; and softening them out was a simple one click process after the fact. Before seeing this method in practise, I would either have used a soft brush with high opacity, or the smudge tool, which often results in muddy and inconsistent shading. Something I struggled with in this tutorial was the consistency of my linework. The laptop screen was slippery compared to paper, and this led to losing control of the pen - creating a line which was way off the desired trajectory. This was the main reason I was glad to have an undo button and layers to delete. In a way, having the security of redoing a stroke gave me more confidence in my linework.
I added a slight amount of smoothing to the brush to counteract the glassy screen. Going slower meant that I had more control over the curvature. In the end I was happy with how this exercise went. I gained a lot of insight into product design sketching with photoshop, and was eventually able to produce a piece I was happy with (Image 4). I would definitely experiment with different styles and shapes if I were to redo this activity.

I decided that I wanted to try another program as well, so I opened up Sketchbook Pro on my laptop. Sketchbook Pro has a plethora of tools designed specifically to speed up the process of perspective drawing, and I wanted to try them out. The perspective grid tool was extremely powerful, and it allowed me to block out the bounding box of the bottle in under a minute. From the bounding box, I created a freehand sketch of the bottle on a new layer, and when I had created something I was happy with, Reducing the opacity of that layer and using the built-in drawing tools helped create the final linework. I liked this process because it allowed me to work methodically and in stages. I don't think I have full control over Sketchbook as of yet - the perspective was still a bit off due to the fact that I neglected the initial linework and misjudged where to place the ellipses. I found the process of creating a drawing in Sketchbook enjoyable, and the built in Copic marker set made it feel like it was built for Industrial Design.
Even though I am happy with the final product, I would say that my drawings are still not where I would like them to be. I think that my linework could be refined and confident; and my application of colours and lighting are not always appropriate. I would like to continue to complete these exercises on a semi-frequent basis, and use it as a benchmark to track my progress - focusing on my linework and colouring. Overall, I feel like I have already made a lot of improvement in my drawing abilities over the past 6 weeks, and I look forward to evolving them further.
9 notes
·
View notes
Text
Week 5 - Sketching
This weeks activity was definitely the hardest for me mentally. The previous weeks of content were quite technique based, in the sense that once you learn the rules, the results are straightforward to replicate and ideate upon. This week's content was much more skills based than it was techniques based, and that lead to a lot of frustration and challenges - mainly around the fact that my drawing skills weren't as developed, making it harder to replicate my ideas how I initially saw them in my head.
The warmup exercises were a great start to the tutorial, they definitely brought the skillset of hand drawing into focus; immediately making me realise how reliant I was upon the tools in the previous classes. I felt like the exercises definitely increased in skills and difficulty. The lines exercises (Image 1, 2) made me realise how important grip, posture and positioning is when drawing. I played around with the speed and control of the pen, and I noticed that holding the pen further down the barrel helped reduced my shaky motions.

Along with the other exercises, the ones I enjoyed the most were the contour lines (Image 5), and the circles and ellipses (Images 3, 4). The circles exercise was really difficult, and at times I found it very frustrating when the circle would look more like an ellipse, but I think it was the most rewarding as I forced myself to complete the page. Sometimes I find that completing something is more important than refining it. As someone who can be overly critical of my own work, completing a task where the result may not be perfect is a great way to improve. The circles in perspective exercise was also difficult for the same reasons. The contour lines exercise was definitely my favourite (Image 5), because it really taught me to visualise forms on a 2D page. I think I gained the most from this exercise because it amalgamated all of the skills from line confidence, ellipses and circles into one.

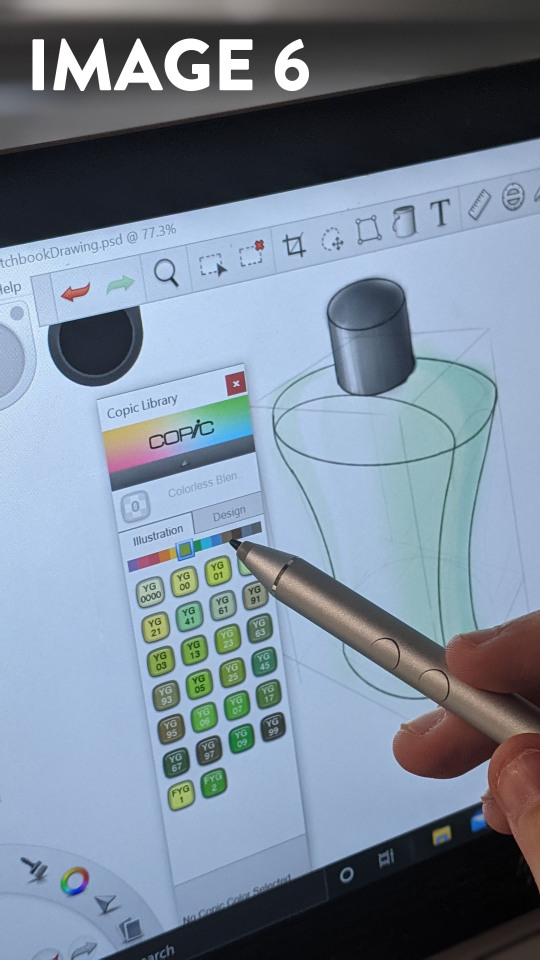
Moving on from the warmup exercises, the task for this week was to redesign an Olay Moisturiser bottle. I found myself trying to consider the brand identity and constraints, as I think they are a great way to come up with inspiration. Doing some research on the Olay line, their bottles have very simplistic and curved form without many extrusions and harsh edges. When undertaking the first task (Image 6), I wanted to focus on the overall silhouette of the bottles, rather than supplying detail for each concept. This exercise allowed me to quickly iterate on ideas, and gave me immediate reactions to what I liked and disliked as I put pen to paper. There were times I drew the first line of the bottle and knew I wasn't going to like it (for example, bottom left). Not devoting too much time, and overthinking allowed me to produce bottles which I thought had a lot of potential for the next stage.

When it came to add shading to the bottles, I started to experience some issues. Having never worked with alcohol markers before, I bought a couple of Copic markers in two shades of grey (C4, C5) to try and do some shading. I quickly learned that I should have purchased some lighter shades of grey as well, as they can be layered to increase the richness of value. I found that I wasn't moving the markers across the page fast enough, and it caused some ugly bleeding, so I smoothed over the marker with some graphite pencils which were more familiar and easier to control. Eventually, I would like to not rely on pencil for correcting my mistakes, especially if I decide to buy coloured Copics in the future. My corrective efforts are definitely a bi-product of being a beginner, but it was a great lesson to learn early on.
The second exercise started off very similar to week four's content. Drawing the boundary box template using the perspective techniques worked well. When transferring the boxes to other paper, I used thin mechanical pencil to lightly place them on the page. When drawing the three forms I liked from task 1, I found that the construction of the form was relatively ok during the straight line sections. When constructing circles and ellipses, I found that I was still too shaky and lacked control, so I drew them with the mechanical pencil, and then went over them with pen. When adding marker to these concepts, I once again found that I was not happy with the results. Unfortunately, because marker is rather permanent, my mistakes were immortalised on the page. I don't regret using the Copic markers, because I know that I will develop control with practise.
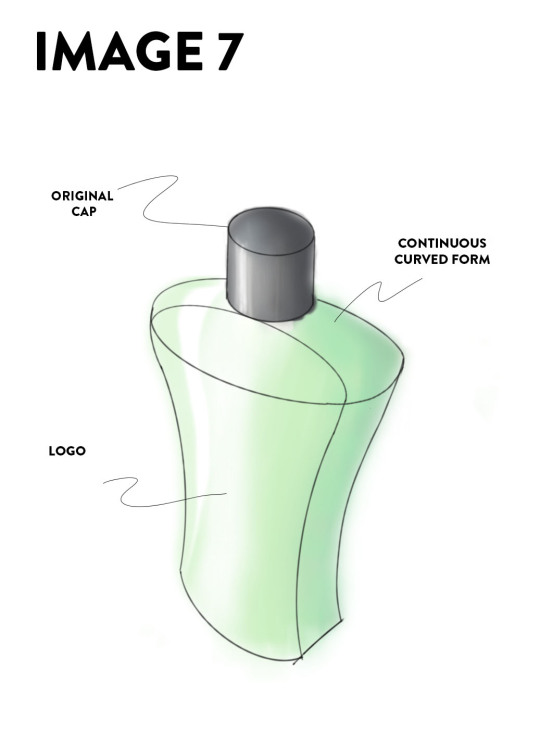
I wasn't completely happy with these three concepts (Image 7), so I wanted to create a final concept which was more visually interesting. I think I set my constraints too early, and should have allowed myself to make anything that came to mind - so I could rein them in when it cam time to develop them into final drawings. With this concept I went back to sketching without considering the proper dimensions. I made annotations on what was good, and more importantly, what I didn't like (Image 8).
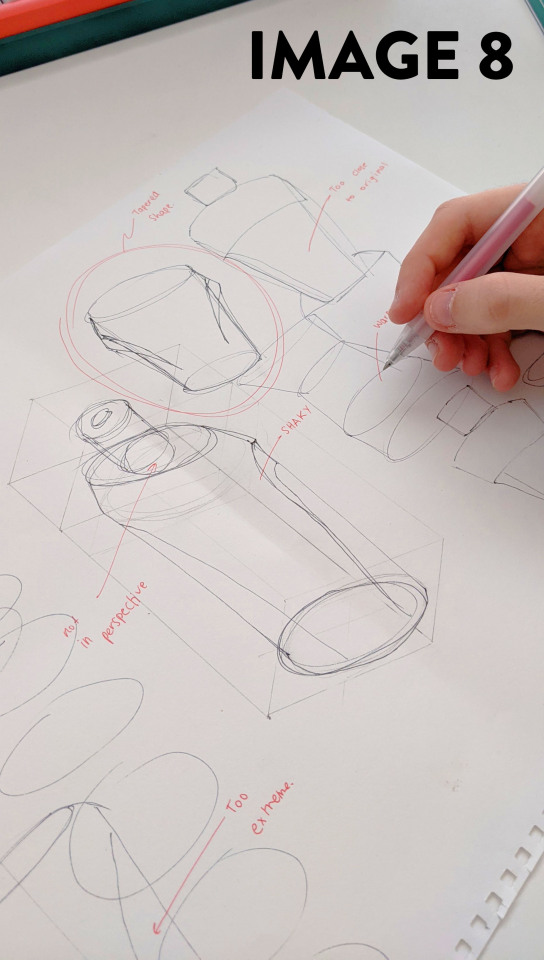
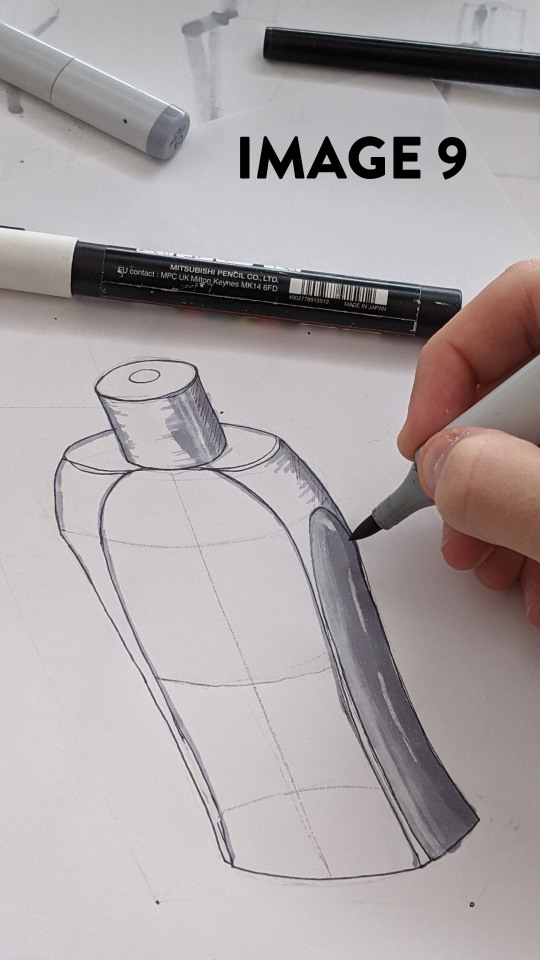
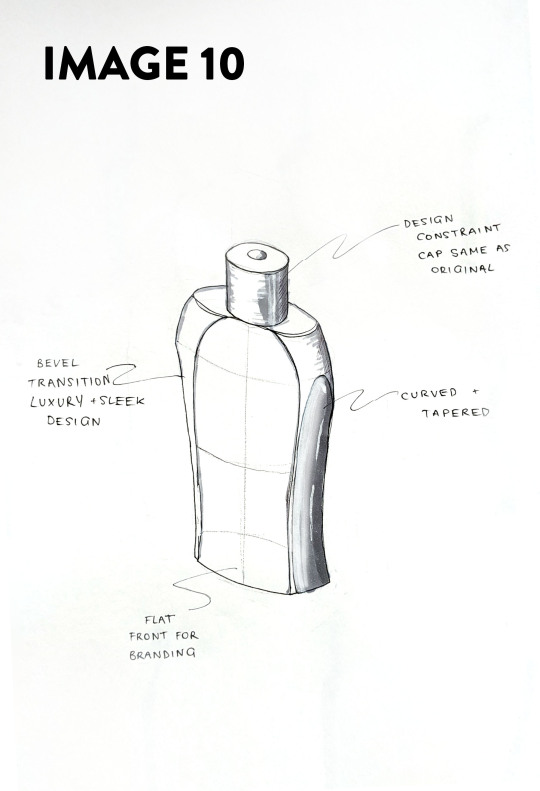
When it finally came time to finishing the activity, I placed dots on the corner in thin mechanical pencil so I could remove them later. I liked this technique because it still gave me guidelines to work from, but kept the page clean and legible. I focused more on the detail and creating interesting forms on the bottle, and used these guidelines to create curved shapes and lines which tapered and chamfered the bottle, which I tried to highlight with the markers (Image 9). Overall, I wasn't entirely happy with the final product (Image 10), but I could definitely see my improvement with the markers from my first and second attempts.
Confidence is definitely something I lack when drawing, particularly with ellipses and circles; and it is something that can only be developed with practise and time. If I were to redo this activity, I would really focus on the circular forms and improving them, as well as practising with the markers more before using them in my linework. Using the YouTube Channels from the Pre-Class activities, I want to keep developing these skills and create my own style. It really is the skill I look most forward to developing for concepting as an Engineer and as a Designer.
8 notes
·
View notes
Text
Week 4 - Secondary Auxiliary and Perspective Drawing
Before the class on Friday, I first completed the week 3a optional exercise on Secondary Auxiliary Drawings. I found this really challenging, and it took me a lot of external research as well as reviewing the slides in order to fully understand the second auxiliary projection. Having the paper model with me at my desk made understanding the way the form rotates much easier, as well as labelling the points in the Secondary view on the Top and Front views.
Once I understood the way the form rotated, I drew a sketch of the secondary auxiliary view on the drawing (Image 1 + 2). After verifying the positioning and view with reference images, I transferred the skills from weeks one to three onto the page (Image 3). I am quite proud of the result, because it was a skill I had never seen or completed in my life before this week, and I would be interested in expanding my technical drawing skills with other new concepts.


For the week 4 tutorial class, we focused on Perspective Drawing. One thing I found really interesting with the content this week is that I didn't realise how technical a perspective drawing could be. I really enjoyed looking at a creative visualisation of forms through this lens because it is always rewarding to explore new ways of doing something. I have attempted perspective drawings for concepting and ideation, but never to try and replicate an object in front of me.
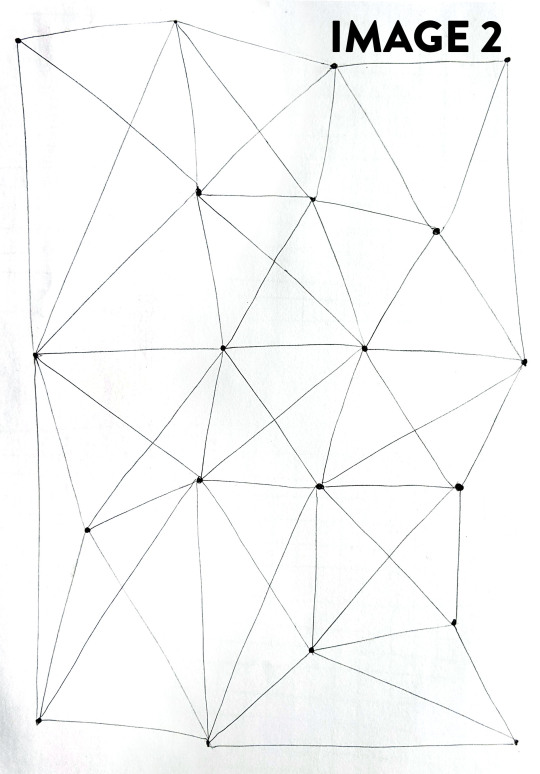
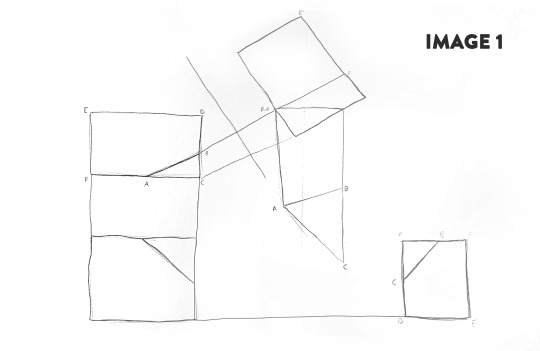
The first exercise was to create a two point perspective drawing of the paper model chamfered cube. I basically followed the method of the pre-class interactive activity, and kept it open to check my progress at each step. When first starting, I underestimated how much room I would need on the left for the 30° angle perspective. So I flipped the page over and started again.
When completing the activity the second time around (Image 4), I realised that it wasn't important how far apart I place the PP and the HL, but the final perspective view was based on how far apart the HL was was from the GL. I found it really beneficial to have the chamfered cube in front of me when completing the first activity. I had it on the table, and picked it up to align my view roughly to what I had on the page. It is really exciting to see that I had transferred it correctly to paper. I was glad I restarted this drawing because it made me realise how important it was to consider the space on the page before starting a drawing in perspective.

I found the second exercise (Image 5) much easier after proceeding from the first exercise. Basically followed the exact same steps as the first exercise, and the only thing different was that I approximately doubled the length of SP. It really interesting to see that when you increase the distance of the viewer, the top faces become less visible. I used the chamfered cube on my table as a test, and when I moved away from it, I noticed that I could see less of the top face.

I decided to trace the result from the first part of task 2 onto a new piece of paper, so that I could extend the box in a way that was visually clearer (Image 6). There would have been intersecting outlines and a messy page layout, so I decided to move it it a new A2 sheet. I am really happy with the decision, because the linework is really clean and legible. I found the process of extending the boxes quite easy, as the initial linework simply was elongated to create the extruded form.

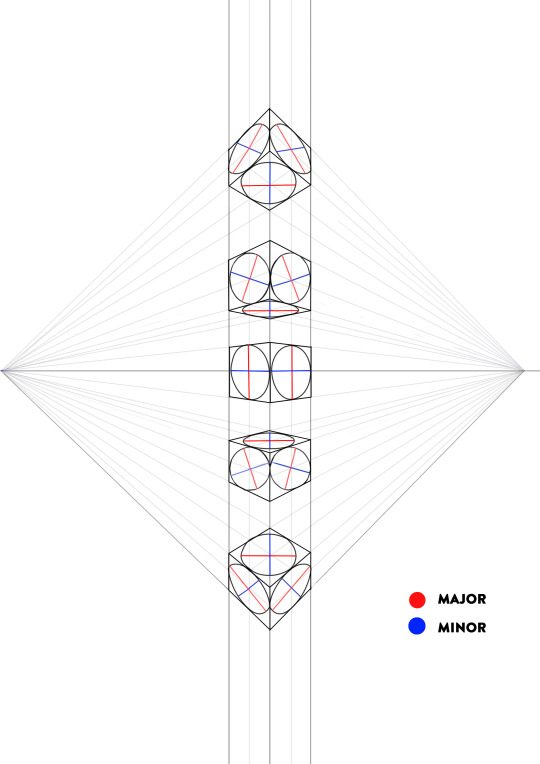
The final activity (Image 7) was to create a layout on the page of a cube to practise ellipses in perspective. I decided to try and be efficient with my page layout and time by drawing multiple cubes with varying distances from the Horizon Line. I have always found drawing circles and ellipses difficult, so I wanted extra practise with it. This is definitely the skill I believe I have to practise the most, because I find the more I concentrate on getting a line to look smooth, the shakier it ends up being. I was moderately happy with the results, but I decided to label the Major and Minor Axes when post processing the image.
After completing all of these exercises I realise how much room for improvement there is for technical drawing. I think as I continue to practise and refine this skill over years to come, many of the guidelines and concepts will come naturally without having to draw them. The opportunity to make the process of drawing more efficiently will come with time. I am keen to keep practising this skill, as it was a really interesting mix between technical drawing and artistic concepting; which I think fits so well into the field of Industrial Design.
11 notes
·
View notes
Text
Week 3 - Section and Auxiliary Views
The task for this week's tutorial was to build off the skills of the previous two weeks by practising Sectioning, and a Primary Auxiliary view on a third angle projection.
At first I thought the tapered block that we had to draw in the tutorial was symmetrical, but it was actually an illusion formed by the smaller dimensions on the right; making it look like the model had perspective. This reinforced that it is really important to study and imagine the object in 3D space before putting pen to paper. When presented with only one view of an object, it is easy to make assumptions about its form. I visualised putting the object inside a box, similar to week two's tutorial exercise to help visualise it's 3D geometry from all angles.
I started the first exercise with a sketch of the tapered block projected on its three respective sides. I used this sketch as an opportunity to see how the top and front view would fit onto the page (Image 1). As the dimensions of the model were quite large I was worried that it wouldn't fit on A3 paper. As much as I want to refine it, I try not to fixate on the sketch, as it is meant to be just a thumbnail of the final measured drawing.

During the last tutorial, I chose to restart my drawing after the initial construction lines, because I aligned my image too far to one side. I wanted to practise my layout to make sure it looked centred and balanced. I underestimated the size of the tapered block, and after drawing boxes to represent the top and front view, I realised I had to move them further to the left to ensure I could fit the auxiliary view comfortably (Image 3).
When it came time to add pen to the outlines and dimensioning, I focused on making more confident strokes to reduce ink bleeding; as a result, I improved the quality of my linework from the previous weeks. When drawing the section lines, I struggled to find a way to efficiently add them in. After speaking with Tom, I used my t-square and 45° set square, sliding it along the t-square evenly by 5mm using its ruled edges. This significantly reduced the time it took to draw the (approx.) 20 straight lines. They were then marked in 0.25 pt fineliner (Image 4).

I made sure to take my time with this drawing, deciding to finish it at home. I tend to make very sloppy mistakes when I rush, so all of the pen linework was completed after the tutorial. All in all I was very proud of the final product below:

This exercise was very engaging, and really made me think about the importance of conserving space and page layout for different views within a drawing.
If I were to redo this drawing, I would take Tom's advice and draw the construction lines more selectively, as over-drawing them lead to more erasing further down in the process that could have been avoided. Knowing how squished the page layout would be on A3 paper, I would also consider using A2, or planning out my dimensioning locations more thoroughly next time.
8 notes
·
View notes
Text
Week 2 - Engineering Drawing
In this week's tutorial, we practised the content from the readings; understanding and developing our skills in engineering drawing. High school Engineering Studies, and earlier courses provided an excellent foundation for this week's content, but it was demonstrated in a hands on approach which aimed to visualise before execution.
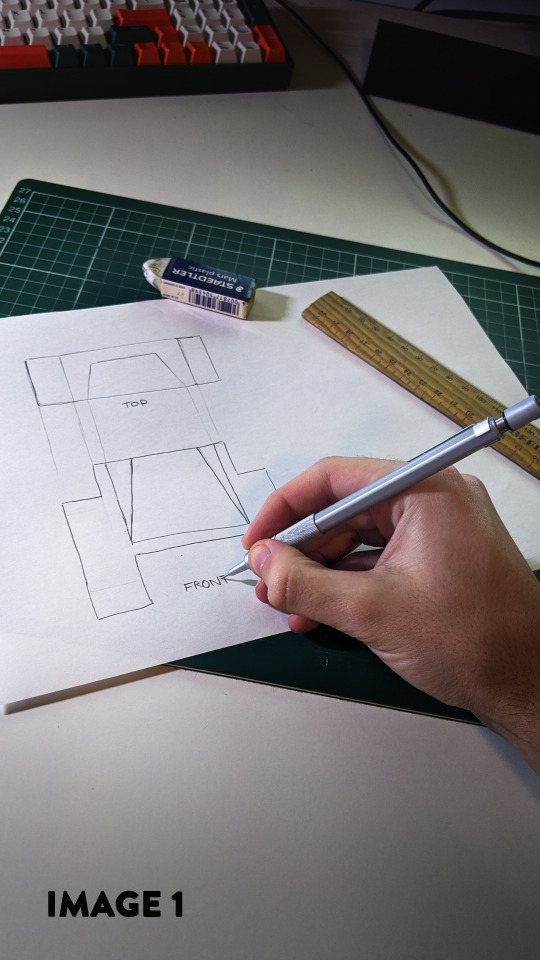
The first exercise required the class to choose a handheld item, and create a paper box around it. Labels were placed on the Top, Front, Left and Right sides of the net (Image 1), and assembled to be placed over the object (Image 2). Initially I didn't find much value in this stage, but after talking with Tom, I found that I developed a deeper appreciation for it. This exercise inspired me to start thinking about how different forms would be observed from each side of the box in my head. When I could imagine the box made of glass, or a wireframe box around the form, I could look in and see how it would project orthogonally.


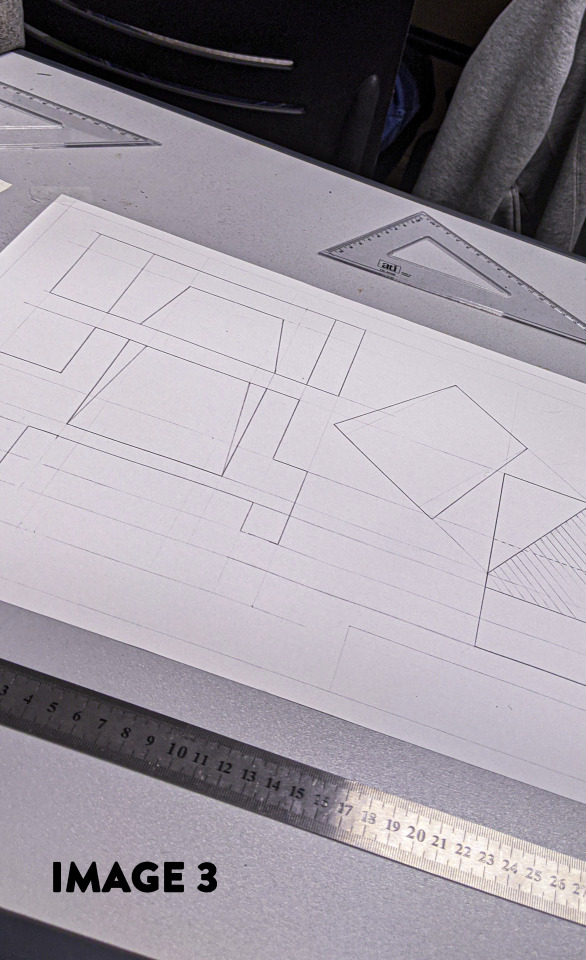
After encasing the laptop charger in the box, I moved onto the second task, which was to create a sketch of the third angle projection technical drawing (Image 3/4). I think this stage is vital when doing technical drawings by hand, as it allows for experimentation of the page layout, and to ensure the forms look correct when projected onto the page. Having to do it by hand is a challenging, but necessary activity which forced me to to apply the knowledge from the readings, and personal experience. Having my neighbour in the tute, Khulan, as well as Gonz comment and critique my work also allowed me to identify any missing details or features of the object.


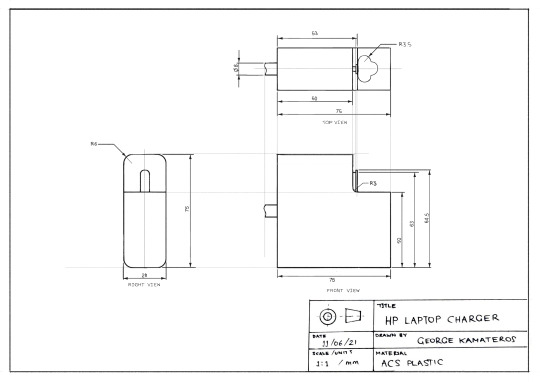
The final task was to use the insights developed in the previous activities to create a dimensionally accurate 1:1 technical drawing of the charger in third angle projection. I got halfway through this activity before the class ended, and decided to take it home. In last week's tutorial, I struggled with ink bleeding and blotting from removing the ruler against the page, and rushing, so I wanted to improve and reduce any error caused by not taking my time. I decided to start completely from scratch when I got home. I think that this was the right decision, as the page layout was centred and clean in the final drawing below.
Overall I was quite happy with how the tutorial activities went. If I were to redo the tasks I would try to develop a more efficient workflow to complete the drawing faster. I really enjoyed going to the origins of engineering drawing and practising this important skill.
17 notes
·
View notes
Text
Week 1 - Drawing Instrument Exercises
The first tutorial for IDES1262 utilised the drawing instruments within our kit to construct dimensionally accurate shapes. Having brief exposure to these tools from high school Engineering Studies, and earlier courses in my Engineering degree was an excellent introduction to sketch modelling; however, using them all in conjunction to create a drawing was a new and rewarding experience.
Part 1 – Dimensionally accurate drawing
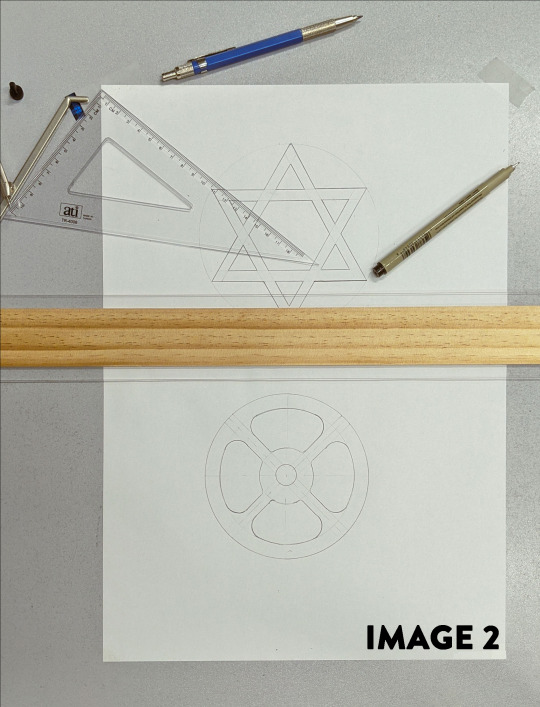
The first half of the tutorial required the class to use a t-square, compass, set squares and a circle template to construct the final linework (image 1). I found it beneficial to create the construction linework very lightly using the mechanical drafting pencil (image 2). For the first exercise, I used the radius of the compass to create six even points around its circumference, being sure to align the first point vertically. For the second exercise, it was not possible to use the radial relationship to distribute the points, so I was required to use the 45° set square and the t-square to create the diagonal construction lines. By approaching these two exercises with a focus on a different tool, I found that I was trying to be mindful of the best techniques to use for all the shapes and lines.
When it came time to solidify the pencil lines using fine liners (image 3), I found it difficult to produce precise linework by hand and using the compass extension. Any hesitance in the stroke produced blotting and bleeding through the page. As the exercise progressed, I tried to become more mindful of the time the pen spent on the page through faster and more confident strokes.
If I were to repeat the exercise, I would focus on producing more confident linework with the fine liners, and practise creating smaller circles with the compass, as they were the lest refined areas upon reflection.


Part 2 – Tessellation
Building off the concepts of the first exercise, the tessellation exercise was about testing the dimensional accuracy of the shapes we made by cutting them out and observing the tolerances when pieces were fitted together.
I used the same horizontal linework of the t-square for each of the four tiles, as it produced a datum for which all the pieces shared. When completing this task for the first time, I was rushing to finish the task before the end of the tutorial, and this resulted in mistakes, and misaligned cuts. When I placed the tiles next to one another, there were very clear and evident gaps, where some of the sides were less than the desired 30mm. I repeated the task at home, being sure to take my time with it. I also substituted the set square with the steel ruler, and the snap-off cutter with the scalpel (image 4); finding that it allowed me to see the paper better as I cut on the mat. This resulted in tiles which tessellated with a smaller tolerance and higher accuracy (image 5). By starting the exercise over again from scratch, I gained more experience with the cutting tools and it gave me the chance to actively focus on correcting previous errors.


6 notes
·
View notes
Text
Hello World!
Hey! My name’s George. I’m a 3rd year Mechatronics Eng student with a keen interest in IDES. I’m taking this subject as a free elective, because I am striving for a career where I can mix the creativity of Industrial Design with the technicality of Engineering.
I also work at a few of the makerspaces on campus, so come say hi if you’re around. For the moment though, I’m just trying to wrap my head around Tumblr...
6 notes
·
View notes