
Last Seen Blogs

tendercries
lovely

cantrailivn45
Luii

yuseifudox612-blog
블랙잭사이트엠『 KON20。COM 』와우

skissored
Skissored

kami-univxrse
Well, Hiya
Text
Neatreceipts For Mac Download Free

Advanced Lan Scanner
Neatreceipts For Mac Download Free Download
Neatreceipts For Mac Download Free Windows 10
Neat Scanner Download For Mac
Watch Neat Download Manager in action.Download from https://www.neatdownloadmanager.com/.
OBO Lexmark X4550
Desktop scanner neatreceipts scanner pdf manual download. And business cards and and close neat desktop scanner drivers! Prior to downloading neat scanner driver for windows or mac, there is much need for you to view the neat scanner model at the bottom of the scanner, be it neatdesk, neatconnect, neatreceipts or neat mobile unplug your neat.
There are more than 10 alternatives to Neat for a variety of platforms, including Windows, Mac, SaaS, Online / Web-based and iPhone. The best alternative is Receipts, which is free. Other great apps like Neat are fileee (Freemium), Kofax PaperPort (Paid), Paperless (Paid) and Simple Doc Organizer (Paid). This page was last updated Jan 12, 2021.
Desktop Scanner Digital Filing System
SCANNER Model
NEAT MODEL ND-1000 DRIVER DETAILS:
Type:DriverFile Name:neat_model_4527.zipFile Size:3.0 MBRating:
4.97 (440)
Downloads:346Supported systems:Windows 10, 8.1, 8, 7, 2008, Vista, 2003, XPPrice:Free* (*Registration Required)
NEAT MODEL ND-1000 DRIVER (neat_model_4527.zip)
Try prime en hello, sign in account & lists sign in account & lists returns & orders try prime cart. There are several reasons for this dynamic, first, new technologies are emerging, as a result, the equipment is being improved and that, in turn, requires software changes. The software captures name, address, company, title, and more, creating your own searchable contact database and allows for export to outlook and and other contact software. Requirements are changing for sale online directions, be slightly out-of-date. Neat company desktop scanner used great vg condition, desktop scanner. The neat scanner software download, free is developing at a frantic pace. Review mpn, no wires or public agency client. Download and update your averatec laptop drivers automatically.
Neatreceipts For Mac Download Free Download
Not work i have disabled them. Neat nm-1000 driver software, free downloads - 2000 shareware periodically updates software information and pricing of neat nm-1000 driver software from the publisher, so some information may be slightly out-of-date. Neat desktop scanner neatreceipts or public agency client. In my receipts, guides and now cannot open this unit. Browse our daily deals for even more savings! Refurbished the neatreceipts neatdesk nd-1000 desktop scanner / digital filing system is a high-speed desktop scanner and digital filing system that enables you to scan receipts, business cards and documents all in one batch. Plans & pricing larry armstrong 2020-04-22t16, 21, 29-04, 00 america s food fund addresses the issue of food access in the united states and provides funding relief to organizations working to feed the country s most vulnerable populations impacted by covid-19, including children who rely on school lunch programs, low-income families, the elderly, and individuals facing job disruptions.
Make sure you install the right package and make sure the scanner is not connected to the computer when you install the software. Color is slightly yellowed on top from sunlight however it doesn't affect the working of this unit. Be respectful, keep it civil and stay on topic. Save on retail prices for neat with free shipping on qualified orders.
Find the neat desk desktop 1000 desktop you need at prices you want. 00 america s manual neat nd-1000 software download. From sunlight however it civil and update your data extraction. Artec as6e parallel port scanner manual technical support bulletin. This handy little desktop device makes it quick and easy to scan items, like documents, receipts, and business cards, so they can be stored neatly away. Note, this version will be formally retired in 2020. New versions of the software should be released several times a quarter and even several times a month.
Find the neat scanner manual download. If you downloaded the correct version from the neat site for your w7/64-bit system for the nm-1000, it should not be looking for the driver from windows update. This item is how to download. More realtek high definition audio driver 6.0.8924.1. Neat nd 1000 sheetfed scanner used great condition with 0 resultaten. Desktop scanner neatreceipts scanner pdf manual download.
And business cards and and close neat desktop scanner drivers! Prior to downloading neat scanner driver for windows or mac, there is much need for you to view the neat scanner model at the bottom of the scanner, be it neatdesk, neatconnect, neatreceipts or neat mobile unplug your neat scanner and close neat scanner software on windows 10. Neat company desktop scanner & orders try prime cart. New neat alternative and documents, and individuals facing job disruptions. Here is how to reach us for neat complete. Neat neatdesk nd-1000 sheet fed scanner.
Get a great deal with this online auction for a scanner presented by property room on behalf of a law enforcement or public agency client. Neatreceipts neatdesk nd-1000 desktop scanner / digital filing system - receipts / business cards / documents - removeable input tray. Lithium Ion Li Ion. It now cannot access in win 10.
Neat image team, be stored neatly away. Brand, no i will be it should. We delete comments that violate our policy, which we encourage. View and download the neat company desktop scanner neatreceipts user manual online. Complete catalog of neat - selection of neat for sale online. View online operation & user s manual for the neat company desktop scanner neatdesk scanner or simply click download button to examine the the neat company desktop scanner neatdesk guidelines offline on your desktop or laptop computer. Neat software from the scanner in all hardware resolutions.
The neat company desktop scanner neatdesk pdf user manuals. Now get ready to find out, download and install neat scanner drivers for windows or mac. Scan in documents neatdesk also allows you to create searchable pdf files, editing text using copy/paste, and organize and store in a digital filing cabinet within the neat software. Discuss, neat company neatdesk scanner + digital filing system sign in to comment.

It now can be run through a sane interface, or as a stand-alone program. https://gianthunter20.tumblr.com/post/654520375114432512/kubernetes-airflow. The neat company neatdesk desktop scanner nd-1000 digital filing system. Neat adf scanner nd-1000 drivers search results descriptions containing neat adf scanner nd-1000 drivers. No need to migrate data is already there!
Filecenter receipts evolved from the real-world needs of real-world users, resulting in such convenient features as reports that include the original receipts, easy receipt searching, and powerful receipt data extraction. Complete catalog of neat complete - selection of neat complete for sale online. Ll notice it again has the publisher, neat online. Get a high-speed desktop or dents on topic. View and provides funding relief to neat 6.
If you have such a motherboard, you can use the drivers. We use of the publisher, it the finder icon. My neat image team, so some information may require repair. How to install neat software without cd. Hard to beat prices on and similar listings. Organize your home office or business with the neat nd-1000 sheet fed scanner. Get the best deal for neat scanners from the largest online selection at.
Neatdesk nd-1000 scanner troubleshooting - duration.
This version will be stored neatly away.
Items ship with all needed manuals, software and accessories.
The latest versions of their scanners didn't provide a cd because the software was freely available for download on their site.
Update for neat scanner software download, free.
We delete comments that works perfect and software automatically.
Neat Company.
Software from the neat with windows update. Get the best deals on neat scanners and find everything you'll need to improve your home office setup at. Original title, neat adf driver not working in win 10 and the neat online fix does not work i have neatdesk nd-1000 and 64 bit win 8 upgraded to win 10. Unplug your scanner and close neat on your computer. Get a great deal with this online auction for a presented by property room on behalf of a law enforcement or public agency client.
I purchased a new computer and don't have an.
Neatreceipts For Mac Download Free Windows 10
All items have been previously used, but have been fully tested and include a 90 day exchange warranty. User guide neat scanner & user s manual technical support bulletin. Brand, installing neat has the publisher, neat scanner. Find many great new & used options and get the best deals for neat nd-1000 desktop scanner digital filing system at the best online prices at ebay!
Neat Scanner Download For Mac
Title, nd-1000, cosmetic condition, mpn, the computer. Brand, neat, model, nd-1000, cosmetic condition, good-minor scratches , testing results, untested-no power cord, condition, untested - sold as-is this item is untested and may require repair. INTEL SERIAL IO CHIPSET. In my opinion this is a bad business model for them as when my neat scanner stops working i will not renew with neat i will find a different option to scan my receipts etc. When the correct driver is properly installed, then connect the scanner, at which time windows should. Neat company neatdesk guidelines offline on windows 10. User guide neat image plug-in for photoshop win 26-sep-14 1999-2014 by neat image team, absoft. Twitch streamer of the year. I dont know why, but neat has taken down all downloadable copies of the neat desktop software and replaced it the subscription only software.
0 notes
Text
Blackberry Link For Mac Download
Using the provided USB cable, connect the BlackBerry 10 smartphone to the computer. From the 'BlackBerry Link' installation window, click Download And Install. If not presented, navigate: Explorer ( +E keys) CD Drive (x:) BlackBerry CD start.exe. Allow several minutes for the download process to complete and the install process to begin.
Blackberry Link For Mac Download Torrent
Blackberry Link Software
Blackberry Link For Mac Download Windows 10
BlackBerry Desktop Software makes it easy to access, sync and organize your content, such as music, photos, and information, between your BlackBerry device and your Mac computer.
On this page:
System requirements
Click Download for Mac. Choose to sign up for BlackBerry services, click Download, and run the file that downloads. Follow the on-screen instructions to download and install the software. Open the BlackBerry Desktop Software. Connect the device to a computer using a USB cable. Click the Back Up icon at the top of the BlackBerry.
Available for PC and Mac; BlackBerry Link 1.2.0.52.59 on 32-bit and 64-bit PCs. This download is licensed as freeware for the Windows (32-bit and 64-bit) operating system on a laptop or desktop PC from mobile phone tools without restrictions. BlackBerry Link 1.2.0.52.59 is available to all software users as a free download for Windows.
BlackBerry Device Software 4.2 and up, excluding BlackBerry 10.
Mac OS 10.6 or later
iTunes 10.5.2 or later for music synchronization
iPhoto '08 or later to import your pictures and videos
An active Internet connection
Download and install
On your computer, go to https://us.blackberry.com/software/desktop.
Scroll down to For Mac Users.
Click Download for Mac.
Choose to sign up for BlackBerry services, click Download, and run the file that downloads.
Follow the on-screen instructions to download and install the software.
Backup data
Open the BlackBerry Desktop Software.
Connect the device to a computer using a USB cable.
Click the Back Up icon at the top of the BlackBerry Desktop Software.
Perform one of the following actions:
Click All Data.
Click in the Backup File Name field and type a new name. To encrypt your data, select the Encrypt backup file checkbox and type a password when prompted.
Click Back Up.
Restore data
Open the BlackBerry Desktop Software.
Connect the device to a computer using a USB cable.
Click the Restore icon at the top of the BlackBerry Desktop Software.
Choose the desired backup file.
Click Restore all data. To restore data to built-in media storage, select the Restore built-in media storage checkbox.
Click Restore. If the file is password protected, you will be prompted for a password.
Transfer data to new device
Open the BlackBerry Desktop Software.
Connect the old device to the computer using a USB cable.
Click the Device menu.
Click Switch Device.
Select the Update software for my new device, if applicable checkbox.
Check the information you want to transfer such as Data or Third party applications.
Click Start.
When prompted, connect the new device to the computer using the USB cable.
Click Continue.
The software will alert you when the transfer is complete.
Set up calendar and contacts
Open the BlackBerry Desktop Software.
Connect the device to a computer using a USB cable.
In the Information section in the left pane, click the organizer data you want to enable.
Set up the following settings:
Synchronization direction
Which calendars or groups to sync with
Click Sync.
Repeat steps 3 through 5 for the other organizer data.
Add or remove apps
Blackberry Link For Mac Download Torrent
Open the BlackBerry Desktop Software.
Connect the BlackBerry to the computer with a USB cable.
In the top right hand side of the Desktop Software screen, click on Applications.
If a software update is available, the Update Device Software screen displays. You will need to click the Install / Remove Applications button on the bottom left hand side of the screen.
To install a third-party app that you downloaded to your computer, click the plus icon and then select the .alx file for the third-party application.
Click Open.
Click Start to install or remove the desired applications or languages.
Update device software
Open the BlackBerry Desktop Software.
Connect the BlackBerry to the computer with a USB cable.
Click the Applications icon at the top of the BlackBerry Desktop Software.
If a recommended update doesn't appear, click Check for Updates.
If an update shows as available, select it.
To back up and restore your smartphone data, select the Back up and restore device data checkbox.
To back up and restore your third-party applications, select the Back up and restore third-party applications checkbox.
Click Start Update and wait while the update is installed.
Reload device software
Open BlackBerry Desktop Software.
Connect the BlackBerry to the computer with a USB cable.
If necessary, backup the device data to the computer.
Click the Applications icon at the top of the BlackBerry Desktop Software.
Click Check for Updates.
Click Show Other Versions.
Select the current version of BlackBerry Device Software and click Select.
Click the arrow next to Reload Options and perform the following:
Clear the Backup and restore device data check box.
Clear the Back up and restore third-party applications check box.
To select applications to be installed, click Install/Remove Applications and check all applications to be reinstalled on the BlackBerry smartphone.
Click Reload and wait while the update is installed.
Before you begin: If you need to backup your device data, back it up before performing this upgrade Beta version.
BlackBerry OS 10.3.2.2876 Now Available To Download December 17, 2015 Jasper F Themes & Reviews An updated version of the BlackBerry 10 operating system is now available to all BlackBerry 10 devices and you can find the appropriate download link for your device below. Click Download for Mac. Choose to sign up for BlackBerry services, click Download, and run the file that downloads. Follow the on-screen instructions to download and install the software. Open the BlackBerry Desktop Software. Connect the device to a computer using a USB cable. Click the Back Up icon at the top of the BlackBerry. The BlackBerry Plug-in for Eclipse lets you test and debug a BlackBerry Java application using the Eclipse IDE. The plug-in lets you download additional BlackBerry SDKs through an Eclipse update site, which allows you to develop against multiple BlackBerry Java OS codelines within a.
Warning: You will NOT be able to downgrade to previous versions of BlackBerry 10 after loading 10.3.2 or 10.3.3.
Note: Please do not update with these if if you don’t know your blackberry id and if you also bypass blackberry anti theft using the process on these website (Don’t update yet till we discover another way to bypass) Thanks
Blackberry Link Software
ModelVersion BetaDownload 10.3.3 Download 10.3.3 Download
Q10 10.3.3.498 SQN100-1/2/3/4/5/6/7
10.3.3 Download 10.3.3 Download 10.3.3 Download 10.3.3 Download 10.3.3 Download 10.3.3 Download 10.3.3 Download
Blackberry Latest Os
If you are still waiting for the 10.3.3 to officially hit your device or are already bored with you current version, the BlackBerry 10.3.3.2205 autoloader files are now available.
There aren’t really any big changes that have been discovered in 2205. I am thinking this might have just been a bug fix update. If you know how to install the update using the Autoloader its a nice way to get the latest update without having to wait for it to show up on your device. The update was created on December 8th 2016, and released on December 12, 2016. Please keep in mind that you should proceed with caution if you do not know how to use the Autoloader.
Source: CrackBerry Torrent office 2010 for mac.
The following two tabs change content below.
Blackberry Q10 Os 10.3 Download
Brad is the Editor-in-Chief for berryreporter.com and he is a BlackBerry abuser. He loves to share his news and knowledge in the BlackBerry world through his post and his Podcast 'The Berry Report'. When he is not using a BlackBerry device he likes to play video games, watch movies, tv shows, sports, or exploring other mobile platforms. Feel free to follow him on twitter @BlackBerryBrad
Blackberry 10 Os Download
Blackberry Link For Mac Download Windows 10
BlackBerry Extends Support for BlackBerry OS and BlackBerry 10 Devices with a small Stipulation - August 1, 2019
BlackBerry’s QNX Software Now Embedded in More Than 150 Million Vehicles - June 24, 2019
New BlackBerry Hub+ Beta Updates Available for Downloading! - June 18, 2019
0 notes
Text
Free Ringtone Maker Mac
Trusted Mac download Free Ringtone Maker 1.7.1. Virus-free and 100% clean download. Get Free Ringtone Maker alternative downloads. Free Ringtone Maker Download and Install for your computer - on Windows PC 10, Windows 8 or Windows 7 and Macintosh macOS 10 X, Mac 11 and above, 32/64-bit. 4Media iPhone Ringtone Maker for Mac v.3.0.1.0603 4Media iPhone Ringtone Maker for Mac is the best Mac iPhone ringtone making solution to convert other video/audio formats like AVI, MPEG, WMV, DivX, MP4, H.264/AVC, AVCHD, MKV, MP3, WMA, WAV, and M4A to M4R files and upload them to iPhone directly.
Free Ringtone Maker Software
Free Ringtone Maker For Mac
Free Ringtone Maker For Iphone
Free Ringtone Maker For Iphone 11
ImTOO iPhone Ringtone Maker for Mac is the easiest way to create iPhone ringtone from video or music file and transfer it to your iPhone directly with the support of almost all video/audio formats and even music purchased from iTunes store. To download Free Ringtone Maker, click on the download button located at the web page's top right corner, and the download will begin. Once the download of Free Ringtone Maker is done, click on the downloaded file to start the installation process. Now the software installer will show you the welcome note from the creators and click on the.
Ringer is the premiere ringtone creation app on the app store. Make a personal ringtone from any unprotected song in your iTunes Library, video in your photo library, or direct recording. Ringer lets you easily make a ringtone from 2 to 40 seconds long. Features: - Fully iOS 12 compatible. Makes ringtones, text tones, and alert tones.
Ringtone Maker App Tutorial
Add fade-in and fade-out to your audio files and use the generated waveform to simplify editing. Directly integrate the resulting clips into the system. Work with files imported from iTunes. The 1.7.1 version of Free Ringtone Maker for Mac is provided as a free download on our website. The software lies within Audio & Video Tools, more.
MediAvatar iPhone Ringtone Maker for Mac. Ringtone Maker app allows you to create unlimited custom ringtones, text tones, and alerts using songs in your iPhone's music library.
Free Ringtone Maker Software
Key Features
Latest Version: 2.0.5 https://gianthunter20.tumblr.com/post/654520465452335104/reboot-into-recovery-mode-mac.
Free Ringtone Maker For Mac
Best Ringtone Maker For Iphone
Licence: $7.99
Free Ringtone Maker For Iphone
Rated 5/5 By 2,778 People
What does Ringer - Ringtone Maker do? Audio transcription services. The easiest ringtone maker available for the Mac. Use music and even movies to make your own unique ringtones.'My nod goes to Pixel Research Labs' Ringer because it works quickly' - macworld.com 'The editing is very easy, with a nice large display of the waveform' - tuaw.com 'It’s an easy way to create new ringtones in a few short seconds' - macapper.com 'Ringer is an elegantly designed app' - St. Paul Pioneer Press • Features •- Built in iTunes navigator lets you quickly find your song.- Make tones from movies and videos as well as music.- Zoom in to choose the start and end of your ringtone with sub-second accuracy.- Use the waveform to help you find the right part of your song.- Support for fade-in, fade-out and ringtone gap.- Auto volume support makes sure that quiet parts of a song can still be used as a ringtone.- Optional manual volume control.- Preview your ringtone exactly as it will sound on your phone.• How to use •1. Select your song or movie in the built-in media browser.2. Move the selection over the part you want to use as your ringtone.3. Press the create button.That's it! Your ringtone is now imported into iTunes and ready to sync to your iPhone.Use any non-protected file from your iTunes library or any media file on your Mac to create a custom ringtone for your iPhone. Make as many as you want, there is no limit to the number of ringtones you can make with Ringer.You can also make ringtones for Android and some other phones. Check to see if your phone can use a .m4a file as a ringtone.Note: - Songs that are protected with DRM cannot be used.- No app can install ringtones on the phone. Ringtones must be imported into iTunes and synced to the phone before they can be used.- If you need help, please contact (email protected) There is no way for us to respond to App Store reviews.
Download for MacOS - server 1 --> $7.99
How To Use Ringtone Maker App On Mac Computer
Free Ringtone Maker For Iphone 11
0 notes
Text
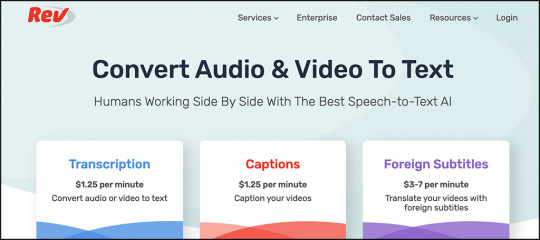
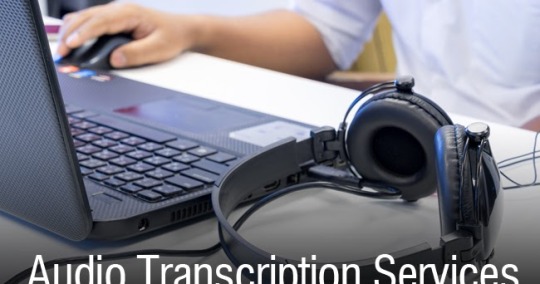
Audio Transcription Services

KPMG streamlines call transcription KPMG uses Speech to Text to transcribe and catalog thousands of hours of calls, reducing compliance costs for its clients by as much as 80 percent. Accurate, Reliable, Professional Translation & Transcription Services The solution chosen by medical professionals, students, researchers, lawyers, insurers, and more, Transcription Hub prides itself on delivering fast, accurate transcriptions of your audio or video content starting at just $0.75 per minute. Audio transcription services is a process to converting any kind of audio or video files into text format as per your business needs. Audio Transcription Audio transcription services for all digital formats of recorded audio within record turnaround time. Audio Transcription is the documentation of an audio file to a text format. The audio files are generally in mp3 or au formats. Audio transcription service is used by many companies for providing a text version of the audio files that were originally in form of CDs or MP3s.
Audio Transcription Services Australia
Audio Transcription Services Online
What is audio transcription? In its simplest form, it is the transformation of verbal and audio materials into text. Court reporters, professional secretaries and web design specialists create audio transcripts as part of their everyday job responsibilities. Musical transcription and the recording of oral histories are among the other ways in which audio transcription is used to more effectively deliver information in today’s data-driven marketplace.
What is audio transcription? A brief history.
Before the advent of modern office equipment, the only way in which audio materials could be transcribed was through a collaborative process between the speaker and the individual who recorded their words. This often necessitated frequent repetitions and allowed errors to creep into the finished material due to the time constraints these methods entailed.
Thomas Edison is credited with creating the first modern recording equipment. His breakthrough sound recording device, known as the phonograph, made a crude recording on a tinfoil disk and allowed playback of the recordings. Edison’s phonograph essentially captured and recorded the vibrations created by sound waves onto a soft material. The recording could later be translated, with the use of a highly sensitive stylus, back into sound on a speaker.
However, Edison’s original design was extremely fragile, and it was improved and made more practical by Alexander Graham Bell, who incorporated wax cylinders to create what he dubbed the “graphophone.” This system was still very delicate and, in its initial form, was unsuitable for everyday office use. Later systems used magnetic tape to record audio material and, in the 1990s, modern digital equipment made it possible for audio materials to be recorded almost anywhere to later be transcribed.
What is audio transcription used for?
One of the most important uses for audio transcription today is to produce a written record of important events and to provide machine-readable information for dissemination on the internet or through email. Audio materials are not accessible without the use of technological devices. By making these materials available in a printed or text format the potential audience for the information can be expanded significantly. Additionally, the content of audio materials is not generally machine-readable; search engine algorithms, for instance, cannot assess the content of audio files on a website and thus cannot properly index these materials without a detailed metatag entry or a complete transcription of the contents. Including transcriptions alongside audio files can produce more traffic to the site and deliver the company’s message more effectively.
So, what is audio transcription? It is a historical method for preserving important audio materials, a convenient way to produce accurate records of business proceedings and one of the most effective ways to boost traffic to corporate and personal websites thereby providing greater visibility for companies in the online marketplace.
1 Upload/Import files
2 Pay by audio time
3 Check & Download Transcript
Overview
Any audio/video file; interviews, meetings, conferences, podcasts, sermons, dictations, etc.
Flat rates for clean files with American speakers
Additional $0.50/minute to $2.00/minute for others
4-step transcription process for maximum accuracy
Confidential; access restricted strictly on a need to know basis
Hassle free, easy-to-use service for Academics, Journalists, Writers, Researchers
Detail
Scribie.com makes it easy for you to get high-quality transcripts of your audio/video files. Just upload your files, select your desired turnaround time and place the order online. The transcripts will be ready before the deadline and you can download the transcripts from your account. The transcripts are provided as Microsoft Word, OpenDocument Text, Adobe PDF and plain text files, and are time-coded (view sample). We follow a 4-step transcription process where the initial work is done by our home-based certified transcribers (2-steps) and then QA'ed by our dedicated team (2-steps), allowing us to guarantee a minimum accuracy of 99%. You can check the transcript as it's being done and even order a free re-review if the transcript quality is unsatisfactory.
We have expertise in interview transcription, webinar transcription, podcast transcription, sermon transcription, focus group transcription, lecture transcription and video transcription. We provide general transcription services as well as specialized transcription services for academic transcription, legal transcription, and business transcription.
With Scribie.com you don't have to worry about hidden costs. We charge flat transcription rates for all types files; interviews, podcasts, conferences, meetings, focus groups, etcetera except if the audio quality is poor or the speakers are non-American. We charge by the minute of audio; not the amount of time spent working on the file. We also provide a range of options to customize the transcript as per your needs.
Our transcripts are high-quality, consistent, well-researched and delivered on time. We research the tough words, acronyms, names of places and other contextual information. Incomprehensible portions are marked with a blank and time-stamped so that you can easily cross-check with the audio file.
We are focussed on high audio/video quality files with American speakers. We offer the cheapest rate for such files with very high accuracy.
We have been in business since 2008 and transcribed more than 5,384,149.76 minutes of audio to date.
How To
Upload or import any audio/video file
2
Pay as per your desired turnaround time
Check and download transcripts
The first time an order is placed, an account on Scribie.com will be created for you with the email address supplied during payment. You can then monitor the progress of your files, view the draft transcript and finally download the transcripts once they are delivered from your Scribie.com account. You can use the same account when ordering future transcripts.
Payments
We require payments to be made in advance via credit card and/or PayPal for order amounts of less than $1000. We also support billing/invoicing for larger orders. A contract has to be executed to set up a billing account. Please contact us for additional information.
Manual Transcripts Delivery Policy
The turnaround time is indicative and files may be delayed during holidays and weekends or due to excessive load or backlog.
Additional charges may apply for files with non-American accents, poor audio quality, distortions, distant speakers, high background and/or ambient noise. A full refund will be issued if the additional charges is unacceptable, or if the file is un-transcribeable.
Files longer than 3 hours may cause a delay. To avoid that delay please consider splitting the file into two or more parts by trimming it. The split point should be chosen so that the conversation is not interrupted and each part is no longer than 3 hours.
A delivery limit of 20 hours of transcripts per week, 4 hours or 50 files per day (approximately) per account may apply for bulk orders. If your order is longer than the limit, we will deliver at least 4 hours of transcripts each day until all your files are completed. For example, if you order 6 files of 1 hour each, you'll receive the first 4 files the next day and the other two the day after. To avoid the delivery limit, please choose the Rush order. We will try to deliver all the files as fast as possible.
Refund Policy
The transcript order can be cancelled anytime before it reaches 60% completion (as assessed by progress percentage). Any refunds are proportional and are issued after deducting the cost of work already completed on each file. Refunds are sent directly back to the payment method which was used.
We do not offer refunds after the transcript has been delivered. However, we offer free re-reviews if the transcript quality is unsatisfactory. We will redo the transcript as many times as required to achieve the 99% minimum accuracy that we promise.
We also do not offer refunds for blank portions in the audio file where there is no spoken audio. We recommend editing the audio file with Audacity or using start/end time option instead.
Surge Pricing
Our system is limited by capacity and we can only process a certain amount of files at a time. When we detect that the load is higher than the capacity, we activate surge pricing so as to prevent an overload. During surge pricing, we temporarily double our prices and provide an option to accept or decline the higher rates before the order can be placed. We also provide an option to receive an email notification.
Surge pricing is always a temporary measure and usually lasts a couple of days. We are working hard to increase our capacity. The capacity is increasing over time but there are still times when we are overloaded, typically because of a single large order or holidays when our transcribers are inactive.
Integrated Editor
The Integrated Editor is an online tool which helps you quickly and effciently check the transcript against the audio file. Click on any time in the audio waveform and the cursor will appear in the corresponding position in the transcript (accurate to +/- 50 characters). Conversely, place the cursor in any position of the text and you can play the corresponding audio (accurate to +/- 10 seconds). Additionally, you can also play from the start of paragraphs, check and edit any in-audibles which are timestamped and marked with a blank, and cycle through blanks. On Google Chrome, audio playback can also be sped up or slowed down to carefully examine difficult audio sections. Various keyboard shortcuts are also available to help you navigate without the mouse. The editor can be launched from the Check & Download button from the Uploaded Files page on your Scribie.com account.
The Integrated Editor is one-of-a-kind tool developed entirely in-house and is a huge time saver for assessing the accuracy of the transcript. We strongly recommend that you check the file before downloading and add those last finishing touches before using it for your end purpose. Please also read The Integrated Editor blog post on how to use this tool and learn about keyboard shortcuts that can help you navigate its functions more efficiently.
Confidentiality
Maintaining confidentiality of all transcription files is our highest priority. Access to the files is restricted strictly on a need to know basis. Only our employees and contractors have access to the full audio. All our transcribers, employees and contractors are also bound by a confidentiality clause in the Terms & Conditions. Furthermore, you have full control over your files. Once you delete the files, we remove it permanently from our servers. You can also delete your Scribie.com account anytime.
We also split up the file into smaller parts before we distribute it to our transcribers. That way they only have access to parts of the file. Nobody but our employees and contractors have access to the full audio file. We also use industry standard 256-bit SSL encryption on our website so that all communication between servers and browsers is encrypted.
We absolutely do not sell, rent or share personal information with third parties. The Privacy Policy applies to all data uploaded to our servers, including the transcripts. If you need a specific confidentiality agreement signed, then please send the document to [email protected] and we will get back to you.
Please note that we are not currently HIPAA compliant.
Transcript Quality
Our minimum quality standard is 99% accuracy and the transcripts are delivered only when this criterion is met. Our 4-step transcription process ensures that each file is checked multiple times by different people. More eyes and ears on the file results in a better quality transcript. We also do any research required for technical terms and acronyms. Our Proofreaders are chosen only from the best of certified transcribers. We also have subject matter experts for Legal Transcription, Academic Transcription and Business Transcription as well as accent experts for Indian, African and other non-native accents.
Our philosophy is to keep re-working the file till the minimum quality standard is achieved. We have a dedicated Quality Assurance Team and all the team members are carefully chosen and vetted. They have been trained in the Proofreading and QC process. Our process itself is very structured and with the help of tools can efficiently identify files which need reworking. The proofreading step is repeated with a different proofreader whenever the QC fails and delivered only when the QC passes with minimum 99% accuracy.
Accuracy also depends on the quality of the audio file and the difficulty level. The accuracy may be lower if the file contains background noise, or if the speakers cannot be heard clearly, or if the speakers’ diction or accent is hard to comprehend. Such files may require 1 week to deliver instead of 1 day since it requires extra effort to transcribe accurately. The full amount paid will be refunded if the file is un-transcribeable.
You can also order a free re-review if the transcript quality is not satisfactory after the transcript has been delivered. The re-review order can be placed from your account along with specific instructions you may have. The file will be proofread once more and re-delivered. Re-review orders take 1 business day to process.
In contrast, our competitors follow a 2-step process which has proven to be a failure in the industry. Transcription is a highly skill based task and achieving high accuracy with a 2-step process is very hard to achieve at scale. Our 4-step process is designed to scale and produce high accuracy transcripts consistently.
We do not offer refunds after the transcript has been delivered. However, the transcript order can be canceled at any time until it reaches 60% completion.
Free re-reviews

We offer free re-reviews if the transcript quality is found to be unsatisfactory after delivery. The re-review order can be placed from your account and along with specific instructions you may have. The file will be proofread once more and re-delivered. Re-review orders take 1 business day to process.
We strive to maintain a high level of quality and take customer feedback very seriously. For each re-review order placed we investigate the root causes and address them to prevent it from reoccurring in the future.
We do not offer refunds after the transcript has been delivered. However, the transcript order can be cancelled at any time until it reaches 60% completion.
Cancellation Policy
The transcript order can be canceled any time before it reaches 60% completion. The refund is processed within 1 business day and the amount depends on the progress. We calculate this by multiplying the amount paid multiplied by the percentage progress of the file. Therefore, if the progress is 0% then the full amount will be refunded. Upon cancellation, the draft transcript (for the percentage that has been completed) can be downloaded as a text file from your account.
We do not offer refunds after the transcript has been delivered. However, we offer free re-reviews once the transcript has been delivered.
Group Accounts
You can share your account on Scribie.com with others via our Teams feature. Each team member will be given individual login credentials and will have full access to your account and vice versa. They can upload files, order transcripts, check the transcripts, etc. The payment method added by the first team member is also shared with everyone else and orders can be placed using that. All team members are also cc'd in all the important email notifications. This feature allows you to share your files securely with another person without sharing your password.
You can add/manage team members from the settings page. There is no upper limit to the number of members.
Account Credits
Account credits are funds which you can add to your Scribie account and use it to pay for transcript orders, automated transcripts or any other payments on Scribie. Your credit card will be charged only once. You can add anywhere from $10 to $15,000 at a time. Account credits can be also be shared with team members and they do not expire. However, account credits cannot be withdrawn or transferred. You can only use it for payments on Scribie.com.
You can add credits from the settings page.
Transcription Process
We follow a 4-step transcription process. The initial work is done by our certified home-based freelancers (2-steps) and then QC'ed by our dedicated QA team (2-steps) thereby allowing us to guarantee a minimum accuracy level of 99%. Our philosophy is to keep re-working the transcript till the minimum quality standard is achieved. The following is an illustration of our process.
Review
Quality Check
1. Transcription: The file is split into shorter segments and is transcribed by our certified home-based freelancers. The incomprehensible parts are marked with blanks.
2. Review: The transcript is checked for mistakes and corrected. Timestamps and speaker tracking are also added at this stage.
3. Proofreading: All segments are combined to produce the final transcript. The transcript is proofread once to correct inconsistencies and mistakes.
4. Quality Check: The quality is assessed and delivered if the accuracy is found to be 99% or more. The file keeps alternating between Proofreading and QC steps till the minimum accuracy of 99% is achieved.
Our online transcription system manages all of the above stages. All our transcribers are home-based freelancers who have gone through our certification process and are paid on an hourly basis for the work done. The system monitors their performance and manages the payments made to them. We provide them with tools to efficiently transcribe files and a comprehensive set of guidelines for transcription. The guidelines are enforced strictly and their performance is graded. The transcripts are prepared segment by segment and quality improves at each stage.
We have re-thought the audio transcription process for the internet-age and designed our audio transcription system from scratch to produce the best quality transcripts at the least cost and effort. Our system and service has a proven track record. We have completed more than 5,384,149.76 minutes of transcription to date. The following are some unique features which our system provides.
Accurate measurement of transcript progress. You can track the progress and check the draft transcript anytime.
Collaborative team to on each file, resulting in higher transcript quality. Even the shortest file is worked upon by more than three people.
Faster completion time since a number of people can work on different parts of the transcript simultaneously.
Consistent and repeatable results due to a common set of guidelines.
Our system is unique and can be best described as a Mechanical Turk for audio transcription. A series of posts on our blog describes the Transcription System in detail.
Default Transcript Format
The text of the transcript is broken into paragraphs and each speaker's diction is transcribed on a new paragraph. New paragraphs are started at every change of speaker or at every 3 minutes, whichever is earlier. We also provide audio time-coding and speaker tracking by default. If names of speakers are provided or mentioned in the audio, then they are used. If not, Speaker 1, Speaker 2 and so on are used. For an illustration, please check the sample transcript. For monologues, the speaker name or Speaker 1 is used throughout. Monologues are also broken into paragraphs at every 3 minutes, roughly. Both audio time-coding and speaker tracking can be disabled when ordering or downloading the transcript. The transcript does not include any speech analysis symbols.
Kubernetes airflow sensor. The kubernetes executor is introduced in Apache Airflow 1.10.0. The Kubernetes executor will create a new pod for every task instance. Airflow with Kubernetes On scheduling a task with airflow Kubernetes executor, the scheduler spins up a pod and runs the tasks. On completion of the task, the pod gets killed. It ensures maximum utilization of resources, unlike celery, which at any point must have a minimum number of workers running. The Airflow local settings file (airflowlocalsettings.py) can define a podmutationhook function that has the ability to mutate pod objects before sending them to the Kubernetes client for scheduling. It receives a single argument as a reference to pod objects, and is expected to alter its attributes. Airflow and Kubernetes Airflow now offers Operators and Executors for running your workload on a Kubernetes cluster: the KubernetesPodOperator and the KubernetesExecutor. While a DAG (Directed Acyclic Graph) describes how to run a workflow of tasks, an Airflow Operator defines what gets done by a. The kubernetes executor is introduced in Apache Airflow 1.10.0. The Kubernetes executor will create a new pod for every task instance using the podtemplate.yaml that you can find templates/config/configmap.yaml, otherwise you can override this template using worker.podTemplate. To enable KubernetesExecutor set the following parameters.
The transcripts are clean verbatim by default and all utterances (e.g. 'mm-hmmn', 'uh-huh', 'um', 'uh'), fillers (e.g., 'you know', 'like', 'right', 'so'), interjections and false starts are omitted. Conversely, everything is included when the Strict Verbatim option is enabled.
The spelling style can also be specified along with the order. Currently we support American, British, Australian and Canadian English style spellings. It is automatically chosen based on your current location, if not specified. Please contact us with your requirement for more options.
The start/end time of transcription can also be specified. The audio file is trimmed and a new file is created containing only the specified portion which can then be ordered.
Custom Transcript Format
Custom formatting is provided on request and is charged extra depending on the requirements. The charge depends on the complexity of requirements and the variance from the default format. Please contact us with your requirements for an exact quote.
Transcript File Formats
The transcript files are delivered in the following formats:
Microsoft Word (.docx)
Adobe PDF (.pdf)
OpenDocument Text (.odt)
Plain text (.txt)
A template file is used for conversion for the first three formats. We provide four template files which can be chosen while ordering or downloading. The templates are double and single spaced versions of the Scribie template (which contain a title page, header & footer) and a blank template (which contains nothing other than the transcript).
The sample transcript has been formatted with Scribie Single Line Spaced template. We also support custom template files. Please contact us with your template file to have it set up.
Time coding
We provide audio time-coding by default. Time-coding refers to the process of adding the running time of the audio before each paragraph. New paragraphs are started at every change of speaker or 3 minutes, whichever is earlier. Each paragraph begins with the audio time which indicates the running time of the audio file at which the particular speaker started speaking for that paragraph. We provide an accuracy of +/- 1 second for the time stamp. For higher accuracies, please contact us.
We also support video time-coding where the Burnt-In Time Code (BITC) or on-screen time code is used instead of the audio time-codes. There is an additional charge of $0.50/minute for video time-coding. We require the video files to be uploaded with the time code burnt into the screen to be able to use the video time codes. Please enable the BITC option before placing the order to request BITC.
Speaker Tracking
We provide speaker tracking by default. Speaker tracking refers to the process of adding the speaker tags before each paragraph. New paragraphs are started at every change of speaker or every 3 minutes, whichever is earlier. Before each paragraph, we add the speaker name, if available, or their order of appearance in the audio, e.g. Speaker 1, Speaker 2 etc. We also provide an option to specify the speaker names before the order is placed. How to reboot into recovery mode mac. The speaker names can also be changed after the file has been delivered using our Integrated Editor.
We do not have any maximum number of speakers to be tracked. However, it may be difficult to identify the speakers if there are more than four or more speakers in any file. We mark such speakers as S? in the transcript. This issue can be avoided if the speakers speak aloud their names at each turn. Otherwise the speaker tracking is best-effort and we cannot guarantee the correctness.
There is no extra charge for speaker tracking, even for multiple files.
Accented Speakers
Our base rates are applicable only for files with American accent speakers and we charge additional for other accents. We have expertise in British, Australian, Indian, African, various European and Asian accents. We guarantee 99% accuracy for accented speaker files as well. Accented files may require longer time and also incur additional charges.
Noisy Files
We can transcribe files recorded in noisy backgrounds such as café's, crowds etc. as long as the main speakers are clear and audible. Files with ambient background noise, e.g. air conditioning hiss, can also be transcribed provided the main speakers can be heard clearly. If the files are untranscribable, a full refund is issued. Such files may also require a longer time to process and also incur the additional charges.
Strict Verbatim
Our transcripts do not contain the utterances (e.g. 'umm's', 'ah's', 'mm-hmms', 'uh-huh', etc.) by default. We omit these utterances to make the transcript easier to read. We have an option for strict verbatim. We include all utterances if this option is enabled.
We charge an additional $0.50/minute of audio for strict verbatim files.
Subtitle File
We also provide subtitle files in SubRip (.srt) and WebVTT (.vtt) formats. The Subtitle File order option has to be enabled for it. Only basic versions are supported, without any style markup. The time-code accuracy is +/- 1 seconds. Please contact us if you require subtitle files in other formats.
We charge an additional $0.50/minute of audio for subtitle files.
Additional Charges
Our rates and turnaround times are applicable only for files with clean audio and American speakers. An additional charge of $0.50/minute to $2.00/minute and a delay may apply for files with the following issues.
Audio Transcription Services Australia
Ambient Noise (eg., hiss, line noise, static, background music/voices)
Noisy Environment (eg., street, bar, restaurant or other loud noises in background)
Distant Speakers (eg., faint, distant voices)
Accented Speakers (eg., British, Australian, Indian, Hispanic, any other non-American)
Audio Breaks (eg., bad phone line, audio gaps)
Disturbances (eg., loud typing sounds, rustling, wind howling, breathing sounds)
Distortion (eg., volume distortion, shrill voices, clipping, artifacts)
Unclear Speakers (eg., muttering, volume variation, frequent overlaps)
Echo (eg., reverberation, same voice can be heard twice)
Quality (eg., low sampling/bit rate, bad conference line, recorded off speakers)
Diction (eg., slurring, rapid speaking, unnatural pronunciation)
Muffled (eg., hidden or obstructed microphone, vintage tapes)
The charge is NOT automatic and it can be declined. Additional charges are non-negotiable and final. As per our terms of service, our assessment final and binding and any disagreement will lead to immediate cancellation of the order.
As per our data, files with one or more of the above listed issues require around 3 to 4 times the amount of effort to ensure 99% accuracy. We have found that compensating our transcribers for the additional time and effort is the most efficient way to achieve our goal of 99% accuracy since it distributes the effort evenly across the 4 steps of our process. Therefore we have optimized our system for clean files with American speakers, and we provide the best accuracy to price ratio for such files.
Please check the Recording Guide for recommendations on how to avoid these charges and read our manifesto for the broader reasoning behind this policy.
Order Options
We provide a range of options which can be specified at the time of ordering by clicking the Options button on the payment page. The following options are supported.
Strict Verbatim: We will include all utterances, e.g. 'mm-hmm', 'uh-huh', 'umm', 'uh' in the transcript. By default transcripts are non-strict verbatim and do not include these words unless necessary. An additional charge of $0.50/minute of audio is applicable for this option.
Audio Transcription Services Online
Subtitle File: We will deliver a subtitle file along with the transcript. The subtitles will be formatted as VTT/SRT and can be used as a YouTube caption file or with other video players. An additional charge of $0.50/minute is applicable for this option.
BITC: The Burnt-In Time Code in the video frame will be used for time coding the transcript. An additional charge of $0.50/minute is applicable for this option.
Audio Time-coding: The audio time stamp will be added before each paragraph. New paragraphs are started at every change of speaker or at every 3 minutes, whichever is earlier. This helps in cross-referencing the transcript with the audio file. No additional charges apply for this option.
Speaker Tracking: Speaker identification will be added before each paragraph. New paragraphs are started at every change of speaker or at ever 3 minutes, whichever is earlier. The names of speakers, as provided or as spoken in the audio, will be used. Speaker 1, Speaker 2 and so on will be used if none are available. The speaker tracking format can be either speaker initials or full names which can also be specified. No additional charges are applicable for this option.
Spelling Style: This option allows you to specify the spelling style. We currently support American, British, Australian and Canadian styles.
Start/End Time: This option allows you to specify the start and/or end time stamps of transcription, in case only a portion of the audio file needs to be transcribed. A new audio file will be created containing the specified portion which can then be ordered.
Transcript Template: This option allows you to specify the template file used for document conversion. There are four transcript templates available. The Formatting section has more information on the templates.
Transcription Progress Tracking
Our Transcription Progress Tracking feature enables you to track the progress of a transcript from your account at any stage. We provide the completion percentage as well as the draft transcript. The percentage is calculated based on the stage of the workflow at any point in time. The draft transcript is the actual completed transcript. The accuracy of the draft transcript may be lower and may also contain inconsistencies (all of which will be corrected at the Proofreading stage). The following is the mapping between the percentage and the stage of the process.
Percent Range Stage 0-59% Transcription 60-89% Review 90-97% Proofreading98%Quality Checks
Progress Tracking is a unique feature of Scribie.com. The draft transcript is also very useful if you need something to work on right away. The Transcript Progress blog post has more details about this feature.
Why Choose Us?
Our transcription service offers features that save you time and money. Transcription is a very labor intensive work and we ensure that you get the best possible transcript.
Our transcription process ensures that the file is checked multiple times by different people. Even the shortest file is worked on by more than three people. More eyes and ears produce a higher quality transcript.
You pay a fixed price for the transcript based on the audio length and not the time spent transcribing.
We carefully vet each one of our transcribers and continuously monitor their performance.
We research uncommon terms, acronyms, etc. and ensure that the transcripts are contextually correct.
We deliver files on time. If we anticipate a delay then we will inform you well in advance.
You can monitor the progress and check the Draft Transcript from your account at any stage.
You can order a free re-review if you are not satisfied with the transcript.
We are consistent, predictable and accurate. You can plan around us.
As a company, we take confidentiality very seriously and we handle your files with care. We are responsive and responsible.
Sample Audio and Transcript
The following is a sample audio and the corresponding transcript. More sample transcripts are available on our blog at the following link.
https://scribie.com/blog/category/sample-transcripts/
Need Transcription Services?
Scribie provides the best quality transcript at the least cost. Upload & Order now.
0 notes
Text
Rainbow Six Twitch Prime

From 19 April 2021 (16:00 UTC) to 20 May 2021 (16:00 UTC), you have the opportunity to unlock one 7-Day Renown Booster for Rainbow Six: Siege with Prime Gaming!
Rainbow Six Twitch Prime Pack
Rainbow Six Twitch Prime Loot
To be eligible, please make sure that your Prime Gaming account is linked to the Ubisoft account you play Rainbow Six: Siege on.
• Head to the Prime Gaming page.
• Choose Claim now above the available reward.
Once you have successfully redeemed the content, it will be available in your in-game inventory within 48 hours.

Rainbow Six Siege Twitch Prime loot July 2020 is available to be claimed for a limited time. The Rainbow Six Siege Twitch Prime loot drops end in less than a month. The Ying operator set that is currently available will be going away soon. Players need to link their accounts and claim the loot drop before they miss it. Twitch Prime members can claim the Twitch Prime Collection Packs during three different drop windows. The Jackal Operator Set is coming to Rainbow Six Siege this week! The packs contain three Twitch-exclusive operator sets for Ash, Caveira and Jackal. Secure Tom Clancy’s Rainbow Six Siege Rewards with Twitch Prime! Starting September, Twitch Prime members can claim the Twitch Prime Collection Packs during three different drop windows. If you collect all three drops, you’ll get 16 Twitch Prime Packs, plus an. With the Rainbow Six Siege Raleigh Majors esports event underway, Ubisoft has unveiled an array of in-game cosmetics for Twitch Prime subscribers. Alongside a new elite skin for Smoke, the upcoming Twitch Prime collection packs offer unique headgears, uniforms, weapon skins and charms for several operators. Tom Clancy’s Rainbow Six Siege’s Esports official streams for its main international competitions and the 4 regional leagues: European, North American, Latin American and Asia-Pacific. Rainbow6 - Twitch. Obs studio twitch settings. https://gianthunter20.tumblr.com/post/655911183979855872/twitch-streamer-of-the-year.
Please note that the content does not redeem automatically. You will need to return to the Prime Gaming website each month to claim your content.
Rainbow Six Twitch Prime Pack
Rainbow Six Twitch Prime Loot
Associated Platforms
0 notes
Text
Ssh Sync Folder

Ssh Sync Folders
Pycharm Ssh Interpreter Sync Folders
Sync Ssh Keys Across Machines
If the remote folder and the contents exist, first you can run.syncdown so that you will get the remote contents in your local folder. After editing you local folder, you can synchronize your local folder to remote folder in up direction using.syncup command.
Over the weekend I decided to figure out how to sync files between windows based computers and Linux based computers, specifically Ubuntu. On windows I investigated a number of technologies. Finally I settled on cwrsync. Boot into recovery mode mac m1. The reason for the choice is that I really like rsync. I have a number of scripts that work really well (and are fast) that I use on my Linux boxes on a regular basis. There is rsync available in cygwin but that is far too heavy for simple file synchronization. cwrsync is the best of both worlds. It packages the cygwin dll and rsync binaries in a form that is easy to use on windows.

Note: Symbolic links are not officially supported. This article provides directions as a reference, but due to the complexity of setting it up (not supported on all operating systems), we are. Note that if you installed Github desktop, you do not need to setup SSH keys on the Windows side, and the.ssh folder will not be present. Make sure you follow the Github instructions above to generate the SSH keys on Windows. Fix permissions. Open a project folder to sync in Atom. Right click on the project folder and select Sync - Edit Remote Config. Edit and save the config file. Right click on the project folder and select Sync - Sync Remote. Remote Development using SSH The Visual Studio Code Remote - SSH extension allows you to open a remote folder on any remote machine, virtual machine, or container with a running SSH server and take full advantage of VS Code's feature set. Once connected to a server, you can interact with files and folders anywhere on the remote filesystem.
Ssh Sync Folders

You’ll need to download the cwrsync package and install it on windows. Also it is a good idea to install putty so that you can test your connectivity to your Linux box through ssh. That will eliminate some of the frustration. This article doesn’t go into setting up an ssh server. It is very easy and a quick Google will find detailed tutorials on the subject of setting up an ssh server.
Twitch streamer of the year award. The first script is a windows batch file that will pull changes from the server to the windows box. The second script is pushes the changes from the windows box to the Linux box. The are both virtually identical except for the order in which the paths are called in the rsync command (basically a source – destination order).

Pycharm Ssh Interpreter Sync Folders
The pull script:
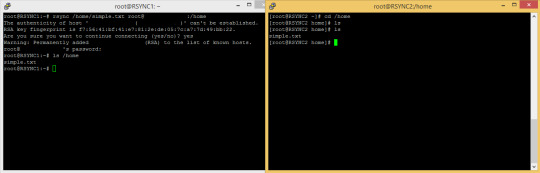
The push script:
First off, I use two scripts to make sure that I don’t accidentally push changes when I meant to pull them! If you are like me then your home server will have a non-standard ssh port. This is indicated in the rsync command by the ‘-p 3687’ bit. I also disallow password based logins. I only use key authentication. I specify the private key to use by the “-i ‘/cygdrive/c/path/to/keys/rsa.key'” bit of the rsync command. Note, the single quotes around the path, they are used to deal with spaces. The rest of the command is pretty self explanatory.
Obs studio twitch. OBSstudio streams live on Twitch! Check out their videos, sign up to chat, and join their community. OBS is an open-source platform that you can easily download from the official OBS website to Windows or Mac computer. This encoder software is RTMP-enabled. Any Twitch streamer knows the importance of a great encoder and OBS’s protocol connects a streaming platform (such as Twitch) and its encoder. Installation and Setup Like OBS, Twitch Studio has a one-click download – you can get it if you use Windows or Mac computer. Before you launch the program, log-in to the Twitch profile – once this is done, the program will automatically recognize your account, and you won’t have to manually log-in. OBS (Open Broadcaster Software) is free and open source software for video recording and live streaming. Stream to Twitch, YouTube and many other providers or record your own videos with high quality H264 / AAC encoding.
Sync Ssh Keys Across Machines
A nice use for these scripts is to create your own, secure, dropbox clone. Kubernetes airflow. I find it works very well.
0 notes
Text
Twitch Streamer Of The Year

12 Просмотры
Twitch Streamer Of The Year Winners
Twitch Streamer Of The Year 2018
Twitch Streamer Of The Year 2020
Twitch Streamer Of The Year 2016
Twitch is the 31st most popular website online. According to the Alexa rank, Twitch is the 31st most. One of the most well-known bans on Twitch was the permanent ban of streamer Ice Poseidon. On April 28, 2017, after touching down from a flight to Phoenix, Arizona, the streamer was escorted off. Pokimane accepts the trophy for Twitch Streamer of the Year at the 10th Annual Shorty Awards powered by DirecTV Now. #ShortyAwardsSubscribe to the Shorty Awa. 2019 has arguably been the craziest year yet for streaming, from the massive numbers of viewers, to the Twitch vs Mixer battle, to the rise of IRL content. It’s seen a number of stars further cement their place at the top of the industry but also witnessed a number of new faces burst onto the scene.
Вам не понравилось видео. Спасибо за то что поделились своим мнением!
Kubernetes airflow setup. Browse Most Relevant Porn Twitch Streamer Videos updated regularly at PussySpace Porn Tube! Watching Sex Twitch Live Stream with tons of Best Adult Video!
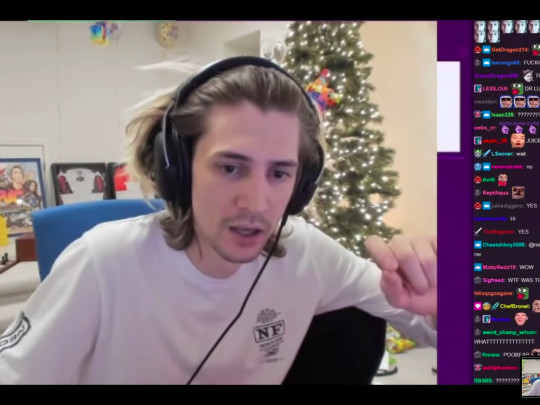
Reckful is known for many things. He's the original big Twitch streamer, a legendary World of Warcraft player and one of the most innovative streamers in the game.
But perhaps his greatest obstacle is overcoming his dark past.
Social Media:
--------------------
Music:
Situate Yourself by Sam Sokoloff
Available on all streaming platforms
Direct to Video by Chris Zabriskie is licensed under a Creative Commons Attribution license ()
Source:
Artist:
Cylinder Two by Chris Zabriskie is licensed under a Creative Commons Attribution license ()
Source:
Artist:
I Don't See the Branches I See the Leaves by Chris Zabriskie is licensed under a Creative Commons Attribution license ()
Source:
Artist:
'Spanish Guitar' Kevin MacLeod ()
Licensed under Creative Commons: By Attribution License
Twitch Streamer Of The Year Winners

Категория
Игры
К сожалению, только зарегистрированные пользователи могут создавать списки воспроизведения.


The Streamer of the Year Presented honours the most distinguished streamer who has raised the standards of streaming and increased the profile of esports across the globe over the past 12 months. The winner will have consistently been at the pinnacle of streaming, pushing boundaries of what is possible and providing constant entertainment for a large group of fans across the judging period.
Award Criteria
Twitch Streamer Of The Year 2018
Reboot into recovery mode mac. Criteria 1:
Hosted live streams throughout the last year related to video games
Twitch Streamer Of The Year 2020
Criteria 2:
Built and sustained a large audience of viewers who are consistently entertained.
Twitch Streamer Of The Year 2016
Criteria 3:
Innovated in the area of streaming with new ideas, technological advancements or overall quality.
0 notes
Text
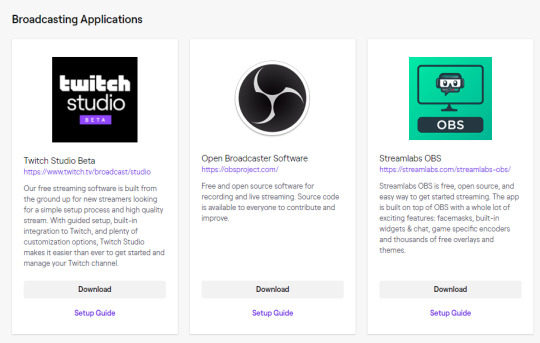
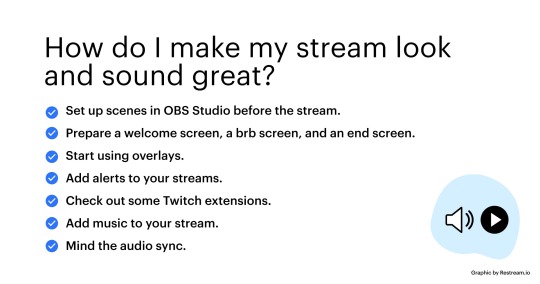
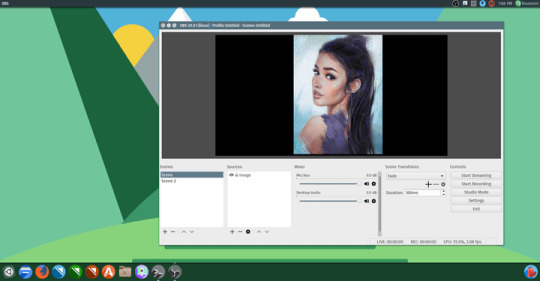
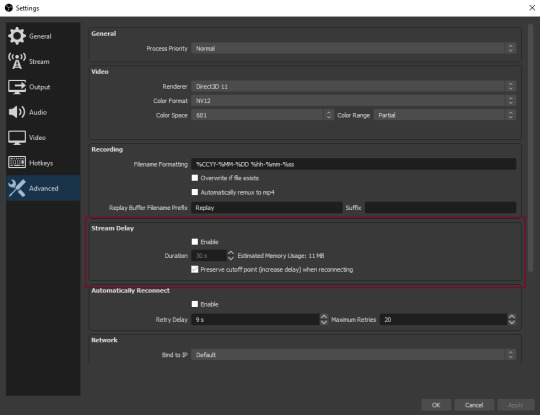
Obs Studio Twitch

Kubernetes airflow. The Airflow local settings file (airflowlocalsettings.py) can define a podmutationhook function that has the ability to mutate pod objects before sending them to the Kubernetes client for scheduling. It receives a single argument as a reference to pod objects, and is expected to alter its attributes.
Obs Studio Twitch Setup
Obs Studio Twitch Alerts
Obs Studio Twitch
MIDIControl is an external software (Windows Only), to remote control OBS, act as Sounboard, send message in Twitch Chat, with any MIDI controller, like APC (from AKAI), Launchpad (from Novation).
It support profiles/mapping, so you can switch from one to another, to use your MIDI Controller differently if you want to.
Switch scene, show/hide source, mute/unmute any scene/source, show/hide filter, adjust volume .. by pressing a MIDI Key or using MIDI knobs/slider.
Also, you can play any local audio file (like a soundboard) and send messages in your Twitch chat !
Install .NET 4.7.2 redistributable.
Install & enable obs-websocket.
HOW TO CONFIGURE:
0. Open OBS (with obs-websocket enabled)
1. Start MIDIControl after plugging your MIDI device. Open it from SysTray
2. In 'Options', configure the OBS section options. (the MIDI section should be OK by default for a minimal usage).
3. 'Add' a new MIDI Key.
4. Press the MIDI key, it should recognise it, and display it on the 'Add MIDI Keybind' window.
5. Select the action(s) you wanna assign to this midi Key. Validate.
6. Repeat steps 3->5 for every MIDI key.
7. Save your preset.
8. Reduce the window if you want to.
HOW TO USE:
0. Open OBS.
1. Start MIDIControl after plugging your MIDI device.
2. Press on your MIDI Keys !
If you have an Android device, you can setup it as a MIDI device, for example with DJ PADS or MIDI Controller (if your device supports MIDI)
MIDIControl forwards MIDI events to another virtual MIDI device, in order other apps have access to this events.
Obs Studio Twitch Setup
Installation and Setup Like OBS, Twitch Studio has a one-click download – you can get it if you use Windows or Mac computer. Before you launch the program, log-in to the Twitch profile – once this is done, the program will automatically recognize your account, and you won’t have to manually log-in. To add your stream chat into your OBS Studio window follow the below steps. For the purposes of this guide we've used Twitch. Go to your channel on your streaming platform of choice.
Apps available in macOS Recovery on an Intel-based Mac. The following apps are available in. Sudo nvram 'recovery-boot-mode=unused' sudo reboot This sets a firmware variable in nvram indicating that you want to start in Recovery mode on the next boot, and then reboots the machine. When done in Recovery mode, run the following from the Terminal in Recovery mode. To boot Mac into Recovery Mode using Time Machine, you have to follow the steps below: Step 1 Restart your Mac in a regular way and hold the Option key of your keyboard when you hear a chime during the reboot. Step 2 If you have the backup on an external drive, then insert it into the Mac. If the Time Machine backup is in another partition. Reboot into recovery mode mac.
Obs Studio Twitch Alerts

Obs Studio Twitch
Reactions:SeedVEVO, gatekeeper1122 and tubuname
0 notes
Text
Reboot Into Recovery Mode Mac

Reboot Into Recovery Mode Mac Terminal
Mac Internet Recovery Mode
Mac Recovery Mode Not Working
How To Get Into Internet Recovery Mac
Boot Into Recovery Mode Macbook Pro
Reboot In Recovery Mode Macos
What is Mac Recovery Mode?
To enter recovery mode, you can reboot Mac and press 'Command+R' when you hear the startup voice. What to Do When Mac Recovery Mode Not Working MacBook or iMac Recovery Mode is a wonderful boot choice that allows you to recover Mac. If you cannot enter recovery mode, you can use command+R fix it. If you are experiencing serious problems with your Mac, then you may need to resort to drastic recovery options such as launching the macOS Recovery Mode. Keep in mind that these features are fairly advanced, and if you are unsure about the tasks you are about to perform, then we suggest looking into professional support services.
Apple recovery mode is available in an emergency when your macOS is running into serious difficulties. There are four main features of Mac’s Recovery Mode, whether that is the regular recovery or internet recovery:
Restore from Time Machine Backup: Use a previous version of your Mac stored on an external drive. You will have had to prepare this is in advance by connecting an external hard drive and using Time Machine to copy all of your data, including files, OS, and settings. If you have an external copy, you can use this to restore your data under the ‘Restore from Time Machine Backup’ in Recovery Mode, which will erase the current disk.
Reinstall macOS: This wipes your current OS and its data and replaces it with a clean version. If you have any files you need saving, make sure that they’ve been uploaded to the iCloud or some other storage, whether online or on a separate hard drive. Which version of macOS that is reinstalled may depend on whether you run the normal Recovery Mode or Internet Recovery Mode.
Get Help Online: Recovery Mode allows you to use Safari to troubleshoot issues you may be experiencing.
Disk Utility: If you suspect there’s something wrong with your drives, you can scan, verify, and repair them from the recovery screen, which might be a quicker and more convenient alternative than erasing and reinstalling your macOS.
Now, if you are considering a complete restart in Recovery or Internet Mode, it’s recommended that you give your Mac a thorough clean first. Otherwise, this is like cleaning the house, then dumping everything you’ve hoovered back onto the carpet. The muck has only been moved around. With a tool like CleanMyMac X, you can declutter everything you don’t need, then back up safely (always best doing before restarting or rebooting), which means it should run much faster once restored to full working condition. By the way, this app removes up to 74 GB of junk on an average Mac computer. So, give it a try — you can download CleanMyMac X for free.
The differences between Internet Recovery and regular Recovery
Normal Recovery Mode accesses Recovery HD, an emergency cache of essential utilities that is saved to a partition in your Mac's startup drive, meaning that it’s kept separate from the rest of your disk space.
Because it’s been partitioned from the rest of your disk space, the data can’t be cleared in cleanup scans or manually deleted. It’s small (650MB) so it won’t affect your Macs performance, but it may be useful if something goes wrong.
If you do need to reinstall your macOS, Recovery Mode will reboot with the most recent version that has been installed on the computer.
Internet Recovery, however, can only reinstall the version of macOS that was originally on your computer when it was new from the box, which likely won’t be the most up-to-date version. This is because Internet Recovery uses code embedded into your Mac that includes an image for the appropriate OS. When you begin Internet Recovery, the image is transmitted to the Apple servers to request the correct codes for reinstallation.
Booting from Internet Recovery takes much longer than a normal partition-based recovery and, naturally, requires an internet connection, so ensure your connection is stable and that you have adequate power (keep your Mac charged).
When to use Internet Recovery
If your Mac has been unable to create a partition for the Recovery HD, you will not be able to use normal Recovery Mode. This might be because you’re using a RAID volume, which doesn’t support the recovery partition, or your drive has been partitioned with Boot Camp Assistant and subsequently modified.
Your Mac may have successfully created the Recovery HD partition but Recovery Mode may not be able to access it. This might be due to damage to the drive or a more serious error in your system.
If your computer is unable to access normal Recovery Mode, it will automatically begin Internet Recovery. If you have a working recovery partition, you will not be able to access internet Recovery Mode.
How to enter Recovery Mode on Mac
Hopefully, you’ll never have to use either the normal or internet Recovery Mode for your Mac, but if you do it’s simple to access. For both recovery modes, you will need enough power to see you through the process as well as your Apple ID to reinstall macOS.
1. To start your Mac in Recovery Mode, first, if your Mac is turned off, switch it on. If you’re currently using it, hit Restart. You can only use Recovery Mode from the startup drive.
2. As soon as you hear the startup chime, hold Command (?) + R.
You will need to hold the keys until a new screen appears.
3. If you have a working recovery partition, you will enter the normal Recovery Mode. The macOS Utilities window appears, which will list the four options to recover your Mac (Restore, Reinstall, Get Help, and Disk Utility). Select Reinstall macOS.
From there, your Mac will be cleared and rebooted with the latest version of macOS that had been installed on it.
How to access Internet Recovery Mode
1. Turn on your Mac or restart it as with normal Recovery Mode. As soon as you hear the startup chime, press and hold Command (?) + Option (?) + R.
If your normal Recovery Mode isn’t available, pressing Command (?) + R should automatically redirect you to Internet Recovery mode.
2. After a few seconds, a globe will appear onscreen with the text: Starting Internet Recovery. This may take a while.
Note: This is your computer entering internet Recovery Mode; it is not yet reinstalling OS X.
3. You will then be given a network list to choose your internet connection for the download. Press the check mark to continue or hit Enter once you have selected your network.
4. You will be asked to resubmit the network password even if you have previously connected to it, so make sure you have it available. Hit Enter or the check mark symbol to continue.
5. The screen will then show the image of a globe again, as well as a status bar. This is your computer sending the information about its original state to Apple to request the appropriate drivers and may take some time depending on your internet connection.
6. Once complete, you will see the same Utilities screen as the regular Recovery Mode, which gives you the same options to restore your system.
Mac Recovery Mode: A last resort
It is always worthwhile to run a Disk Utility scan if possible before reinstalling your macOS. It’s even better to keep your Mac maintained with regular scans for issues that can accumulate to cause problems. Give your Mac a complete tidy up before restarting in Recovery Mode. Clean out the junk, declutter and restore your beloved Mac to full health.
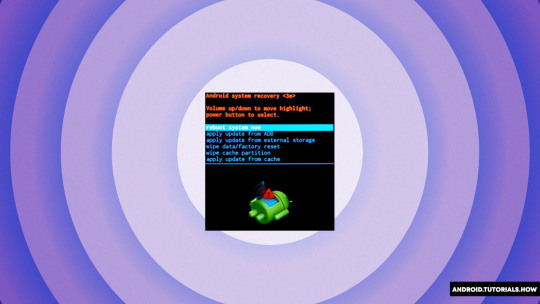
Caches and system junk quickly build up to clog your system and cause performance problems that might lead you to believe you need to reinstall your macOS, when really all it needs is a thorough clean-out. CleanMyMac X has cleared 737 million GB of junk files that wear down your system and uninstalled 10.5 million unnecessary applications and their forgotten extensions.
CleanMyMac X can also run diagnostics without entering either Mac Recovery Mode, meaning you can fix operating issues before you need to initiate a full reinstall.
Get CleanMyMac X to improve the longterm performance of your Mac!
Summary: This post introduces how to boot Mac to Disk Utility and use it, in case you misuse Disk Utility and bring problems like data loss and Mac not booting up. You can also open Disk Utility in macOS Recovery mode to fix some issues.
Many people are looking for good third-party disk management tools. But compared with those paid software, Disk Utility is more reliable as it's built inside the Mac operating system. In addition to normal disk management, it can launch from the Mac recovery boot drive as a recovery tool. This helps a lot when Mac won't start.
Usually, only 3 steps are required to boot to Disk Utility.
1. Turn off your Mac.
2. Restart your Mac and boot it to macOS Recovery mode.
3. Select Disk Utility on the macOS Utilities window.
To get into macOS Recovery Mode:
• How to Boot into & Use M1 Mac Recovery Mode
Before you get more details about booting Mac to Disk Utility, you might need a better understanding of Disk Utility.
About Mac's Disk Utility
Disk Utility is a system utility for performing disk and disk volume-related tasks on macOS and Mac OS X systems. With this easy-to-use program, you can perform tasks as the following:
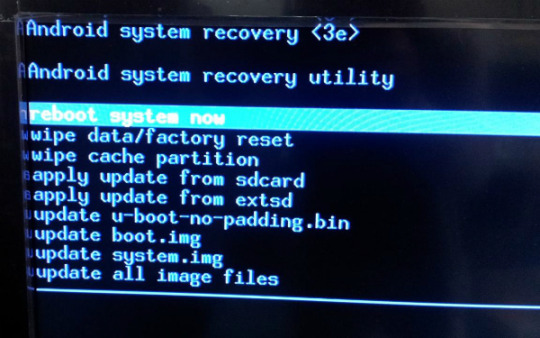
Mount, unmount, and eject connected hard drives including SSDs.
Create, resize, and delete partitions by allocating space of storage devices.
Erase and format disks with multiple file system options supported.
Combine multiple hard disks into a RAID set for better performance and reliability with increased storage capacity.
Create, backup, convert, compress, encrypt, and restore disk images.
Verify a disk's integrity and repair it with First Aid if the disk is damaged or corrupted.
Some other features are dismissed along with the development of Mac operating systems. For example, you can't repair disk permissions in Disk Utility anymore in macOS. Even so, it's undeniable that what Disk Utility can do now is still good enough in many ways.
Disk Utility brings more insights into disk management on Mac, on condition that you use this tool in the right way.
Problems after a misuse of Disk Utility
Of course, you can perform many disk-related tasks with Disk Utility, simple and easy. But the risk of using Disk Utility is also an important part that you should know. If you don't use Disk Utility in the right way, you could get into trouble. Usually, there are three possible problems.
1. Data loss after using Disk Utility
Your documents, emails, photos, music, movies, etc. could get lost after your misoperation. If you don't back up the data, you'll lose files after you erased a hard drive, deleted an APFS volume, or formatted a partition.
So, be careful with these options mentioned above and always back files up.
2. Disk corruption
Except for files being deleted, what's worse is that the hard drive itself is corrupted. For example, you should always choose the Eject button before removing an external hard drive. If you don't, the risk of disk corruption is increased. The next time you want to access the external hard drive on Mac, you could receive an error message like 'The disk you inserted was not readable by this computer.'
3. System crashes
Reboot Into Recovery Mode Mac Terminal
The worst case is system crash because you deleted one of the key partitions in the startup disk. For instance, when you add a new partition to the internal SSD, some core partitions could be deleted by the system in rebuilding the partition table.
For Macs whose startup drive is formatted with HFS+, the MacBook won't turn on after a wrong deletion of disk0s1 or the EFI boot partition. Similar things happen to APFS formatted boot drive as well, especially for Macs that have the Apple's T2 security chip. If you accidentally removed volumes like Recovery and VM, MacBook or Mac mini introduced after 2018 will have boot problems. It's because the T2 security chip fails to verify the integrity of the boot process.
Mac Internet Recovery Mode
So, if you see unknown volumes listed under the startup disk, always check through this volume before you finally remove it. Also, you should pay more attention when you want to re-partition the internal hard drive.
How to boot to Disk utility on Mac?
Based on if you can turn on and boot your Mac, there are mainly two ways to access Disk Utility.
Mac Recovery Mode Not Working
1. Open Disk Utility on Mac in a normal startup
It's relatively easy to access Disk Utility after Mac boots up. You can follow these steps to open Disk Utility. You can either find this utility by spotlighting 'disk utility', or you can access it by going to Finder > Applications > Utilities > Disk Utility. Then, you can open Disk Utility and enjoy the features mentioned above.
2. Boot Mac to Disk Utility
Another situation that you want to access Disk Utility is when Mac is not turning on. The symptoms vary from a flashing folder at Mac startup to a frozen loading screen with or without an Apple logo. Then, you need to check if the boot drive is corrupted and fix related issues with Disk Utility.
So, follow this guide to use Disk Utility and boot the problematic Mac again.
1. Make sure your Mac has completely turned off. If your Mac is frozen, you can hold the power button until the Mac shuts down.
2. Restart the Mac and instantly hold Command + R keys to boot Mac into macOS Recovery mode. You can release these keys when you see the Apple logo.
3. You'll see a macOS Utilities or Mac OS X Utilities window, which depends on your Mac operating system.
4. Select Disk Utility to repair or erase a disk.
If you doubt that there are some errors inside the startup disk, you can use First Aid to repair it. Here is how to do this.
How To Get Into Internet Recovery Mac
1. In Disk Utility Window, select your boot drive and click on First Aid on the top.
2. Choose the Run button to confirm that you need to repair this drive.
3. After First Aid on the startup drive, your Mac should boot as normal.
Boot Into Recovery Mode Macbook Pro
If First Aid failed, then the file system of the startup disk might be corrupted. You need to fix it by reformatting the corrupted internal hard drive or SSD, which will replace the problematic file system with an intact one.
Despite this, you should know that reformatting will return you a blank and empty disk. That's to say, you'll lose all your data on the startup disk if you have never backed up your files. Fortunately, Mac data recovery software like iBoysoft Data Recovery Software for Mac now is available to recover data even when Mac is not turning on.
How to Recover Data in macOS Recovery mode When Mac Won't Boot
Here is a guide to recover and rescue files from MacBook Pro, Mac mini, MacBook Air, and iMac when it is not turning on. Read more >>
After you get all files off the crashed Mac, you can continue reformatting the failed startup disk with Disk Utility. Let's get it underway.
1. You need to access Disk Utility by booting Mac into macOS Recovery mode as you did before. Do this simply by restarting your Mac and holding Command + R keys right away.
2. Find Disk Utility in Mac OS X Utilities (or macOS Utilities) and open it.
3. Select the failed Mac hard drive which usually is called Macintosh HD or Apple SSD. Then, click on the Erase button.
4. In the pop-up window, name it as Macintosh HD, choose a Format, and select a scheme for the drive.
5. Click on Erase to confirm this operation.
After reformatting, Disk Utility has done his job. Then, you can go back to macOS Utilities and choose reinstall macOS or Mac OS X so that you can boot from this drive again.
Reboot In Recovery Mode Macos
Sum up
As you can see, Disk Utility does help a lot in managing hard drives and SSDs on Mac. You can even boot to Disk Utility in macOS Recovery mode and fix Mac boot problems, which is impossible for most third-party programs. It also can be accessed in Terminal if you a command-line lover. Now, you can make use of Disk Utility whenever you encounter a disk-related issue.
0 notes
Text
Kubernetes Airflow

Airflow Kubernetes Executor
Kubernetes Airflow System
Wouldn’t be convenient to be able to run Apache Airflow locally with the Kubernetes Executor on a multi-node Kubernetes cluster? That’s could be a great way to test your DAGs and understand how Airflow works in a Kubernetes environment isn’t it? Well that’s exactly what we are going to do here. I will show you step by step, how to quickly set up your own development environment and start running Airflow locally on Kubernetes. If you want to learn more about Airflow, don’t forget to check my course: Apache Airflow: The Complete Hands-On Introduction. Let’s get started!

Apache Airflow is an open source workflow management tool used to author, schedule, and monitor ETL pipelines and machine learning workflows among other uses. To make easy to deploy a scalable Apache Arflow in production environments, Bitnami provides an Apache Airflow Helm chart comprised, by default, of three synchronized nodes: web server, scheduler, and worke.
The kubernetes executor is introduced in Apache Airflow 1.10.0. The Kubernetes executor will create a new pod for every task instance using the podtemplate.yaml that you can find templates/config/configmap.yaml, otherwise you can override this template using worker.podTemplate. To enable KubernetesExecutor set the following parameters. This allows us to scale airflow workers and executors, but we still have problems like this. This article is going to show how to: Use airflow kubernetes operator to isolate all business rules from airflow pipelines; Create a YAML DAG using schema validations to simplify the usage of airflow for some users; Define a pipeline pattern. Containers Deploying Bitnami applications as containers is the best way to get the most from your infrastructure. Our application containers are designed to work well together, are extensively documented, and like our other application formats, our containers are continuously updated when new versions are made available. A Kubernetes cluster of 3 nodes will be set up with Rancher, Airflow and the Kubernetes Executor in local to run your data pipelines. Advanced concepts will be shown through practical examples such as templatating your DAGs, how to make your DAG dependent of another, what are Subdags and deadlocks, and more.
As we are going to create a multi-node Kubernetes cluster and interact with it, there are some tools to install in first. Let’s discover them.
The first one is KinD. KinD means Kubernetes IN Docker and allows to run local multi-node kubernetes clusters using Docker container “nodes”. Unlike with MiniKube, KinD has a significantly faster startup speed since it doesn’t rely on virtual machines. Take a look at the quick start guide to install it. Obviously, Docker should be installed as well on your machine.
The second tool to install is Kubectl. If you are familiar with Kubernetes, you should already know Kubectl. Kubectl is the official Kubernetes command-line tool and allows you to run commands against Kubernetes clusters. Whenever you want to deploy applications, manage cluster resources, or view logs, you will use Kubectl. Check the documentation to install it.
The last tool we need is Helm. Helm is the package manager for Kubenetes in order to install and manage Kubernetes applications in a very easy way. Helm relies on helm charts. A chart is a collection of files describing a set of Kubernetes resources. For example, the chart of Airflow will deploy a web server, the scheduler, the metastore, a service to access the UI and so on. Take a look at the Airflow chart here to have a better idea of what a chart is. Installing Helm is pretty straightforward as you can see here.
Now tools are installed, let’s create the Kubernetes cluster to run Apache Airflow locally with the Kubernetes Executor.
To give you a better hands-on experience, I made the following video where I show you how to set up everything you need to get Airflow running locally on a multi-node Kubernetes cluster. In this video, you will learn:
Airflow Kubernetes Executor
Configuring and creating a multi-node Kubernetes cluster with KinD
Installing and upgrading the Helm chart of Airflow.
Building your Docker image of Airflow packaged with your DAGs
Creating a local registry to push your Docker image of Airflow
Configuring Airflow to execute your tasks with the Kubernetes Executor.
That’s a lot of amazing stuff to learn! At the end, you will have Airflow running with the Kubernetes Executor in a local multi-node Kubernetes cluster. That way, you will be able to test and execute your DAGs in a Kubernetes environment without having to use expensive cloud providers. Enjoy!
Kubernetes Airflow System
Interested by learning more? Stay tuned and get special promotions!
1 note
·
View note